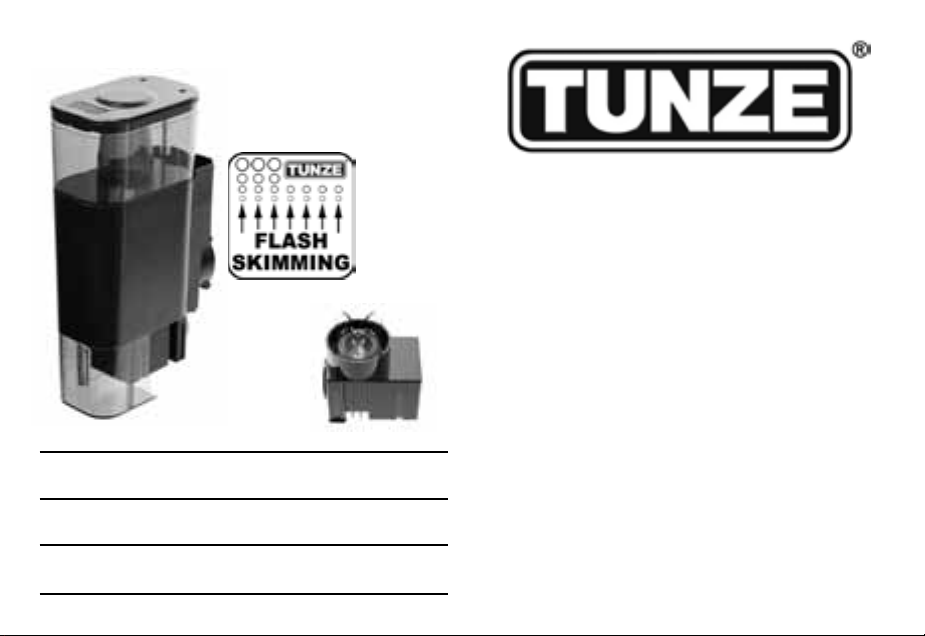
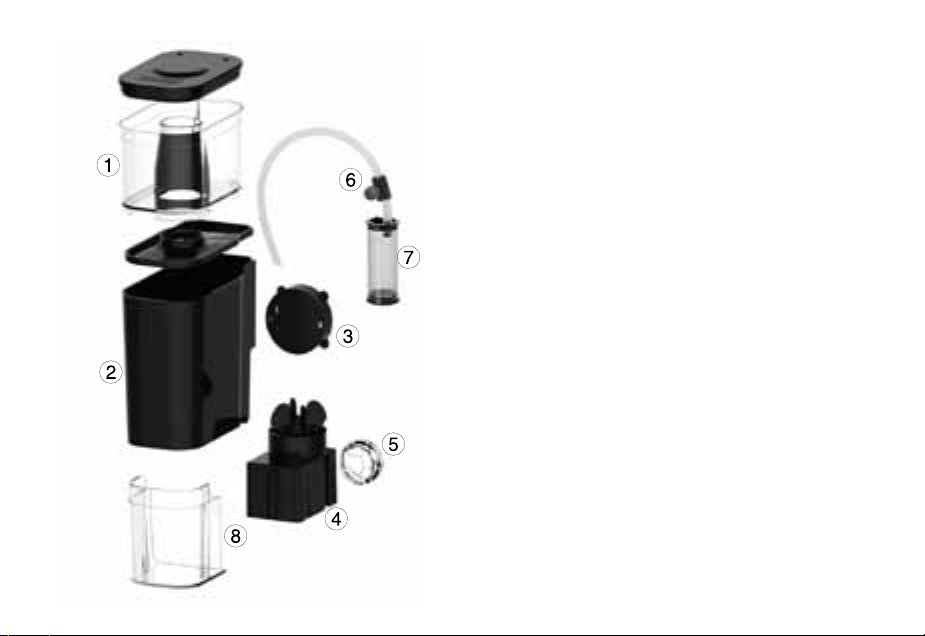
Tunze Comline DOC Skimmer 9001 User manual

1
x9001.8888
08/2014
DOC Skimmer 9001
Foamer 9001.040
Gebrauchsanleitung
Instructions for Use
Mode d’emploi
Comline®

2
TUNZE®Aquarientechnik GmbH
Seeshaupter Straße 68
82377 Penzberg
Germany
Tel: +49 8856 2022
Fax: +49 8856 2021
www.tunze.com
Email: info@tunze.com
Inhalt
Comline® DOC Skimmer 9001
Allgemeines
Sicherheitshinweise
Befestigung/Zubehör
Wasseransaugung
Platzwahl / Installierung
Inbetriebnahme
Wöchentliche Wartung
Jährliche Wartung / Zerlegen
Teileliste
Comline® Foamer 9001.040
Allgemeines
Sicherheitshinweise
Wartung / Zerlegen
Teileliste
Garantie
Entsorgung
Seite
4
6-8
10
12-14
16-18
20-22
24
26
28-29
30
32
34
36-37
38
40

3
Page
5
7-9
11
13-15
17-19
21-23
25
27
28-29
31
33
35
36-37
39
40
Page
5
7-9
11
13-15
17-19
21-23
25
27
28-29
31
33
35
36-37
39
40
Contents
Comline® DOC Skimmer 9001
General
Safety instructions
Attachment/accessories
Water intake
Position selection / installation
Commissioning
Weekly maintenance
Annual maintenance / disassembly
Parts list
Comline® Foamer 9001.040
General
Safety instructions
Maintenance / disassembly
Parts list
Warranty
Disposal
Sommaire
Comline® DOC Skimmer 9001
Généralités
Sécurité d’utilisation
Fixation / Accessoires
Entrée d’eau
Placement / Installation
Mise en service
Entretien hebdomadaire
Entretien annuel / Démontage
Liste des pièces
Comline® Foamer 9001.040
Généralités
Sécurité d’utilisation
Entretien / Démontage
Liste des pièces
Garantie
Gestion des déchets

4
Comline® DOC Skimmer 9001
Allgemeines
Der Comline® DOC Skimmer 9001 ist für
den Einsatz in Meerwasser- Mischaquarien /
Weichkorallenaquarien von 20 bis 140 Liter oder für
empndliche Riffbiotope mit Steinkorallen bis 60
Liter konzipiert.
(1)DerSchaumtopfenthältauch denSchaumreaktor,
er ist leicht abnehmbar.
(2) Kompaktes und stabiles Gehäuse mit Steck-
system, schützt das Innenleben und den Reaktor
gegen Licht und Algen.
(3) Inklusive Magnet Holder bis 10mm Glasstärke.
(4) Comline® Foamer 9001.040, siehe Gebrauchs-
anleitung im Anschluss!
(5) Die Wasseransaugung kann wahlweise in der
Mitte des Aquariums, im Kreislauf als Kontakt-
abschäumung oder an der Oberäche mit dem
Surface Kit stattnden.
(6) Luftschraube zur Einstellung der Schaum-
feuchtigkeit in der Einfahrphase.
(7) Schalldämpfer für einen besonders leisen
Betrieb.
(8) Wasserausgang mit Blasenvernichtung.

5
Comline® DOC Skimmer 9001
Généralités
Comline® DOC Skimmer 9001 est un écumeur
interne pour aquariums marins mixtes / coraux mous
de 20 à 140 litres ou pour biotopes récifaux à coraux
durs jusqu’à 60 litres.
(1) Godet d’écumage intègre aussi le réacteur, facile
à extraire.
(2) Corps compact et robuste avec principe
d’emboitement, protège les parties internes et le
réacteur contre la lumière et les algues.
(3) Fixation par Magnet Holder pour vitres jusqu’à
10mm.
(4) Comline® Foamer 9001.040, voir la notice en n
de livret!
(5) L’aspiration d’eau se fait au choix dans le centre
de l’aquarium, en recirculation avec préservation du
plancton vivant ou à la surface avec Surface Kit.
(6) Réglage d’air pour une écume sèche ou humide.
(7) Silencieux d’air pour un fonctionnement
particulièrement discret.
(8) Sortie d’eau avec réducteur de bulles d’air.
Comline® DOC Skimmer 9001
General
The Comline® DOC Skimmer 9001 is designed
for use in mixed seawater aquariums/soft coral
aquariums between 20 to 140 liters (5 to 37 US gal.),
or for sensitive reef biotopes with hard corals up to 60
liters (16 US gal.).
(1) The skimmer cup also contains the foam reactor
and can be easily removed.
(2) Compact and rugged housing with a plug-in
system, protects the interior and the reactor against
light and algae.
(3) Including magnet holder for a glass thickness of
up to 10 mm (3/8”).
(4) Comline® Foamer 9001.040, see the following
instructions!
(5) The water intake can either be performed in
the middle of the aquarium, as a passive diffusion
skimmer, or on the surface with the surface Kit.
(6) Air control to set the moisture of the foam during
the start-up phase.
(7) Silencer for an exceptionally quiet operation.
(8) Water outlet with bubble eliminator.

6
Sicherheitshinweise
Der Comline® DOC Skimmer 9001 ist für den
Betrieb im Freien nicht zulässig (1).
Vor Inbetriebnahme prüfen, ob Betriebsspannung
mit Netzspannung übereinstimmt.
Um Wasserschäden an den Steckern zu vermeiden,
sollte der Netzstecker möglichst höher als die
Anlage stehen (2).
Betrieb nur mit FI- Schutzschalter, max. 30mA.
Vor dem Hantieren im Aquarium, alle eingesetzten
Elektrogeräte vom Netz trennen.
Beschädigtes Netzkabel nicht reparieren, sondern
die Pumpe komplett erneuern.
Aquarienwasser- Temperatur max. +35°C (3).
Gebrauchsanleitung gut aufbewahren.
Dieses Gerät ist für Benutzer (einschl. Kinder)
mit eingeschränkten physischen, sensorischen
oder psychischen Fähigkeiten bzw. ohne jegliche
Erfahrung oder Vorwissen nur dann geeignet, wenn
eine angemessene Aufsicht oder ausführliche
Anleitung zur Benutzung des Gerätes durch eine
verantwortliche Person sichergestellt ist. Achten Sie
darauf, dass Kinder nicht mit dem Gerät spielen (4).

7
Sécurité d’utilisation
Comline® DOC Skimmer 9001 n’est pas conçu pour
une utilisation hors habitation (1).
Avant toute mise en service, vériez que la tension
d’alimentation de la pompe corresponde bien à celle
du réseau électrique.
An d’empêcher tout dégât d’eau au niveau des
raccordements électriques, les prises d’alimentation
secteur doivent se situer plus haut que l’installation (2).
Utilisation avec disjoncteur différentiel 30mA max.
Avant toute intervention dans l’aquarium, débranchez
l’ensemble des appareillages électriques.
N’essayez pas de réparer un câble de pompe mais
remplacez ou renouvelez le bloc-moteur.
Température max. de l’eau véhiculée : +35°C (3).
Veuillez attentivement consulter la notice d’entretien.
Les utilisateurs (enfants inclus) ayant des limitations
physiques, sensorielles, psychiques, ne bénéciant
pas d’une expérience ou de connaissances
sufsantes ne peuvent utiliser cet appareil qu’avec
le concours d’une tierce personne responsable,
assurant la surveillance ou veillant à l’observation
du mode d’emploi. Veuillez vous assurer que les
enfants ne puissent jouer avec cet appareil (4).
Safety instructions
The Comline® DOC Skimmer 9001 has not been
designed for outdoor operation (1).
Prior to initial operation, please check whether the
operating voltage corresponds to the mains voltage
available.
In order to avoid water damage in the plugs, the mains
plug should be tted at a higher lever than the unit (2).
Operation is permitted only with a residual-current-
operated circuit-breaker tted, max. 30 mA.
Before working in the aquarium, please make sure
that all electric units used have been disconnected
from the mains.
Do not repair a damaged mains cable - replace the
pump completely.
Temperature of the aquarium water: maximum +35°
Celsius (95° F) (3).
Keep the operating instructions in a safe place.
This device is suitable for users (including children)
with limited physical, sensorial or mental abilities or
without any experience or previous knowledge, if
suitable supervision or detailed instructions on the
operation of the device is provided by a responsible
person.
Please make sure that children do not play with the
device (4).

8
Sicherheitshinweise Magnet Holder
Sehr starker Magnet! (1)
Magnet Holder von Kindern fernhalten! Achtung
Verletzungsgefahr! (2)
Magnethälften nicht direkt zusammenbringen! Die
Magnethälften haften mit ca. 25 - 50 kg, je nach Typ
bei direktem Kontakt.
Magnetteile mit der Hand nur an den Seitenächen
greifen; niemals die Hand oder Finger zwischen die
Kontaktächen bringen!
Magnet zieht Metallteile und andere Magneten
unter 10cm Abstand mit großer Kraft an! Beim
Hantieren mit dem Magnet sollten sich keine
Metallteile, andere Magneten, Klingen oder Messer
im Umkreis von 10cm benden, um Verletzungen
zu vermeiden.
Vorsicht bei magnetisch empndlichen
Gegenständen, z.B. Herzschrittmachern,
Datenträger, Kreditkarten und Schlüssel, mind.
30cm Abstand halten! (3)
Beim Transport des Magnet Holders immer das
mitgelieferte Zwischenstück verwenden.
Erhitzung über 50°C führt zur Zerstörung des
Magneten, bzw. Verlust der Magnetwirkung.(4)
CAUTION !

9
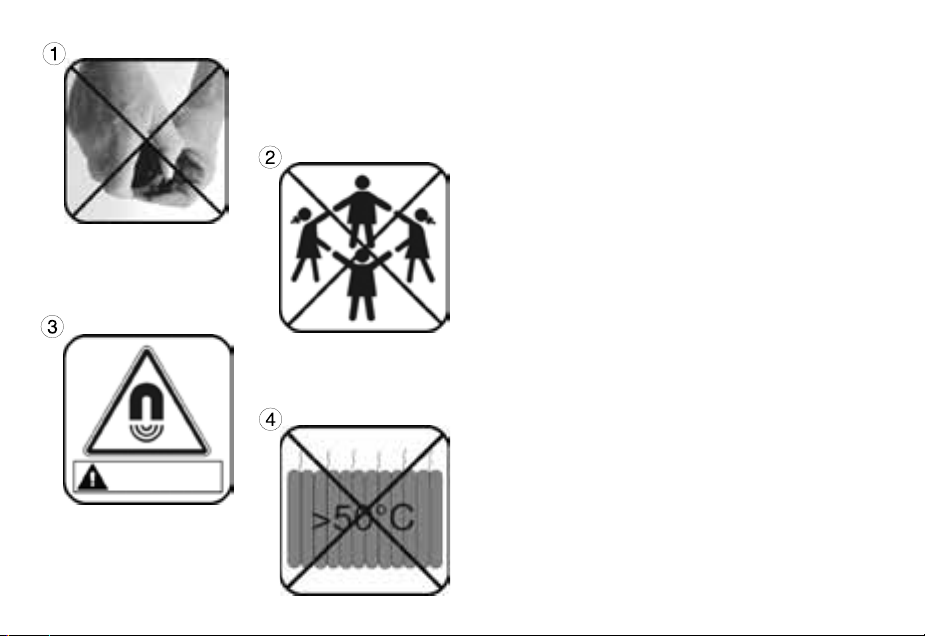
Sécurité d’utilisation Magnet Holder
Aimants surpuissants ! (1)
Les aimants sont à tenir hors de portée des enfants!
Attention, risques de blessures ! (2)
Ne jamais réunir directement les deux parties des
aimants ! Force d’attraction env. 25 - 50 kg en
fonction du modèle et lors du contact direct.
Tenir les aimants uniquement sur les côtés sans
jamais intercaler la main ou les doigts entre les
surfaces magnétiques !
Les aimants attirent fortement le métal ferreux et les
autres aimants à moins de 10cm de distance ! Pour
éviter les blessures lors de la manipulation des
aimants, aucune partie métallique, aimant, lame ou
couteau ne doivent se trouver à moins de 10cm.
En présence d’appareillages sensibles comme des
simulateurs cardiaques, des supports de données,
des cartes de crédits et des clés, observez une
distance minimale de 30cm ! (3)
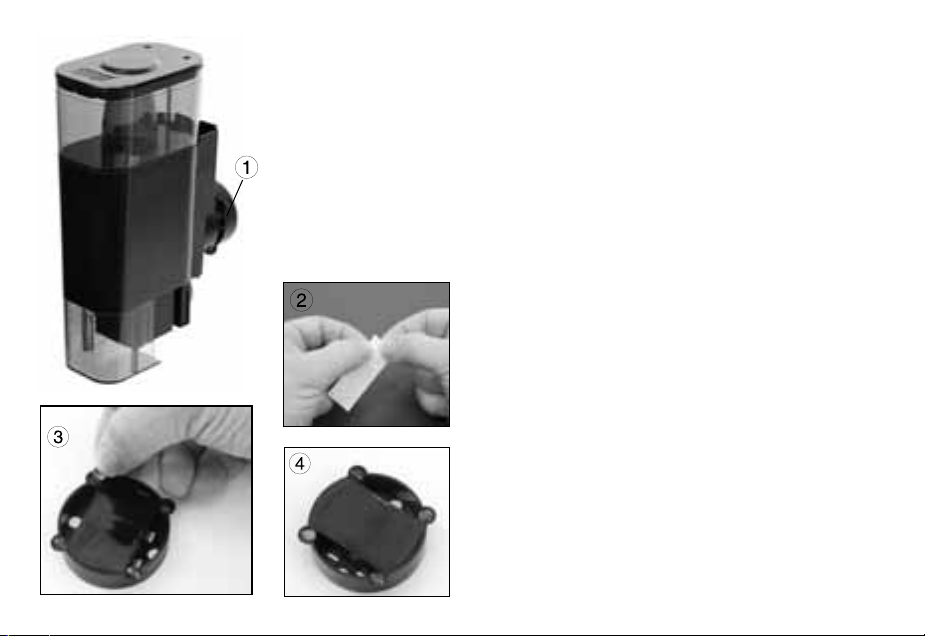
Lors du transport de Magnet Holder, utilisez toujours
la pièce intermédiaire livrée dans l’emballage. Un
échauffement de plus de 50°C conduit à l’altération
des aimants et à une perte de leur puissance
magnétique (4).
Safety instructions for Magnet Holder
Very strong magnet ! (1)
Keep Magnet Holder out of reach of children !
Caution ! Danger of injury ! (2)
Do not bring upper and lower magnet part together
directly ! Depending on the type, the parts of the
magnet cling together on direct contact with about
25 to 50 kg (55 to 110 lbs.)
Get hold of the magnet parts at the sides only;
never get your hand or ngers between the contract
surfaces !
Attracts metal parts and other magnets with a
large force at a distance of below 10cm (3.9 in.) !
When handling the magnet, no metal parts, other
magnets, blades or knives should be located closer
than 10cm (3.9 in.) in order to avoid injuries.
Exercise caution in case of magnetically sensitive
objects, such as pacemakers, data carriers, credit
cards and keys – keep a distance of at least 30cm
(11.8 in.) ! (3)
Always use the piece of polystyrene supplied when
transporting the Magnet Holder. (4) Heat of more
than 50° Celsius (122° F) will lead to the destruction
of the magnet or the loss of the magnetic action.

10
Befestigung
Der Comline® DOC Skimmer 9001 hat einen
integrierten Magnet Holder (1) mit einer Haltekraft
bis 10mm Glasstärke. Die volle Haltekraft der
Magnete ist nur beim Einsatz im Wasser möglich.
Werden die Geräte ohne Wasser im Aquarium
montiert, könnten die Haltekräfte zu gering sein.
Montieren der selbstklebenden Elastikpuffer auf
den beiden Teilen des Magnethalters:
ACHTUNG! Magneten nacheinander einzeln
vorbereiten und weit voneinander ablegen, sonst
Verletzungsgefahr.
Elastikpuffer von Folie entfernen (2) und auf
Klebestellen pressen (3). Für jedes Magnetteil
4 Stück verwenden. Die Klebestellen benden sich,
wie auf Bild (4) gezeigt, an den hierfür vorgesehenen
runden Vertiefungen.
Zubehör
Magnet Extension 6025.501 erweitert die Haltekraft
des Magnet Holders 6015.500 für eine Verwendung
von Glasstärken bis 15mm.

11
Attachment
The Comline® DOC Skimmer 9001 is equipped
with an Magnet Holder (1) with a holding force
for glass thicknesses up to 10 mm (3/8“). The full
holding force of the magnets can only be achieved
when they are used in the water. If the devices are
installed in the aquarium without water, the holding
forces could be too low.
Attach the self-adhesive elastic buffers to both
parts of the Magnet Holder:
CAUTION! Prepare the magnets individually and
place them far apart from each other to avoid
injuries.
Remove the elastic buffer from the foil (2) and press
it on the adhesion spot (3). Use 4 of them for each
magnetic component. The adhesion spots are
located in the appropriate round indentations, as
shown in gure (4).
Accessories
The Magnet Extension 6025.501 enhances the
holding force of the Magnet Holder 6015.500 for
use on glass with a thickness of up to 15mm (1/2“) .
Fixation
L’écumeur Comline® DOC Skimmer 9001 est
équipé d’un Magnet Holder (1) pour une xation sur
vitres jusqu’à 10mm. Son maintien maximal n’est
possible que dans un aquarium rempli d’eau. S’il
est mis en place sans eau, la tenue sur le verre
pourrait être trop faible.
Montage des tampons élastiques autocollants sur
les deux parties du support magnétique:
ATTENTION ! Procédez avec un seul aimant à
la fois, tenez les aimants éloignés l’un de l’autre,
risques de blessures.
Détachez le tampon élastique (2) de son carton
puis pressez-le sur la surface de collage du
support magnétique (3). Appliquez 4 tampons
élastiques par support. Les surfaces de collages
sont matérialisées par les renfoncements visibles
sur la vue (4).
Accessoires
Magnet Extension 6025.501, augmente la
puissance de xation du Magnet Holder 6015.500
pour une utilisation jusqu’à 15mm d’épaisseur de
vitres.

12
Wasseransaugung
Die Pumpe kann je nach Aquarienbiotop in vier
verschiedene Richtungen orientiert und genau an
das Aquarium angepasst werden:
Kontaktabschäumung (1) (Auslieferungszustand)
Der Wasserkreislauft im Abschäumer ist teilweise
geschlossen, der Nachschub von Protein aus dem
Aquarium ießt automatisch durch den sogenannten
Molekular-Ausgleichsdruck (Diffusion) nach. Die
TUNZE®-Erndung der Kontaktabschäumung sorgt
dafür, dass nahezu kein lebendes Plankton in den
Pumpenkreislauf gesaugt wird.
Standardabschäumung (2)
Die Wasseransaugung ist etwa 100mm unter der
Wasseroberäche an der hinteren Seite, diese
Einstellung ist für alle Aquarien geeignet.
Outlet entfernen (3), Foamer etwa 20mm
herausziehen (4) und Wassereingang 180°
nach hinten drehen (5). Foamer wieder hinunter
drücken (6) und Outlet wieder einsetzen.
Achtung! Der Foamer kann nur gedreht werden,
wenn er herausgezogen ist! Luftschlauch beim
Herausziehen nicht abreißen!

13
Water intake
The pump can be oriented in four different directions,
depending on the aquarium biotope, and precisely
adapted to the aquarium:
Contact foam skimming (1) (delivery state)
The water circuit within the skimmer is partially
closed, and the protein supply from the aquarium is
automatically performed through osmotic diffusion.
The TUNZE® invention for contact skimming
ensures that almost no living plankton is drawn into
the pump circuit.
Standard skimming (2)
The water intake is approx. 100 mm below the water
surface on the rear side, and this setting is suitable
for all aquariums.
Remove the outlet (3), pull out the former approx. 20
mm (4) and turn the water inlet 180° to the rear (5).
Press the former down again (6) and replace the
outlet.
Caution! The Foamer can only be rotated when it‘s
pulled out! Do not tear off air hose when removing!
Entrée d’eau
En fonction du biotope aquatique, la pompe peut
être orientée dans quatre directions différentes an
de s’adapter exactement à l’aquarium:
Ecumage à contact (1) (réglage d’usine)
Le circuit d’eau de l’écumeur est partiellement
clos, les apports en protéines dans l’appareil se
font automatiquement par diffusion moléculaire.
L’invention TUNZE® de l’écumage à contact évite
l’aspiration du plancton vivant dans le circuit de
pompage.
Ecumage standard (2)
L’aspiration d’eau est réalisée en partie arrière à
env. 100mm sous la surface de l’aquarium, cette
conguration est adaptée à tous les aquariums.
Déposez l’Outlet (3), retirez le Foamer d’env.
20mm (4) et tournez-le de 180° an que l’entrée
d’eau soit positionnée à l’arrière (5). Repoussez
le Foamer à nouveau dans l’écumeur (6) et
repositionnez l’Outlet.
Attention! Le Foamer ne peut être tourné qu’en
l’extrayant de 20mm! Veillez à ne pas arracher le
tuyau d’air lors de la manipulation!

14
Oberächenabsaugung mit Surface Kit 9001.500
Der Comline® DOC Skimmer 9001 kann das
Aquariumwasser von der rechten oder linken Seite
an der Oberäche beziehen. Dies verbessert die
Effektivität der Abschäumung, weil sich die Proteine
an der Wasseroberäche konzentrieren.
Outlet entfernen (7), Foamer etwa 20mm
herausziehen (8) und Wassereingang je nach
Abschäumerposition im Aquarium 90° links oder
rechts drehen (9). Foamer wieder hineindrücken (10)
und Outlet wieder einsetzen.
Achtung! Der Foamer kann nur gedreht werden,
wenn er herausgezogen ist! Luftschlauch beim
Herausziehen nicht abreißen!
Schlitzkörper mit einem Schraubenzieher vom
Foamer entfernen (11) und Surface Kit (12) auf
den Wassereingang der Pumpe einrasten lassen,
Nut (13) gut beachten.
Surface Kit 9001.520 senkrecht positionieren (14).
90°90°

15
Aspiration de surface avec Surface Kit 9001.500
Comline® DOC Skimmer 9001 peut être alimenté
en eau de surface par son côté droit ou gauche
en fonction de sa position dans l’aquarium. Cette
option améliore l’efcacité d’écumage étant donné
que les protéines se concentrent d’avantage à la
surface de l’aquarium.
Déposez l’Outlet (7), retirez le Foamer d’env.
20mm (8) et tournez-le à 90° vers la droite ou vers la
gauche en fonction de la position de l’écumeur dans
l’aquarium (9). Repoussez le Foamer à nouveau
dans l’écumeur (10) et repositionnez l’Outlet.
Attention! Le Foamer ne peut être tourné qu’en
l’extrayant de 20mm! Veillez à ne pas arracher le
tuyau d’air lors de la manipulation!
A l’aide d’un tournevis, retirez la crépine du
Foamer (11) et insérez Surface Kit (12) sur l’entrée
d’eau de la pompe. Tenir compte de la rainure (13).
Positionnez Surface Kit 9001.520 à la verticale (14).
Surface suction with Surface Kit 9001.500
The ComLine® DOC skimmer 9001 is able to draw
aquarium water from the right or the left side on
the surface. This improves the effectiveness of the
skimming, because the proteins concentrate on the
surface of the water.
Remove the outlet (7), pull out the foamer approx.
20 mm (8) and according to the skimmer position in
the aquarium turn the water inlet 90° to the left or
right (9). Press in the foamer again (10) and replace
the outlet.
Caution! The Foamer can only be rotated when it‘s
pulled out! Do not tear off air hose when removing!
Remove the strainer from the Foamer with a
screwdriver (11), let the Surface Kit (12) click into
the water inlet of the pump, and precisely observe
the groove (13).
Position the Surface Kit 9001.520 vertically (14).

16
Platzwahl / Installierung
Comline® DOC Skimmer 9001 in eine Ecke des
Aquariums so aufstellen, dass er leicht bedienbar
ist (1), der Schaumtopf muss gut zugänglich sein.
Über dem Abschäumer soll genügend freier
Raum vorhanden sein, um den Abschäumertopf
senkrecht, ohne an den Rahmen oder die Leuchte
anzustoßen, entnehmen zu können (2). Dies ist
erforderlich, da ein Teil des Schaumreaktors am
Schaumtopf verbunden ist.
Der Wasserstand im Aquarium sollte mit der
Oberächenmarkierung (3) übereinstimmen. Wir
empfehlen dafür eine Wasserstandsregelung durch
TUNZE® Osmolator® oder Osmolator®nano.
Bei Verwendung in eingetauchten
Aquarienkammerltern (fertige Aquarien aus dem
Handel) kann der Outlet (4) am Abschäumer aus
Platzmangel weggelassen werden.

17
Placement / Installation
Installez Comline® DOC Skimmer 9001 dans un
coin de l’aquarium et de manière à ce qu’il soit
facile d’utilisation (1), le godet d’écumage doit être
bien accessible.
L’espace libre au-dessus de l’écumeur doit être
sufsant an de pouvoir retirer verticalement et
facilement le godet sans toucher l’éclairage ou la
galerie (2). Ceci est important car le godet et le
réacteur d’écumage ne forment qu’une seule pièce.
Le niveau d’eau de l’aquarium doit correspondre au
marquage en partie avant de l’écumeur (3). Nous
conseillons l’utilisation d’une régulation de niveau
par Osmolator® ou Osmolator® nano TUNZE®.
Lors d’une utilisation en ltre interne à
compartiments (aquariums „clés en main“ du
commerce), l’Outlet peut être retiré par manque de
place (4).
Position selection / installation
Place the Comline® DOC Skimmer 9001 into
a corner of the aquarium so that it can be easily
operated (1), and the skimmer cup is properly
accessible.
There must be enough clearance above the
skimmer, to be able to remove the skimmer cup
vertically without hitting the frame or the lamp (2).
This is necessary because part of the foam reactor
is connected to the skimmer cup.
The water level in the aquarium should coincide
with the surface mark (3). For this, we recommend
a water level control with the TUNZE® Osmolator®
or Osmolator® nano.
When used in submerged aquarium chamber lters
(completely congured aquariums from retailers),
the outlet (4) on the skimmer can be omitted due to
a lack of space.

18
Installierung in Aquarien mit Abdeckungen
Bei Aquarien mit Abdeckungen ist eine Montage
des Comline® Abschäumers an der Glasscheibe
nur mit Modizierung möglich (1). Dafür sollte der
mitgelieferte Abstandshalter 3162.500 (2) für den
Magnet zwischen Comline® und Magnet montiert
werden, dies erzeugt einen Abstand von 15mm.
Magnet Holder von dem Comline® Abschäumer mit
einem Schraubenzieher abziehen (3).
Abstandshalter für Magnet auf die Comline®
klipsen (4).
Magnet Holder auf den Abstandshalter für Magnet
klipsen (5).
C o m l i n e ® A b s c h ä u m e r i n d a s B e c ke n m o n t i e r e n ( 6) .

19
Installation in aquariums with covers
In aquariums with covers an installation of the
Comline® onto the glass is only possible with
a modication (1). For this, the supplied spacer
3162.500 (2) for the magnet should be mounted
between the Comline® and the magnet, to create a
spacing of 15 mm (1/2“).
Remove the Magnet Holder from the Comline® with
a screwdriver (3).
Clip the spacer for the magnet onto the Comline® (4).
Clip the Magnet Holder onto the spacer for the
magnet (5).
Mount the Comline® skimmer into the aquarium (6).
Installation en aquariums avec galerie
Dans les aquariums comportant une galerie, il est
possible que le montage de l’écumeur Comline®
contre la vitre ne soit pas toujours possible (1). Pour
cela, nous vous conseillons de monter l’entretoise
pour Magnet 3162.500 (2) entre l’appareil et Magnet
Holder. La distance entre la vitre et l’écumeur
Comline® sera alors de 15mm.
Retirez les Magnet Holder de l’écumeur à l’aide
d’un tournevis plat (3).
Clipsez l’entretoise sur la Comline® (4).
Clipsez les Magnet Holder sur les entretoises (5).
Montez l’écumeur Comline® dans l’aquarium (6).

20
Inbetriebnahme
Abschäumer gut befestigen, dies ist entscheidend
für Effektivität und geringen Geräusch des Gerätes.
Der Wasserstand im Aquarium sollte mit der
Oberächenmarkierung (1) übereinstimmen.
Es sollte keine Strömungspumpe direkt auf den
Abschäumer strömen.
Stecker am Netz anschließen, der Foamer ist jetzt
in Betrieb.
Luftschraube aufdrehen (2).
Es kann sein, dass ein neu betriebener
Abschäumer eine Startphase von einigen Stunden
bis zu einem Tag benötigt. Bei wässrigem Schaum,
Lufteinstellschraube etwas zudrehen oder das
Gerät ein paar Millimeter höher als die normale
Wasserlinie positionieren (3).
Bei dunklem Schaum Lufteinstellschraube etwas
aufdrehen oder das Gerät ein paar Millimeter tiefer
als die normale Wasserlinie positionieren (4). Nur in
kleinen Schritten arbeiten!
Nach der Stabilisierung der Abschäumung kann
die Lufteinstellschraube (2) komplett aufgedreht
werden.
Schalldämpfer außerhalb der Abdeckung verlegen,
der Silikonschlauch sollte nicht verlängert oder
modiziert werden.
This manual suits for next models
1
Table of contents
Other Tunze Swimming Pool Filter manuals
Popular Swimming Pool Filter manuals by other brands

Zodiac
Zodiac Nature2 Express owner's manual

Pahlen
Pahlen MiniMaster manual

Norsup
Norsup S Series Original manual

GRE
GRE FS300 Installation and maintenance manual

Innovative Water Care
Innovative Water Care Pulsar Precision 30 System Operation and installation manual

Jacuzzi
Jacuzzi JMC16 Installation and operation manual