TUYA Smart Life Wifi IP Camera User manual

Users'Manual
Sma rt Life Wifi IP Ca mera
Dear users, Thanks for using this product.
Please read the users' manualcarefu[ty and
keep it forfuture reference. Thankyou.

Co nte nt
1 . How to download the mobile phone App ------- 1
2.How to operate the mobile phoneApp -"""-'2
2.1 . Register account '-'------ ----"'-'-'----2
2.2. Add the camera ---'-""" 3
2.2.1.Add the camera by QR Code "'- 4
2.2.2.Add the camera by Smartconfig ---- 6
2.3. The main function introduction "-"'-'-'-'-"'7
2.3.1. The APP main interface ------- ---------------7
2.3.2.1ive View interface -----------.8
2.3.3.Playback interface ---------'8
2.3.4.lntroduction of more settings ----'9
2.3.5.The Alarm Push Settings ------"9
2.3.6.Share with Others -"""11
2.3.7.Micro SD card settings "" 11
2.3.8. Use Amazon Echo show to control
smart devices ---- 12
2.3.9. Deletethecamera --- -"14
3, FAQ -"" 14

1.How to download the mobile phone App
A.Please search "Smart life" in the mobile app store
(Android phone on "Google-P-lay", IOS phone on "
App Store"), download the APP'
e.Scan the QR code, download the APP'
Notice:Whenrunningtheappforthefirsttime,several
windows will pop up to get permission for the phone' For
better using experience, it is recommended that you allow
the app to obtain the following two permissions:
l.AllowSmartlifeusemobilecellulardataandwireless
LAN(Function:WhetheritisWlFlorusingmobilephone
traffic, the phone can access the camera)'
2.Allow Smart life to get system push message permission
(Function:Whenthecameratriggersmotiondetectionor
sound detection alarm, the phone can receive alarm push'

2.How to operate the mobile phone App
2.1.Register account
*i$lnil ra fiX,
{Ol56lf} d'ill rto l*fi a rser3
Register
ry.qo
,!-l*i::i!s *ii#*rtrSir;,1
Lqin
Afit+An
t+:::*=r{:-:e:r.,irrgi1
FasL.-t.::
I rorta cdt Sslirx i{cM*i$ PdrG,
S6ds \dttbsns For6+t PtterE d
New users need to register by e-mail, click "Register",
follow the steps to complete the registration of the account,
and log in.
Notice:
1. Username must be a valid email address.
2. Password must be between 6-20 digits in length.
3. Please choose the same country in register and login
lf you have forgotten your password, click "Forgot password"
to retrieve your password via email verification.
I
I
i
I

2.2. Add the camera
;Please use the power adapter in the package to connect the
device, and the device indicator lights up'
>lf your item is an outdoor camera with an external antenna
(wiih an antenna in the box), please connect the antenna to
the camera at first
)After the device is successfully powered on, the normal
indicator will turn flashing red quickly(twice a second)' lf the
indicator status is abnormal, please reset the device to factory
settings. (Press and hold RESET button untilyou hearthe
Oeep.ine reset button position of eirch product is different,
but they are all marked with "RESET")'
) A stable and smooth WlFl network is required when adding
devices, please bring the device as close as possible to the
WlFl router.
R
i.
::t;: ,i
ti''l'
-
Camera
Before adding a device, you need to note the followings:
1.This camera only supporls2. GHZWlFI network. Before
adding equipment, please ensure that your router supports
2. GiZWlFlnetwork, and the mobile phone is connected
lo 2.4GHZWlFl network. (For details, please refer to FAQ
of this manual)
2.When the network is too complicated, the signal interference
is serious. lt is recommended to add the device by placing the
camera in a single network environment'
3.Please follow the steps below to complete the device addition
and ensure that the wlFl password is entered correctly.
#-.
--B
30cm*100cm Smartphone

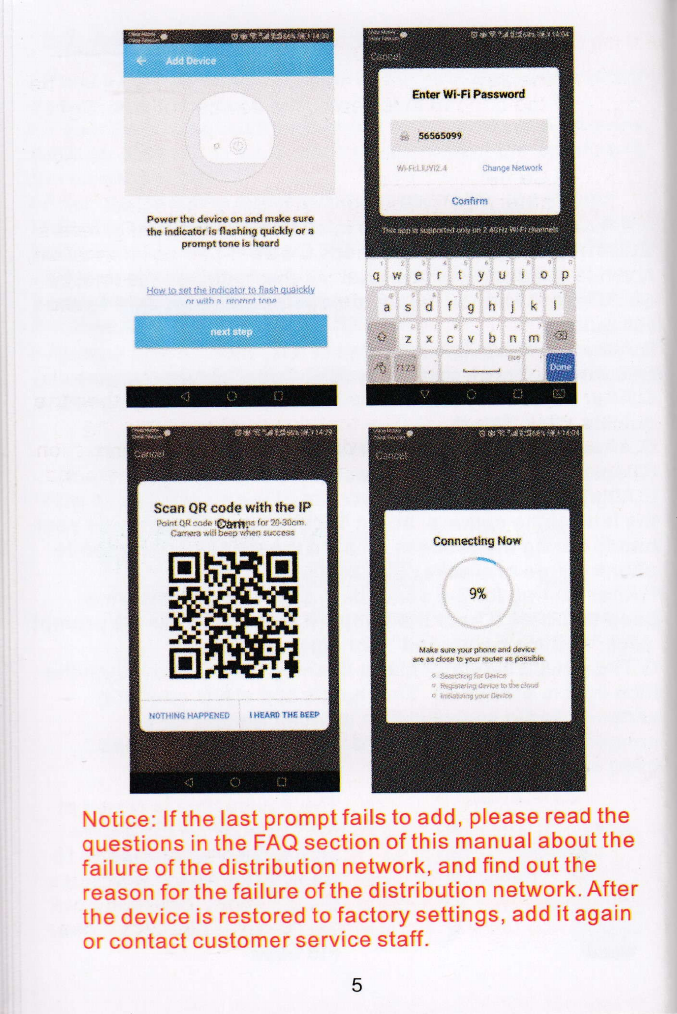
4.lf the device fails to be added, press and hold the reset button
on the device to restore the device to the factory settings. After
the device indicator flashes red fast and you hear the beep,
try again.
5.lf you still fail after many attempts, please contact the
customer service for after-sales assistance.
6.A camera can only be added by one account^ lf the camera
has been already added, it cannot be added twice.
z.2/l.Add the camera by QR Gode
A.When the device is powered on, the indicator light will be
on. After the beep is heard, the device indicator light flashes
red quickly.
B.After the phone is connected to wifi, click "+" and select "
Security Camera", and enter "QR Code" setup interface.
C.After confirming that the device indicator is flashing red
quickly, click "Next".
D.After entering the correct WlFl password, click Next.
(Display the password to check if the password is correct)
E.Align the QR code on the screen of the mobile phone with
the lens of the camera, about 1Scm away (do not shake your
hands during the process, ensure the screen of the mobile
phone is free of cracks)
F.After waiting f or 2-5 seconds, you will hear the device
beep and click "l hear the beep" (lf you don't hear the prompt,
click "nothing happened" for help).
G.The device indicator starts flashing blue quickly, then the
blue light is always on. The mobile app starts counting
seconds and is searching for devices waiting for a
connection. After the APP prompts that the device has
been searched, click "Done".
ibsl 13em 15 g el:l@i The device lens is aimed at
the QR code on the phone
screen with a distance of 15
cm. After the device recognizes
the QR code, it will send out
the "Beep". Then click "l hear
the beep"
ry

Pows th€ d€rie6 os n.d Bake sur6
iho indicaior is flashirq qulckly or a
prcm0t lons ls h@rd
qi4eilyilr+p
asdfqhjkl
E
Notice: lf the last prompt fails to add, please read the
questions in the FAQ section of this manual about the
failure of the distribution network, and find out the
reason for the failure of the distribution network. After
the device is restored to factory settings, add it again
or contact customer service staff.
Scafi QR cade vrith the lP
i:'i,nr QR r.{r r&?hri (nr ?i]3ilcn,
r.a'n€-a -.? {l bs:i vhn rLirrsi
EIT
ffi,J
ffit
r/r,,r:trililipfrNrr rBEASIltsE&iEp

2.2.2.Add the camera by Smartconfig
A.When the device is powered on, the indicator light will be
on. After the beep tone is heard, the device indicator light
flashes red slowly.
B.After the phone is connected to wifi, click "+" and select "
Security Camera"
C.Click "otherwise" in the right up corner, and select "
Smartconfig" to enter setup interface. (Smartconfig refers
to that mobile phone will broadcast the net-pairing information,
device will connect the router when it receives the info. )
D.After confirming that the device indicator is flashing red
quickly, click "Next".
E.After entering the correct WlFl password, click Next.
(Display the password to check if the password is correct)
F.The device indicator starts flashing blue quickly, then the
blue light is always on. The mobile app starts counting
seconds and is searching for devices waiting for a connection.
After the APP prompts that the device has been searched,
click "Done"
e Select a method
QR Code
k@oloffituQRode6
the fro6iLph6. ff@ffi
d-F&tloin o.
AP Mode
hukphm@dtu6{d&g
hb by @nffilng a@6's Mspd.
Powar ti6 deviiga os and mske sure
the indicrtor ls lteshing quickly or a
prompt to*s is heard
lat.rii!-!-$i1-!ii1irtl..,rlet i-q fir}:,t-{Iila.Jt
ft id,ih r '1rr,ii1rs r6/ra
SmartConfio
. kbil.pMedlkoa&A$n
d p*iB infodlm. dryl* wlll
ffimd fu rM.r whs tr .eeivcs
tk lnfo.
L::*i

qwertyui09
Notice: lf the last prompt fails to add, please read the FAQ
part of this manual for questions about the failure of the
network connection, and find out the reason for the failure
of the network connection. After the device is reset to default
factory settings, select "QR code" and try to add again.
2.3.The main function introduction
2.3.1.The APP main interface
lova wr*
@
A.Add device
B.Video window, click to enter
the video interface
C.All the devices that are added
D.customi ze your own personal
scenes to suit your needs
E.personal profi le setup
*( .*- o &r
l"i:.. -r'11::- lltl".. 7

2.3.2.Live View i nterface
LlYeview i'iAlhilnk D
iJ"r Q r {"
{jjiir, :iie* ,i:.ii,:.
E3' o'
E!ir._:rrt 1.'.+n:,,Jn
A.More settings
B.Live video
C.Full screen
D.playback the videos in storage
E.turn motion detection on or off
F.press and talk to the camera
G.PTZ control. Move the
camera up and down, left
and right.
H.Sound on/off button
l.Record video in realtime
and save it to your phone
photo album
J.Take a screenshot of the
video and save it to your
phone's photo album
interface
Playback
A.Playback video recording.
B.The time table. The time in grey
color are with video recordings.
You can drag the time table to the
exact time that you want to see.
C.Pause or start playback video
recording.
D.ln Calendar, you willsee the date
in red color with video recordings.
E.Record the video recordings to
the mobile phone.
F.Snapshot the picture of the video
recordings and save it on the phone.
I=I U
Lq Ji
fnE

2.3.4.lntroduction of more settin gs
, +E5i;6 t9:17 et551E!
(arct s€ttinss A'Rename and modify the
device name.
!r1!:!! !..1i.a li!.!.]
5;s*: Fini!?F Ba11in!s
ili1,on Dslec!il Srlli){l
$D Cnr4 Se1nil4t
B.Share the device with Your
friends
C.Device info:the owner lD,lP
Address, Device lD, Device time
zone, Wifi signal strength.
D.How to connect Your device to
Amazon Alexa.
E.Basic feature settings; turn
on/off indicator light;fliP the
video; turn on/off time watermark.
F.turn on/off sound detection alarm.
G.turn on/off motion detection alarm.
H.SD card capacity;format SD card.
l.Write your feedback of the products
J.Check for the firmware uPdate.
2.3.S.The Alarm Push Settings
The device supports motion detection and sound detection
alarms. When the settings are correct, the device will send
an alarm message to the mobile phone when the event is
triggered.
Molion }electid\ Aiarm Sr4nd oets;tim a,arh
nigh
Medrum
Hish

Turn on motion detection and sound detection, and select
the correspondi ng sensitivity
Remarks: ln a small space, select "Low" or "Medium". For
environments with large space, in order to improve the
alarm sensitivity, it is recommended to select "high".
Notice: lf you need your phone to receive an alert message,
you must allow the Smart life APP get all the permissions in
your mobile phone app permissions interface.
:::;i3:",flr ro s u e,.d ,:::ril?e.+r 6:?? :il:,.l""::. & 6 'a 6. ".il iiiix62l + | 0e:2)
+ Smart Life <. App permissions i
Tru6t this app
oive ti:i! arf iilil aa'a+.js ic all ilDr{i!nsir-ar!
PHON€
Access phone lD
OTH€R PERMISSIONS
Take photos or Yideos
Rsord eudb
Accs l@ation info
Acce$ list of installed apps
Dropzone apps
G ffi snanr-ire
CameE
rc Mierophofle
G Phone
rc storage
rc Yourlocation
(D setindividualpermissions
rc
rc
rc
{m
G
rc
After setting the motion
detection parameters, the
camera detects the moving
object and pushes the alarm
information and picture to
the APP.
Open message center to view
all the pictures pushed by the
mobile event, and push two
pictures in one event.
10

2.3.6.Share with Others
One camera can only be added to one account, meanwhile,
the account can only be set in by one phone. lf anyone need
to view the camera, the camera can be shared unlimited times
A.Go to the more setting interface of the device, click "
device sharing"
B.Click "add" and enter an account (the account must be
registered in Smart lifeAPP successfully in advance),click "add"
C.The account which have been invited will get a message
by the app, please confirm and agree to this sharing
request,you will share the device with others.
Email User
2.3.7.Micro SD card settings
Micro SD card is the main way for you to save the video.
For different models, the SD card slot is in different
positions. Please look for the card slot on the device.Here
are the requirements for the Micro SD card:
11

1.Only support 2-128G8
2.To ensure the recognition rate and service life of the SD
card,We suggest using Class 10 high speed Micro SD card,
Samsung, SanDisk, Kinston Micro SD card.
3.Please format the Micro SD card before insert it into the
camera, and the format must be FAT32.
The instruction of SD card:
A: Go to the setting page and click "SD card"
B: The memory capacity will be displayed if the memory
card was recognized.
C: lf you need delete the recordings, or the SD card is
damaged ,please format the memory card.
:aii: r(ria !:++t:itt
Total
Used
Resldue
I3$68
&5*5
6AqfiB
Notice: lf you memory card
can't be recognized, please
check the memory card if it
meets all the requirements.
Restart the device. lf you still
can't identify,it is recommended
to restore the device to settings,
try another SD card, or contact
customer service for help.
2.3.8.Use Amazon Echo show to control smart
devices
Before using Echo show to control your smart devices,
make sure you meet the following conditions.
) Echo show and Amazon account; Smart devices and smart
Life app.
) The same and stable WlFl network for Echo show and
Smart devices.
1)Add devices in Smart Life app,Please change the device
name to a easily recognized word or phrase, like "security
camera"
2)Set up Echo show with Alexa app
3)Link Smart Life account to Alexa
12

A.Tap "skills" in the hamburger menu, then search "Smart
Life". Select "Smart Life" and tap "ENABLE" to enable the Skill
S? !*""riru
g :;.It;l;;
I
ba1 l& 4&n *+ art ;serr*ee. sr r*cr+t-at
r*.d! dn* 4[B!.& r,i& e{ tddd Br ir&
l4Jdq a1!, d.rrr de7+^ N#di !#. )61 dF n, kEl t.*rn
B.You will be redirected to the account link page. Type in
your Smart Life account and password, don't forget to select
the country/region where your account belongs to. Then tap
"Link Now" to link your Smart Life account.
Ift nrf, Fw Lnv? !!$ Iaar
13

C-Now you can control your smart devices through Echo
Show. You can use the following commands to c6ntrol
your devices (e.9., security camera):
Alexa, show the security camera
Alexa, stop the security camera
2.3.9.Delete the camera
Please go to more settings interface, and click,,remove
device" ; then confirm the pop-up noiice.
Notice:After the device is deleted,
the cloud storage service will be
automatically released. please
consider carefully.
lf you need to add the camera by
another account or return the
product, please delete the camera
in the APP.
3.FAQ
1.why can't I add a device or fair to configure the network?
According to the status of the device indicator, you can
determine the cause and sorution of the fairure 'ot tn"
network connection.
1)Be-fore adding the device, ensure that the device is in
red.flashing state (2 times in 1 second). rf the inoicatoi
status is abnormal, please reset the device to factorV
setti.ngs (press and hold the device RESET button until
you hear a beep) (The reset button position of each
product is different, but they are marked with ,RESET,,;.
14

2)The device indicator does not turn blue or does not hear
the beep.
A.Note that the screen of the mobile phone is aligned with
the lens of the device in parallel, and the distance is kept
at about 15cm.
B.Try to adjust the distance between the phone screen
and the device before and after, and keep ilfor 2 seconds
or so in each position.
C.Please check if there are any stains on the surface of
the lens of the device.
D.Make sure the screen of the phone is clear, crack-free
and non-reflective.
E.Use the other way of network connection
3)The device indicator flashes blue quickly and does not
turn constant blue.
A.device does not support SGHZ WlFl, please ensure that
when adding device, the phone is connected to 2.4GHZ WlFl.
B.WlFl password must be entered correctly, and there must
be no special characters.
C.Note that the current WlFl network is smooth, it is
recommended to try to restart the router.
4)The device indicator light turns blue. And the APP can not
find the device.
A.Try adding devices in other ways
B.lf after repeated attempts, the blue light is still on and the
device cannot be found. Please contact customer service for
technical assistance.
Note: After any failed addition, you must first reset the
device to factory settings when you need to re-connect the
network.
2. When adding a device, the APP prompts that the device
has been added by the XXXX account. What should I do?
Please reset the product to default and try to connect it again.
3.How to reset the camera to factory settings?
Locate the reset button of the device, press and hold until
the indicator light goes out, release it, hear the beep sound,
wait for the device to restart, and the indicator lights up.
15

4.camera indicator status description
Constant red The camera is starting up or running abnormally.
Red light flashing quickly The camera is ready t6r networr ioin""iion.
Constant blue The camera is running nor."if y.
Blue light flashing quickry The camera is connecling to thL network
|.WhV is there a blank in the middle of the video
intermittent?
T.he blank space of the recording timerine represents no
video file, and the two video mode problems are different.
SD card recording: After the device is powered ofi, tfre SO
card will not continue recording. please check whether the
device is powered off during the blank time. lf it is abnormally
pow.ered off, please check whether the power supply, power
cable and machine power interface are normal.
6.Why can't the phone receive an alarm message?
confirm that the notification permission of the smart life
APP in the phone settings is iurned on, and whether the
mobile alarm settings are allenabled in the app. UnOer
normal circumstances, when an abnormality is detected,
a.message will appear in the notification bai of the mobile
phone. There is no sound or vibration depending ;; th;
settings of the mobile phone.
7.The APP can't load the video, what should I do if the
camera is disconnected?
First check if the camera's power and network are normar.
lf it is normal, turn off the camera and then restart it. lf the
camera is still offline after restarting, please remove the
camera in the APp, reset the camera to factory settings,
and then re-add the device.
8.APP prompts access to the device failed, what should I do?
Please reset the device after resetting it to factory settings.
lf this problem still occurs, prease contact customer service
staff for technical assistance.
16

9.APP often can not load the video, showing
disconnect?
Troubleshoot the problem based on the camera's indicator
status:
1)The indicator light is off, indicating that the device is not
powered. Please check the power supply carefully and the
power supply interface is normal. lt is recommended to try
the power supply.
2)The indicator light is on, in two cases:
A.The indicator light is red, indicating that the camera's
network has been disconnected. Please check the stability
of the WlFl network and restart the router. lt is recommended
to move the camera closer to the router.
B.The indicator light is blue, indicating that the camera's
network is normal. Please check if the mobile phone's
network is normal. lf the mobile phone network is not
smooth, the video stream may not be transmitted to the
mobile phone. lt is recommended that the mobile phone
switch to WlFl.
1O.Why do you have a circle in the middle when
watching the video screen, will it delay?
The circle indicates that the video is loading. The delay
indicates that the network is not smooth. Please check
whether the network connected to the camera and the
mobile phone is smooth. lt is recommended to bring the
camera closer to the WlFl router.
11 . How many people can Iog in at the same time?
An account can only be logged in simultaneously by one
mobile phone and one computer, and others can only watch
the camera through the sharing mechanism.
12.How many accounts can lshare with my family?
No limit
13.Why is the shared account operation function
not complete?
17

For s.ecurity reasons, the shared account permissions are
restricted, and some functions of the device cannot be
operated. lf other people need to operate the camera, they
can log in directly with the bound account.
14.Why does configuring a camera network with
other mobile phones fail?
A camera can only be bound by one account, and other
acc.ounts can only be viewed through the sharing mechanism.
lf other accounts need to reconfigure the cam jra, please
remove the device under the first account.
15.the camera was stolen, can you still see the video?
lf the sD card is recorded and the sD card is lost, the video
in the sD card cannot be viewed, but the App can view the
picture record of the mobile alarm push.
After-sales i nstru ctions :
1. Please refer to the specific product, the manual is for
reference only.
2. The product is updated in real time, if there is any
upgrade without prior notice.
3' The manual contains the basic functions of the product.
Please check the operation
4. lf there is any problem when using the camera, please
contact customer service.
5. We have tried our best to ensure the completeness and
accuracy of the contents of the manual, but some of the
data may still be deviated from the actual situation. ln the
deviation, if there are any doubts and disputes, please refer
to the final interpretation of the company.
6. lf you do not follow the instructions in ihe manual, any
loss caused by it will be borne by yourself.
18
Table of contents
Other TUYA Security Camera manuals