TV Star MID7108 User manual

MOBILE INTERNET DEVICE
MID7108
USER MANUAL
ENG

CONTENTS
Important Declaration ..................................................................................................................................3
Precautions ...................................................................................................................................................4
Main Functions ............................................................................................................................................. 5
Appearance & Button ...................................................................................................................................6
Quick Start.....................................................................................................................................................6
Internet .......................................................................................................................................................11
Multi media Entertainment........................................................................................................................13
Basic Settings .............................................................................................................................................. 15
Product Specifications.................................................................................................................................16

For all respected users:
Thank you for choosing TV Star Mobile Internet Device (MID)! Hope this device will
help your life become more creative!
IMPORTANT DECLARATION
1. Before using the Device, please read all information provided by us first so that you can use
this product correctly. Please make sure that you have read this manual carefully before use this
product.
2. Our company reserves the copyright of this manual, any random duplication or
interpretation of the full or partial manual is forbidden in commercial activities.
3. The information covered in this manual is all based on the latest information when
compiling the manual, and Devices are subject to change without notice for further improvement.
We are not committed to any mistakes or incidences caused by the manual. For additional product
information, visit the company’s web site www.tvstar.net.
4. When using this product, please make backup for the data by yourself and this company
will just be responsible for the product's hardware itself, and will not undertake any responsibility
for any loss or damage of personal data and information due to wrong operations of hardware.
WARNING: To reduce the risk of fire or electric shock, do not expose this apparatus to rain or
moisture.
WARNING: The batteries shall not be exposed to excessive heat such as direct sun light, fire, etc.
This symbol indicates that there are important operating and maintenance instructions in the
literature accompanying this unit.
This symbol indicates that dangerous voltages constituting a risk of electric shock are
present within this unit.

This symbol indicates that this product incorporates double insulation between hazardous
mains voltage and user accessible parts.
When servicing use only identical replacement parts.
This symbol on the product or in the instructions means that your electrical and
electronic equipment should be disposed at the end of life separately from your household waste.
There are separate
collection systems for recycling.
For more information, please contact the local authority or your retailer where you purchased the
product.
PRECAUTIONS
This manual includes important information on safety precautions and corrects usage of this
product. To prevent any accident, please make sure that you have read this manual carefully
before you use this product.
Do not keep this product in a place with a high temperature, humidity or too much dust.
Especially that does not place this product in a car with all windows closed in summer, and
keep out of direct sunlight.
Avoid dropping or shocking this product heavily and avoid shaking the TFT display violently,
otherwise, the TFT display may be damaged or cannot play correctly.
Please choose a suitable volume. Avoid excessively high volume when using a headset. If you
feel any ear noise, please decrease the volume or stop using.
Do not break the connection suddenly when this player is conducting formatting, uploading or
downloading operations, otherwise there may be program errors.
This company will not undertake any responsibility for any memory loss due to product
damage, repairing or other reasons.
Do not dissemble this product by yourself and do not clean the surface of this product with
alcohol, thinner or benzene.
Do not use this product in a place where the using of electronic device is prohibited, such as
on a plane.
Do not use this product while driving a car or walking on a street, otherwise traffic accident

may occur.
This Company reserves the right to make any improvement on this product. No further notice will
be provided on any variation on the specification and design of this product!
(This product has no water-proof function)
MAIN FUNCTIONS
7.0 inch, high-resolution super color, TFT touch-screen display, 800*480 pixel resolution;
Supporting HDMI 2160P 3D video (whole digital high-resolution multi-media jack) output,
let your high resolution TV fully create the effect of cinema.
Multiple network access methods Internet, Supporting Wifi, you can enjoy the internet life
everywhere.
Beside switch the horizontal and vertical screen, G-sensor can also enable installation
ofvarious software to extend the functions, such as turn the text, switch music and funny
games.
Support shaking function.
Adopting Google Android intelligent operating system, abundant software extent function,
you can make the personal space by yourself, if you can have in mind, and it can do.
Supporting installation and application of the APK application program, abundant software
can down and installation through the “application market” or internet.
Business and entertainment can deal with the product; abundant software such as e-mailword,
website browsing, news, Instant messaging, financial, blog, games online, video online, stock
market, weather report, mobile TV, maps, fun software, etc.
Supporting music formats including MP3; M4A; WMA; APE; FLAC; AAC; MID; WAV;
AMR; OGG etc., and supporting the show of LRC.
Supporting HD video format 2160P; 1080P; 720P; 480P; Supporting MKV; AVI; RM/RMVB;
WMV; 3GP; MOV; MP4; ASF; MPG; DAT; VOB; FLV video format play* (please use the
adequate player applications to ensure correct functioning with various video formats).
Supporting JPG; JPEG; BMP; PNG image browsing.
Supporting external TF Card (Micro SD), with capacity up to 128MB-32GB;
Free style set, Power-saving setting, adjustable brightness and user-defined sleep power-off

time;
APPEARANCE & BUTTON
Front View:
Functions Definitions
1. “ ”: Volume increase
2. “ ”:Volume increase”
3. “ ”: Long press the key to turn on, turn on, long press the key pop up the option of turn off;
turn on, short press the key to close the screen to avoid mistake operation.
4. Front Camera (Option function)
5. “ ”: return key, click the key return back to last operation menu or the last operation interface;
6. “ ”: Home key, Press the key return to the main interface in any interface, long press the key to
open the recently operation program application interface.
7. “ ”: Press the icon at the opening interface menu, the function is same as other interface “ ”
function; short press to unlock under lock status.
8. Headphone jack
9. HDMI jack
10. USB jack
11. DC jack
12. TF (memory card) slot
13. MIC - microphone
QUICK START
1-1. Power ON/OFF and unlock: At the status of power off, press “ ” 3-4 seconds to power on,

it will takes a little longer time to power on, please wait a moment. At the status of lock the LCD
screen, it will takes about 100 seconds enter into system desk,
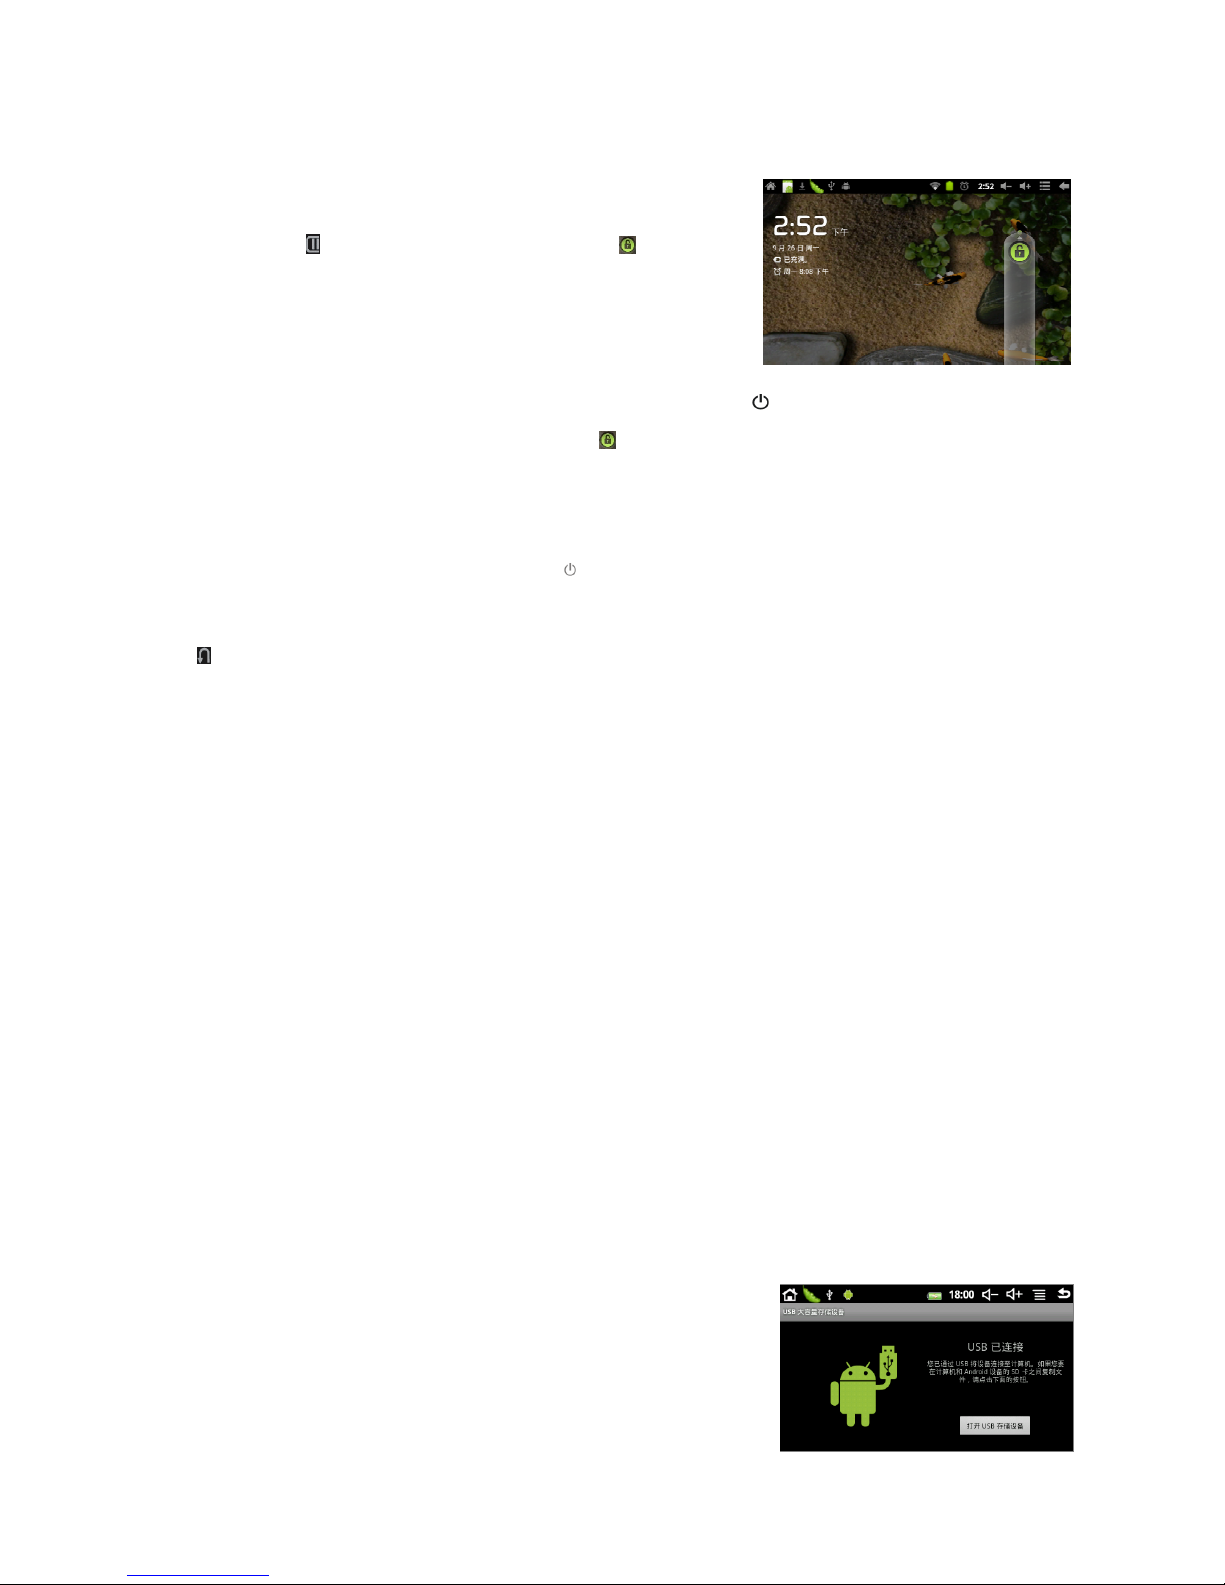
light click “ ” unlock or drag unlock icon , LCD will
automatic unlock, same as the following:
Saving energy and lock mode: At the process of using,
system will automatic enter into saving energy mode, press “ ” to wake the screen, the system
will enter into unlock mode in 1 second, slip unlock.
Notes: At the status of energy saving mode, the main operation won’t be stopped, only LCD
screen will be off, showing black screen. Music and films will continue running.
Power Off: At the status of using, press “ ”5 seconds, the screen will show power off icon, select
“Power off” option, confirm your choice and system will automatic power off. Light click
“ ”cancel power off operation.
Notes: At the status of low power, it will automatically power off. If the device is unable to start,
please check the status of battery and connect the charger.
1-2. If your device runs slow
After using the Device for a longer time, although the used program was shut down, the
background programs may be still working, what may cause the system run slow. Therefore, the
system may need some superior task manager to end the background applications, then it can keep
the device go smoothly. In order to make the device run smoother, we suggest to set some
program as superior task manager to end the unused apps.
1-3. Charge
Please use the approved charger, and correctly insert the jack of the charger to the DC socket.
Please check if the charge is full by checking the power status on the working Device.
In the process of charging, it is normal that the charger and the device will be heating to a higher
temperature to certain extent.
1-4. Computer Connection & File Transfer
The Device has high-speed USB interface, connect the
machine with the computer, the top status will show USB has
connected, this machine default charge mode, if it need connect
with the move disk, it need pull automatic running list at the top
status, it can be see “USB connected” option, click the option,

show USB status switch interface, according to the note icon on the right bottom “ Open USB
storage equipment”, switch into USB storage status, at this time the users can access the moveable
disk, at the status of USB storage, click the icon again to interrupt USB connect and recover
charge mode. USB storage mode system will limit the users use, it need access the local disk
reference application program, after interrupt USB storage
mode, it will recover into normal status, same as the following
picture:
1-5. The using of touch screen
There are various operation methods of the device, the user can touch the main screen, menu
and application programs.
1-5-1. Click
When you want to use screen keyboard input or select the application program in the main
interface, it can be realized just use the fingers to click.
1-5-2. Press
When you want to open one available option or shortcut and main program in the main
interface, just press the option is ok.
1-5-3. Quick swap or swap
Quick swap or swap with your finger to make the vertical or horizontal drag fast action.
1-5-4. Drag
Before dragging the icon, please use your finger to press, until arrived into the wanted location.
1-6. G-Sensor
The product has the function of G-sensor, after open this function in the settings, rotating the
device into 90 degree, the screen will perform horizontal and vertical screen switching
automatically.
Besides screen switching, it can support more function, such as such as turn the text, switch
music and games.
1-7. Main interface
Longer press power button to turn on, if the screen is locked
after turn off, short press Menu to unlock and enter into the

main interface as below, in this interface, you can view the status, change background, add
components, add program shortcuts, start program etc.
1-7-1. Status Bar: With a finger please slide down to read prompts in the status bar and to open
the notification bar.
1-7-2. Volume adjustment: use fingers to click the icon “-” “+”can adjust the volume of the
system, or use Vol + or - buttons
1-7-3. Menu: Dub click the menu icon or short press “ ” to open the menu interface.
●Add: Through this function to add various function icon, or window component, flies,
background, it can also delete the added icon in the main interface, press the delete icon all the
time, it will show the delete icon in the right, drag the icon to the delete icon directly.
●Manage application programs: checking all program of the device, and can uninstall the
installed program.
●Background: In this menu you can set your favorite image to be the main interface
background.
●Search: Enter into the website waiting status, enter the website to search.
●Notice: It can view the system notice in this interface.
●Setting: Click directly to enter into the setting menu
interface.
1-7-4. Shortcut key: Click the button to pop the function menu,
as follows:
This window show all function icons of the product, click any icon to enter into corresponding
function interface, the corresponding icon function are simple introduced as following:
APK program installer: it can install new program, manager new user in the APK program.
The operation method please refers to the introduction of 1-9 program install.
Browser: Click to enter into the on line interface, browser the website.
• Calendar: View the calendar and setting
• Calculator capabilities
• Clock: It can set clock.

• It can play music. Please refer to the operation of 3-1.music.
• Video player. Please refer to the operation of 3-2 video player.
• Camera. Please refer to the operation of 3-2 camera player.
Superior test manager: to manager and uninstall the program. When the machine run slowly,
this function can end some unused program to solve the problem of getting slow.
1-8. Additional Function
To arrange some window component in the main interface click “Menu” to select “add, then
select “Window component” as follows:
After the user has added the component to the main window,
the main window will show relevant component, such as, adds
“Analog clock” to the main interface, it will show the real time
analog clock as follows:
1-9. Program Installation
The device can install applications (APK) from the
electronic market or website.
To install the application from the sources other than Android Market, please choose the
permission to install the third party applications from the “Unknown” sources in the Settings /
Applications Menu.
1-9-2. Program (APK) Installation:
Please open the application “Android Market” and choose the suitable Application programs for
installation.
NOTE: This function can operate only with appropriate internet access!
1-9-3. Program (APK) uninstall
Click the Settings interface shortcut key, go to Application Menu, select “Manage applications”,
choose the applications you would like to uninstall from the list.
1-10. Text Entry
When you start program and select the text edit box to enter the text, the screen keyboard will
appear. The keyboard has the possibility for the different input language settings, please check the
Settings Menu.

INTERNET
2-1. Internet setting
Click the main interface shortcut, select “internet and
wireless connect”, enter the internet setting interface.
2-1-1. WIFI connect
Click the main Settings interface shortcut, select “Wireless
and Networks”, click “WIFI” and turn it on.
After WIFI opened, it will be automatically searching for the
wireless internet access,
Please check the Wi Fi Settings Menu further for details, choose the available network
and input the password, if the network is protected.
When the WIFI is active, it will add 1/4 power consumption of the device. If you are not
using the WIFI, please turn it off to extend the battery life.
2-2. Webpage browser
After setting the internet as described in chapter 2-1, you can use the browser to open the
webpages.
Click shortcut in the main interface, select “Browser”, enter
into browser interface, click “Menu” to pop up the browser
setting menu; click “Start”, pop up address bar, input the
URL .After opening the webpage, you can use fingers to slip up
and down, to scan and check other part of website. Use your
fingers to enlarge and zoom out the page.
2-2-1. Book mark manager
●Setting webpage mark
In the browsing interface, if you want to add the current address as the bookmark. Click
“Menu” to select “Bookmark”, then click “Add bookmark”. After add it well, click “Yes” to
confirm.
●Open bookmark
In the interface of browser, click “Menu” to select “Bookmark”, select you wanted bookmark

to open the webpage.
●Edit bookmark
In the interface of browser, click “Menu” to select “Bookmark”, click and press bookmark to
open the menu option. Select you wanted bookmark to open the webpage. Select “Edit bookmark”
to edit it., click “Yes” to confirm.
2-2-2. Open new window
●Open new browser window
In the browser window, click “Menu”, click “New window” to open the new browser window.
●Switch browser window
In the browser window, click “Menu” and “window” select you wanted window to open a new
browser window.
2-2-3. Change your browser homepage
In the browser window, click “Menu” and pop up browser setting menu, click “More” and then
click “Setting”, click “Setting homepage” in the setting interface, then entry URL, click “Yes” to
finish it.
2-2-4. Setting browser
In the browser window, click “Menu” and click “More”, then click “Setting” to set browser.
2-3. E-mail
You can receive and send the e-mail in e-mail program.
There are e-mail setting guide in the application program, it can
add POP3 OR IMAP e-mail account of normal WEB e-mail
service. (Such as Yahoo; Gmail; Hotmail and others).
Notes: Before setting e-mail guide, please ensure your
internet had connected and the setting time is ok.
2-3-1. E-mail setting guide
Click shortcut in the main interface, select icon of “E-mail”, appeared e-mail setting guide will
help you to set. Click the button “Next”, input you e-mail address and password of your e-mail
account. Click the button “Next” again; select your e-mail form, POP3 or IMAP. Click the button
“Next” again, to check whether the e-mail sending and receiving servicers can use or not, input
account name and sending e-mail name, click “Finish”. If e-mail is available, it will enter into

your inbox automatic.
2-3-2. Receiving and sending E-mail
Click shortcut in the main interface, Select icon “E-mail” to enter into inbox, it will refresh new
e-mail automatically, click it to read.
In the inbox, click “Menu” pop up the menu. Click “Write” for writing new e-mail interface.
Input the receiver’s e-mail subject and information in the receiver; If you want to add attachment,
click “Menu” to pop up the menu option, click “Add attachment” to select the attachment. Then
click “Send” to send the e-mail.
Notes: If you have one more account, and hope to send one e-mail of one account, click the
account name before click the main menu and writing the e-mail.
2-3-3. Delete e-mail account
You can delete the well installed POP3 OR IMAP e-mail account from your e-mail program.
Click shortcut in the main interface, select icon “e-mail” to enter into your inbox, click
“Menu”, then click “Account”, press the account you want to delete, pop up the menu list, click
“Delete account”, then click “Yes” to delete.
MULTI-MEDIA ENTERTAINMENT
3-1. Music
Select music icons, click to enter into music list, the bottom
icon are introduced as follows:
Icon: listing the music files by article classified;
Icon: listing files by album classification;
Icon: list all songs;
Icon: checking the newest adding music
Icon: Enter into playing music
Click music files to enter into music playing interface:
“ / ” Select previous/next songs, fast backwards/fast

forwards; click the progress bar directly to realize fast backward/fast forward.
“ / ” Play/Pause the music
“ ” Random playing
“ ” Repeat All
“ ” Repeat One
3-2.Video
Select video playing icon, click to enter into video files list,
long press video to pop up a delete menu in the video list, and
click delete to delete the video files. Select video to enter into
video playing interface:
“ / ” Volume Increase / Decrease
“ / ” Select last/next video, fast backwards/fast forwards in the current video; click
Progress Bar directly can realize fast backwards/fast forwards function.
“ / ” Play/Pause video;
“ ” Return to last menu;
3-2-1. HDMI output
When you use HDMI output, insert the end of the HDMI video line into the HDMI output port,
and insert the other end to the HDMI input port of TV set.
Note: when you use the HDMI function, do not insert and draw the HDMI line frequently.
3-3. Camera
Select camera icon, enter into view find mode.
3-3-1. Shooting photos
When operating Camera in photo mode, click “ ”to take the picture. The picture is
automatically taken as Jpg picture, and saved into DCIM/Camera menu, the files will named by
year month day hour minutes second.
3-3-2. Shooting videos
When operating Camera in video mode, click “ ” enter into record mode, click “ ” begin
record, after record, click “ ” save files, then back to view finder status. (If the record video time
has been set, it will be automatically saved when time elapsed) The video will be taken as 3gp
picture, and saved into DCIM/Camera menu, the files will named by year month day hour minutes

second.
Click “ ” back to main interface.
BASIC SETTINGS
Select “Settings” icon, click to enter into settings menu:
wireless and internet, volume and appearance, safety and
location, application program, privacy right, SD card and MID
saving, data and time, area and text, Touch screen calibration,
USB mode select, update media, about equipment.
4-1. Wireless and Internet setting: for setting the internet connections; the operation can be
refered to the details introduced in chapter 2-1. (Internet setings).
4-2. Sound: Media volume, notifications ring tones, Operating sound selection and screen lock
notification sound.
4-3. Display - orientation (automatic change orientation or not when Rotating MID), brightness
(Adjust the brightness of screen) and screen idle (the time setting of the screen idle).
4-4. Safety and location: for setting the internet ID and screen unlock icon and input the code
when using the internet.
4-5. Application program: for authorization to install the third party applications; managing and
deleting installed application programs.
4-6. Privacy right: Show “ID”, Recover my set and default factory set or not.
4-7. Storage settings: for mounting / unmounting SD card connecting and checking the relevant
saving space, uninstalling SD card and formatting SD card.
4-8. Language and keyboard: for selecting area (Languagearea select), input setings.
4-9. Date and time: for setting the data, time, time zone and favorite date format.
4-10. About equipment: check the status of the MID, the conditions of using the battery power,
software version number.
Chapter. Troubleshooting:
1. The MID turns on slowly at first time
●After MID starts, it needs install pre-install some application software at the first time, it may
take about 2-3 minutes, then turn on will be quicker.

2. Unable to connect WIFI or weak signal
●Ensure you have chosen the appropriate internet service.
●Ensure the correct user name and passport.
●Ensure MID has minimum distance between wireless access points, and ensure there is no
wall or other obstructions.
3. Can not copy files
-Please check the MID is connected to computer and recognized
-Please confirm the disk space is full or not
-Please confirm USB is broken or not
4. No sound in the Headset
Please make sure that the volume is not set as 0.
Check whether the headset is correctly connected, or the wire is broken.
5. The system has some trouble
●When you install some third application program, it may lead to un-normal work. You can
slip the “Power” to restart the program.
6. Unable to set E-mail or registration application program
●Ensure your network connection is active
●Ensure the e-mail setting method is correct.
●Ensure your system time is set to same as the local time.
●For better performance it is recommended to use the task Manager for ending some
background running programs and create more memory space.
PRODUCT SPECIFICATIONS
Dimension 194mm x 122mm x 13mm
Display 7.0 inch, high-resolution super color, TFT touch-
screen display, 800x480
pixel resolution;
PC connection High speed USB 2.0
CPU Boxchip A10 type CPU, 1Ghz
Memory DDRII 512M
Configuration
Internal Memory 8GB

TF card (External Micro
SD)
128MB 16GB (not included)
operating system Android 2.3
Access network Wifi IEEE802.11b/g
Built-in battery Lithium battery 3.7V; 3200mAh
Power
Power Adapter output DC 5.5V 2A
Max. headset output L 7mW R 7mW 32 ohm
MP3 bit rate 32K bps – 320K bps
WMA bit rate 16K bps –320K bps
Frequency response 20Hz to 20KHz +/-3dB
SNR =85dB
Audio parameter
Distortion degree <0.6%
Music formats MP3; M4A; WMA; APE; FLAC; AAC; MID; WAV; AMR; OG etc.
Video formats 720P MKV(H.264 HP); MKV; AVI; RM/RMVB; WMV; 3GP; MOV; MP4;
ASF; MPG; DAT; VOB; FLV
Image formats JPG; JPEG; BMP etc.
Environment
temperature
+5 to 40
0
C
OS language English; Chinese; etc.
OS supported Windows2K/XP/Vista/Windows7/Linux2.4/MAC OS 10.4
The manufacturer reserves the right to change the configuration, technical or any other parameters
without prior notice.
www.tvstar.eu
Other manuals for MID7108
1
Table of contents
Other TV Star Tablet manuals