1-YEAR LIMITED WARRANTY
The manufacturer warrants that your new Electric Stove is free from manufacturing and material defects for a period of one year from date of puchase, subject to the following
conditions and limitations.
1. Install and operate this Electric Stove in accordance with the installation and operating instructions furnished with the product at all times. Any unauthorized repair, alteration,
willful abuse, accident, or misuse of the product shall nullify this warranty.
2. This warranty is non-transferable, and is made to the original owner, provided that the purchase was made through an authorized supplier of the product.
3. The warranty is limited to the repair or replacement of part(s) found to be defective in material or workmanship, provided that such part(s) have been subjected to normal
conditions of use and service, after said defect is conrmed by the manufacturer’s inspection.
4. The manufacturer may, at its discretion, fully discharge all obligations with respect to this warranty by refunding the wholesale price of the defective part(s).
5. Any installation, labor, construction, transportation, or other related costs/expenses arising from defective part(s), repair, replacement, or othe wise of same, will not be covered
by this warranty, nor shall the manufacturer assume responsibility for same.
6. The owner/user assumes all other risks, if any, including the risk of any direct, indirect or consequential loss or damage arising out of the use, or inability to use the product,
except as provided by law.
7. All other warranties – expressed or implied –with respect to the product, its components and accessories, or any obligations/liabilities on the part of the manufacturer are
hereby expressly excluded.
8. The manufacturer neither assumes, nor authorizes any third party to assume on its behalf, any other liabilities with respect to the sale of the product.
9. The warranties as outlined within this document do not apply to non accessories used in conjunction with the installation of this product.
This warranty is void if:
a. The replace is subjected to prolonged periods of dampness or condensation.
b. Any unauthorized alteration, willful abuse, accident, or misuse of the product.
c. You do not have the original receipt of purchase.
IF WARRANTY SERVICE IS NEEDED
Contact the manufacturer by calling customer service department at 1-888-674-7517, 9 a.m.-5 p.m., EST, Monday-Friday.
Make sure you have your warranty, your sales receipt, location of purchase and the model/serial number of your product.
1. Read all instructions before using this appliance.
2. This appliance is hot when in use. To avoid burns, do not let bare skin touch hot
surfaces. If provided, use handles when moving this appliance. Keep combustible
materials, such as furniture, pillows, bedding, papers, clothes and curtains at
least 3 feet (0.9 m) from the front of this appliance. WARNING: In order to avoid
overheating, do not cover the heater. It cannot be used in a wardrobe.
3. CAUTION: Whenever the heater is left operating and unattended, extreme
caution is necessary if children or invalids are nearby.
4. The appliance is not to be used by children or persons with reduced physical,
sensory or mental capabilities, or lack of experience and knowledge, unless they
have been given supervision or instruction.
5. Children being supervised not to play with the appliance.
6. If possible, always unplug this appliance when not in use.
7. Do not operate any heater with a damaged cord or plug or after the appliance
malfunctions, or if it has been dropped or damaged in any manner.
8. If the supply cord is damaged, it must be replaced by the manufacturer, its service
agent or similarly qualied persons in order to avoid a hazard.
9. Any repairs to this replace should be carried out by a qualied service person.
10. Under no circumstance should this replace be modied. Parts having to be
removed for servicing must be replaced prior to operating this replace again.
11. Do not use outdoors.
12. This heater is not intended for use in bathrooms, laundry areas and similar
indoor locations. Never locate this appliance where it may fall into a bathtub or
other water container.
13. Do not run cord under carpeting. Do not cover cord with throw rugs, runners or the
like. Arrange cord away from trafc areas and where it will not be tripped over.
14. To disconnect this appliance, turn controls to the off position, then remove plug
from outlet.
15. Connect to properly grounded outlets only.
16. This appliance, when installed, must be electrically grounded in accordance with
local codes or, in the absence of local codes, with the current CSA C22.1
Canadian Electrical Code or for U.S.A. installations, follow local codes and the
National Electrical Code, ANSI/NFPA NO.70.
17. There is a thermostat limiter inside the heater. When the inner temperature
over-heats or abnormal heating occurs, the thermostat protective device would
cut off power supply to prevent damage or risk of re.
18. The heaters must not be located immediately below a socket-outlet.
19. Do not insert or allow foreign objects to enter any ventilation or exhaust
opening as this may cause an electric shock or re, or damage the appliance.
20. To prevent a possible re, do not block air intakes or exhaust in any manner.
Do not use on soft surfaces, like a bed, where opening may become blocked.
21. This appliance has hot and arcing or sparking parts inside. Do not use it in areas
where gasoline, paint or ammable liquids are used or stored. This replace
should not be used as a drying rack for clothing. Christmas stockings or
decorations should not be hung in the area of it.
22. Use this appliance only as described in the manual. Any other use not recommended
by the manufacturer may cause re, electric shock or injury to persons.
23. Always plug heaters directly into a wall outlet/receptacle. Never use with an
extension cord or relocatable power tap (outlet/ power strip).
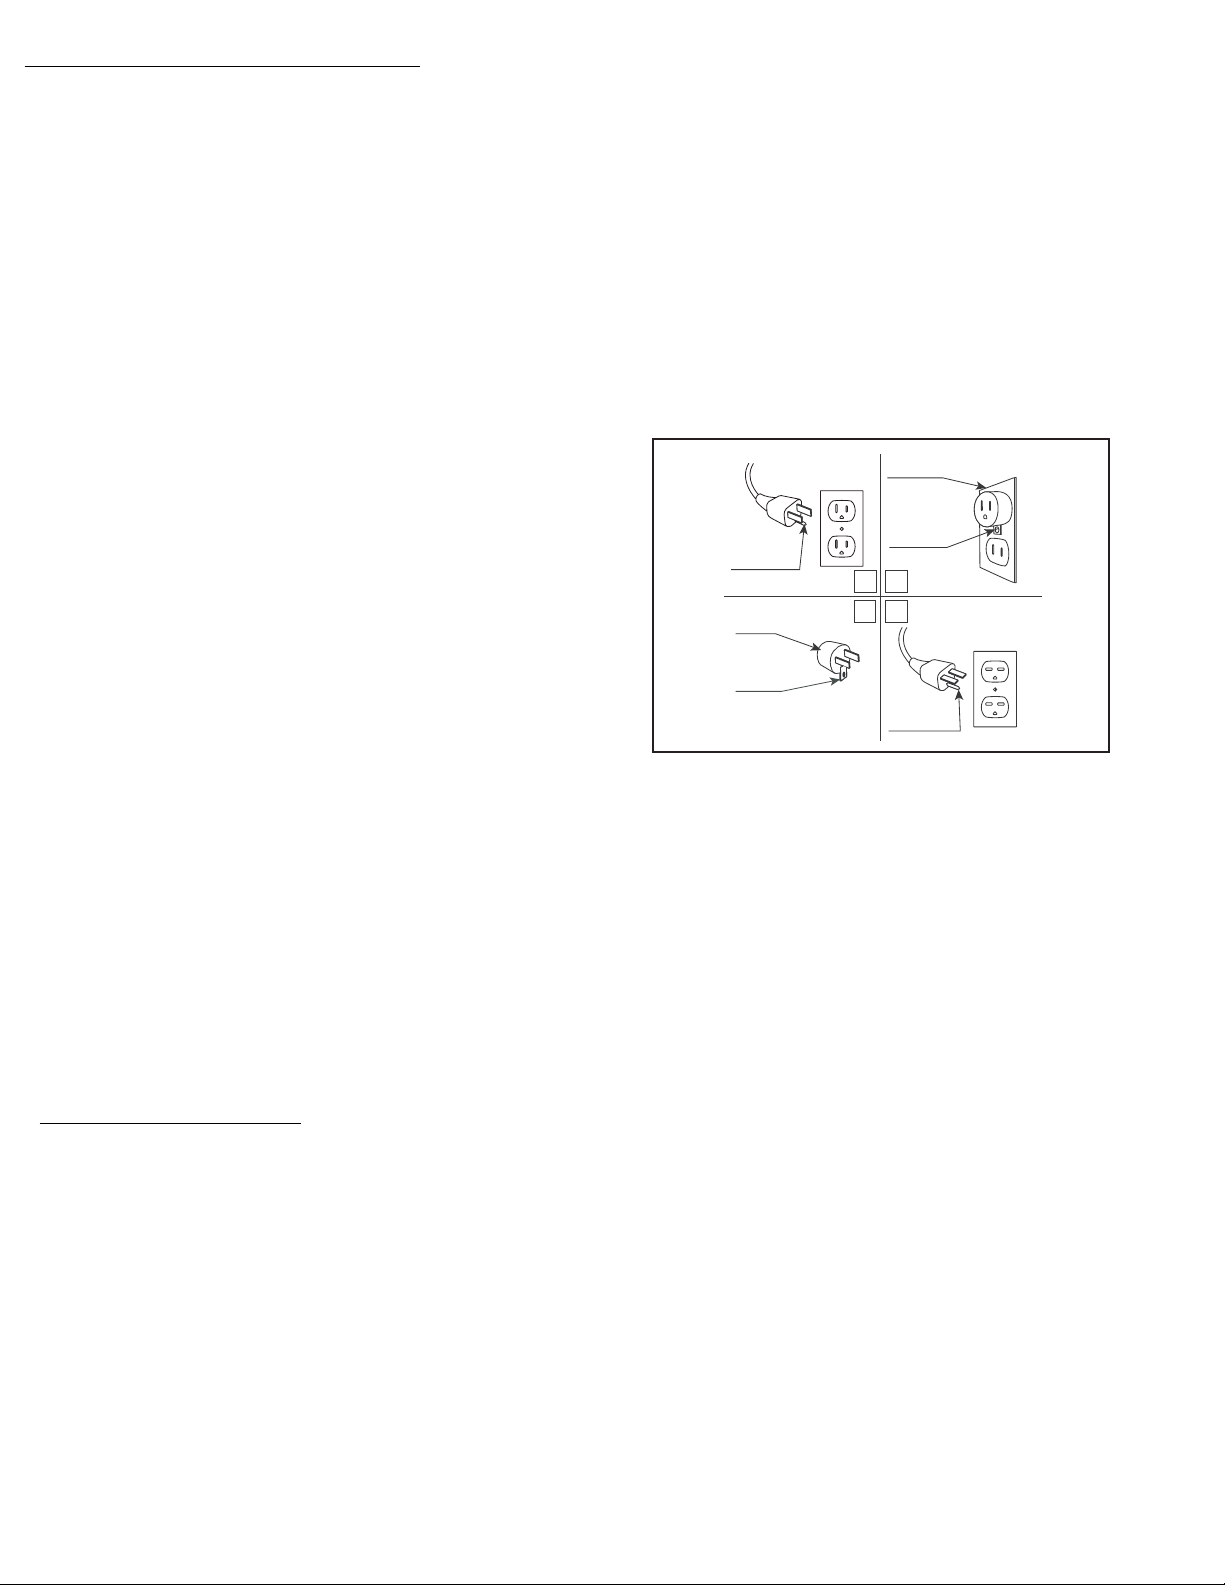
24. See directions in Figure 1. This heater is for use on 120 volts. The cord has a
plug as shown in gure 1. See Figure 1 for grounding instruction. An adapter as
shown at C is available for connecting three-blade grounding type plugs to
two-slot receptacles. The green grounding plug extending from the adapter must
be connected to a permanent ground such as a properly grounded outlet box.
The adapter should not be used if a three-slot grounded receptacle is available.
IMPORTANT INSTRUCTIONS
When using electrical appliances, basic precautions should always be followed to reduce the risk of re, electrical shock, and injury to persons including the following:
Battery Replacement
Note: Batteries should be removed if the product is to be left unused for a long time.
1. The battery compartment is located on the back end of the remote control.
2. Press and slide the battery door open and remove the old battery.
3. Insert 2 AAA batteries, checking that the + and - sides of the battery match
inside the battery compartment.
4. Replace the battery compartment door.
Note: Do not mix old and new batteries. Do not mix alkaline, standard (carbon zinc),
or rechargeable (nicad, nimh, etc) batteries.
DISPOSAL OF USED BATTERIES
Battery may contain hazardous substances which could endanger the
enviroment and human health. Used batteries shall not be treated as municipal waste,
but left at the appropriate collection point for recycling.
For more information about collection and recycling of used batteries,
please contact your local municipality or waste disposal service.
NOTE: This equipment has been tested and found to comply with the limits for Class B
digital device, pursuant to part 15 of the FCC Rules. These limits are designed to provide
reasonable protection against harmful interference in a residential installation. This equipment
generates, uses, and can radiate radio frequency energy and, if not installed and used in
accordancewith the instructions, may cause harmful interference to radio or television reception,
which can be determined by turning the equipment off and on, the user is
encouraged to try to correct the interference by one or more of the following measures:
• Reorient or relocate the receiving antenna.
• Increase the separation between the equipment and the receiver.
• Connect the equipment into an outlet on a circuit different from that to which the receiver is connected.
• Consult the dealer or an experienced radio/TV technician for help.
This device complies with Part 15 of the FCC Rules.
Operation is subject to the following two conditions:
(1) This device may not cause harmful interference, and
(2) this device must accept any interference received, including interference that may cause
undesired operation. Modications not approved by the party responsible for compliance could
void user’s authority to operate the equipment.
B
A
C D
Grounding Pin
Cover Of Grounded
Outlet Box
Metal
Screws
Adapter
Grounding
Means
Grounding
Pin
SAVE THESE
INSTRUCTIONS


