Twin-Star International Duraflame DFI-470-04 User manual

www.tsicustomerservice.comA621
1
www.tsicustomerservice.com
Twin-Star International, Inc; Delray Beach, FL 33445
Made in China • Fabricado en China • Impreso en China
1-800-318-9373
MODELS/ MODELOS/ MODÈLES :
DFI-470-04
Español P.10
Français P.18

www.tsicustomerservice.comA621
2
IMPORTANT INSTRUCTIONS
SAVE THESE INSTRUCTIONS
When using electrical appliances, basic precautions should always be followed to reduce the risk of re, electrical shock, and injury
to persons including the following:
1. Read all instructions before using this appliance.
2. is appliance is hot when in use. To avoid burns, do not let bare skin touch hot surfaces. If provided, use handles when moving this
appliance. Keep combustible materials, such as furniture, pillows, bedding, papers, clothes and curtains at least 3 feet (0.9 m) from the
front of this appliance. WARNING: In order to avoid overheating, do not cover the heater.
3. CAUTION: Never leave the heater operating unattended. Extreme caution is necessary if unsupervised children or invalids are nearby.
4. e appliance is not to be used by children or persons with reduced physical, sensory or mental capabilities, or lack of experience and
knowledge, unless they have been given supervision or instruction.
5. Always unplug this appliance when not in use.
6. Do not operate any heater with a damaged cord or plug or aer the appliance malfunctions, or if it has been dropped or damaged in
any manner.
7. If the supply cord is damaged, it must be replaced by the manufacturer, its service agent or similarly qualied persons in order to avoid
a hazard.
8. Do not use outdoors.
9. is heater is not intended for use in bathrooms, laundry areas and similar indoor locations. Never locate this appliance where it may
fall into a bathtub or other water container.
10. Do not run cord under carpeting. Do not cover cord with throw rugs, runners or the like. Arrange cord away from trac areas and
where it will not be tripped over.
11. To disconnect this appliance, turn controls to the o position, then remove plug from outlet.
12. Do not insert or allow foreign objects to enter any ventilation or exhaust opening as this may cause an electric shock or re, or damage
the appliance.
13. To prevent a possible re, do not block air intakes or exhaust in any manner. Do not use on so surfaces, like a bed, where opening
may become blocked.
14.is appliance has hot and arcing or sparking parts inside. Do not use it in areas where gasoline, paint or ammable liquids are used
or stored. is stove should not be used as a drying rack for clothing. Christmas stockings or decorations should not be hung
in the area of it.
15.Use this appliance only as described in the manual. Any other use not recommended by the manufacturer may cause re, electric shock
or injury to persons.
16. is product is equipped with a polarized plug (one blade is wider than the other blade). To reduce the risk of electrical shock, this plug
will t into a polarized outlet only one way. is is a safety feature. If you are unable to insert the plug into the electrical outlet, try
reversing the plug. If the plug still does not t, contact a qualied electrician.

www.tsicustomerservice.comA621
3
GETTING STARTED
1. e serial number is located on the back of the stove, the serial number is necessary for product
warranty registration and customer service.
2. Go to www.tsicustomerservice.com for product warranty registration. For registration use the MODEL
NUMBER: DFI-470-04. If you are unable to complete registration save your proof of purchase for warranty
purposes.
PRODUCT SPECIFICATIONS
VOLTAGE 120VAC, 60 Hz
AMPS 12.5 Amps
WATTS (max.) 1500 Watts
SEE OWNERS MANUAL FOR SERVICE DETAILS
WARNING: DISCONNECT POWER BEFORE CLEANING OR SERVICING
CAUTION:
HIGH TEMPERATURE, RISK OF FIRE, KEEP ELECTRICAL CORDS, DRAPERY,
FURNISHINGS AND OTHER COMBUSTIBLES AT LEAST3 FEET(0.9M) FROM
THE FRONT OF THE HEATER AND AWAY FROM THE SIDE AND THE REAR.
CAUTION:RISK OF ELECTRICAL SHOCK
DO NOT OPEN NO USER
SERVICEABLE PARTS INSIDE
CUIDADO: EL RIESGO DE CHOQUE ELÉCTRICO,NO ABRA.
NO HAY PARTES DE SERVICIO PARA ELUSUARIO ENELINTERIOR.
(0.9M) DEL FRENTE DEL CALENTADOR Y LEIOS DE LA PARTE POSTERIOR.
PAÑERÍA,MOOBILIARIO Y OOTROS COMBUSTIBLES POR LO MENOS 3 POES
CUIDADO:
LA TEMPERATURA,RIESGO DE INCENDIO,GUARDA CORDONESÉCRICOS,
AVISO:
DESCONECTE LA ENERGÍA ANTES DE APOYARSE O REPAARA.
VERA A DUENOS MAÑUALES PARA LOS DETALLES DEL
SERVICIO
VOIR LE MANUEL DU PROPRIÉTAIRE POUR LES DÉTAILS
SUR L’ENTRETIENET LA RÉPARATION
DÉBRANCHEZ L’APPAREIL AVANT DE NETTOYER OU
TEMPÉRATURE ÉLEVÉE,RISQUE DEFEU,GARDEZ LES
AVERTISSEMENT:
AVERTISSEMENT:
TIBLES À AU MOINS 0.9M(3 PIEDS) DE LA PARTIE FRONTALE DE L’APAREIL DE
RISQUE DE CHOC ÉLECTRIQUE NE PAS OUVRIR AUCUN
ENTRETIEN DES PIÈCESINTÉRIEURES PAR L’UTILISATEUR
AVERTISSEMENT:
EFFECTUER L’ENTRETIEN OULA RÉPARATION.
CORDONS ÉLECTRIQUES,DRAPERIES,MEUBLES ET AUTRES MATIÈRES COMBU-
CHAUFFAGE ET ÉLOIGNÉS DES CÔTÉS.
(+1) 800-318-9373
www.tsicustomerservice.com
SN #:AC-XXXXX-X
Date Code/ Code de Date/ Código Fecha:
ELECTRIC FIREPLACE/FOYER
ÉLECTRIQUE/INSERTO PARA CHIMENEA
MODEL / MODÈLE / MODELO
Twin-Star International, Inc.
www.twinstarhome.com
Made In China
Fabriqué en Chine
Fabricado en China
DFI-470-04
VOLTS WATTS/VATIOS H
Z
120V~ 1500 60
220391
Back of the Stove
Serial Number
Model Number

www.tsicustomerservice.comA621
4
INSTALLATION INSTRUCTIONS
Tools Required for Assembly
123
Align the mounting tab into
the base.
Slide the leg downward to lock
in place. When locked in position
the screw holes from step 3 will be
aligned.
Fasten the leg to the base using the
included screws, 3 per leg.
CARE AND MAINTENANCE
• Clean the trim using a so cloth, slightly dampened with citrus oil based product and bu with a clean so cloth.
• DO NOT use brass polish or household cleaners as these products will damage the metal trim. Citrus oil based
products can be obtained at supermarkets or hardware stores.
• WARNING: Electrical outlet wiring must comply with local building codes and other applicable regulations to
reduce the risk of re, electrical shock and injury to persons.
• Warning: Disconnect power before attempting any maintenance or cleaning to reduce the risk of re, electrical
shock or personal injury.
2. Leg Assembly
1. Handle Installation
12
Attach the handle to the mounting hole on the
outside of the door.
Insert the screw (0.16 in. x 0.4 in.) from inside of
door and tighten the screw until the handle can not
be turned.
Phillips Head Screwdriver

www.tsicustomerservice.comA621
5
• Clean the trim using a so cloth, slightly dampened with citrus oil based product and bu with a clean so cloth.
• DO NOT use brass polish or household cleaners as these products will damage the metal trim. Citrus oil based
products can be obtained at supermarkets or hardware stores.
• WARNING: Electrical outlet wiring must comply with local building codes and other applicable regulations to
reduce the risk of re, electrical shock and injury to persons.
• Warning: Disconnect power before attempting any maintenance or cleaning to reduce the risk of re, electrical
shock or personal injury.
OPERATION INSTRUCTIONS
Control Panel Location
Control Panel
Thermostat Dial
1. Set the thermostat knob
to turning clockwise to
allow the heater to warm
up the room.
2. When the desired
comfort level is reached,
lower the thermostat
knob counter clockwise
until the unit shuts o.
3. e heater will now
automatically maintain
the desired comfort level
by cycling the heater
on and o.
Note: Day to day changes
in room or outdoor
temperatures can eect the
thermostat. Readjust the
thermostat if needed.
Heater Switch
1. e 1000W switch will turn on the
heater to the low heat setting and
will also turn the heater o.
2. Turning on both the 1000W and
1500W switches will turn on the
high heat setting.
High Heat--1000W(ON)+1500W(ON)
Low Heat--1000W(ON)+1500W(OFF)
Power Switch
1. is switch turns
on and o the
main power.
2. e switch will be
illuminated when
the heater is on.
3. is switch needs
to be on in order
to use the heater.
Flame Brightness
Dimmer
1. Turning the dial
clockwise will
increase the
brightness of the
ame eect.
2. Turning the dial
counter clockwise
will decrease the
brightness of the
ame eect.

www.tsicustomerservice.comA621
6
BULB REPLACEMENT
Clear, 40-watt, E12 socket base light bulb
(candelabra base, B bulb).
1. Unplug the stove. Remove the screws holding the stove back panel in place. Remove the back
panel to access the light bulb.
2. Unscrew 3 screws holding the bae and remove it carefully.
3. Remove light bulb and replace. Reverse steps 2 and 1, re-install bae and stove back panel into
position; be careful to not overtighten the screws.
REMOVE
Screws
Bulb
Bae
Tools Required for Assembly
Phillips Head Screwdriver
1
3
2

www.tsicustomerservice.comA621
7
Problem Root Cause Corrective Action
1. No power, switches
do not light up.
1. Power cord was not plugged into
the outlet.
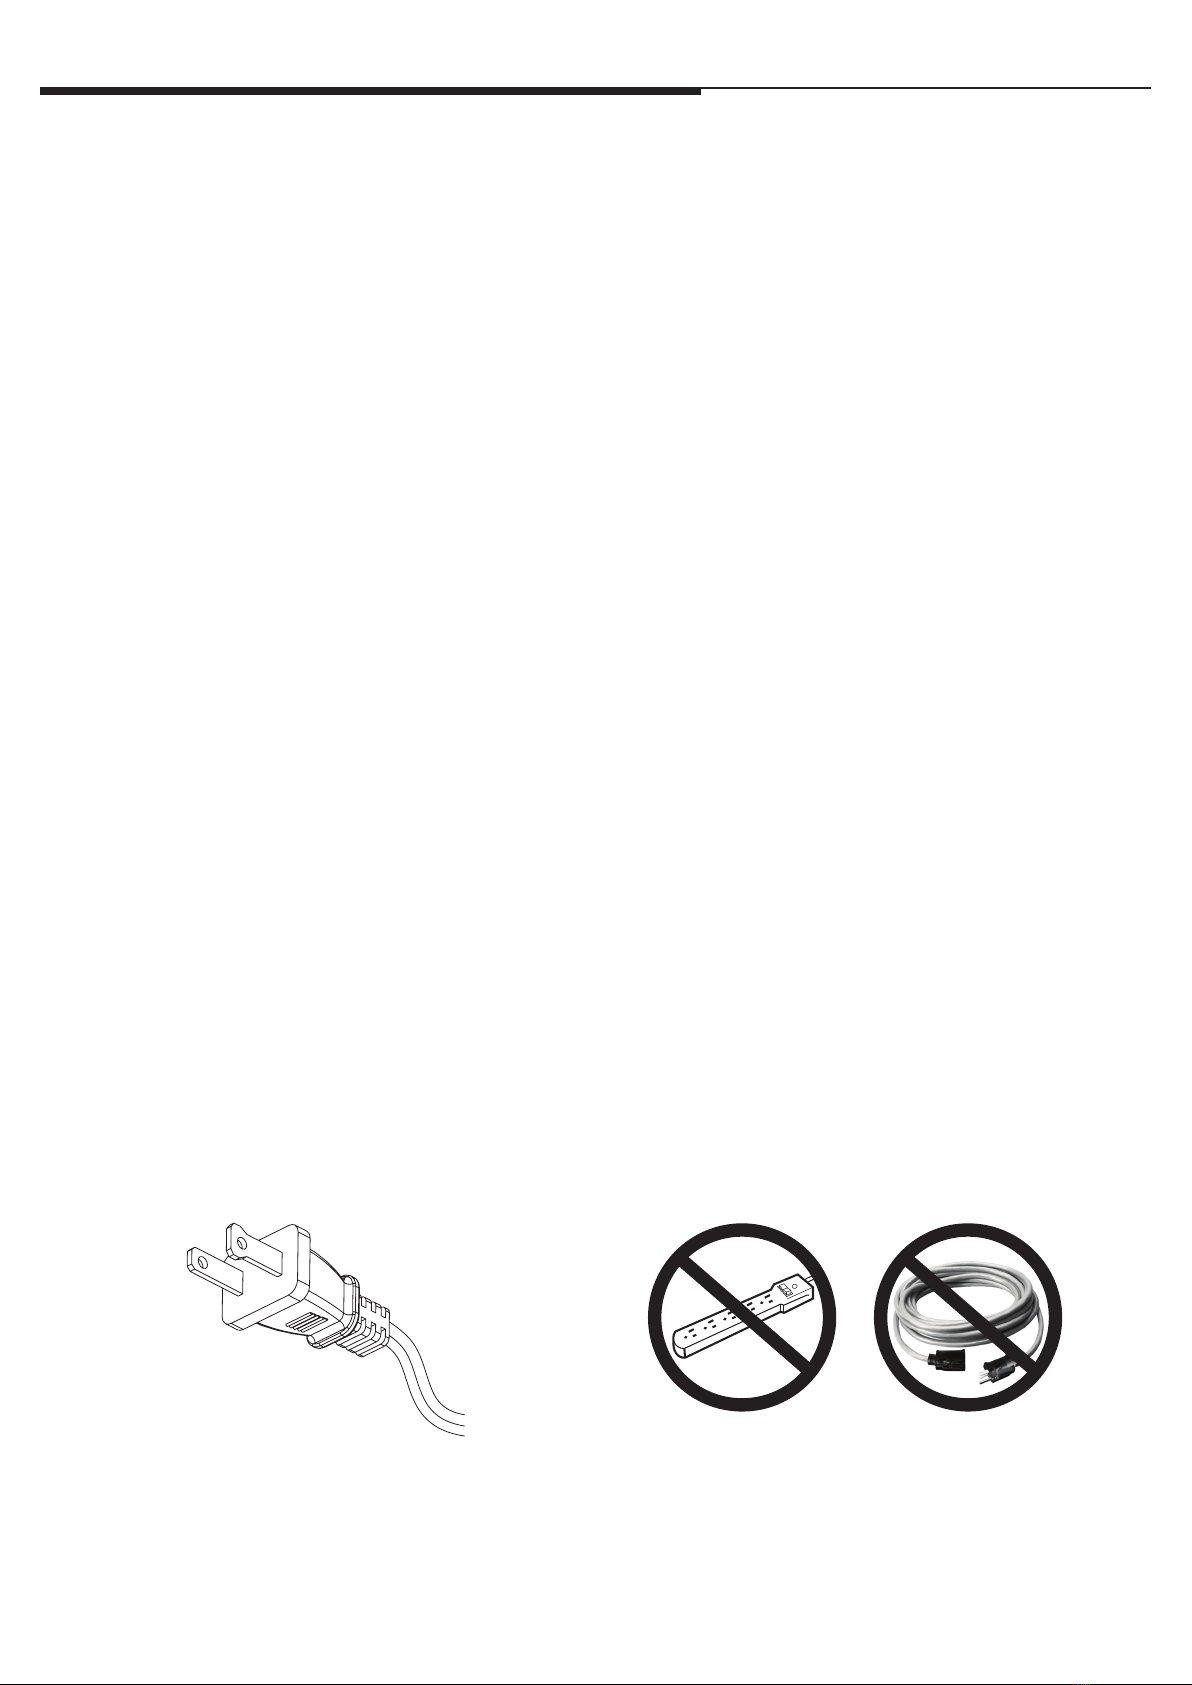
1. Check that unit is plugged directly into a standard
120 volt outlet.
2. Stove does not
turn on manually.
2a. No incoming power from the
electrical wall socket or switches.
2b. Improper operation.
2c. Defective switch.
2a. Check circuit breakers and move unit to another outlet.
2b. Manually press main power button from front of unit.
2c. Replace power switch.
3. Flames are not
moving.
3a. Defective ame generator drive
motor.
3b. Spinner detached from
the motor.
3a. Replace ame generator drive motor.
3b. Remove the back panel and check to see if “spinner” is correctly
mounted to the motor.
4. Flames are not
visible.
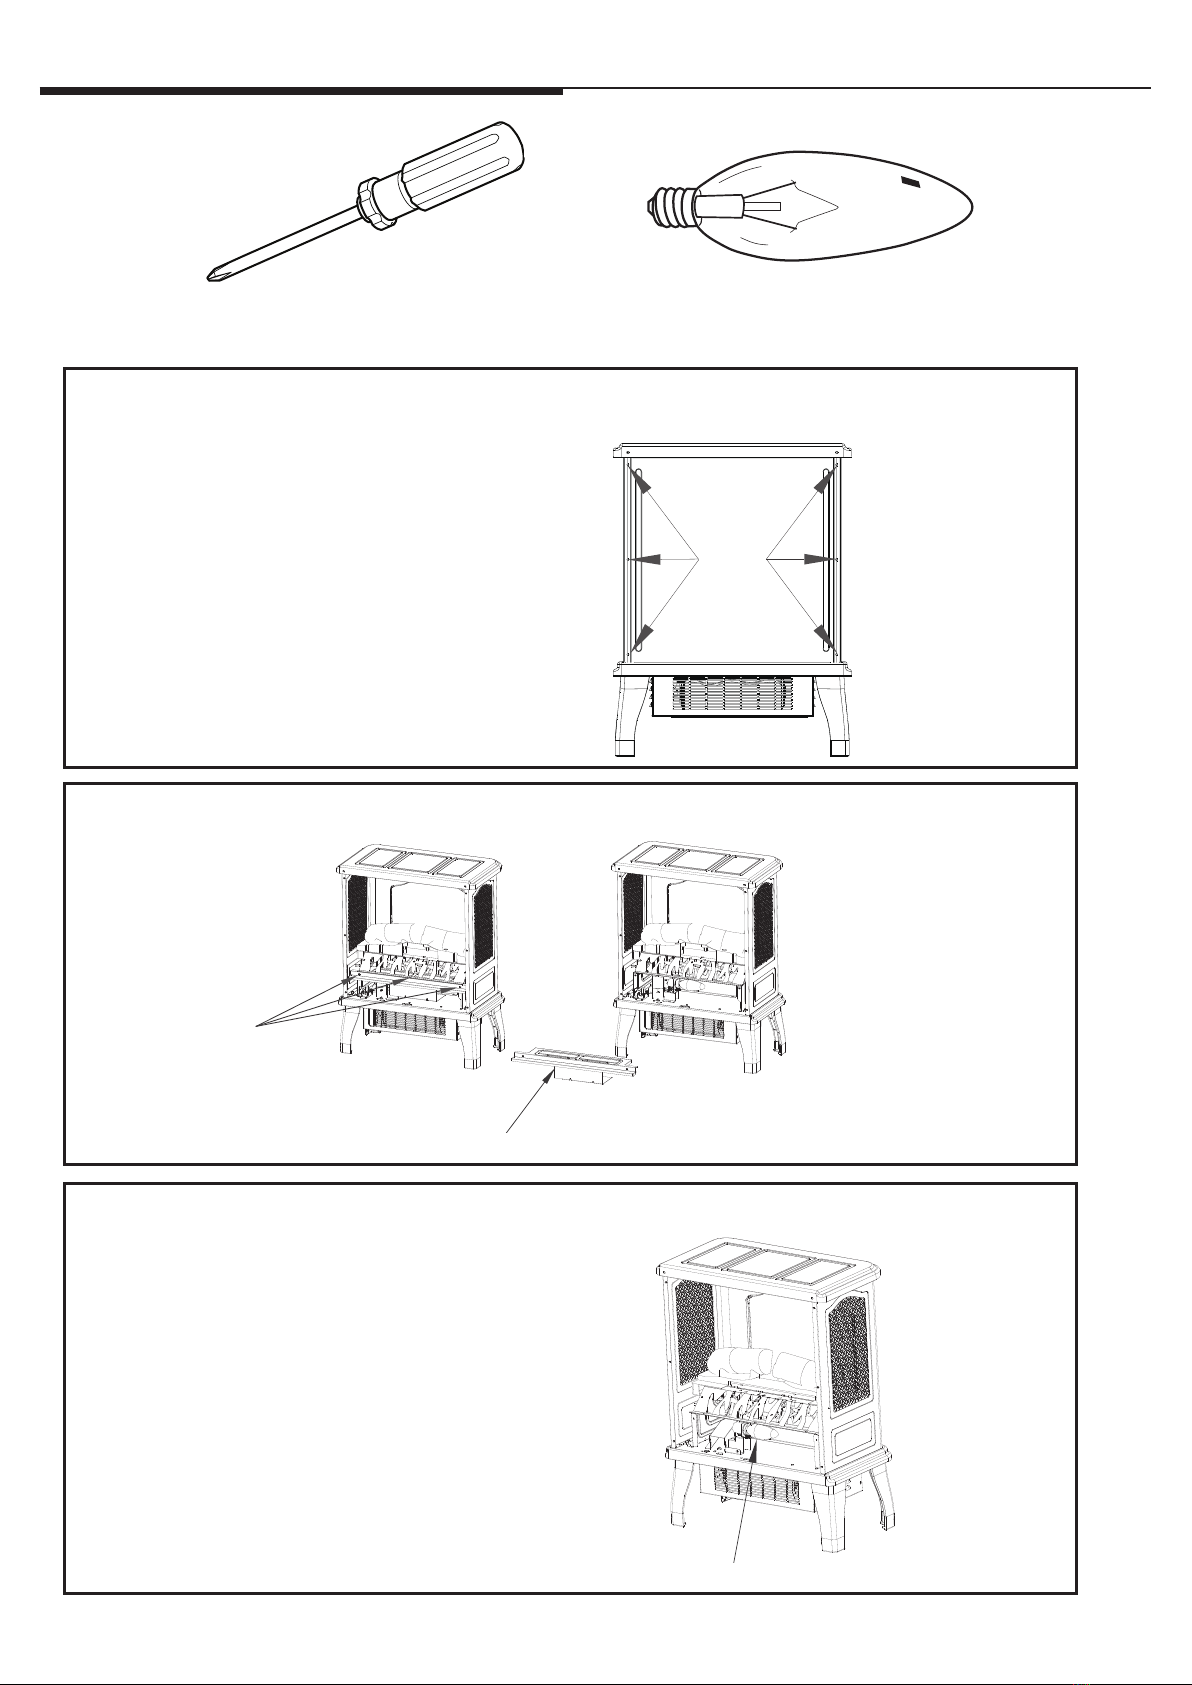
4. Burnt out light bulb. 4. Replace 40 watt candelabra bulb.
5. Flames are not
bright.
5a. Normal operation.
5b. Defective dimmer switch.
5a. Turn brightness dimmer knob until desired brightness is achieved.
5b. Replace dimmer switch.
6. No ames eect and
heater is turning on.
6a. Defective Flame Circuit Aseembly.
6b. Defective Power Circuit Aseembly.
6a. Replace Flame Circuit Aseembly.
6b. Replace Power Circuit Aseembly.
7. Heater is not
turning o.
7. Defective ermostat. 7. Replace ermostat.
8. Heater is not
turning on.
8a. Improper operation.
8b. Defective switch.
8c. Defective heater blower motor.
8a. Manually press main power button on front of unit.
8b. Replace heater switch.
8c. Replace heater/blower Assembly.
9. Not producing
enough heat.
9a. power strip/surge protector/
extension cord being used.
9b. Location of unit.
9a. Plug unit directly into the wall.
9b. Make sure unit is located on an interior wall.
10. Unit blows cool or
cold air.
10. Defective heater blower motor. 10. Replace heater/blower Assembly.
11. Noise with
heater on.
11a. Dirty heater blower motor.
11b. Defective heater blower motor.
11a. Gently vacuum heater blower vents.
11b. Replace heater/blower Assembly.
12. Noise with ames
on and heater o.
12a. Defective ame generator
drive motor.
12b. Dented back panel.
12c. Warped spinner sha.
12a. Replace ame generator drive motor.
12b. Refer to TSI customer service.
12c. Refer to TSI customer service.
13. Power cord gets
warm.
13. Normal operation. 13. Check your heater cord and plug connections. Faulty wall outlet
connections or loose plugs can cause the outlet or plug to overheat.
Be sure the plug ts tight in the outlet. Heaters draw more current
than small appliances, overheating of the outlet may occur even if
it has not occurred with the use of other appliances. During use
check frequently to determine if your plug outlet or faceplate
is HOT! If so, discontinue use of the heater and have a qualied
electrician check and/or replace the faulty outlet(s).
14. Is it safe to place
unit on carpet?
14. Product Inquiry. 14. It is safe to place unit on carpet but make sure any ammable
items are at least 3 feet away from front and sides of the unit.
15. How many square
feet will my unit
warm up?
15. Product Inquiry. 15. Provides supplemental heat up to 1000 square feet.
16. Heater doesn’t work,
but Power and
Heaters witches
are in the “ON”
position and
thermostat is set on
the highest level.
16. e thermal protector has
tripped.
16. Turn all switches to the “OFF” position and unplug the unit from the wall
outlet for 5 minutes. Aer 5 minutes, plug the unit back into wall outlet
and operate as normal.
TROUBLESHOOTING GUIDE

www.tsicustomerservice.comA621 8
REPLACEMENT PARTS
Part Part Name Part Number
1Power Switch P06-S
2ermostat P03-S
3ermostat knob P05-S
4Heater Switch P06-S
5Dimmer Knob P04-S
6 Dimmer Switch P07-S
7 Legs Y16-S181-LG
8Logset Y17-S218-LOG
9 Heater/Blower Assembly Y16-S181-P01
10 Flame Generator Drive Motor P10-Q-S
11 Flame Circuit Assembly Y17-S218-P40A
12 Power Circuit Assembly Y17-S218-P40PA
34156
7
8
11
12
10
9
2

www.tsicustomerservice.comA621 9
1-YEAR LIMITED WARRANTY
e manufacturer warrants that your new Electric Stove is free from manufacturing and material defects for a period of one
year from date of puchase, subject to the following conditions and limitations.
1. Install and operate this appliance in accordance with the installation and operating instructions furnished with the
product at all times. Any unauthorized repair, alteration, willful abuse, accident, or misuse of the product shall nullify
this warranty.
2. is warranty is non-transferable, and is made to the original owner, provided that the purchase was made through
an authorized supplier of the product.
3. e warranty is limited to the repair or replacement of part(s) found to be defective in material or workmanship,
provided that such part(s) have been subjected to normal conditions of use and service, aer said defect is conrmed
by the manufacturer’s inspection.
4. e manufacturer may, at its discretion, fully discharge all obligations with respect to this warranty by refunding
the wholesale price of the defective part(s).
5. Any installation, labor, construction, transportation, or other related costs/expenses arising from defective part(s),
repair, replacement, or otherwise of same, will not be covered by this warranty, nor shall the manufacturer assume
responsibility for same.
6. e owner/user assumes all other risks, if any, including the risk of any direct, indirect or consequential loss or
damage arising out of the use, or inability to use the product,except as provided by law.
7. All other warranties – expressed or implied –with respect to the product, its components and accessories, or any
obligations/liabilities on the part of the manufacturer are hereby expressly excluded.
8. e manufacturer neither assumes, nor authorizes any third party to assume on its behalf, any other liabilities with
respect to the sale of the product.
9. e warranties as outlined within this document do not apply to non accessories used in conjunction with the
installation of this product.
10.is warranty gives you specic legal rights, and you may also have other rights which vary from state to state.
is warranty is void if:
a. e stove subjected to prolonged periods of dampness or condensation.
b. Any unauthorized alteration, willful abuse, accident, or misuse of the product.
c. You do not have the original receipt of purchase.
CUSTOMER SERVICE
www.tsicustomerservice.com
For Customer Service Call 1-800-318-9373
Questions? Our message centers are available 7 days a week 24 hours a day at our toll-free help line. Our
Consumer Service department is available Monday – Friday 8:30 am – 5:30 pm EST. We can help you with
assembly and if necessary, replace damaged/missing parts.
IMPORTANT:
Before contacting Customer Service please have this information available:
• Serial Number
• Model Number
• Sales Receipt or Proof of Purchase

www.tsicustomerservice.comA621 10
1. Lea todas las instrucciones antes de usar este aparato.
2. Este calentador se calienta cuando está en uso. Para evitar quemaduras, no permita que la piel sin protección entre en contacto con
supercies calientes. Si están incluidas, utilice las manijas para mover este aparato. Mantenga los materiales inamables, como
muebles, almohadas, ropa de cama, papeles, prendas de vestir y cortinas, a un mínimo de 3 pies (0.9 m) de distancia de la parte
frontal del calentador y manténgalos alejados de los laterales y la parte posterior.
ADVERTENCIA: Para evitar el sobrecalentamiento, no cubra el calentador.
3. PRECAUCIÓN: Nunca deje la estufa desatendida operativo. Ponga extremo cuidado cuando los niños o personas inválidas sin super
visión están cerca.
4. El aparato no debe ser utilizado por niños o personas con capacidades mentales, sensoriales o físicas disminuidas o con falta de
experiencia o conocimiento, a menos que sean supervisados o que hayan recibido instrucciones.
5. Siempre desenchufe este aparato cuando no esté en uso.
6. No opere ningún calentador con un cable o enchufe dañado o luego de que éste funcione incorrectamente, o si se cae o se daña de
cualquier manera.
7. Si el cable de alimentación está dañado, el fabricante, su empresa de servicio o alguien de calicación similar deben reemplazarlo
para evitar peligros.
8. No lo use en exteriores.
9. Este calentador no se debe usar en el baño, lavadero y en espacios húmedos similares interiores. Nunca coloque este calentador
donde se pueda caer dentro de una bañera u otro contenedor de agua.
10. No coloque el cable debajo de una alfombra. No cubra el cable con alfombras, tapetes o similares. Coloque el cable lejos de zonas de
tránsito en donde nadie se pueda tropezar y caer.
11. Para desconectar este electrodoméstico, gire los controles a la posición de apagado y luego retire el enchufe del tomacorriente.
12. No introduzca objetos extraños ni permita que entren en las aberturas de ventilación o escape, ya que pueden provocar descargas
eléctricas, incendios o daños en el electrodoméstico.
13. Para evitar incendios, no bloquee las entradas ni salidas de aire de ninguna manera. No use sobre supercies blandas, como una
cama, donde las aberturas se puedan bloquear.
14. Este electrodoméstico tiene en su interior piezas calientes y piezas que forman arcos eléctricos o que echan chispas. No lo use en
áreas donde se use o almacene gasolina, pintura o líquidos inamables. Esta chimenea no se debe usar como una rejilla para secar
ropa. No cuelgue medias navideñas u otras decoraciones sobre o cerca de este producto.
15. Utilice este electrodoméstico sólo como se describe en este manual. Cualquier otro uso no recomendado por el fabricante puede
causar incendios, descargas eléctricas o lesiones personales.
16.Este producto está equipado con un enchufe polarizado (una clavija es más ancha que la otra) para reducir el riesgo de descarga
eléctrica. El enchufe podrá colocarse en un tomacorriente polarizado de una sola manera. Ésta es una medida de seguridad. Si no puede
colocar el enchufe en el tomacorriente eléctrico, intente invirtiendo el enchufe. Si aún así no puede, póngase en contacto con un
electricista calicado.
INSTRUCCIONES IMPORTANTES
GUARDE ESTAS INSTRUCCIONES
Al utilizar aparatos eléctricos, siempre deberán tomarse precauciones básicas para reducir el riesgo de incendio, descarga eléctrica y
lesiones a personas. Éstas incluyen:

www.tsicustomerservice.comA621
11
PARA EMPEZAR
1. El número de serie se encuentra en la parte posterior de la estufa, el número de serie es necesario para el reg
istro de la garantía del producto y el servicio de atención al cliente.
2. Visitar www.tsicustomerservice.com para el registro de la garantía del producto. Para inscribirse use el
NÚMERO DE MODELO: DFI-470-04. Si usted no puede completar el registro guarde el comprobante de
compra para hacer válida la garantía.
ESPECIFICACIONES DEL PRODUCTO
VOLTAJE 120VAC, 60 Hz
AMPERAJE 12.5 Amps
POTENCIA EN VATIOS(max) 1500 Watts
SEE OWNERS MANUAL FOR SERVICE DETAILS
WARNING: DISCONNECT POWER BEFORE CLEANING OR SERVICING
CAUTION:
HIGH TEMPERATURE, RISK OF FIRE, KEEP ELECTRICAL CORDS, DRAPERY,
FURNISHINGS AND OTHER COMBUSTIBLES AT LEAST3 FEET(0.9M) FROM
THE FRONT OF THE HEATER AND AWAY FROM THE SIDE AND THE REAR.
CAUTION:RISK OF ELECTRICAL SHOCK
DO NOT OPEN NO USER
SERVICEABLE PARTS INSIDE
CUIDADO: EL RIESGO DE CHOQUE ELÉCTRICO,NO ABRA.
NO HAY PARTES DE SERVICIO PARA ELUSUARIO ENELINTERIOR.
(0.9M) DEL FRENTE DEL CALENTADOR Y LEIOS DE LA PARTE POSTERIOR.
PAÑERÍA,MOOBILIARIO Y OOTROS COMBUSTIBLES POR LO MENOS 3 POES
CUIDADO:
LA TEMPERATURA,RIESGO DE INCENDIO,GUARDA CORDONESÉCRICOS,
AVISO:
DESCONECTE LA ENERGÍA ANTES DE APOYARSE O REPAARA.
VERA A DUENOS MAÑUALES PARA LOS DETALLES DEL
SERVICIO
VOIR LE MANUEL DU PROPRIÉTAIRE POUR LES DÉTAILS
SUR L’ENTRETIENET LA RÉPARATION
DÉBRANCHEZ L’APPAREIL AVANT DE NETTOYER OU
TEMPÉRATURE ÉLEVÉE,RISQUE DEFEU,GARDEZ LES
AVERTISSEMENT:
AVERTISSEMENT:
TIBLES À AU MOINS 0.9M(3 PIEDS) DE LA PARTIE FRONTALE DE L’APAREIL DE
RISQUE DE CHOC ÉLECTRIQUE NE PAS OUVRIR AUCUN
ENTRETIEN DES PIÈCESINTÉRIEURES PAR L’UTILISATEUR
AVERTISSEMENT:
EFFECTUER L’ENTRETIEN OULA RÉPARATION.
CORDONS ÉLECTRIQUES,DRAPERIES,MEUBLES ET AUTRES MATIÈRES COMBU-
CHAUFFAGE ET ÉLOIGNÉS DES CÔTÉS.
(+1) 800-318-9373
www.tsicustomerservice.com
SN #:AC-XXXXX-X
Date Code/ Code de Date/ Código Fecha:
ELECTRIC FIREPLACE/FOYER
ÉLECTRIQUE/INSERTO PARA CHIMENEA
MODEL / MODÈLE / MODELO
Twin-Star International, Inc.
www.twinstarhome.com
Made In China
Fabriqué en Chine
Fabricado en China
DFI-470-04
VOLTS WATTS/VATIOS H
Z
120V~ 1500 60
220391
Parte posterior de la estufa
Número de Serie
Número de modelo

www.tsicustomerservice.comA621
12
INSTRUCCIONES DE INSTALACIÓN
Herramientas requeridas para el ensamblado
2. Leg Asamblea
123
Alinee las 2 pestañas de
montaje en el soporte. Deslice las patas descargar para que
encajen en su lugar. Cuando esté
encajado en su posición, el agujero del
tornillo del paso 3 quedará alineado.
Fije las patas en la base al utilizar
los tornillos incluidos, 3 por pata.
Destornillador de cabezal Phillips
CUIDADO Y MANTENIMIENTO
• Limpie la moldura metálica con un paño suave humedecido con un producto a base de aceite cítrico y púlalo
con un paño suave y limpio.
• NO utilice productos de limpieza domésticos ni limpiametales, ya que estos productos dañarán la moldura
metálica. Los productos a base de aceite cítrico pueden conseguirse en supermercados o ferreterías.
• ADVERTENCIA: El cableado del tomacorriente eléctrico debe cumplir con los códigos de edicación locales
y otras normas aplicables, a n de reducir el riesgo de incendio, descarga eléctrica y lesiones a personas.
• ADVERTENCIA: Desconecte la alimentación antes de intentar realizar mantenimiento o limpieza a n de
reducir el riesgo de incendio, descarga eléctrica o lesiones personales.
1.Instalación Mango
12
Fije el mango para el oricio de montaje de la puerta
exterior.
Inserte el tornillo (0.16 pulgada X 0.4 pulgada)
desde el interior de la puerta y apriete el tornillo
hasta que el mango no se puede girar.

www.tsicustomerservice.comA621
13
INSTRUCCIONES DE INSTALACIÓN
Localización del panel de control
Control Principal
Indicador del termostato
1. Fije la perilla del termostato
al darle vuelta en el sentido
de las agujas del reloj hasta
permita que el Calentador
caliente la habitación.
2. Cuando se alcance el nivel
de comodidad deseado,
disminuya el termostato
hasta que se apague la
unidad.
3. El calentador mantendrá
automáticamente el nivel de
comodidad deseado al
realizar el ciclo de encen
dido (ON) y apagado
(OFF).
Nota: Los cambios diarios en
las temperaturas de la
habitación o externas pueden
afectar al termostato. Ajuste el
termostato si es necesario.
Interruptor del calentador
1. La puesta en marcha de un
interruptor de 1000W activará el
ajuste de calor bajo y también
apagar el calentador
2. La puesta en marcha del
interruptor 1000W y 1500W
permitirá el ajuste de las altas
temperaturas.
Interruptor de en-
cendido/apagado
1. Este interruptor
enciende y apaga
la corriente princi
pal.
2. El interruptor estará
iluminado cuando
el calentador se
enciende.
3.Este interruptor se
debe encender
para utilizar el
calentador.
Atenuador del
brillo de la llama
1. Al girar el indicador
a la derecha, aumen-
tará el brillo del efecto
de llama.
2. Al girar el indicador
en el sentido contrario
de las agujas del reloj,
se disminuirá el brillo
del efecto de llama.
De calor las altas --1000W((ENCENDER)
+1500W((ENCENDER)
De calor bajo------1000W((ENCENDER)
+1500W(APAGAR)

www.tsicustomerservice.comA621
14
REEMPLAZO DE LAS BOMBILLA
transparentes, 40-watt, socket E12 base de la
bombilla de luz
(candelabros de base, bombilla B).
1. Unplug the stove. Remove the screws holding the stove back panel in place. Remove the back
panel to access the light bulb.
2. Desenrosque los 3 tornillos que sostienen el deector y retírelos con cuidado.
3. Retire la bombilla y cámbiela. Invertir los pasos 2 y 1, vuelva a instalar el deector y el panel
trasero de la estufa en su posición; Tenga cuidado de no apretar demasiado los tornillos.
Tornillo
Bulbo
Deector
Herramientas requeridas para el ensamblado
Destornillador de cabezal Phillips
1
3
2
REMOVE

www.tsicustomerservice.comA621
15
GUÍA PARA SOLUCIÓN DE PROBLEMAS
Problema Causa Medidas correctivas
1. Sin energía, los
interruptores no se
encienden.
1. El cable de alimentación no estaba
enchufado en la toma de corriente. 1. Compruebe que la unidad esté enchufada directamente a una toma
de corriente estándar de 120V.
2. La estufa no
se enciende manu
almente.
2a. No hay corriente entrante de la
toma de corriente eléctrica o de los
interruptores.
2b. Funcionamiento incorrecto
2c. Interruptor defectuoso
2a. Compruebe los interruptores y mueva la unidad a otra toma de
corriente.
2b. Pulse manualmente el botón de corriente principal de la parte
delantera de la unidad.
2c. Reemplace el Interruptor de Alimentación.
3. Las llamas no se
mueven
3a. El motor del disco giratorio está
defectuoso
3b. El disco giratorio se cayó del so-
porte
3a. Reemplace el Motor de accionamiento de generador de llama.
3b. Quite el panel posterior y compruebe si el “disco giratorio” está
montado correctamente en el motor.
4. Las llamas no son
visibles 4. Se quemaron las bombillas/LED
de la tarjeta 4. Vuelva a colocar candelabros de 40 vatios bombillas bordo.
5. Las llamas no bril
lan
5a. Operación normal
5b. Perilla del amortiguador defectuoso 5a. Gire la perilla del atenuador de brillo hasta que se alcance el brillo
deseado.
5b. Reemplace el Perilla del amortiguador
6. No hay efecto de
llamas y el calentador
se enciende.
6a. Ensamblaje defectuoso del circuito
de la llama.
6b. Ensamble del Circuito de Potencia
defectuoso.
6a. Reemplace el ensamblaje del circuito de llama.
6b. Reemplace el conjunto del circuito de alimentación.
7. El calentador no se
apaga 7. Interruptor Termostato. 7. Reemplace el Termostato.
8. El calentador no se
enciende
8a. Funcionamiento incorrecto
8b. Interruptor defectuoso
8c. Motor del ventilador del calenta
dor defectuoso
8a. Pulse manualmente el botón de corriente principal en la parte
delantera de la unidad.
8b. Reemplace el Interruptor del calentador.
8c. Reemplace el Conjunto del Calentador / Soplador.
9 . N o p r o d u c e s u
ciente calor
9a. Regleta/protector de sobrecarga/
cable de extensión que se utiliza
89. Ubicación de la unidad
9a. Enchufe la unidad directamente en la pared.
9b. Asegúrese de que la unidad está ubicada en una pared interior.
10. La unidad sopla
aire fresco o frío 10. Motor del ventilador del calentador
defectuoso 10. Reemplace el Conjunto del Calentador / Soplador.
11. Ruido con el
calentador
encendido
11a. El motor del ventilador del calenta-
dor está sucio
11b. Motor del ventilador del calentador
defectuoso
11a. Suavemente aspire las entradas del ventilador del calentador.
11b. Reemplace el Conjunto del Calentador / Soplador.
12. Ruido con llamas
encendidas y el
calentador apagado
12a. Motor generador de llamas defec-
tuoso
12b. Panel posterior abollado
12c. Eje del disco giratorio deformado.
12a. Reemplace el Motor de accionamiento de generador de llama.
12b. Consulte al servicio de atención al cliente de TSI
12c. Consulte al servicio de atención al cliente de TSI
13. El cable de
alimentación se
calienta
13. Operación normal 13. Compruebe que el cable del calentador y las conexiones de enchufe.
Toma de corriente defectuosa conexiones o enchufes sueltos
pueden hacer que la toma de corriente o el enchufe se recaliente.
Asegúrese de que el enchufe queda ajustado en la salida.
Calentadores consumen más corriente,de pequeños
electrodomésticos, el sobrecalentamiento de la toma de corriente
puede producirse incluso sino se ha producido con el uso de otros
aparatos. durante el uso comprobar con frecuencia para
determinar si el tapón de salida o la placa frontal
es CALIENTE! Si es así, deje de utilizar el calentador y tienen un
calicado electricista de cheques y / o sustituir la toma de corriente
defectuosa (s).
14. ¿Es seguro colocar
la unidad sobre
una alfombra?
14. producto Inquiry 14. Es seguro colocar la unidad sobre una alfombra, pero asegúrese
de que los objetos inamables están por lo menos a 3 pies (0.9 M)
de distancia desde la parte frontal y laterales de la unidad.
15. ¿Cuántos pies
cuadrados mi
unidad calentará?
15. producto Inquiry 15. Hasta 1000 pies cuadrados.
16.El calentador no
funciona,pero los
interruptores
ENERGÍA y
CALENTADOR
están en la posición
encendido y el
termostato está en el
nivel más alto.
16. El protector térmico se
activó. 16. Coloque todos los interruptores en la posición apagado y desenchufe la
unidad del tomacorriente de pared durante cinco (5) minutos.
Transcurridos los cinco (5) minutos, enchufe nuevamente la unidad al
tomacorriente y use normalmente.

www.tsicustomerservice.comA621
16
VISTA DESPLEGADA
Pieza Parte Nombre Número de Pieza ar
1Interruptor de Alimentación P06-S
2 Termostato P03-S
3Perilla del termostato P05-S
4Interruptor del calentador P06-S
5Perilla del amortiguador P04-S
6Amortiguador cambiar P07-S
7Piernas Y16-S181-LG
8incrustado Y17-S218-LOG
9 Conjunto del Calentador / Soplador Y16-S181-P01
10 Motor de accionamiento de generador de llama P10-Q-S
11 Ensamblaje del circuito de la llama Y17-S218-P40A
12 Montaje del Circuito de Potencia Y17-S218-P40PA
34156
7
8
11
12
10
9
2

www.tsicustomerservice.comA621
17
GARANTÍA LIMITADA DE 1 AÑO
El fabricante garantiza que su nueva estufa eléctrica no presentará defectos de fabricación ni materiales durante un período de
un año a partir de la fecha de compra, siempre y cuando se cumplan las siguientes condiciones y limitaciones.
1. Esta estufa eléctrica se debe instalar y operar en todo momento de acuerdo con las instrucciones de instalación y operación
proporcionadas con el producto. Cualquier reparación no autorizada, alteración, abuso deliberado, accidente o uso
inadecuado del producto anulará esta garantía.
2. Esta garantía no es transferible y sólo está disponible para el propietario original, siempre y cuando la compra se haya
realizado a través de un proveedor autorizado del producto.
3. Esta garantía se limita a la reparación o reemplazo de piezas que se consideren defectuosas en material o mano de obra,
siempre y cuando dicha pieza haya estado sometida a condiciones normales de uso y servicio, después de que una inspec
ción por parte del fabricante conrme dicho defecto.
4. Esta garantía no cubre las bombilla incluidas con la estufa eléctrica.
5. El fabricante podrá, bajo su criterio, eximirse de toda obligación respecto de esta garantía reembolsando el precio al por
mayor de la pieza defectuosa.
6. Esta garantía no cubre·ningún costo de instalación, mano de obra, fabricación, transporte o de otro tipo que surja de la
pieza defectuosa, su reparación, reemplazo u otra situación, y el fabricante no asume ninguna responsabilidad por
las mismas.
7. El dueño/usuario asume todos los riegos, si los hay, incluidos los riesgos de daños o pérdidas directos, indirectos o result
antes que surjan del uso del producto, o de la incapacidad para usarlo, salvo que la ley estipule lo contrario.
8. Mediante el presente, se excluye expresamente cualquier otra garantía, expresa o implícita, respecto del producto, sus
componentes y accesorios, o cualquier otra obligación o responsabilidad de parte del fabricante.
9. El fabricante no asume ni autoriza a ningún tercero a asumir en su nombre ninguna otra responsabilidad respecto de
la venta de este producto.
10.Las garantías descritas en este documento no se aplican a accesorios que no sean del fabricante y que se usen junto con la
instalación de este producto.
Esta garantía es nula si:
a. La chimenea está sometida a períodos prolongados de humedad o condensación.
b. Se produce cualquier alteración no autorizada, abuso deliberado, accidente o uso inadecuado
del producto.
c. Usted no tiene el recibo original de compra.
SERVICIO AL CLIENTE
www.tsicustomerservice.com
Por Call 1-800-318-9373 Servicio al Cliente
¿Tiene preguntas? Nuestro Centro de mensajes está disponible 7 días de la semana, 24 horas del día con nuestra
línea de ayuda gratuita. Nuestro departamento de Servicio al Consumidor está disponible de Lunes a Viernes, de
8:30 am hasta las 5:30 pm EST. Le podemos ayudar con ensamblaje y si es necesario con el reemplazo de piezas
dañadas o pérdidas.
IMPORTANTE:
Antes de comunicarse con atención al cliente, tenga disponible la siguiente información:
• Número de serie
• Número de modelo
• Recibo de compra o prueba de compra

www.tsicustomerservice.comA621 18
CONSERVER CES INSTRUCTIONS
INSTRUCTIONS IMPORTANTES
Lors de l’utilisation d’appareils électriques, pour éviter les risques d’incendie, d’électrocution et de blessures, toujours suivre les
consignes de sécurité de base suivantes :
1. Lisez toutes les directives avant d’utiliser cet appareil.
2. Cet appareil est chaud lorsqu’il est en marche. An d’éviter les brûlures, ne touchez pas aux surfaces chaudes. Si l’appareil est muni
de poignées, utilisez-les pour le déplacer. Assurez-vous que les matières combustibles, comme les meubles, les oreillers, la literie, le
papier, les vêtements et les rideaux, se trouvent à au moins 0,9m (3pi) de l’avant de l’appareil.
AVERTISSEMENT: Ne couvrez pas l’appareil pour éviter qu’il surchaue.
3. AVERTISSEMENT : Ne jamais laisser un chauage fonctionnant sans surveillance. Une grande prudence est nécessaire si des
enfants sans supervision ou des invalides sont à proximité.
4. Cet appareil ne doit pas être utilisé par les enfants, les personnes atteintes d’une défaillance physique, sensorielle ou intellectuelle,
ou les personnes n’ayant pas l’expérience et les connaissances nécessaires, à moins qu’une personne ne les supervise ou leur donne
les instructions nécessaires.
5. Débranchez toujours cet appareil lorsqu’il n’est pas utilisé.
6. N’utilisez pas un appareil muni d’un cordon ou d’une che endommagé, qui a subi une défaillance, qui est tombé ou qui a été
endommagé de quelque façon que ce soit.
7. Si le cordon d’alimentation est endommagé, il doit être remplacé par le fabricant, par un de ses agents ou par une personne
qualiée an d’éviter tout danger.
8. N’utilisez pas cet appareil à l’extérieur.
9. Cet appareil n’est pas conçu pour être utilisé dans une salle de bains, une salle de lavage ou tout autre endroit humide semblable.
Ne placez jamais cet appareil à un endroit où il risquerait de tomber dans une baignoire ou un autre contenant rempli d’eau.
10. Évitez de placer le cordon sous un tapis. Ne couvrez pas le cordon avec une carpette, un tapis de passage ou un autre article
semblable. Placez le cordon dans un endroit peu passant et où il ne pourra pas être accroché.
11. Pour débrancher cet appareil, tournez les commandes en position d’arrêt, puis retirez la che de la prise
12. N’insérez jamais un objet, quel qu’il soit, dans les ouvertures de ventilation ou de sortie d’air de l’appareil an de prévenir les
dommages ainsi que les risques de choc électrique et d’incendie.
13. An de prévenir les risques d’incendie, ne bloquez jamais les ouvertures d’aération ou de sortie d’air de quelque façon que ce soit.
Ne placez pas l’appareil sur une surface molle, comme un lit, car les ouvertures pourraient se bloquer.
14.Cet appareil renferme des pièces chaudes qui produisent des arcs électriques ou des étincelles. N’utilisez pas l’appareil là où de
l’essence, de la peinture ou des liquides inammables sont utilisés ou entreposés. Ce foyer ne doit pas être utilisé pour faire sécher
les vêtements. Ne suspendez pas de bas de Noël ou d’autres décorations sur ou à proximité de ce produit.
15. N’utilisez cet appareil que pour l’usage prévu dans ce manuel. Toute autre utilisation de l’appareil qui n’est pas prévue par le
fabricant peut provoquer un incendie, un choc électrique ou des blessures.
16. Cet appareil est muni d’une che polarisée (une lame est plus large que l’autre). Pour réduire le risque d’électrocution, cette che ne
peut être insérée dans une prise polarisée que dans un seul sens. Ceci est une mesure de sécurité. Si vous n’arrivez pas à insérer la
che dans la prise de courant, inversez la che. Si la che ne s’insère toujours pas, contactez un électricien qualié.

www.tsicustomerservice.comA621 19
SEE OWNERS MANUAL FOR SERVICE DETAILS
WARNING: DISCONNECT POWER BEFORE CLEANING OR SERVICING
CAUTION:
HIGH TEMPERATURE, RISK OF FIRE, KEEP ELECTRICAL CORDS, DRAPERY,
FURNISHINGS AND OTHER COMBUSTIBLES AT LEAST3 FEET(0.9M) FROM
THE FRONT OF THE HEATER AND AWAY FROM THE SIDE AND THE REAR.
CAUTION:RISK OF ELECTRICAL SHOCK
DO NOT OPEN NO USER
SERVICEABLE PARTS INSIDE
CUIDADO: EL RIESGO DE CHOQUE ELÉCTRICO,NO ABRA.
NO HAY PARTES DE SERVICIO PARA ELUSUARIO ENELINTERIOR.
(0.9M) DEL FRENTE DEL CALENTADOR Y LEIOS DE LA PARTE POSTERIOR.
PAÑERÍA,MOOBILIARIO Y OOTROS COMBUSTIBLES POR LO MENOS 3 POES
CUIDADO:
LA TEMPERATURA,RIESGO DE INCENDIO,GUARDA CORDONESÉCRICOS,
AVISO:
DESCONECTE LA ENERGÍA ANTES DE APOYARSE O REPAARA.
VERA A DUENOS MAÑUALES PARA LOS DETALLES DEL
SERVICIO
VOIR LE MANUEL DU PROPRIÉTAIRE POUR LES DÉTAILS
SUR L’ENTRETIENET LA RÉPARATION
DÉBRANCHEZ L’APPAREIL AVANT DE NETTOYER OU
TEMPÉRATURE ÉLEVÉE,RISQUE DEFEU,GARDEZ LES
AVERTISSEMENT:
AVERTISSEMENT:
TIBLES À AU MOINS 0.9M(3 PIEDS) DE LA PARTIE FRONTALE DE L’APAREIL DE
RISQUE DE CHOC ÉLECTRIQUE NE PAS OUVRIR AUCUN
ENTRETIEN DES PIÈCESINTÉRIEURES PAR L’UTILISATEUR
AVERTISSEMENT:
EFFECTUER L’ENTRETIEN OULA RÉPARATION.
CORDONS ÉLECTRIQUES,DRAPERIES,MEUBLES ET AUTRES MATIÈRES COMBU-
CHAUFFAGE ET ÉLOIGNÉS DES CÔTÉS.
(+1) 800-318-9373
www.tsicustomerservice.com
SN #:AC-XXXXX-X
Date Code/ Code de Date/ Código Fecha:
ELECTRIC FIREPLACE/FOYER
ÉLECTRIQUE/INSERTO PARA CHIMENEA
MODEL / MODÈLE / MODELO
Twin-Star International, Inc.
www.twinstarhome.com
Made In China
Fabriqué en Chine
Fabricado en China
DFI-470-04
VOLTS WATTS/VATIOS H
Z
120V~ 1500 60
220391
PRÉPARATION
1. Le numéro de série est situé à l’arrière du poêle-chaleur et le numéro de série est requis pour l’enregistrement
de la garantie du produit et pour le service à la clientèle.
L’arrière de la cuisinière
Número de Serie
Numéro de modèle
2. Rendez-vous sur le site www.tsicustomerservice.com pour compléter l’enregistrement de la garantie. Pour
l’inscription, utilisez le NUMÉRO DE MODÈLE: DFI-470-04. Si vous êtes incapable de compléter
l’enregistrement, conserver votre preuve d’achat pour les besoins de la garantie.
CARACTÉRISTIQUES DU PRODUIT
TENSION 120VAC, 60 Hz
Ampères 12.5 Amps
WATTS (Max.) 1500 Watts

www.tsicustomerservice.comA621 20
INSTRUCTIONS POUR L’INSTALLATION
Outils requis pour l’assemblage
123
Alignez l’onglet de montage
dans la base.
Glisser la jambe vers le bas pour
verrouiller en place. Lorsqu’il est
verrouillé à la position, les trous de
vis de l’étape 3 seront alignés.
Fixer la jambe à la base en utilisant
les vis fournies, 3 vis par jambe.
2. Assemblée jambe
1. Installation de la poignée
12
Fixez la poignée au trou de montage sur le
En dehors de la porte.
Insérez la vis (0,16 po x 0,4 po) de l’intérieur de la
porte et serrez la vis jusqu’à ce que la poignée ne pui-
sse pas être tournée.
Tournevis phillips
ENTRETIEN GÉNÉRAL
• Nettoyer le contour métallique à l’aide d’un linge doux légèrement humecté d’huile de citron, puis polir avec un
linge doux et propre.
• NE PAS UTILISER de produits à polir le laiton ou de produits de nettoyage domestique car ils pourraient en
dommager le contour de métal. Les produits à base d’huile de citron sont disponibles dans les supermarchés ou
les quincailleries.
• AVERTISSEMENT: Le raccordement des prises électriques doit être conforme aux codes du bâtiment locaux et à
tout autre règlement en vigueur an de réduire les risques d’incendie, de choc électrique et de blessures corpo
relles.
• VERTISSEMENT: Débrancher l’alimentation électrique avant l’entretien ou le nettoyage an de réduire les
risques d’incendie, de choc électrique ou de blessures corporelles.
Table of contents
Languages:
Other Twin-Star International Stove manuals

Twin-Star International
Twin-Star International DFS-450-2 User manual

Twin-Star International
Twin-Star International DFS-550-0 User manual

Twin-Star International
Twin-Star International Duraflame DFS-500 User manual

Twin-Star International
Twin-Star International CFS-750-11 User manual

Twin-Star International
Twin-Star International DFS-550-6 User manual

Twin-Star International
Twin-Star International DFS-450 User manual

Twin-Star International
Twin-Star International DFS-760-1 User manual

Twin-Star International
Twin-Star International DFS-750-12 User manual

Twin-Star International
Twin-Star International DFS-550-11 User manual