TyloHelo IS 44 BT User manual

71-0145 Page 1 07/29/18
Rev. 01
IS 44 BT Room Owner’s Manual
with
IS SaunaLogic Control and Bluetooth Sound System
Precautions before Use…………………………………………………….….…….…… 3
Read Before Installation…………………………………………………………..……... 4
Room Assembly……………………………………………….………………….……… 5
Lighting Operation………………………………………………….………………….... 9
IS 44 Room Operation…………………………………………….……………….…….. 9
Infrared/Sauna Tips and Tricks……………………………………….…………….……. 11
Troubleshooting and Maintenance………………………………….……………..…….. 12
Please record the serial number here:
Sauna Heater __________________
Sauna Room __________________
Keep the recorded serial numbers just in case you would have to call in to our Technical Support
Department.
Please contact us at 1-888-780-4427 8 a.m. to 5 p.m. central time with technical questions.

71-0145 Page 2 07/29/18
Rev. 01
Read all instruction carefully before installation including
instructions packaged separately with the sauna heater. Please leave
all instructions and warranty with the owner.
WARNING: When using electrical sauna heaters and associated sauna products, basic
precautions must be followed, including the following:
1. Grounding is required.
2. No electrical receptacle shall be installed in the sauna room.
3. Be sure rocks are placed in the heater according to the instructions on page 9 of this manual.
4. Do not tamper with the door or install a latching or locking system. Malfunction of which
may cause entrapment inside the heated room.
5. Do not block ventilation openings. Vents must be kept free of obstruction so proper airflow is
maintained in the sauna room. Do not stack anything in front of the vents or push the back of
the room up tight to a wall surface. Do not stack anything in front of the vents or push the
back of the room up tight to a wall surface.
WARNING: Prolonged exposure to elevated temperatures is capable of inducing
hyperthermia. Hyperthermia occurs when the internal temperature of the body reaches several
degrees above the normal body temperature of 98.6°F. The symptoms of hyperthermia include
an increase in the normal temperature of the body, dizziness, lethargy, drowsiness, and fainting.
The effects of the hyperthermia include failure to perceive heat, failure to recognize the need to
exit the room, unawareness of impending hazard, fetal damage in pregnant women, physical
inability to exit the room and unconsciousness.
WARNING: The use of alcohol, drugs, or medication is capable of greatly increasing the risk
of fatal hyperthermia.
CAUTION FIRE HAZARD: Do not use the sauna room for drying clothes, bathing suits,
etc. Do not hang towels above the heater or place any object, other than the rocks supplied, in the
heater. If any darkening of the wall around the heater is noticed, discontinue sauna use
immediately.
ELECTRICAL SHOCK HAZARD: High voltage exists within this equipment. There is
no user serviceable part in this equipment. All installation and service to this equipment should
be performed by qualified licensed personnel in accordance with local and national codes.

71-0145 Page 3 07/29/18
Rev. 01
ROOM ASSEMBLY
The 1.7kw can be used on all 15 amp or 20 amp household outlets (the standard 120 volt outlet
found in all homes). A dedicated circuit is advisable to avoid unnecessary tripping of the breaker.
Each panel is heavy. Be careful to avoid injury when installing, especially the top panel.
Two adults are required for the installation of sauna room.
There is a “+” button or a “–” button at the sides of each panel, which will be installed
correspondingly with one “+” to one “–” in the following way when installing: The panel with
“+”button should be lifted up about 4 inches (10cm) higher than the panel with the “-“ button
(Refer to Picture 1); place the “+” panel against the panel with “–”button (Refer to Picture 2),and
then slide the panel with “+”button down until the two panels are equal in height (Refer to
Picture 3). If they are not equal in height or there is an obvious gap between the two panels, that
means they are not properly attached, and you should try again.
The panels should be installed in the following order: *Floor Panel—Back Panel—Right Side
Panel—Left Side Panel
—Lower Bench —Bench Skirt Panel—Upper Bench—Front Panel—Top Panel
Note: The vents must be kept free from any obstruction so proper airflow is maintained in the
sauna room. Do not stack anything in front of the vents or push the back of the room up tight to a
wall surface.

71-0145 Page 4 07/29/18
Rev. 01
Step 1. Place the floor on a flat level Step 2. Place side wall on sauna floor
surface (you many need to use wood interlocking the two wall panels
shims to assist with leveling. Shims together (repeat for the other side
are not provided). Then place the back wall)
wall on the sauna room floor (have
somebody hold the back wall). Note: Do not install the front wall at this
point.

71-0145 Page 5 07/29/18
Rev. 01
Step 3. Connect heater in to the water tight plug. Place
the heater inside of the room. Final installation of heater
in Step 8.
Step 4. Connect the two black junction boxes, located on the lower left and right wall corner.
R1 to the Right wall, L1 to the Left wall. Then screw them into place.
Step 5. Install the lower bench and bench skirt

71-0145 Page 6 07/29/18
Rev. 01
Step 6. Connect the S1 junction box on the bench skirt and install the top bench. Place heater
on the floor in front of the benches.
Step 7. Front wall and ceiling installation.
Place the front wall in the slot in the floor. Lift each corner to slide and lock into place. This step
will require two people. Then set the ceiling on the unit. Using the foam blocks from packaging
to hold the ceiling up off the unit to put the wires into the ceiling.

71-0145 Page 7 07/29/18
Rev. 01
Step 8. Connecting the wires in the ceiling.
Back compartment connections
Connect C to C
Connect 6 to 6
Connect B to B
Connect 5 to 5
Connect 4 to 4
Connect C to C
Right Side Wall above Sensor
Front compartment above control.

71-0145 Page 8 07/29/18
Rev. 01
Step 9. Remove heater mounting plate from the back of the heater. With the 1” screws provided
with the heater, fasten the heater mounting plate to the wood brackets. The upper left screw
(closest to the wall) should be 5” from the wall and 24-3/4” from the floor. Then put the two
lower screws in the holes. Then hang the heater on the heater mounting plate.
After mounting the heater, connect the large wire from the sauna heater to the blue connector on
the back wall. Connect the smaller wire from the heater to the right side wall.
Step 10. Ensure all connections are completed. Plug the cord from the back of your room to a
15 or 20 amp 120 volt dedicated outlet.

71-0145 Page 9 07/29/18
Rev. 01
IS SAUNALOGIC CONTROL OPERATION for IS 44 ROOM
Lighting
Press External Light Icon (light
bulb outside a box) to toggle on
or off the lights.
Press Internal Light Icon (light
bulb inside a box) to toggle on or
off the lights.
Press Color Light Icon (light bulb
with a color pallet) to scroll
through the colors and then off.
Audio System
Bluetooth Audio System always has power while the room is plug in to the outlet. During first
power up, the audio system will provide a tone to notify the user it is ready to pair to
Bluetooth device. Open your device and search for Bluetooth device and pair. Once paired it
will provide a pairing tone. Note: Check with your device manufactures for operation
temperatures before using the device in the Sauna/IR Room.
OPERATING INSTRUCTIONS FOR IS 44 ROOMS
Press the control POWER button once. The room temperature will be displayed on the
control and an LED indicator will be glowing above the Infrared or Traditional button. The
LED that is glowing is the system this chosen. If the system desired is not chosen, press the
appropriate system.
NOTE: You can only operate one heating system at a time.
Note: Once the desired type of heat is chosen, follow the “Setting the Time” and Setting the
Temperature” section of the manual to operate the room.
OPERATING INSTRUCTIONS FOR INFRARED SAUNA HEATERS
Default settings for temperature are preset to 120°F, the bath time is set to 60 minutes and 0
minute delay to start to heat. These settings are adjustable (as described below) from 100°
to 149°. Length of sauna can be set from 0 to 60 minutes. The time delay before start can be
up to 23 hour and 59 minutes. Any changes are remembered by the heater for your next
bath. Should the room power be lost then restored, the settings will return to their default
values.
OPERATING INSTRUCTIONS FOR TRADITIONAL SAUNA HEATER
Default settings for temperature are preset to 176°F, the bath time is set to 60 minutes and 0
minute delay to start to heat. These settings are adjustable (as described below) from 125° to
194°. Length of sauna can be set from 0 to 60 minutes. The time delay before start can be up
to 23 hour and 59 minutes. Any changes are remembered by the heater for your next bath.
Should the heaters power be lost then restored, the settings will return to their default values.

71-0145 Page 10 07/29/18
Rev. 01
STARTING EITHER HEATING SYSTEM IMMEDIATELY
Immediately after pressing the Power On button, the selected heating system will engage. The
heater(s) will turn on and begin heating the room to current set points. At the end of the selected
time (60 minutes maximum), the heating system will turn off. The control display will turn off
and all lights will turn off 5 minutes after heating system.
NOTE: You can only operate one heating system at a time.
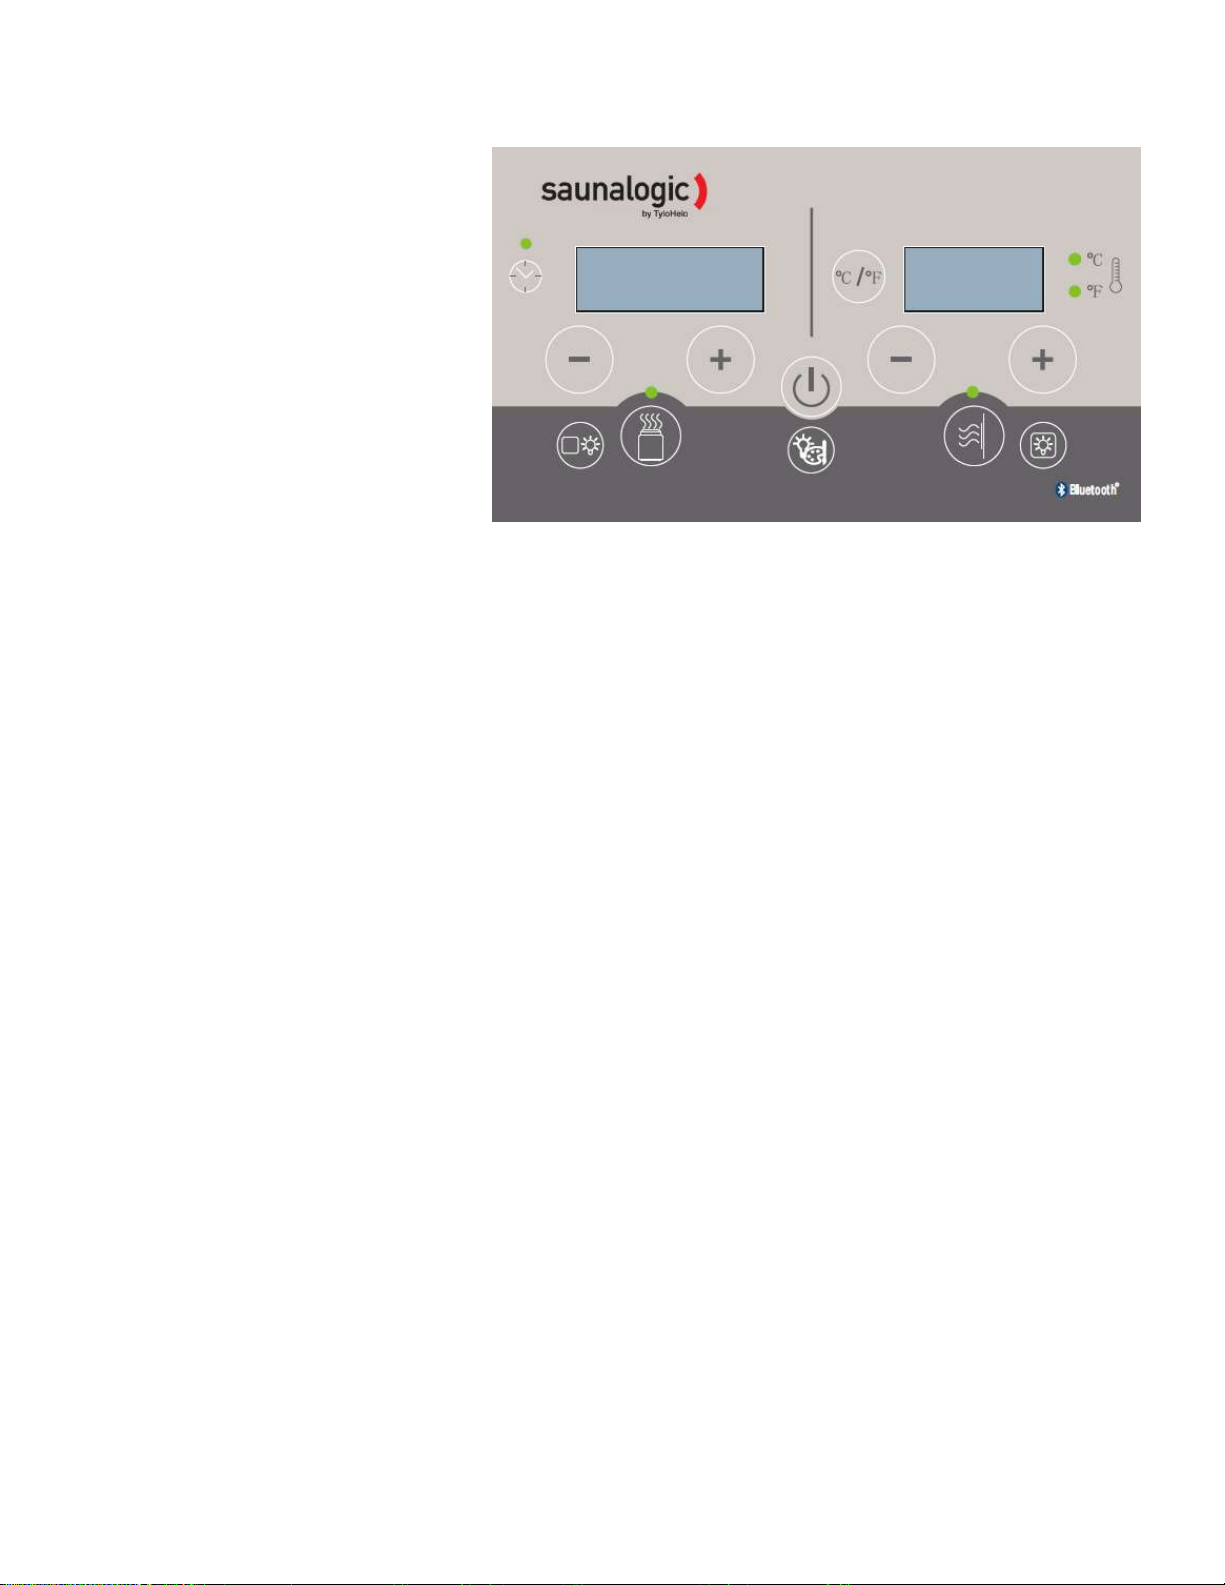
SETTING THE TIME AND TEMPERATURE
To set the sauna length time, press the control POWER button to turn on the heater. Press the
TIME “+” or “-” buttons on the control to increase or decrease time for desired setting. The
maximum of time is 60 minutes.
To set the temperature, press the control POWER button to turn on the heater. Press the TEMP
“+” or “-” buttons on the control to increase or decrease temperature for desired setting. The
maximum temperature is 194°F (90°C) for Tradtional Sauna and 150°F (65°C) for Infrared.
Note:
Typical bathing temperature for a traditional sauna is 150F to 165F displayed on the control.
Typical bathing temperature for Infrared sauna is above 100°F displayed on the control. Infrared
sauna is a much lower temperature and the display of room temperature is not important. The
key is the room should feel warm upon entry (after approximately 15 –20 minute heat up).
Infrared energy heats objects not the air. When the body is placed in front of infrared heat, the
infrared wavelength causes water molecules to vibrate in the skin on a molecular level. As the
skin warms, the inner core temperature of the body rises. When the core temperature rises, the
bodies cooling mechanism is to sweat.
PRE-SETTING DELAYED START
With the electricity applied to the contactor box, press the control POWER button once. The
room temperature will be displayed on the control. Press the “Pre-setting” button. Press the
TIME “+” or “-” buttons on the control to increase or decrease delay time for desired setting. The
maximum of time is 23 hours and 59 minutes. If no delay start is desired, set to 00:00 and press
“Pre-Setting” button.
Note: The “ : ” will flash between the numbers in the time display when system is in the delayed
start mode.
USER MAINTENANCE INSTRUCTIONS
Water Tray (under heater):
A water tray is provided to reduce the amount of water that will get on the floor. Ensure water is
removed from tray after use and floor is dry.
Room Instructions for Cleaning:
Perspiration and dirt may absorb into the wood, so periodic cleaning is needed. Scrubbing the
benches and floorboards with a stiff brush and mild detergent is normally sufficient. Light sanding
is another option.

71-0145 Page 11 07/29/18
Rev. 01
Important Information about your new IS 44 Sauna
Infrared Saunas have a typical operating range of 100°F (38°C) to 115°F (46°C). This lower
heat range is ideal for users new to sauna bathing and the lower temperature does not dry out
mucus membranes.
Also, Infrared energy is the same energy produced by the Sun and thus does not heat the air,
rather it heats objects in the room. In fact, less than 20% of the infrared energy is used to
heat the air. The rest is available to be directly converted to heat within the body.
Your sauna’s typical heat-up time is usually about 15 to 20 minutes but can vary depending
on a few key factors listed below. Please consider these factors when choosing a location for
your sauna.
Locate your sauna indoors and in an area with an ambient air temperature of about
70°F. (25°C) and on a flat, level and dry surface.
Supply voltage should be a nominal of 120 volts AC / 20 Amp.
“House” wiring gauge size should match the amperage of the product being used.
Keep the length of wiring run from the breaker panel to your sauna to a minimum.
Do not use surge protection devices or extension cords.
Always try to use a dedicated 120 volt AC circuit of appropriate amperage for your
sauna.
It is important to remember that whether the sauna achieves 100°F or 120°F, the
effectiveness of the infrared energy is the same.
Some people will sweat easier than others and if you are having difficulty in achieving a
deep sweat, please consider the following tips to help you reach your desired goals.
Drink plenty of fluids before using the sauna. Hydration is very important!
Perform some light exercise before using the sauna, this will help elevate your
body’s core temperature and induce sweating.
Your body may be low on trace minerals such as sodium or salt. Consult your
doctor before taking supplements.
Take a warm shower prior to using the sauna.
Finally, relax and enjoy your sauna!

71-0145 Page 12 07/29/18
Rev. 01
Sauna Heater Tips and Tricks
Before using your new sauna heater, verify proper rock placement, wall sensor placement and
the wall thermometer is placed no more than 12” from the ceiling near the seating area.
Steam- Your new sauna heater is designed to have water ladled on the rocks. Proper use of water
in the sauna is important. One cup of water will produce 2500 cups of steam. ¼ cups of water
every three to five minutes will be sufficient. Only use clean tap water. Do not use water with
any chemicals present. (Example: spa or pool water). This WILL damage the sauna heater. Over
usage of water will only cool down the rocks, thus producing less steam. This will also allow
water to pass through the rocks and out the bottom of the heater, ending up on the floor of the
sauna. Water on the floor of the sauna means you are using to much water.
Ventilation- Proper ventilation will provide fresh air into the sauna room and will circulate the
heat in the room more evenly, resulting in a more consistent heat throughout the sauna.
TROUBLESHOOTING SECTION
Room Questions
No Heat:
Control is delay mode? Ensure system is not in the delay mode.
Infrared Room not reaching set point:
Infrared system will not reach set point typically. System is designed to keep heating
panels on so the body can absorb the infrared heat. Refer to operation for more details.
Room not reaching set point while using Traditional heat:
This room is designed to be indoors with a start temperature of 70°F. If this room is
located in a cooler location, pre-heating time will increase and higher temperatures may
not be reached.
Ensure power supply is correct for room. This system should be connected directly to an
outlet. Do not use an extension cord. Low supply voltage can cause poor temperature
performance.
No control functions:
Verify the control wiring has been connected.
For troubleshooting or service questions call 1-888-780-4427 and ask to speak with the
Technical Support Department.
Prior to calling, please have the Model and Type number available. You may also e-mail
Table of contents
Other TyloHelo Plumbing Product manuals
Popular Plumbing Product manuals by other brands

Hans Grohe
Hans Grohe Ecostat Comfort Series Instructions for use/assembly instructions

Hans Grohe
Hans Grohe 10452180 Instructions for use/assembly instructions

Berkey
Berkey Water View troubleshooting guide

Symmons
Symmons 3DIV-BODY Operation & maintenance manual

Thetford
Thetford 19833 quick start guide

Hans Grohe
Hans Grohe Axor Nendo Instructions for use