3
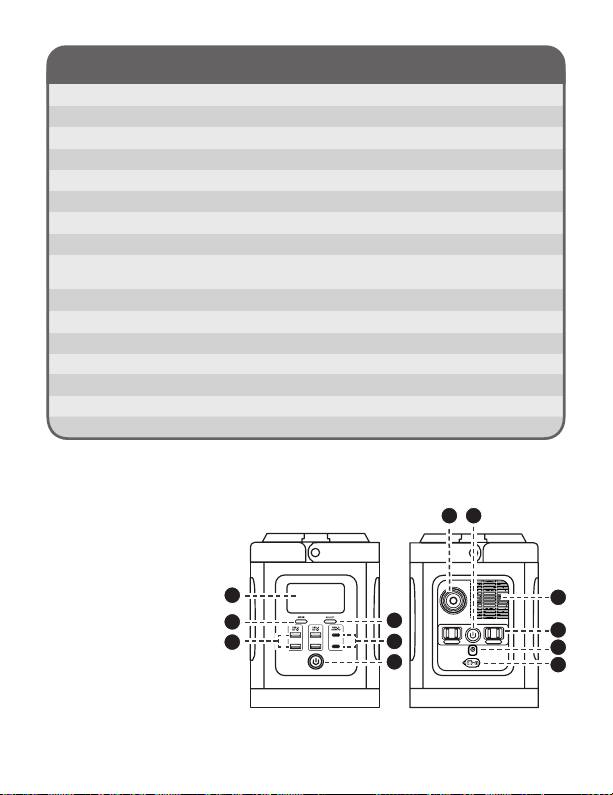
1. LCD Display
Precisely monitor charge / discharge rates, battery status, load information and
temperature & safety alerts.
2. MODE Button
Toggle between power IN, power OUT or CAR modes.
3. SELECT Button
Selection button in CAR mode.
4. USB-A Output Port (x4)
Charges a wide range of devices at 2X the speed for Quick Charge 3.0
compatible devices. If your device does not support Quick Charge 3.0
standard, the device will be charged at its normal speed.
5. USB-C Output Port (x2)
Provides 100W maximum output for your MacBook Pro, notebook, iPad Pro,
Android phones and any devices that charge through a USB-C port.
*MacBook PRO and iPad PRO are trademarks of Apple Inc.
6. Power Button & LCD Display Screen ON / OFF & LED Power Indicator
Press the Power Button once to turn on the POWERGEN 500. Press again to turn off
the POWERGEN 500. When POWERGEN 500 is turned on, the LED power indicator
turns BLUE and the LCD display is on. The LCD display will enter into sleep mode
afterbeinginidleforveminutes.PressthePowerButtononcetoturnitonagain.When
POWERGEN500isbeingcharged,theLEDpowerindicatorturnsGREENandashes.
7. 12V Socket
Provides 10A maximum charge for items such as portable fridge & freezer and
other devices that require power from a 12V car port.
8. AC Power Button (Press for ON / OFF) & AC Power Indicator
To enable AC power output, press the AC Power Button once, the AC Power Indicator
will turn BLUE. When the AC Power is not in use, press the AC Power Button once
again to turn it o, unplug the power cord from the AC outlet.
9. Ventilation Fan
The Ventilation Fan prevents device from overheating. The fan will turn on
automatically when device’s temperature exceeds the optimal range.
10. AC Output Socket (x2)
Provides 800W maximum AC power for 100V-120V devices such as laptops,
electric drills, medical devices, LCD TV and mini refrigerators.
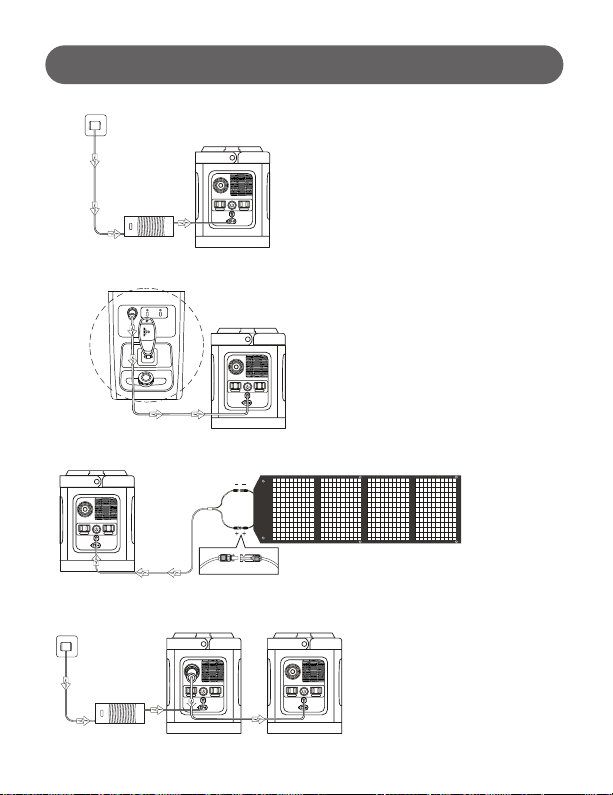
11. Charging Input Port
Charging Input Port for the included AC/DC adapter, car charger cable and
solar charging cable for the solar panels (sold separately).
12. Output Port for 6V/12V Battery Charging
Charges and maintains 6V and 12V Lead-acid, AGM and Li-ion batteries for
vehicles, boats, and lawn mowers. It is NOT for vehicle jump starting. Car battery
charging function will be activated once the cable is connected to car battery terminals.