Vearsion 1.0 Specifications and procedures are subjected to changes without prior notification. Specifications and procedures are subjected tochanges without prior notification. Vearsion 1.0
DE
DE
3 4
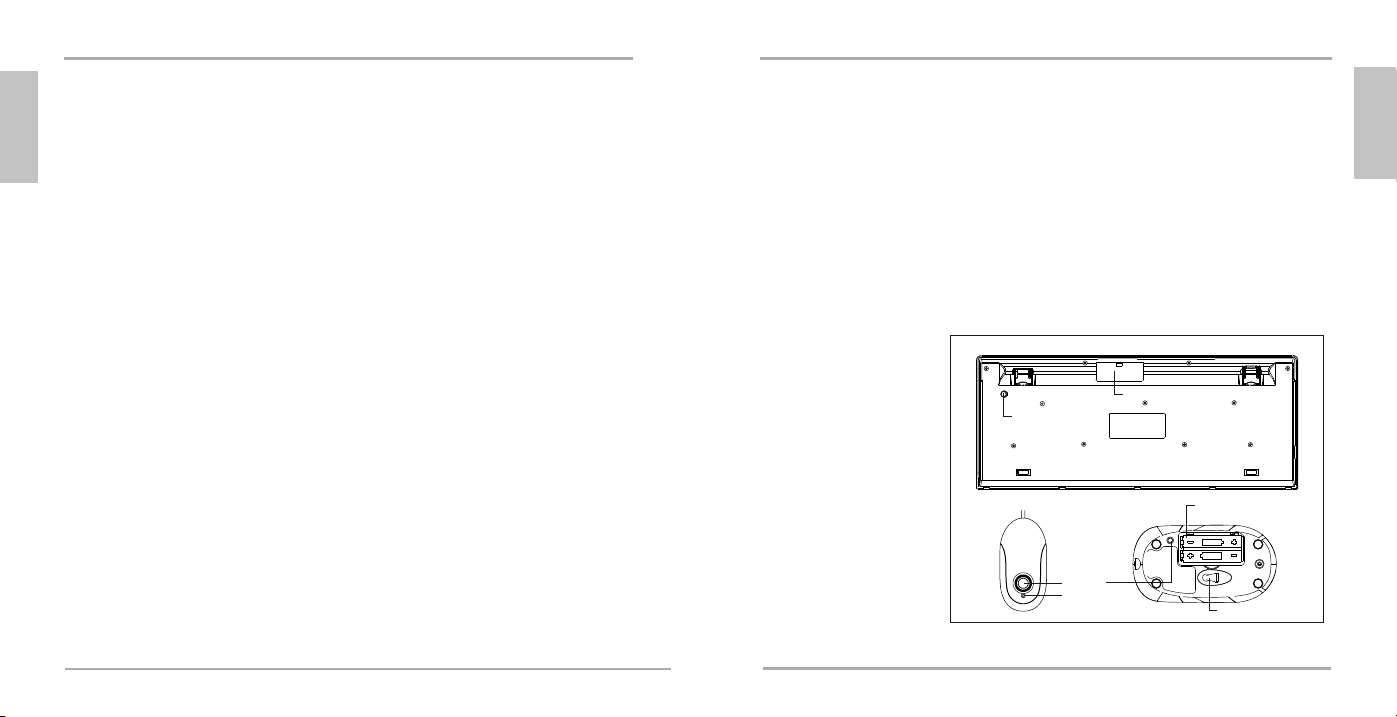
Link button
Keyboard
Receiver Mouse
Link button
LED
Battery compartment
Battery compartment
Optical Sensor
Herzlichen Glückwunsch zum Kauf des Multimedia Tastatur-/Maus-Set, kabellos. Bitte lesen Sie sich
diese Bedienungsanleitung sorgfältig durch, um mehr über dieses schnurlose Maus-Tastatur-Set zu
erfahren und um optimal die Möglichkeiten nutzen zu können, die Ihnen dieses Equipment bietet.
Sicherheitshinweise
Der Hersteller ist nicht für Radio- oder TV-Interferenzen verantwortlich, die durch unauthorisierte
Modifizierungen dieses Geräts oder Ersatz bzw. Anschluß von Verbindungskabeln und Geräten, die nicht
genehmigt sind, verursacht wurden. Der Benutzer ist für die Behebung von Interferenzen verantwortlich,
die durch derartige unauthorisierte Modifizierungen, Ersatz bzw. Anschluß verursacht wurden.
Eingebaute Antennen, ob in Innenräumen oder im Freien installiert, sollten nur von erfahrenen und
fachkundigen Installateuren für Antennen installiert werden, die mit den lokalen Bau- und
Sicherheitsvorschriften vertraut und von den zutreffenden Regierungsbehörden für Vorschriften lizenziert
sind, sofern dies erforderlich ist.
1. Verpackungsinhalt
a) Schnurlose Tastatur
b) Schnurlose optische Maus
c) Empfänger
d) USB zu PS/2 Adapter
e) 2 AA-Batterien für die Tastatur
f ) 2 AAA-Batterien für die optische Maus
g) CD-ROM mit Treibern
h) Bedienungsanleitung
2. Installation der Hardware
2-1. Anschluss über PS/2
a) Schalten Sie zunächst Ihren Rechner aus.
b) Verbinden Sie den grünen PS/2-Stecker mit der grünen PS/2-Buchse an Ihrem Rechner.
c) Verbinden Sie den USB-zu-PS/2 Adapter mit dem USB Connector des Empfängers. Stecken
Sie den Adapter in den PS/2-Tastatur-Port des Computers ein.
2-2. Anschluss über USB & PS/2
a) Schalten Sie zunächst Ihren Rechner aus.
b) Stecken Sie den USB Stecker des Empfängers in den USB Port und den PS/2 Stecker in den
PS/2 Anschluss Ihres Computer's ein.
2-3. Verbinden der Maus und Tastatur mit dem Empfänger
a) Legen Sie die Batterien in die Batterienkästchen der Tastatur und der Maus ein
b) Bitte schalten Sie Ihre PC an. Der LED Indikator auf dem Empfänger leuchtet.
c) Drücken Sie den ID-Verbinden-Knopf auf dem Empfänger und der LED Indikator blinkt. Der
Vorgang für die Verbindung mit der Tastatur dauert 15 Sekunden.
d) Danach drücken Sie den ID-Verbinden-Knopf auf der Rückseite der Tastatur unter dem
Flossenbein.
e) Drücken Sie nochmals den ID-Verbinden-Knopf auf dem Empfänger. Es dauert 15 Sekunden
für die Verbindung mit der Tastatur.
f ) Dann drücken Sie den ID-Verbinden-Knopf auf der Rückseite der Maus neben der Etikette.
g) Nach einem Batteriewechsel müssen Sie die Verbindungsprozedur noch einmal durchführen.
h) Es gibt 256 verschiedene ID's für jeden Kanal.