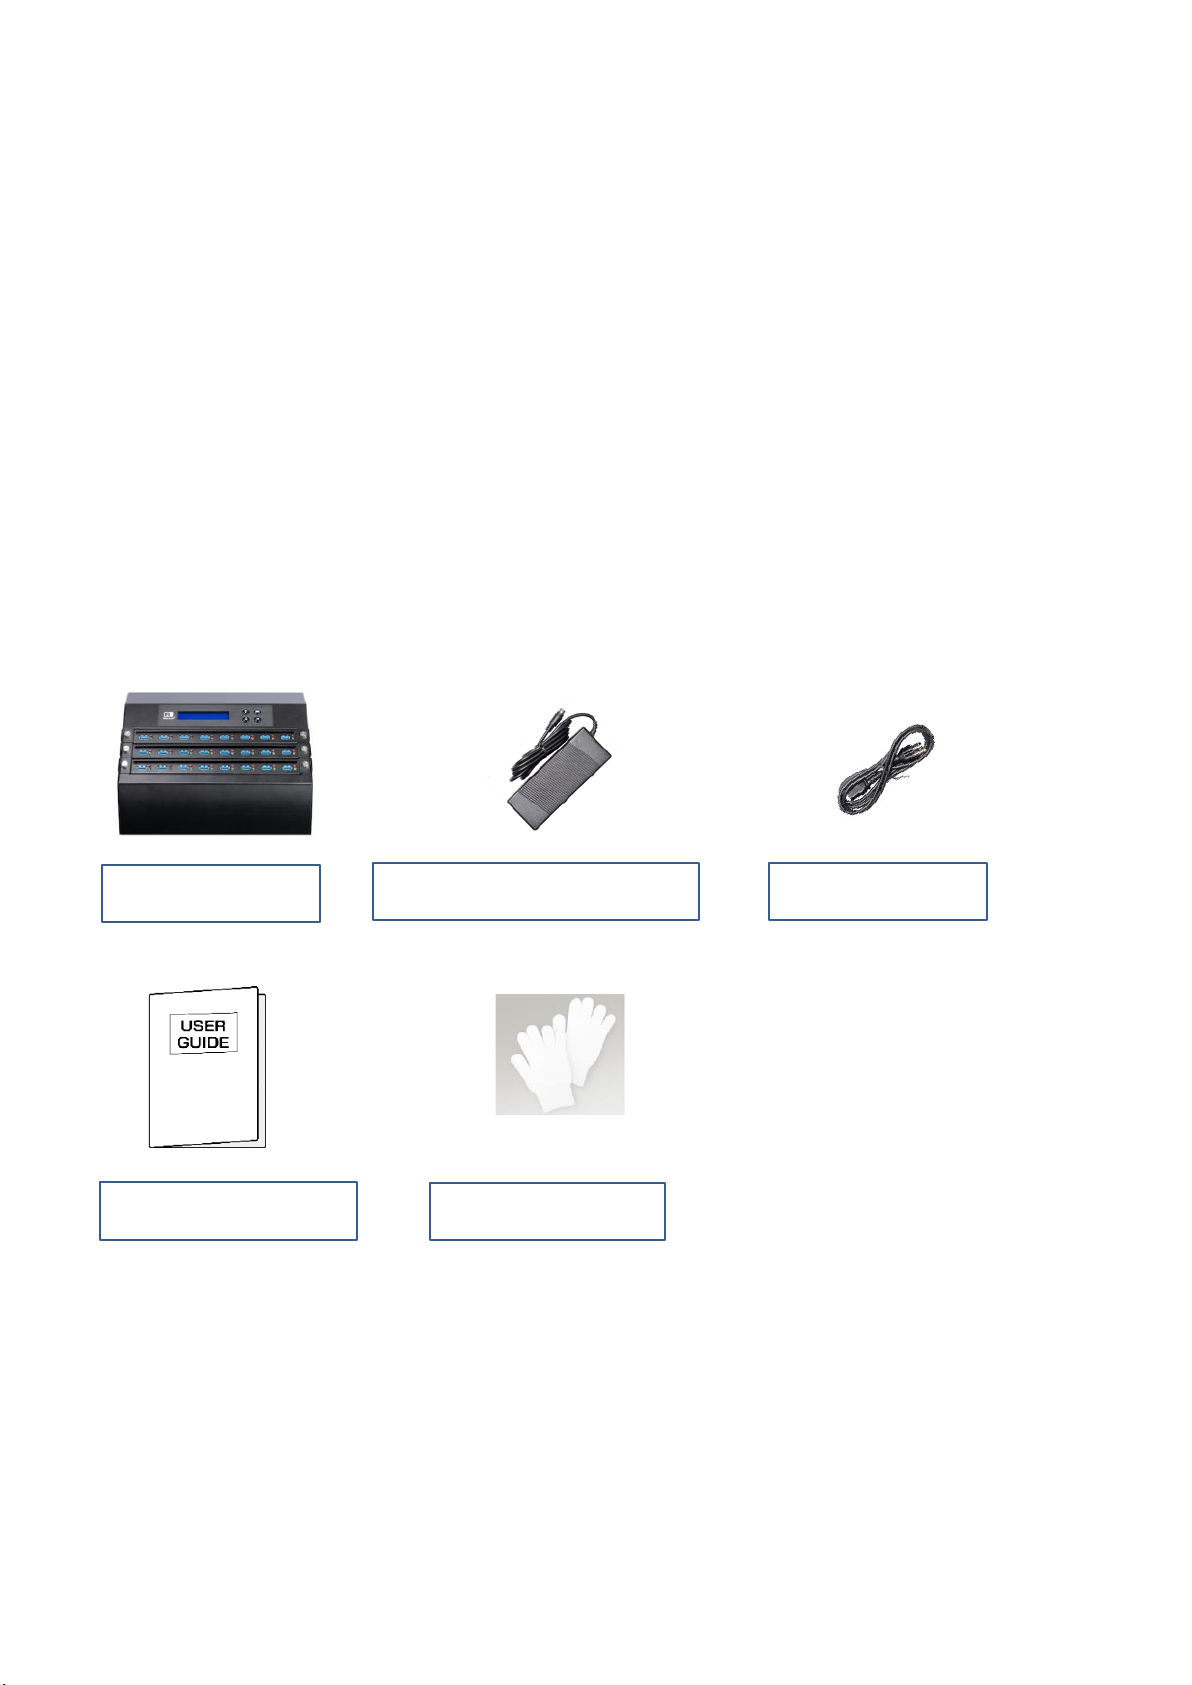
U-Reach Intelligent U3 Series User manual

Intelligent U3
USB 3.1 Duplicator & Tester
(USB/USB-HDD)
User Manual vA.01

2
Index
Product Disclaimer ................................................................................................................. 3
Warranty.................................................................................................................................. 3
Piracy Statement ..................................................................................................................... 3
Before You Start ...................................................................................................................... 4
Notice Symbols........................................................................................................................ 4
Introduction............................................................................................................................. 5
Function Table......................................................................................................................... 6
Function Description ............................................................................................................ 10
1. Copy.................................................................................................................................... 10
2. Compare............................................................................................................................. 11
3. Copy+Compare ................................................................................................................. 11
4. Media Check....................................................................................................................... 11
5. Signal Detection................................................................................................................. 13
6. Utilities............................................................................................................................... 14
7. Setup................................................................................................................................... 16
8. Log Manager ...................................................................................................................... 19
9. Write Protect ..................................................................................................................... 21
Specification .......................................................................................................................... 23
vA.01.3

3
Product Disclaimer
U-Reach is not accountable for any incidental or consequential damages, which includes,
but is not constrained to property harm, loss of time or data from use of a U-Reach product,
or any other damages attributable to product malfunction or failure (including without
limitation, those attributable to: (1) reliance of the materials provided, (2) costs of product
replacement, (3) loss of use, data or profits, (4) delays or business interruptions, (5) and any
principle of legal responsibility, arising out of or in reference to the use or overall
performance or from delays in servicing or lack of ability to render service) of any U-Reach
product. U-Reach makes every effort to ensure proper operation of all products. However,
the customer is responsible to affirm that out of the U-Reach product meets the customer’s
quality requirement. The customer further acknowledges that fallacious operation of U-
Reach product and/or software program, or hardware issues, can cause loss of data,
defective formatting, or data loading. U-Reach will make efforts to resolve or repair any
issues recognized by customer either within the warranty period or on a time and materials
basis.
Specifications and features subject to change without notice or obligation.
Warranty
U-Reach provides a basic one-year parts and labor warranty for all of its products (excluding
cables, adapters, and other consumable items). An optional extended warranty is also
available for an added cost. Telephone and email support is available for the life of the
product as defined by U-Reach.
All warranties will be restricted and defined by the market region from which customers
purchased.
Piracy Statement
U-Reach accepts no responsibility for copyright infringement or misuse of any U-Reach
equipment. Copying all forms of data: audio, video, or software without the permission of
the copyright holder is illegal. It is the sole responsibility of the user to ensure that the legal
copyrights of the copyright owners are respected.

4
Before You Start
Important Notice
Carefully read the entire manual before operating.
Never turn off the power while the firmware is updating.
Devices will operate at high temperature during high-speed tasks. Please wear
protective gloves to prevent burns when handling devices.
Devices working in high temperature may cause it to slow down or even shut down.
Please make sure the devices are not overheated.
Ensure machine and operator are properly grounded to prevent ESD.
Make sure the source device is correct and functioning.
Equal capacity of source and target is recommended for guaranteed data consistency.
Using the Copy+Compare function provides the most flawless duplication.
Damage incurred due to noncompliance with U-Reach operating instructions will void
the warranty.
Store the equipment safely when not in use and keep out of the reach of children.
Use only approved, stable power sources.
Use product only in a clean, dry, dust free, and ventilated area. Liquids or foreign debris
can severely damage your duplicator.
It is typical for the machine to heat up during operation.
While in use, do not move the duplicator or remove devices.
Static electricity may cause duplication error. Please pay attention to the duplicator’s
environment and operator’s equipment. Purchasing static electricity elimination
equipment to avoid static electricity shock while in high static electricity areas.
Notice Symbols
Special items, procedures, or notes to be observed prior to use.
Note
Refers to related duplicator operations, special details, tips, or
suggestions for operational effectiveness.
Caution
Refers to procedures that need to be adhered to or precautions.

5
Introduction
1. Features
The Intelligent U3 Series duplicator was designed with diversified media compatibility and
high-speed performance in mind to not only flawlessly duplicate in high speed demands,
but also provides helpful examinations by delivering the most accurate testing functions
known today. The user-friendly interface offers stress-free operation with no steep learning
curve to climb. The Event Log Report is an essential tool for production quality remote
control and yield analysis.
2. Package Contents
*Wear protective gloves to prevent burns when handling devices.
*12V 9A for 8 Ports
Duplicator x1
Power Cord x 1
User Manual x 1
1 pair of Gloves*
12V 12.5A DC Adapter x 1

6
Function Table
*Below functions and features subject to change without notice.
Function
Description
1. Copy
Data or whole media duplication only.
2. Compare
Bit-for-bit comparison between the source and target flash
medias.
3. Copy&Compare
First copies, then compares the target to the source once
duplication is completed.
4. Media Check
4.1 Signal+H2+Format
Precheck the 2.0 / 3.0 signal of the flash’s first, then do H2 and
Format.
4.2 H2+Format
Checks the flash’s quality by reading and writing H2 files, then
format the flash’s.
4.3 H2
Checks the flash’s quality by reading and writing H2 files.
4.4 Signal+H5+Format
Precheck the 2.0 / 3.0 signal of the flash’s first, then do H5.
4.5 H5+Format
Checks the flash’s quality by reading and writing H5 files.
4.6 Setup Range %
Sets the flash’s checking range percentage from 1% to 100%
4.7 Setup Range MB
Sets the flash’s checking range in MB from 1MB to 9000MB.
4.8 Set ErrorLimit
Sets the error tolerance range when checking the flash.
4.9 Minimum Read Speed
Sets the minimum read speed from 0~260MB/sec.
4.10 Minimum Write Speed
Sets the minimum write speed from 0~260MB/sec.
4.11 Low Speed Tolerance Time
Sets the tolerance time when flash does not reach the minimum
speed from 10~99 seconds. The default value is 30 seconds.
4.12 Set Capacity Limit
Set Upper Limit
Set Lower Limit
Clear Limit

7
5. Signal Detection
5.1. USB2 and USB3
Detects both USB2.0 and USB3.1 signals of the device.
5.2. Only USB3
Detects USB3.1 signal of the device.
5.3. Only USB2
Detects USB2.0 signal of the device.
6. Utilities
6.1 Information
6.1.1 USB Info.
This feature will show flash’s data
information, file format, content size, and
capacity.
6.1.2 System Info.
This feature will show system information,
such as, model number and software version.
6.2 Erase
6.2.1 Quick Erase
Erases flash media content. It will keep the
FAT format.
6.2.2 Full Erase
Fully erases, bit for bit, data on flash,
including format and content.
6.2.3 DoD Erase
Erases flash three times complying with USA
Department of Defense (DoD) standards.
6.3 Do Format
6.3.1 Auto Format
Auto formats media to FAT16 or 32.
6.3.2 FAT16 Format
Formats media to FAT16.
6.3.4 FAT32 Format
Formats media to FAT32.
6.4 Calc. Hash MD5
Calculates the MD5 value of the source port’s flash media.
6.5 System Update
System firmware update via the flash media.
7. Setup
7.1 Copy Area
7.1.1 System and Files
The system automatically analyzes the source
data’s format and copies only the data area.
(Available for FAT16/32, NTFS, Linux -
ext2/ext3/ext4/LVM)
7.1.2 Whole Media

8
Copies the flash’s entire content, including
the empty space.
7.2. Button Sound
Enables or disables the audible beep when a button is pressed.
7.3 Active USB Revision
Select the USB Revision to active.
Both USB 2.0/3.0
Only USB 2.0
Only USB 3.0
7.4 Target Tolerance
Sets the capacity tolerance range between
the source and target. The default setting is
“No limit”.
No Limit
100% Same
Allow Tolerance
7.5 Asynchronous
Enable opens Asynchronous function.
Disable closes this function.
Enable
Disable
7.6 Power off Time Between Copy+ Compare
Sets the power-off time between Copy and Compare.
7.7 Skip Source Bad sectors
Sets the allowable number of bad sectors of the source.
7.8 Delete Disk Signature After Copy
Allow user to delete Disk Signature After Copy or not.
7.9 Language
Sets system language. (English or Japanese)
7.10 Select Speed
Sets data transmission speed.
7.11 Active Hash
No Hash
Hash MD5
7.12 Set to Default
Reverts everything back to original manufacturer settings.
8. Log Manager
8.1 Out Today Report
Outputs today’s log records.
8.2 Out Recent Report
Outputs recent log records.
8.3 Out Period Date
Outputs log records for user defined time periods.
8.4 Advanced Function
Access to this function requires a password
8.4.1 Clear All Logs
8.4.2 Setup Password
8.4.3 Adjust Clock

9
9. Write Protect
9.1 Copy+ Write Protect
Copies data from the source to targets, then sets targets with
write protection.
9.2 Copy+Comp+WriteP.
Copies data from the source to targets then compares and set
targets with write protection.
9.3 Set Write Protect
Sets targets with write protection.
9.4 Set Write Enable
Reverses the USB write protection.
9.5 Show USB WP Info
Displays basic information for W-Mode USB drives.

10
Function Description
1. Copy
Step 1: Prepare source and target devices.
Step 2: Connect source and target devices.
Step 3: Proceed to copy.
Scroll to select "1. Copy", then press "OK" to start the duplication process.
The information below states what is displayed on the LCD during duplication.
Step 4: Copy Completed!
The quantity of passed or failed target device(s) and the copied duration will be displayed
on the LCD after duplication completes.
Note
Recommendation: Target device(s)’ capacity must be equal to or larger
than the source device capacity.
Note
The number of working/connected targets will be displayed on LCD. Press
"OK" to start.
Note
Before duplication, select the data area at "6.1 Copy area"
Press ▲▼ together for 5 seconds to stop operation on the slowest
device.
Press “ESC” for 5 seconds to stop all the copy jobs.
Note
If flash card is removed during copy process, the system will stop
immediately, and red light will illuminate to notify user the copy has
failed. Removing the flash card during copy is strongly discouraged as
it will damage the flash card.
Backup the data on target flash cards before starting the copying
process as any pre-existing data will be lost once copy is complete.
Copy 7695M
3% 0:27 (3)270M
(3) indicates Port #3 is the slowest.

11
2. Compare
The compare function checks the accuracy of copy result. Scroll to select "2. Compare",
then press "OK" to start the verification process.
3. Copy+Compare
Sequentially automates from Function 1, Copy to Function 2, then Compare.
Scroll to select "3. Copy+Compare", then press "OK" to start the automated duplication and
verification process.
4. Media Check
Note
You can set the checking range in [4. Media Check >> Setup Range].
To protect source data, the system default setting will not execute this
function on the master device.
The source port will not perform any formatting because this function
will delete the flash media’s data.
4.1 Signal+H2+Format
This function can precheck the 2.0 / 3.0 signal of the flash’s first, then performs a read and
write test to determine the flash’s quality. After H2 (Keep Format) test, the device will be
formatted back to its original format (Supports FAT16, FAT32, exFAT)..
4.2 H2+Format
This function performs a read and write test to determine the flash’s quality. After H2 (Keep
Format) test, the device will be formatted back to its original format (Supports FAT16,
FAT32, exFAT).
4.3 H2
This function performs a read and write test to determine the flash’s quality. After H2
(Overwrite) test, the device will contain H2 files which can be verify again through
computer’s software if necessary.

12
4.4 Signal+H5+Format
This function can precheck the 2.0 / 3.0 signal of the flash’s first, then performs a read and
write test to determine the flash’s quality. The flash’s original data will be erased during this
test. The USB will be formatted into FAT32..
4.5 H5+Format
This function performs a read and write test to determine the flash’s quality. The flash’s
original data will be erased during this test. The USB will be formatted into FAT32.
Note
The flash device will be formatted at FAT 16/32 once testing is complete.
4.6 Setup Range %
This function sets the quality check capacity range. Use the▲▼buttons to set the range
from 1 to 100%. The higher the percentage, the longer it takes.
4.7 Setup Range MB
This function sets the quality check capacity range in MB. Use the▲▼buttons to set the
range from 1MB to 9000MB.
Note
The duplicator will abide by whichever was set last if both Range% and
Range MB are set.
4.8 Set Error Limit
This function sets the error tolerance range while checking the flash. Use the ▲▼ buttons
to set the error limit value. Select units to use (KB or MB), then select the value.
4.9 Minimum Read Speed
This function can be used to select the flash media whose reading speed is too slow. Users
can set an expected minimum reading speed for media check, so the flash media that
doesn’t reach the minimum speed value will be identified.
Pass: 1 H5 Test
Fail: 0 0
Pass Quantity
[#02] Bad: 0 3871M
W:7.2 M/s R: 14.2M/s
Bad Sector
Test Capacity
Writing Speed
Reading Speed
Fail Quantity

13
4.10 Minimum Write Speed
This function can be used to select the flash media whose writing speed is too slow. Users
can set an expected minimum writing speed for media check, so the flash media that
doesn’t reach the minimum speed value will be identified.
Note
When the red-light illuminates to indicate that an error has occurred, use
the▲▼buttons to view the error information.
4.11 Low Speed Tolerance Time
Sets the tolerance time when flash does not reach the minimum speed from 10~99
seconds. The default value is 30 seconds.
4.12 Set Capacity Limit
This function is used to set the flash device testing capacity limit. Users can set an upper
and lower limit of the flash capacity. To reset, select “clear limit”.
5. Signal Detection
5.1. USB2 and USB3
This function detects both USB2.0 and USB3.1 signal of the device. If any signal can’t be
recognized, it will show red light.
5.2. Only USB3
This function detects USB2.0 signal of the device.
5.3. Only USB2
This function detects USB3.1 signal of the device.
Pass:16 USB Signal
Fail:0 0
Press ▼for further
information
[#01] USB2 and USB3
Pass

14
6. Utilities
6.1 Information
➊USB Info.
This setting displays the flash media’s basic information such as file format, content size,
and total capacity.
Use the ▲▼buttons to view the information of each flash media, source included.
Note
Using this function will not delete the flash media content or format.
➋System Info.
This function displays system information such as model number and software version.
6.2 Erase
➊Quick Erase
This function erases flash data while keeping the format if the original flash format is
FAT16/32. Use the ▲▼buttons to view status, progress, and information.
Note
Quick erase function will erase only FAT 16/32 formatted flashes.
➋Full Erase
Completely erases the entire flash media, including format and content. This task takes
longer. Pressing <ESC> during this process will abandon the task, but the original format
and content will no longer be readable.
➌DoD Erase
[#01] 116G
FAT32
15M
Total Capacity of the Device
Data Size

15
DoD Erase complies with the U.S.A. Department of Defense (DoD 5220) standards by
erasing the flash three times, which guarantees that data is completely scrubbed.
Note
Use the▲▼buttons to view the status of each port during erase.
6.3 Do Format
➊Auto Format
This function formats flash into FAT. Plug in the flash media and press "OK". The system will
automatically detect its capacity, then format the media per its capacity.
If the flash media format is already FAT16 or FAT32, the format function won’t alter its
original format.
If the original flash media is not FAT format, i.e. NTFS, Linux or FAT multi-partition.
The system will format per flash’s capacity. If capacity is above 2GB, the system will
format the flash to FAT32 and below 2GB, the system will format the flash to FAT16.
Capacity <2GB
Format FAT16
Capacity >2GB
Format FAT32
➋FAT16 Format
Sets the FAT16 format.
➌FAT32 Format
Sets the FAT32 format.
6.4 Calc. Hash MD5

16
This function will count the MD5 value for the source port. The MD5 value is an easy way to
double check the source data is correct.
6.5 System Update
Step 1: Prepare a USB drive for update.
Connect a USB drive to PC. Download the latest firmware, unzip the BIOS firmware, then
save it to the root directory in the USB drive.
Step 2: Proceed to update firmware.
Connect USB drive. Scroll to select "6.3 System Update”, then press "OK" to start the
firmware update process.
Caution
The firmware update process may take longer than 5 minutes. Please do
not disrupt power or process during BIOS update. If interrupted, the
system will become useless. U-Reach will not be held responsible for any
damages.
7. Setup
7.1 Copy Area
➊System and Files
Caution
User is responsible for verification of targets’ quality. Testing a few
completed targets in a mass production environment for quality control is
recommended.
Note
The USB’s format must be: FAT16 or FAT32.
Please place the unzipped file ”.bin” into the USB for update.

17
Also known as "Quick Copy”. The source’s format is automatically analyzed and if it’s
recognizable, such as, FAT 16/32/64, NTFS, or Linux ext. 2/3/4, the system will copy the
data only, rather than the entire flash.
Note
If the file format is not recognized, the whole flash card, including empty
space, will be copied even if you specify copy area in “System and Files”.
➋Whole Media
The system will copy the whole flash card, including empty space and format. This function
is useful when users want to copy the whole flash or have a flash source with an unknown
format. "Whole media" copies take a bit longer to complete.
7.2 Button Sound
Controls whether to hear a sound when a button is pressed.
7.3 Active USB Revision
Sets the operating protocol for the duplicator.
Both USB 2.0/3.0 :
The duplicator will detect USB3.1 first. If the device does not support USB3.1 protocol, the
machine will detect USB2.0 instead.
Only USB 2.0 :
The duplicator will detect USB2.0 only.
Only USB 3.0 :
[Copy Area]
System and Files
Copies 2GB data only
[Copy Area]
Whole Media
Copy total 8GB

18
The duplicator will detect USB3.1 only. If the device does not support USB3.1 protocol, it
will show “Fail.”
7.4 Target Tolerance
This function sets the capacities tolerance range between the source and target flash. If the
capacity is outside the tolerance range, the copy will fail.
100% Same
No Limit
Allow Tolerance
Set UP Limit: The target capacity can be bigger than the source capacity.
Set UP Limit: The target capacity can be smaller than the source capacity.
7.5 Asynchronous
Users can activate Asynchronous copy by selecting “Enable” or deactivating it by selecting
“Disable” For Asynchronous copy to run, the source’s data must be smaller than the
system’s buffer memory and set to “Enable”. However, if set to “Disable”, regardless of
content size, synchronous copy will be performed.
The conditions of executing “Asynchronous Copy”
DISABLE Asynchronous Copy
ENABLE Asynchronous Copy
Data >Buffer
Data <Buffer
Note
The buffer memory may vary depending on product model.
[Target Tolerance]
Allow Tolerance
[Set UP Limit]
2 %
[Set LOW Limit]
0 %

19
7.6 Power Off Time Between Copy+Compare
The use of this setting is highly advised as it prevents data loss due to unstable flash. Users
can set the time gap of power supply between copy and compare. The time gap can be set
from 0 to 15 seconds. The default is "3".
7.7 Skip Source Bad sectors
Skips Source bad sectors during Copy/ Compare/ Erase.
Scroll to select "Skip Source Bad Sectors”, then press "OK" to scroll through the available
values for skipping source bad sectors. If the data of source is critical and needs to be a full
clone, it is recommended to set "0.”
7.8 Delete Disk Signature After Copy
Allow user to delete Disk Signature after copy or not.
7.9 Language
Sets the system’s language. (English or Japanese)
7.10 Select Speed
There are 3 transmission speed options:
Slower Mode
Normal Mode (Default)
Faster Mode
Use a good quality flash media that supports a faster mode. If unsure about the flash
quality or notice a high copy/compare failure rate, use a slower transmission speed. The
default setting is “Normal Mode”.
7.11 Active Hash
Set whether to calculate the MD5 value of the source data at the same time when
executing the copy or compare function.
7.12 Set to Default
Restores all settings back to manufacturer defaults.
8. Log Manager
The log manager is an excellent management tool for operation control purposes. It can
record duplication operation, system and targets information details.

20
8.1 Out Today Report
Insert flash media into Port 1.
Go to "Out Today Report” and press “OK” to output today’s log records.
Remove flash media and read the log report on PC.
8.2 Out Recent Report
Insert flash media into Port 1.
Go to "Out Recent Report" and press “OK” to output the log records from the last 28
days.
Remove flash media and read the log report on PC.
8.3 Out Period Date
Insert flash media into Port 1.
Go to "Out Period Date" and press “OK” to output the log records from a specific date.
8.4 Advanced Function
Enter protective password to access advanced functions. The default password is "123456".
Clear ALL Log
After entering the password, all the log records can be cleared from the duplicator.
Caution
Before using function “Clear ALL Log”during PC connection, please
observe the following steps:
1. Close the PC-Link software (LV07B) or 2. Disconnect the duplicator
from PC
[Advanced Function]
1. Clear ALL Log
Warning:
Clear ALL log?
This manual suits for next models
6
Table of contents
Other U-Reach Test Equipment manuals