U.S. General 64033 User manual

Visit our website at: http://www.harborfreight.com
Email our technical support at: [email protected]
Owner’s Manual & Safety Instructions
Save This Manual Keep this manual for the safety warnings and precautions, assembly,
operating, inspection, maintenance and cleaning procedures. Write the product’s serial number in the
back of the manual near the assembly diagram (or month and year of purchase if product has no number).
Keep this manual and the receipt in a safe and dry place for future reference. 18b
When unpacking, make sure that the product is intact
and undamaged. If any parts are missing or broken,
please call 1-888-866-5797 as soon as possible.
Copyright© 2017 by Harbor Freight Tools®. All rights reserved.
No portion of this manual or any artwork contained herein may be reproduced in
any shape or form without the express written consent of Harbor Freight Tools.
Diagrams within this manual may not be drawn proportionally. Due to continuing
improvements, actual product may differ slightly from the product described herein.
Tools required for assem bly and service may not be included.
Read this material before using this product.
Failure to do so can result in serious injury.
SAVE THIS MANUAL.

Page 2 For technical questions, please call 1-888-866-5797. Item 64033
Specifications
Total Combined Weight Capacity
(Evenly distributed from bottom up.) 700 lb

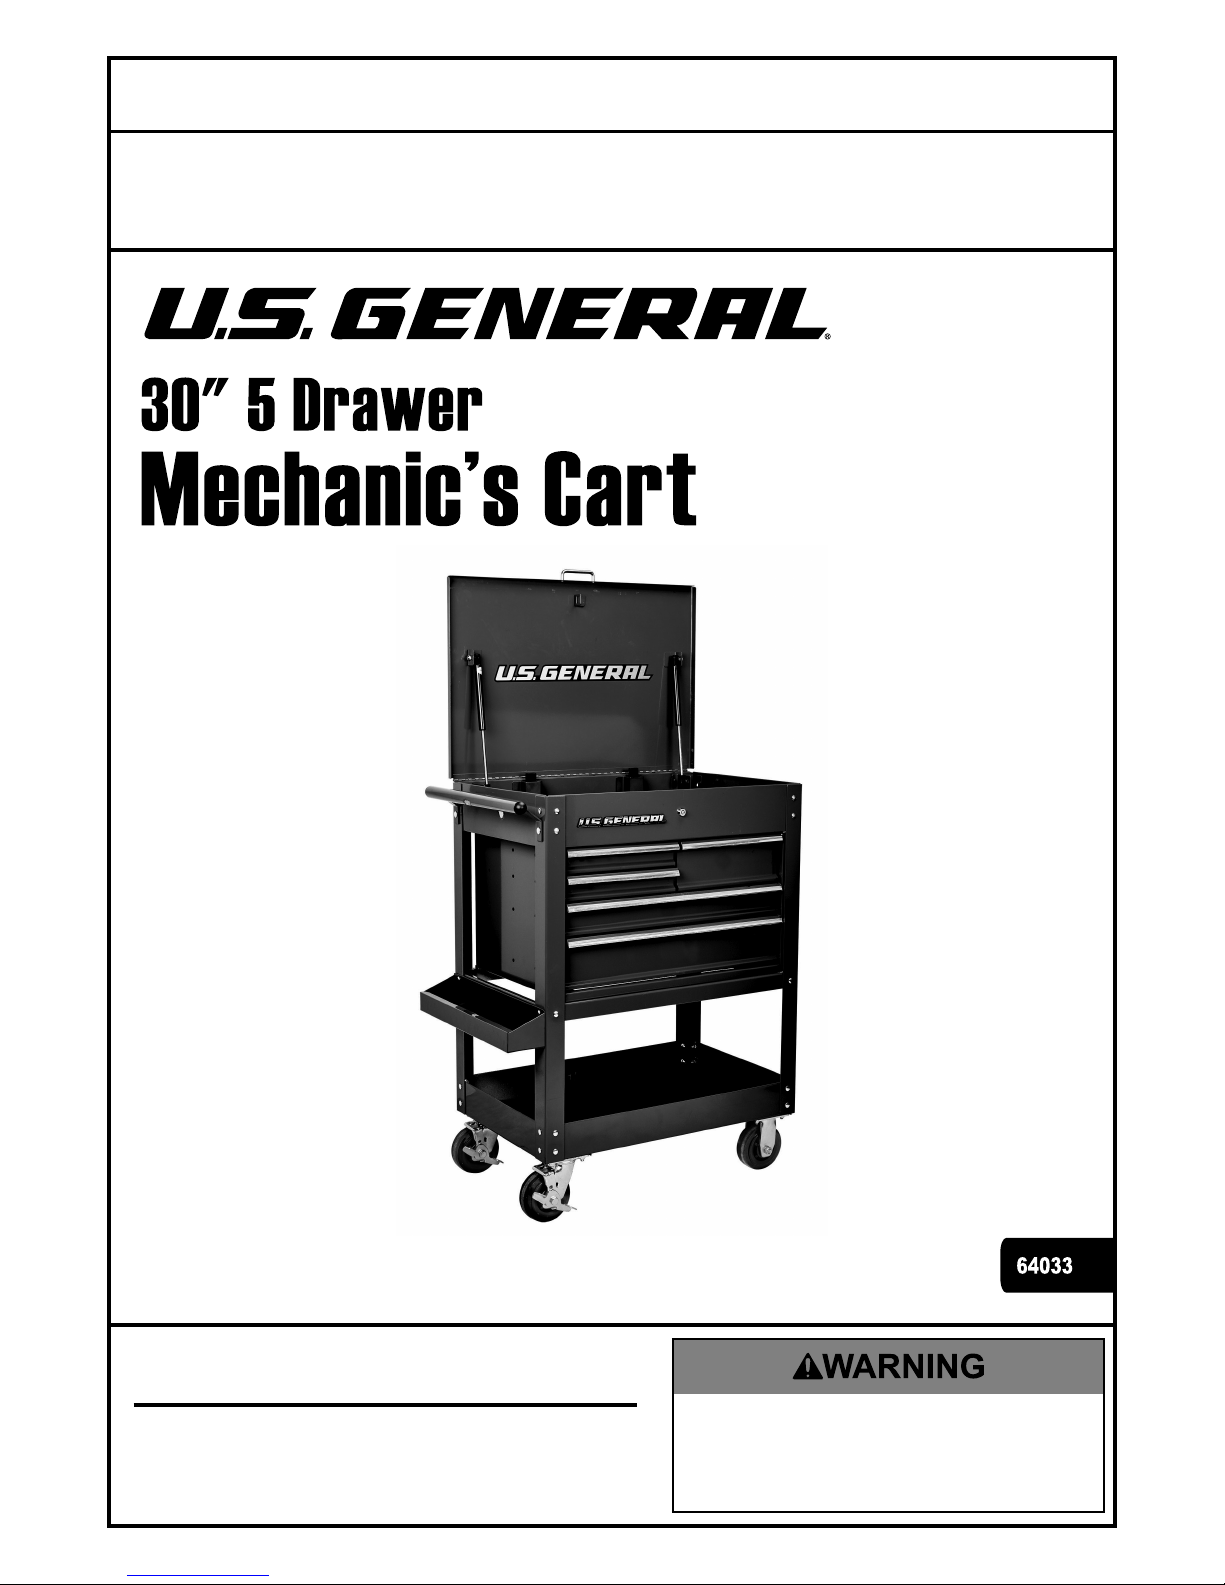
Page 3For technical questions, please call 1-888-866-5797.Item 64033
IMPORTANT SAFETY INFORMATION
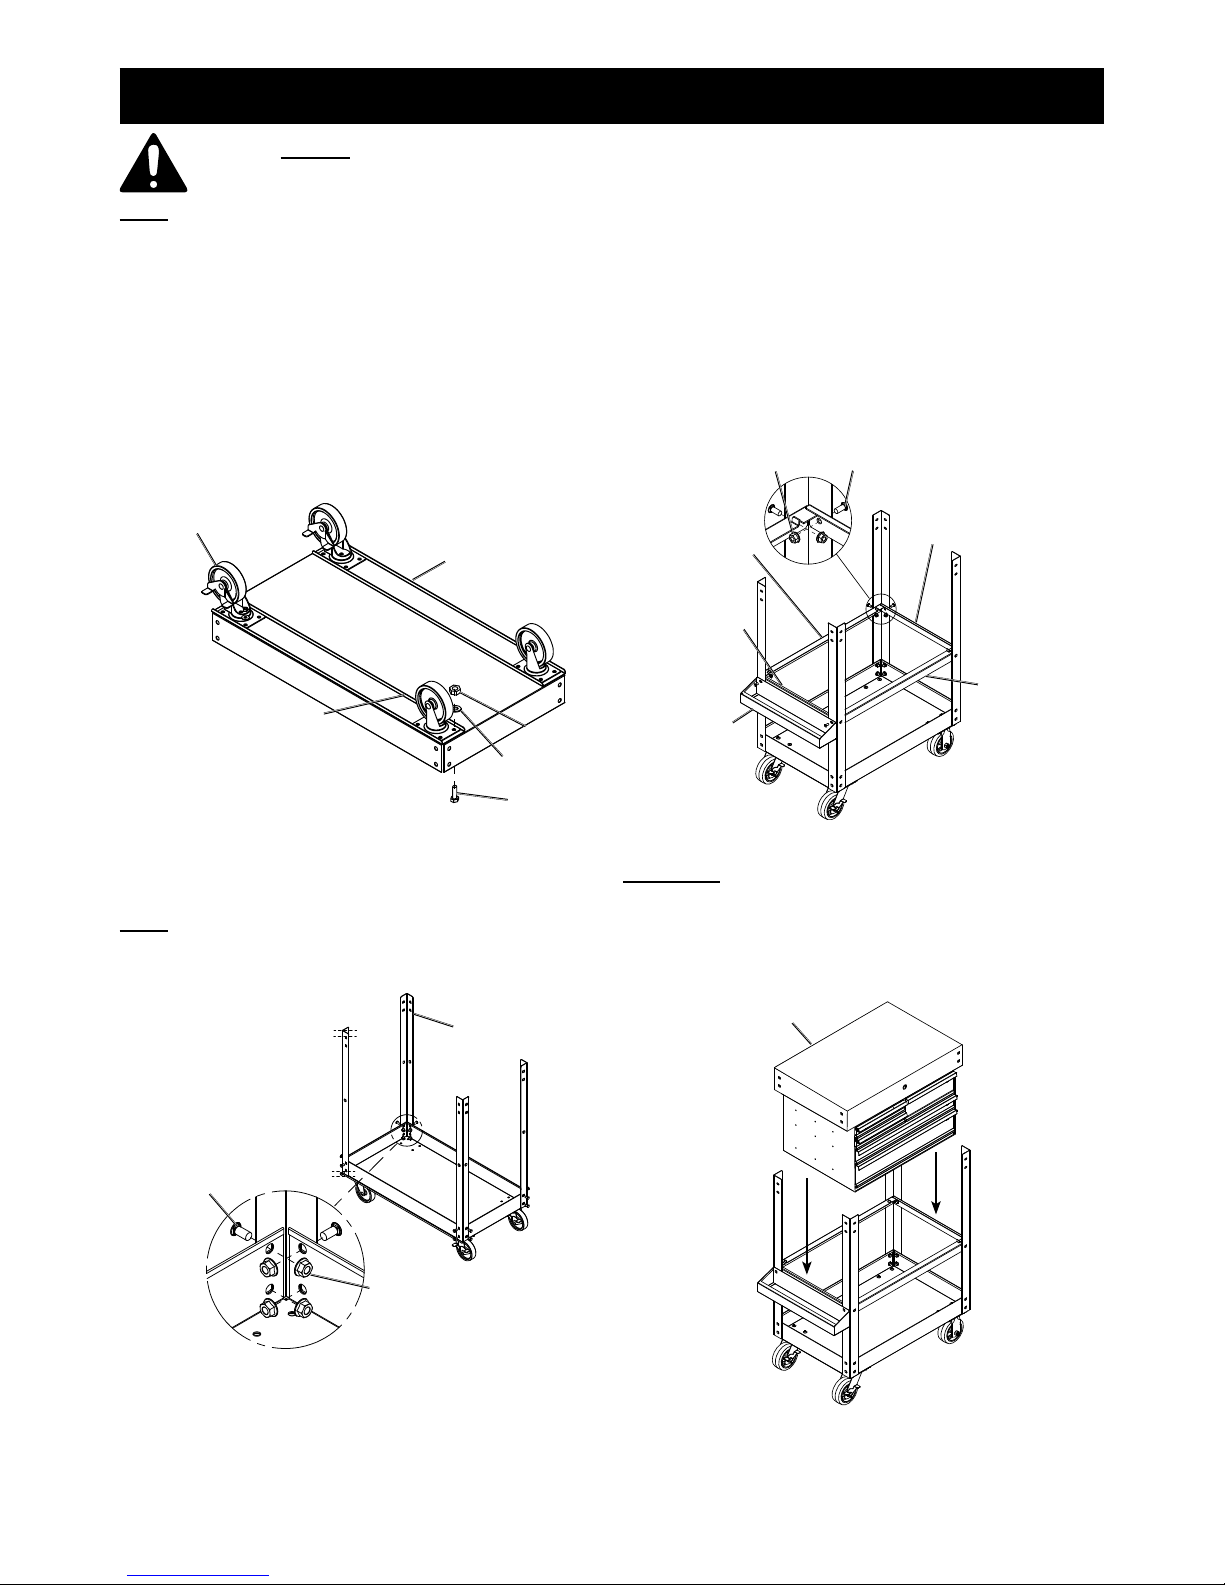
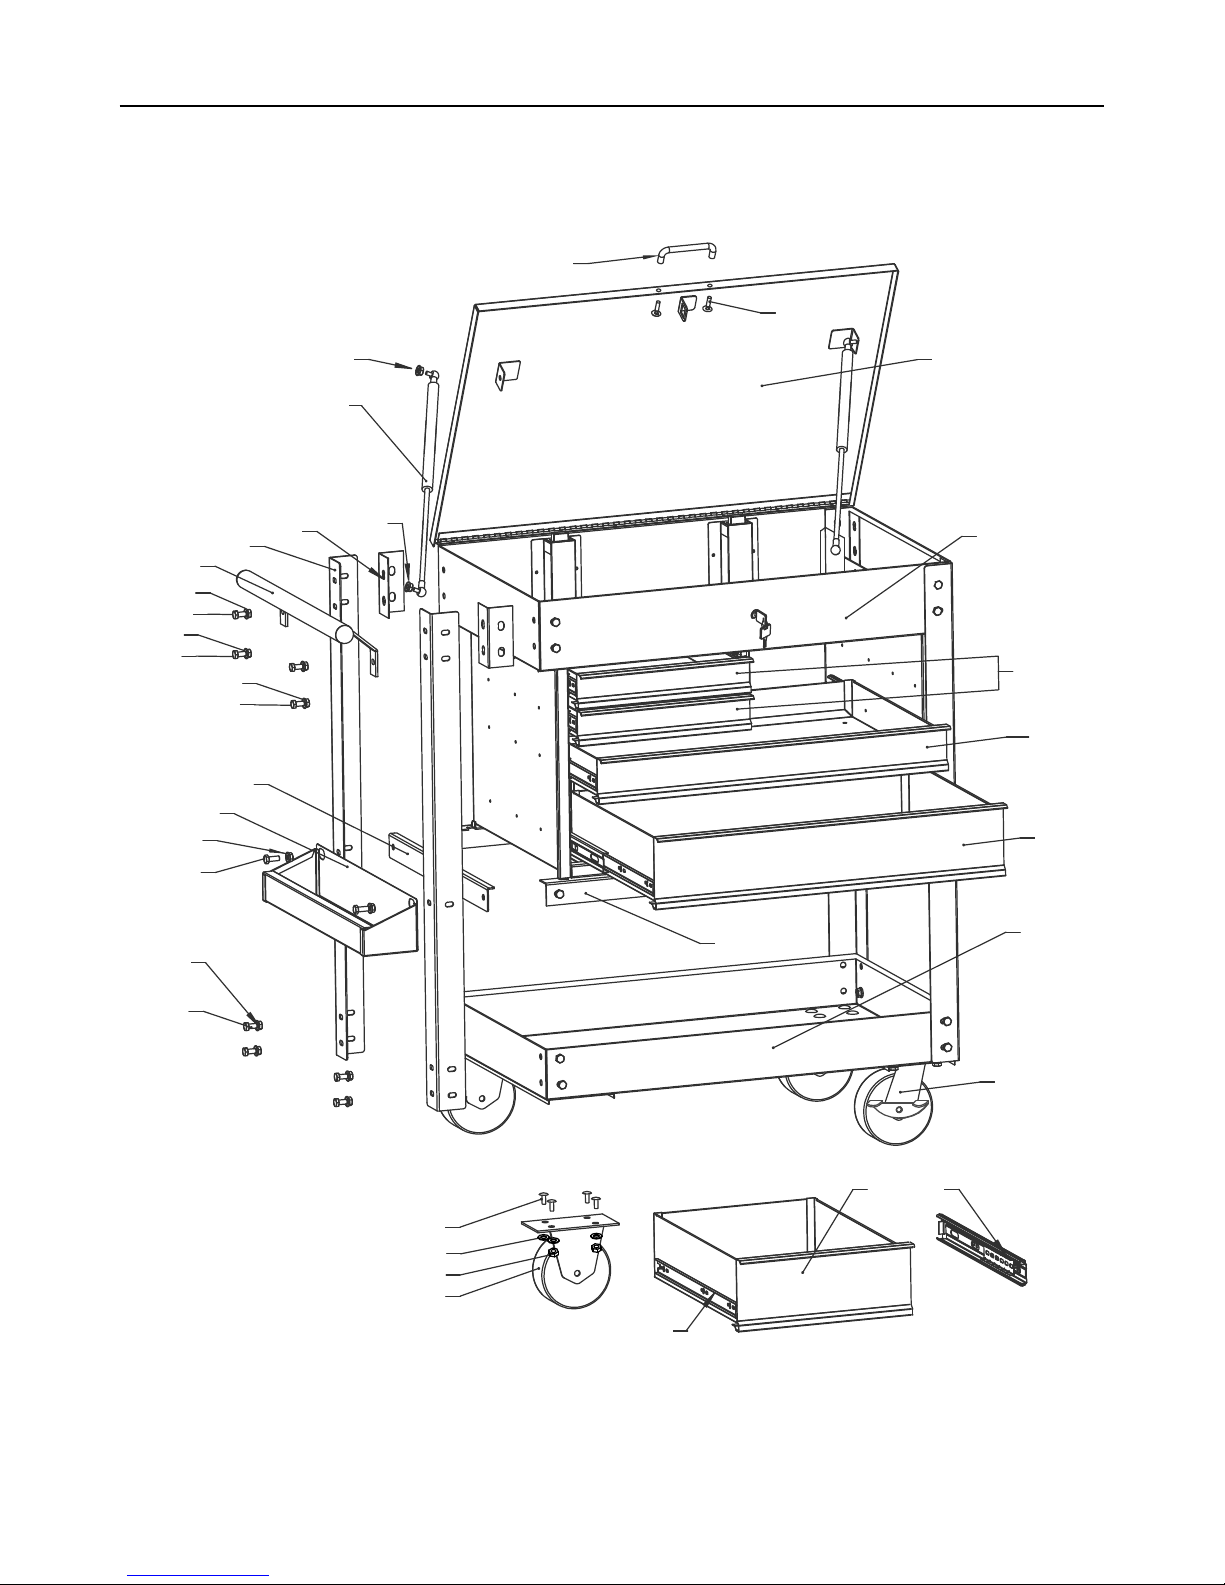
Assembly Precautions
1. Assemble only according to these instructions.
Improper assembly can create hazards.
2. Wear ANSI-approved safety goggles and
heavy-duty work gloves during assembly.
3. Keep assembly area clean and well lit.
4. Keep bystanders out of the area during assembly.
5. Do not assemble when tired or when under the
influence of alcohol, drugs or medication.
6. Weight capacity and other product capabilities apply
to properly and completely assembled product only.
7. Assemble on a flat, level, hard and smooth surface
capable of safely supporting a fully loaded Cart.
Use Precautions
TO PREVENT SERIOUS INJURY AND DEATH FROM TIPPING:
1. DO NOT SIT, STAND OR CLIMB ON THIS ITEM.
2. This product is not a toy nor a toy chest.
Do not allow children to play with or near this item.
3. Do not exceed 700 lb weight capacity,
evenly distributed from bottom up.
Uneven loading causes tipping.
Be aware of dynamic loading!
Sudden load movement may briefly create
excess load causing product failure.
4. Do not open more than one Drawer at once.
Lid must be open for Drawers to be unlocked.
5. Close and lock Drawers before moving.
6. Use only on a flat, level, hard and smooth surface
capable of safely supporting a fully loaded Cart.
Do not roll Cart over concrete seams
or other rough/uneven surfaces.
7. Do not lift using handle(s).
Do not lift while loaded.
8. Lock Swivel Casters after moving.
9. Do not mount on truck bed or
any other moving object.
10. Use as intended only.
11. Inspect before every use;
do not use if parts are loose or damaged.
12. Maintain product labels and nameplates.
These carry important safety information.
If unreadable or missing, contact
Harbor Freight Tools for a replacement.

Page 4 For technical questions, please call 1-888-866-5797. Item 64033
Assembly Instructions
Read the ENTIRE IMPORTANT SAFETY INFORMATION section at the beginning of this document
including all text under subheadings therein before set up or use of this product.
Note: Finger tighten hardware until
assembly is complete.
1. Assemble on a flat, level, hard and smooth surface
capable of safely supporting a fully loaded Cart.
2. Attach two Fixed Casters (10) to one side
of the Bottom Shelf (8), using eight sets of
Bolts (11), Washers (12) and Nuts (13).
3. Attach two Locking Swivel Casters (9) to the other
side, using eight sets of Bolts (11), Washers (12) and
Nuts (13).
Fixed
Caster
Locking
Swivel Caster
Bottom
Shelf
Nut
Washer
Bolt
Figure A
4. Attach Posts (18) to the outside corners of the Bottom
Shelf, using sixteen sets of Bolts (14) and Nuts (15).
Note: Make sure the bolt holes on the upper ends
of Posts measure 1-3/8" from the top and the
lower holes measure 1" from the bottom ends.
Bolt
Nut
Post
1"
1-3/8"
Figure B
5. Attach Front/Back Cross Supports (6) to the inside
of Posts using four sets of Bolts (14) and Nuts (15).
6. On the same side as Swivel Casters, attach
Tray (16) to the outside, and a Side Cross
Support (7) to the inside of Posts using two
sets of Long Bolts (11) and Nuts (15).
7. On the other side, attach the remaining Side
Cross Support to the inside of Posts using
two sets of Bolts (14) and Nuts (15).
Bolt
Front
Cross
Support
Back
Cross
Support
Tray
Side
Cross
Support
Side
Cross
Support
Nut
Figure C
WARNING! The chest is heavy; do not attempt to lift
and lower onto Cross Supports without assistance.
8. With assistance, lift up the chest, then lower
it carefully between the Posts until its bottom
edges rest on the Cross Supports.
Chest
Figure D

Page 5For technical questions, please call 1-888-866-5797.Item 64033
9. Attach Side Handle (17) to lower holes on
same side as Locking Swivel Casters, using
two sets of Long Bolts (11) and Nuts (15).
10. Attach Lid Handle (21) using two Screws (22).
11. Place one Bracket (19) in each corner of
Chest. Attach Posts to chest using fourteen
sets of Bolts (14) and Nuts (15).
12. Attach Gas Struts (20) using four Nuts (13).
Bracket
Lid
Handle
Screws
Gas
Struts
Short
Bolt
Nut
Nut
Side
Handle
Long Bolt
Long
Bolt Nut
Nut
Nut
Figure E
13. Tighten all hardware, starting at the bottom.
Operation Instructions
Read the ENTIRE IMPORTANT SAFETY INFORMATION section at the beginning of this document
including all text under subheadings therein before set up or use of this product.
1. Unlock Drawers and fill Cart evenly, from bottom
to top. Do not exceed weight capacities.
2. Close all Drawers and lock them.
3. Unlock Swivel Casters.
4. Roll Cart to a flat, level, hard and smooth
surface capable of safely supporting a fully
loaded Cart. Do not roll Cart over concrete
seams or other rough/uneven surfaces.
5. Lock Swivel Casters.
Maintenance and Servicing
Procedures not specifically explained in this manual must
be performed only by a qualified technician.
TO PREVENT SERIOUS INJURY FROM TOOL FAILURE:
Do not use damaged equipment. If any part becomes damaged,
have the problem corrected before further use.
1. PERIODICALLY, inspect the general
condition of the Cart. Check for:
• loose hardware,
• misalignment or binding of moving parts,
• brake operation,
• caster swivel function and movement,
• cracked or broken parts,
• any other condition that may
affect its safe operation.
2. Wipe external surfaces of the Cart with clean cloth.
3. Lubricate Drawer Slides as needed.
Table of contents
Other U.S. General Outdoor Cart manuals
Popular Outdoor Cart manuals by other brands

Carts Vermont
Carts Vermont 20 manual

Westward
Westward 2CZY4 Operating instructions and parts manual

Numatic
Numatic EcoMatic EM-5 Assembly

Bosch
Bosch XL-Cart Operating/safety instructions

Tennsco
Tennsco Modular Cart Top Component Assembly Assembly Instructions/Parts Manual

Clam
Clam POLAR TRAILER HD MAX manual