UEC DSD 700 User manual

DSD 700 OPERATING INSTRUCTIONS 1
Contents
Unpacking ................................................................................... 2
Safety ........................................................................................... 2
Preface ......................................................................................... 2
Digital Satellite Services............................................................ 2
Conditional Access .................................................................... 3
Smart Card ................................................................................... 3
Inserting the Smart Card ......................................................... 3
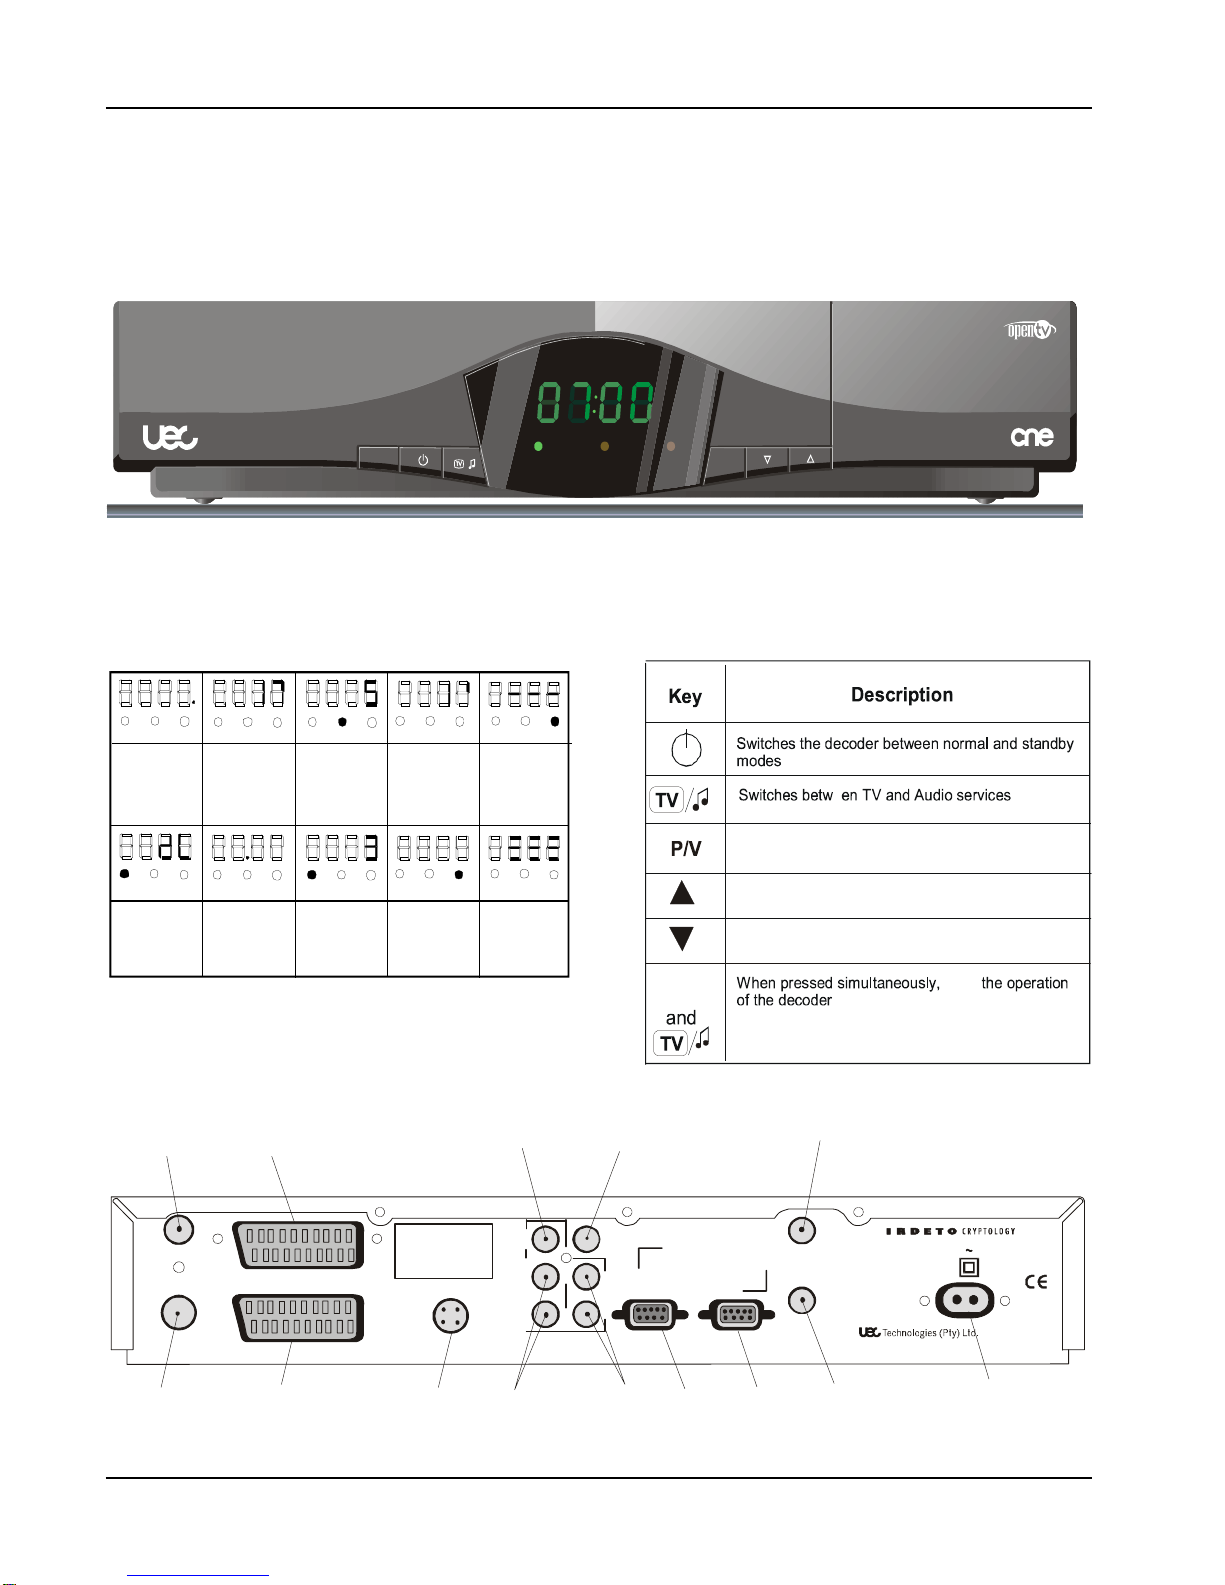
The Digital Satellite Decoder (DSD) ....................................... 4
Display .......................................................................................... 4
Front Panel Keys .......................................................................... 4
Rear Panel Connections .............................................................. 4
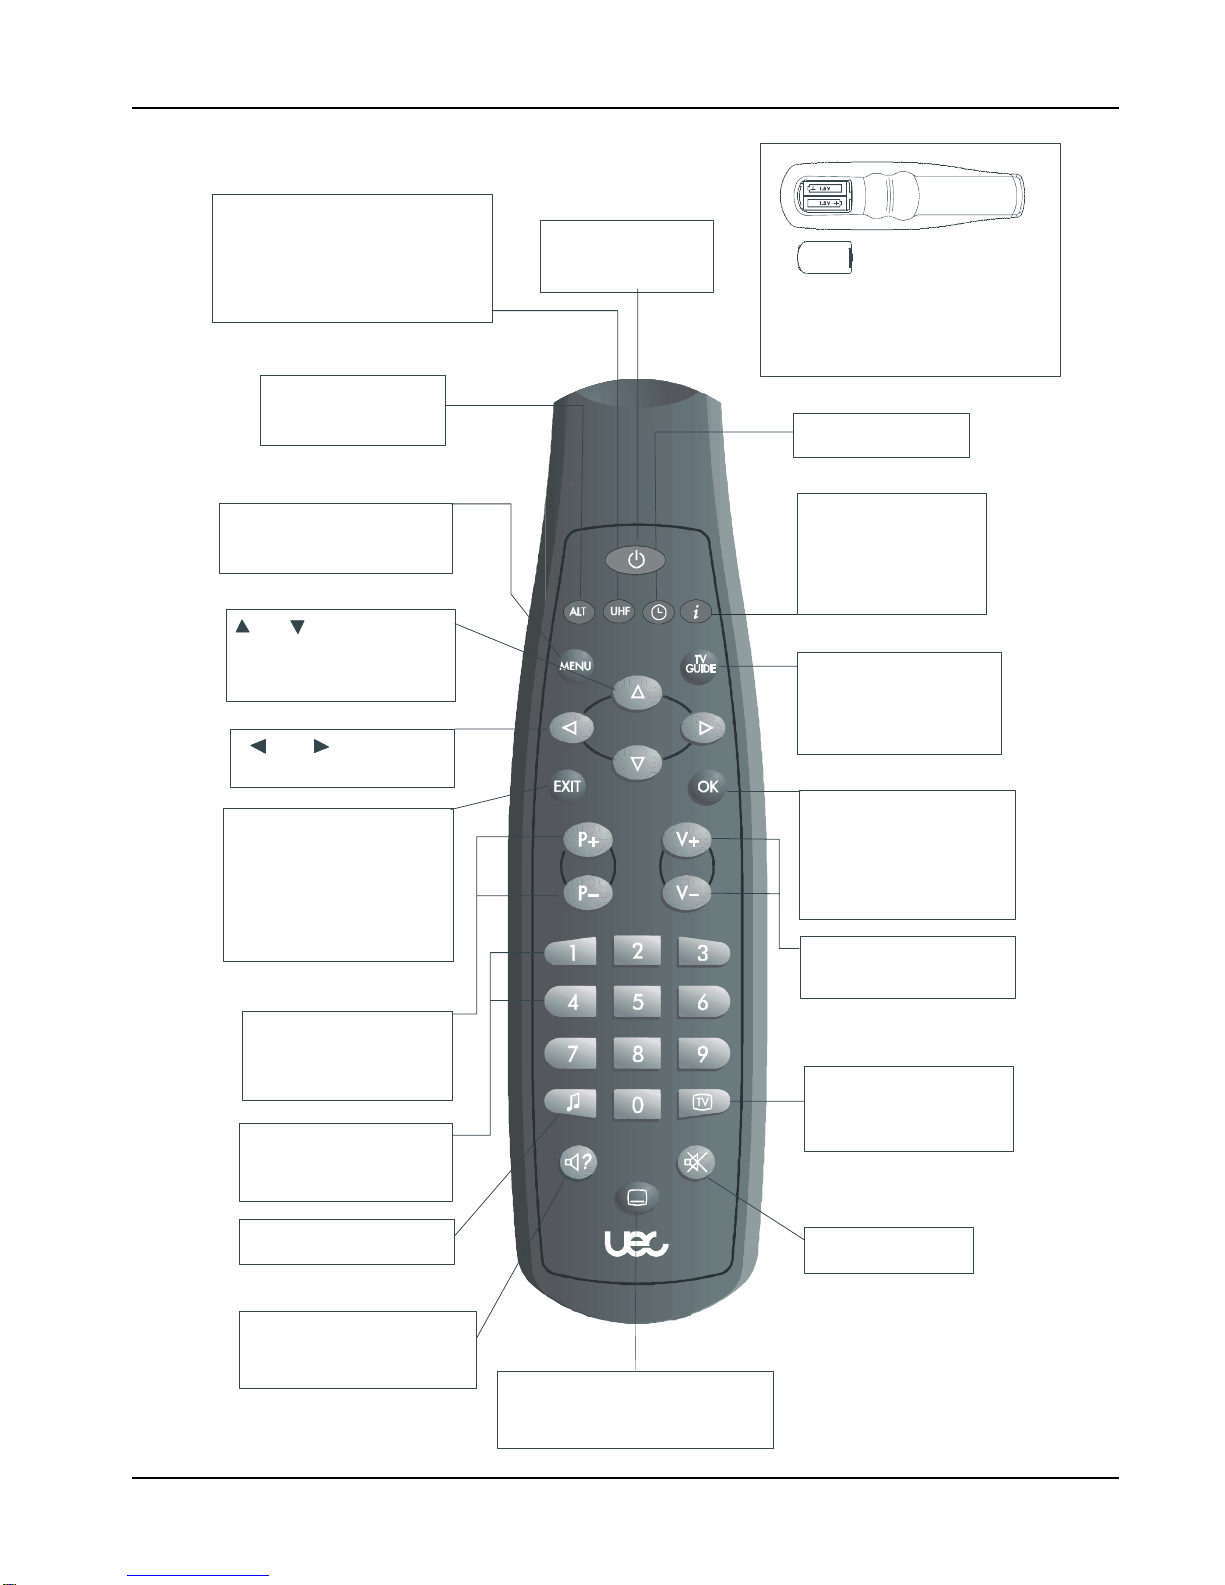
Remote Control Unit................................................................... 5
Replacing Batteries in the RCU ................................................... 5
Getting Started............................................................................ 6
Installation of the satellite dish and cabling to the decoder......... 6
Installation Indemnity ............................................................. 6
Setting-up the System .................................................................. 6
Switching on the Decoder at the Mains ....................................... 6
Tuning your TV ............................................................................. 6
Adding a Modem .......................................................................... 7
Standby and Normal Modes......................................................... 7
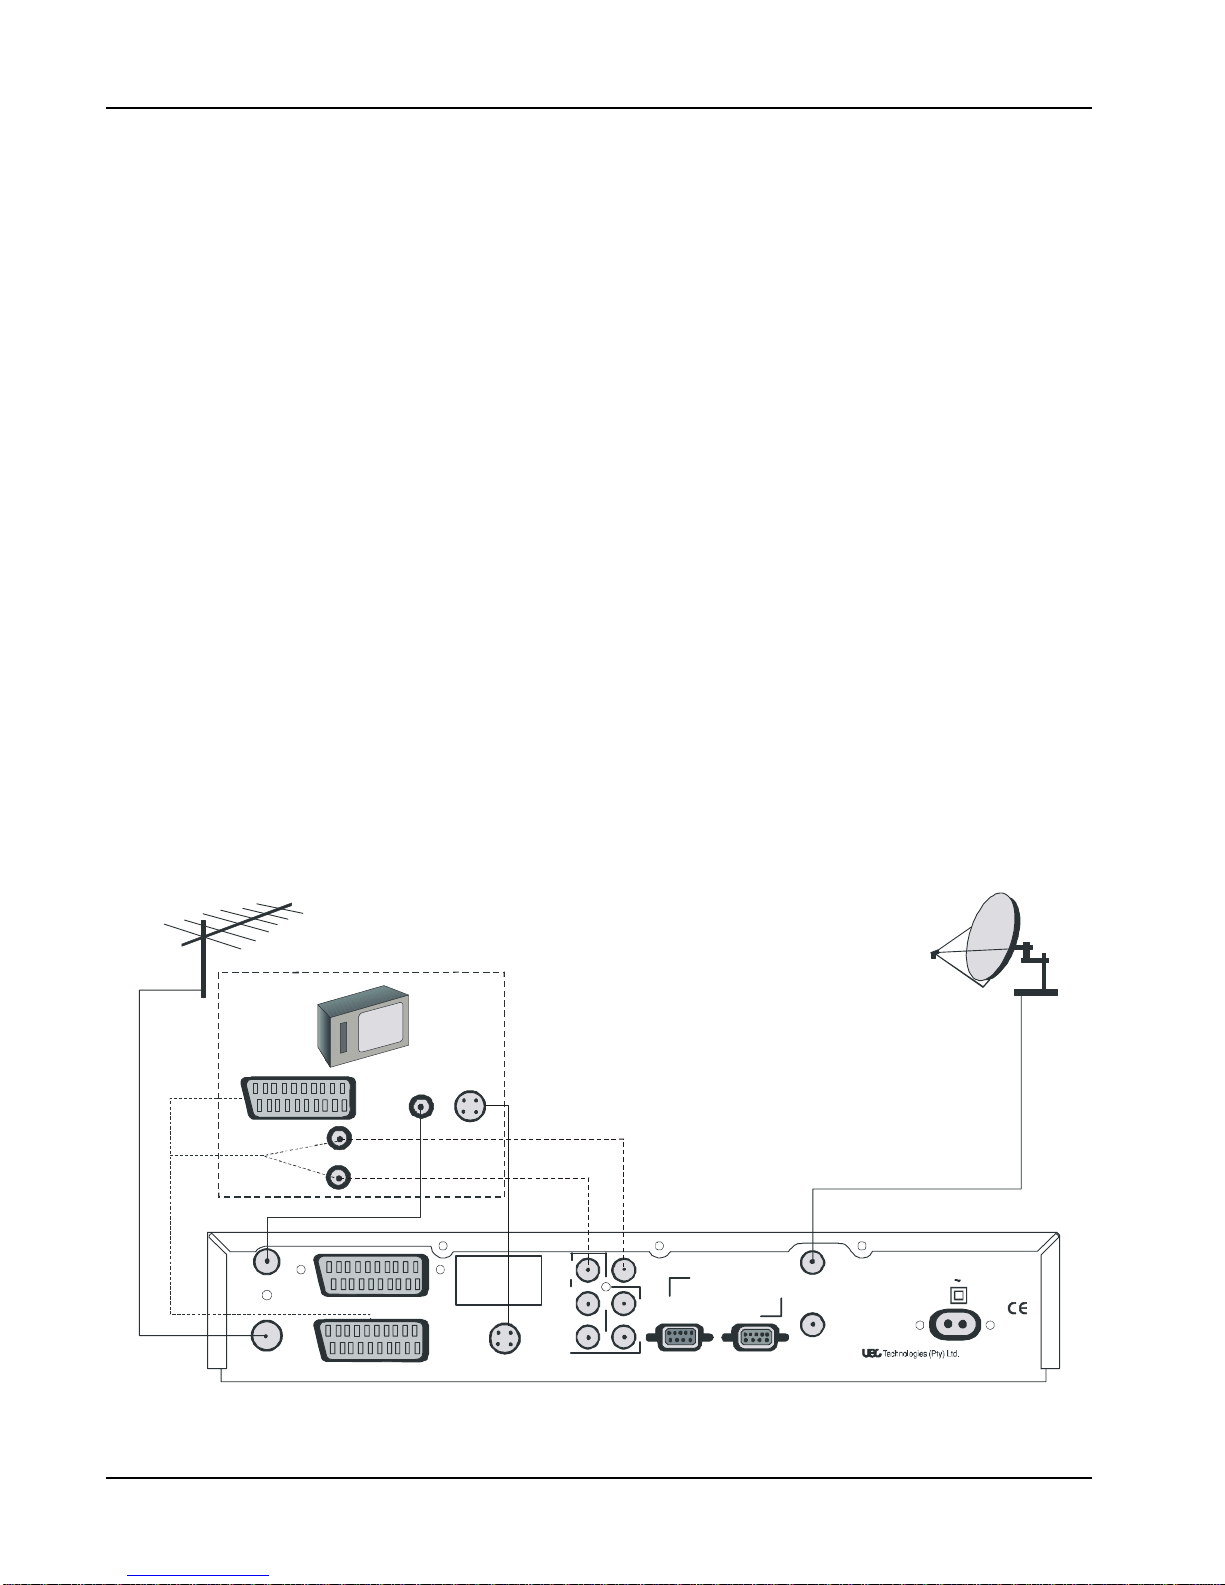
Optional Decoder Connections .................................................... 8
Introduction.............................................................................. 8
Hints to Quality TV System Configurations ............................ 8
IRD, TV..................................................................................... 8
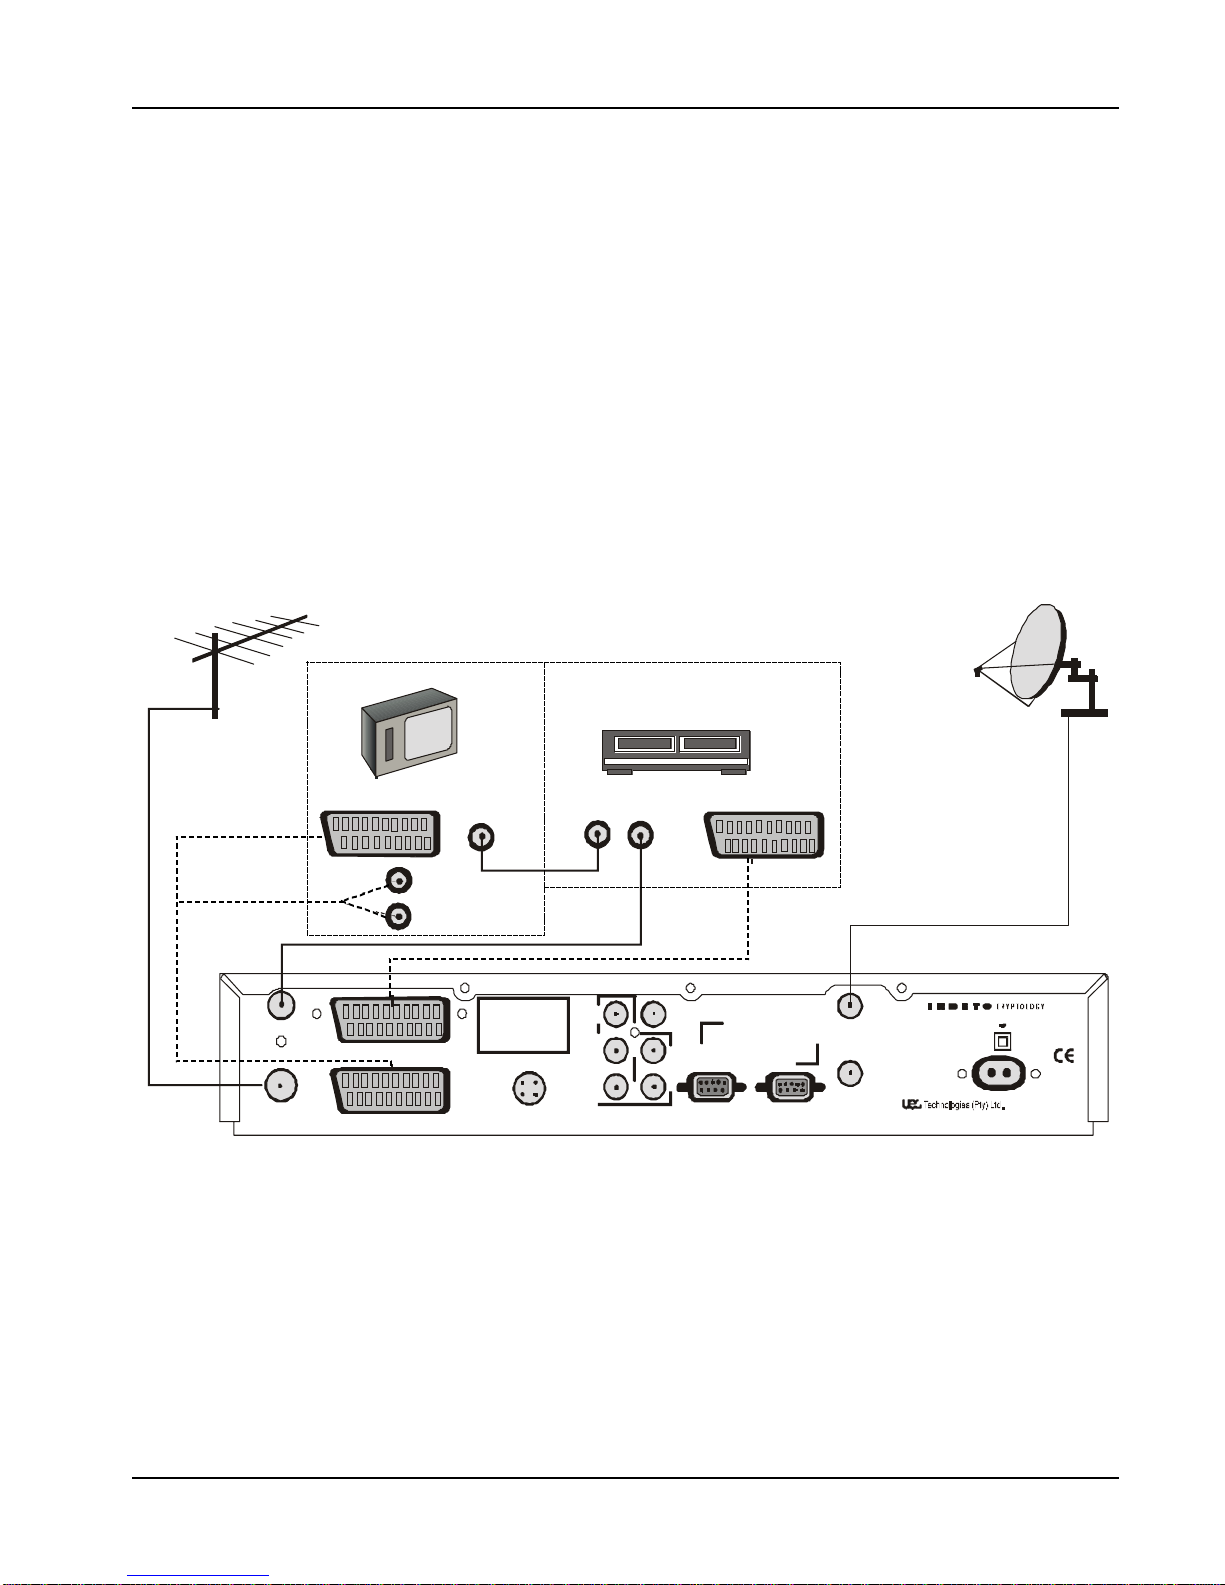
IRD, VCR, TV (using SCART or RF Interfaces) ...................... 9
IRD, TV (SCART or RF Interfaces), Hi-Fi ................................ 10
IRD, VCR, TV, Hi-Fi ................................................................. 11
IRD, VCR, TV, Hi-Fi (using RCAconnectors) ......................... 12
Bouquet Selection ...................................................................... 13
Selecting Specific Services .................................................... 13
Selecting Services Directly ..................................................... 13
Stepping through Services...................................................... 13
Stepping using the RCU .......................................................... 13
Stepping using the Decoder Front Panel Keys ...................... 13
Selecting Specific Services from the EPG ............................. 14
Selecting Services from the Information Bar.......................... 14
Controlling the Functions....................................................... 14
Volume Control using the RCU Keys ...................................... 14
Volume Control using the Decoder Keys ................................ 14
Mute......................................................................................... 14
Displaying Subtitles or Teletext ............................................... 14
Subtitles ............................................................................. 14
Teletext ............................................................................... 14
Clock ......................................................................................... 15
Selecting Soundtracks ............................................................. 15
Power Reset ............................................................................ 15
Signal Source Selection ........................................................... 15
Open TV Electronic Programme Guide ............................... 15
Using theEPG ............................................................................... 15
Now/Next EPG ........................................................................... 15
Extended EPG ............................................................................ 16
Theme Search ........................................................................... 17
Open TV Information Bar ........................................................ 17
Reminders ................................................................................. 17
Parental Blocking...................................................................... 17
Menu Navigation Route ............................................................. 18
Using Menus ............................................................................... 19
Language Selection...................................................................... 19
Language Option in Guide & Menu.......................................... 19
Soundtrack Options.................................................................. 19
Parental Control............................................................................ 20
Setting the Parental Level....................................................... 20
Changing the Parental Pin Code ............................................ 20
Information Box Display Period .................................................... 21
Organising Service....................................................................... 21
Sort TV Services ..................................................................... 21
Reset TV Services .................................................................. 21
Sort Audio Services................................................................. 21
Reset Audio Services.............................................................. 21
Full Rescan .............................................................................. 22
Mail Messages .............................................................................. 22
Advanced Options ........................................................................ 22
Change Dish Installation ......................................................... 22
LNB Configuration .............................................................. 22
Signal Setup ....................................................................... 23
Tune IRD ............................................................................. 23
Reset to Factory Defaults .................................................. 23
Loop Through ..................................................................... 23
Signal Detection....................................................................... 23
Information ............................................................................... 23
IRD Status ........................................................................... 23
CA Status ........................................................................... 23
Loader Status..................................................................... 23
TV Installation .......................................................................... 24
TV Type .............................................................................. 24
Aspect Ratio....................................................................... 24
UHF Tuning ......................................................................... 24
Scart Source ...................................................................... 24
Scart Video Output ............................................................ 24
Change Modem Settings (if fitted) .......................................... 25
Local Time................................................................................ 25
IRD Upgrade ............................................................................ 25
Troubleshooting ....................................................................... 26
Specifications............................................................................ 30
Hotlines....................................................................................... 31
Installation Settings ................................................................. 31
Notes ........................................................................................... 32

2 OPERATING INSTRUCTIONS DSD 700
UNPACKING
Ensure that the following items are included with the Digital Satellite
Decoder (DSD):
1 x Remote Control Unit (RCU)
2 x AAA Batteries
1 x Flylead
1 x Mains Cable
1 x User Manual (Operating Instructions)
SAFETY
This decoder exceeds International Safety Standards. Please read
the following recommended safety precautions carefully.
MAINS SUPPLY: 210-250 V AC 50 Hz ONLY.
LIQUIDS: Keep liquids away from the decoder.
CLEANING: Before cleaning, disconnect the decoder from the wall
socket. Use a cloth lightly dampened with water (no solvents) to
clean the exterior.
VENTILATION: Do not block the decoder ventilation holes. Ensure
that free airflow is maintained around the decoder. NEVER stand the
decoder on soft furnishings or carpets. Do not use or store the
decoder where it is exposed to direct sunlight, or near a heater.
Never stack other electronic equipment on top of the decoder.
ATTACHMENTS: Do not use any attachment that is not
recommended by the manufacturer, as it may cause a hazard or
damage the equipment.
CONNECTION TO THE SATELLITE DISH LOW NOISE BLOCK
(LNB): The LNB connector cable has a voltage on its centre core. It
is therefore recommended that the decoder is disconnected from the
mains power before connecting or disconnecting this cable. FAILURE
TO DO SO COULD DAMAGE THE LNB.
SERVICING: Do not attempt to service this product yourself. Any
attempt to do so will make the warranty invalid. Refer all servicing to
a qualified service agent.
LIGHTNING: If the decoder is installed in an area subject to intense
lightning activity, protection devices for the decoder mains connector
and modem telephone line are essential. The individual
manufacturer’s instructions for safeguarding other equipment, such
as TV set, Hi-Fi, etc., connected to the decoder, must also be
followed during lightning storms.
EARTHING: The earth of the LNB cable MUST BE DIRECTLY
CONNECTED to the system earth for the satellite dish. The earthing
system must comply with local regulations.
Refer to the Installation Indemnity on page 6.
PREFACE
The DSD introduces exciting new technology. This manual provides
full information on how to use the decoder and enjoy the benefits of
all its features.
The decoder is easy to use, even for those users unfamiliar with, or
intimidated by, modern technology. The more advanced and more
complex features can be avoided until you become comfortable with
the basic operation of the system.
The manual provides:
•Important safety precautions; please study them.
•Overview material; read only those parts that interest you. It is
not necessary to study the manual from cover to cover before
using the decoder.
•Step-by-step instructions on how to use the decoder and its
advanced features.
•Step-by-step instructions on how to install the decoder and
connect it to basic sound and TV systems. It is beyond the
scope of this manual to include all of the possible
configurations or installation procedures.
•Troubleshooting guide to assist you if you have difficulty with
operating the decoder correctly, or if technical problems occur.
The operation of the decoder can be upgraded using over-the-air
signals (typically in the morning). This manual and the menus
downloaded in the decoder are therefore subject to change at any
time.
This document and the information contained herein are the subject
of copyright and intellectual property rights under international
convention. All rights are reserved. No part of this document may be
reproduced, stored in a retrieval system or transmitted in any form by
any means, electronic, mechanical or optical, in a whole or in part,
without the prior written permission of UEC Technologies (Pty) Ltd,
the Manufacturer.
DIGITAL SATELLITE SERVICES
The DSD has been designed to receive and process digital signals
from the Pas 4, Pas 7, Astra and EutelSat satellites. The satellites
act as mirrors in the transmission process, beaming the Service
Provider’s signals back to your satellite dish. Compared to conven-
tional TV (analogue), digital technology presents higher quality
pictures, sound comparable to that of a CD, and many more
services.
Satellite technology also enables excellent reception of satellite TV
services in remote rural areas where good quality terrestrial
reception has never before been possible.
The term “Services” is used instead of “Channels” because
compressed digital TV and audio technology efficiently uses
available bandwidth, allowing several services to use the bandwidth
of one channel.
In addition to the digital TV and audio signals, satellite signals also
contain data that the decoder extracts, processes and stores. This
provides up-to-date text information on the content and status of the
various services at the touch of a button. Convenient facilities are
also provided to manipulate received data in order to customise
viewing and listening preferences.
Due to the nature of compressed digital TV, many more features will
become available in the near future.

DSD 700 OPERATING INSTRUCTIONS 3
CONDITIONALACCESS
Although some satellite TV and audio services are free to air, most
TV and audio services are only available on a subscription basis
and can only be enjoyed via the conditional access components.
These are the removable Smart Card and a built-in conditional
access process already fitted into the system.
Smart Card
The Smart Card looks similar to a credit card and is inserted into the
slot behind the right-hand front flap of the DSD.
A valid Smart Card entitles you to view and listen to all the services
you choose to subscribe to. Full details of subscription options are
supplied with the card.
Inserting the Smart Card
The Smart Card is the key to unlocking the decoder. The decoder will
not decode scrambled TV or audio services if the card is not inserted
or is incorrectly inserted.
Inserting the Smart Card into the decoder allows instant access to
all the services you subscribe to.
The Smart Card is not required for access to menus.
The Smart Card is not required for access to menus except for the
Parental Control Options sub-menus, which requires your PIN to be
entered first. The setting of the Advanced Options parameters does
not require the Smart Card to be inserted.
The Smart Card, which is supplied separately and forms part of
your subscription, is updated over-the-air when your subscription
details change, for instance, each time you purchase additional
products (details regarding these products will be announced in the
future).
To insert the Smart Card, follow the instructions carefully.
1Open the right hand flap on the front of the decoder (see
figure) Swing the flap downwards to expose two card slots.
2Hold the Smart Card horizontally with the logo on top and the
arrows pointed towards the front of the card. Insert the
card fully into the open (bottom) slot.

4 OPERATING INSTRUCTIONS DSD 700
THE DIGITAL SATELLITE DECODER (DSD)
The IRD combines a high quality MPEG-2 and DVB compliant satellite
receiver, with a sophisticated decoder in one package. The IRD
provides all that you need to exploit the exciting new satellite
services that are now available.
DISPLAY
REAR PANEL CONNECTIONS
FRONTPANELKEYS
RF OUT
RF IN
MONO
AUDIO VIDEO
OUT
STEREO AUDIO
OUTPUTS
R
L
DATA SERVICE
WARNING! Hi
g
h Volta
g
e
DANGER! Do not open
Unauthorised opening
renders warranty invalid
Protect against moisture
LNB IN
LNB OUT
F
I
X
E
D
V
A
R
I
A
B
L
E
VCR
S-VHS
EXTERNAL MODEM Republic of South Africa
400 mA max.
210- 250V 50Hz 30W
TV
TO TV/VCR
TERRESTRIAL
ANTENNA
CONNECTOR
SCART CONNECTOR
(TO VCR)
AUDIO TO MONO
AMPLIFIER
(TV OR VCR)
SCART
CONNECTOR
(TO TV)
S-VHS
CONNECTOR
(TO TV)
AUDIO TO
Hi Fi FIXED STEREO
AUDIO OUTPUT
(FOR RECORDING)
RCA VIDEO
OUTPUT
(TV OR VCR)
TO EXT.
MODEM COMMS
PORT LOOP-THROUGH
OUTPUT MAINS INPUT
SATELLITE
DISH CONNECTOR
Selects the next service on the list, or increases
volume level
Selects the previous service on the list, decreases
volume level
V+
Switches between programme selection and
volume control
Only to be used if the decoder has stopped
reacting to the Remote Control
e
reset
YGR YGR
YGR YGR
YGR
YGR YGRYGR YGR
YGR
Green dot
IRD in Standby
mode
Service No. 17
selected Green light -
Audio services
selected
Rotatingbar.
Searching for
service
information
Three flashing
bars and red
light. Service
not found, or
signal of inferior
quality
Downloadin
progress.
Steady yellow
light
Green dot
flashes when
RCU keys are
pressed
Yellowlight.
Mail message
waiting
Red light
Error
indication
Menu selected
D I G I T A L S A TE L LI T E D E C O D E R
- D SD 7 0 0
/P/V

DSD 700 OPERATING INSTRUCTIONS 5
Remote Control Unit (RCU)
Inserting
/
changing the batteries
- Never leave flat batteries in the remote control
- Only Insert
A
A
A
size batteries
- Make sure batteries are correctly positioned, or
remote will not work
Puts the decoder into
standby or takes it out
of standby
When pressed, displays
the last viewed
programme
Displays the Main Menu, or,
if a menu is displayed, returns
to the last viewedprogramme
and arrow keys
Move the highlights up or down
the screen when a menu or
TV/Radio guide isdisplayed
and arrow keys
Switches options in menus
Removes the TV/Radio guide
or information from the screen
and redisplays the last
programme you were
watching
If a menu is displayed,
pressing EXIT returns you to
the previous menu
P+ and P- keys
Steps through the
channels one at a time
(+ for next, - for previous)
Number keys 0 to 9
Selects programmes,
or keys in numbers,
e.g, PIN number
Switches to a Radiochannel
from aTV channel
Displays soundtrack information
on the TV for 5 seconds.
Where options are available, the
display identifies the numbers
Displays subtitle options (if available)
on the TV. When pressed again,
displays teletext on channels
where it is available
Displays the local time
and date on the TV
Displays a programme
information bar on the
screen for 5 seconds.
When pressed again,
displays extended event
information
Selects the
programme guide (EPG)
which displays all the
availableTV and Radio
programmes
Selects a programme in
when In the EPG and selects
highlighted options or values
in menus.
Saves any changed settings
in menus
V
+ and
V
- keys
A
d
j
usts th volume up or
down
Switches to aTV channel
from a Radio channel.
Displays available bouquets
on screen
Mutes the sound from
the TV
e
When pressed once then released,
toggles between the various INPUT
sources (VCR, TV, IRD).
When pressed, held for 5 seconds
then released, displays the UHF
tuning channel. Press once to remove
the tuning channel.
Electronic

6 OPERATING INSTRUCTIONS DSD 700
GETTING STARTED
NOTE:Unless absolutely necessary, do not change
installation, connections or decoder setup, or carry out
any retuning on a working system. If changes are
made, note all changed settings in the table on page
31.
Installation of the satellite dish and cabling to the
DSD
Installation procedures for satellite dishes and cabling to DSDs are
outside the scope of this manual. Please refer to the manuals
provided with your satellite dish and associated equipment if you
decide to do the installation yourself.
Installation Indemnity
1For the decoder to operate, it is required to correctly install and
align a satellite dish and a Low Noise Block (LNB) converter.
2Each and every INSTALLER acts as an independent contractor
and is not a servant, sub-contractor or agent of the
manufacturer. The manufacturer is, therefore, not liable for any
loss or damage of any nature whatsoever caused by the
conduct of the installer, including but not limited to:
a. Any direct, indirect or consequential damages of any
nature or any loss of profit or other special damages of
any nature which the USER may suffer as a result of any
breach by the INSTALLER of any of its obligations to the
USER.
b. Any loss or damage to any property of the user or
any third party, situated on the USER’s premises even if
loss or damage arises out of any part of the INSTALLER.
3The manufacturer does not directly or indirectly warrant or
guarantee or make any representations whatsoever with
regard to any equipment, including, but not limited to any dish,
LNB, or cabling, used by the INSTALLER.
4Subject to any express warrant or guarantee given by the
manufacturer, in writing, the manufacturer does not:
a. Give any warranty or guarantee or make any
representation whatever in respect of any work
carried out by the INSTALLER.
b. Accept any liability for any latent or other defect in any
work carried out by the INSTALLER.
Setting-up the System
1Install and align satellite dish (installer).
2Connect the decoder to the TV set (either SCART to SCART or
RF OUT on the decoder to RF IN on the TV). (See Optional
Decoder Connections.)
Switching on the Decoder at the Mains
When you switch on the decoder at the mains, it goes through a
power-up sequence, then attempts to find a signal at the specific
factory-set frequency. During this process, various indications are
displayed on the decoder display and TV, as shown in the following
sequence of drawings:
NOTE: If the TV is not tuned to the channel chosen to
view the satellite services, the sequence is still
the same, but the TV will not display the scanning
screen. To tune the TV to the decoder services,
tune the TV as per Tuning Your TV.
If your TV has been tuned to accept the decoder
services, but your smart card has not been inserted
into the decoder, an error message will appear on your
TV screen.
If your decoder was in standby mode at mains power
switch off, the decoder will display a green dot when
mains power is restored. Press On/Off symbol to
restore signal.
Tuning your TV
If your TV is not tuned to the decoder viewing channel, you will not be
able to view the satellite services. Your VCR, decoder and TV can
also interfere with each other unless they are tuned in correctly. The
output of the decoder can be tuned over the whole UHF band using
the following recommended method (refer to the following figures):
1Connect the satellite dish and terrestrial antenna (installer).
2Connect the installation as shown (if VCR installed).
3Switch on the TV and select an unused channel to use with
your VCR.
4Switch on your VCR, then set its test signal to ON (see VCR
instruction manual).
5Tune the TV to the test signal from the VCR. Switch off the
VCR test signal.
dL
I
I
Inf
7
Scann i ng
Wa iti n g for N IT ac quisiti o n
Press EXIT tocancel scanning
dL with yellow dot indicates
software being down-loaded
Number 1 with rotating bar and
yellow dot. Indicates decoding
process is in progress
Display flashes briefly
Three flashing bars and red dot
Inf (information) appears
at the same time as
scanning screen on TV
Number of last used
service appears

DSD 700 OPERATING INSTRUCTIONS 7
6On the TV, select any unused channel on which you wish to
view your satellite programmes (only in case of a non-SCART
or RCA connection). Once selected, all your satellite services
will be viewed on this channel, selection of the service being
made using the RCU.
7Press and hold UHF on the RCU for approx. 5 seconds until
UHF is displayed on the decoder display. Tune your TV set to
receive the decoder test signal display (see following figure).
A Channel number (initially 50) will be displayed on the
decoder front panel display.
Press UHF on the RCU to remove the test signal.
Check that any noise from the decoder does not interfere with
signals received on the VCR.
Check all tuned channels on the TV for interference.
8If any interference is noticed, change the UHF channel number
as follows:
Press and hold UHF on the RCU to display UHF on the
decoder display and the UHF test screen on the TV.
Change the channel number by pressing and on the
RCU.
Press OK to save. The following will happen as soon as
and is pressed:
a. The TV display is lost because the TV is not tuned to the
new channel.
b. The new channel number is displayed on the front panel
of the decoder.
On the TV, retune the channel allocated to the decoder until
the decoder test pattern is clearly visible.
Repeat step 8 until interference on all channels is eliminated.
NOTE: After changes have been made, the decoder must
not be switched off for at least 3 minutes to allow for
the new setting to be saved.
If interference is still present, it is recommended that good
quality screened cables (preferably double screened) are used
for interconnecting all other equipments to the decoder.
Standby and Normal Modes
The decoder does not have a mains power on/off switch and it is
recommended that, for normal viewing, it remains connected to the
mains after installation. When the decoder is not in use, it should be
switched to the standby mode using the symbol on the front
panel or on the RCU.
The standby mode is indicated by a constant small green dot on the
right of the decoder display panel. To use the decoder after the initial
installation:
1Switch on the TV and any other equipment included in the
system.
2Select the channel on the TV that you have allocated for
viewing the satellite services (in case of a non-SCART / RCA
connection) or select the appropriate scart source (in case of
a SCART or RCA connection.
3If the decoder is in the standby mode, press on the
RCU or decoder front panel, to return to the normal viewing
mode. A service number will be displayed on the front panel
indicator.
4Press TV on the RCU. A Bouquet selection box is then
displayed on the TV screen . Select the bouquet you have
subscribed to, then press OK.
5If you wish to select the Audio Services, press the key
on the RCU, or on the decoder front panel. If subscribed to,
an audio service will be heard, and the audio programme
information box will be displayed on the TV. A green indicator
on the front panel display is illuminated while the decoder is in
the Audio Services mode.
Some audio services are free-to-air and do not require a
subscription. TV Services are restored by pressing TV on the
RCU, or TV on the decoder front panel.
NOTE: When switching from normal to standby then
back to normal, the decoder automatically returns
to the previously selected service.
If a SCART VCR is connected, it is not necessary
to take the decoder out of standby to view VCR
play back.
6The decoder is set up to the local default settings by the
manufacturer. If it becomes necessary to change the
installation parameters consult your local installer.
The decoder is now ready for normal use.
UHFChannel
50
UHF Frequency
703.25 MHz
Press OK to save
Press EXIT to cancel

8 OPERATING INSTRUCTIONS DSD 700
Optional Decoder Connections
Introduction
There are several ways of connecting the DSD to an existing
entertainment system.
The following more common examples enable you to view satellite
services and terrestrial channels, record and playback from a VCR
and listen to CD quality stereo sound on a Hi-Fi.
Consult your local installer for assistance in setting up an audio/
video configuration best suited to your requirements.
Hints to Quality TV System Configurations
•Where possible, connect cables via audio/video outputs/inputs
(SCART or RCA) instead of RF connectors.
•Use an appropriate, correctly installed satellite dish system.
•Ensure that the system is properly earthed and protected
against lightning.
•Use high quality stereo TV and Hi-Fi equipment.
•Use high quality screened cables.
NOTE: When Video and Audio Inputs/Outputs are used, it
may be necessary to select the Video/ Audio mode
on the VCR and TV in place of theTV mode.
DSD, TV (most common connection)
1Connect the terrestrial antenna connector to the RF IN socket
ontheIRD.
NOTE: It is recommended that you switch off the mains
supply to the DSD before connecting or
disconnecting the LNB connector to/from the
decoder
2Using a SCART-to-SCART cable, connect the TV SCART
socket on the IRD to the SCART socket on the TV.
OR
3If the TV does not have a SCART connector, use the supplied
flylead to connect the RF OUT socket of the IRD to the
RF IN socket on the TV.
OR
4If using RCA connectors, connect betweenDSD audio and
video connectors and respective RCA connectors on the TV.
OR
5If using SCART to RCA connector, connect between the DSD
TV SCART output and RCA connectors on the TV.
OR
6If your TV has a S Video connector, connect to S VHS
connector on the decoder. Also, connect Mono Audio on
decoder to Audio In on the TV.
7Connect the coaxial cable connector from the LNB on the
satellite dish into the socket marked LNB IN on the DSD.
The connector on the coaxial cable should be turned until it
is fingertight
RF OUT
RF IN
MONO
AUDI O VI DE O
OUT
STEREO AUDIO
OUTPUTS
R
L
DATA SERVI CE
W
A
RNI NG! Hi gh Voltage
D
A
NGER! Do not open
Unauthorisedopening
renderswarrantyinvalid
Protect against moisture
LNB IN
LNB OUT
F
I
X
E
D
V
A
R
I
A
B
L
E
VCR
EXTERNALMODEM Republic of South Africa
400 mA max.
210 - 250
V
50Hz 30W
REAR PANEL
TV
RF IN
AV CONNECTIONS
SCART TO RCA
SCART TO SCART
AUDIO IN
VIDEO IN
NOTE: CONNECT EITHER RF IN TO RF OUT
OR RCA TO RCA
S-VHS
S VIDEO
TV/AUX

DSD 700 OPERATING INSTRUCTIONS 9
DSD, VCR, TV (using SCART or RF Interface)
NOTE: As the LNB carries a small voltage from the IRD on
its centre connector, it is recommended that the
decoder is switched off at the mains before
connecting or disconnecting the LNB connector.
1Connect the coaxial cable from the LNB on the satellite dish to the
socket marked LNB IN on the IRD. The connector on the coaxial
cable should be turned until it is finger tight.
2Connect the terrestrial antenna connector to the RF IN socket on
theDSD.
3Connect the RF OUT socket on the IRD to the RF IN socket on the
VCR.
4Connectthe RFOUT socket ontheVCR to the RFINsocket on the
TV.
The following instructions applies if your TV and VCR have SCART or
RCA connectors:
5Using a SCART-to-SCART (or SCART to RCA) cable, connect the
TV SCART socket on the IRD to the SCART (or RCA) socket on
the TV.
6Using a second SCART-to-SCART cable (not supplied), connect
VCR SCART socket on the IRD to the TV SCART socket on the
VCR.
RFOUT
RF IN
MONO
AUDIO VIDEO
OUT
STEREO AUDIO
OUTPUTS
R
L
DATA SERVICE
WARNING! High Voltage
DANGER! Do not open
Unauthorised opening
renderswarranty invalid
Protect against moisture LNBIN
LNBOUT
F
I
X
E
D
V
A
R
I
A
B
L
E
VCR
TV S-VHS EXTERNAL MODEM Republic of South Africa
400 mA max.
210 - 250V 50Hz 30W
SCART TO RCA A
V
RF IN
REAR PANEL
RF IN
VCR
TV SCART VCR SCART
TV

10 OPERATING INSTRUCTIONS DSD 700
DSD, TV (SCART or RF Interfaces), Hi-Fi
NOTE: It is recommended that you switch off the mains
supply to the decoder before connecting or
disconnecting the LNB connector.
1Connect the terrestrial antenna connector to the RF IN socket
on the decoder.
2To use the stereo output facility on the IRD to connect to the
amplifier on your Hi-Fi, connect an AUDIO flylead between the
fixed stereo audio outputs on the DSD and the audio inputs on
theHi-Fi.
NOTE: If you want to control the volume level from the
RCU, use the variable stereo audio outputs.
3 Connect the coaxial cable connector from the LNB on the
satellite dish into the connector marked LNB IN on the
decoder. The connector on the coaxial cable to the decoder
should be finger tight.
4Using a SCART-to-SCART (or SCART to RCA) cable (not
supplied), connect the TV SCART socket on the decoder to
the SCART (or RCA) socket on the TV.
5If the TV does not have a SCART (or RCA) socket, use the
supplied fly lead to connect the RF OUT connector on the
decoder to the RF IN connector on the TV.
RF OUT
RF IN
MONO
AUDIO VIDEO
OUT
STEREO AUDIO
OUTPUTS
R
L
DATA SERVICE
WARNING! High Voltage
DANGER! Do not open
Unauthorised opening
renderswarranty invalid
Protect against moisture LNBIN
LNBOUT
F
I
X
E
D
V
A
R
I
A
B
L
E
VCR
TV S-VHS EXTERNAL MODEM Republic of South Africa
400 mA max.
210 - 250V 50Hz 30W
SCART TO RCA RF IN
V
REAR PANEL
LR
AUDIO
INPUT
Hi-Fi
TV SCART
TV
A

DSD 700 OPERATING INSTRUCTIONS 11
IRD,VCR,TV,Hi-Fi
NOTE: It is recommended that you switch off the mains
supply to the IRD before connecting or
disconnecting the LNB connector.
1Connect the terrestrial antenna connector to the RF IN socket
on the DSD.
Follow Steps 2 to 4 if you are not using SCART connectors.
2Using the supplied flylead, connect the RF OUT connector on
the IRD to the RF IN connector on the VCR.
3Using the flylead supplied with the VCR, connect RF OUT on
the VCR to RF IN on the TV
4Connect the coaxial cable from the satellite dish to the LNB IN
connector on the DSD. Tighten the connector finger tight.
Follow steps 5 and 6 if you are using SCART connections
5Using a SCART-to-SCART (or SCART to RCA) cable, connect
the TV SCART connector on the IRD to the SCART (or RCA)
socket on the TV.
6Using a second SCART cable, connect the VCR SCART on
the DSD to the SCART on the VCR.
7ConnecttheFIXEDSTEREOAUDIOOUT connectors on the
DSD to the AUDIO INPUT connectors on the Hi-Fi.
NOTE: If you want to control the volume level from the
RCU, use the variable stereo AUDIO outputs.
8Switch power on to the DSD
RF OUT
RF IN
MONO
AUDIO VIDEO
OUT
STEREO AUDIO
OUTPUTS
R
L
DATA SERVICE
WARNING! HighVoltage
DANGER! Do not open
Unauthorised opening
renders warranty invalid
Protect against moisture
LNB IN
LNB OUT
F
I
X
E
D
V
A
R
I
A
B
L
E
VCR
TV S-VHS
EXTERNAL MODEM Republic of South Africa
400 mA max.
210 - 250V 50Hz 30W
SCART TO RCA
A
V
RF IN
REAR PANEL
LR
RF OUT
A
UDIO
INPUT
V
CR
Hi-Fi
TV SCART VCR SCART
TV
RF IN

12 OPERATING INSTRUCTIONS DSD 700
DSD,VCR, TV, Hi-Fi (using RCAConnectors)
NOTE: It is recommended that you switch off the mains
supply to the DSD before connecting or
disconnecting the LNB connector.
1Connect the terrestrial antenna to the RF IN socket on the
DSD.
2Using the supplied flylead, connect the RF OUT on the
DSD to the RF IN on the VCR.
3Using the flylead supplied with the VCR, connect the RF OUT
on the VCR to the RF IN on the TV.
4Connect the coaxial cable connector from the LNB on the
satellite dish to the socket marked LNB IN on the IRD.
Tighten the connector finger tight.
5 Using a SCART-to-RCA cable, connect the VCR SCART socket
onthe DSDto theLEFTand RIGHTAUDIO INPUTsocketsandthe
Video input socket of the VCR.
6Connect the AUDIO OUT sockets on the VCR to the AUDIO
INPUT sockets on the TV.
7ConnecttheVIDEO OUT socket on theVCRtothe VIDEO INPUT
socket on the TV using an RCA to RCA cable.
8Connectthe LEFTand RIGHTHI-FI FIXEDAUDIOOUTsocketson
theIRDtotheLEFTandRIGHTAUDIOINPUTsocketson theHi-Fi.
NOTE: If you want to control the volume level from the
RCU, use the variable stereo AUDIO outputs.
9Connect the power plug of the DSD to the mains wall socket and
switch the power on.
10 Select the Video Input of the VCR to record satellite.
11 Select a UHF channel on the TV to view the satellite service.
12 Select the video input of the TV for better quality (refer to TV
manual).

DSD 700 OPERATING INSTRUCTIONS 13
Bouquet Selection
The TV services are transmitted in subscribed packages called
BOUQUETS, each bouquet containing a series of services. The DSD
has provision for several bouquets, any of which can be selected
by pressing TV on the RCU, highlighting the required bouquet using
the up/down arrows on the RCU, then following the on-screen
instructions. If a selected bouquet is not subscribed to, a message
“E38 Service is not currently running” will appear on the TV screen.
When a subscribed to bouquet is selected, the services in that
bouquet will be listed numerically in the Electronic Programme
Guide.
Selecting Specific Services
Specific TV or Audio Services can be selected, either:
♦Directly
♦By stepping through services
♦By using the Open TV Electronic Programme Guide (EPG), or
♦By using the Open TV Information Bar.
Selecting Services Directly
Services can only be selected directly using the RCU. To select a
specific service, do the following:
1To select an audio service, press on the RCU. Press
TV to restore TV services.
NOTE: By pressing or TV a mini-menu will appear on
screen. Using the or buttons, select the bouquet
that you wish to view and press OK to confirm
selection. Select other applications if available.
2Press the number of the required service on the RCU’s
numerical keypad.
The specific service will be heard/displayed after a few
moments accompanied by an information box at the bottom of
the TV screen with details of the selected service.
NOTE: To select services requiring two/three-digit
numbers, i.e. 10-999, it is necessary to press the
second-third digit without pausing after pressing
the first/second digit.
TIP: When the key for the first digit is pressed on the RCU, the
corresponding number is displayed on the left of the front
panel numerical display on the DSD. After a few moments,
the number moves to the right. The second digit of two digit
numbers must be keyed in before this move takes place.
Stepping through Services
Stepping through services is possible using either the RCU or DSD
front panel keys.
Selecting Specific Services from the EPG
NOTE: For a description of the Electronic Programme
Guide (EPG) refer to the next section.
Stepping using the RCU
To step through services using the RCU, do the following:
1Refer to step 1 of “Selecting Services Directly”.
2Press P+ to step to the next service or P - to step to the
previous service in the list of available services.
After pressing P+ or P -, an information box is displayed at the
bottom of the TV screen with details of the service. After a few
seconds, the relevant service is displayed/heard.
3If required, continue stepping by pressing P+ or P - until you
find the service you prefer. It is not necessary to wait for
services to be displayed/heard before stepping to the next or
previous service.
If you decide to watch or listen to a service you have stepped
to, wait for the service to be displayed/heard. The information
box will disappear after a short while or can be removed
immediately by pressing EXIT.
NOTE: When you reach the last available service in the list
and press P+ you are returned to the first service
in the list.
TIP: Use the convenient selecting and sorting facilities to
personalise the services list. After using these facilities, your
favourite services will be in your order of preference.
Stepping using the Decoder Front Panel Keys
To step and select a specific service using the decoder front panel
keys, do the following:
1Select the type of service required, by pressing TV/ to
switch between TV services and audio services. Selection of
the audio service is indicated by a green indicator on the front
panel display.
NOTE: By pressing TV a mini- menu will appear on
screen. Using the or buttons, select the bouquet
that you wish to view then press OK to confirm the
selection. Select other applications if available.
2Press (up) to step to the next service or (down) to
step to the previous service in the list of available services.
After pressing or , an information box is displayed at
the bottom of the TV screen with details of the service. After
a few seconds the relevant service is displayed/heard.
3Continue stepping, by pressing or until you find the
service you prefer. It is not necessary to wait for services to
be displayed/heard before stepping to the next or previous
service.
To view/listen to any service you have stepped to, wait for
the service to be displayed/heard. The information box will
disappear after a short while.
NOTE: When you reach the last service in the list,
pressing returns you to the first service in the
list. The or symbols have dual functions and
cannot be used for stepping while the volume
control box is played on the screen. This box is
displayed when setting the volume.

14 OPERATING INSTRUCTIONS DSD 700
Selecting Services from the Information Bar
NOTE: For a description of the Information Bar refer to
the next section .
Controlling the Functions
Volume Control using the RCU Keys
NOTE: It is recommended that you first select a
terrestrial channel, then set the volume on the TV
to a comfortable listening level.
To change the volume level on the decoder, select your satellite
service, then press V+ to increase the volume level or V- to reduce
the volume level. The following is displayed on the TV screen when
adjusting volume:
The volume level is depicted by the length of the highlight bar.
NOTE: The Fixed Stereo Sound Outputs (Left and Right)
cannot be controlled with the volume control keys
on the RCU or on the front panel.
Volume Control using the IRD Keys
To change the volume level, press V+ or V- on the IRD. The
following is displayed for a brief time:
While the volume control window is displayed, press V+ or V-
respectively to increase or reduce the volume level in separate
steps. The change in volume level is depicted by the changing
llength of the highlight bar.
NOTE: The Variable Stereo Sound Outputs (Left and Right)
can be controlled using the volume control keys
on the RCU.
Mute
To mute the audio do the following:
1Press on the RCU. The following window is
displayed for 3 seconds and the audio muted:
2To restore the audio press again. The audio is
restored at the previous level and the volume control
window displayed for 3 seconds.
NOTE: The mute function is disabled when the FIXED
STEREO audio outputs (Left and Right) on the
decoder are used. This ensures a fixed volume
level for recording purposes. The VARIABLE
STEREO audio outputs (Left and Right) of the
decoder can, however, be muted.
Displaying Subtitles or Teletext
Subtitles
If subtitles are available, they are normally displayed on the screen
as part of the program.
To select a subtitle do the following:
1Press symbol on the RCU. A box is displayed on
the TV screen as follows:
NOTE: If subtitles are not available, a “No subtitling”
window is displayed for 5 seconds. Press EXIT if
required.
2To stop the subtitles, press again. The following box is
displayed
NOTE: If the Operator transmits subtitles already
superimposed in the picture, it cannot be removed
using the above method.
Teletext
Some services (e.g., CNN) have a teletext service. This can be
selected as follows:
1With the service selected, i.e., CNN, press symbol
twice on the RCU. The following box is displayed:
If teletext is not available, a “No teletext” window is
displayed for 5 seconds. If other languages are available
keep pressing the symbol until the language is
selected.
2To make the teletext transparent press the symbol
again.
3To page up or down teletext pages, press P+ or P- on the
RCU. To change to a distant page, select the page number on
the RCU keypad, then press OK
4To clear the teletext , press EXIT on the RCU.
1 of 2 Stop subtitle
Press OK to select
1 of 1 English
Press OK to select
2 of 2
Press OK to select
(Language)

DSD 700 OPERATING INSTRUCTIONS 15
Clock
To view the time do the following:
1Press on the RCU. The date and time are displayed for
a few seconds. If required press EXIT to clear.
Selecting Soundtracks
Available soundtracks, included with programmes, can be heard
and selected at any time while watching a programme.
NOTE: Preferred soundtrack languages for automatic
selection can be set using the menu system. Refer
to Soundtrack Options.
To listen to and select available soundtracks, do the following:
1Press ?on the RCU. The current soundtrack
language is displayed as follows:
Pressing OK selects the option listed.
2Press the symbol again. If there are additional soundtracks
available, the next soundtrack option is listed in the window.
Continue pressing to cycle through all the available
soundtracks.
3Press OK to select a soundtrack language. The soundtrack
window is displayed and the new soundtrack is heard.
NOTE: Soundrack selection using the above procedure is
temporary and will be lost when changing channel.
Power Reset
If your TV picture freezes for a prolonged period, it is possible to
reset the decoder without unplugging it from the power supply.
Simultaneously press then release the and TV/ buttons on the
decoder front panel.
Signal Source Selection
Switching between signal source devices is automatic by using the
UHF button on the RCU. To select between the available signal
sources, a single press-release of the UHF button in normal running
mode (i.e., not in menu or EPG) switches to the next source. This is
an override selection in that it will switch to VCR even if a VCR is not
playing.
The signal source is indicated on the decoder front panel display.
The available options are:
•VCR: This allows you to view a program on the VCR. Press
Play on the VCR to view.
•TV (tv): If your TV and IRD are connected through SCART,
this will allow you to view the normal terrestrial TV channels.
•Decoder (IRD): This allows you to use your satellite services.
If your TV and decoder are connected through SCART, this
will automatically switch your TV to AV and keep control of it.
ELECTRONIC PROGRAMME GUIDE
The DSD stores up-to-date information, received over the air, of all
the currently subscribed to TV Services and on-air Audio Services,
as well as the next and extended programmes scheduled for each
TV and Audio service. The information for each programme
includes, where appropriate:
•The service number and name
•Title of the programme
•Censorship classification of the programme
•Brief information on the programme
•Start and finish times of the current programme
•Reminders
Using the EPG
1On the RCU, press TV GUIDE. An on-screen menu is
displayed as follows:
NOTE: When pressing any of the arrow controls on the
RCU, the colour of the displayed arrow in the EPG
screens darkens to indicate activity.
Now/Next EPG
Selecting Now/Next EPG displays a programme guide, as shown in
the following diagram, that provides short text descriptions of the
TV and audio programmes contained in the selected bouquet, as
well as the next programmes scheduled for each TV and audio
service.
NOTE: TV programmes are not displayed and audio not
heard while the EPG screen is displayed.
Use the cursor keys or to scroll up or down the list, as only five
events are shown on the screen. When the last event is highlighted
and you press , six new events are displayed and the highlight is
put at the top of the list. This also works for scrolling up.
The list is continuous, so after the last service the Guide starts
displaying service 1 again.
The current programmes are listed when NOW is selected and the
programmes to follow are listed when NEXT is selected.
?
1 of 2 English
Press OK to select
Services
Now/Next EPG
Extended EPG
Theme Search
Press OK to select
Press EXIT to cancel

16 OPERATING INSTRUCTIONS DSD 700
7Press OK to return to normal viewing/listening.
8In all programme guides, additional information on the
programmes is displayed when ion the RCU is pressed while
the EPG is displayed and the programme highlighted.
Extended EPG
Selecting Extended EPG provides a guide as to today’s programmes
and the next 7 days, as per the following diagram:
Pressing on the RCU, selects the TV guide for tomorrow’s
programmes. Pressing and holding the button pages through
each day’s programme until the end of the 8 days.
Pressing and holding the button, returns you to today’s
programme guide.
NOW
11:10
5
SciFi
TV Guide
18/5/99
Jupiter Moon
Space School Fam
12:30 - 13:00
20
TMMC Striptease
Drama 18
11:05 - 13:05
21
Hall Blue River
Drama Fam
11:30 - 13:00
22
TNT The Picture of Dorian Gray
Drama Fam
12:30 - 13:00
Motorsport Magazine
Reports Fam
13:00 - 14:00
Press the INFO button for more event information
Press OK to tune to this programme
3To move between the NOW or NEXT programmes, press
or on the RCU.
4Select the highlighted programme to view/hear by pressing
OK.
NEXT programmes cannot be viewed before their start time.
When attempting to view them the following screen is
displayed:
Pressing OK sets a programme reminder and a clock symbol
appears under the programme time, indicating a reminder. To
remove the reminder press OK again; the clock symbol
disappears.
5Additional information on the programme is displayed when i
on the RCU is pressed with a service on the the EPG
selected. Press EXIT to return to the EPG.
6Press on the RCU to enter the Audio guide. The Audio guide
behaves exactly the same as the TV guide. Pressing TV on
the RCU takes you back to the TV guide.
Audio Guide
NOW 18/5/99
15:00
1
Symph DMX - Symphonic
Classical Fam
12:07 - 00:07
2
Chamb DMX - Chamber Music
Classical Fam
12:30 - 00:30
3
Opera DMX - Opera
Classical Fam
13:07 - 00:30
4
LiteC DMX - Light Classical
Drama Fam
13:37 - 01:37
5
Beaut DMX - Beautiful Instrumentals
Instrumentals Fam
14:07 - 02:07
Press the INFO button for more event information
Press OK to tune to this programme
CABLE NETWORK EGYPT
+
18
P- P+
(1) M Net
Today 18/5/99
15:30
10:30 Egoli - Plek van Goud
Daaglikse Reeke Fam
11:02 The New Age
Dramatic Comedy
13:00 The Warehouse
Product Info Fam
14:30 Teletubbies
Series Fam
14:58 Bananas in Pyjamas
Adventure Fam
Press the INFO button for more event information
Press OK to tune to (1) M Net
Press EXIT to quit
CABLE NETWORK EGYPT
TV Guide
NEXT 17/5/99
14:10
20
TMMC The Bridge on the River Kwai
Classical 15:05 - 17:50P
21
Hall Bye Bye Birdie
Comedy 15:00 - 17:15
Fam
22
TNT White Heat
Psychotic 14:20 - 16:15
Fam
30
SS Argus Tour
Cycling 16:00 - 18:00
Fam
31
SS2 Spanish Soccer
Highlights 17:30 - 18:00
Fam
Press the INFO button for more event information
Press OK to set a reminder on this programme
CABLE NETWORK EGYPT
G

DSD 700 OPERATING INSTRUCTIONS 17
Theme Search
Selecting Theme Search allows you to search for a particular type
of programme, as shown in the following diagram:
Scrolling down using the button transfers the highlight and left
and right arrows to the selected box. Pressing the arrows selects
various options.
Making a selection in the sub-theme box, then pressing OK presents
a display as per the following diagram:
INFORMATION BAR
At any time whilst watching TV services or listening to radio
services, the viewer can obtain information about the current
programme and select available programmes via the Information Bar.
1Press ion the RCU. The following window is displayed:
2Use the cursor keys or to scroll up or down through
titles on other services, whilst simultaneously watching the
current service. The current programmes are listed when
NOW is selected and the programmes to follow are listed
when NEXT is highlighted.
3Move between the NOW or NEXT programmes by pressing
or on the RCU.
4With NEXT selected, an Information Bar appears that displays
the next programme. Pressing OK sets the reminder and a
clock symbol appears in the Information Box. Pressing OK
again removes the reminder.
NEXT programmes cannot be viewed before their start time.
To exit the Information Box, press EXIT.
5When viewing a programme, to tune to another programme
press the numbered keys on the RCU. The Information Bar will
be displayed for X seconds (see Information Box Display
Period, page 20).
REMINDERS
The procedure for setting and removing a reminder has already
been described.
Refer to Open TV Electronic Programme Guide or Open TV Informa-
tion Bar. At the right time a reminder message pops up. If you intend
to watch the booked programme, press OK on the RCU which tunes
the decoder to the new service. Otherwise press EXIT to remove
the message, while remaining tuned to the original service.
PARENTAL BLOCKING
When the user has selected a service where there is a parentally
blocked programme, a “key” symbol is displayed in the Information
Bar (bottom right). The message above the Information Bar indicates
that the user should press OK to unblock the programme.
Press OK. A screen requiring the Parental PIN code is
displayed.
2Enter your Parental PIN code using the keypad. Refer to
Parental Guidance Options. The programme is then unblocked.
Dstv
Theme Search Setup 16/5/99
16:00
Select the day
Select the time of day
Select the theme
Select the subtheme
Today
Whole Day
Movies
Action
Press OK to start the search
Press EXIT to quit
CABLE NETWORK EGYPT
Dstv
Today - Whole Day
Action 16/5/99
16:15
02:00 The Gypsy Moths
04:00 Action, (22) TNT Fam
18
Press the INFO button for more event information
Press OK to tune to (22) TNT
Press EXIT to return to the setup screen
CABLE NETWORK EGYPT
50 Science Frontiers 15:00 - 16:00
Disc Science
Fam
14:15
1
M Net
Timecop
A
ction
14:10 - 15:45
Press OK to unblock this programme
PG
14:15
1
M Net
Timecop
A
ction
14:10 - 15:45
PG
To retain the blocking, press EXIT
Enter your PIN code to unblock this programme

18 OPERATING INSTRUCTIONS DSD 700
MENU NAVIGATION ROUTE
NOTE: The menu structure is occasionally upgraded over
the air by the Service Provider and may differ
slightly from that shown in these instructions.
Main Menu
Language Selection
Parental Guidance
Information Box Display Period
Organising Services
Mail Messages
Advanced Options
Press and to select option
Press OK to confirm selection
Language Selection Language Options in Guide & Menu
Soundtrack Options Arabic/English
Parental Guidance Censorship Classification PIN Code
Change PIN Change PIN Code-Old/New
Information Box Display Period Display Period (seconds)
Organising Services Sort TV Services Current Order List
Reset TV Services
Reset Audio Services
Full Rescan
Current Order ListSort Audio Services
Mail Messages Mail Message Box
Advanced Options Change Dish
Installation LNB Configuration
Signal Setup
Tune IRD
Loop Through Mode
Reset to Factory
Defaults
Signal Detection
Information
Change Modern Settings
Local Time
IRD Upgrade
TV Installation
CA Status
Loader Status
TV Type
Aspect Ratio
UHF Tuning
Scart Source
Scart Video Output
PIN Code for
installation
PIN Code for
installation

DSD 700 OPERATING INSTRUCTIONS 19
USINGMENUS
To use the Menu system:
1Ensure that the decoder is not in standby mode by pressing
if necessary.
2Press MENU on the RCU. The following Main Menu is
displayed, which provides access to all other menus a shown
in the following figure:
All the menus are navigated as follows:
1Use or buttons to scroll the highlighted bar up or down
in a(sub)menu or a vertical list box.
2Select a highlighted menu option and go one level lower within
the menu hierarchy by pressing OK on the RCU. This applies
to the Main Menu screen and all submenu screens.
In screens where parameters can be set, OK is used to save
the settings.
3Use EXIT to return to the preceding menu (go one level higher
within the menu hierarchy).
In screens where the parameters can be set, EXIT is used to
cancel any settings that may have been entered without
saving.
4Use and buttons to change the value of an input field
having preprogrammed values.
5Use MENU to exit all menus and return to the TV or audio
programme.
6Use numbered buttons to enter numerical values.
Language Selection
The Language Selection screen allows users to set the text
language of the decoder, if options are available. The text
language is set for the menus, EPG and Information Bar.
To select the text language of your choice, do the following:
1PressMENUontheRCU.
The Main Menu screen is displayed with Language Selection
highlighted.
2Press OK. The following option list is displayed:
Language Options in Guide and Menu
1PressMENUon the RCU.
The Main Menu screen is displayed.
2Press or to highlight Language Selection and then OK.
3Press or to highlight Language Options in Guide and Menu.
4Press OK.
The Language Menu containing a selection of languages is dis-
played, as follows:
5Use or arrows to highlight preferred language.
6Press OK to select the desired language.
7Press EXIT to return to the Main Menu or MENU to return to the
service.
Soundtrack Options
Soundtrack Options allows users to set the programme language of
the decoder, where one is available.
1Press MENUon the RCU.
The Main Menu screen is displayed.
2Press or to highlight Language Selection.
3 Press OK. The language selection menu is displayed.
The Language Selection Menu is displayed.
4Press or to highlight Soundtrack Options.
5Press OK.
The current order soundtrack language preferences is displayed,
as follows:
Main Menu
Language Selection
Parental Guidance
Information Box Display Period
Organising Services
Mail Messages
Advanced Options
Press and to select option
Press OK to confirm selection
Language Selection
Press and to select option
Press OK to confirm selection

20 OPERATING INSTRUCTIONS DSD 700
6OntheRCU,press or to highlight the languagethatyouwish
to relocate from the list.
7Press to move the highlighted language option into the reloca-
tion window.
8Press or to highlight the position where you want the
language from the relocation box to be placed.
9Press OK to confirm your selection.
The Language Selection Menu is displayed.
10 Press EXIT to return to the Main Menu or MENU to return to the
service.
Parental Guidance
The decoder includes a Parental Guidance facility to control viewing
of age restricted programmes. Access to this facility is controlled
via the Parental PIN code.
TIP: The Pin is set at the factory to 1 2 3 4. If you intend to use the
Parental Control facility, please change the PIN as soon as pos-
sible. Remember to keep a note of your new PIN in a secure
place. If you forget your Pin Code please contact the Customer
Service Department.
Parental Guidance can only be applied to scrambled programmes.
NOTE: To use or change the Parental Pin Code your smart
card must be in the DSD.
Setting the Parental Level
1PressMENUon the RCU.
The Main Menu options list is displayed.
2On the RCU, press or to highlight Parental Guidancel
then press OK. The Parental Guidance screen is then
displayed with the Censorship Classification option
highlighted.
3Press OK. A Security Check screen is displayed, in which the
Parental PIN must be entered using the RCU.
4On entering the correct PIN, a Parental Control submenu is
displayed, which is organised as follows:
NOTE: If the incorrect PIN is entered, the previous menu
(Security Check) is again displayed.
5Press or to highlight the preferred control option.
6Select your choice by pressing OK on the RCU.
7Press EXIT to return to the Main Menu or MENU to return to
the service.
Changing the Parental PIN Code
To change your existing PIN to a new number, carry out the
following:
1Press MENU on the RCU. The Main Menu options list is
displayed.
2Press to select the Parental Guidance option, then press
OK.
3On the Parental Control menu, press and to highlight
Change PIN, then press OK. The Change PIN screen is
displayed.
4Key in your old PIN code.
This automatically highlights the new PIN code to be entered.
5Change the PIN to its new value. Instead of digits, symbols are
displayed for the PIN codes. When the new PIN code is
entered, a second box is highlighted requesting you to re-
enter the new code. This is a safeguard against an initial
incorrect entry.
6The Parental Guidance menu is displayed.
7Press EXIT to return to the Main Menu or MENU to return to
the service.
Soundtrack Options
Arabic
English
EXPLANATION SELECT MENU OPTION
All CNE programmes will be
blocked Family
CNE programmes are blocked
to children 13 and younger Parental Guidance
16
All CNE programmes can be viewed
CNE programmes are blocked
to persons 18 and younger
No Block
CNE programmes are blocked
to children 16 and younger
18
Other manuals for DSD 700
1
Table of contents
Popular Media Converter manuals by other brands

Cross Technologies
Cross Technologies 3117-3338 720 Series instruction manual

Omnitron Systems Technology
Omnitron Systems Technology Fiber-to-Fiber Converter 1000FF user manual

EECI
EECI ADC-8U15HG Technical reference

AJA
AJA FS-HDR quick start guide

Absolute Process Instruments
Absolute Process Instruments IsoSplitter APD 4930 quick start guide

Jaycar Electronics
Jaycar Electronics AC1714 user manual