Ugolini Delice User manual

DELICE
MANUALE D’ISTRUZIONI
OPERATOR’S MANUAL
CARNET D’INSTRUCTIONS
GEBRAUCHSANWEISUNG
MANUAL DE INSTRUCCIONES
FRANCAIS
ENGLIS
H
DEUTSCH
ENGLIS
H
ESPAÑO
ENGLIS
H
ESPAÑOL ENGLISH ITALIANO

DICHIARAZIONE DI CONFORMITÀ CE
Noi Ugolini S.p.A. - Via Orobia 11 - 20139 Milano - Italy dichiariamo, sotto la nostra responsabilità, che i prodotti DELICE 230V 50Hz
sono conformi alle seguenti Normative:
-
-
-
-
-
EN 292 Part 1 1991
EN 292 Part 2 1991
EN 60335-1 1995
EN 60335-2-24 1994
DIN VDE 700 Teil 240 1983, mod. A1 1988
-
-
-
-
EN 60555-2 1994
EN 60555-3 1986
EN 61000-3-2 1986
EN 61000-3-3 1994
In ottemperanza alle Direttive EC 73/23, EC 89/392, EC 89/336, EC 91/368, EC 92/31, EC 93/44, EC 93/68.
EC DECLARATION OF CONFORMITY
We Ugolini S.p.A. - Via Orobia 11 - 20139 Milano - Italy declare, under our responsability, that the products DELICE 230V 50Hz are
in conformity with the following Standards:
-
-
-
-
-
EN 292 Part 1 1991
EN 292 Part 2 1991
EN 60335-1 1995
EN 60335-2-24 1994
DIN VDE 700 Teil 240 1983, mod. A1 1988
-
-
-
-
EN 60555-2 1994
EN 60555-3 1986
EN 61000-3-2 1986
EN 61000-3-3 1994
Following the provisions of the Directives EC 73/23, EC 89/392, EC 89/336, EC 91/368, EC 92/31, EC 93/44, EC 93/68.
DECLARATION DE CONFORMITE CE
Nous Ugolini S.p.A. - Via Orobia 11 - 20139 Milano - Italy déclarons, sous notre responsabilité, que les produits DELICE 230V 50Hz
sont conformes aux Normes suivantes:
-
-
-
-
-
EN 292 Part 1 1991
EN 292 Part 2 1991
EN 60335-1 1995
EN 60335-2-24 1994
DIN VDE 700 Teil 240 1983, mod. A1 1988
-
-
-
-
EN 60555-2 1994
EN 60555-3 1986
EN 61000-3-2 1986
EN 61000-3-3 1994
Conformément aux Directives EC 73/23, EC 89/392, EC 89/336, EC 91/368, EC 92/31, EC 93/44, EC 93/68.
EG-ÜBEREINSTIMMUNGSERKLÄRUNG
Wir Ugolini S.p.A. - Via Orobia 11 - 20139 Milano - Italy erklären auf eigene Verantwortung, daß die Produkte DELICE 230V 50Hz
mit den folgenden Normen übereinstimmen:
-
-
-
-
-
EN 292 Part 1 1991
EN 292 Part 2 1991
EN 60335-1 1995
EN 60335-2-24 1994
DIN VDE 700 Teil 240 1983, mod. A1 1988
-
-
-
-
EN 60555-2 1994
EN 60555-3 1986
EN 61000-3-2 1986
EN 61000-3-3 1994
Gemäß den EWG-Richtlinien EC 73/23, EC 89/392, EC 89/336, EC 91/368, EC 92/31, EC 93/44, EC 93/68.
DECLARACIÓN DE CONFORMIDAD CE
Nosotros Ugolini S.p.A. - Via Orobia 11 - 20139 Milano - Italy declararamos, bajo nuestra responsabilidad, que los productos DELICE
230V 50Hz responden con las siguientes Normativas:
-
-
-
-
-
EN 292 Part 1 1991
EN 292 Part 2 1991
EN 60335-1 1995
EN 60335-2-24 1994
DIN VDE 700 Teil 240 1983, mod. A1 1988
-
-
-
-
EN 60555-2 1994
EN 60555-3 1986
EN 61000-3-2 1986
EN 61000-3-3 1994
En cumplimiento de las Normas EC 73/23, EC 89/392, EC 89/336, EC 91/368, EC 92/31, EC 93/44, EC 93/68.
vedere targa dati sulla macchina
see data plate on the machine
voir la plaque sur l’appareil
siehe Dispenser Typenschild
ver la placa del distribuidor
Ugolini S.p.A.
L’Amministratore Delegato
Giancarlo Ugolini
(luogo ed anno di prod. - place and mfr. year - lieu et an de production
Produktionsort und Produktionsjahr - lugar y año de producción)

GARANZIA
1. L’apparecchio è garantito per un periodo di dodici mesi dalla data di ac-
quisto. Tale data viene certificata dalla ricevuta e/o fattura fiscale e/o da
un documento di consegna rilasciato dal Rivenditore.
2. Per garanzia si intende la sostituzione o riparazione gratuita delle parti
componenti l’apparecchio riconosciute difettose all’origine, per vizi di fab-
bricazione.
3. Non sono coperte dalla garanzia le parti aventi funzione estetica e tutte
le parti che dovessero risultare difettose a causa di negligenza o trascura-
tezza nell’uso, di errata installazione o manutenzione, di manutenzioni
operate da personale non autorizzato, di trasporto senza dovute cautele,
di circostanze che comunque non possano farsi risalire a difetti di fabbri-
cazione dell’apparecchio.
Sono altresì esclusi dalle prestazioni in garanzia gli interventi tecnici ine-
renti l’installazione e l’allacciamento agli impianti di alimentazione elettrica
e idrica.
4. La casa costruttrice declina ogni responsabilità per eventuali danni che
possano, direttamente o indirettamente, derivare a persone o cose in con-
seguenza della mancata osservanza di tutte le prescrizioni indicate nelle
apposite “Istruzioni”, concernenti in particolare le avvertenze in tema di in-
stallazione, uso e manutenzione dell’apparecchio.
5. Nel caso di apparecchi per i quali sia previsto l’intervento a domicilio,
l’acquirente è tenuto a corrispondere il diritto fisso di chiamata in vigore
presso il fabbricante alla data dell’intervento. Qualora l’apparecchio venga
riparato presso uno dei laboratori autorizzati dal fabbricante, le spese ed
i rischi di trasporto relativi saranno a carico dell’acquirente.
6. Trascorsi dodici mesi dall’acquisto decade il diritto di garanzia e l’assi-
stenza verrà esplicata addebitando, oltre alle spese di manodopera, an-
che il costo delle parti sostituite e quello di trasporto.
7. Sono esclusi la sostituzione dell’apparecchio ed il prolungamento della
garanzia a seguito di intervenuto guasto.
8. E’ escluso dalla garanzia l’apparecchio la cui targa di identificazione ri-
sulti manomessa, asportata o comunque in condizioni tali da non rendere
possibile l’identificazione certa dell’apparecchio stesso.
9. Tale garanzia è valida solo in Italia.

DELICE
4Ugolini S.p.A.
1 CARATTERISTICHE TECNICHE
E’ riservato il diritto di modifica senza preavvi-
so.
2 INTRODUZIONE
Si consiglia di leggere attentamente questo li-
bretto di istruzioni allo scopo di conoscere tutte
le caratteristiche del distributore.
Come tutti i prodotti meccanici, anche questo
distributore richiede pulizia e cura. Il suo buon
funzionamento inoltre può essere compromes-
so da eventuali errori compiuti dall'operatore
durante le fasi di smontaggio e pulizia. Per que-
sto motivo è importante che le procedure di
smontaggio, lavaggio, sanitizzazione e rimon-
taggio, essendo operazioni giornaliere, siano
conosciute senza possibilità di errore da tutto il
personale responsabile del distributore.
3 INSTALLAZIONE
1 - Estrarre il distributore dall’imballo, che è
consigliabile conservare per future neces-
sità.
2 - Controllare che il distributore non abbia
subito danni da trasporto. In caso contra-
rio, provvedere immediatamente ad effet-
tuare il reclamo presso lo spedizioniere.
3 - Appoggiare il distributore su un banco in
grado di sostenerne il peso, anche a carico
completo.
4 - Prima di collegare elettricamente il distri-
butore controllare che la tensione di rete
sia quella corretta indicata in targa. Colle-
gare il distributore a una rete monofase,
servendosi di una presa completa di
messa a terra secondo quanto stabilito
dalle norme vigenti. Se il distributore è for-
nito senza spina, collegare al cavo una
spina conforme alle norme vigenti nel
vostro Paese, provvista di spinotto o con-
tatti di terra ed adatta a correnti di almeno
10 A 250 V (per aree aventi tensioni di
220-230 V 50-60 Hz) e 20 A 250 V (per
aree aventi tensioni di 100-115 V 50-
60 Hz). Nel caso si volesse realizzare un
collegamento fisso alla rete, collegare il
cavo ad un interruttore a parete di tipo
bipolare con apertura dei contatti di
almeno 3 mm. Non usare prolunghe per
collegare elettricamente l'apparecchio.
5 - Il distributore non esce prelavato e sanitiz-
zato dalla fabbrica. Prima dell’uso esso
deve essere smontato, lavato e sanitizzato
seguendo quanto previsto nelle presenti
istruzioni al capitolo 5.3 PULIZIA.
4 PER UN FUNZIONAMENTO
SICURO
1 - Non usare il distributore prima di aver
letto il presente libretto d’istruzioni.
2 - Non usare il distributore se non corretta-
mente collegato a terra.
3 - Non usare prolunghe per collegare elettri-
camente il distributore.
Delice
Contenitori trasparenti smontabili n 1
Capacità singolo contenitore, circa l 5
Dimensioni:
larghezza cm 24
profondità cm 32
altezza cm 49
Peso netto, circa kg 8
Peso lordo, circa kg 13
Termostati regolabili n 2
Livello di rumorosità inferiore a 70 dB (A)
IMPORTANTE
Caratteristiche elettriche: leggere i dati
riportati sulla targa di ogni singolo distri-
butore; questa è situata sotto il distribu-
tore stesso. I numeri di matricola degli
apparecchi sono preceduti dal simbolo #.
I dati riportati sulla targa sono sempre
quelli a cui fare riferimento. ATTENZIONE
Assicurarsi che l’apparecchio sia corret-
tamente collegato a terra; in caso contra-
rio è possibile causare shock elettrici alle
persone o danneggiare il distributore.

DELICE
Ugolini S.p.A. 5
ENGLIS
H
ITALIANO
4 - Non mettere in funzione il distributore se
questo non è chiuso e bloccato con viti.
5 - Non introdurre dita o oggetti nelle fessure
di raffreddamento e nell’apertura del rubi-
netto.
6 - Non aprire il distributore per pulizia o
manutenzione senza assicurarsi che esso
sia scollegato elettricamente.
7 - Non rimuovere il contenitore quando la
macchina è in funzione.
5 ISTRUZIONI PER L’USO
1 - Lavare e sanitizzare il distributore prima di
utilizzarlo seguendo quanto previsto nelle
presenti istruzioni al capitolo 5.3 PULIZIA.
2 - Riempire il contenitore con il prodotto desi-
derato, preparato secondo le istruzioni del
produttore.
3 - Montare il coperchio sopra il contenitore
accertandosi che questo sia posizionato
correttamente.
4 - Agire sui comandi (vedere capitolo
5.1 DESCRIZIONE DEI COMANDI).
5 - Il distributore deve sempre funzionare con
il coperchio montato al fine di prevenire
un’eventuale contaminazione del prodotto.
6 - Il distributore deve funzionare ininterrotta-
mente: il riscaldamento si arresterà auto-
maticamente quando il prodotto sarà
pronto per la distribuzione. Il dispositivo di
agitazione continuerà a funzionare.
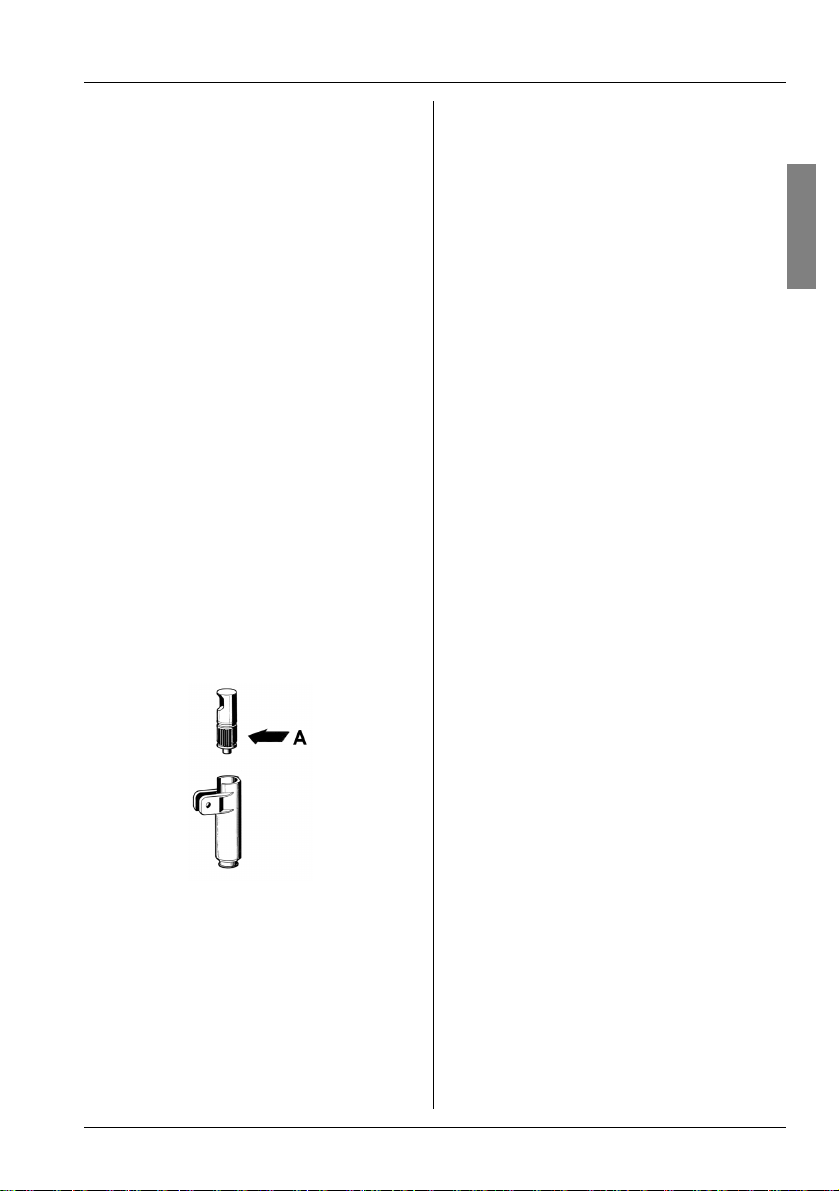
7 - Il distributore è dotato di contenitore a
fondo chiuso rimovibile al fine di agevolare
le operazioni di pulizia e sanitizzazione.
5. 1 DESCRIZIONE DEI COMANDI
Il distributore è provvisto di un interruttore ge-
nerale le cui funzioni sono le seguenti:
Il distributore è poi dotato di un termostato, po-
sto sul lato destro, per la regolazione della tem-
peratura del prodotto.
Nota: il distributore è inoltre dotato di un secon-
do termostato, posto sotto il distributore, per la
regolazione della temperatura della piastra ri-
scaldante. Esso viene tarato in fabbrica. In
caso di necessità, per prevenire eventuali bru-
ciature del prodotto, è comunque possibile agi-
re su tale termostato riducendo la temperatura
della piastra riscaldante. In questo caso si al-
lungheranno i tempi di riscaldamento del pro-
dotto e non sarà mai possibile ottenere un
prodotto ad una temperatura superiore a quella
impostata per la piastra riscaldante.
5. 2 SUGGERIMENTI
Preparazione della cioccolata: seguendo il
metodo artigianale, stemperare bene il cacao in
una casseruola prima di versarlo nel contenito-
re del distributore. Usando prodotti istantanei
confezionati attenersi invece alle istruzioni del
fabbricante. Con questo genere di prodotti la
miscelazione può essere effettuata direttamen-
te nel contenitore.
Azionare quindi il distributore mettendo l’inter-
ruttore in posizione I. Ruotare la manopola del
termostato fino alla posizione 90 °C ottenendo
così la temperatura di cottura del prodotto.
Quando la cioccolata sarà pronta abbassare la
temperatura al valore desiderato per la distribu-
zione agendo sulla manopola del termostato.
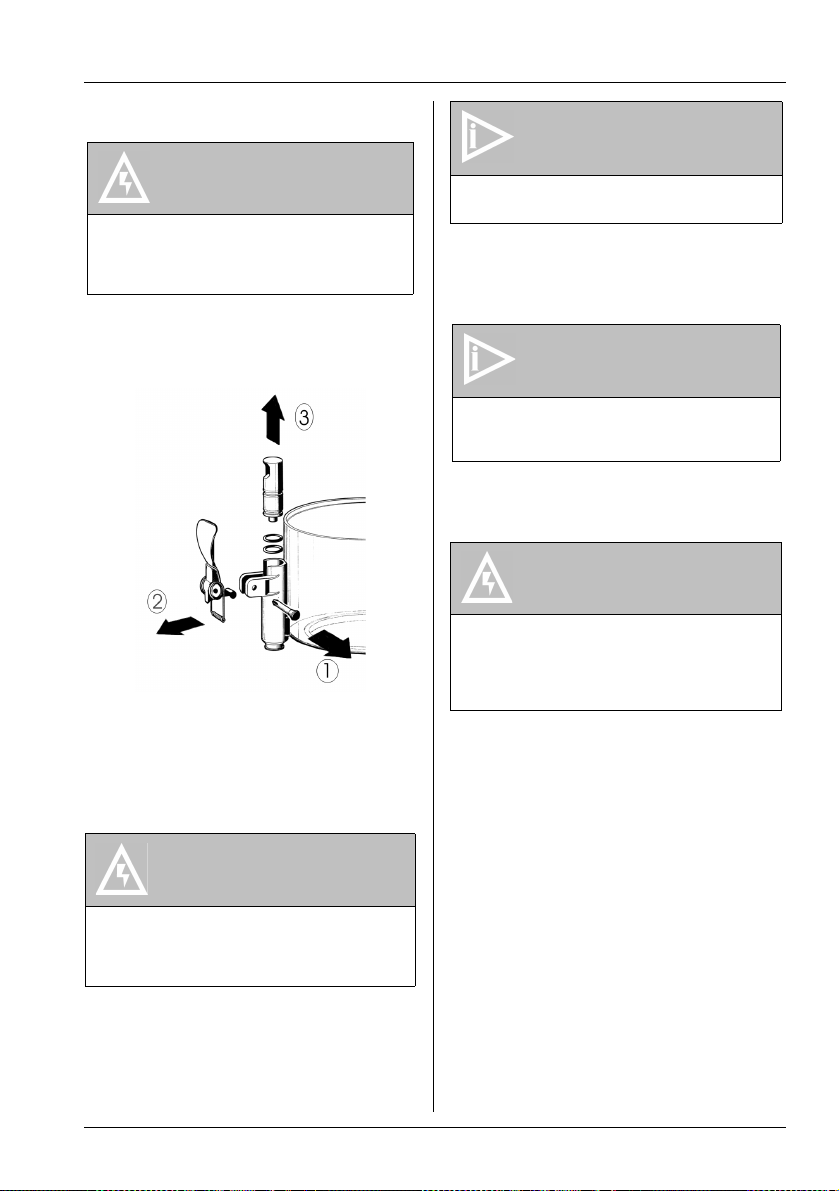
ATTENZIONE
Al fine di evitare scottature non rimuovere
il contenitore fino a quando la piastra riscal-
dante non è fredda.
ATTENZIONE
Non rimuovere il contenitore dal distribu-
tore quando questo contiene prodotto
caldo.
Posizione 0 :il distributore è spento.
Posizione I :funziona sia il dispositivo di
agitazione che il riscaldamen-
to.
IMPORTANTE
Prima di spegnere completamente il distri-
butore (interruttore in posizione 0), por-
tare il termostato nella posizione di
minima temperatura ed attendere che il
prodotto si raffreddi. Ciò evita che il pro-
dotto stesso, (se non agitato) si incolli
sulla piastra riscaldante.

DELICE
6Ugolini S.p.A.
5. 3 PULIZIA
Pulizia e lavaggio sono fondamentali per garan-
tire la perfetta conservazione del gusto della
bevanda e la massima efficienza del vostro di-
stributore. Le procedure descritte nel seguito
devono essere considerate di carattere genera-
le e possono variare per effetto della regola-
mentazione sanitaria vigente.
Prima dello smontaggio per il lavaggio il distri-
butore deve essere svuotato del prodotto.
5. 3. 1 SMONTAGGIO
1 - Svuotare il contenitore e togliere il coper-
chio.
2 - Sfilare il mescolatore dall’albero centrale.
3 - Disassemblare il rubinetto con la sequenza
indicata (vedere figura 1).
figura 1
4 - Togliere il contenitore, sollevandolo verso
l’alto.
5 - Sfilare il cassetto raccogligocce e svuo-
tarlo.
5. 3. 2 LAVAGGIO
1 - Preparare in una bacinella circa quattro litri
di acqua calda (45-60°C) e detersivo spe-
cifico rispettando con attenzione le prescri-
zioni del fabbricante; una soluzione troppo
concentrata può infatti causare danni alle
parti da lavare, mentre una troppo diluita
può non detergere a sufficienza. Non
usare detersivi abrasivi.
2 - Usare una spazzola adatta e lavare accu-
ratamente con la soluzione detergente
tutte le parti a contatto con la bevanda.
3 - Risciacquare tutte le parti lavate con acqua
corrente.
ATTENZIONE
Prima di procedere allo smontaggio di
qualsiasi componente disconnettere
sempre elettricamente l’apparecchio
togliendo la spina dalla presa o spe-
gnendo l’interruttore esterno a parete.
ATTENZIONE
Prima di qualsiasi intervento di pulizia
disconnettere sempre elettricamente il
distributore estraendo la spina dalla
presa o spegnendo l'interruttore esterno
a parete.
IMPORTANTE
Non lavare alcun componente della mac-
china in lavastoviglie.
IMPORTANTE
Al fine di evitare danni al distributore uti-
lizzare solo detersivi compatibili con le
parti in plastica.
ATTENZIONE
Durante il lavaggio del distributore non
usare eccessiva quantità di acqua in vici-
nanza dei componenti elettrici; in caso
contrario è possibile causare shock elet-
trici o danneggiare il distributore.

DELICE
Ugolini S.p.A. 7
ENGLIS
H
ITALIANO
5. 3. 3 SANITIZZAZIONE
La sanitizzazione deve essere eseguita im-
mediatamente prima di mettere in funzione
il distributore; evitare che questo rimanga
inattivo per lungo tempo dopo la sanitizza-
zione.
1 - Prima di iniziare le procedure descritte
nel seguito lavarsi le mani con un
sapone antibatterico.
2 - Preparare in una bacinella circa quattro litri
di soluzione di acqua calda (45-60°C) e
prodotto sanitizzante approvato dalle auto-
rità del vostro paese rispettando le specifi-
che del produttore. In mancanza di un
prodotto sanitizzante specifico, preparare
una soluzione di acqua e ipoclorito di sodio
(varechina) in proporzione di 1 cucchiaio
ogni 2 litri di acqua.
3 - Immergere nella soluzione tutte le parti da
sanitizzare per il tempo indicato dal fabbri-
cante del prodotto.
4 - Fare asciugare all'aria, su una superficie
pulita, le parti sanitizzate.
5 - Asciugare le parti esterne del distributore
senza usare panni abrasivi.
5. 3. 4 RIMONTAGGIO
1 - Inserire cassetto raccogligocce e griglia
nella sua sede.
2 - Lubrificare il pistone rubinetto (nella zona
A indicata in figura 2) utilizzando esclusiva-
mente il grasso fornito dal fabbricante o
altro grasso per uso alimentare.
figura 2
3 - Riassemblare il rubinetto sul contenitore
con sequenza inversa rispetto a quanto
fatto per lo smontaggio (vedere figura 1).
4 - Montare il contenitore infilando l’albero
centrale nell’apposita sede.
5 - Inserire il mescolatore nell’albero centrale.
6 - Posizionare il coperchio sul contenitore.
6 MANUTENZIONE
1 - Ogni giorno: controllare il distributore e
verificare che non ci siano perdite di pro-
dotto dalle guarnizioni. Se si notano per-
dite, controllare prima di tutto che il
distributore sia correttamente montato,
quindi verificare che le guarnizioni non
necessitino di lubrificazione e infine che
non siano difettose o usurate; in tal caso
sostituirle con ricambi originali del fabbri-
cante.
2 - Al fine di prevenire danni al distributore le
parti in plastica devono essere lubrificate
solo con il grasso fornito dal fabbricante o
con altro grasso compatibile con policarbo-
nato.

DELICE
8Ugolini S.p.A.
1 TECHNICAL CHARACTERISTICS
The manufacturer reserves the right to make
changes without any prior notification.
2 INTRODUCTION
Read this instruction manual carefully to know
the specifications of the dispenser. As all
mechanical products, this unit requires cleaning
and maintenance. Its working order can be
compromised by possible errors made by the
operator during disassembly and cleaning. For
this reason it is important that the staff in charge
of the dispenser is qualified to carry out the day
to day operations, which are dismantling,
cleaning, sterilisation and reassembly.
3 INSTALLATION
1 - Remove the dispenser from the packaging.
(This should be kept for any future
requirement)
2 - Check the dispenser has not been
damaged during transport. The forwarding
agent must be notified immediately of any
claim.
3 - Install the dispenser on a counter top that
will support its weight, even with a full load.
4 - Before connecting the dispenser
electrically check that the voltage (in the
network) is as shown on the data plate.
Plug the unit into a grounded, protected
single phase electrical supply according to
the applicable electrical codes and the
specifications of your machine. If the
dispenser has no plug, conforming to the
regulations in your Country, to the cable,
supplied with an earthing pin or earthing
contact and suitable to currents of at least
10A 250V (for areas with tension of 220V-
230V 50-60Hz) and 20A 250V (for areas
with tension of 100-115V 50-60Hz). If you
want to make a fixed connection to the
network, connect the cord to a bipolar wall
breaker with a contact gap of at least 3mm.
not use extension cords to connect the unit
electrically.
5 - The dispenser does not leave the factory
presanitized and sanitized. Prior to use it
must be disassembled, cleaned and
sanitized according to the instructions in
chapter 5.3 CLEANING.
4 TO OPERATE SAFELY
1 - Read the instruction booklet before using
the dispenser.
2 - Use the dispenser only if it is grounded
correctly.
3 - Do not use extension cords to connect the
dispenser electrically.
4 - Do not operate the dispenser if it is not
closed and blocked with screws.
5 - Do not place fingers or objects in the
cooling fissures and faucet outlet panels
louvers.
6 - Do not open the dispenser for cleaning or
maintenance without ensuring it has been
disconnected from the electricity.
7 - Do not remove the container when the unit
DELICE
Transparent removable bowls n 1
Capacity of each bowl, approx. l 5
Dimensions:
width cm 24
depth cm 32
height cm 49
Net weight, approx. kg 8
Gross weight, approx. kg 13
Adjustable thermostats n 2
Noise level lower than 70 dB (A)
IMPORTANT
Electric specifications: read the informa-
tion on the data plate of each single
dispenser, situated on the underside.
The serial number of the units is prece-
ded by #
ATTENTION
Ensure that the unit is grounded cor-
rectly; if not it may cause electric shock
to persons or damage the dispenser.

DELICE
Ugolini S.p.A. 9
ENGLIS
H
ENGLISH
is in operation.
5 OPERATING PROCEDURES
1 - Clean and sanitized the dispenser prior to
use following the instructions in chapter 5.3
CLEANING.
2 - Fill the bowl with the product, prepared
according to the instructions of the
manufacturer.
3 - Install the cover above the container
making sure that it is placed correctly.
4 - Set the control switch (see charter 5.1.
COMMAND DESCRIPTIONS)
5 - The dispenser should always operate with
the cover installed in order to prevent
possible contamination of the product.
6 - The dispenser must run uninterruptedly;
heating will stop automatically when the
product is ready for dispensing. The mixing
device will continue to operate.
7 - The dispenser is supplied with a container
with a closed removable bottom to facilitate
cleaning and sterilisation.
5. 1 DESCRIPTION OF CONTROLS
The dispenser is equipped with a general
switch whose functions are:
The dispenser is equipped with a thermostat,
on the right side, to adjust the temperature of
the product.
Comment: the dispenser is also equipped with
a second thermostat on the underside to
regulate the temperature of the hot plate. This
is calibrated in the factory. If necessary, it is
possible to act on the thermostat reducing the
temperature of the hot plate to prevent possible
burns. This will lengthen the heating time of the
product and it will never be possible to obtain a
product at a higher temperature to that set for
the hot plate.
5. 2 OPERATION HELPFUL HINTS
hot chocolate: preparation following the
traditional artisan method, mix the cocoa with
milk or water well in a pan before pouring it into
the bowl. Follow the instructions of the
manufacturer if using packaged instantaneous
products. It is possible to mix these directly in
the container.
Activate the dispenser turning the switch to
position 1. Turn the thermostat knob to 90°C to
obtain the cooking temperature of the product.
When the hot chocolate is ready lower the
temperature to the value required for
dispensing turning the thermostat knob.
5. 3 CLEANING AND SANITIZING
PROCEDURES
Cleaning and sanitizing are essential to
maintain perfect taste and maximum efficiency
from your dispenser. The procedures described
below are general and can vary due to the
sanitary regulations of the local health
authorized.
The product must be taken out of the dispenser
before it is disassembled for cleaning.
ATTENTION
Do not remove the container until the hot
plate is cold.
ATTENTION
Do not remove the container from the
dispenser when it contains hot products.
Position 0 :power is turned off
Position I :mixer and heating device in
working order
IMPORTANT
Before switching off the dispenser com-
pletely (switch at position 0), bring the
thermostat to the lowest temperature
and wait for the product to cool down.
This stops the product (if not agitated)
from sticking to the hot plate

DELICE
10 Ugolini S.p.A.
5. 3. 1 DISASSEMBLY
1 - Empty the bowl and remove the lid
2 - Remove the mixer from the central shaft
3 - Dismantle the faucet following the
sequence shown (see fig. 1)
figure 1
4 - Remove the container, lifting it upwards.
5 - Remove the drip-tray and empty it.
5. 3. 2 CLEANING
1 - Prepare approx. four litres (2 gallons) of
hot water (45-60° C) and specific detergent
in a bowl according to the instructions of
the manufacturer; a solution, which is too
concentrated, may cause damage to the
parts to be washed, one that is too diluted
will not clean adequately. Do not use abra-
sive detergents.
2 - Use a suitable brush and carefully clean all
the parts in contact with the drink
3 - Rinse all the washed parts in running
water.
5. 3. 3 SANITIZING
The dispenser must be sanitized prior to
starting the machine. Do not allow the unit to sit
for extended periods of the time after
sanitization
1 - Before starting the procedure described
below wash hands with an anti-bacterial
soap.
2 - Prepare at least. four litres of hot water
(45-60°C) and sterilising product legally
approved in your Country, following the
instructions of the manufacturer. If there is
no specific sterilising product prepare a
solution of water and bleach in the
following ratio: 1 tbsp: 2 litres of water.
3 - Immerse all the parts to be sterilised in the
solution for the time indicated by the
manufacturer.
4 - Allow the sterilised parts to air dry on a
ATTENTION
Before proceeding to disassemble any
component always disconnect the unit
from the electricity removing the plug or
switching off the 2 pole wall breaker.
ATTENTION
Before cleaning disconnect the dispen-
ser from the electricity taking out the
plug or turning off the outside switch on
the wall.
IMPORTANT
Do not wash any component of the
machine in the dishwasher.
IMPORTANT
Use detergents compatible with the pla-
stic parts to avoid damaging the dispen-
ser.
ATTENTION
Do not use excessive amounts of water
near the electric components of the
dispenser when washing it as this can
cause electric shock or damage the
dispenser.

DELICE
Ugolini S.p.A. 11
ENGLIS
H
ENGLISH
clean surface.
5 - Use non-abrasive cloths to dry the external
parts.
5. 3. 4 ASSEMBLY
1 - Put the drip-tray and grill in place
2 - Lubricate the faucet piston (in the area A
shown in fig. 2) using only the grease
supplied by the manufacturer or other oil
used for food.
figure 2
3 - Reassemble the faucet assembly on the
container in the opposite way to which it
was dismantled (see fig. 1).
4 - Install the container putting the central
shaft in place.
5 - Insert the mixer in the central shaft
6 - Position the cover on the container.
6 MAINTENANCE
1 - Daily: check the dispenser for any loss of
product from the gaskets. If there is, first
check the dispenser is assembled correctly
making sure that the gaskets need no
lubricating and they are not faulty or worn.
In this case they must be replaced with
original parts.
2 - To avoid damage to the dispenser the
plastic parts must be lubricated only with
the grease supplied by the manufacturer or
other grease compatible with
polycarbonate.

DELICE
12 Ugolini S.p.A.
1 CARACTERISTIQUES
TECHNIQUES
Nous nous réservons le droit d'apporter des
modifications sans avertissement préalable.
2 INTRODUCTION
Nous vous recommandons de lire
attentivement ce carnet d’istructions, de façon
à connaître toutes les caractéristiques du
distributeur.
Comme tous les produits mécaniques, ce
distributeur nécessite hygiène et soin. Son bon
fonctionnement peut être compromis par
d'éventuelles erreurs de l'opérateur au cours
des phases de montage et de nettoyage. C'est
la raison pour laquelle il est important que les
procédures quotidiennes de démontage et
remontage soient connues par tout le
personnel responsable du distributeur sans
courir le risque de commettre des erreurs.
3 INSTALLATION
1 - Retirez le distributeur de l'emballage. Nous
vous conseillons de conserver l'emballage,
vous pourriez en avoir besoin plus tard.
2 - Assurez-vous que le distributeur n'a pas
subi de dommages au cours du transport.
Si c'est le cas, présentez immédiatement
une réclamation auprès du transporteur.
3 - Posez le distributeur sur un comptoir qui
supporte son poids lorsqu'il est plein.
4 - Avant d'effectuer les branchements
électriques, vérifiez que la tension du
réseau est la même que celle indiquée sur
la plaquette. Branchez le distributeur à un
réseau monophasé à l'aide d'une prise
comprenant la mise à la terre,
conformément aux normes en vigueur. Si
le distributeur n'en est pas doté, utilisez
une fiche conforme aux normes de votre
pays pourvue de fiche ou contacts de terre
et adaptée à des courants d'au moins 10A
250V (pour les endroits qui ont une tension
de 220-230V 50-60Hz) et 20A 250V (pour
les endroits qui ont une tension de 100-
115V 50-60Hz). Si vous voulez réaliser un
branchement fixe au réseau, branchez le
câble à un dispositif bipolaire de coupure
fixé au mur dont les ouvertures de contact
sont d'au moins 3 mm. N'utilisez pas de
rallonge pour brancher l'appareil au réseau
électrique.
5 - Le distributeur n'est ni lavé ni désinfecté
avant de sortir de la fabrique. Avant de
l'utiliser, il vous faut le démonter, le laver et
le désinfecter suivant les indications du
chapitre 5.3 NETTOYAGE.
4 POUR UN FONCTIONNEMENT
SANS DANGER
1 - N'utilisez pas le distributeur avant d'avoir lu
ce carnet d’istructions.
2 - N'utilisez pas le distributeur s'il n'est pas
correctement relié à la terre.
3 - N'utilisez pas de rallonge pour le
branchement électrique du distributeur.
4 - Ne mettez pas le distributeur en fonction si
les panneaux ne sont pas en place et fixés
DELICE
Réservoirs transparents
démontables n 1
Capacité chaque réservoir,
environ l 5
Dimensions:
largeur cm 24
profondeur cm 32
hauteur cm 49
Poids net, environ kg 8
Poids brut, environ kg 13
Thermostats réglables n 2
Niveau de bruit inférieur à 70 dB (A)
IMPORTANT
Caractéristiques électriques : lire les
données qui figurent sur la plaquette de
chaque distributeur. Cette plaquette se
trouve sous le distributeur. Les numéros
d'immatriculation des appareils sont
précédés du symbole #. Les données
figurant sur la plaquette sont toujours celles
auxquelles vous devez faire référence.
ATTENTION
Vérifiez que l'appareil est correctement relié
à la terre. S'il ne l'est pas, les personnes
pourraient subir des chocs électriques et le
distributeur pourrait être endommagé.

DELICE
Ugolini S.p.A. 13
ENGLISH
FRANCAIS
par des vis.
5 - N'introduisez pas les doigts ou des objets
dans les fentes des panneaux ou dans
l'ouverture du robinet.
6 - N'ouvrez pas le distributeur pour le
nettoyage ou l'entretien sans vous être
assuré qu'il est débranché.
7 - Ne retirez pas le conteneur lorsque la
machine est en route.
5 MODE D'EMPLOI
1 - Avant d'utiliser le distributeur, lavez-le et
désinfectez-le suivant les indications du
chapitre 5.3 NETTOYAGE.
2 - Remplissez le conteneur du produit voulu
préparé selon les indications du
producteur.
3 - Montez le couvercle sur le conteneur en
veillant à le positionner correctement.
4 - Agissez sur les commandes (voir chapitre
5.1 DESCRIPTION DES COMMANDES).
5 - Le distributeur doit toujours fonctionner à
couvercle fermé, afin d'éviter une
éventuelle contamination du produit.
6 - Le distributeur doit fonctionner sans
interruption. Le chauffage s'arrêtera
automatiquement lorsque le produit sera
prêt à la distribution. Le dispositif
d'agitation continuera à fonctionner.
7 - Le distributeur est équipé d'un conteneur à
fond clos amovible afin de faciliter les
opérations de nettoyage et désinfection.
5. 1 DESCRIPTION DES COMMAN-
DES
Le distributeur est doté d'un interrupteur
général dont les fonctions sont :
Le distributeur est équipé d'un thermostat,
placé sur le côté droit, pour le réglage de la
température du produit.
Note: le distributeur est équipé d'un second
thermostat, situé sous l'appareil, pour le
réglage de la température de la plaque
chauffante. Il est calibré par le fabricant. Au
besoin, pour éviter de brûler le produit, vous
pouvez agir sur le thermostat et réduire la
température de la plaque chauffante. Dans ce
cas, le temps de chauffe du produit sera plus
long, et le produit n'atteindra jamais une
température supérieure à celle qui est
paramétrée pour la plaque chauffante.
5. 2 SUGGESTIONS
Préparation du chocolat chaud : conformez-
vous à la production artisanale. Diluez bien le
cacao dans une casserole avant de le verser
dans le conteneur du distributeur. Si vous
utilisez des produits instantanés emballés,
suivez les indications du fabricant. Avec ce
genre de produits le mélange peut être effectué
directement dans le conteneur.
Actionnez ensuite le distributeur en plaçant
l'interrupteur en position I. Tournez le bouton du
thermostat jusqu'à la position 90°C de façon à
obtenir la température de cuisson du produit.
Lorsque le chocolat est prêt, baissez la
température à la valeur désirée pour la
distribution en tournant le bouton du
thermostat.
5. 3 NETTOYAGE
Laver et nettoyer le distributeur sont des
opérations fondamentales pour une parfaite
conservation du goût de la boisson et la
meilleure efficacité de votre distributeur. Les
procédures décrites ci-après doivent être
considérées comme des opérations de
caractère général et peuvent varier selon les
ATTENTION
Ne retirez par le conteneur tant que la
plaque chauffante est chaude.
ATTENTION
Ne retirez pas le conteneur du distributeur
lorsque celui-ci contient du produit chaud.
Position 0 :le distributeur est éteint.
Position I :l'agitateur et le ventilateur
sont en fonction.
IMPORTANT
Avant d'éteindre complètement le
distributeur (interrupteur en position 0),
placez le thermostat sur la température
minimum et attendez que le produit
refroidisse. Cela évite que le produit, s'il
n'est pas agité, ne se colle à la plaque
chauffante.

DELICE
14 Ugolini S.p.A.
normes sanitaires en vigueur.
Videz le produit avant de démonter le
distributeur pour le nettoyer.
5. 3. 1 DEMONTAGE
1 - Videz le conteneur et retirez le couvercle.
2 - Faites glisser le mélangeur de l'arbre
central.
3 - Démontez le robinet selon la séquence
indiquée (voir figure 1).
figure 1
4 - Retirez le conteneur en le soulevant vers
le haut.
5 - Faites glisser vers l'extérieur le tiroir qui
recueille les gouttes et videz-le.
5. 3. 2 LAVAGE
1 - Dans une bassine, préparez environ
quatre litres d'eau chaude (45-60°C) et du
produit lavant spécial en vous conformant
aux prescriptions du fabricant. Une
solution trop concentrée peut endommager
les pièces à laver et une solution trop
diluée peut ne pas nettoyer correctement.
N'utilisez pas de produits abrasifs.
2 - Utilisez une brosse adaptée et lavez
soigneusement à l'aide de la solution
nettoyante toutes les pièces qui sont en
contact avec la boisson.
3 - Rincez toutes les pièces lavées à l'eau
courante.
ATTENTION
Avant de procéder à toute intervention de
démontage, débranchez toujours le
distributeur en sortant la fiche de la prise
électrique ou en arrêtant le dispositif
bipolaire de coupure fixé au mur.
ATTENTION
Avant de procéder à toute intervention de
nettoyage, débranchez toujours le
distributeur en sortant la fiche de la prise
électrique ou en arrêtant le dispositif de
coupure fixé au mur.
IMPORTANT
Ne lavez aucun des éléments de l'appareil
au lave-vaisselle.
IMPORTANT
Pour ne pas endommager le distributeur,
utilisez uniquement des produits lavant
adaptés aux pièces en plastique.
ATTENTION
Durant le lavage du distributeur, veillez à ne
pas utiliser trop d'eau à proximité des
composants électriques : vous pourriez
provoquer des chocs électriques ou
endommager le distributeur.

DELICE
Ugolini S.p.A. 15
ENGLISH
FRANCAIS
5. 3. 3 DESINFECTION
La désinfection doit être effectuée avant de
mettre en marche le distributeur. Evitez que
celui-ci reste trop longtemps inactif après avoir
été désinfecté.
1 - Avant de commencer les procédures
décrites ci-après, lavez-vous les mains
avec du savon antibactérien.
2 - Dans une bassine, préparez environ
quatre litres d'eau chaude (45-60°C) et de
produit désinfectant approuvé par les
autorités de votre pays en respectant les
doses indiquées par le fabricant. En
l'absence de produit désinfectant
spécifique, préparez une solution d'eau et
d'hypochlorite de sodium (eau de javel)
dans les proportions suivantes : 1 cuiller
pour deux litres d'eau.
3 - Immergez toutes les pièces à désinfecter
dans la solution pendant la durée indiquée
par le fabricant.
4 - Laissez sécher les pièces désinfectées à
l'air, sur une surface propre.
5 - Séchez les parties extérieures du
distributeur sans utiliser de linges abrasifs.
5. 3. 4 REMONTAGE
1 - Mettez le tiroir qui recueille les gouttes et la
grille en place.
2 - Lubrifiez le piston robinet (dans la zone A
indiquée sur la figure 2) uniquement avec
la graisse fournie par le fabricant ou une
autre graisse à usage alimentaire.
figure 2
3 - Ré assemblez le robinet sur le conteneur,
dans le sens inverse des indications de
démontage (voir figure 1).
4 - Montez le conteneur en enfilant l'arbre
central à sa place.
5 - Insérez le mélangeur dans l'arbre central.
6 - Mettez en place le couvercle sur le
conteneur.
6 ENTRETIEN
1 - Quotidien : vérifiez le distributeur et vérifiez
qu'il n'y a pas de fuite de produit par les
joints. Si vous remarquez des fuites,
contrôlez avant tout le montage du
distributeur. Assurez-vous ensuite que les
joints n'ont pas besoin d'être lubrifiés et
enfin qu'aucune pièce n'est défectueuse
ou abîmée. Dans ce cas, remplacez-la
avec une pièce de rechange originale du
fabricant.
2 - Pour éviter d'endommager le distributeur,
lubrifiez les pièces en plastique
uniquement avec de la graisse fournie par
le fabricant ou une autre graisse
compatible avec le polycarbonate.

DELICE
16 Ugolini S.p.A.
1 TECHNISCHE DATEN
Wir behalten uns das Recht vor, ohne
Vorankündigung Änderungen vorzunehmen.
2 EINFÜHRUNG
Wir empfehlen Ihnen, das vorliegende
Anleitungshandbuch aufmerksam zu lesen, um
sich mit allen Eigenschaften des Distributors
vertraut zu machen.
Wie alle mechanischen Bauteile macht auch
dieser Distributor eine sorgfältige Reinigung
und Pflege erforderlich. Der ordnungsgemäße
Betrieb kann außerdem durch eventuelle
Fehler des Bedieners während der Zerlegung
und der Reinigung beeinträchtigt werden. Aus
diesem Grund ist es wichtig, dass die täglichen
Prozeduren Zerlegung, Reinigung,
Hygienisierung und Montage bekannt sind, so
dass Fehler durch das für den Distributor
verantwortliche Personal ausgeschlossen
werden können.
3 INSTALLATION
1 - Der Distributor aus seiner Verpackung
entnehmen, die für zukünftige
Verwendungen aufbewahrt werden muss.
2 - Sicherstellen, dass der Distributor während
des Transports keinerlei Beschädigung
erfahren hat. Anderenfalls dem Spediteur
sofort Meldung erstatten.
3 - Den Distributor auf einen Tisch auflegen,
der in der Lage ist, das Gewicht auch mit
voller Füllung zu tragen.
4 - Vor dem elektrischen Anschließen des
Distributors sicherstellen, dass die
Netzspannung mit der auf dem
Typenschild angegebenen
Betriebsspannung übereinstimmt. Der
Distributor unter Verwendung eines
Netzsteckers mit Erdung unter Beachtung
der geltenden Bestimmungen an das
Einphasenstromnetz anschließen. Falls
der Distributor ohne Netzstecker geliefert
wird, so muss ein Kabel mit Stecker
angeschlossen werden, das den
Bestimmungen Ihres Landes entspricht;
dabei muss der Stecker einen
Erdungskontakt aufweisen und für einen
Strom von zumindest 10 A 250 V (für
Bereiche mit einer Spannung von 220 -
230 V 50 - 60 Hz) und 20 A 250 V (für
Bereiche mit einer Spannung von 100 -
115 V 50 - 60 Hz) geeignet sein. Falls ein
fester Netzanschluss vorgenommen
werden soll, so muss das Kabel an einen
zweipoligen Wandschalter mit einer
Kontaktöffnung von zumindest 3 mm
angeschlossen werden. Für den
elektrischen Anschluss des Gerätes keine
Verlängerungskabel verwenden.
5 - Der Distributor verlässt das Werk nicht
vorgereinigt und hygienisiert. Vor der
Benutzung muss es daher zerlegt,
gereinigt und hygienisiert werden; dabei
die Anweisungen im entsprechenden
Abschnitt 5.3 REINIGUNG beachten.
DELICE
Abnehmbare Klarsicht-Behälter stück 1
Fassungsvermögen
Einzelbehälter, ungefähr l 5
Abmessungen:
Breite cm 24
Tiefe cm 32
Höhe cm 49
Nettogewicht, ca kg 8
Bruttogewicht, ca kg 13
Einstellbare Thermostaten stück 2
Geräuschpegel unter 70 db (A)
WICHTIG
Elektrische Eigenschaften: Die auf dem
Typenschild eines jeden einzelnen
Distributors angegebenen Daten lesen;
das Typenschild befindet sich unter dem
Distributor. Den Seriennummer der
Geräte geht das Symbol # voraus. Es
muss stets auf die Daten Bezug
genommen werden, die auf dem
Typenschild angegeben werden.
ACHTUNG
Sicherstellen, dass das Gerät
ordnungsgemäß geerdet worden ist;
anderenfalls besteht die Gefahr von
elektrischen Schlägen für Personen
sowie die Gefahr der Beschädigung des
Distributors.

DELICE
Ugolini S.p.A. 17
ENGLIS
H
DEUTSCH
4 SICHERHEITSMAßNAHMEN
1 - Den Distributor nicht benutzen, bevor das
vorliegenden Anweisungshandbuch
gelesen worden ist.
2 - Den Distributor nicht benutzen, wenn es
nicht ordnungsgemäß geerdet worden ist.
3 - Für den elektrischen Anschluss des
Distributors keine Verlängerungskabel
benutzen.
4 - Den Distributor nicht in Betrieb nehmen,
wenn es nicht geschlossen und mit
Schrauben blockieren ist.
5 - Nicht die Finger oder Gegenstände in die
Kühlungsschlitze oder die Öffnung des
Hahns einführen.
6 - Den Distributor nicht für die Reinigung
oder die Wartung öffnen, ohne zuvor
sicherzustellen, dass die
Stromversorgung unterbrochen worden ist.
7 - Den Behälter nicht entfernen, wenn die
Maschine in Betrieb ist.
5 GEBRAUCHSANLEITUNGEN
1 - Den Distributor vor der Benutzung unter
Beachtung der Anweisungen in Abschnitt
5.3 REINIGUNG des vorliegenden
Handbuches spülen und hygienisieren.
2 - Den Behälter mit dem gewünschten
Produkt füllen, das unter Beachtung der
Anweisungen des Herstellers zuzubereiten
ist.
3 - Die Abdeckung über dem Behälter
anbringen und sicherstellen, dass sie
ordnungsgemäß positioniert worden ist.
4 - Die Bedienelemente betätigen(siehe
Abschnitt 5.1 BESCHREIBUNG DER
BEDIENELEMENTE).
5 - Der Distributor muss immer mit montierter
Abdeckung in Betrieb genommen werden,
um eine eventuelle Verunreinigung des
Produkts zu vermeiden.
6 - Der Distributor muss ununterbrochen
betrieben werden: Die Heizung schaltet
sich automatisch ab, wenn das Produkt für
die Ausgabe fertig ist. Das Rührwerk läuft
weiter.
7 - Der Distributor weist einen Behälter mit
geschlossenem Boden auf, der zur
Vereinfachung der Reinigung und
Hygienisierung entfernt werden kann.
5. 1 BESCHREIBUNG DER
BETRIEBSSCHALTER
Der Distributor weist einen Hauptschalter mit
den folgenden Funktionen auf:
Der Distributor weist auf der rechten Seite
außerdem ein Thermostat für die Einstellung
der Temperatur des Produkts auf.
Anmerkung: Der Distributor ist außerdem mit
einem zweiten Thermostat unter dem
Distributor für die Einstellung der Temperatur
der Heizplatte ausgestattet. Es wird im Werk
tariert. Falls es zur Vermeidung von
eventuellen Verbrennungen des Produkts
erforderlich ist, so kann dieses Thermostat
jedoch auch eingestellt werden, um die
Temperatur der Heizplatte zu senken. In
diesem Fall verlängern sich die Zeiten für die
Erwärmung des Produkts und es ist nie
möglich, dass das Produkt eine Temperatur
erreicht, die über der für die Heizplatte
eingestellten liegt.
5. 2 NÜTZLICHE HINWEISE
WÄHREND DES GEBRAUCHS
Zubereitung von Schokolade: Unter Beachtung
der Handwerklichen Vorgehensweise den
Kakao in einer Kasserolle temperieren, bevor
er in den Behälter des Distributors gegossen
wird. Bei Verwendung konfektionierten Instant-
Produkte die Anweisungen des Herstellers
beachten. Bei diesem Produkttyp kann die
Mischung direkt im Behälter vorgenommen
werden.
Den Distributor einschalten, indem der Schalter
in Position I gebracht wird. Den Knauf des
Thermostats in die Position 90 °C drehen, so
dass die Temperatur für das Kochen des
Produkts erreicht wird. Wenn die Schokolade
fertig ist, die Temperatur durch Drehen des
Thermostatknaufs auf den für die Ausgabe
ACHTUNG
Den Behälter nicht entfernen, bis die
Heizplatte kalt ist.
ACHTUNG
Den Behälter nicht vom Distributor
entfernen, wenn dieses heißes Produkt
enthält.
Position 0 :der Distributor ist abgeschaltet
Position I :sowohl das Rührwerk, als
auch die Heizung sind in
Betrieb.

DELICE
18 Ugolini S.p.A.
gewünschten Wert senken.
5. 3 REINIGUNG
Zur Gewährleistung einer perfekten
Konservierung des Geschmacks des
Getränkes sowie der uneingeschränkten
Effizienz Ihres Distributors sind das Spülen und
die Reinigung von grundlegender Bedeutung.
Die im Folgenden beschriebenen Prozeduren
haben allgemeinen Charakter und unterliegen
in Abhängigkeit von den geltenden
Hygienebestimmungen Abweichungen.
Vor dem Zerlegen des Distributors für das
Spülen muss das Produkt entleert werden.
5. 3. 1 DEMONTAGE
1 - Den Behälter entleeren und die
Abdeckung abnehmen.
2 - Das Rührwerk von der zentralen Welle
abziehen.
3 - Den Hahn in der angegebenen
Reihenfolge zerlegen (siehe Abbildung 1).
Bild 1
4 - Den Behälter entnehmen, indem er nach
oben abgehoben wird.
5 - Die Tropfschublade herausnehmen und
ausleeren.
5. 3. 2 WASCHEN
1 - Ein Becken mit ca. vier Litern heißem
Wasser und spezifischem
Reinigungsmittel vorbereiten und dabei die
Angaben des Herstellers genau einhalten;
ein zu starke Konzentration kann eine
Beschädigung der zu reinigenden Bauteile
verursachen, während eine zu starke
Verdünnung die Reinigungswirkung
beeinträchtigt. Keine scheuernden
WICHTIG
Vor dem vollständigen Abschalten des
Distributors (Schalter in Position 0) das
Thermostat auf die Position der
Mindesttemperatur einstellen und
warten, bis das Produkt abgekühlt ist.
Dadurch wird vermieden, dass das (nicht
umgerührte) Produkt auf der Heizplatte
festklebt.
ACHTUNG
Vor dem Abbauen von Komponenten die
Stromversorgung des Gerätes
unterbrechen; dazu den Netzstecker aus
der Netzsteckdose ziehen oder den
Wandschalter öffnen.
ACHTUNG
Vor allen Reinigungsarbeiten die
elektrische Speisung des Distributors
unterbrechen; dazu den Netzstecker aus
der Netzsteckdose ziehen oder den
Wandschalter öffnen.
WICHTIG
Die Komponenten der Maschine nicht in
der Spülmaschine reinigen.

DELICE
Ugolini S.p.A. 19
ENGLIS
H
DEUTSCH
Reinigungsmittel verwenden.
2 - Eine geeignete Bürste benutzen und alle
Bauteile, die mit dem Getränk in Kontakt
kommen, sorgfältig mit der
Reinigungslösung reinigen.
3 - Alle gereinigten Bauteile unter fließendem
Wasser abspülen.
5. 3. 3 DESINFEKTION
Die Hygienisierung muss unmittelbar vor
der Inbetriebnahme des Distributors
vorgenommen werden; eine längere
Nichtbenutzung nach der Hygienisierung
muss vermieden werden.
1 - Vor Beginn der im Folgenden
beschriebenen Prozeduren die Hände mit
antibakterieller Seife waschen.
2 - Eine Wanne mit ca. vier Litern Lösung aus
heißem Wasser (45 - 60 °C) und
Hygienisierungsprodukt zubereiten, das
von den Behörden Ihres Landes
genehmigt worden ist; dabei die Angaben
des Herstellers beachten. Falls kein
spezifisches Hygienisierungsmittel
vorhanden ist, eine Lösung aus Wasser
und Natriumhypochlorit (Chlorbleichlauge)
in einem Verhältnis von 1 Löffel je 2 Liter
Wasser zubereiten.
3 - Alle zu hygienisierenden Bauteile für die
vom Hersteller des Produkts angegebene
Zeit in die Lösung eintauchen.
4 - Die hygienisierten Bauteile auf einer
sauberen Fläche an der Luft trocknen
lassen.
5 - Die Außenflächen des Distributors
abtrocknen; dabei keine kratzenden
Lappen verwenden.
5. 3. 4 MONTAGE
1 - Die Tropfschublade und den Rost in
seinen Sitz einsetzen.
2 - Den Kolben des Hahns (in Bereich A,
gezeigt auf Abbildung 2) ausschließlich mit
dem vom Hersteller gelieferten Fett oder
einem anderen lebenmitteltauglichen Fett
schmieren.
Bild 2
3 - Den Hahn an den Behälter anbauen; dabei
mit Bezug auf die Zerlegung in der
umgekehrten Reihenfolge vorgehen (siehe
Abbildung 1).
4 - Den Behälter montieren und dabei die
zentrale Welle in den entsprechenden Sitz
einführen.
5 - Den Mischer auf die zentrale Welle
einführen.
6 - Die Abdeckung auf dem Behälter
positionieren.
6 WARTUNG
1 - Täglich: Den Distributor kontrollieren und
überprüfen, ob an den Dichtungen Produkt
austritt. Im Falle von Lecks zuerst
kontrollieren, ob der Distributor
ordnungsgemäß montiert ist, dann
kontrollieren, ob die Dichtungen
geschmiert werden müssen, und
anschließend kontrollieren, ob die
Dichtungen beschädigt oder abgenutzt
sind; in diesem Fall müssen sie durch
Originalersatzteile des Herstellers ersetzt
werden.
2 - Zur Vermeidung von Beschädigungen des
Distributors dürfen die Kunststoffbauteile
ausschließlich mit dem vom Hersteller
gelieferten Fett oder einem anderen mit
Polykarbonat kompatiblem Fett geschmiert
WICHTIG
Zur Vermeidung von Beschädigungen
des Distributors ausschließlich
Reinigungsmittel verwenden, die mit den
Bauteilen aus Kunststoff kompatibel
sind.
ACHTUNG
Während der Reinigung des Distributors
keine zu große Menge Wasser in der
Nähe der elektrischen Komponenten
verwenden; anderenfalls besteht die
Gefahr von elektrischen Schlägen oder
die Gefahr einer Beschädigung des
Distributors.

DELICE
20 Ugolini S.p.A.
1 CARACTERÍSTICAS TÉCNICAS
Se reserva el derecho de aportar
modificaciones sin previo aviso.
2 INTRODUCCIÓN
Es aconsejable leer atentamente este manual
de instrucciones a fin de conocer todas las
características del distribuidor.
Al igual que todos los productos mecánicos,
este distribuidor necesita ciertos cuidados y
limpieza. Su buen funcionamiento podría
depender además de posibles errores
cometidos por el operario en las fases de
desmontaje y de limpieza. Por este motivo es
importante que las operaciones de desmontaje,
lavado, saneamiento y montaje, siendo éstas
diarias, se conozcan bien sin posibilidad de
error por parte de todo el personal responsable
del distribuidor.
3 INSTALACIÓN
1 - Extraer el distribuidor del embalaje; se
aconseja su conservación en caso de
futura necesidad.
2 - Comprobar que el distribuidor no haya
sufrido daños en el transporte. En caso
contrario, proceder inmediatamente a
hacer las reclamaciones pertinentes al
transportista.
3 - Apoyar el distribuidor sobre una mesa para
descansar el peso, incluso a carga
completa.
4 - Antes de proceder a la instalación eléctrica
del distribuidor, comprobar que la tensión
de la red sea la indicada en la placa.
Conectar el distribuidor en una red
monofase, ayudándose de una toma a
tierra en conformidad con las normas
vigentes. Si el distribuidor no tuviera
clavija, conectar al cable una clavija que
cumpla las normas vigentes del país de
utilización, con un enchufe o con
conexiones a tierra y apto para una
corriente de al menos 10A 250V (para
áreas con una tensión de 220-230V 50-
60Hz) y 20A 250V (para áreas con una
tensión de 100-115V 50-60Hz). Si se
quisiera realizar una conexión fija a la red,
conectar el cable a un interruptor de pared
bipolar con una apertura para los
contactos de al menos 3 mm. No utilizar
alargos para realizar la conexión eléctrica
del aparato.
1 - El distribuidor no viene lavado y saneado
de fábrica. Antes de usarlo, es necesario
desmontarlo, lavarlo y sanearlo siguiendo
las instrucciones del capítulo 5.3
LIMPIEZA.
4 PARA UN FUNCIONAMIENTO
SEGURO
1 - No usar el distribuidor antes de haber leído
el presente manual de instrucciones.
2 - No usar el distribuidor si la conexión a
tierra no es correcta.
DELICE
Contenedores transparentes
desmontables n 1
Capacidad de cada contenedor,
aproximada l 5
Dimensiones:
ancho cm 24
largo cm 32
alto cm 49
Peso neto, aproximado kg 8
Peso bruto, aproximado kg 13
Termostatos regulables n 2
Nivel de ruido inferior a 70dB (A)
IMPORTANTE
Características eléctricas: leer los datos
indicados en la placa de cada distribui-
dor; ésta se encuentra bajo el mismo
distribuidor. Los números de matrícula
de los aparatos están precedidos por el
símbolo #. Los datos indicados en la
placa son los únicos datos de referencia. ATENCION
Comprobar que el aparato esté
conectado a tierra correctamente; en
caso contrario se corre el peligro de
electrocución de las personas o de cau-
sar daños en el distribuidor.
Other manuals for Delice
2
Table of contents
Languages:
Other Ugolini Beverage Dispenser manuals

Ugolini
Ugolini ARCTIC Compact 5L UL User manual

Ugolini
Ugolini MT mini User manual

Ugolini
Ugolini NG 6/1 User manual

Ugolini
Ugolini ARCTIC Compact Series User manual

Ugolini
Ugolini ARCTIC Compact 1/12 User manual

Ugolini
Ugolini INSTANT 20/2 User manual

Ugolini
Ugolini MT micro User manual

Ugolini
Ugolini Arctic Deluxe 12L User manual

Ugolini
Ugolini ARCTIC COMPACT User manual

Ugolini
Ugolini ARCTIC Compact 12L User manual