ULTIMATE BODY PRESS DSVKR User manual

CUSTOMER SERVICE / SATISFACTION GUARANTEE
Our passion is providing high quality affordable fitness equipment that lets you get the most from your
workouts every day. We are proud to serve your gym needs and want to meet and exceed your
expectations for customer service. Satisfaction is guaranteed, please contact us if you need any
assistance.
Ultimate ody Press
16 Avenue A,
Leetsdale, PA 15056-1304
Email:
support@ultimatebodypress.com
USA Tech Support:
877-734-7227
(M-F 9am-5pm EST)
FOR YOUR SAFETY: This Dip Station is designed to be mounted to wood frame walls with solid wood studs measuring 16
inches apart on center. This Dip Station should not be mounted to drywall alone. It is the users responsibility to choose a
secure location and properly install the Dip Station using the instructions provided. Tighten all bolts and carefully examine
your installation to ensure that the Dip Station is securely fastened in place before attempting use.
Consult your physician before beginning this or any exercise program. If you experience any discomfort while using this
machine, discontinue use and consult your physician immediately.
DSVKR – WALL MOUNT DIP STATION / VERTICAL KNEE RAISE STATION
PARTS LIST
1. Support Br cket
2. Dip St tion Br cket
3. B ckrest
4. B ckrest Mounting Br cket
5. Armrests
6. Vertic l H nd Grips
7. L g Bolt
8. L rge Allen Bolt
9. Sm ll Allen Bolt
10. L rge Fl t W sher
11. Sm ll Fl t W sher
12. Allen Wrench
TOOLS REQUIRED
5/16 in. Drill Bit
Socket Drive Ad pter for Power Drill
(Recommended)
17mm Socket Wrench
17mm Open Socket

Constructing the M in Assembly
Attach the Support racket (Part #1) to the Dip Station
racket (Part #2) using 4 Small Allen olts and 4 Small
Washers. These two pieces together form the Dip
Station Assembly.
Att ching the Dip St tion Assembly to W ll
1. Find two studs measuring 16 inches apart on
center using a stud finder or the hammer
technique. If you are unsure how to find the
studs, there are many videos online that illustrate
both techniques.
2. Mark the location of the center of each stud.
3. Set the Dip Station Assembly Height:
a. For most individuals, the Dip Station
racket (Part #2) needs to be mounted
between 4 and 5 feet off the floor. This will allow enough clearance for your feet to hang off
the ground during dips and knee raises. To get the exact height for your needs, the mount
holes of the Dip Station racket (Part #2) should be placed at mid-chest height. If multiple
individuals are using this dip station, choose the mounting height for the tallest user. Too
high is better than too low.
b. Measure the distance from the floor to your mid-chest and note it below.
c. NOTE YOUR SPECIFIC MOUNTING HEIGHT HERE _____________
4. The Dip Station Assembly is mounted to the wall using the 4 Lag bolts and 4 Large Washers.
5. Facing the wall and using the stud on the left side, mark the location of the first pilot hole using the
predetermined height noted above.
6. Pre-drill the first pilot hole to a depth of 3 inches using a 5/16 inch bit.
For n e sier, more secure inst ll tion nd to void d m ge to
studs nd h rdw re m ke sure your 5/16 inch drill bit length, when
inst lled on the power drill, is t le st 3 inches.
7. Insert the first Lag olt and Large Washer to the left side mount hole of
the back plate of the Dip Station Assembly.
8. Hold the Assembly vertically in your left hand or over your left shoulder.
Insert the Lag olt into the pilot hole and, using a power drill and
socket drive adapter, tighten the Lag olt about half way so that the
assembly can be rotated to a horizontal position.
Att ching M in Assembly to W ll (cont.)
9. You will now use the assembly as a template to locate and mark the remaining three pilot holes.
a. Rotate the assembly to a horizontal position.
b. Place a level on top of the back plate.
c. Ensure that the assembly is level and, using a pencil, mark the position of the remaining
three pilot holes. Verify that all holes are centered over studs.
10. Rotate the assembly out of the way and pre-drill the remaining three pilot holes.
11. Rotate the assembly back into place. Insert the remaining Lag olts and Large Washers into the
pilot holes and tighten each Lag olt about half way. Do not completely tighten the bolts until all
four bolts have been started. Then tighten all Lag olts.
12. Pat yourself on the back. You have successfully mounted the Dip Station Assembly to the wall.
Att ching B ckrest, Armrests nd Grips to M in Assembly
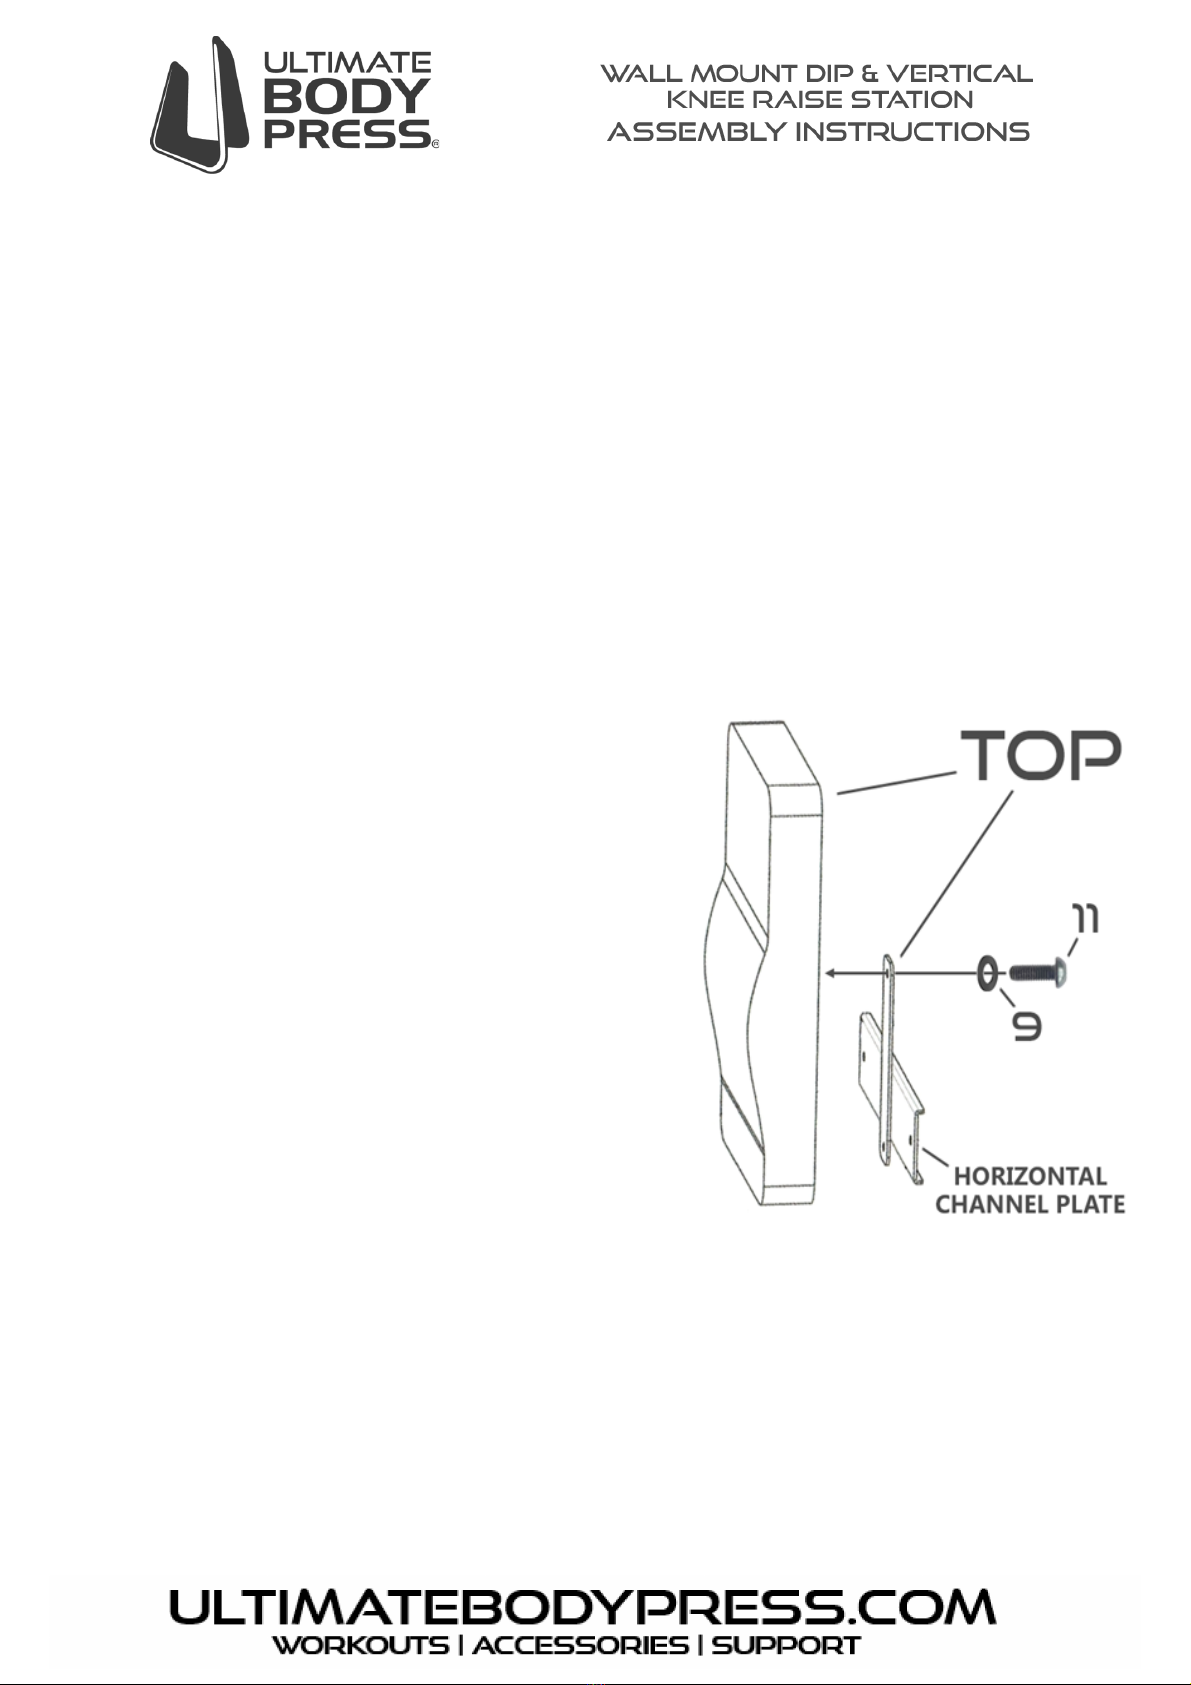
1. Locate the ackrest (Part #3) and ackrest
Mounting racket (Part #4). Note that both pieces
have a top and a bottom and need to be oriented
correctly for proper assembly. Attach the ackrest
to the Mounting Plate using two Small Allen olts
and Small Washers. efore tightening, verify that
the Horizontal Channel Plate is approximately 3
1/2 inches from the lower edge of the ackrest. If
the Horizontal Channel Plate appears centered on
the backrest, reattach as shown before attempting
to mount the ackrest to the Dip Station Assembly.
2. Mount the ackrest and Horizontal Channel Plate
Assembly to the back plate of the Dip Station
Assembly using two Small Allen olts and Small
Washers. Verify that the thicker lumber support
area of the backrest is closest to the floor.
3. Locate the two Armrests (Part #5). You will notice a
seam on one end of the Armrests. The seams
should face the wall so they are out of view when the Armrests are attached to the Dip Station
Assembly.
4. Attach the two Armrests to the Dip Station Assembly using 4 Large Allen bolts and 4 Small
Washers.
5. Locate the Vertical Hand Grips (Part #6). Insert them into the 1-inch holes in front of the Armrests.
Attach the Grips using 2 Small Allen bolts and 2 Small Washers.
6. Carefully examine your installation to ensure that all bolts are tightened and that the dip station is
securely fastened to the wall.
Table of contents
Other ULTIMATE BODY PRESS Home Gym manuals


