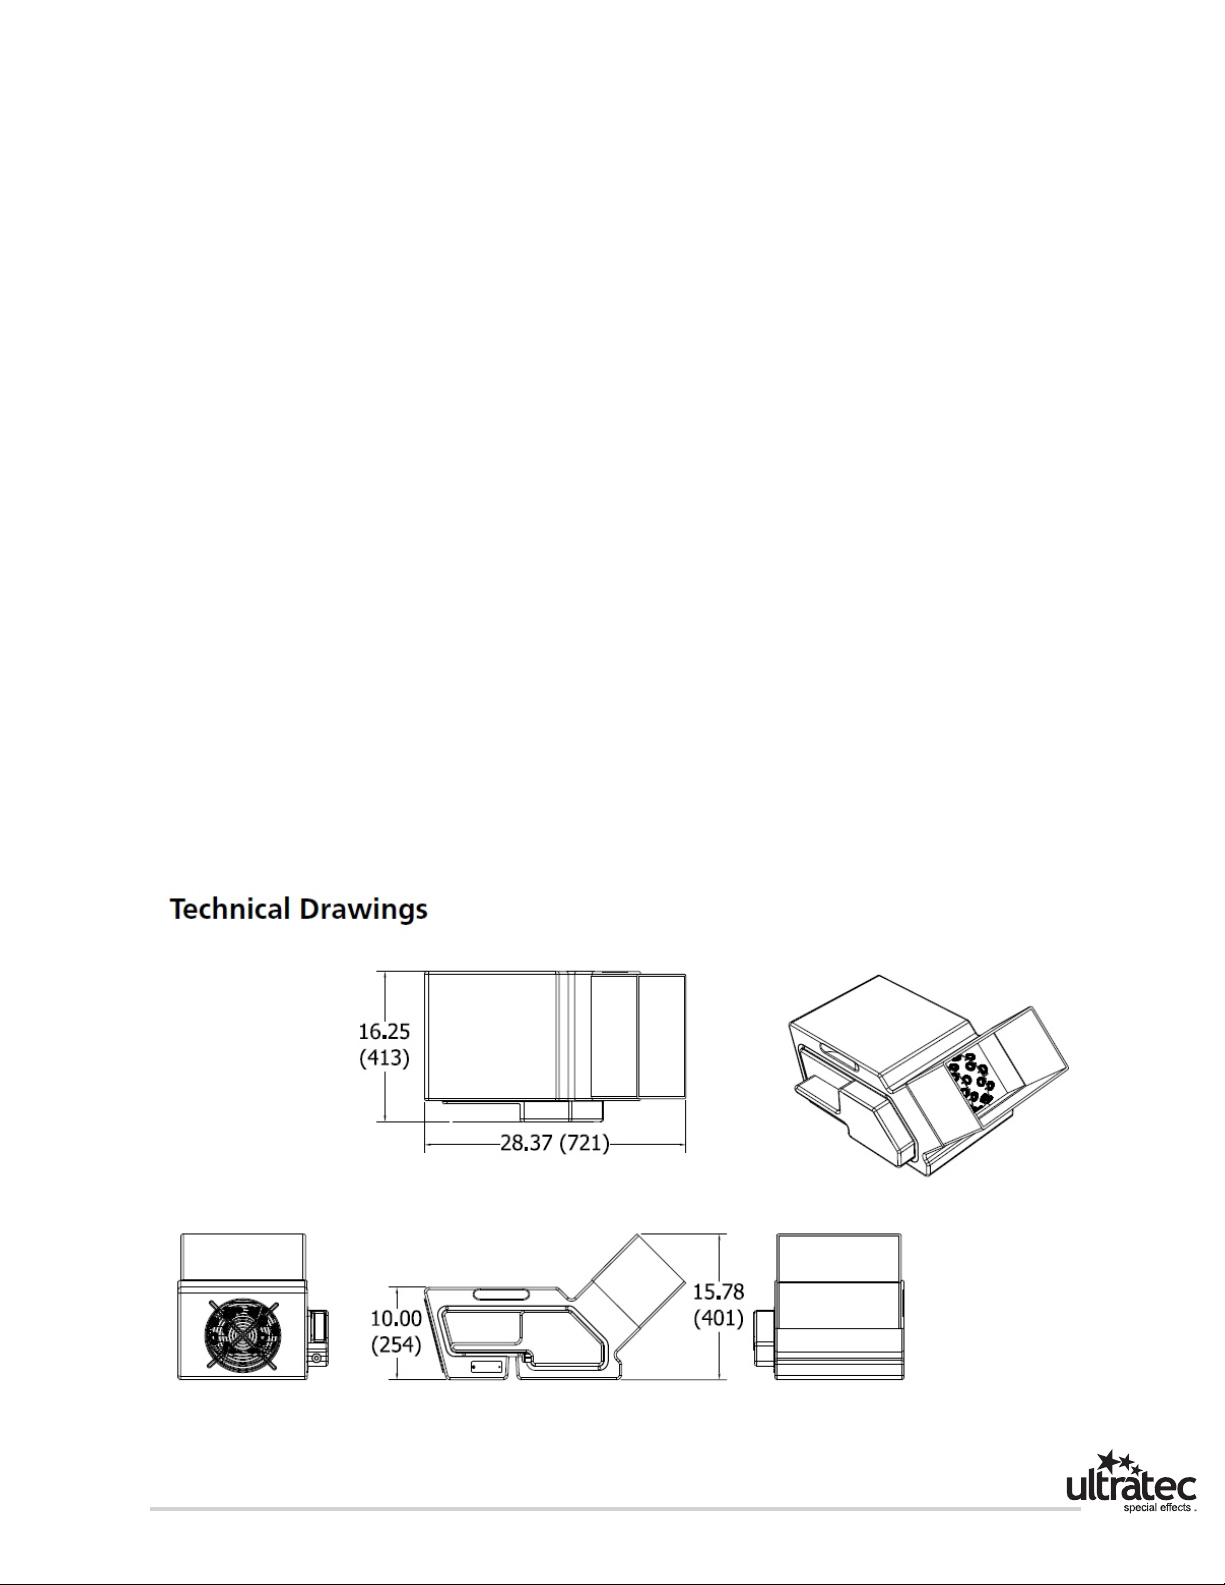
ULTRA TEC Bubble Master User manual

Bubble Master
Bubble Master JR.
Bubble Master DMX
Operation Manual
www.ultratecfx.com
v.072020

1www.ultratecfx.com
Table of Contents
Warning 2
Safety Precautions 2
Technical Specifications 3
Technical Drawings 3
Set Up Procedure 4
Bubble Master Operation 4
Bubble Master DMX Operation 5
Shut Down Procedure 7
FDS Option 8
Troubleshooting 8
Maintenance 9
Recommended Fluid 9
Warranty 10
Contact Information 11
Note: Please read entire manual before operating the Bubble
Master

Important Safety Instructions:
1. Do not remove the outer case.
2. Ensure that this unit is grounded at all times. Failure to do so may result in serious injury.
3. Use Ultratec Special Effects fluid ONLY.
WARNING!!
Safety Precautions!!
1. Ensure that any operation of the machine is supervised by suitably trained and authorized personnel.
2. Do not modify the machine or use a machine which has been damaged in any way.
3. Allow sufficient air circulation around the machine at all times.
4. Protect the machine from direct weather effects and wet locations.
5. Only use fluids manufactured by Ultratec Special Effects.
6. Avoid directing bubble output continuously at people, structures or objects within close proximity of the
discharge nozzle.
WARNING!!
Warning!!!
2
www.ultratecfx.com

Technical Specifications
Model: Bubble Master/Bubble Master DMX
Part Number:
CLB-2012 Bubble Master 110V
CLB-2015 Bubble Master 110V w/FDS Option
CLB-2014 Bubble Master 220V (CE)
CLB-2020 Bubble Master 220V w/FDS Option
CLB-2024 Bubble Master DMX 110V
CLB-2026 Bubble Master DMX 110V w/FDS Option
CLB-2025 Bubble Master DMX 220V
CLB-2018 Bubble Master DMX 220V w/FDS Option
CLB-2022 Bubble Master Junior 110V
CLB-2023 Bubble Master Junior 220V
*Dimensions Include bubble projector*
Length: 28.4in 72.1cm
Width: 16.3in 41.4cm
Height: 15.8in 40.1cm
Net Weight: 21lbs 9.51kg
Power Rating: 120 Volt A.C. 50/60 Hz. 1 Amps.
240 Volt A.C. 50/60 Hz. 0.5 Amps.
Fluid: Water Base Bubble Fluid (Use only Ultratec Fluid)
Approvals: Field Certification Q.P.S.
This product has been certified to CSA/UL Standards by QPS Canada Inc
Product descriptions with (CE) included are CE Approved.
3www.ultratecfx.com

If using for the first time: Unpack the Bubble Master and inspect all components. Although the
packaging was designed for the rigors of today’s parcel delivery services,
damage may have occurred during shipping.
1. Prior to operation, the extension sleeve may be placed into the bubble
outlet. This will allow the bubbles to be projected higher, before they
begin to disperse outwards.
TECH TIP: For lower flying bubbles do not use the extension sleeve.
2. Place the Bubble Master on a level sturdy surface, or use the optional
adjustable stand sold separately.
3. Open a container of Ultratec Bubble Fluid, and pierce the foil top. Pour
the fluid into the bubble outlet. Fill up to 1/2” below the reservoir top.
This initially should take approximately 1 gallon.
NOTE: Care must be taken when filling with bubble fluid to ensure that fluid does not overfill above the
dividing “dam” and enter into the rear of the machine. Drain holes are manufactured into rear
compartment in case of accidental spillage.
4. Plug the Bubble Master into an outlet that is capable of sustaining the
current load listed on the product serial plate.
Operation of the Bubble Master has been engineered to be simple and intuitive.
Use the Fan Speed Control knob to start the bubble wheel and fans,
and to control the fan speed.
By varying the fan speed you can control
the bubble volume, size and height.
Fan Speed Control
High
Low
Off
Fan speed contol
Location
Bubble Master Operation
Set Up Procedure
4
www.ultratecfx.com

Bubble Master DMX Operation
(This includes 110V / 220V Regular and Junior DMX Bubble
Machines)
Remote Operation
The Bubble Master DMX use standard 5 pin fog machine remote
CXP-41395PIN.
Plug the 5 pin remote cable into the 5 pin remote receptacle marked
“Remote”.
Smoke OFF/ON Switch = Disables / Enables operation of fans and of
bubble wheel motor.
Switch must be in ON position to allow control of machine.
Flow Dial = Allows speed adjustment of fans.
Fully CCW (Min) fans are off.
Fans start turning (slow) at about the first hash mark on remote label.
Duration Dial = Allows bubble wheel motor to turn OFF / ON only (No
speed control).
Lowest turn ON point is 50% (1/2 way on hash mark on remote label).
Suggest this dial be left at full CW (Max) setting. This will allow the
bubble wheel motor to turn OFF / ON as soon as fans are
turned OFF / ON.
Interval Dial = Not used for operation (Does nothing when adjusted).
1. Turn power switch to ON position.
2.The red LED on the hand held remote OFF/ON switch, will be on
solid.
NOTE: The red valid DMX LED located between the Remote IN
and DMX IN XLR must be off.
3. Adjust the Duration dial above 50% to to enable the bubble wheel motor rotation.
4. Flip the OFF/ON switch on the hand held remote to the ON position to initiate bubble
production.
5. Adjust the Flow dial to change the fan speed.
By varying the fan speed you can control the bubble volume and height.
DURATION INTERVAL
FOG
VARIFLOW
Smoke OFF/ON Switch
Flow Dial
Duration Dial Interval Dial
5 pin fog machine remote
5www.ultratecfx.com

DMX Operation
Unit uses 2 channels for DMX control. DMX OVERRIDES HAND HELD REMOTE
Base DMX Address = Allows speed adjustment of fans.
0% - 8% = Fans OFF
9% - 100% = Fans ON (low – high)
Base DMX Address + 1 = Bubble wheel motor control OFF / ON only (No speed control)
TECH TIP: leaving this DMX+1 value at 100% will enable the bubble wheel motor to turn
OFF / ON as soon as fans are turned OFF / ON]
0% - 49% = Bubble wheel motor OFF
50% - 100% = Bubble wheel motor ON
1. Set desired DMX address on thumb-wheels between 001 to 511.
2. Connect a 5 pin DMX cable to the DMX IN XLR.
3. Turn power switch to ON position.
4. If valid DMX signal is present, the red valid DMX LED will be on solid.
5. Adjust base DMX address to control fan speed.
By varying the fan speed you can control the bubble volume and height.
6. Adjust the next consecutive DMX (D+1) address above 50% to turn on the bubble wheels
motor.
6
www.ultratecfx.com
PUSH PUSH
000
Valid DMX
Remote DMX In DMX Out Address

7www.ultratecfx.com
Manual Mode Operation
MANUAL MODE OVERRIDES HAND HELD REMOTE AND DMX.
1. Set DMX thumbwheels to 600 address range before powering up the machine.
2. Turn power switch to ON position.
NOTE: Red VALID DMX LED will start to blink continuously after powering up machine.
3. The Ones column needs to be set between 4 – 9 to turn ON bubble wheel motor
when fan(s) turn ON.
NOTE: When set below 4, bubble wheel motor will not turn ON when fans turn ON.
4. The Tens column changes fan speed when set from 1 – 8 (9 is same speed as 8)
PUSH PUSH
000
Valid DMX
Remote DMX In DMX Out Address
Shut Down Procedure
1. Disconnect the Bubble Master from the power source.
2. Remove the bubble extension sleeve if used.
3. Using a funnel, empty the contents of the fluid reservoir back into the 1 gallon fluid container. This can be
done by tipping the unit, and pouring the fluid out of the bubble outlet.
4. Replace cap on the fluid container to keep dirt and debris from entering.
5. Rinse out fluid reservoir and bubble wheels with hot tap water tap water to remove excess bubble fluid
residue. Using a paper towel wipe out extension sleeve and bubble outlet.
6. Empty into sink or appropriate drain.

8
www.ultratecfx.com
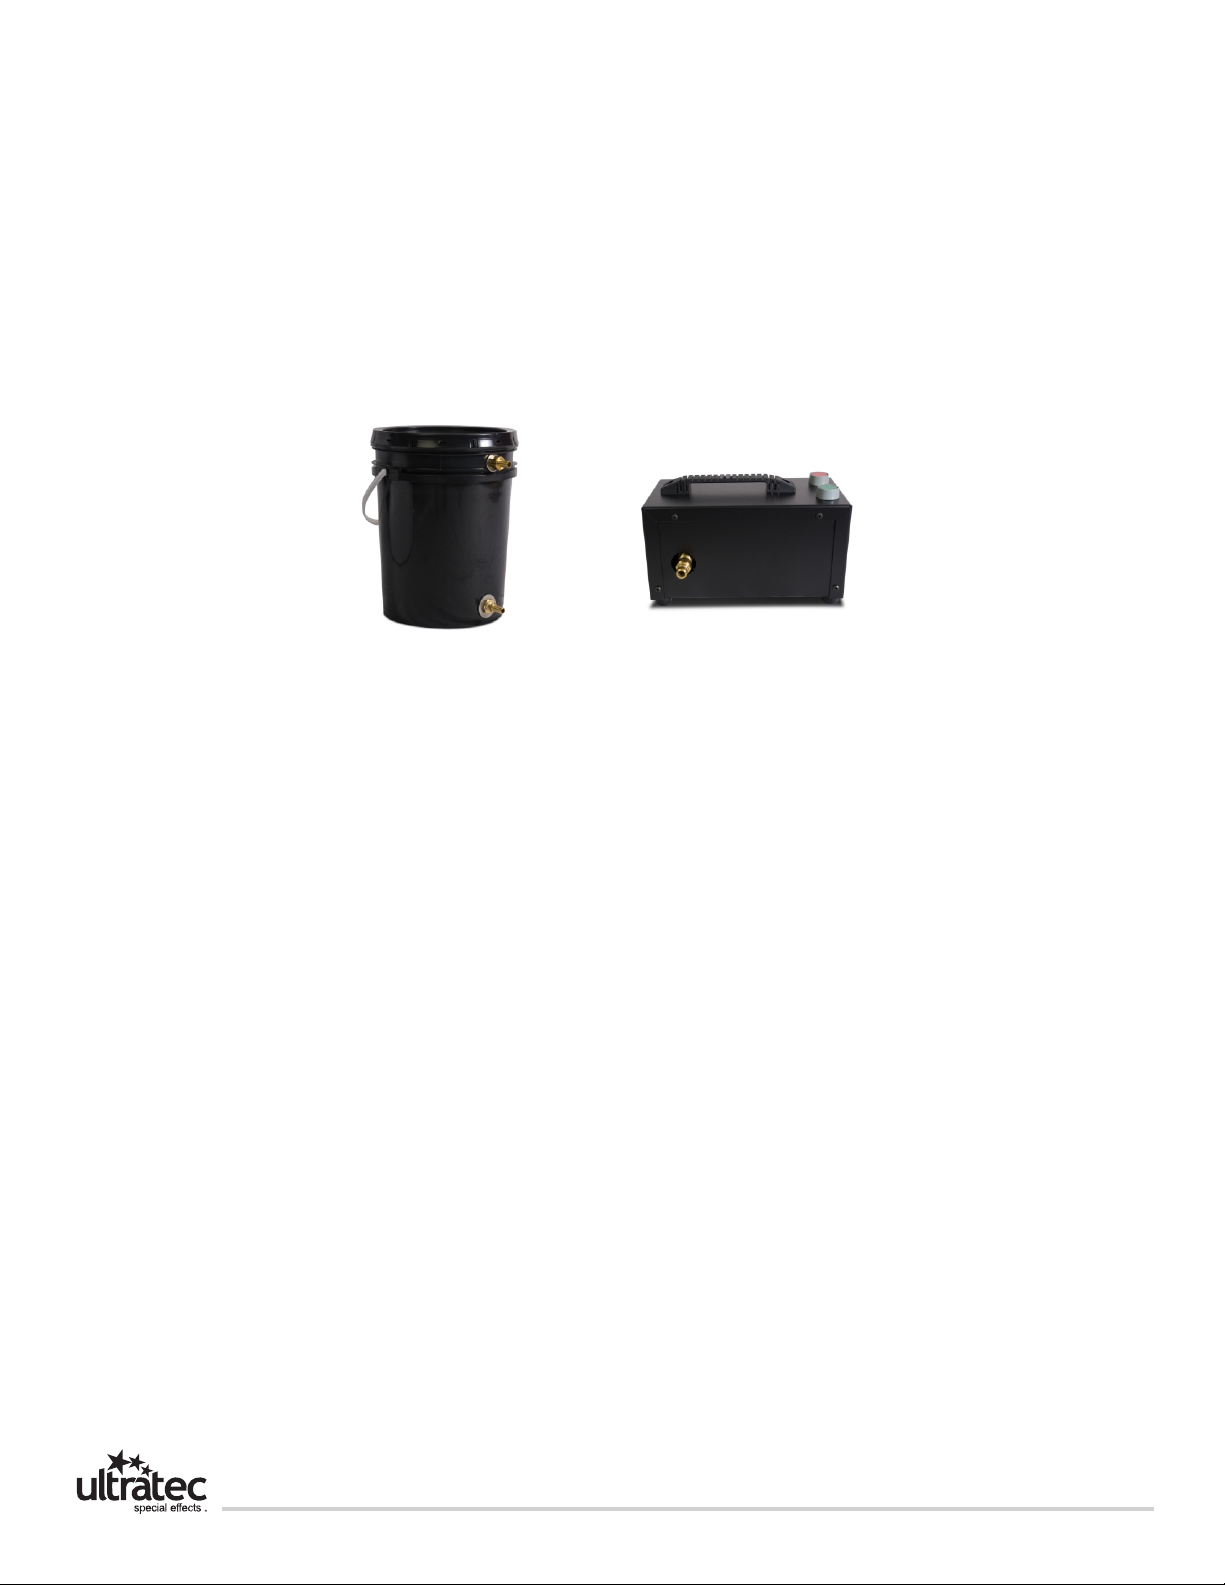
FDS Option (Fluid Distribution System)
The FDS System is designed for high volume and permanent location installations.
The Bubble Master W/ FDS has a mechanical float installed that opens when fluid is low and closes once the
reservoir has been filled. The Bubble Master W/ FDS is attached by a fluid line to a 5 gallon Bubble Master FDS
Pail to supply the Bubble Master W/ FDS with fluid.
NOTE: The Bubble Master W/ FDS relies on gravity to transfer the fluid from pail to the bubble machine.
Therefore the pail must be mounted higher than the bubble machine.
In applications where the location of the Bubble Master FDS is difficult to get to, a FDS Pump may be added to
the system to fill the Bubble Master W/ FDS pail from a remote location.
CLB-2010 Bubble Master
FDS Pail
CLF-4145 FDS Pump 110V
CLF-4147 FDS Pump 220V
Troubleshooting
Bubble Wheel not turning:
1. Ensure that unit is plugged into a suitable power source and that power switch is in the ON position.
NOTE: The power switch is breaker type switch. If there is a electrical short; the power switch will trip to the OFF
position.
2. If using speed control dial; see that dial is turned ON.
3. If using hand held remote, see that
Ÿ Duration dial is above 50%
Ÿ The Flow dial is above the 1st hash mark and that
Ÿ The bubble OFF/ON switch is in the ON position.
4. If using DMX see that
Ÿ Correct DMX address is set and
Ÿ That next consecutive DMX address is set above 50%.
Ÿ Confirm that red valid DMX LED is on solid.
5. If using Standalone mode, see that
Ÿ The red valid DMX LED is blinking continuously
Ÿ The ones column is set above 4.
6. Ensure that set screws are secure in bubble wheel motor shaft.
Contact Ultratec Special Effects for further assistance if needed.

Troubleshooting cont.
Intermittent bubbles produced:
1. Ensure that there is enough fluid in the fluid reservoir, and that the bubble wheels are being submersed in
bubble fluid.
2. Check that all bubble wands are present and not missing.
3. Bubble wands and or fluid reservoir may be dirty and need cleaning.
4. Check that bubble fluid is not contaminated or expired. Replace with new fluid if not sure.
Unit with FDS reservoir not filling up:
1. Check that hose from bubble master FDS pail is connected to pail and to bubble machine.
2. Check that float assembly inside bubble machine is moving freely.
3. Check that float assembly valve is not plugged / gummed up from dried bubble fluid.
4. Check that bubble master FDS pail has bubble fluid in it.
Contact Ultratec Special Effects for further assistance if neccessary.
Maintenance
Fluid Reservoir
When storing the Bubble Master for any extended period, be sure to thoroughly rinse the fluid reservoir.
Bubble Wheel
When storing the Bubble Master for any extended period, be sure to thoroughly rinse bubble wheels.
Recommended Fluid
Bubble Master Bubble Fluid: This Premium Quality Bubble Fluid produces large quantities of bubbles that are
very dry and long lasting.
Bubble Fluid Supreme: This Supreme Quality Bubble Fluid produces large quantities of Bubbles that are longer
lasting and much drier than regular Bubble Fluids.
This Bubble Fluid is recommended for applications that require a drier Bubble Effect.
9www.ultratecfx.com

Please remember to include the RA Number on all items being shipped for repairs.
To request a Return Authorization number please refer to our website - instructions below:
1) www.ultratecfx.com
2) Click on the Fog & Atmospheric Icon
3) Click on the REQUEST RMA Tab along the top of the screen
4) Fill in the required information
5) Click "Submit" button
If you have any questions or require assistance please contact service at
519-951-3355/866-534-5557 or by email at [email protected].
10
www.ultratecfx.com
Warranty
Hardware products come with a five-year warranty on parts and labor. If the unit in question has a material
defect or fault that is caused in manufacturing, Ultratec Special Effects will provide free parts and labor to
remedy the equipment. Ultratec Special Effects service department must be advised in a timely manner
after defect appearance and the date of warranty request must be within five years of sale/purchase.
Proof of sale and/or proof of purchase will be required for warranty to take effect.
Warranty service will be performed as follows: faulty parts will be repaired or replaced with the same or
comparable parts, based on availability. Freight to our facility for warranty requests will be prepaid by the
user/dealer. Upon completion of the repair, Ultratec Special Effects will return the unit via the most
economical means available. Should you require the item express-returned, the user/dealer is responsible
for indicating this request and for any difference in freight cost.
Warranty will be voided, and customer will lose all rights guaranteed by the warranty if any of the following
are observed/occur:
If any non Ultratec Special Effects fluid is used at any point of operation.
If any adjustments or repairs are done to the machine in question by repair technicians not authorized by
Ultratec Special Effects.
If our repair technicians observe any signs of incorrect handling/treating of machine in question.
Warranty services do not cause an extension of the warranty nor does a repaired product start a new
warranty. This warranty only applies to the product supplied by Ultratec Special Effects, Ultratec Special
Effects is not responsible for any losses, costs, or damages from the use of a defective product.
Any additional costs incurred are the responsibility of the Dealer and/ or the customer.
An RA (Return Authorization) number must be noted on the outside of each box being returned to our
facility. Any package(s) without an RA number clearly marked, will not be accepted by our receiving
department.
Export Distributors are required to carry out the warranty repair, parts will be supplied by
Ultratec.
Please do not forget to remove any liquid from the machine when sending in for repair.

Head Office
Ultratec Special Effects
1960 Blue Heron Drive
London, Ontario N6H 5L9
Direct: 519-659-7972
Toll Free: 800-388-0617
Fax: 519-659-7713
Europe Office
Ultratec Special Effects GmbH
Dieselstrasse 30-40
60314
Frankfurt am Main
Germany
Direct: 49-69-87-000-1850
Fax: 49-69-87-000-1899
Canadian Shipping Address
(For All Canadian Repairs)
Ultratec Special Effects
1960 Blue Heron Drive
London, Ontario N6H 5L9
USA Shipping Address
(For All USA Repairs)
Ultratec Special Effects
640 Gadson Street
Groveland, Florida 34736
Contact Us
11www.ultratecfx.com
Other manuals for Bubble Master
2
This manual suits for next models
12
Table of contents
Other ULTRA TEC Dj Equipment manuals