Uniden XSA 975 User manual

XSA
975
Digital Answering
Machine
Speakerphone
900 MHz
Caller ID
10 Number
Memory
Rocket Dial
Plus
Guide
Quick Start

INSTALLATION
INSTALLATION & SAFETY
3
AVOID -
multi power
boards.
CHARGE -
the new phone
for 20 - 25 hrs.
AVOID -
connecting
more than
DON’T -
overload the
power outlet.
AVOID -
Moisture
CHOOSE -
a central location
AVOID -
Television sets and
other electronic
appliances
AVOID -
Microwave
ovens
AVOID -
Moisture
AVOID -
Computers
AVOID -
other cordless phones
Choosing the best location for your phone.
When choosing a location for your phone there are a number of appliances the phone should not be near, and areas you should avoid.
This symbol
indicates
important
operating
and servicing
instructions.
Note: Ringing will not be impaired by adding extra cordless handsets.
Page i
The earcapof
this telephone
may attract and
retainsmall
metallicobjects.
phones as ringing
may be impaired

Here!
Start
Start
Here!
Installing the Base Unit
Page ii
QUICK START GUIDE
This page is a very condensed version of the Owners Manual. It
is designed to allow you to get your phone installed and
operating as quickly as possible - however it does not attempt to
explain any of the advanced features of the XSA975.
l
l
l
l
Plug the telephone cord into the Base
Unit, then into the telephone socket on
the wall.
Plug the AC Adaptor cord into the Base
Unit, then the AC Adaptor into the wall
power point.
Press the AC Adaptor cord into the
curved recess under the Base Unit.
Raise the antenna.
Make sure the AC
Adaptor/s remains
switched ON at all
times. Use only
the Uniden AC
Adaptor/s supplied
with this unit.
AC adaptor
Power point
Telephone cord
Installing the Charge Cradle
lPlug the AC Adaptor cord into the Charge Cradle,
then the AC Adaptor into the wall power point.
AC adaptor
Power point
New Zealand
Australia
Tel Line Adaptor
(adaptor not supplied)

QUICK START GUIDE
Installing the Handset Battery
Page iii
lPress the battery cover and slide it off.
l
l
l
l
Connect the battery plug to the socket at the rear of
the battery compartment.
Make sure the plug is the right way round.
The RED and BLACK battery wires must match the
RED and BLACK printed on the phone case for the
plug to fit properly.
Press firmly until it clicks into place.
lPosition the battery in the compartment and slide the
cover into place.
You must charge
the batteries
continuously for
20 hours before
using the phone. Repeat process for second handset.
Place one handset on the main base and place the
other handset in the extra charging cradle. It does
not matter which handset is placed on the main
base and extra charging cradle.
l
BLACK
RED

QUICK START GUIDE
findhs
rep/rew skip/ff
set/ring
menu
anson/off
redial
speaker inuse
charge
flash speaker
900MHz
mic
123
456
789
0
abc def
ghi jkl mno
pqr
stuv wxy
z
sp.phone vol
memo
greeting
delete play/stop
ansvol.
l
l
l
Pick up the handset and press . Dial the phone number
OR
Dial the phone number - then press
To hang up - press
OR
Place the handset on the Base Unit
To use the speakerphone on the Base Unit press then dial the phone number.
Making a Call
Page iv
Registration of Dual Handset
in use/charge
main
l
l
After fully charging the handsets, remove the handset from the extra charging cradle and
place it on the main base. (The LED will begin to flash indicating
registration is occurring).
Wait for at least 5 seconds before removing the extra handset from the base.
The registration has been completed, and your dual handset cordless phone is ready for use.
Answering a Call
lHandset on the Base Unit:
Remove the handset from the base and speak ( ).Autotalk on
l
l
l
Handset off the Base Unit:
Pick up the handset, press and speak.
To hang up - press
OR
Place the handset on the Base Unit.
If using the speakerphone on the Base Unit press to answer a call and press to end a call.
IMPORTANT
speaker speaker
Dual Handset
pause select delete
redial channel transfer
mem
speaker

QUICK START GUIDE
Page v
Setting Up the Answering System
To turn the answering system on:
To record your outgoing message:
l
l
l
l
l
Press - the pre-recorded greeting will play and your system is ready to accept calls.
Press and hold . After you hear a short tone, release the key.
"Record Greeting" is announced followed by a long tone.
Record your greeting while speaking within 15cm of the base.
When finished, press again.
Your outgoing
message can be
recorded up to 30
seconds long.
To play your message:
To repeat a message:
l
l
l
l
l
Press - new messages play first.
Press during playback of messages.
To skip a message:
To delete messages:
Press anytime during playback to skip to the next message. The system beeps and begins to play the next
message.
Delete one message:
Press during a message. The system beeps and begins to play the next message.
Delete all messages:
After reviewing all messages. Press , "To delete all messages, press delete again" is announced.
Press again.
Using the Answering System
answer
on
findhs
rep/rew skip/ff
set/ring
menu
anson/off
redial
speaker inuse
charge
flash speaker
900MHz
mic
123
456
789
0
abc def
ghi jkl mno
pqr
stuv wxy
z
sp.phone vol
memo
greeting
delete play/stop
ansvol.

QUICK START GUIDE
To have the ability to transfer calls from one handset to the other handset:
Initial Setup:
(Important -
TO TRANSFER CALLS
3 Way Conference
Please make sure you have registered your dual handset - refer to instructions on page iv).
To transfer your call from handset 1 to handset 2:
Press .
The call is placed on hold on the first handset, while handset 2 begins to ring. The call is transferred when
the 2nd handset is answered.
Repeat the process to transfer the call back to handset 1. Calls can be transferred from either handset.
If the transferred call is not answered, you can retrieve the call by pressing or .
During Handset talk mode press the button on the Base then you can talk 3 ways.
If you are already using the Base speaker phone, press the button on one Handset.
l
l
l
l
l
Page vi
transfer
If the transferred
call is not picked
up after 5 minutes,
the call will be
disconnected.
transfer
CALL TRANSFER
speaker

Installation & Safety
Quick Start Guide
Contents
Getting Started
Using your Phone
............................................................................................i
...............................................................................................ii
vii
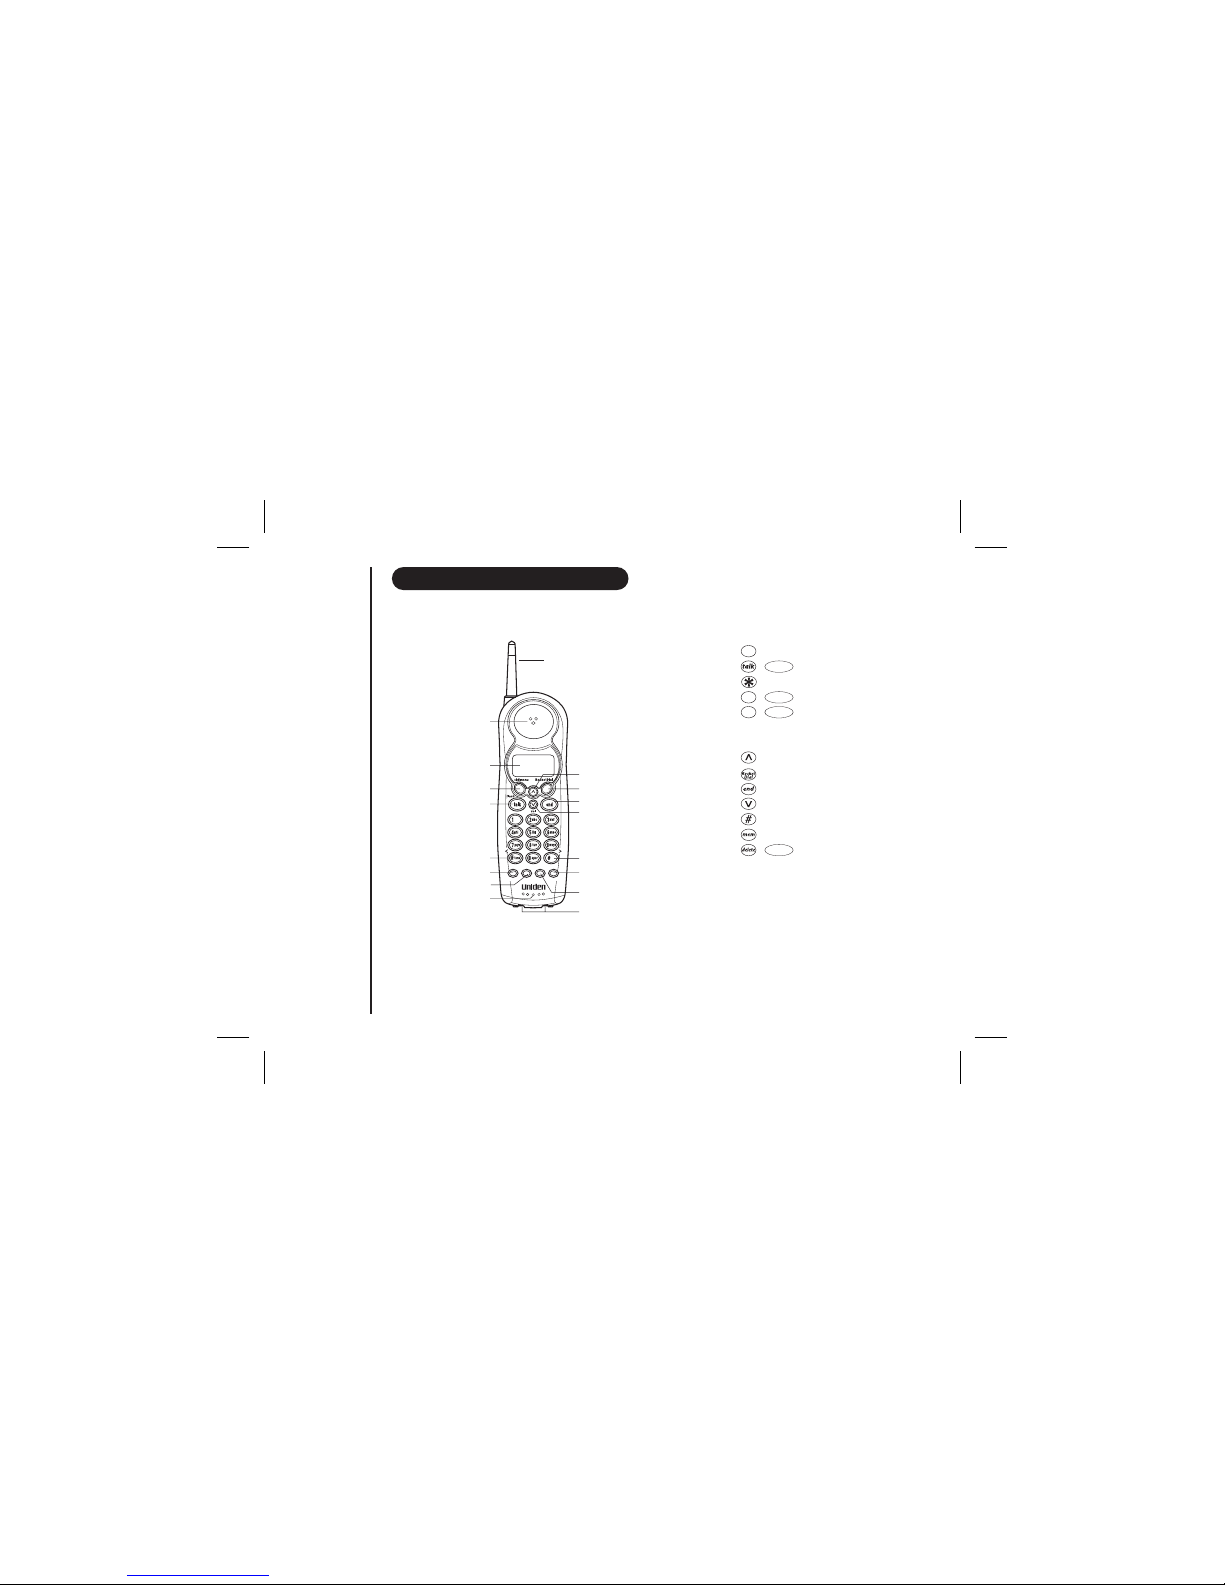
Controls and Functions .........................................................................1
Welcome ................................................................................................3
Included in your Package ......................................................................4
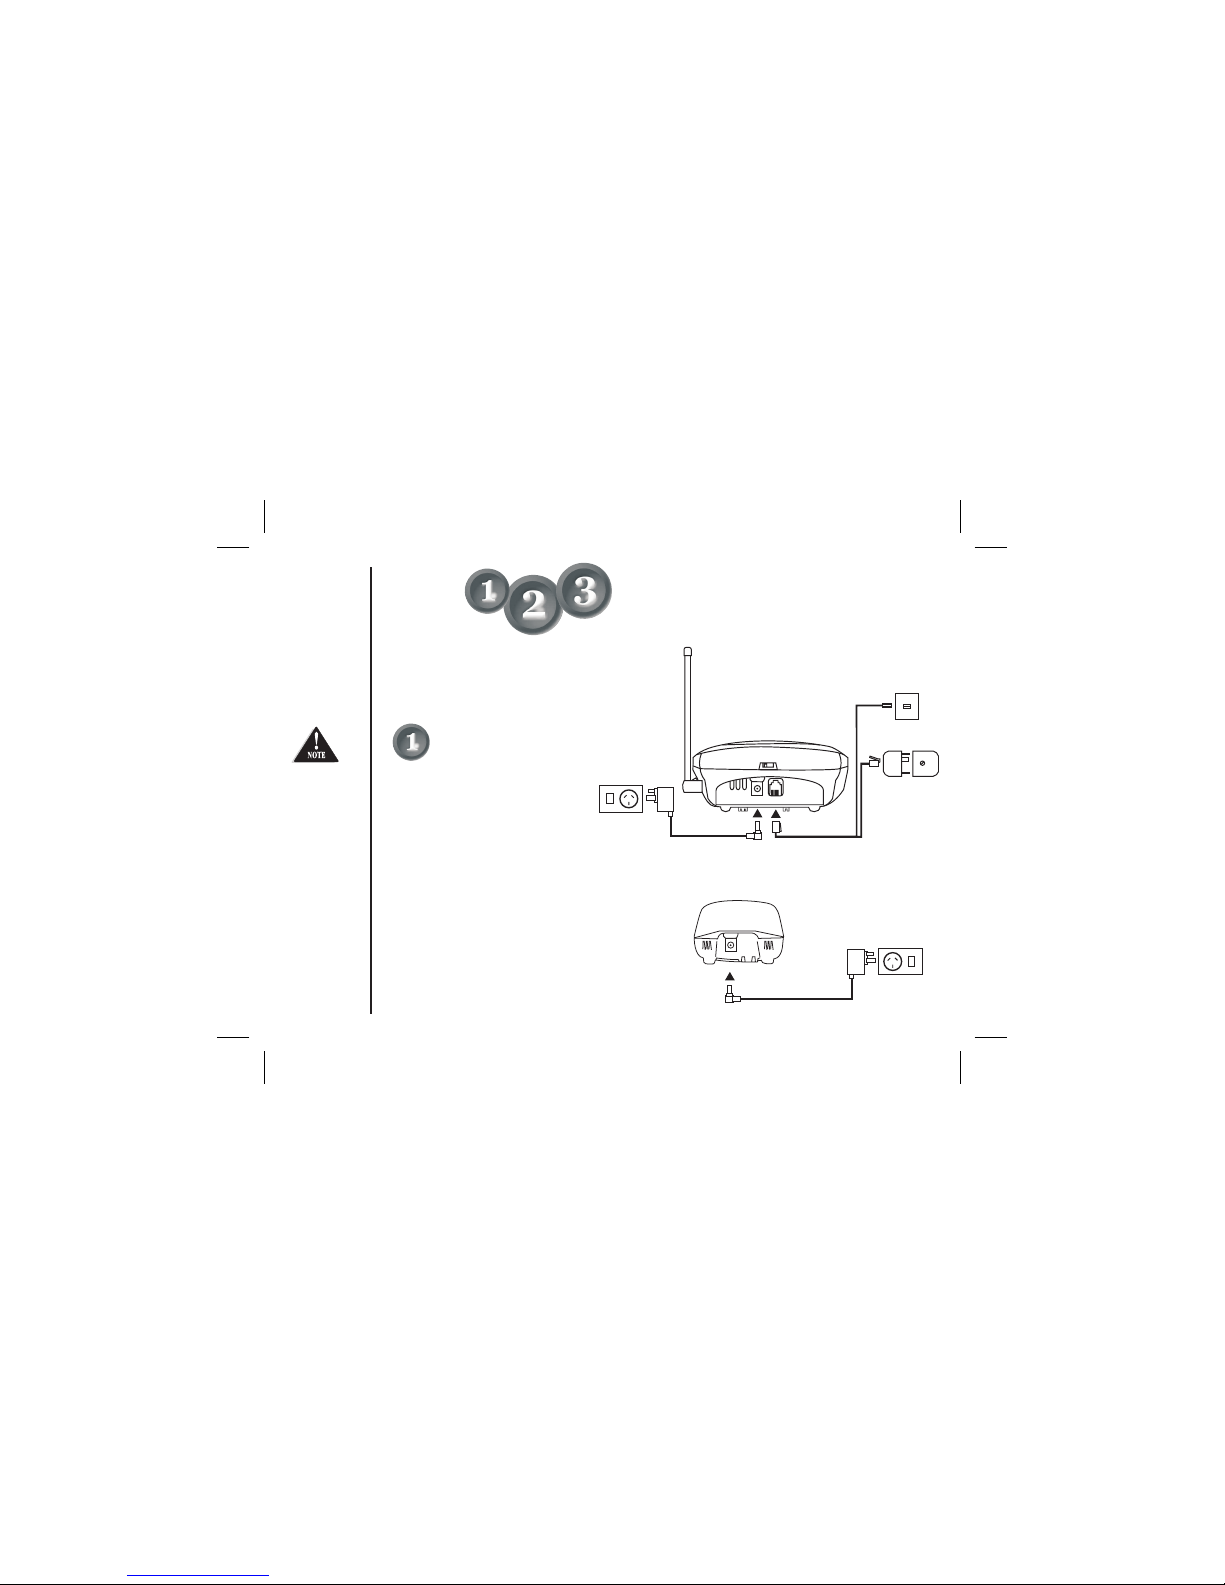
Mounting the Base Unit on a wall .........................................................5
Battery Maintenance .............................................................................6
Setting Menu Options ............................................................................7
Autotalk .................................................................................................7
Pop Up Name ........................................................................................7
Making and Receiving Calls ...................................................................8
Adjusting the Handset Ringer Volume and Earpiece Volume ................9
Adjusting the Speakerphone Volume .....................................................9
Redial ....................................................................................................9
Travelling Out-of-Range .......................................................................10
Selecting a Different Channel ..............................................................10
Find Handset .......................................................................................10
Call Waiting/Flash ................................................................................10
Installing the Beltclip ............................................................................5
Headset Installation ..............................................................................5
Storing Phone Numbers ......................................................................11
Making Calls with Memory Dialing ......................................................12
Memory Dialing from Talk Mode ........................................................12
Chain Dialing ......................................................................................12
Editing a Stored Name and/or Phone Number ....................................13
Erasing a Stored Name and/or Phone Number ...................................13
Call Transfer.........................................................................................14
Rocketdial ...........................................................................................15
Storing and Editing the Rocketdial ......................................................15
Making Calls with Rocketdial ...............................................................15
Deleting the Rocketdial .......................................................................15
Memory Dialing
Rocketdial
CONTENTS
Page vii
Caller ID
Answering System
Troubleshooting
Warranty
Notes
Caller ID .............................................................................................16
When the Telephone Rings .................................................................16
Viewing the Caller ID Message List .....................................................17
Deleting Information from the Caller ID List .....................................17
Deleting a Caller ID Message ..............................................................17
Deleting all Caller ID Names and Numbers ........................................17
Calling a Party from the Caller ID List ................................................18
Dial Edit .............................................................................................18
Stored Caller ID Messages in Memory Dialing ....................................18
Setting the Time .................................................................................20
Setting a Personal Security Code (PIN) ...............................................20
Setting the Ring Time .........................................................................21
Setting the Message Record Time .......................................................21
Announce Only Feature ......................................................................22
Setting the Message Alert Tone ...........................................................22
Setting Your Outgoing Message (Greeting) .........................................23
Setting the Base Ringer Volume ..........................................................24
Adjusting the Answering System Speaker Volume Level .....................24
Using Your Answering System .............................................................25
Playing Your Messages ........................................................................25
Repeating a Message ...........................................................................25
Skippin
Deletin
Voice Memo ........................................................................................27
Remote Access Away From Home .......................................................28
Turn on the Answering System Remotely ...........................................29
Remote Operation Card ......................................................................31
...............................................................................................33
...........................................................................................................34
.................................................................................................................35
Answering System ...............................................................................19
Turning the Answering System On/Off ................................................19
g a Message ............................................................................26
g a Message .............................................................................26
Notes ..................................................................................................30

cid/
menu
CONTROLS AND FUNCTIONS
GETTING STARTED
Page 1
3
2
4
5
6
7
9
10
11
12
13
14
15
8
17
1. Handset antenna
2. Handset earpiece
3. LCD display
4. key
5. / key
6. /< key
7. / key
9. Handset microphone
and ringer speaker
10. Volume up key
11. key
12. key
13. Volume down key
14. /> key
15. key
16. / key
17. Handset charging contacts
8. / key
redial
XSA975
Dual Handset
pause select delete
redial channel transfer
mem
16
select
1
transfer
pause
flash
channel

find hs
rep/rew skip/ff
set/ring
menu
ans on/off
redial
speaker inuse
charge
flash speaker
CONTROLS AND FUNCTIONS
GETTING STARTED
30
21 23
45
21.
23. AC Adaptor input
24. Handset retainer clip
27. Delete key
28. Speaker LED
29.
30. Base speaker
31. Message counter display
34. Play/Stop key
35. skip/ff key
36. /off key
41. Base Antenna
42.
43.
Telephone line jack
22. Speakerphone volume switch
25. key
26. key
In use/charge LED
32. / Answering machine volume keys
33. repeat/rew key
37. key
38. /ringer key
39. key
40. key
key
key
44. Microphone
45. Base charging contacts
set
find
memo
greeting
900MHz
mic
Page 2
41
24
menu
25
22
44 4243 redial
26
27
28
29
31
32
33
35
36
37
38
39
40
34
speaker
flash
answer
on
123
456
789
0
abc def
ghi jkl mno
pqr
stuv wxy
z
sp. phone vol
memo
greeting
delete play/stop
ans vol.

WELCOME
Congratulations on your purchase of this Uniden cordless telephone. This Product is designed for reliability, long life and
outstanding performance utilising the latest in 900MHz Technology.
l
l
l
Multiple Handsets (up to 2)
900MHz SCR Technology (Sound Clarity and Range)
LCD Back Light
l
l
l
l
l
l
l
l
Caller ID Display*
Digital Telephone Answering Device
Pop Up Name - Caller Name Identification #
30 Caller ID Memories
Alphanumeric Memory Dialing
Super Chat Battery
Maxi-Sound - Extra Loud Handset Volume Control
Rocketdial - One Touch VIP Dial
GETTING STARTED
Page 3
NOTES
* Caller ID feature only works if you subscribe to the service by your local telephone company.
There is usually a fee for this service.
# Pop Up Name feature only works if you subscribe to your telephone company Caller ID service and
record names into your phones memory.
l
l
l
l
l
l
l
l
l
l
Wall or Desk Mountable
Page/Find Handset Feature
AutoTalk
32 Digit Redial
Pause
Flash Button (Call Waiting Compatible)
2 Type Tone Ringer
2 Step Ringer Volume Control
Speakerphone
3 Way Communcation (Handset to Base to Outside Caller)
FEATURES

GETTING STARTED
Page 4
NOTES
Make sure you have received the following items in the package. If any of these items are missing or damaged, contact the
Uniden Parts Department.
INCLUDED IN YOUR PACKAGE
Handset
2nd Handset
Main Base
Owners Manual
Dual Handset
pause select delete
redial channel transfer
mem
Charge
Cradle
charge
Dual Handset
pause select delete
redial channel transfer
mem
Belt Clip
T
Cordelephone
AC Adaptor
2nd AC Adaptor
Super Chat
Rechargeable Battery 2nd Super Chat
Rechargeable Battery
2nd Belt Clip
findhs
rep/rew skip/ff
set/ring
menu
anson/off
redial
speaker inuse
charge
flash speaker
900MHz
mic
123
456
789
0
abc def
ghi jkl mno
pqr
stuv wxy
z
sp.phone vol
memo
greeting
delete play/stop
ansvol.

DirectWallMounting
You can mount your phone directly to the wall. Before doing this, consider the following:
• Avoid electrical cables, pipes or other items behind the mounting location that could cause a hazard when inserting screws
into the wall.
• Mount your phone within distance of a working phone jack.
• Make sure the wall material is capable of supporting the weight of the base and handset.
• Use screws with anchoring devices suitable for the wall material where the base unit will be placed.
1. Insert two mounting screws into a wall (with their appropriate anchoring device), 85mm apart.
Allow about 3mm between the wall and screw heads for mounting the phone.
2. Plug the AC adaptor into the Base Unit and then into a power point.
3. Plug the telephone cord into the Base Unit and then into the telephone socket on the wall.
4. Align the mounting slots on the base with the mounting posts on the wall.
5. Then push in and down until the phone is firmly seated.
MOUNTING THE BASE UNIT ON A WALL
Page 5
GETTING STARTED
INSTALLING THE BELTCLIP
HEADSET INSTALLATION
To attach the beltclip:
To remove the beltclip:
Insert the beltclip into the holes on each side of the handset. Press down until it clicks.
Pull both sides of the beltclip to release the tabs from the holes.
Your phone may be used with an optional headset. To use this feature,
simply plug the headset into the headset jack.
If you are using
an optional
headset, you
must still use the
handset keypad
for phone
operations.
Headset Jack
85mm
35mm
3mm
TOP

GETTING STARTED
BATTERY MAINTENANCE
Battery use time (per charge)
• 10 • 12 days when handset is in the standby mode
If the phone is not in use, ' ' flashes and none of the keys will operate. If the phone is in use, ' '
flashes and the handset beeps. Complete your conversation as quickly as possible and return the handset to the base unit for
charging.
• You cannot overcharge the battery.
• You may return the handset to the charger after each call or when the battery is low.
To maintain a good charge, it is important to clean the battery contacts on the handset and base unit with a dry cloth or a pencil
eraser about once a month. Do not use any liquids or solvents.
hours continuous use
When the Battery charge becomes low
Cleaning the battery contacts
Low Battery Low Battery
Page 6
Use only the
genuine Uniden
Super Chat
Battery supplied
with your phone.
Replacement
Super Chat
Batteries are
available
through the
Uniden Parts
Department.
SPECIAL
NOTE
Genuine Handset Batteries
The high quality rechargeable batteries supplied with your phone will perform for up to two years or more. In
order to enjoy the best performance from your phone, we recommend you replace your batteries every two years
with a genuine Uniden battery.
Simply visit our website to order a replacement battery:
Service Division Service Division
www.uniden.com.au www.uniden.co.nz
Uniden Australia PTY Limited Uniden New Zealand Limited

Page 7
SETTING MENU OPTIONS
Options available include AutoTalk and Pop Up Name.
AUTOTALK
AutoTalk allows you to answer the phone without pressing the button. If the phone rings when Autotalk is on, simply remove
the handset from the base and the phone automatically answers the call. If the phone rings when Autotalk is off, you must press
answer the call.to
POP UP NAME
If the displayed Caller ID telephone number is the same as a number stored in memory, then the stored name will also be
displayed with the caller ID telephone number.
1. Press and hold . The following screen appears.
2. Use and or a number key ( and ) to move the pointer to the selection that you would like to change.
Press to toggle between ' ' and ' ' for AutoTalk and Pop Up Name (Name Tag).
3. Press and return the handset to the base unit. The handset returns to the standby mode.
exactly
To change your AutoTalk and Pop Up Name (Name Tag)
On Off
cid/menu
1 2
USING YOUR PHONE
Functions will
need to be
programmed in
both handsets
separately.
1 Auto Talk
2 Name Tag
:On
:On

Press , any number,
or ( )Autotalk on .
MAKING AND RECEIVING CALLS
To answer a call
To make a call
To hang up
To redial
Handset Off Base
USING YOUR PHONE
Refertopage7
"Autotalk" to turn
on/off the Autotalk
feature.
Pick up the handset (
) or pick up the handset and
press
Autotalk
on
(Autotalk off).
1. Pick up the handset.
2. Press .
3. Listen for the dial tone.
4. Dial the number.
1. Pick up the handset.
2. Dial the number, then
press .
OR
Press , or return
the handset to the base
or extra charging cradle
()AutoStandby .
1. Pick up the handset.
2. Press .
3. Listen for the dial tone.
4. Press .
1. Pick up the handset.
2. Press , then press .
OR
1. Press .
2. Listen for the dial tone.
3. Dial the number.
Dial the number, then
press .
OR
1. Press .
2. Listen for the dial tone.
3. Press .
Press , then press .
OR
Page 8
Handset On Base Base Speakerphone
Press .
1. Press .
2. Listen for the dial tone.
3. Press .
1. Press .
(
)
The speaker LED will
then turn off
1. Press .
2. Listen for the dial tone.
3. Dial the number.
speaker
speaker
speaker
speaker

ADJUSTING THE HANDSET RINGER VOLUME AND EARPIECE VOLUME
REDIAL
USING YOUR PHONE
Page 9
Handset ringer tone and volume
Press or in standby mode to select one of five ringer tones and volume
combinations. The telephone will keep this setting for all future calls.
Pressing or during a call will change the earpiece volume of the handset. The
telephone will keep this setting for all future calls.
You can temporarily mute the ringer tone. When the handset is off the base and the
phone is ringing,press . The ringer tone will return to normal with the next
incoming call.
Earpiece Volume
Ringer Mute
Settings will need
to be
programmed in
both handsets
separately.
The key redials the last number dialed. The redialed number
can be up to 32 digits long.
1. Press .
2. Press . The last number dialed will be called.
To redial on the speakerphone.
1. Press .
2. Press . The last number dialled will be called.
speaker
ADJUSTING THE SPEAKERPHONE VOLUME
To adjust the Speakerphone Volume move the Speakerphone Volume Switch to
either Lo, Mid or Hi. Speakerphone
Volume Switch

find hs
rep/rew skip/ff
set/ring
menu
ans on/off
redial
speaker in use
charge
flash speaker
123
456
789
0
abc def
ghi jkl mno
pqr
stuv wxy
z
memo
greeting
delete play/stop
ans vol.
CALL WAITING/FLASH
If the call waiting tone sounds during a call:
Press /flash, then to switch between callers.
Press /flash on the handset or on the base speakerphone to
switch between callers.
AUSTRALIA:
NEW ZEALAND:
Page 10
USING YOUR PHONE
You must
subscribe
through your
local telephone
company to
receive Call
Waiting services.
FIND HANDSET
To locate the handset (while it's off the base), press on the base. The handset
beeps for 60 seconds.
Both handsets will ring when paged. Paging is cancelled by pressing any key on either
handset.
SELECTING A DIFFERENT CHANNEL
If you encounter interference while using your phone, you can manually change the phone's channel for clear
operation. This function works only when the phone is in use.
• Press /select. 'Scanning' appears on the display, indicating the phone is changing to another channel.
channel
flash
TRAVELLING OUT-OF-RANGE
During a call, noise will increase if you move your handset too far from your base unit. If the range limit of your
base unit is exceeded, your call will terminate within five minutes.

MEMORY DIALING
STORING PHONE NUMBERS
Page 11
In memory
dialling operation,
you must press
a key within 30
seconds or the
phone will return
to standby.
The pause
feature is useful
for long distance
calling, credit
card dialling or
sequences of
numbers that
require a pause
between digits.
Memory Dialing allows you to dial a number using just a few key presses. Your XSA975 stores up
to 10 names/numbers in each handset.
1. Press and hold , ' ' is displayed.
2. Press or or enter a number ( - ) to select the memory location where
you would like to store the number.
3. Press . ' ' is displayed on the screen and a cursor flashes indicating that
the display is ready for a name to be entered.
If the screen shown to the right appears, the selected memory location is already stored. Then
you must either edit the entry in this location, delete the entry in this location (page 13) or select
" " to choose another location.
4. Use the Alpha Numeric keys to enter a name. The name cannot exceed 14 characters.
• Use and to move the cursor to the desired location.
• Use to delete characters as needed.
• Press and hold to delete all the characters.
• If a name is not required, go to step 5.
5. Press , ' ' is displayed. The cursor flashes indicating that the display
is ready for the number to be entered.
6. Use the number keys to enter the phone number. The phone number cannot exceed 20
digits. Use the /pause to enter a pause in the dialing sequence if required. The display
shows a ' '. Each pause counts as one digit and represents a two second delay of time
between the digits. Use to delete digits as needed.
7. Press , you will hear a confirmation tone, and the following screen appears. Memory
storage is complete. For example, if you store a number into the memory location number
1, the display shows ' '. After about 2 seconds, ' '
is displayed. Repeat steps 2-7 to store more numbers.
8. Press to return to standby mode.
Memory Store
Store Name
Go Back
Store Number
P
Memory 1 Stored Memory Store
0
9
Memory Store
1
2
Store Name
Store Number
Edit Memory 1
Delete Memory 1
Go Back
Store Number
8002971023
Memory 1 Stored
Memory Store
1 UNIDEN AUS
2 <Memory 2>
Thereisno
memory store
in the Base
Speakerphone.

MEMORY DIALING
Page 12
MAKING CALLS WITH MEMORY DIALING
Memory dialing from Standby Mode.
1. Press . The handset displays your programmed memory locations.
2. Press or , or enter the number ( - ) to select the memory location you
would like to dial.
3. Press 'Talk' and the volume settings are displayed. Then the displayed number is
dialed.
Press . The handset displays your programmed memory locations.
Use and to toggle between the names and numbers displayed.
Display a Programmed Number
0
9
MEMORY DIALING FROM TALK MODE
1. Press . 'Talk' and the volume setting appears.
2. Press .
3. Enter a number ( - ) to select the memory location of the desired phone number. The selected phone number is displayed.
Then the number is dialed. If the memory location selected does not have a number stored, a series of beeps is sounded.
4. To hang up, press .
0
9
CHAIN DIALING
On certain occasions after dialing a number, you may be required to enter an access code such as your account number for
phone banking. You can enter this number into a memory location for later use by doing the following:
1.
2.
3.
Store the access code into one of the memory locations ( - ) following the steps on page 11.
Dial the party or service main number.
When you need to enter the special number, press followed by the memory location ( - ).
0
9
0
9
Numbers stored
in one handset
can not be
accessed from
the other.
1
2 JOE BLOGGS
3 JOHN DOE
UNIDEN AUS
Talk
0800123456789
1
2 JOE BLOGGS
3 JOHN DOE
UNIDEN AUS 1 0800123456789
2 5452930
3 6567983
Table of contents
Other Uniden Answering Machine manuals

Uniden
Uniden DA 069 User manual

Uniden
Uniden XSA965 User manual

Uniden
Uniden 7000A User manual

Uniden
Uniden 7100A User manual

Uniden
Uniden Answering Machine User manual

Uniden
Uniden 7500AI User manual

Uniden
Uniden DA 069 User manual

Uniden
Uniden XCA4510 User manual

Uniden
Uniden XCA4500 User manual

Uniden
Uniden DA071 User manual