Uniden UM423 AM User manual

UM423 AM
AM Marine Radio
UM423 AM.indd 1 28/9/11 11:58:16 AM

2
Table of Contents
Introduction ........................................................................................................................... 3
Features.......................................................................................................................3
Manual overview .........................................................................................................3
Getting Started...................................................................................................................... 4
What's included ..........................................................................................................4
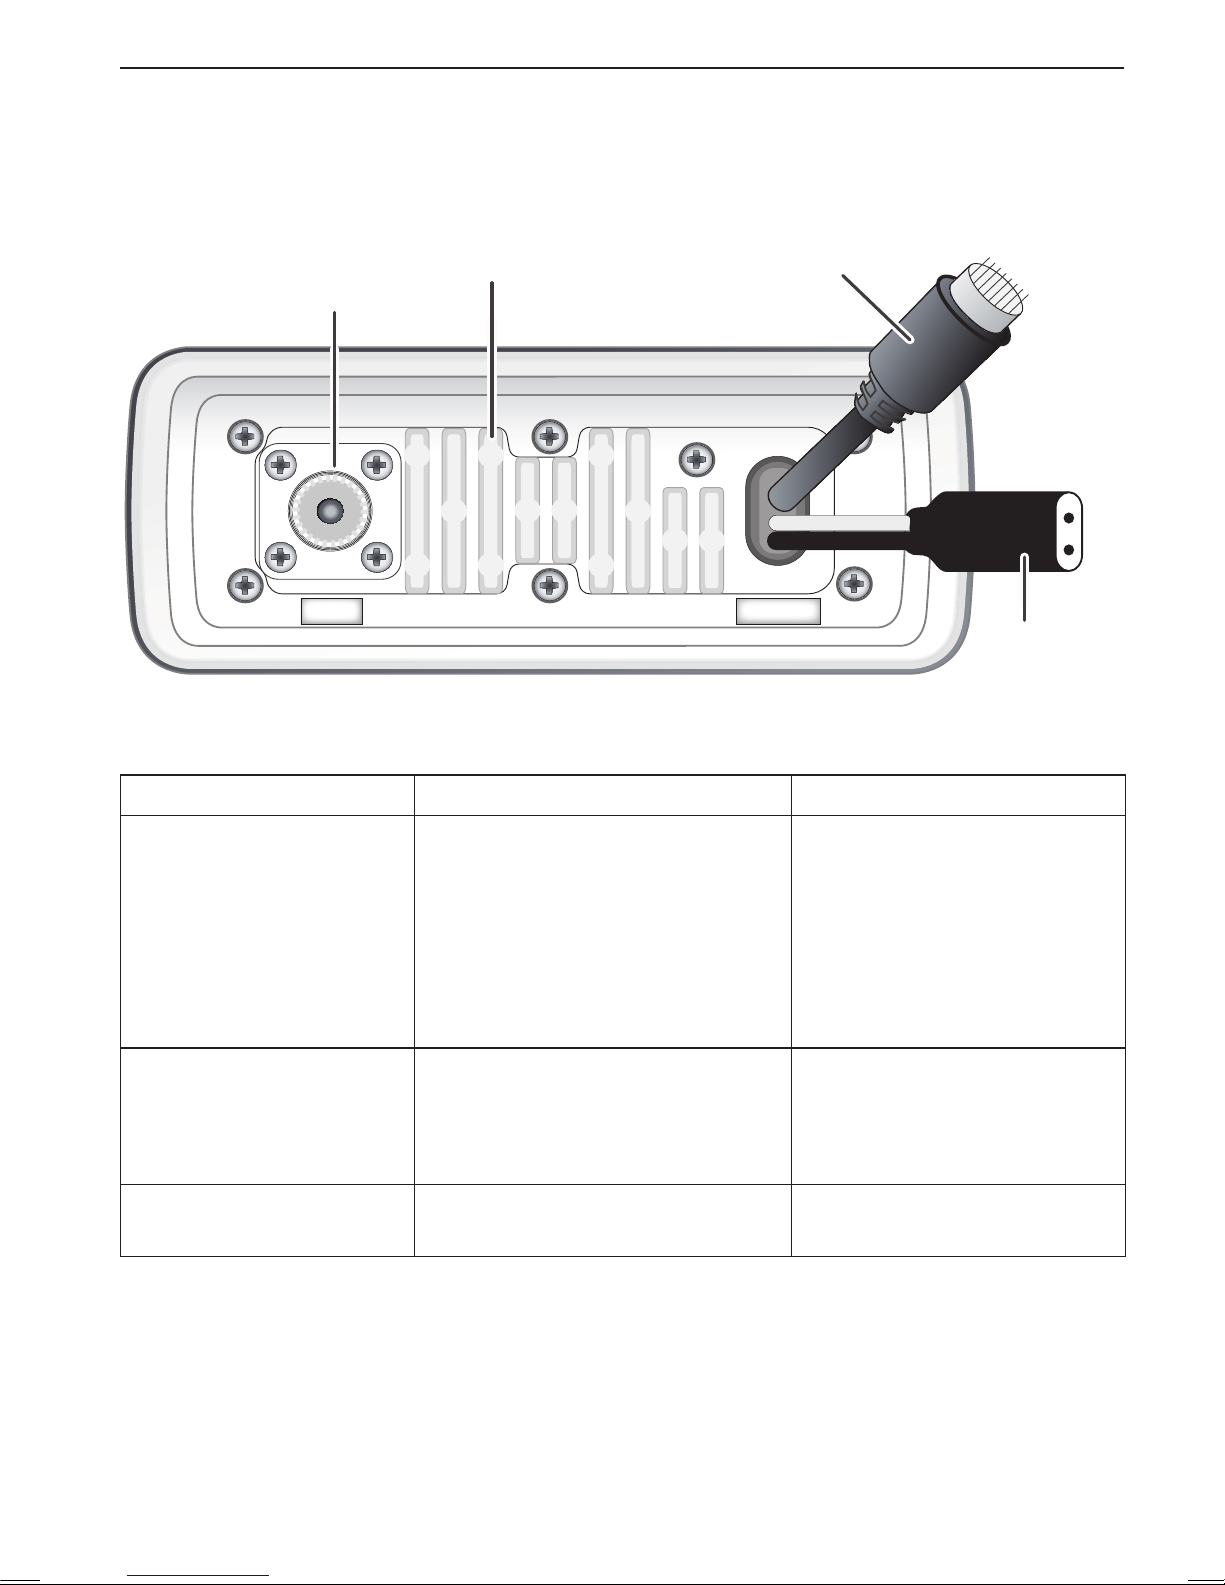
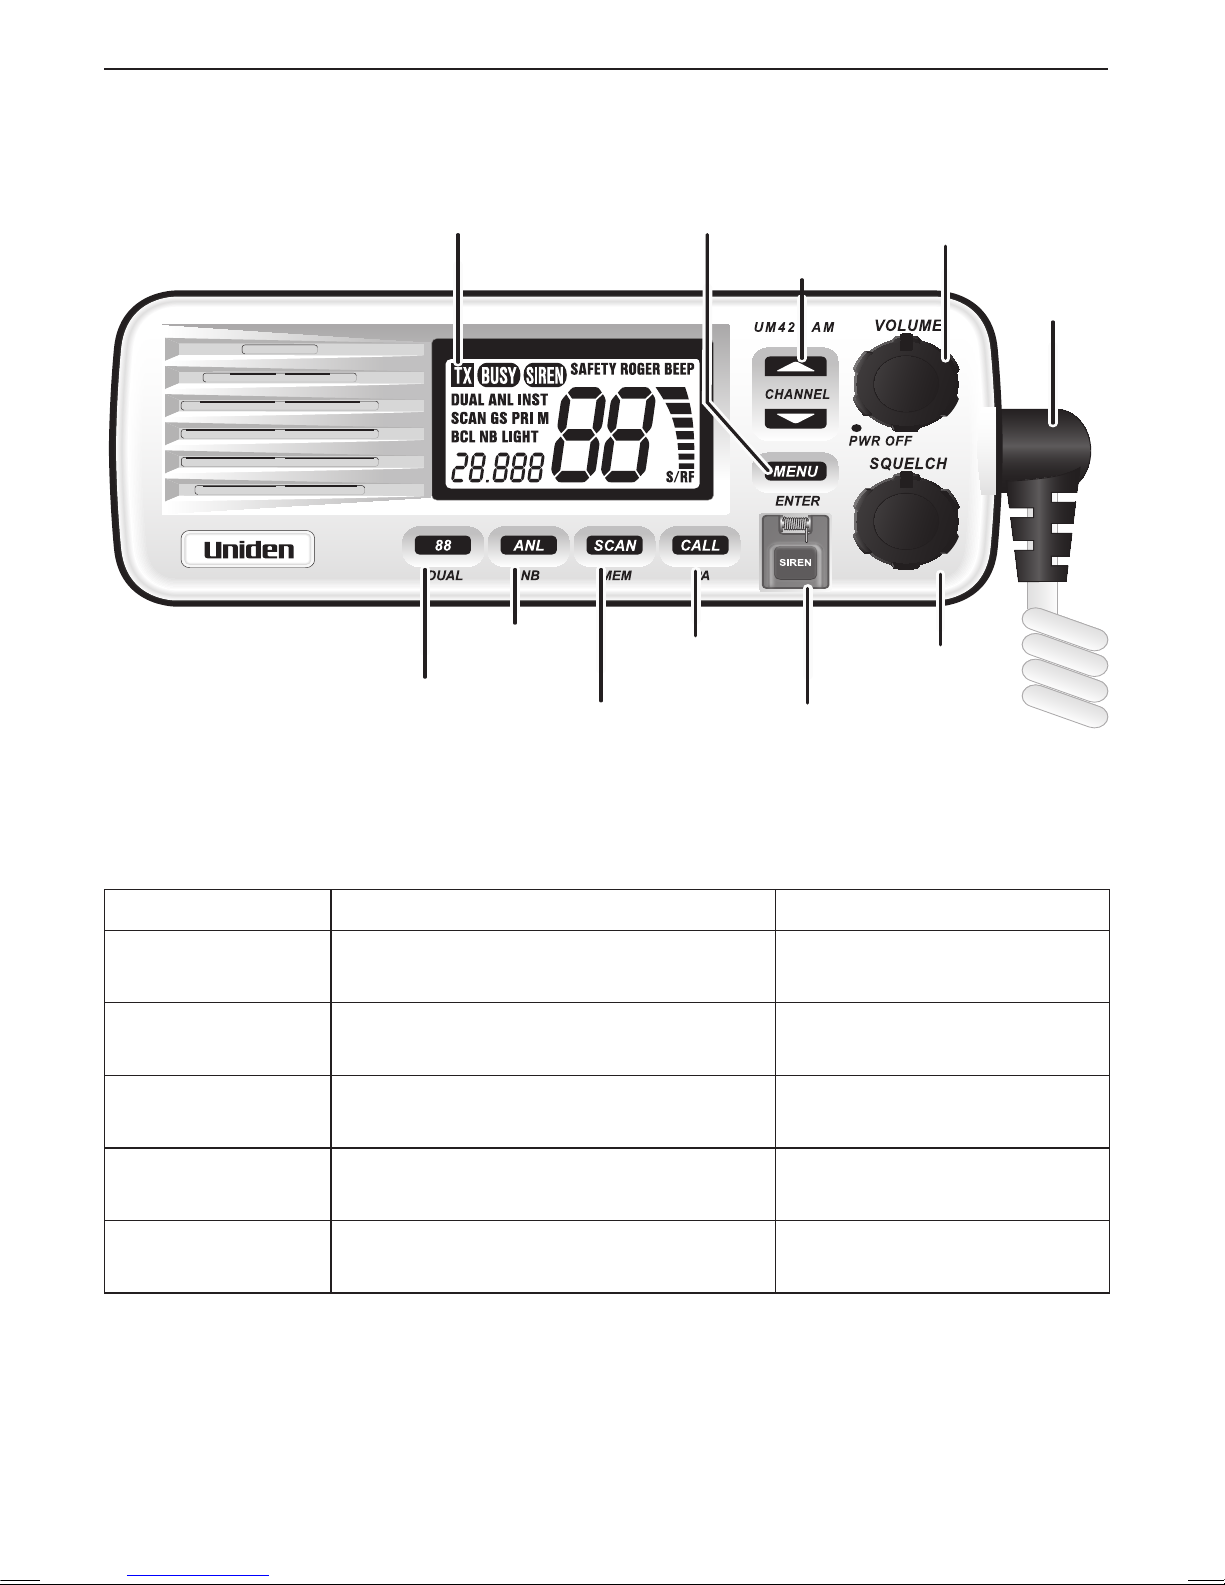
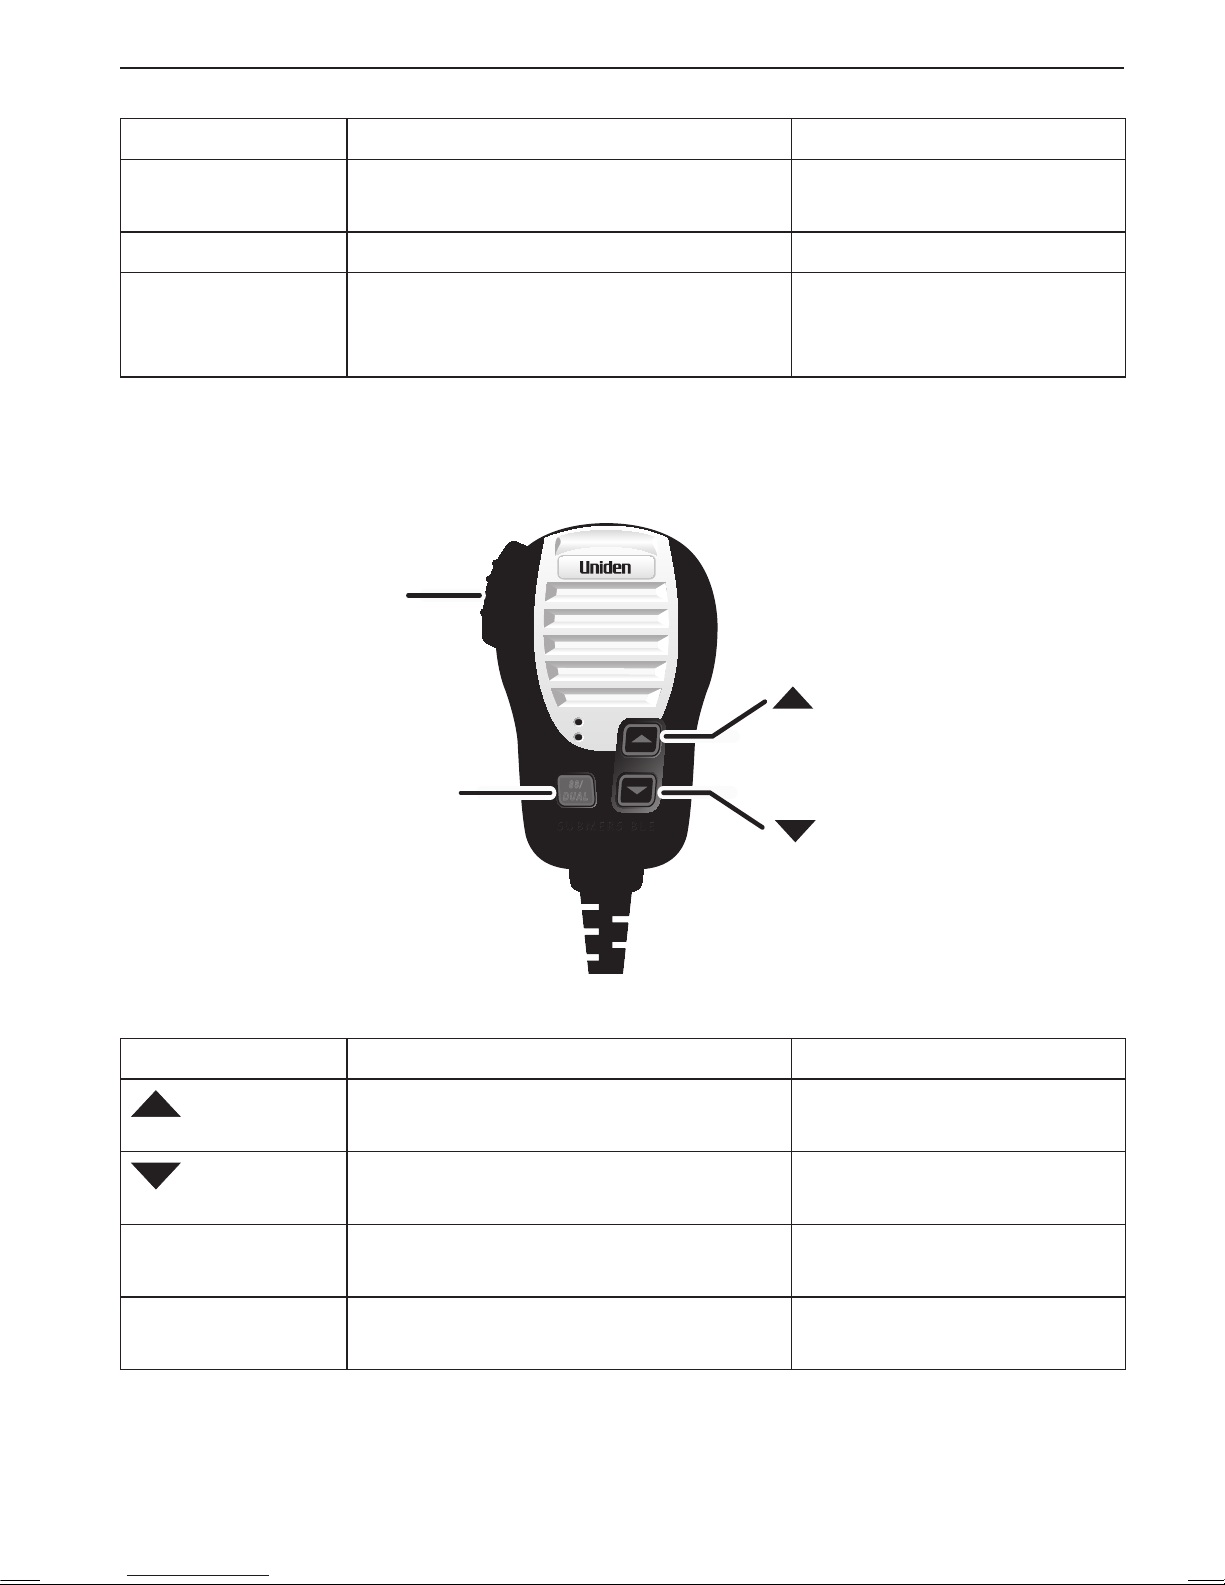
Parts of the radio .........................................................................................................5
Operation ............................................................................................................................... 8
Turning on the Power ..................................................................................................8
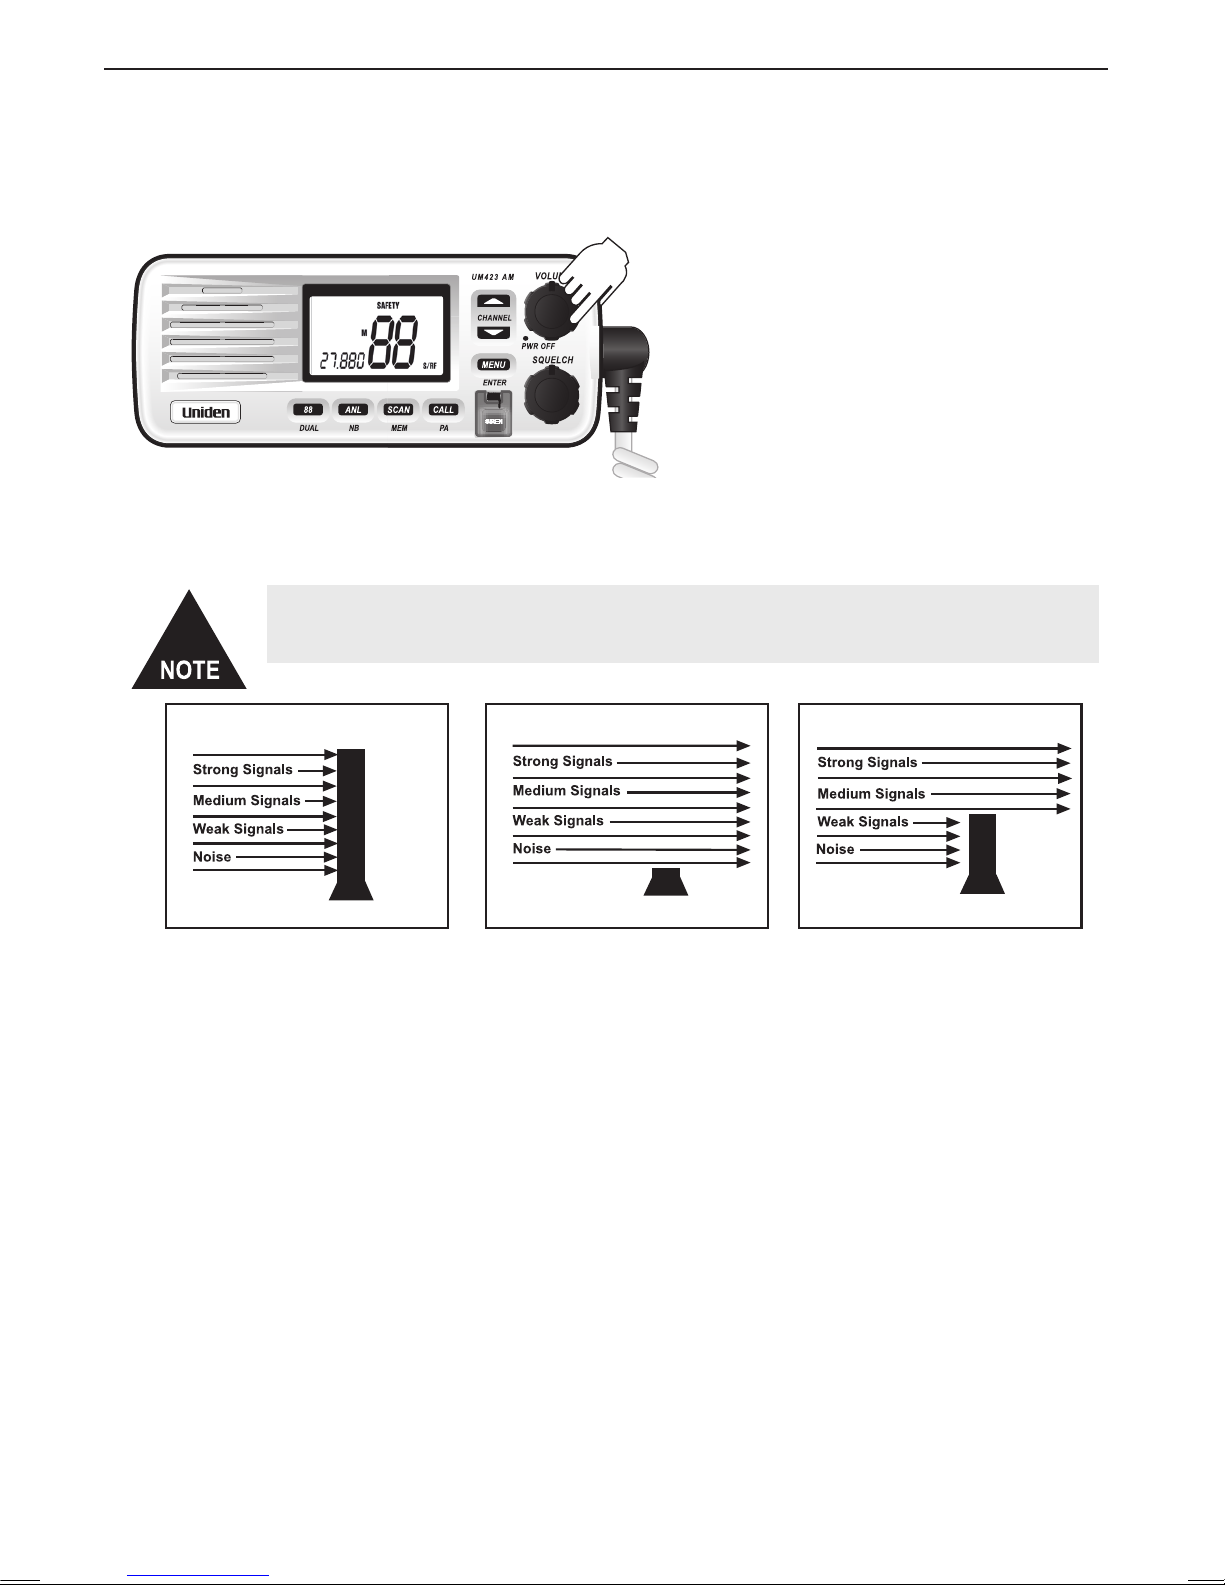
Setting the Manual Squelch.........................................................................................8
Selecting a Channel.....................................................................................................9
Transmitting ...............................................................................................................10
Call Function..............................................................................................................10
Channel 88 ................................................................................................................10
Dual Watch ................................................................................................................10
Scanning ...................................................................................................................11
Open Scan (OS) Mode .............................................................................................12
Group Scan (GS) Mode.............................................................................................12
Priority Channel .........................................................................................................13
Add/Remove Channels from SCAN Memory.............................................................13
Busy Channel Lockout...............................................................................................14
Back Light..................................................................................................................14
Roger Beep................................................................................................................15
Beep On/Off...............................................................................................................16
Selecting the Call tone...............................................................................................16
ANL (Automatic Noise Limiter) ..................................................................................17
NB (Noise Blanker)....................................................................................................17
Using the PA feature..................................................................................................18
Using the Siren feature..............................................................................................18
Installing the Hardware ..................................................................................................... 19
Mounting the radio ....................................................................................................19
Connecting the radio..................................................................................................21
Connecting accessories.............................................................................................23
Connecting to an External Speaker.......................................................................... 24
Connecting to an external PA Speaker .....................................................................25
Maintenance and Toubleshooting .................................................................................. 26
Common questions....................................................................................................26
Engine Noise Suppression ...................................................................................... 26
Specifications...................................................................................................................... 27
Australia AM Marine Channels & Frequencies .............................................................. .28
Regulations and Safety Warnings ..............................................................................29
Basic radio guidelines................................................................................................29
Antenna Selection and Installation.............................................................................29
2 Year Limited warranty ..................................................................................................... 30
Mounting Bracket Template .............................................................................................. 31
Table of Contents
UM423 AM.indd 2 28/9/11 11:58:16 AM

3
Introduction
Features
Designed and Engineered in Japan•
Built for Rugged Australian Marine Conditions•
2 Year Warranty•
Dual Speakers:• One speaker is mounted at the front of the unit allowing better sound clarity
and the second speaker is built into the microphone hand piece.
4 Watts Maximum TX Output Power•
10 AM Marine Channels:• Allows you to choose from all the Inshore Boating Radio Services
channels to transmit or receive messages.
Watertight Radio Housing:• Meets the worldwide JIS6 water-resistance specication, which
means the radio is able to withstand powerful water jets without damage
Rugged Waterproof and Submersible Speaker Microphone:• With Channel Select, One-
Touch Ch88 and Dual Watch Select Keys. Meets the worldwide JIS7 waterproof specication;
submersible to 1.0 metre depth for 30 minutes
Variable Squelch Level Knob:• Adjust the threshold of the receiver to eliminate background
noise whenever a transmission is not being received
Volume Control Knob:• Rotary Power on/off and volume control
Backlit Keypad and LCD Display:• The keypad and Extra Large Liquid Crystal Display (LCD)
is backlit for easy viewing at night or in low light situations, and features a 3 level dimmer
function
RF Level Bar Indicator:• View the radio frequency signal strength.
Built-in PA Output:• Connect optional PA speaker for Public Address and Siren Function.
Siren Alert Function:• Alert nearby vessels with connection of an optional PA speaker
ANL (Automatic Noise Limiter) Function:• Reduces unwanted signal noise for better clarity.
NB (Noise Blanker) Function:• Reduces unwanted power or ignition noise
One Touch Channel 88 Recalling:• Instantly switch to the emergency Ch 88 with the touch of
one button on the radio or the microphone
Open Scan:• Scans all the channels in memory and locks on active channels
Group Scan (GS) with Priority Channel Watch:• Allows the user to select the channel they
want to monitor / listen to in a group, along with a priority channel (priority watch)
Dual Watch Function:• Allows you to monitor Ch 88 for activity every two seconds while
monitoring another channel at the same time.
Roger Beep:• Conrmation tone indicates the completion of your transmission
Call Tone Function:• Choose from one of 5 ringing tones to initiate your transmission with the
touch of one button
Accessory connector: For connecting optional External Speaker and PA Speaker•
And More!•
Manual overview
Conventions
This manual uses several different type styles to help you distinguish between different parts
of the radio:
• BOLD SMALL CAPITALS indicates an actual button or knob on the radio or
microphone.
• Upper and Lower case bold indicates a connector or label on the radio.
• Italics indicate text on the display, such as menu options, prompts, and conrmation
messages.
Introduction
UM423 AM.indd 3 28/9/11 11:58:16 AM

Getting Started
4
What's included
AM TRANSCEIVER
UM423 AM Radio
DC Power Cable Accessory Cable
Mounting Bracket and
knobs Mounting Hardware
Microphone Hanger and
Mounting Hardware
Spare Fuse 250V 3A
Getting Started
UM423 AM.indd 4 28/9/11 11:58:20 AM

5
Getting Started
Parts of the radio
13.8V DC
ANTENNA
Antenna
connector
(SO238)
Heat sink
Power
connector
Accessory
connector
Rear panel connector functions
Connector Connects to For details, see
Antenna connector External AM antenna with
a male PL259 (SO238)
connector and 50 Ω
impedance.
Minimum 1.2m, 3dB rated
antenna for sailboats, 2.4m, 6
dB rated for power boats.
Connecting the radio,
page 22.
Power connector Nominal 13.8 VDC power
supply with negative ground
(10.8 VDC to 15.6 VDC)
(Red wire +, black wire -).
Connecting the radio,
page 21.
Accessory connector External speaker, external PA
speaker.
Connecting accessories,
page 23.
UM423 AM.indd 5 28/9/11 11:58:22 AM

Getting Started
6
VHF DSC TRANSCEIVER
AM TRANSCEIVER
LCD
display
MENU /
ENTER
BUTTON
CHANNEL UP &
DOWN buttons
VOLUME-PWR
(power) knob
(turn clockwise
to increase
volume)
Microphone
cord
88 / DUAL
(DUAL-WATCH)
BUTTON
ANL / NB
button
SCAN / MEM
(channel
memory)
button
CALL / PA
(public
address)
button SIREN
button
SQUELCH knob
(turn clockwise
to decrease
channel noise)
Button Press to... Press and hold to...
MENU Select the option in MENU mode Store new setting and exit
MENU mode
CHANNEL UP Move up one channel at a time. Move quickly up the
channels.
CHANNEL DOWN Move down one channel at a time. Move quickly down the
channels.
88 / DUAL Go to Channel 88 Dual Watch mode (see
page 10).
SIREN Initiate siren tone for one cycle Initiate continuous siren
output
Front panel button functions
UM423 AM.indd 6 28/9/11 11:58:24 AM

7
Getting Started
Button Press to... Press and hold to...
ANL / NB ANL (Automatic Noise Limiter) on/
off
NB (Noise Blanker) on/off
CALL / PA Call tone transmission PA mode on/off
SCAN / MEM Start scanning the channels saved
in memory.
Save a channel into
memory or remove a
channel from memory.
88/
DUAL
MIC
MIC
PTT (PUSH-
TO-TALK)
button
88 / DUAL
(Dual-Watch)
button
(up) button
(move up a channel)
(down) button
(move down a channel)
Microphone button functions
Button Press to... Press and hold to...
Move up one channel at a time. Move quickly up the
channels.
Move down one channel at a time. Move quickly down the
channels.
88 / DUAL Go to Channel 88 Dual Watch mode (see
page 10).
PTT (PUSH-TO-
TALK)
Temporarily stop scanning and stay
on a channel.
Talk on a channel.
UM423 AM.indd 7 28/9/11 11:58:25 AM

Operation
8
MENU
ENTER
MON
DCS/CTCSS
MON
DCS/CTCSS
MENU
ENTER
Turning on the Power
Turn the radio ON by rotating the Volume/ON/OFF control clockwise.
Setting the Manual Squelch
Turn the SQUELCH control to adjust the Squelch.
You must select a channel which is not in use before setting the SQUELCH control.
(see page 9 for “Selecting a Channel”).
Operation
Think of the squelch
control as a gate. If you
turn Squelch fully
clockwise it raises the
‘Squelch gate’ so high that
no signals get through.
If you turn the Squelch
fully counterclockwise it
lowers the ‘Squelch Gate’
to the extent that all
signals get through -
weak, medium and strong
signals and noise.
To set the ‘Squelch Gate’
to the desired level, turn
the squelch knob
counterclockwise until you
hear noise. Then carefully
turn the Squelch knob
clockwise until the noise
fades. Now only strong
signals get through.
AM TRANSCEIVER
UM423 AM.indd 8 28/9/11 11:58:31 AM

9
Operation
Selecting a Channel
Press or keys on the handset
or base to select the desired channel.
For your reference a list of the available channels, corresponding frequencies
and guidelines for their use is printed on page 28.
AM TRANSCEIVER
UM423 AM.indd 9 28/9/11 11:58:37 AM

Operation
10
Transmitting
The UM423 AM radio uses the Inshore Boating
Radio Service Band channels.
Select the desired channel. Press the microphone’s PTT
button and speak normally into the microphone. Hold it
approx. 7cm from your mouth. Release the PTT button to
end the transmission and listen for a reply.
Call Function
Use the Call Function to transmit a call (wake up) tone. Press
the [CALL/PA] button on the base. A three second ringing
tone will be transmitted.
You may select from 5 types of tones (see page 14).
Call Tone cannot transmit on Emergency CH88 and CH86.
The Call Tone Function is restricted to one transmission per minute. If a second
transmission is attempted within one minute then an error tone will sound.
Channel 88
Instantly switch to emergency Channel 88.
Press [88/DUAL] on the handset or base.
DUAL Watch
Dual watch will monitor the Priority Channel and the current
channel for activity. Dual watch is suspended when there
is activity and resumes after activity ceases (see Priority
Channel on page 13).
Press and hold [88/DUAL] on the handset or base. DUAL icon
appears and a short tone beep is heard.
To cancel DUAL Watch press and hold [88/DUAL] on the
handset or base. DUAL icon disappears.
PTT
88/
DUAL
MIC
MIC
UM423 AM.indd 10 28/9/11 11:58:40 AM

11
Operation
Scanning
The AM Marine Radio has a scanning feature
that allows you to search for active channels
automatically.
Furthermore, the AM Marine Radio is
designed to have two types of scanning;
Open Scanning (OS) and Group
Scanning (GS), to give you exibility and
allow you to use the radio more
effectively. Press [SCAN/MEM] and
Scanning starts.
The SCAN icon appears and blinks.
The scan direction can be changed
at any time by pressing a channel key.
After transmission in scan mode, the unit will wait 20 seconds for the signal to return, otherwise
scanning resumes.
If SCAN is deactivated while on an active channel, the AM Marine Radio will stay on
that active channel. If no channels are active, the AM Marine Radio will reinstate the
starting channel.
AM TRANSCEIVER
UM423 AM.indd 11 28/9/11 11:58:41 AM

Operation
12
Open Scan (OS) Mode
Allows continuous scanning of all selected channels.
If an active channel is found, scanning will stop on that
channel. If the received signal ceases, the unit will wait 3
seconds for the signal to return, otherwise scanning resumes.
To skip the active channel, press any of the channel keys on the base or handset. To deactivate
SCAN, press [SCAN/MEM].
OS Mode is indicated by the absence of the GS icon.
Group Scan (GS) Mode
Includes the accessory feature Priority Watch which allows you to monitor the Priority Channel
while scanning (see page 13 for setting Priority Channel).
To use GS Mode Scanning, press [MENU/ENTER] one time and then press any channel key to
change the GS setting to on. Then press and hold [MENU/ENTER] to save the setting.
GS icon appears on the display.
GS Scanning checks the Priority Channel
for activity regularly.
If the Priority Channel becomes active the
radio will stay on that channel for as long as
the signal is present. If the received signal
ceases, GS Scanning continues after 3
seconds.
If scanning stops on a channel which is not the Priority Channel, AM Marine Radio will continue
monitoring the Priority Channel for activity while listening to the active one.
To deactivate SCAN, press [SCAN/MEM].
AM TRANSCEIVER
UM423 AM.indd 12 28/9/11 11:58:43 AM

13
Operation
Priority Channel
To set the Priority channel.
1. Press [MENU/ENTER] two times. The current priority watch channel ashes.
2. Press any channel key on the base or handset to change the Priority Watch channel.
3. Press and hold [MENU/ENTER] to store the setting and exit from the menu mode.
If SCAN is deactivated while it is tuned to an active channel, the AM Marine Radio will
stay on that active channel.
If none of the channels are active, the AM Marine Radio will reinstate the scan start
channel.
If OS/GS Scanning is initiated when there are no channels programmed in
OS/GS memory, an error tone will be heard and scanning will not start (see
Add/Remove Channels from SCAN Memory - below).
Add/Remove Channels from SCAN Memory
Select which Scanning Mode you wish to use
OS or GS.
Select the channel you want to store.
Press and hold [SCAN/MEM] to add channel
in SCAN memory . Micon appears
and a short tone beep is heard.
To remove the channel from SCAN memory,
press and hold [SCAN/MEM].
The Micon disappears.
AM TRANSCEIVER
UM423 AM.indd 13 28/9/11 11:58:45 AM

Operation
14
AM TRANSCEIVER
Busy Channel Lockout
If the channel is already in use,
you can prevent the AM Marine Radio
from transmitting .
1. Press [MENU/ENTER] three times.
The BCL setting ashes.
2. Press any channel key on the base or
handset to change the setting between
ON or OFF.
3. Press [MENU/ENTER]to store the setting.
4. Press and hold [MENU/ENTER] to exit
from the menu mode.
If a button is not pressed within 10 seconds the AM Marine Radio will automatically
exit the Menu Mode.
Back Light
1. Press [MENU/ENTER] four times. The
Backlight setting ashes.
2. Press any channel key on the base or
handset change the setting between
OFF, LO and HI.
3. Press [MENU/ENTER] to store the
setting.
4. Press and hold [MENU/ENTER] to exit
from the menu mode.
AM TRANSCEIVER
UM423 AM.indd 14 28/9/11 11:58:47 AM

15
Operation
AM TRANSCEIVER
Roger Beep
1. Press [MENU/ENTER] ve times.
The roger beep setting ashes.
2. Press any channel key on the base
or handset to change the
setting between ON or OFF.
3. Press [MENU/ENTER] to store the
setting.
4. Press and hold [MENU/ENTER] to
exit from the menu mode.
If a button is not pressed within 10 seconds the AM Marine Radio will automatically
exit the Menu Mode.
UM423 AM.indd 15 28/9/11 11:58:49 AM

Operation
16
AM TRANSCEIVER
AM TRANSCEIVER
Beep On/Off
1. Press [MENU/ENTER] six times. The
Beep setting ashes.
2. Press any channel key on the base or
handset change the setting between ON
or OFF.
3. Press [MENU/ENTER] to store the
setting.
4. Press and hold [MENU/ENTER] to exit
from the menu mode.
Selecting the Call tone
1. Press [MENU/ENTER] seven times.
The call tone setting ashes.
2. Press any channel key on the base or
handset change the setting between C1,
C2, C3, C4 and C5.
3. Press [MENU/ENTER] to store the setting.
4. Press and hold [MENU/ENTER] to exit
from the menu mode.
If a button is not pressed within 10 seconds the AM Marine Radio will automatically exit
the Menu Mode.
UM423 AM.indd 16 28/9/11 11:58:50 AM

17
Operation
ANL (Automatic Noise Limiter)
ANL will reduce harsh background noise
caused by some transmission interference.
1. Press [ANL/NB], the ANL icon
appears.
2. Press [ANL/NB] to turn ANL off, the ANL
icon disappears.
NB (Noise Blanker)
NB will reduce noise caused by some ignition
interference.
1. Press and hold [ANL/NB], the NB icon
appears.
2. Press and hold [ANL/NB] to turn NB off, the NB icon
disappears.
AM TRANSCEIVER
AM TRANSCEIVER
UM423 AM.indd 17 28/9/11 11:58:53 AM

Operation
18
AM TRANSCEIVER
Press and hold the microphone2. PTT button. Speak clearly in your
normal voice (you don’t have to shout). Use the VOLUME-PWR knob on
your UM423 AM to adjust the volume of the PA speaker.
Release the3. PTT button when you're nished talking.
To turn off the PA feature and return to the radio mode you were using, 4.
press and hold [CALL/PA] for two seconds again.
Using the SIREN feature
For best results an optional external PA Speaker should be connected to use this
feature. See page 25.
The Siren feature generates a siren output via the Front speaker, Microphone
speaker and optional PA speaker for situations where you wish to alert nearby
vessels.
1. Single Cycle Siren:
Lift the siren cover and
press the red [SIREN]
key. The “SIREN” icon
appears and the UM423
AM sounds the siren tone
via the Front speaker,
Microphone speaker
and optional PA speaker
After one cycle output, the “SIREN” icon disappears and the UM423
AM stays in the PA mode.
2. Continuous Siren:
Lift the siren cover and press and hold the red [SIREN] key until the
end of the 3 second display count down. The “SIREN” icon ashes and
the UM423 AM sounds the siren tone continuously.
3. To cancel the single cycle or continuous siren; Press [SIREN] or PTT
key. The UM423 AM stays in the PA mode. Pressing [88/DUAL] also
cancels the siren and changes to CH88. The siren via PA speaker
cannot be controlled. The siren via Front speaker Microphone speaker
can be controlled.
Using the PA feature
An optional external PA Speaker is re-
quired to use this feature. See page 25.
Press and hold1. [CALL/PA]
for two seconds to activate
the PA feature. The display
shows PA.
AM TRANSCEIVER
UM423 AM.indd 18 28/9/11 11:58:56 AM

19
Installing the Hardware
Mounting the radio
The UM423 AM can sit at any angle in the mounting bracket so it can easily
accommodate the best location. First, determine the best place to mount the
radio. For optimum performance, nd a location that can:
• Properly support the weight of the radio, approximately 2 pounds or
0.9 kilograms. You may need to use some type of anchor with the
mounting screws to hold the radio, depending on the surface.
• Keep the battery leads as short as possible.
• Keep the antenna lead-in wire as short as possible.
• Allow free air ow around the heat sink on the rear of the radio.
• Avoid interference with the ship’s compass.
Install the radio into the mounting bracket, and connect the 1. power
cable and accessory cable.
1
2
Step 1:
Slide the radio
into the mounting
bracket.
Step 2:
Tighten the mounting knobs
to secure the radio in place.
Installing the Hardware
UM423 AM.indd 19 28/9/11 11:58:59 AM

Installing the Hardware
20
Position the radio into the desired location. Mark the edges of the2.
bracket on the mounting surface.
Remove the mounting bracket drill template from the back of the3.
manual, and use the template to mark the drill holes on the mounting
surface.
Drill the holes for the mounting bracket; be sure to follow any special 4.
requirements of the mounting surface.
Remove the bracket from the radio, and use the mounting hardware to 5.
secure the bracket to the mounting surface.
Hex bolt
Washer
Spring washer
Hex nut
Mounting
bracket
Mounting
surface
Install the radio back into the mounting bracket.6.
UM423 AM.indd 20 28/9/11 11:59:01 AM
Table of contents
Other Uniden Marine Radio manuals

Uniden
Uniden Oceanus LTD1025 User manual

Uniden
Uniden MHS335BT User manual

Uniden
Uniden OCEANUS DSC Series User manual

Uniden
Uniden ATLANTIS 200 User manual

Uniden
Uniden SOLARA DSC-BK User guide

Uniden
Uniden POLARIS User manual

Uniden
Uniden MHS125 User manual

Uniden
Uniden UM455 User manual

Uniden
Uniden PRESIDENT LTD 950 User manual

Uniden
Uniden MC 635 User manual

Uniden
Uniden MHS050-2 User guide

Uniden
Uniden UM380 User manual

Uniden
Uniden ATLANTIS 200 User manual

Uniden
Uniden MHS235 User manual

Uniden
Uniden Atlantis 275 User manual

Uniden
Uniden POLARIS User manual

Uniden
Uniden MHS125 User manual

Uniden
Uniden UM425 VHF DSC User manual

Uniden
Uniden OCEANUS DSC Series User manual

Uniden
Uniden MC 610 User manual