Unistellar eVscope eQuinox User manual

P
a
g
e
eVscope eQquinox V1.1
eVscope eQuinox
User Guide
Prepare to Be Amazed

eVscope eQquinox V1.1

Page 3 eVscope eQquinox V1.1
CONTENTS:
Instructions………………………………………………………………………………………
1. Tripod installation…………………………………………………………………………..
2. Adjusting level bubble……………………………………………………………...………
3. eVscope eQuinox installation………………………………………………………..……
4. Starting the eVscope eQuinox……………………………………………………………
5. Removing the dust cap……………………………………………………………………
6. Connecting the eVscope eQuinox to your smartphone………………………………...
7. Focus………………………………………………………………………………………...
8. Observation…………………………………………………………………………………
9. Park mode…………………………………………………………………………………..
10. Improve your observations………………………………………………………………...
11. Mirror alignment…………………………………………………………………………….
12. Charge/discharge…………………………………………………………………………..
13. Data………………………………………………………………………………………….
Safety instructions………………………………………………………………………………
Maintenance……………………………………………………………………………………..
Specifications……………………………………………………………………………………
Declarations……………………………………………………………………………………..
p. 4
p. 4
p. 5
p. 5
p. 5
p. 6
p. 6
p. 6
p. 8
p. 8
p. 9
p. 9
p. 11
p. 12
p. 12
p. 13
p. 13
p. 14

Page 4 eVscope eQquinox V1.1
Instructions
Box content:
- eVscope eQuinox + Bahtinov mask included in the tube top cover
- Tripod
- Power supply with exchangeable plugs (EU, USA, UK)
- Quick start guide
- User Guide
- Accessories box with tools
Requirements:
- Avoid directly exposing the eVscope eQuinox to strong wind and try to shelter it from moderate
winds to improve your observations.
- Use the eVscope eQuinox on stable ground that does not vibrate when you walk near it.
- Use the eVscope eQuinox under a clear sky.
- Locate the eVscope eQuinox away from direct streetlight.
- For best results, avoid a full moon
Using the telescope, please follow these steps carefully:
1. Setup the tripod:
Open the legs of the tripod and adjust the device to the height that works best for you.
Warning: The internal tripod’s screws could have loosened during shipment.
Please check that all screws are tightened. If not, you can tighten them with the specific tools you can
find in the accessories box.

Page 5 eVscope eQquinox V1.1
2. Adjust the legs to put the bubble level in the middle of the black circle, as in the image.
Note: each time you move your eVscope, we recommend resetting the level bubble.
3. Loosen the 2 tripod screws. Install your eVscope vertically on the tripod and tighten the screws. Be
careful not to tighten it too hard.
4. Start the eVscope by pressing the ON button for 2 seconds. When you see a red light, the eVscope
is on and ready to use.
Warning: if you turn on your eVscope in daylight, you might not see the button light because of its
low intensity. It has been set up like this, so it won’t dazzle you at night.
Battery is not fully charged when shipped.

Page 6 eVscope eQquinox V1.1
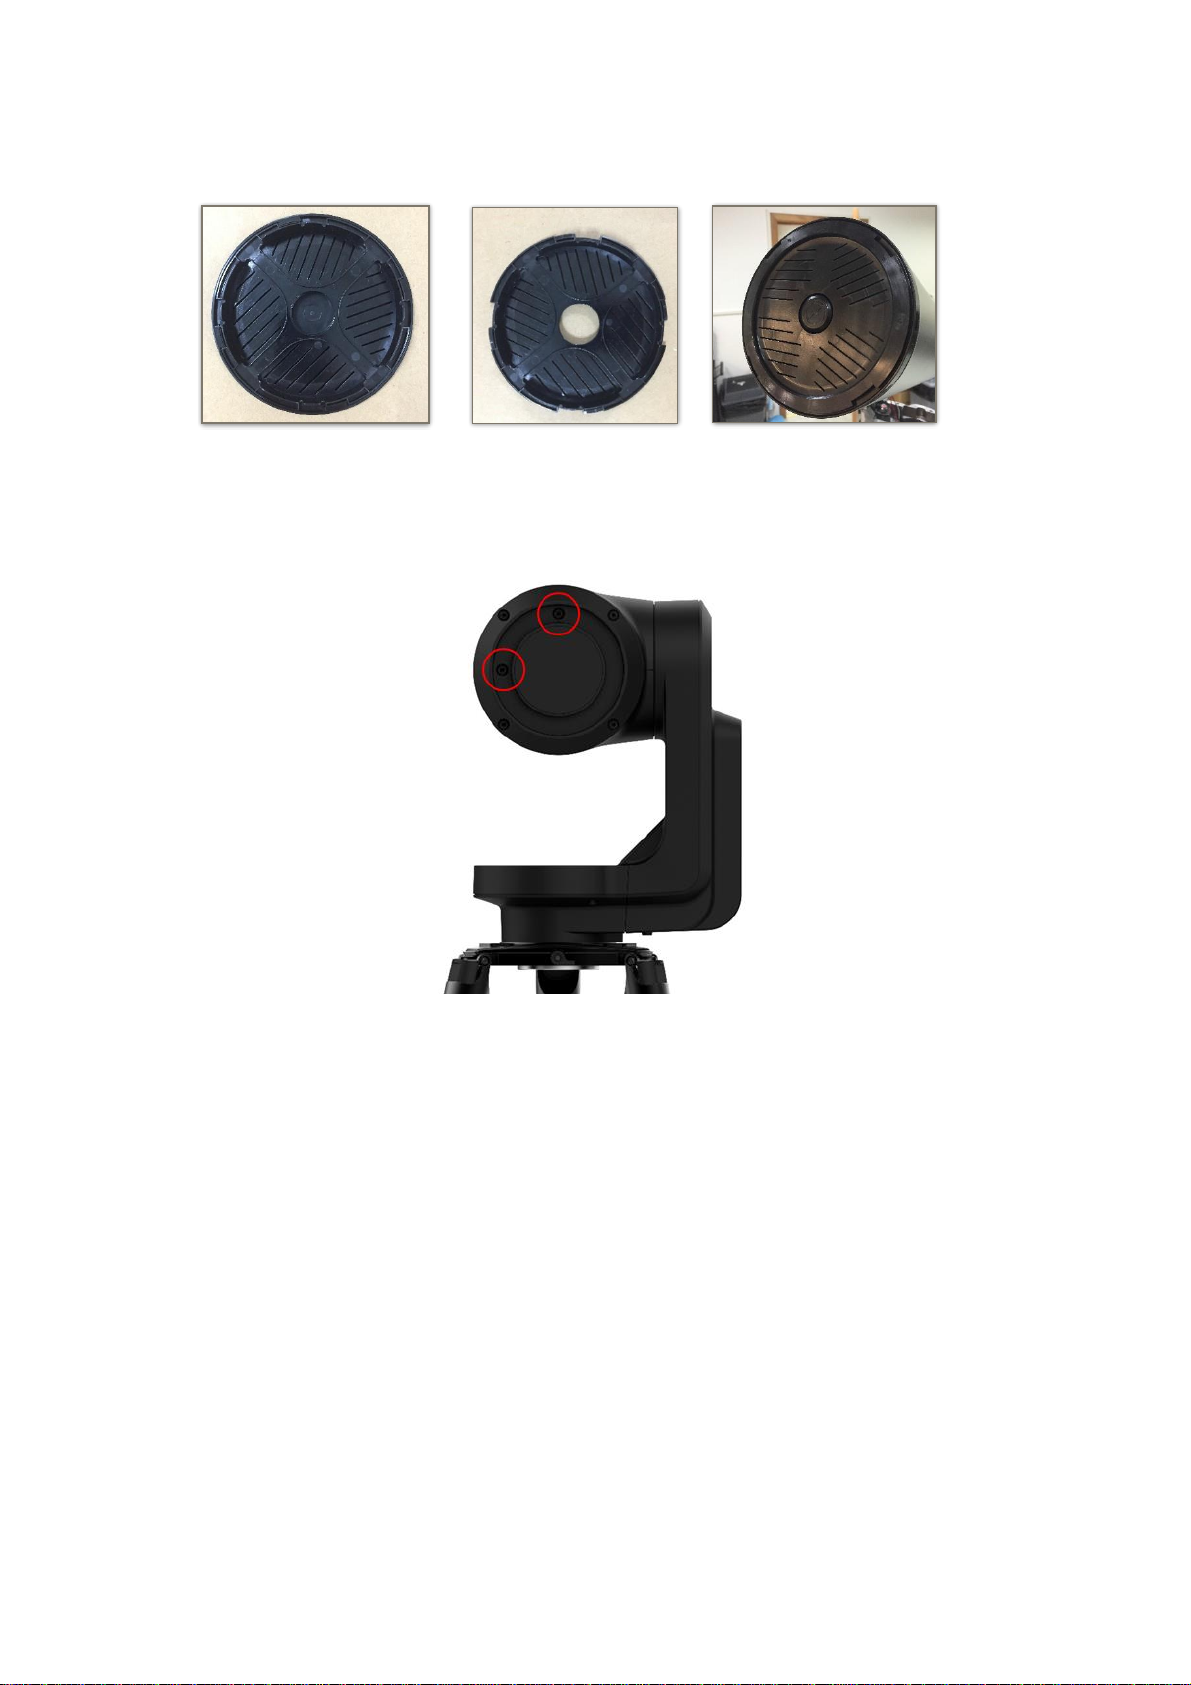
5. Remove the dust cap from the top of the tube.
6. Connection to the smartphone:
oDownload the Unistellar app from the Google
Play Store or Apple Store.
oTurn on your smartphone’s Wi-Fi.
oCheck available Wi-Fi networks.
oConnect your smartphone to the eVscope
eQuinox’s Wi-Fi network named eVscope-
xxxxxx (the network’s name consists of
eVscope and six random characters).
oLaunch the Unistellar app on your
smartphone
oWarning: the connection between your
eVscope and your smartphone may
sometimes be lost, in this case please restart
your application. If you encounter broken
connections, we advise you to disable Auto-
Lock.
7. Focus:
oUsing the in-app joystick, lower the telescope to around 45°.
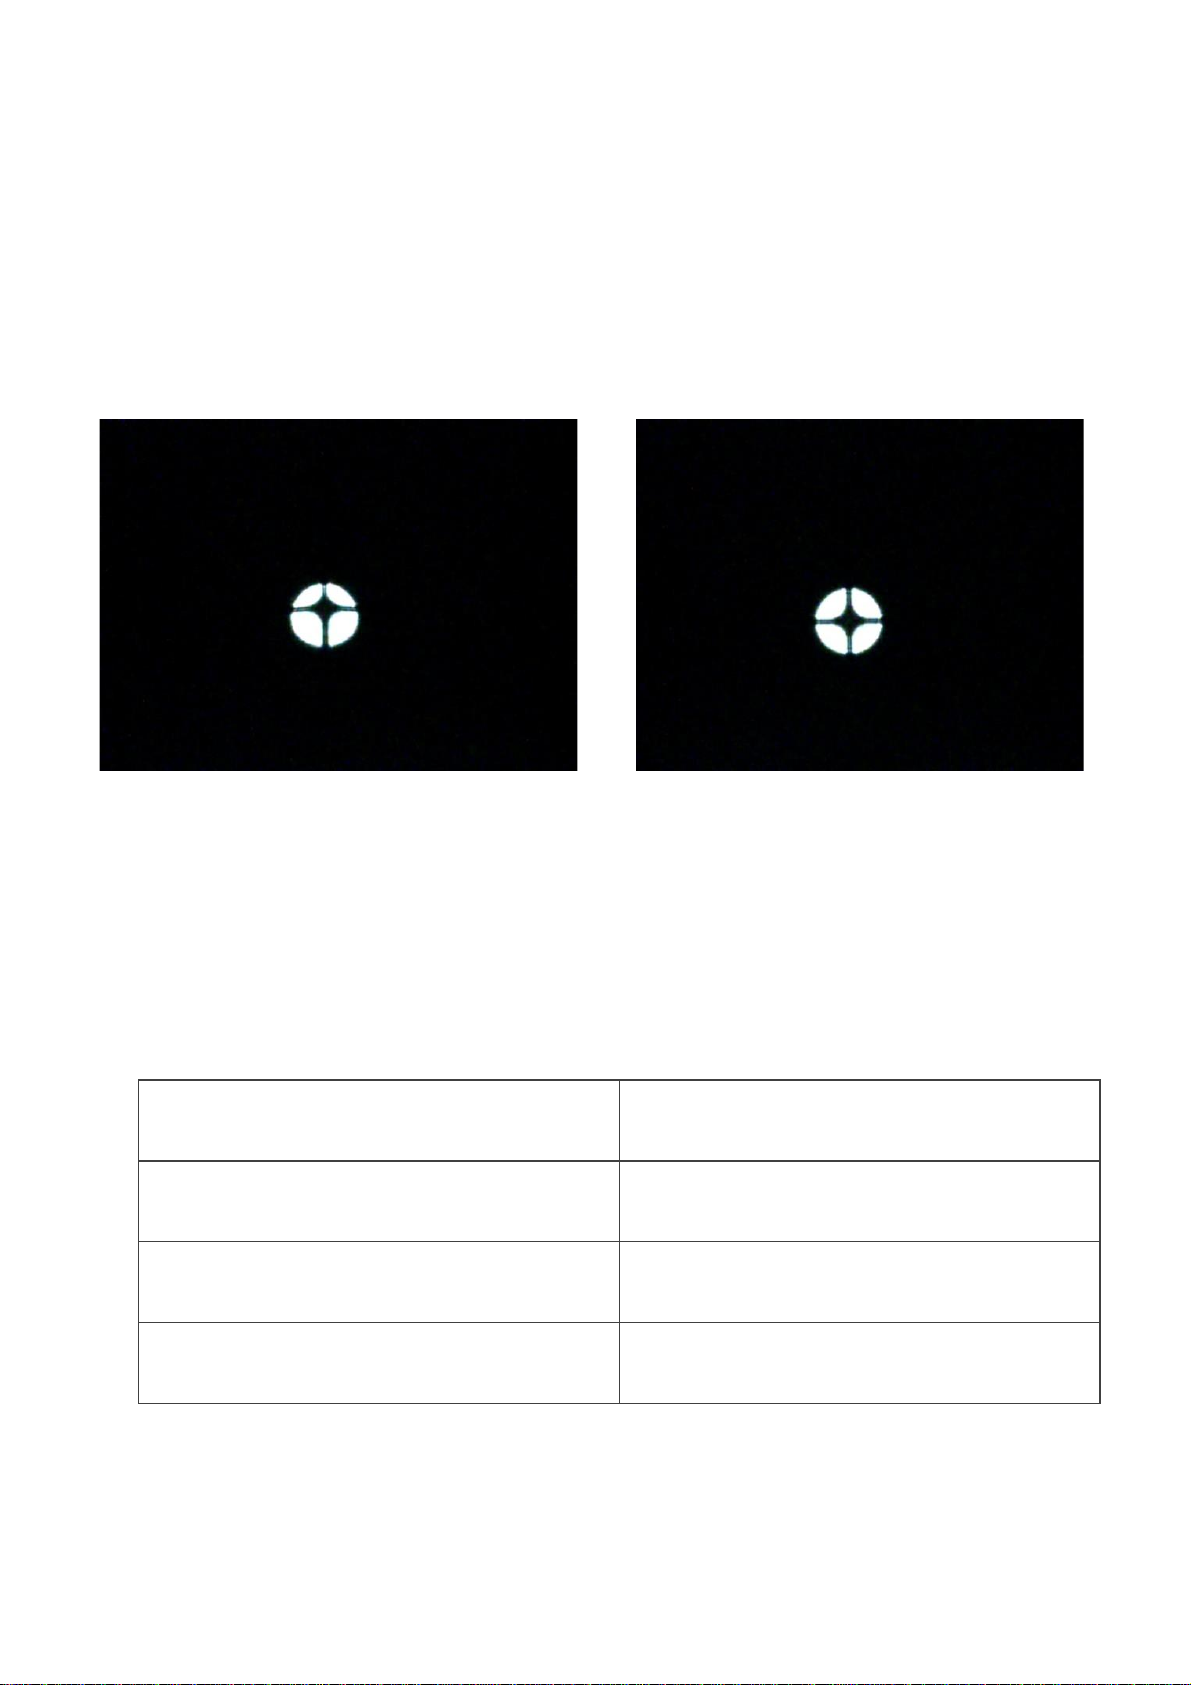
oBasic focus: Adjust the focusing wheel at the bottom of your eVscope to align the visual
cue with the top screw.
Note: To get a perfect focus, the visual cue might not be exactly aligned with the top screw
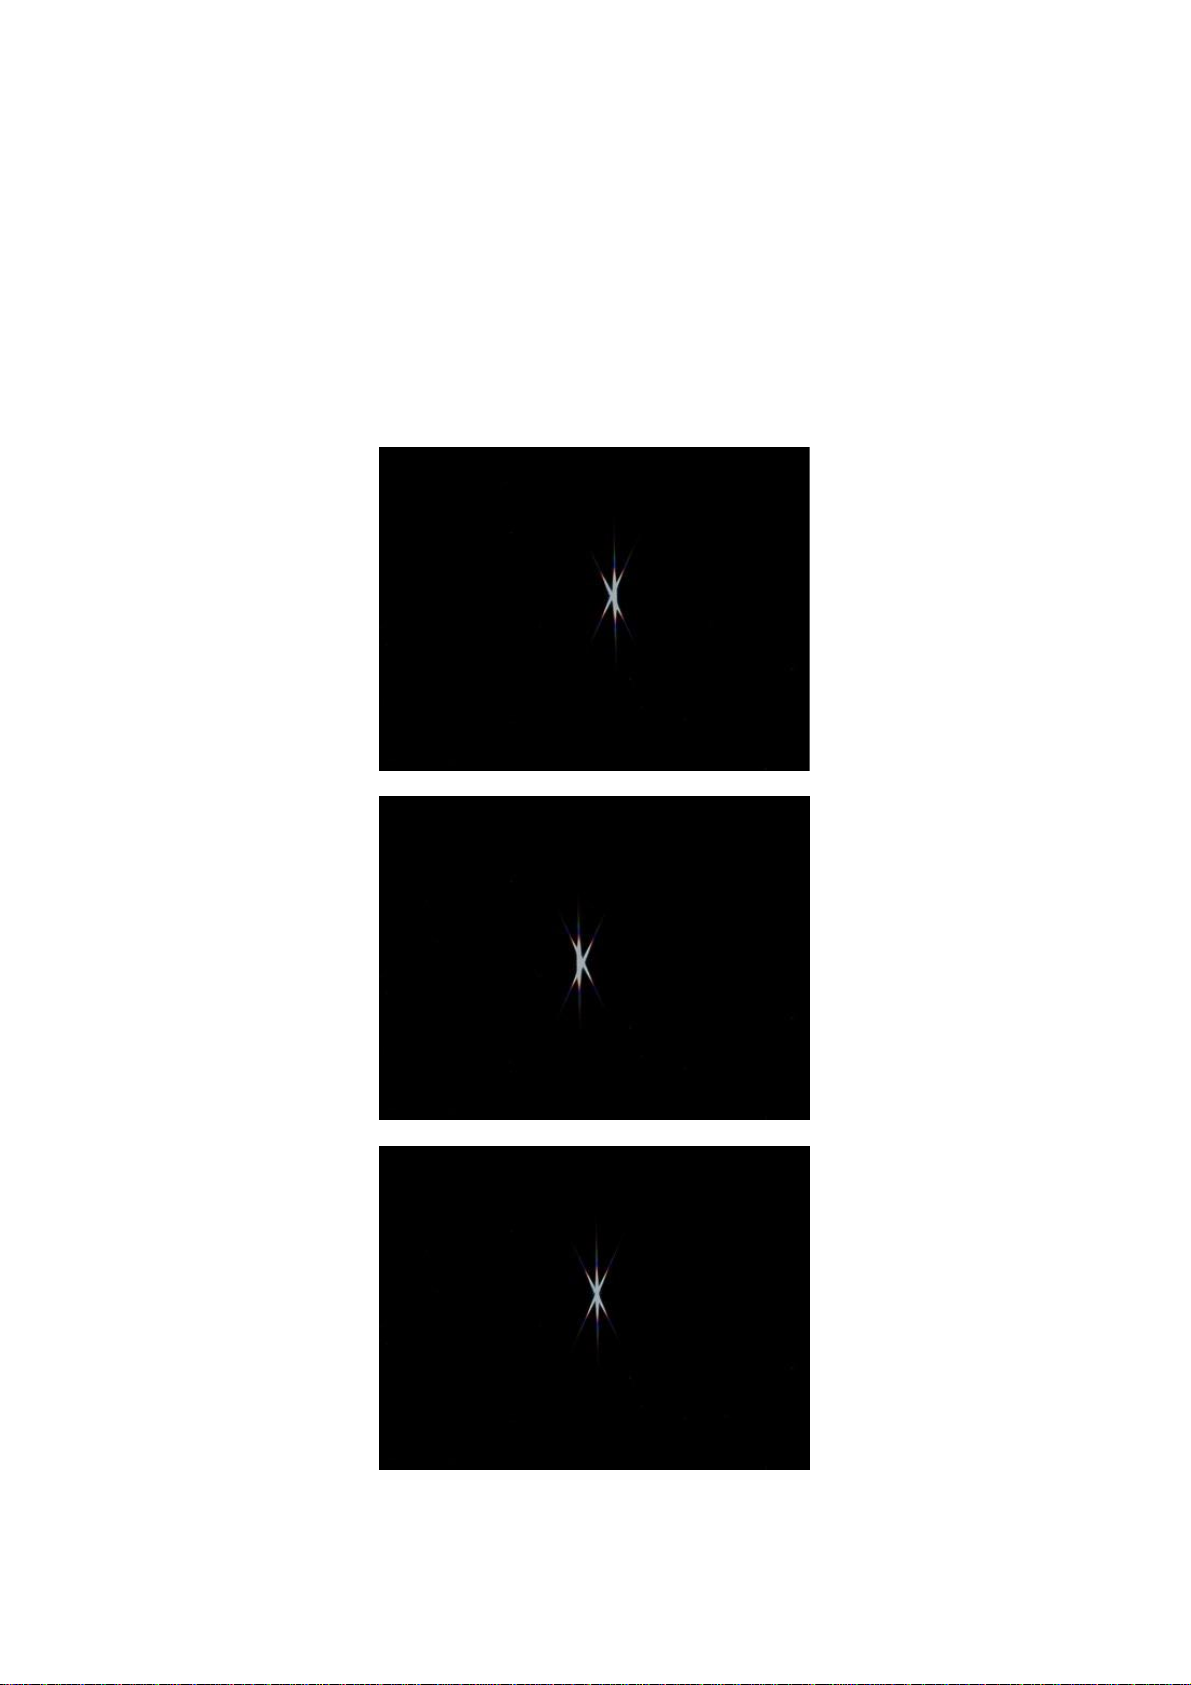
to have the perfect focus. You can focus "by eye"or focusprecisely using the Bahtinov mask
(recommended for excellent results).

Page 7 eVscope eQquinox V1.1
oAccurate focus: To ensure perfect accuracy, point the eVscope on a bright star and use
the Bahtinov mask to adjust the focus and the coma (see Mirror Alignment).
i. Here is how to focus with the mask. In the « Explore » tab of your app, go to « Star », and select the
first one. Select « GoTo» to move the eVscope on it. Go to « eVscope »tab, then touch the Settings
icon on the top right of your screen and activate the « Auto » mode. Put the mask on top of the
tube. This will create a specific diffraction pattern for that bright star, with a central line and two spikes
forming an X. If the central line is positioned exactly in the middle of X, it means your eVscope is
perfectly focused. To achieve this result, you just need to manually rotate the focusing wheel at the
bottom of your eVscope and observe the results.
The orientation of the cross does not matter
ii. In these three images, you can see the star Rigel observed with our mask. The first two images are
out of focus, but by rotating the wheel, we were able to achieve perfect focus.

Page 8 eVscope eQquinox V1.1
iii. The Bahtinov mask is included in the cover. To use it you should remove the mask from the cover
and install it on the eVscope, as in the pictures.
iv. In case you need to adjust the coma, use the two screws of the adjustment mechanism (see Mirror
Alignment on next page).
8. Observation:
oCheck the Quick Start Guide for detailed explanations on how to use your eVscope.
9. Park:
oWhen you are done observing, use the « Park my eVscope » function so it automatically
moves to the zenith position and turns itself off. First, the tube will go a little further than the
zenith, then it will slowly go back. Youwillfind the option « Park my eVscope » in the « User
» tab
oPut the dust caps back on the tube.

Page 9 eVscope eQquinox V1.1
10. To improve your next observations:
oAdjust the gain and the exposure time in Live View mode.
oAdjust the contrast and brightness in Enhanced Vision mode.
oSet up your observing conditions in the « Explore » settings (city, suburb, countryside).
oCheck and adjust the mirror alignment (below).
oCheck the battery charge level in the « User » tab
oShare your observationswith the community by sending us your data (Download data, then
Upload my data).
oEnjoy the multi-user experience.
oContribute to science by joining eVscope observing campaigns.
oCheck the online FAQ to learn more about your eVscope’s capabilities.
11. Mirror Alignment:
oMirror alignment is advised after each time your eVscope is having a long journey.
oFor this procedure, you will need:
a. The smallest hex key provided in the toolbox
(S2 3mm),
b. A clear sky with visible bright stars.

Page 10 eVscope eQquinox V1.1
oSet up the eVscope using the 1. INSTALL and 2. CONNECT and
3. FOCUS & TRACK sections of the Quick Start Guide.
oPoint toward a bright star by selecting a visible one in the list of proposed stars.
oCenter the target using the joystick.
Note: the joystick of the app can be used in 2 different ways: drag the yellow dot for fast
movement or simply touch the edge of the disc for slow movement. The short touches allow
a slow movement. In the « eVscope » tab, display the settings by touching the icon at the
top right and activate the « Auto » mode.
oFully rotate the large focus wheel clockwise without forcing. You should see this:
Bad alignment
(the cross is not centered)
Good alignment
(the cross is centered)
oIf the dark cross is not centered (as shown in the above image on the left), you
need to realign your mirror.
oFind the smallest hex key (S2 3mm) in the toolbox.
oFirst, move the telescope with the in-app joystick (touch the edge of the circle
quickly) to put the star at the edge in the direction indicated in the table below:
The cross is too high
Move the star to the top of the
image
The cross is too low
Move the star to the bottom of
the image
The cross is off-centered on
the left
Move the star to the left of the
image
The cross is off-centered on
the right
Move the star to the right of
the image

Page 11 eVscope eQquinox V1.1
oThen turn the vertical or horizontal screw in the mirror mount to put the star back
at the center. For example, if the cross is too high:
1. Put the star on the edge of
the screen with the in-app
joystick.
2. Use the hex key to turn the
screw (in this example the
vertical screw)
3. Put back the star at the
center of the screen. The
cross will recenter itself
oRepeat the procedure until the cross looks centered. You might have to do it
several times.
oMove back the focus to the default position by aligning the visual cue with the top
screw (Section 3 in the Quick Start Guide).
oMove toward a target and enjoy. The image should look better now.
11. Charge/Discharge
oThe eVscope eQuinox can be used while charging.
oIt can take from 7 to 8 hours to fully charge it.
oWhen the eVscope is charging, you will see a blue flashing LED that will go from
six flashes to none. Flashes decrease as the battery gets more charged.
oWe strongly advise not to recharge your eVscope below 10°C.
oWhen the battery is low, the performance of the eVscope can be compromised.
You can see the battery charge level in the "User" tab of the app. A fully charged
battery is all yellow, a fully discharged battery is black with a yellow border.
oWe advise to only use the USB-C charger provided by Unistellar.
oYou can also use an external battery to recharge your eVscope.
oYoucan charge yoursmartphone with the eVscope. Plug it to the USB-A port, next
to the USB-C port.

Page 12 eVscope eQquinox V1.1
12. Data
Raw data is saved during Enhanced Vision. You can empty your SD card when the
storage is full.
To empty the SD card storage, first select Download
data. Then, when it is done, select Upload my data.
Download data sends data from eVscope to your
smartphone. Upload my data send data from your
smartphone to the Unistellar servers.
You are your observations owner. By sharing
your data with us, you allow Unistellar to provide its
users with continuous improvement of their observation
experience.
It also makes scientific discoveries possible,
for which your contribution will be mentioned if you wish.
As usual in these cases, the results of
analyzes will be the property of those who analyzed it:
Unistellar and its scientific partners.
Safety instructions
Your eVscope eQuinox and its accessories are not toys. Do not allow
small children to play with them because children could hurt themselves
or others or damage your device. Keep your device and all its parts and
accessories out of the reach of small children.
Your eVscope eQuinox is not meant to be used in wet environment. As
every electronics object (as exception of the waterproof ones), if water
or another liquid enters the eVscope it can be permanently damaged.
You should immediately turn off the power and dry it.
Do not look at the Sun without an adapted filter. You eVscope eQuinox
can be definitively damaged also after a short exposure. There is also an
important fire hazard.
Furthermore, do not expose your eVscope at temperatures above 50°C
or below -20°C, the performances can be compromised by extreme
temperatures.
Your eVscope is fragile, do not let it drop or fall. In case of shocks, it can
be permanently damaged.

Page 13 eVscope eQquinox V1.1
Maintenance
1. Storage:
oStore the eVscope eQuinox in its original packaging or in its backpack.
oStore the eVscope eQuinox with its cover, to avoid dust to enter in the device.
oDo not store the eVscope eQuinox with empty battery.
oDo not store the eVscope eQuinox in wet environment and temperatures below -20°C or
above 50°C.
oDo not store under direct sunlight.
2. Mirror removal and cleaning:
oThe mirror can be removed by removing the 4 screws on the back of the adjustment
mechanism, as in the picture:
oGloves must be used to manipulate the mirror.
oOnce the back removed the mirror can be cleaned with dry compressed air.
oNo liquids should be used to clean the mirror.
oNo wet tissues should be used to clean the mirror.
3. Tripod maintenance:
oThe tripod screws could untighten with the use.
oThree different “tripod tools” are provided to tighten the screws of the tripod in case they are
slightly loosened.
4. Battery removal:
oThe battery is not meant to be removed by the user.

Page 14 eVscope eQquinox V1.1
Specifications
Model: eVscope eQuinox
Mirror specifications: diameter 112mm, focal length 450mm, material BK7
Battery specifications: 9 hours life, capacity 15 000mAh
Power supply unit (PSU) input: 100-240V ~50/60 Hz 0.6A Max; Output: 5.0Vdc, 3A
WIFI frequency and bandwidth: 2.4 GHz, 72.2 Mbit/s
WIFI range: 50m in free space
Input/output: USB-C (PSU); USB-A (smartphone recharge)
Tripod: aluminum, adjustable height; designed for the eVscope
Declarations
Hereby, Unistellar SAS declares that the radio equipment type eVscope eQuinox is in compliance
with Directive 2014/53/EU, the FCC 47 CFR Part 15 and the ICES-003 / NMB-003 standards. The
full text of the declarations of conformity is available at the following internet address: unistellar.com.
Contains: FCC ID: 2ABCB - RPI3AP. Contains IC: 20953 - RPI3A
For Canadian users: A separation distance of 20cm or more is required between the user and the
device according to Canadian standard RSS-102 —Radio Frequency (RF) Exposure Compliance of
Radiocommunication Apparatus (All Frequency Bands) (https://www.ic.gc.ca/eic/site/smt-gst.nsf/
eng/sf01904.html)
Recycling
This device is compliant to the 2012/19/UE directive and should not be disposed in household
waste. The special waste disposal varies according to local rules. The correct recycling of
electronic devices helps to preserve environment and health.
Unistellar SAS
19 rue Vacon
13001, Marseille France
N° SIRET 81233935600022
Designed in France –Made in China
Table of contents
Other Unistellar Telescope manuals