Unninox YRG-50 User manual

Installation-Use-Maintenance

Dear customer,
Thank you for choosing our product as your trusted partner. We ensure you that
we always give
our best as we produce this appliance by using the finest materials.
Gas Economic Table Low is excellent choice to cook. In order to obtain maximum
benefits of this appliance, please read this
manual instruction carefully. Please
notice the warnings and safety instructions to keep your safety. DO NOT use this
appliance except its utility.
If you have any question or difficulty in operating this appliance, please contact
your dealer to
acquire mechanic assistance.

•Cover…………………………………………………………….. 1
•Preface…………………………………………………………… 2
•Table of Content………………………………………………… 3
•General Information…………………………………………….. 4
•Safety Instructions……………………………………………… 5
•Technical Data………………………………………………….. 7
Data Tables…………………………………………………….. 7
Overall Dimension…………………………………………….. 10
•Component List……………………………………………….. 11
•Installation (for the installer)…………………………………. 14
- Position and Fixing 15
- Gas Supply Connection 16
- Checking Gas Pressure and Nominal Heat Input 17
- Gas Conversion 18
- Adjusting Small Combustion 18
- Adjusting Pilot flame 20
- Adjusting Primary Air 21
•Replacing Main Components………………………………… 23
Changing Nozzle Wok Burner……………………………….. 23
•Control Panel Description……………………………………. 24
•Use Instructions (for user)…………………………………… 25
- Warning……………………………………………………… 25
- Turn ON / OFF …………………………………………….. 26
•Routine Cleaning And Maintenance………………………. 27
•Trouble Shooting……………………………………………. 29
•Warranty……………………………………………………… 30

Please read this manual instruction carefully before operating this appliance.
Gas Economic Table Low is an excellent cooking appliance. This appliance is using gas. This
appliance used for
making stock in large quantity. It is very important to keep this instruction book
together with the appliance for future
consultation. If this appliance sold or
transferred
elsewhere, make sure this book goes with it. Therefore, the new
user
can read about its
functions
and other relevant information.
If you have any question about the appliance, please contact your nearest dealer.

Very important!: Before installing, place the appliance on solid, flat, stable and horizontal surface
and connection availability.
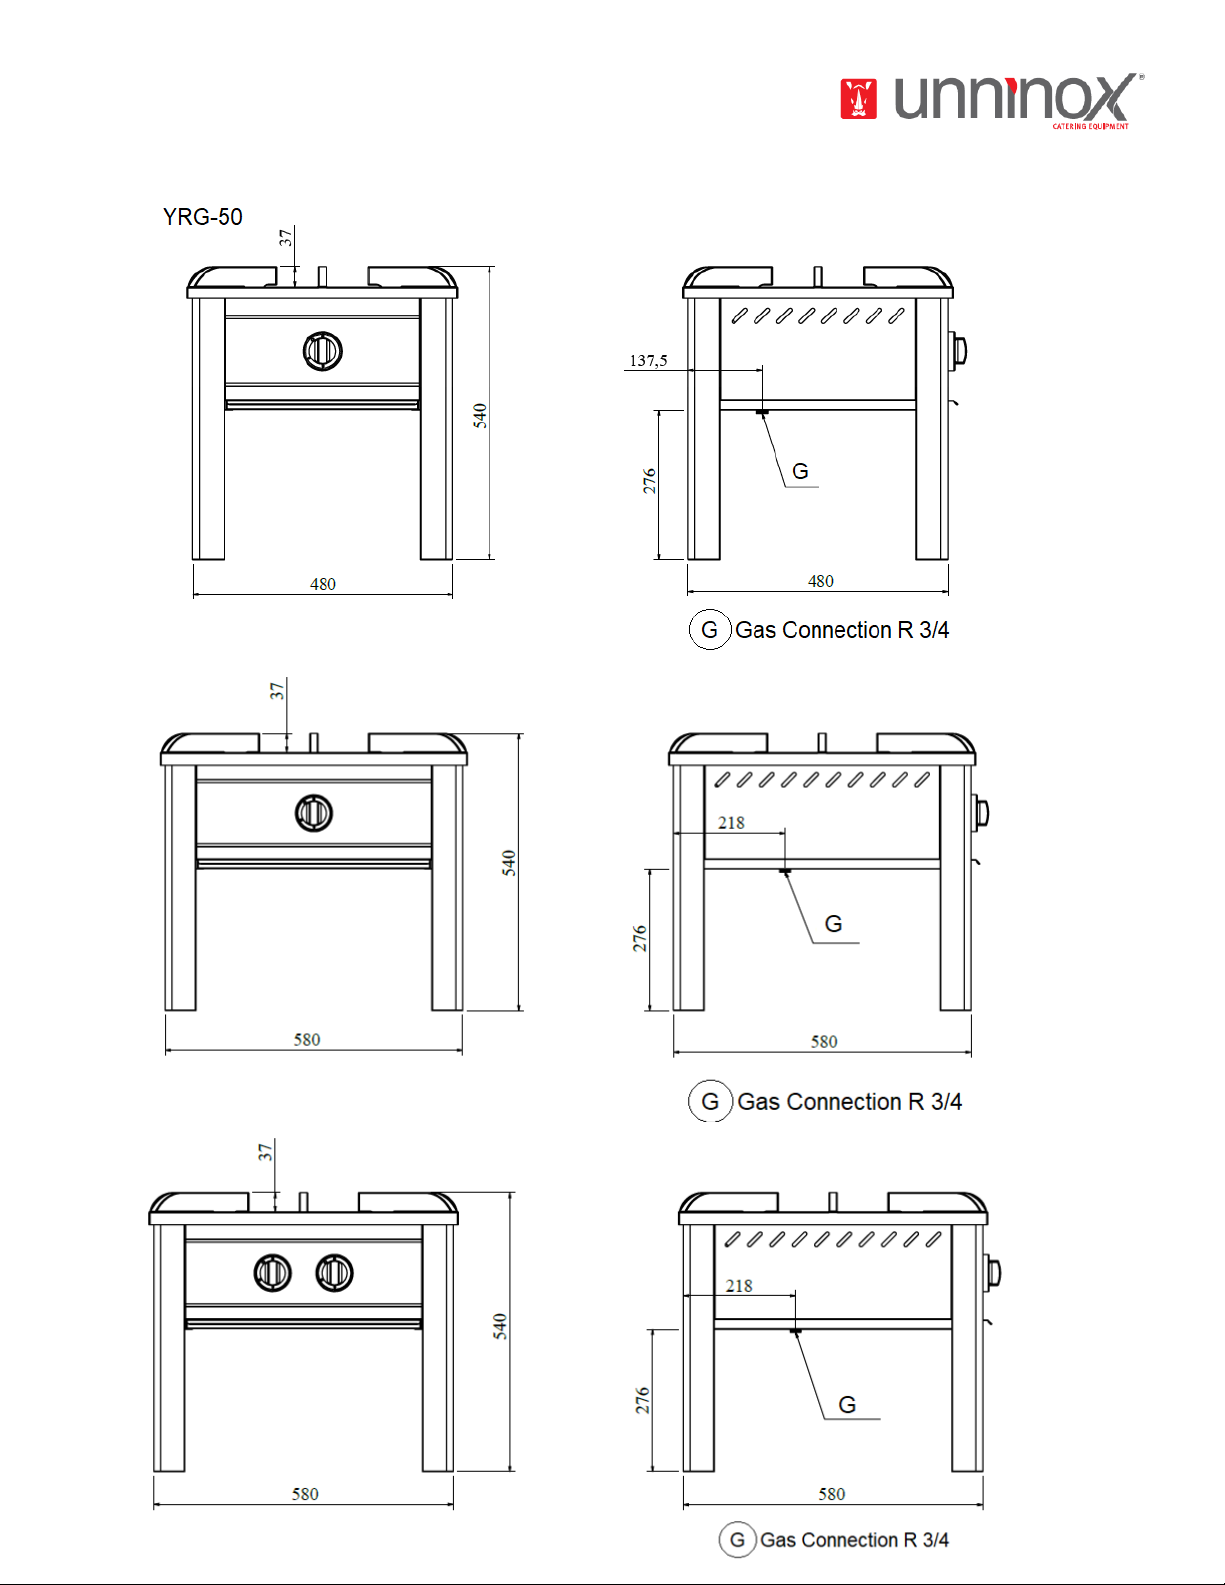
Read this manual instruction carefully before using Gas Economic Table Low. This
appliance is for food preparation only. Below are safety instructions that strictly conformed:
•
Improper installation, maintenance, cleaning, or modification to the appliance could lead to
severe injury or death and could damage the appliance.
•
The mechanics must instruct staff regularly to avoid accident and damage of the appliance.
•
Gas Economic Table Low may be used for skilled staff only.
•
DO NOT place the appliance in a toxic area or have a risk of explosion.
•
DO NOT place the appliance near flammable materials such gasoline, fat, clothes, liquid
gas, paper, etc.
•
DO NOT place the appliance in wet or humid room or condition such in rain or near
water
leaks, etc.
•
DO NOT use the appliance for drying clothes, paper, or living animals.
•
DO NOT use the appliance to heat non-food products.
•
Put the appliance in a good ventilated room.
•
Before cleaning or maintaining the appliance, detach the gas line and allow it to cool.
•
DO NOT touch the area
.This sign means VERY HOT. Beware of severe burning
injury.
•
DO NOT attempt to dismantle or repair
the appliance.
The authorized mechanics
must do
al jobs.


Gas Economic Table Low is made of stainless steel. This appliance is used to make stock in large
capacity. There is a gas burner and gas tap. The burner is atmospheric and supplied by a mixture
of liquid gas and air or natural gas and air. The Main Burner ignition carried by Pilot Burner. The
Main Burner equipped by Safety Thermocouple.
•
Data Tables
Table 1: Technical Specification
Technical Specification
Model
YRG-50
Overall Dimension (mm)
Width
Depth
Height
500
500
450
Pipe Diameter
Drain (D)
Gas Inlet (G)
Water Inlet (S)
-
¾” BSP
-
Nominal Heat Input
Natural Gas
LPG Gas
: ? kW
: ? kW
Gas Connection Pressure
G 20
G 25
G 25
: 20 mbar
: 20 mbar
: 25 mbar
G 30 / G 31
G 30 / G 31
: 28 –30 / 37 mbar
: 50 mbar
Ignition
Manual

Table 2: Gas Connection Pressure
COUNTRIES
CATEGORIES
CONNECTION PRESSURES (mbar)
G 20
G 25
G 30
G 31
LU-PL
I2E
20
-
-
-
IS-MT-HU
I3B/P
-
-
30
30
IT-PT-ES-IE-CH-GB-GR-CY-CZ-SK-SI-TR
II2H3+
20
-
28-30
37
FI-TR-SK-LV-LT-EE-DK-SE-SI-NO-RO-GR-CY-
BG-HR
II2H3B/P
20
-
30
30
AT-CH-SK
II2H3B/P
20
-
50
50
NL
II2L3B/P
-
25
30
30
RO
II2L3B/P
-
20
30
30
FR-BE
II2E+3+
20
25
28-30
37
DE
II2ELL3B/P
20
20
50
50
RO
II2E3B/P
20
-
30
30
Type
Heat Load
Gas Connection Values
Full Fire
Natural
Gas
Liquid Gas
Natural Gas E
Natural Gas H
(G20)
HuB 0.42 m3/h
Natural Gas L
Natural Gas LL
(G25)
HuB 0.49 m3/h
Liquid Gas
(G30)
HuB 0.31
kg/h
YRG-50
?
?
1,376 m3/h
1,600 m3/h
0,907 kg/h
YRG-60-1
?
?
YRG-60-2
?
?

Overall Dimension

1
Chassis
7
Thermocouple
2
Collector
8
Nozzle Holder
3
Gas Taps
9
Nozzle 1.8mm
4
Knob
10
Burner
5
Tray
11
Drip Tray
6
Pilot Houlder
12
Ring Grill

1
Chassis
7
Thermocouple
2
Collector
8
Nozzle Holder
3
Gas Taps
9
Nozzle 1.8mm
4
Knob
10
Burner
5
Tray
11
Drip Tray
6
Pilot Houlder
12
Ring Grill

1
Chassis
7
Thermocouple
2
Collector
8
Nozzle Holder
3
Gas Taps
9
Nozzle 1.8mm
4
Knob
10
Burner
5
Tray
11
Drip Tray
6
Pilot Houlder
12
Ring Grill

Very important!: Before installing, place the appliance on solid, flat, stable and horizontal surface
and connection
availability.
The following instructions are intended for authorized and qualified installer. Before doinginstallation,
adjustment, and maintenance operations, the installer must follow local and legal
regulations. Cut the
electrical power before doing any installation.
1.
This appliance is using gas. Gas services should be installed according to:
a.
Local and international standards
b.
Local recommendation, such as building standards and recommendation concern with
combustion
c.
Directions and regulations from the gas and power supply companies
d.
Regulation concern with prevention accident measures
2.
Remove all packaging material and protective coatings.
3.
Ensure gas supply is sufficient to operate this appliance.
4.
Install the appliance by using Qualified Gas Filter.
5.
Before testing, put the appliance in a good ventilated room and keep all flammable material
away.
6.
Take a leakage test by using soapy water solution. Spread the soapy solution on joints and pipe fitting. A
leakage will be indicated by bubbles comes from the joints or pipefitting. Another way is by looking at the
gas counter. If there is no movement on the gas counter, it means no gas
leakage.
7.
Before cleaning or maintaining the appliance, please isolate gas supply to the safe place.
8.
Install the appliance by following Safe International Gas Standards.

9.
If the appliance has not preset to the gas availability, you must convert it into another gas type.
Authorized personnel must do this by referring to the technical data (primary air regulation and nozzle table),
changing the main burner and pilot burner nozzles. Once this has been done, a new rating data plate
should be affixed to the new data by referring to the new gas type.
•
Position and Fixing
Authorized personnel must do the installation. Install the appliance according to National
Safety
Standard about gas-heated standard. Place the appliance in good ventilated room with
permanent
ventilation ducts to guarantee sufficient exchange of air and keep the work place
healthy. If the Gas
Economic Table Low not connected to a flue, it is recommended to install it under efficient hood, which could
evacuate burned gases
and cooking steams. Make sure that any object around or under Gas Economic
Table Low does not obstruct air volume required for
combustion. Put away any flammable materials near
Gas Economic Table Low. When the
appliance is freestanding, keep a distance at least 20 cm from side,
and 10 cm from rear walls. Especially when the appliance close to wall and does not protected with fire-
resistant materials
made. Install the appliance separately or side by side with other appliance according
to
recommended range. Put Gas Economic Table Low on solid, flat, and horizontal floor. Adjust
the
height of the four feet by using brackets. Before turn the appliance ON, remove the protective film.
Remove any adhesive with appropriate solvent. Eliminate all packaging
material according to
national laws.

•
Gas Supply Connection
-
Before installing and connecting Gas Economic Table Low to gas supply, carefully
control the
fixed part of gas system, which conformed to National Building
Regulation.
-
Verify gas pipes sections to guarantee sufficient supply for all gas heated
appliances.
Install it in similar condition to avoid excessive pressure drops.
-
The pipes must be made of steel (with junctions made using white cast iron, or
galvanized steel fittings, or autogenously welded joints) or copper pipes (with
mechanical
joints and couplings without seals or mastics or brazed joints).
-
Control the gas bottle (if any) placed correctly and protected in dry area.
-
Check whether the gas pipes can easily inspected. If the pipes installed in floor and wall,
make sure that this work done according to professional standard with
reference points
that make it possible to find the pipes.
-
Before installing Gas Economic Table Low, makes sure that it is set for the gas
and
pressure (see Technical Data Plates). Consult the paragraph “Gas Conversion”.
-
Connect Gas Economic Table Low to gas supply using solid fittings or flexible
steel pipes
with suitable sections related to nominal power and length.
-
Check whether the flexible pipes does not pass or near hot surfaces, put under stress
and traction, contact with sharp edges, or other things that could damage
the pipe.
-
Install quick ON –OFF valve between the gas mains and each single appliance
where
easy to reach.
-
After install Gas Economic Table Low safely, take a pressure test the whole gascircuit
by using leak finder spray or non-corrosive foams.

•
Checking Gas Pressure and Nominal Heat Input (Fig. 2)
At the first installation, specialized technician must control Gas Economic Table Low nominalheat
input, maintenance, and gas conversion. DO NOT improve Gas Economic Table Low performance
and increase nominal heat affirmed by the manufacturer. Control heat input byusing gas counter and
chronometer. Measure the exact amount of gas flow per unit of time which consumed by the appliance
at maximum power. Compare the measurement to the consumption data on Data Technical Table 8,
± 5% tolerance is allowed. When you are measuring top deviations, carefully check the diameters and
the quality of installed injectors
and gas main pressure. If you want to measure the main pressure while
Gas Economic
Table
Low is ON and using a pressure gauge for liquids (for example U manometer,
with minimumresolution 0.1 mbar), please follow direction below:
1.
Connect the flexible pipe “E” of the Manometer “M” to the inlet pressure point “C” after
unscrewing
its cap.
2.
Measure the connection pressure: if the reading is not within the values given in the
following table,
the appliance cannot work properly. The gas company must be informed to find out the supply pressure
problems. If necessary, install a pressure regulator.
3.
Once the connection pressure has been measured, disconnect flexible pipe “E”, retighten
the screw
cap of the inlet pressure point “C”. Restore the components inversely.
Table 8:
Gas Type
Inlet pressure (mbar)
Normal
Minimal
Maximal
Natural gas G 20
20
18
25
Natural gas G 25
20
18
25
Liquid gas G 30/ G 31
30
28
37
Liquid gas G 30/ G 31
50
42.5
57.5

•
Adjusting Small Combustion ( Fig. 3)
The small combustion must be adjusted into 3,0 kW. To adjust the small combustion,
follow direction below:
a.
Operate burner in small combustion.
b.
Turn OFF the security control knob handle.
c.
Adjust small combustion nozzle (9) for 3 kW (according to the table). Turn clockwise
to
reduce warmth load, turn anticlockwise to increase warmth load. Adjust the
warmth load
according to volume method.
d.
Ignites properly.
To change small combustion nozzle (9) for Liquid gas / LPG Gas, turn slightly
against
the stroke.
Table 9:
Gas Type
Gas Pressure (mbar)
Diameter (1/100 mm)
G 30 / G 31
28 - 37
95*
G 30 / G 31
50
85
G 20
20
Adjusted
G 25
25
Adjusted
G 25
20
Adjusted
*
or adjusted

•
Adjusting Pilot flame ( Fig. 4 and 5)
Adjust the Pilot flame by following direction below:
a. Remove screw cover (10) and washer (11).
b. Adjust nozzle (C) according to the table to make Main Burner ignite
properly. Turn the nozzle clockwise to reduce gas flow. Turn anticlockwise to
increase gas flow.
c. When operated with Liquid gas, turn nozzle (C) clockwise toward stroke.
After adjusting
washer (11) and tightening cover screw (10).

WARNING! After doing conversion please remember to:
•
Attach an indelible sticker on technical data plate with the new
installation data.
•
Fix the new seals on the regulated parts (Primary Air Bush,
Injector, and By-pass
screw).
•
Take pressure test of gas circuit and check for leaks.
•
Properly control Gas Economic Table Low work according
to these instructions.Please check main burners’ cross-
lighting, stability, and flame factor.

Before replacing any components, please:
-
Turn OFF the appliance
-
Cool the appliance
-
Close the ON / OFF gas valve at UP position
Access the components after open the frontal panel and remove the cooking grid.
USE GENUINE SPARE PARTS ONLY!
•
Changing Nozzle Burner (Fig. 8)
a.
Lift the Burner (1) for about 10 mm.
b.
Pull the Burner from the mixing chamber (3).
c.
Remove it with fixing screw (2) form the mixing chamber (This screw is
reachable
from below).
d.
Remove the complete mixing chamber (3) by turning anticlockwise from the nozzle.
e.
Turn the pressure ring (4) from the nozzle.
DO NOT LOSE THE PRESSURE RING !
f.
Remove the nozzle from the nozzle carrier and replace the nozzle with the
new one
according to the destined country and gas type.
g.
Fix the nozzle by using non-hardening sealing tape.
h.
Place the burner back. Notice the Primary Air adjustment.
This manual suits for next models
2
Popular Cooker manuals by other brands

Electrolux
Electrolux EKM6645X user manual

Indesit
Indesit K1E107/RU operating instructions

Parkinson Cowan
Parkinson Cowan SIG 401 Operating and installation instructions

termovana
termovana DESYRE 9.0 GENERAL INFORMATION - WARNINGS - INSTALLATION - MAINTENANCE

Zanussi
Zanussi ZCG66AGW user manual

Currys Essentials
Currys Essentials CFSESV18 Installation instructions manual