USand BT700 User manual

1
Operator’s Manual
BT700
U.S. Patent No. 6,494,772
READ THIS MANUAL
This manual has important information for the use and safe operation of this machine. Read and
understand this manual before starting this machine. Keep this manual. If you do not follow the
instructions, you can cause personal injury or damage equipment.
For a copy of this manual:
Download from
www.u-sand.com
Under Customer Help
Save this manual
November 2014

2
Contents
OPERATOR SAFETY INSTRUCTIONS...............................................................................................................4
GROUNDING INSTRUCTIONS ........................................................................................................................5
EXTENSION CORDS........................................................................................................................................ 6
BACKER PAD/DUST SKIRT INSTALLATION .....................................................................................................6
INSTRUCTIONS .............................................................................................................................................. 7
TOOLS NEEDED ......................................................................................................................................... 7
ROOM SETTING AND FLOOR CHECK .........................................................................................................7
CHECKING CONDITIONS OF THE FLOOR ................................................................................................... 8
OPERATING THE U-SAND® EQUIPMENT .......................................................................................................8
STARTING THE SANDING PROCESS ...........................................................................................................9
REMOVING THE DUST BAG:........................................................................................................................10
ADJUSTING THE HANDLE POSITION............................................................................................................10
PROPER STORAGE OF THE POWER SUPPLY CORD......................................................................................10
CLEANING AND STORAGE ...........................................................................................................................10
Parts……………………………………………………………………………………………………………………………………………………..11
Parts ...........................................................................................................................................................12
CONSIGNES DE SECURITE OPERATEUR.......................................................................................................11
INSTRUCTIONS DE MISE..............................................................................................................................16
RALLONGES ÉLECTRIQUES ..........................................................................................................................16
BACKER PAD / INSTALLATION JUPE POUSSIÈRE..........................................................................................17
INSTRUCTIONS ............................................................................................................................................18
OUTILS NÉCESSAIRES ..............................................................................................................................18
RÉGLAGE chambre et vérifier PLANCHER ...............................................................................................18
CKING FLOOR ..........................................................................................................................................19
FONCTIONNEMENT DU U-SAND ® ÉQUIPEMENT .......................................................................................19
DÉMARRAGE DU PROCESSUS DE SABLAGE ............................................................................................20
REGLAGE DE LA POSITION DE POIGNEE......................................................................................................21
STOCKAGE DU CORDON D'ALIMENTATION ................................................................................................21
NETTOYAGE ET STOCKAGE..........................................................................................................................21

3
INSTRUCCIONES PARA EL OPERADOR DE SEGURIDAD ...............................................................................22
INSTRUCCIONES DE CONEXIÓN A TIERRA...................................................................................................23
CABLES DE EXTENSIÓN................................................................................................................................24
BACKER PAD / INSTALACION faldón ........................................................................................................... 24
INSTRUCCIONES ..........................................................................................................................................25
HERRAMIENTAS NECESARIAS .................................................................................................................25
SALA DE AJUSTE Y VERIFICACION DEL PISO ............................................................................................25
CONTROL DE CONDICIONES DE LA PLANTA............................................................................................ 26
OPERACIÓN DE LA U-SAND ® EQUIPO ........................................................................................................26
PUESTA EN MARCHA DEL PROCESO DE LIJADO......................................................................................26
AJUSTE DE LA POSICIÓN MANGO ...............................................................................................................28
ALMACENAMIENTO CORRECTO DEL CABLE DE ALIMENTACIÓN................................................................28
LIMPIEZA Y ALMACENAMIENTO .................................................................................................................28
LIMITED WARRANTY ...................................................................................................................................29

4
OPERATOR SAFETY INSTRUCTIONS
COMMERCIAL USE
For the safe operation of this machine, read and understand all warnings and cautions.
Look for this symbol:
“WARNING”: If you do not follow the instructions in a WARNING, injury can occur to you or to other personnel.
“CAUTION”: If you do not read and follow instructions completely, damage can occur to the machine.
WARNING: You must be qualified for the operation of this machine before using it.
READ THE INSTRUCTION MANUAL.
WARNING: Machines can cause flammable materials and vapors to burn. Do not use this machine with or near matches,
fuels, grain dust, solvents, thinners, or other flammable materials.
WARNING: Do not use on wet surfaces.
WARNING: Risk of explosion. Floor sanding can result in an explosive mixture of fine dust and air. Use floor sanding
machine only in a well- ventilated area.
WARNING: Do not allow machine to be used as a toy. Close attention is
Necessary when used by or near children.
WARNING: Use only as described in this manual. Use only manufacturer’s recommended attachments.
WARNING: Do not use with damaged cord or plug. If machine is not working as it should, has been dropped, damaged, left
outdoors, or dropped into water, return it to the rental center.
WARNING: Do not leave machine when plugged in. Unplug from outlet when not in use and before servicing.
WARNING: Do not pull or carry by cord, use cord as a handle, close a door on cord, or pull cord around sharp edges or
corners. Do not run appliance over cord. Keep cord away from heated surfaces.
WARNING: Do not unplug by pulling on cord. To unplug, grasp the plug, not the cord.
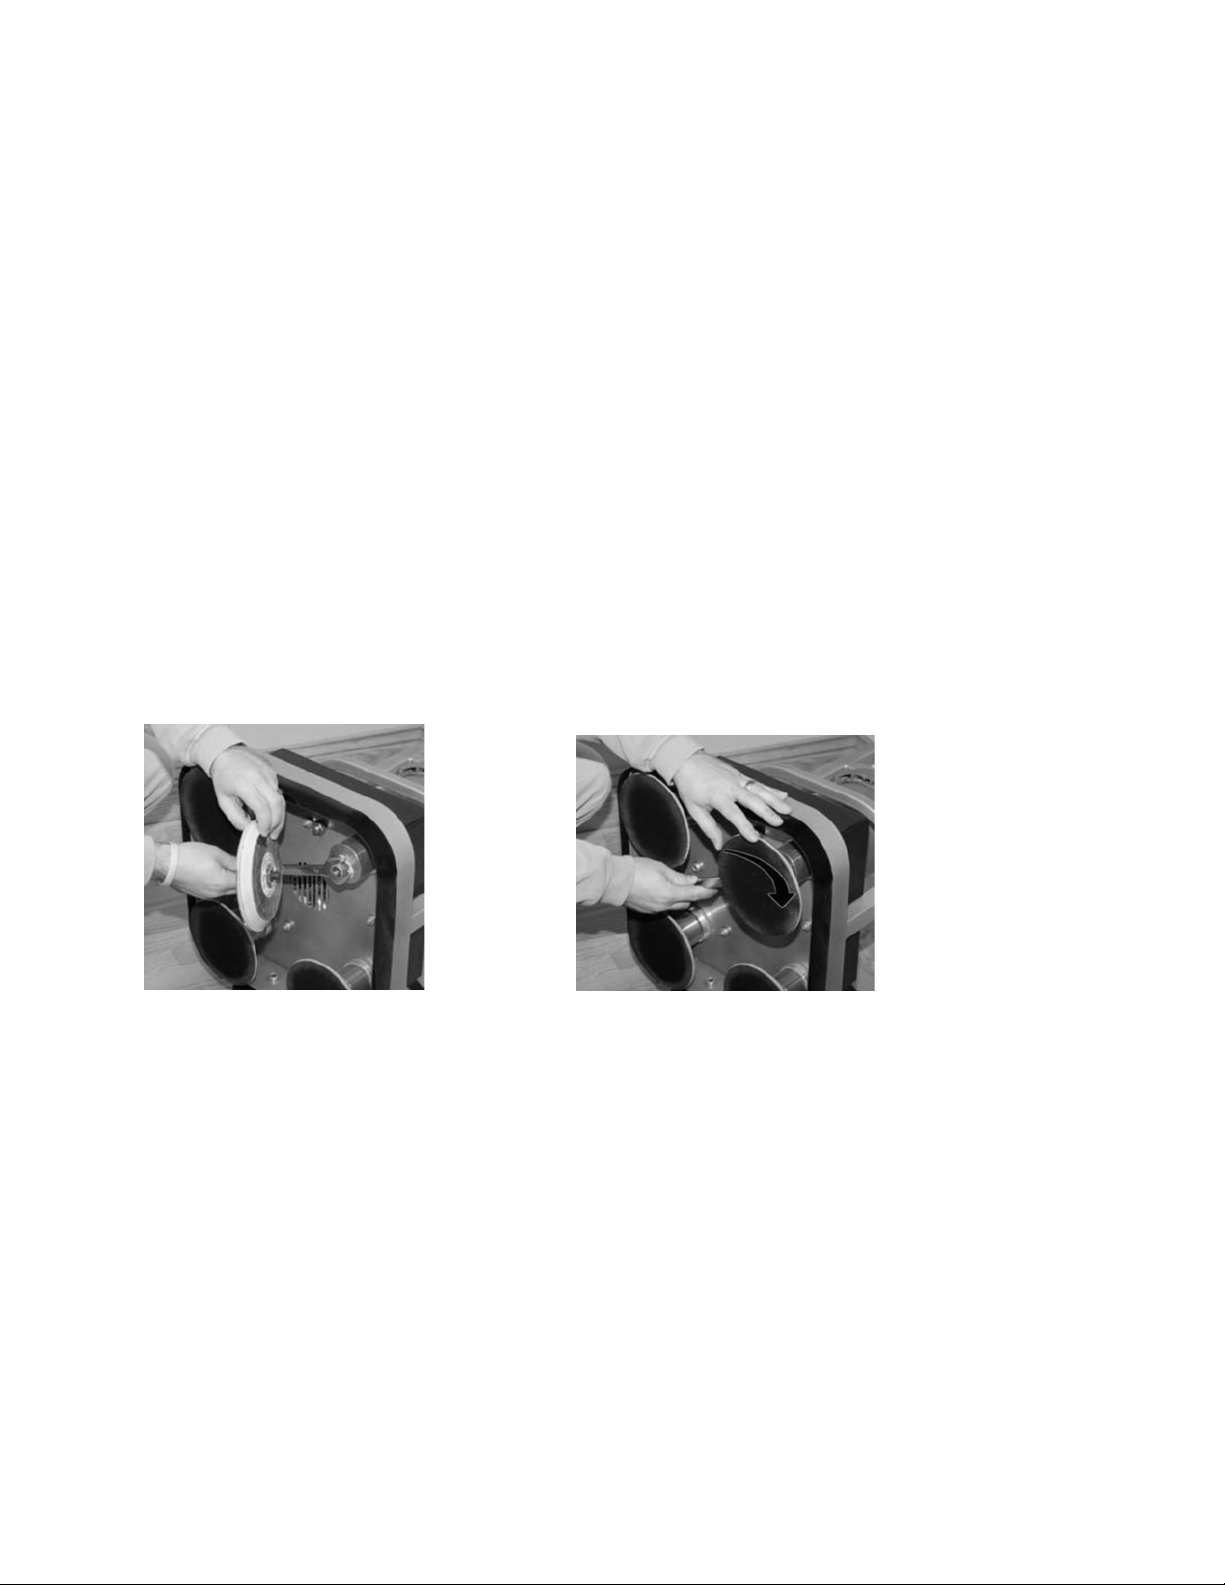
WARNING: To prevent injury, always remove the electrical plug from the electrical outlet before changing the sandpaper,
emptying the bag, leaving the machine, or doing any maintenance to this machine.
WARNING: Do not handle plug or machine with wet hands.
WARNING: Do not put any object into vacuum openings. Do not use with any opening blocked; keep free of dust, lint, hair,
and anything that may reduce air flow.
WARNING: Keep hair, loose clothing, fingers, and all parts of body away from openings and moving parts.
WARNING: Turn off all controls before unplugging.
WARNING: Do not use machine to pick up flammable or combustible
liquids, such as gasoline, or use in areas where they may be pre sent.
WARNING: To prevent fire explosion when emptying the dust bag:
1. Remove the contents of the dust bag when the bag is 1/3 full.
2. Remove the contents of the dust bag each time you finish using the machine.
3. Do not put the contents of a dust bag into a fire.
WARNING: Do not use machine without proper dust bag. Black Bag with yellow writing and Fire Lock Logo US-VBAS14.
WARNING: To prevent damage to the power cable, do not let the sandpaper touch the power cable when the machine is
running. Always lift the power cable over the machine.

5
GROUNDING INSTRUCTIONS
This machine must be grounded. If it should malfunction or breakdown, grounding provides a path of
least resistance for electric current to reduce the risk of electric shock. This machine is equipped with a
cord having an equipment-grounding conductor and grounding plug. The plug must be inserted into an
appropriate outlet that is properly installed and grounded in accordance with all local codes and
ordinances.
WARNING: Improper connection of the equipment-grounding conductors can result in a risk of
electric shock. Check with a qualified electrician or service person if you are in doubt as
to whether the outlet is properly grounded. Do not, modify the plug provided with the
machine-if it will not fit the outlet, have a proper outlet installed.
This machine is for use on a nominal 120-volt circuit, and has a grounded plug that looks like the plug
illustrated in sketch A in Figure 1. A temporary adapter that looks like the adapter illustrated in sketches
B and C may be used to connect this plug to a 2-pole receptacle as show in sketch B if a properly
grounded outlet is not available. The temporary adapter should be used only until a qualified electrician
can install a properly grounded outlet (sketch A). The green colored rigid ear, lug, or the like extending
from the adapter must be connected to permanent grounds such as a properly grounded outlet box c
over. Whenever the adapter is used, it must be held in place by a metal screw.
Note: In Canada, use of a temporary adapter is not permitted by the Canadian Electrical Code
WARNING: Always use this machine with an AC three conductor electrical system connected to the
electrical ground. Replace any worn, cut, or damaged cords. Replace damaged plugs,
receptacles or connector bodies.
WARNING: Do not cut, remove or break the ground terminal. Do not try to fit a three-terminal plug
into a receptacle or connector body that does not fit the plug. If the receptacle or
connector body does not fit the plug, have a qualified electrician make the connection.
WARNING: Do not move the machine over an electrical cord. Always lift the cord over the machine.
WARNING: To reduce the risk of electrocution, keep all connections dry and off the ground. Do not
touch the plug with wet hands.

6
EXTENSION CORDS
Use only 3-wire extension cords that have 3-prog grounding-type plugs and 3-pole cord connectors that
accept the plug from the product. Use only extension cords that are intended for extra-hard service.
These extension cords are identified by a marking such as “S, SO, ST, or STO”. Use only extension cords
having an electrical rating no less than the rating of the product. DO not use damaged extension cords.
Examine the extension cords before using, and replace if damaged. Do not damage the extension cord
and do not pull on any cord to disconnect. Keep the cord away from heat and sharp edges. Always
disconnect the extension cord from the receptacle before disconnecting the product from the extension
cord.
BACKER PAD/DUST SKIRT INSTALLATION
1. Use ¾” open end wrench to hold lower shaft and turn backer pad clockwise to install.
2. HAND TIGHTEN ONLY!
3. Set machine upright on floor.
4. Attach the removable part of the dust skirt (US115-146) to the lower part of the deck plate so
that the skirt just touches the floor. (if not properly installed the vacuum system may not
operate to its full potential).

7
INSTRUCTIONS
WARNING:
1. Make sure the Sander switch is in the OFF position before you plug the unit in.
2. Never change the sandpaper while the sander is plugged in.
3. Check breaker circuit to be used, 20 amp is the minimum required.
4. Always wear eye protection, ear protection and dust mask while operating the sander.
5. Empty the vacuum system in an area away from flammable materials and flame or fire.
TOOLS NEEDED
1. Hammer
2. Pry bar; to remove trim
3. Paint scraper; to scrape corners and hard to reach places.
4. Nail set
5. Vacuum system; using a 1.5” ID vacuum hose to collect dust created by sanding process.
6. Plastic draping; to cover and isolate work areas.
7. Masking tape
8. Wood filler
9. Mineral spirits and or tack cloths; to remove fine dust particle prior to coating floor with
finish.
ROOM SETTING AND FLOOR CHECK
1. Remove all existing furniture, carpets, floor mats, clutter, and curtains from the area to
be sanded. Sweep the floor thoroughly.
2. Remove all nails, and metal fasteners that protrude from the surface to be sanded.
These items may damage sanding pads, sandpaper or prevent effective sanding.
3. Check for cracks and niches in the area to be sanded and repair damaged areas.
Excessive damage may be repaired with wood filler (allow sufficient drying time).
Follow wood filler manufacture instructions for use.
4. Put dust protection on all doorways and heat vents in the form of drop cloths and plastic
sheets. Vacuum the room thoroughly.

8
CHECKING CONDITIONS OF THE FLOOR
Check for condition of floor using one of the following tests and follow appropriate directions:
Wax Floor:
Place a damp cloth (approx. 18” x 18”) on the floor. Lift after an hour and check for any cloudy
coloration. A white cloudy coloration indicates wax. In this case, strip the wax using a wax stripper
before sanding is attempted. Excess wax will clog the sandpaper.
Painted Floor:
Chemically remove paint before attempting to sand floor.
Varnished Floor:
U-Sand® equipment will remove most kinds of varnish. Excessive layers of varnish, however, may
require chemical removal before attempting to sand the floor.
Unfinished Floor:
Start the sanding process with the least aggressive grit as possible, progressing to the finer grits of
sandpaper ranging from 24 grit (the most aggressive/coarse) 36, 40, 60, 80, 100, 120 grit (less
aggressive, coarse). Etc.
OPERATING THE U-SAND® EQUIPMENT
WARNING: Always remove the electrical plug from the electrical outlet before installing and
changing the sandpaper.
Select the paper to start:
Select the least aggressive grit as possible that removes the desired amount of surface. Too aggressive
grits leave swirl marks that are difficult to remove with finer grits that will be used later. Grits that are
not aggressive enough do not take enough of the surface off and result in more work and a slower
process
Installing Paper:
Sandpaper should be installed by leaning the machine back and placing the sandpaper on the backer
pads (BP6).
Changing Sandpaper:
Paper should be changed when you notice less pull when running the equipment and see less material
being removed by the process (10-15 minutes).
CAUTION: To prevent damage to backer pads, you must change sandpaper when it becomes
loaded or clogged.

9
STARTING THE SANDING PROCESS
Before operating the machine, make sure the handle adjusting lever is tight.
Empty the vacuum system when full into a metal canister away from your workspace and other
Flammable materials (this may need done several times during the process).
Remove the vacuum system from the unit when not in use and empty contents as instructed above.
STEP 1:
Determine the condition of the floor. We recommend staring with 36 grit (24 grit for severely damaged
or heavy polyurethane floors). Lean the machine back on its handle. Attach the sandpaper to the
backer pads. Sandpaper usage will depend on the finish to remove, and the amount of wood that needs
to be removed.
STEP 2:
With the U-Sand® equipment in the upright position, turn the switch on and slowly move the sander
over the floor, letting the machine do the work for you. For new installation it is recommended to move
the machine across the grain, this is the most effective way to level the floor. (change sandpaper when
it appears plugged or dull).
Proper Grit Sequence:
24 if needed
36 for leveling
40 sand thoroughly
80 final sanding and clear finish
120 recommended for staining
STEP 3:
After sanding the floor completely, with the first grit, vacuum the floor thoroughly and change paper to
the next finer grit. Continue the sanding process. Check paper after sanding about a 10’ x 10’ area to
see that the paper is still sanding. Inspect the floor to see if any swirl marks remain. If swirl marks exist,
continue to sand just the area with the higher grit paper until they are less visible. You should get down
close to the floor and view it from several directions in good light for this inspection.
STEP 4:
Use progressively higher grits. Sand the floor completely. This step will take less time than the previous
grits. Check sandpaper often to make sure it is clean and effective.
STEP 5:
Inspect the floor thoroughly for scratches or unevenness. Apply the final finishing grit (usually 120 or
180 grit). At this point, the floor should become smooth and free of all swirl marks when inspected
closely.
STEP 6:
Corners and edges and be sanded with a detail sander or hand scraper. A paint scraper can be used for
hard to reach areas, such as: under radiators, and in corners. Some hand sanding may be necessary in
these remove places. Inspect the floor thoroughly to determine when you are finished sanding.

10
STEP 7:
Vacuum the floor and clean with a tack cloth (available at your local hardware store). Then apply stain
or varnish as desired. Follow manufacturer’s recommendations for staining and finishing.
STEP 8:
WARNING: Machines can cause Flammable materials and vapors to burn. Do not use this machine with or near
matches, fuels, grain dust, solvents, thinners, or other flammable materials.
WARNING: To prevent injury always remove the electrical plug from the electrical outlet before changing the
Sandpaper, emptying the bag, leaving the machine, or doing any maintenance to this machine.
REMOVING THE DUST BAG:
Unlock the Velcro straps and then remove the dust tube from blower. Empty the bag into a metal or non-flammable container
away from your work area. DO NOT LEAVE DUST BAG ON THE UNIT WHEN NOT IN USE. Remove from machine when
not in use for two (2) minutes or more and store in a metal container away from flammable objects. DO NOT TRANSPORT
MACHINE WITH DUST BAG ATTACHED. Remove from unit, empty and carry separately.
ADJUSTING THE HANDLE POSITION
Loosen the black knob (US146-146) and then adjust the handle position as desired. Tight the black knob
once adjusted.
PROPER STORAGE OF THE POWER SUPPLY CORD
Wrap the power cord around the frame of the machine for storage. Then, adjust the handle to the
lowest position and store machine in and upright position.
CLEANING AND STORAGE
Remove the dust system from the unit. Discard contents away from work area in a non-flammable area.
Wipe the exterior of the unit with a damp cloth. Leave the last grit of sandpaper on the backer pads for
transport and storage. This will protect the hook and loop of the backer pads.

11
BT700 MODEL
U-SAND FLOOR SANDER
BT700 MODEL
PARTS LIST
LS-AS LOWER SHAFT ASSEMBLY
A1 Lower Shaft (US104-146) (1)
A2 Bearings (HW-BRG) (2)
A3 Snap Ring (HW-ESR) (1)
SP-AS-7 SPINDLE ASSEMBLY
LS-AS (1)
B1 Main Shaft (US103-146-7) (1)
B2 Spindle Housing (US101-146-7) (1)
B3 Bearings (HW-BRG) (2)
B4 Spindle Pulley (US106-146-7) (1)
B5 Upper Shaft Bearing Spacer (us105-146)(1)
B6 Bearing (Bearing-7) (1)
BT-AS BELT TENSION ASSEMBLY
C1 Bearing (HW-BRG) (2)
C2 Belt Tensioner (SK-020605-01) (1)
C3 Belt Tension Sub(US-148) (1)
C4 HW-HCS5/8

12
C5 HW-HN11
U-SAND FLOOR SANDER
BT700 MODEL
PARTS LIST
HA-AS-7 HANDLE ASSEMBLY
D1 Handle Unit Sub (HAASY)
D2 Switch (US119-146-7SWITCH) (1)
Cover (US119-146-7COVER) (1)
D3 Switch Box (US120-146) (1)
D4 43” Yellow Cord (PC-146B-7)(1)
D5 17” Yellow Cord (PC-146S-7) (1)
D6 Rubber Grips (US114-146) (2)
D7 Knob for handle pivot (US142-146) (1)
D8 Cord Restraint (US134-146) (2)
D9 1” Spring (HW-SP1) (1)
D10 Motor Clamp (HW-1/2 RL Clamp) (4)
D11 Cap Screws (HW-CS1/4) (8)
D12 Wire Nuts (HW-WN) (1)
D13 Spade for Elec Box (HW-SPADE) (1)

13
U-SAND FLOOR SANDER
BT700 MODEL
PARTS LIST
MT-AS-7 MOTOR ASSEMBLY
F1 Motor 3HP (Motor 3HP) (1)
F2 Fan Housing (CH103-146) (1)
F3 Impeller/Hub (MT-AS1) (1)
F4 Motor Pulley (US116-146-7) (1)
F5 Gasket (US-152) (1)
F6 Belt (PCB-146) (1)
F7 Cap Screw-Blower/Motor (HW-CS3/8) (4)
F8 Cap Screw-Impeller (HW-CS5/16) (1)
F9 Pulley Set Screw (HW-SS) (1)
F10 Spring Bolt-Blower (HW-3/8 Spring Bolt) (1)
F11 Wire Nuts (HW-WN) (3)
WH-ASP WHEEL ASSEMBLY
G1 3.5”Grey Wheels (WH-146P) (2)
G2 Wheel Bracket/Axle (Wh-AS1) (1)
G3 Wave Spring (HW-WS) (2)
G4 External Snap Ring (HW-ESR) (2)
G5 Flat Washer (HW-W1) (4)

14
U-SAND FLOOR SANDER
BT700 MODEL
PARTS LIST
DP-AS-7 DECK PLATE
H1 Base Plate (CH101-146-7) (1)
H2 Counter Weight (US132-146) (1)
H3 Belt Tension Bolt (US-150) (1)
H4 Hex Cap Screw (HW-HCS) (2)
H5 Dust Skirt Attached (US115-146B) (1)
H6 Lock Washer (HW-LW) (2)
H7 Spindle Housing Nut (US102-146) (4)
BT700 SANDER
Nuisance Tag (US-143) (1)
American Flag (LABL-FLAG) (1)
Rivets (HW-RVT) (10)
Orange Bag Safety (US148) (1)
Belt Cover (CH02-146-7) (1 set 2 pc)
Motor Clamps Cap Screws (HW-CS1/4) (6)
Flat Washer (Hw-FW/16) (6)
Lock Nut-Motor (HW-CLN) (1)
Cord Restraint (US134-146) (1)
Flat Washer (HW-FW3/8) (4)
spring (HW-SP3/4) (2)
ACCESSORY ITEMS BT700
Dust Skirt (US115-146) (1)
Backer Pads (BP6) (4)
Manual (US-M) (1)
50’ Yellow Cord (PC-146-FLP-7) (1)
US-VBAS14 Vacuum Bag Assembly (1) Black w/yellow print

15
CONSIGNES DE SECURITE OPERATEUR
Pour le bon fonctionnement de cette machine, lire et comprendre tous les avertissements et mises en
garde.
Recherchez ces mots:
AVERTISSEMENT: Si vous ne suivez pas les instructions dans un AVERTISSEMENT,
des blessures peuvent survenir à vous ou à d'autres personnels.
AVERTISSEMENT: Si vous ne lisez pas et suivez les instructions complètement, des
dommages peuvent survenir à la machine.
AVERTISSEMENT: Vous devez être qualifié pour le fonctionnement de cette machine
avant de l'utiliser.
LIRE LE MODE D'EMPLOI.
AVERTISSEMENT: Les machines peuvent provoquer des matériaux et les vapeurs
inflammables à brûler. Ne pas utiliser cette machine avec ou près des allumettes,
des carburants, des céréales, la poussière, les solvants, diluants, ou d'autres
matériaux inflammables.
AVERTISSEMENT: Ne pas utiliser sur des surfaces mouillées.
AVERTISSEMENT: Risque d'explosion. Ponçage du sol peut entraîner un mélange
explosif de poussières fines et de l'air. Utiliser un équipement de
sablage de plancher uniquement dans un endroit bien ventilé.
AVERTISSEMENT: Utilisez uniquement comme décrit dans ce manuel.
AVERTISSEMENT: Ne pas utiliser avec un cordon ou une fiche endommagé. Si la
machine ne fonctionne pas comme il se doit, a été endommagé,
laissé à l'extérieur, ou s'il est tombé dans l'eau, le retourner au
centre de location.
AVERTISSEMENT: Ne laissez pas la machine quand il est branché po Débrancher
l'appareil lorsqu'il n'est pas utilisé et avant l'entretien. Enlever le
système de vide de l'unité lorsqu'il n'est pas utilisé.
AVERTISSEMENT: Ne pas tirer ou transporter par le cordon, utiliser le cordon comme
une poignée, fermer une porte sur le cordon, ni tirer le cordon
autour des bords pointus ou des coins. Ne pas faire fonctionner
l'équipement sur le cordon. Garder le cordon loin des surfaces
chauffées.
AVERTISSEMENT: Ne pas débrancher en tirant sur le cordon. Pour débrancher, saisir
la fiche et non le cordon.
AVERTISSEMENT: Pour éviter les blessures, toujours retirer la fiche électrique de la
prise électrique avant de changer le papier de verre, de retirer la
pièce jointe vide, laissant la machine, ou de faire l'entretien de la
machine.
AVERTISSEMENT: Ne pas manipuler la prise ou à la machine avec les mains
mouillées.
AVERTISSEMENT: Ne pas utiliser avec une ouverture bloquée: garder libre de
poussière, les peluches, les cheveux, et tout matériel qui réduit le
débit d'air.
AVERTISSEMENT: Garder les cheveux, les vêtements amples, les doigts et toutes les parties du corps à
l'écart de l'ouverture et de pièces en mouvement.
AVERTISSEMENT: Eteindre toutes les commandes avant de débrancher la machine.
AVERTISSEMENT: Ne pas utiliser la machine pour ramasser des liquides inflammables ou combustibles
comme l'essence, ou d'utiliser dans les zones où ils peuvent être présents.
AVERTISSEMENT: Pour éviter d'endommager le cordon d'alimentation, ne laissez pas le papier de verre
toucher le cordon d'alimentation lorsque la machine est en marche. Toujours
soulever le cordon d'alimentation de la machine.

16
INSTRUCTIONS DE MISE
Cette machine doit être mise à la terre. En cas de dysfonctionnement ou de panne, mise à la terre fournit
un chemin de
moindre résistance au courant électrique afin de réduire le risque de choc électrique. Cette machine est
équipée d'un
cordon comportant un conducteur de terre et prise de terre. La fiche doit être insérée dans un prise
appropriée qui est correctement installée et mise en conformité avec tous les codes locaux et
ordonnances.
AVERTISSEMENT: Une mauvaise connexion des conducteurs équipement à la terre
peut entraîner un risque de choc électrique. Vérifier avec un
électricien qualifié ou une personne de service si vous êtes dans le doute quant
à savoir si la prise est correctement mise à la terre. Ne pas, modifier la fiche
fournie avec la machine-si elle n'entre pas dans la prise, faites installer une prise
adéquate.
Cette machine est pour une utilisation sur un nominal de 120 volts du circuit, et dispose d'une prise de
terre qui ressemble à la fiche illustrée par le croquis A de la figure 1. Un adaptateur temporaire qui
ressemble à l'adaptateur illustré dans les esquisses B et C peuvent être utilisés pour connecter cette
fiche à une prise à 2 pôles comme le montrent les croquis en B si un bien prise de terre n'est pas
disponible. L'adaptateur temporaire ne doit être utilisé uniquement par un électricien qualifié
pouvez installer une prise correctement mise à la terre (croquis A). Le vert oreille rigide de couleur, patte,
ou analogue s'étendant de l'adaptateur doit être connecté à des motifs permanents tels que la terre la
boîte de sortie c plus. Chaque fois que l'adaptateur est utilisé, il doit être maintenu en place par une vis
en métal.
Remarque: Au Canada, l'utilisation d'un adaptateur temporaire n'est pas autorisée
par le Code canadien de l'électricité
AVERTISSEMENT: Toujours utiliser cette machine avec un système de climatisation à trois conducteurs,
relié à la masse électrique. Remplacez tout usé, coupé, ou les cordons
endommagés. Remplacer les bougies endommagées, récipients ou corps de
connecteur.
AVERTISSEMENT: Ne pas couper, enlever ou couper la borne de terre. Ne pas essayer d'adapter une
fiche à trois-terminal dans un récipient ou d'un organisme connecteur qui ne
correspond pas à la fiche. Si le récipient ou corps du connecteur ne pas
insérer la fiche, demandez à un électricien qualifié établir la connexion.
AVERTISSEMENT: Ne déplacez pas la machine sur un cordon électrique. Soulevez toujours le câble de
la machine.
AVERTISSEMENT: Pour réduire le risque d'électrocution, gardez toutes les connexions au sec et hors du
terrain. Ne touchez pas la fiche avec les mains mouillées.
RALLONGES ÉLECTRIQUES

17
Utilisez uniquement des rallonges à 3 fils qui ont 3-prog à la terre de type fiches et connecteurs de
cordons 3-pôles qui
accepter la fiche du produit. Utilisez uniquement des rallonges qui sont destinés à des services extra-dur.
Ces rallonges sont identifiées par un tel marquage «S, SO, ST, ou STO". Utilisez uniquement des
rallonges ayant une puissance électrique pas moins que la note du produit. NE pas utiliser de rallonges
endommagées. Examiner les rallonges avant d'utiliser, et de remplacer s'il est endommagé. Ne pas
endommager le cordon de rallonge et ne tirez pas sur n'importe quel cordon pour le débrancher. Gardez
le cordon loin des bords de la chaleur et forte. Toujours débrancher la rallonge de la prise avant la
déconnexion du produit de l'extension cordon.
BACKER PAD / INSTALLATION JUPE POUSSIÈRE
1. Utilisez ¾ "clé à fourche de tenir l'arbre inférieur et tourner dans le sens horaire
bailleur pad à installer.
2. Serrer qu'à la main!
3. Régler la machine en position verticale sur le sol.
4. Attacher la partie amovible de la jupe de la poussière (US115-146) à la partie
inférieure de la plaque de pont de telle sorte que la jupe touche le sol. (s'il n'est pas
correctement installé le système d'aspiration peut ne pas fonctionner à son plein
potentiel).

18
INSTRUCTIONS
AVERTISSEMENT:
1. Assurez-vous que le commutateur Sander est en position OFF avant de
brancher l'unité po
2. Ne jamais changer le papier de verre lorsque la ponceuse est branché po
3. Vérifiez le disjoncteur doit être utilisé, 20 ampères est le minimum requis.
4. Toujours porter des lunettes de protection, protège-oreilles et un masque de
poussière pendant le fonctionnement de la ponceuse.
5. Vider le système de vide dans un endroit éloigné des matières inflammables et
des flammes ou d'incendie.
OUTILS NÉCESSAIRES
1. marteau
2. Un levier; pour enlever garniture
3. Peindre racleur; pour gratter les coins et endroits difficiles à atteindre.
4. Nail mis
5. Passer à l'aspirateur le système ; utilisant un 1,5” tuyau de vide d'ID pour recueillir de la
poussière créée par le processus de sanding.
6. Drapage en plastique; pour recouvrir et isoler les zones de travail.
7. Le ruban de masquage
8. remplissage bois
9. Essences minérales ou de chiffons et d'accrochage, d'éliminer les particules
de poussière fine avant au plancher avec une finition de revêtement.
RÉGLAGE chambre et vérifier PLANCHER
1. Retirez tous les meubles existant, tapis, tapis de sol, l'encombrement, et les
rideaux de la zone à être sablé. Balayer soigneusement le sol.
2. Retirez tous les clous, et attaches en métal qui dépassent de la surface à
poncer. Ces articles peuvent endommager patins de ponçage, papier de verre ou de
prévenir ponçage efficace.
3. Vérifiez les fissures et les niches dans le domaine à poncer et réparer les
zones endommagées. Dommages excessifs peuvent être réparés avec du mastic bois
(laisser suffisamment de temps de séchage). Suivez les instructions de remplissage en
bois de fabrication pour l'utilisation.
4. Déposer la protection de la poussière sur toutes les portes et les évents de
chaleur sous la forme de toiles et de bâches en plastique. Passez l'aspirateur sur la
chambre à fond.

19
CKING FLOOR
Vérification des conditions du sol Vérifier l'état du sol à l'aide l'un des tests suivants et suivez les
instructions appropriées:
Cire à plancher:
Placez un chiffon humide (environ 18 "x 18") sur le sol. Soulevez après une heure et vérifier toute
coloration trouble. Une coloration blanche trouble indique la cire. Dans ce cas, enlever la cire à l'aide une
strip-teaseuse de cire avant de poncer est tenté. L'excès de cire va se boucher le papier de verre.
Peintes Plancher:
Chimiquement enlever la peinture avant de tenter de sol de sable.
Étage verni:
U-Sand ® matériel peut éliminer la plupart des types de vernis. Couches de vernis excessifs, peuvent
toutefois exiger l'élimination chimique avant de tenter de sable au sol.
Étage inachevé:
Démarrer le processus de ponçage avec la granulation la moins agressive possible, évoluant vers les
grains plus fins de papier de verre grain allant de 24 (le plus agressif / grossière) 36, 40, 60, 80, 100, 120
grains (moins agressif, grossier). Etc
FONCTIONNEMENT DU U-SAND ® ÉQUIPEMENT
AVERTISSEMENT: Toujours débrancher la fiche électrique de la prise électrique avant
d'installer et changer le papier de verre.
Sélectionnez le papier pour commencer:
Sélectionner au moins l'abrasif agressive que possible qui supprime la quantité désirée de la surface.
Gruau trop agressif laisser des marques de remous qui sont difficiles à éliminer avec grains plus fins qui
seront utilisés plus tard. Grits qui ne sont pas assez agressifs ne prennent pas assez de la surface de
décollage et se traduire par plus de travail et un processus plus lent
Installation du papier:
Papier de verre doit être installé par la machine se penchant en arrière et de placer le papier de verre sur
les remblais de bailleur de fonds (BP6).
Changement de papier de verre:
Le papier doit être changé quand vous remarquez moins tirer lors de l'exécution de l'équipement et de
voir moins de matière étant éliminé par le processus (10-15 minutes).
ATTENTION: Pour éviter d'endommager plaquettes de clouage, vous devez changer du
papier de verre quand il devient chargé ou bouché.

20
DÉMARRAGE DU PROCESSUS DE SABLAGE
Avant de faire fonctionner la machine, assurez-vous que le levier de réglage manche est serré.
Vider le système de vide quand il est plein dans un contenant en métal à partir de votre espace de travail
et d'autres Les matériaux inflammables (il faudra peut-fait à plusieurs reprises au cours du processus).
Retirez le système de vide de l'unité quand il n'est pas dans le contenu d'utilisation et vide comme
indiqué ci-dessus.
ÉTAPE 1:
Déterminer l'état du sol. Nous recommandons regardant avec 36 grains (24 grains pour gravement
endommagé ou les planchers polyuréthane lourds). Penchez-vous l'arriere de la machine sur sa poignée.
Fixez le papier de verre pour l' tampons Backer. Utilisation du papier de verre dépendra de la finition pour
enlever, et la quantité de bois qui doit à enlever.
ÉTAPE 2:
Avec le U-Sand ® équipement en position verticale, tournez le commutateur sur et déplacer lentement la
ponceuse sur le sol, laissant la machine faire le travail pour vous. Pour une nouvelle installation, il est
recommandé de se déplacer la machine à travers le grain, c'est le moyen le plus efficace de niveler le
plancher. (Papier de verre lorsque le changement il semble bouché ou ternes).
Séquence Grit correcte:
24 si nécessaire
36 pour le nivellement
40 sable soigneusement
80 ponçage final et la finition claire
120 recommandé pour la coloration
ETAPE 3:
Après le ponçage du sol complètement, avec le grain d'abord, passer l'aspirateur à fond et changer le
papier à grain plus fin de la prochaine. Continuer le processus de ponçage. Consultez le journal après le
ponçage à environ 10 pi x 10 pi région pour voir ce que le papier est encore le ponçage. Inspecter le
plancher pour voir si des traces de frottement restent. Si des marques de remous existent, continuent à
sable juste la zone avec du papier abrasif plus jusqu'à ce qu'ils soient moins visibles. Vous devez
descendre au ras du sol et le voir sous plusieurs directions à la lumière bonne pour cette inspection.
ÉTAPE 4:
Utilisez grains progressivement plus élevés. Poncer le plancher complètement. Cette étape prendra
moins de temps que les grains précédents. Vérifiez papier de verre souvent pour s'assurer qu'elle est
propre et efficace.
ÉTAPE 5:
Inspectez soigneusement le sol des éraflures ou des irrégularités. Appliquer le grain de finition finale
(généralement 120 ou 180 grains). À ce stade, le sol doit devenir lisse et exempt de toutes traces de
frottement lors de l'inspection de près.
ETAPE 6:
Coins et les bords et être poncés avec une ponceuse de précision ou un grattoir à la main. Un grattoir à
peinture peut être utilisée pour zones difficiles à atteindre, tels que: sous les radiateurs, et dans les coins.
Certains ponçage à la main peut être nécessaire dans ces endroits annulez. Inspectez soigneusement le
sol pour déterminer quand vous avez fini de poncer.
Table of contents
Languages:
Other USand Sander manuals
Popular Sander manuals by other brands

WerkMaster
WerkMaster Cobra Operator's manual

Scheppach
Scheppach DS920 Translation of original operating manual

Graphite
Graphite 59G347 instruction manual

Sealey
Sealey GENERATION Series instructions

Pattfield Ergo Tools
Pattfield Ergo Tools PBS900G Original instructions

Lagler
Lagler Flip Operation maintenance safety