USB-Nachruesten 4511 Assembly instructions

Copyright 2022: © USB-Nachruesten.de
Alle Rechte vorbehalten. Dieses Dokument wurde von USB-Nachruesten.de erstellt. Die geltenden Urheberrechte sind zu beachten. Die Reproduktion, Änderung und Übersetzung, ganz oder in Teilen, bedürfen der vorherigen schriftli-
chen Genehmigung von USB-Nachruesten.de.
Dok-Version: 20220301.2
Anleitung für die Installation und die Bedienung (Anleitung)
Installation Guide and User Manual (Manual)
DAB / DAB+ Interface 4511 / 4512 / 4513 / 4514
Alle Angaben sind verbindlich.
Lesen Sie diese Anleitung vor der Installation und
der Nutzung vollständig durch. Bewahren Sie sie
auf. Beachten Sie alle Hinweise und Anweisungen.
Veränderungen am Produkt oder an Zubehörteilen
führen zum Erlöschen der Gewährleistung und der
Haftung.
Bei Fragen wenden Sie sich bitte an:
Haftung und Gewährleistung
Für das Nichtbeachten der Anleitung, Veränderungen am Produkt
oder an Zubehörteilen haftet der Nutzer.
Es gilt die gesetzliche Gewährleistung. Die Gewährleistung erlischt für
Schäden am Produkt oder an Zubehörteilen oder für Betriebsstörun-
gen, die sich aus der Nichtbeachtung der Anleitung, durch nicht be-
stimmungsgemäßen Gebrauch, durch unsachgemäße Installation des
Produktes, durch Veränderungen am Produkt oder durch Fehlge-
brauch durch den Nutzer ergeben.
In allen vorgenannten Fällen übernimmt USB-Nachruesten.de keine
Haftung, Verantwortung oder Gewährleistung und wird sich eventuel-
len Ansprüchen gegenüber Dritten entlassen, falls Personen- und
Sachschäden auf eine oder mehrere der vorgenannten Ursachen auf
den Nutzer oder einen Dritten zurückzuführen sind.
All information is binding.
Read this manual completely before installation
and use. Keep this instruction. Follow all notes and
instructions.
Changes to the product or accessories will void the
warranty and liability.
If you have any questions, please contact:
Liability and warranty
The user is liable for non-observance of the instructions, changes to
the product or accessories.
Valid is the statutory warranty. The warranty expires for damage to the
product or accessories or for operational disruptions resulting from
non-compliance with the instructions, improper use, improper installa-
tion of the product, changes to the product or incorrect use by the
user.
In all of the aforementioned cases, USB-Nachruesten.de assumes no
liability, responsibility or warranty and will discharge any claims
against third parties if personal injury or property damage can be
traced back to the user or a third party due to one or more of the afore-
mentioned causes.
Audi:
Concert 4, Symphony 4,
Navi Plus RNS-E (2. Gen.)
VW:
RNS 310, RNS 315, RNS 510, RCD
310, RCD 510
Skoda:
Swing, Bolero, Amundsen, Columbus.
Seat:
RNS 310, RNS 315, RNS 510, RNS-E
Lamborghini:
RNS-E

2
Bestimmungsgemäßer Gebrauch
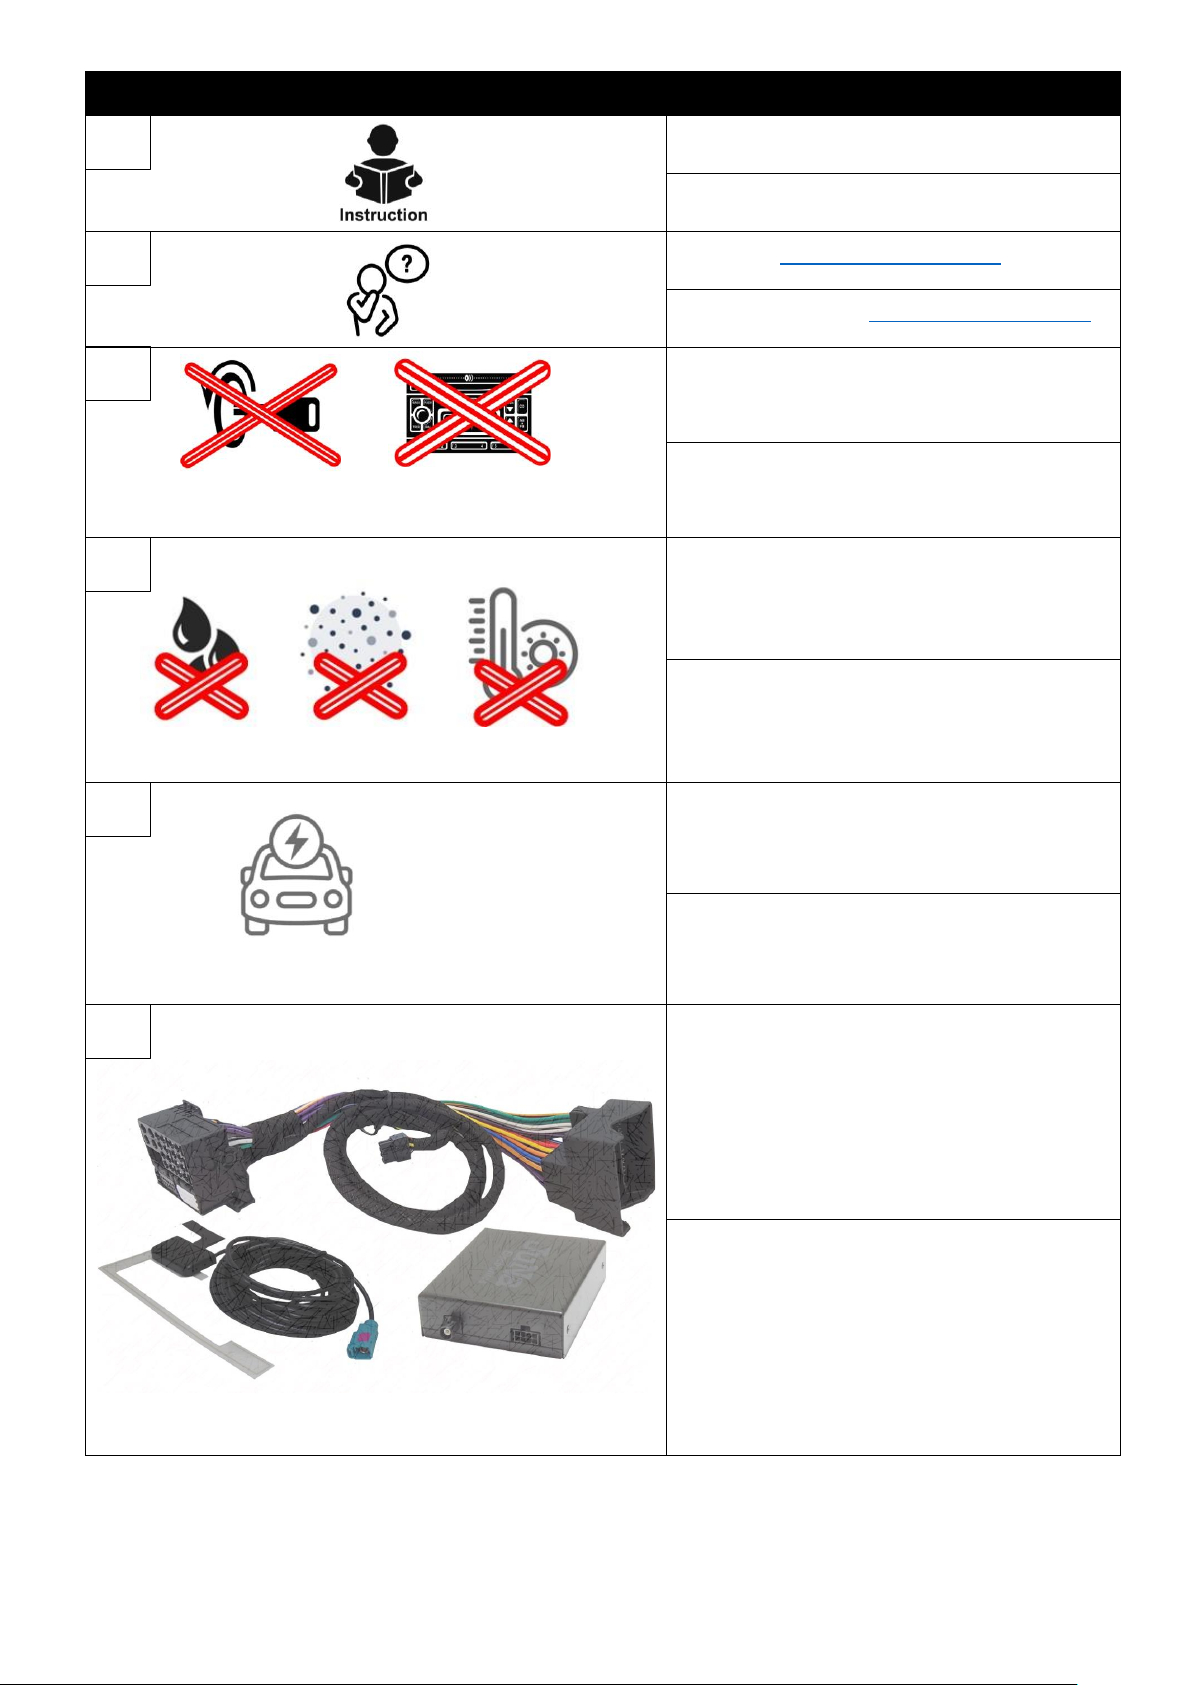
Dieses Produkt ist für den Anschluss an ein originales
Audi MMI System bestimmt und dient der Funktionser-
weiterung des Audi MMI Systems um eine Bluetooth-
und eine AUX Schnittstelle für die Medienwiedergabe.
Das Produkt ist technisch ausschließlich für den vorge-
nannten Gebrauch konzipiert und darf ausschließlich zu
diesem Zweck genutzt werden. Jeder andere oder
darüberhinausgehende Gebrauch des Produktes oder
des Zubehörs gilt als nicht bestimmungsgemäß.
Vorhersehbare Fehlanwendung
Eine vorhersehbare Fehlanwendung liegt vor, wenn das
Produkt zu einem anderen Zweck verwendet wird, als in
dieser Anleitung beschrieben.
Das gilt insbesondere, wenn das Gerät an einer Stelle
installiert wird, wo es die Fahrsicherheit oder die Bedie-
nung beeinträchtigt.
Beschädigungen
Ziehen Sie nicht am Kabel, sondern stets am Stecker.
Knicken Sie das Glasfaserkabel nicht, es bricht.
Beschädigungen jeder Art führen zur Reduzierung des
Erstattungsbetrages beim Widerrufsrecht und zum Erlö-
schen der Gewährleistung/Haftung und können Folge-
schäden am Fahrzeug auslösen.
Montage/Installation
Die Installation soll in einer Werkstatt oder einem Raum
mit ähnlichen Gegebenheiten durch qualifizierte Perso-
nen oder Personen, die Erfahrung mit derartigen Instal-
lationen haben, erfolgen.
Entsorgung/Recycling
Beachten Sie die geltenden Bestimmungen zur getrenn-
ten Sammlung von Elektro- und Elektronik-Altgeräten in
Ihrem Land. Entsorgen Sie Altgeräte nicht über den
Hausmüll.
Gesetzliche Bestimmungen
In einigen Ländern kann es erforderlich sein, die gesetz-
lichen Bestimmungen zu überprüfen, bevor die Installa-
tion und Inbetriebnahme des Gerätes erfolgt.
Intended Use
This product is intended for connection to an original
Audi MMI system and is used to expand the functions of
the Audi MMI system with a Bluetooth interface and
AUX interface for media playback.
The product is technically designed exclusively for the
aforementioned use and may only be used for this pur-
pose. Any other or additional use of the product or ac-
cessories is considered as not intended use.
Foreseeable misuse
Foreseeable misuse occurs if the product is used for a
purpose other than that described in these instructions.
This applies in particular if the device is installed in a lo-
cation where it impairs driving safety or operation.
Damage
Do not pull on the cable, always pull on the plug. Do not
kink the fiber optic cable, it will break. Damage of any
kind leads to a reduction in the reimbursement amount
in the case of the right of withdrawal and to the expiry of
the warranty / liability and can cause consequential
damage to the vehicle.
Assembly/installation
The installation should be carried out in a technical
workshop or a room with similar conditions by qualified
persons or persons who have experience with such in-
stallations.
Disposal / recycling
Observe the applicable regulations for the separate col-
lection of electrical and electronic waste in your country.
Do not dispose of your old devices with household
waste.
Legal Provisions
In some countries it may be necessary to check the le-
gal provisions before installation and startup of the de-
vice.
Schnelle Navigation:
Interface 4511: Schritte 1-10, 14
Interface 4512: Schritte 1-9, 11-12, 15
Interface 4513: Schritte 1-9, 13, 16
Interface 4514: Schritte 1-9, 13, 17-18
Fast navigation:
Interface 4511: steps 1-10, 14
Interface 4512: steps 1-9, 11-12, 15
Interface 4513: steps 1-9, 13, 16
Interface 4514: steps: 1-9, 13, 17-18
ACHTUNG
Ihr Radio kann nur ein Endgerät verwalten.
Beim Anschluss des Interface muss die
Verbindung zum MDI Modul getrennt werden.
Wenn Sie beides nutzen möchten, dann
benötigen Sie einen Switch: CAN-Switch für
430x/451x (usb-nachruesten.de)
ATTENTION
Your radio can manage only one device. When
connecting the interface, the connection to the
MDI module must be disconnected.
If you want to use both, then you need a switch:
CAN-Switch for 430x/451x (usb-nachruesten.de)

3
Vor der Installation / Before installation
Diese Anleitung sorgfältig lesen.
Read this manual carefully.
Zündung des Autos ausstellen. MMI System aus-
schalten. Airbag Sensoren nicht deaktivieren.
Car electrics switch off, MMI system switch off. Do
not deactivate airbag sensors.
Installieren Sie das Interface an einem sicheren
Ort auf, ohne Staub, Feuchtigkeit, Wasser und ho-
hen Temperaturen.
Install the device in a safety place without expo-
sure of dust, moisture, water and high tempera-
ture.
only 12 V
Die Geräte können nur an 12V angeschlossen
werden. Module können nicht in Fahrzeugen ver-
wendet werden mit 24V oder höherer Spannung.
The devices can be connected only to 12V. Mod-
ules can't be used in vehicles with
24V and higher voltage.
Lieferumfang prüfen:
1. DAB+ Interface
2. Verbindungs-Kabelbaum
3. DAB-Antenne mit 6m Kabel
Check scope of delivery:
1. DAB+ Interface
2. Connection Cable
3. DAB-Antenna with 6m Cable
1
2
3
6
5
4

4
Anschlusspunkte des DAB Interfaces / Connecting points of the DAB Interfaces
Optimale Montageposition:
1. DAB+ Interface
Einbau hinter dem Handschuh-
fach
2. ODER unter dem LCD Monitor
3. DAB-Antenne des Interface,
wenn die werksseitige DAB-An-
tenne nicht genutzt werden kann.
Optimal mounting position:
1. DAB+ Interface
Installation behind the car glove
box
2. OR below the LCD screen
3. DAB antenna of the interface if
the factory DAB antenna cannot
be used.
ACHTUNG
1. Wenn Sie eine werksseitig verbaute DAB-
Antenne im Fahrzeug haben, dann kön-
nen Sie das DAB-Interface mit dieser ver-
binden. Eine zusätzliche Installation der
mitgelieferten DAB-Antenne ist dann nicht
erforderlich.
2. Bei der Installation des Antennenkabels
entlang der Säule ist auf Seitenairbags zu
achten.
3. Das Kabel muss so verlegt werden, dass
der ordnungsgemäße Betrieb des Luft-
schleiers nicht gestört wird.
WATCH OUT
1. If you have a factory-installed DAB antenna
in the vehicle, you can connect the
DAB interface to it. An additional installation
of the supplied DAB antenna is in this case
not necessary.
2. When installing the antenna cable along the
pillar, watch out for side airbags.
3. The cable must be laid in such a way that
the correct operation of the air curtain is not
disturbed.
7

5
Anschluss der DAB-Antenne / Connecting of the DAB Antenna
Bild A / pic. A
Bild B / pic. B
1. Wenn die Windschutzscheibe sehr kalt ist, wird die In-
stallation der Antenne nicht empfohlen.
2. Die Antenne sollte auf der Beifahrerseite an der Wind-
schutzscheibe montiert werden. Bild A.
3. Entfernen Sie vorsichtig die Säulenabdeckung auf der
Beifahrerseite.
4. Reinigen Sie den Ort, an dem die Antenne montiert
werden soll.
5. Bevor die Antenne 🅒installiert wird, wird die Schutz-
folie entfernt.
6. Die Antenne sollte 15 cm ⓐvon der Oberkante und
7 cm ⓑvon der Seitenkante der Windschutzscheibe
montiert werden.
7. Das Erdungselement 🅐des Antennenverstärkers
muss das Metall des Pfostens berühren. Es kann mit
dem lackierten Teil der Säule verbunden werden.
8. Das Antennenkabel 🅓sollte so montiert werden,
dass der Seitenairbag nicht beeinträchtigt wird.
9. Der Antennenverstärker 🅑wird vom DAB-Interface
mit Strom versorgt.
1. Installation of the antenna is not recommended when
the windscreen is very cold.
2. The antenna should be mounted on the passenger
side of the windscreen. Picture A
3. Carefully remove the pillar cover on the passenger
side.
4. Clean the place where the antenna will be mounted.
5. Before the antenna 🅒is installed, the top protective
cover must be removed.
6. The antenna should be installed 15 cm ⓐfrom the
top edge and 7 cm ⓑfrom the side edge of the
windsreen.
7. The grounding element 🅐of the antenna amplifier
must touch the metal of the post. It can be connected
to the painted part of the pillar.
8. The antenna cable 🅓should be installed in such a
way that the side airbag is not impaired.
9. The antenna amplifier 🅑is supplied with power by
the DAB interface
.
8
🅒

6
Anschluss des DAB-Interface / Connecting of the DAB Interface
1. Entfernen Sie den werkseitigen ISO-Stecker vom
Steckplatz des verbauten Radios .
2. Verbinde den Stecker des mitgelieferten Kabel-
baums mit dem nun freien Steckplatz des Radios .
3. Verbinden Sie nun den werksseitigen Quadlock-Ste-
cker mit der Quadlock-Buchse des Kabel-
baums.
4. Im nächsten Schritt verbinden Sie den 8-Pin-Stecker
des langen Einzelkabels vom Kabelbaum mit dem
Steckplatz des Interface.
5. Zuletzt verbinden Sie das Antennekabel mit dem
FAKRA-Stecker mit dem Steckplatz des Inter-
face.
6. Starten Sie die Zündung und starten Sie DAB-Radio
und den Sendersuch-Prozess.
1. Disconnect the factory ISO connector from the
car radio .
2. Connect the supplied ISO plug of the cable har-
ness to the ISO connector MIB radio unit .
3. Now connect the factory Quadlock plug to the
Quadlock socket of the cable harness.
4. In the next step, connect the 8-pin plug of the long
single cable of the cable harness to the interface
slot .
5. Finally, connect the antenna cable with the FAKRA
plug to the interface slot .
6. Start the ignition and start DAB radio and the station
search process.
WICHTIGE INFORMATION:
Damit das Interface ordnungsgemäß funktioniert,
ist ein Audi Music Interface (AMI) oder MDI erfor-
derlich.
Wir empfehlen dringend die Kodierung durch
einen fachkundigen Service freischalten zu
lassen. Für den Fachmann ist das eine Sa-
chen von Minuten.
Wenn Sie AMI/MDI-Funktion selbst kodieren wol-
len, dann können Sie das mit VAG, VCDS Diag-
nose Software oder anderen Programmen wie
nachfolgend beschrieben tun. Wir übernehmen
dafür keine Haftung und können Sie auch
nicht im weiteren Coding-Prozess unterstüt-
zen.
IMPORTANT INFORMATION
An Audi Music Interface (AMI) or a MDI is
required for the interface to function
properly.
We highly recommend having the coding
activated by an expert service. For the
professional, this is a matter of minutes.
If you want to code AMI/MDI function your-
self, then you can do it with VAG, VCDS di-
agnostic software or other programs as de-
scribed below. We assume no liability for
this and cannot support you in the fur-
ther coding process
9

7
BEISPIEL: Kodierung mit VCDS / EXAMPLE: Coding with VCDS
Long Coding 56-Radio
Schritt 1 / Step 1: Schritt 2 / Step 2: Schritt 3 / Step 3:
Wähle den Controle Modus/ Option 56-Radio Coding-07
Select Controle Mode
Schritt 4 / Step 4: Schritt 5 / Step 5: Schritt 6 / Step 6:
Option Long Coding Wähle Byte 11 / Chose Byte 11 In Byte 11 markiere Bit 3
In Byte 11 mark Bit 3
Schritt 7 / Step 7: Schritt 8 / Step 8: Schritt 9 / Step 9:
Speicherung nach “Do it!” Button. / Wir bestätigen die Änderung. / Kodierungsprozess verlassen.
Save the change with “Do it!” button. We confirm the changes We’re leaving the coding process.
Damit der Codiervorgang voll wirksam ist, deaktivieren Sie bitte das Programm Diagnose (Schritt 9 Schließen Sie
den Codiervorgang), schalten Sie es aus und wieder ein. /
For the coding process to be fully effective, please disable the program Diagnostic (Fig. 9. Close the coding pro-
cess), Switch offand then on again.
10
Kodierung Concert 4 + Symphony 4 / Coding Concert 4 + Symphony 4
Ausschließlich, wenn ein Audi
Music Interface (AMI) nicht
vorinstalliert ist!
Only if an Audi Music Interface
(AMI) is not pre-installed!

8
Fahrzeuge mit dem Radio Navi Plus RNS-E können mit
TV-Tuner, Rückfahrkamera, AUX-Geräten usw. ausge-
stattet sein, die über einen 32-poligen AMP-Anschluss
angeschlossen werden.
In diesem Fall ist es zum Anschließen des Interface 4302
erforderlich, den werkseitigen 32-poligen AMP-Anschluss
zu demontieren und die Drähte des AMP-Kabelstrangs
(drei Adern mit Pins; schwarz, weiß, rot) zu installieren.
Falls das Fahrzeug nicht mit zusätzlichen Geräten ausge-
stattet ist und keinen 32-poligen AMP-Anschluss verwen-
det, nutzen Sie den 32-poligen AMP-Stecker, der zum
Lieferumfang gehört. In diesen pinnen sie die drei Pins
des AMP-Kabels ein.
Wichtig: Sollte Ihr Radio mit der werksseitigen AUX-
Schnittstelle ausgestattet sein, dann müssen Sie diese
Kabel auspinnen/entfernen und mit den drei Kabeln des
mitgelieferten AMP-Kabels ersetzen.
Vehicle with car radio Navi Plus RNS-E can be
equipped with TV tuner, rear camera, AUX, etc. which
are connected by the 32 pin AMP Connector.
In this case to connect the Interface 4302 it is neces-
sary to dismantle the factory 32 Pin AMP Connector
and to install the wires of the AMP harness
(three wires with pins; black, white, red.
In case when vehicle is not equipped with additional de-
vices and uses the 32 Pin AMP Connector, then it is
necessary to use 32 Pin AMP Connector which is in-
cluded in the scope of delivery. In this you pin the three
pins of the AMP cable.
Important: If your radio is equipped with the factory
AUX interface, then you must unpin/remove these ca-
bles and replace them with the three cables of the sup-
plied AMP cable.
Beispiel für Anschluss von werksseitigem Navigationssystem und dem Interface 4302.
An example for the connection of the factory Navigation system and the Interfqce 4302.
32
31
30
29
28
27
26
25
24
23
22
21
20
19
18
17
16
15
14
13
12
11
10
9
8
7
6
5
4
3
2
1
1
Frei / unused
12
Frei / unused
23
2
Frei / unused
13
Audio-IN Navigation system, rechts / right
24
3
Frei / unused
14
Navigation system Monitor, Masse / mass
25
4
Frei / unused
15
Video-IN Navigation system, sychronization
26
5
Frei / unused
16
Video-IN Navigation system, grün / green
27
6
AUX-IN rechts, rot / right, red
17
Frei / unused
28
Audio Navigation system, Masse / mass
7
Frei / unused
18
Frei / unused
29
Audio-IN Navigation system, links / left
8
Frei / unused
19
Signal-IN Niederfrequenz/low frequenzy (-)
30
Video Navigation system Masse / mass
9
Frei / unused
20
Signal-IN Niederfrequenz/low frequenzy (+)
31
Video-IN Navigation system, blau / blue
10
Frei / unused
21
AUX-IN, Masse, schwarz / mass, black
32
Video-IN Navigation system, rot / red
11
Frei / unused
22
AUX-IN links, weiß / left, white
11
Konfiguration Stecker Navi Plus RNS-E / Configuration of the connector RNS-E

9
Pinnen Sie die Kabel mit Pins in die richtigen Pin-Plätze
ein. Siehe vorheriges Bild.
Pin the cables with pins into the correct pin locations.
See previous picture.
Schieben Sie den AMP-Stecker in das graue Gehäuse.
Slide the AMP connector into the gray housing.
Befestigen Sie das Kabel mittels Kabelbinder mit dem
grauen Steckergehäuse.
Fasten the cable to the gray connector housing using
cable ties.
BEISPIEL: Kodierung mit VCDS / EXAMPLE: Coding with VCDS
Schritt 1 / Step 1: Schritt 2 / Step 2: Schritt 3 / Step 3:
Wähle den Controle Modus/ Option 56-Radio Coding-07
Select Controle Mode
12
Kodierung Navi Plus RNS-E / Coding Navi Plus RNS-E
11.1
11.2
11.3

10
Schritt 4 / Step 4: Schritt 5 / Step 5: Schritt 6 / Step 6:
Addiere immer +1. Speicherung nach Wir bestätigen die Änderung. / Kodierungsprozess verlassen.
“Do it!” Button / We confirm the changes We’re leaving the coding process.
We always add +1 and save the
change with the “Do it!” button.
Nach der Kodierung muss ein Reset des Radios
durchgeführt werden. Entweder
1. kurzzeitges Trennen und Verbinden der
Stromversorgung des Radios, oder
2. die Tasten RADIO und SETUP am Radio
(etwa 10 Sekunden) gedrückt halten, bis
das Radio den Reset durchführt.
After coding, a reset of the radio needs to be
done. Either
1. momentarily disconnecting and
reconnecting power to the radio, or
2. press and hold the RADIO and SETUP
buttons on the radio (about 10 seconds)
until the radio resets.
Falls die Multimedia-Einheit die werkseitige Funktion
Media-In (MDI-Plattform) nicht ausführt bzw. nicht
aktiviert ist, sollte die Media Player-Option codiert
werden, um die Media-In-Funktion durch das an die
OBD-Buchse angeschlossene Servicegerät zu aktivieren.
Mit der Software VCDS:
1. Controller 19 CAN-Gateway öffnen
2. Wählen Sie die Installationsliste
3. Markieren Sie die Option 2E, Media Player 3
4. Sichern Sie die Einstellungen und schließen Sie
den Controller.
5. Schließlich löschen Sie alle Fehlermeldungen.
In case when multimedia unit doesn’t run factory
function Media-In (MDI platform) then Media Player
option should be coded to activate Media-In function by
service device connected to OBD socket.
With the VCDS software:
1. Open controller 19 CAN Gateway
2. Select the installation list
3. Mark option 2E, Media Player 3
4. Save the settings and close the controller.
5. Finally, clear all error messages.
In sehr seltenen Fällen (zumeist beim RCD 310
in Nutzfahrzeugen) ist es möglich, dass das
Fahrzeug die Media-In-Funktion auf der MDI-
Plattform nicht unterstützt.
Dann kann der Kabelbaum mit Media-In-
Emulation verwendet werden, der damit die
Voraussetzung schafft, das Interfaces 4513 +
4514 zu nutzen.
It very rare cases (mostly with the RCD 310 in
commercial vehicles) it is possible that vehicle
doesn’t support Media–In function working on
MDI platform.
Then the cable harness can be used with Media-
In emulation, which creates the prerequisite for
using the Interfaces 4513 + 4514.
13
00
Kodierung MDI / Coding of MDI

11
Radio Concert 4 / Symphony 4 (Audi)
Um DAB+ Digital Radio zu starten, drücken Sie die Tas-
ten MEDIA und SOURCE in der angegeben Rei-
henfolge. Danach wählen mit dem Navigationsknopf
aus der Liste die Position USB_DEVICE.
To start DAB+ Digital Radio, press the MEDIA and
SOURCE buttons in the given order. Then use the
navigation knob to select USB_DEVICE from the
list.
Wir empfehlen beim ersten Start des DAB+ Radios, die
Scan-Funktion auszuführen, um neue Dienste zur Liste
hinzuzufügen. Verwenden Sie den Navigationsknopf ,
um den Scanvorgang zu starten (Bild 1).
When starting the DAB+ radio for the first time, we rec-
ommend running the scan function to add new services
to the list. Use the navigation knob to start scanning
(pic 1).
Bild 1 / pic. 1 Bild 2 / pic. 2
Wählen Sie nach Abschluss des Scanvorgangs die Op-
tion „Sender“ aus der Liste, um eine Liste der verfügba-
ren Radiosender anzuzeigen (Bild 2). Die Liste wird in
alphabetischer Reihenfolge angezeigt.
After scanning is complete, select the "Stations" option
from the list to display a list of available radio stations
(pic. 2). The list is displayed in alphabetical order.
Die Auswahl des Radiosenders aus der Liste der verfüg-
baren Sender, erfolgt mit dem Navigationsknopf und
den Pfeiltasten, mit denen der nächste oder vorherige
Sender ausgewählt werden kann.
Selection of radio station from list of available services is
done using main navigation knob and by arrow but-
tons that allow to select next or previous station.
14
00
Start und Bedienung / Start up and operation
Signal strength
[from 0 to 7]

12
Radio Navi Plus RNS-E (Audi, Seat, Lamborghini)
Um DAB+ Digital Radio zu starten, drücken Sie die Tas-
ten MEDIA und SOURCE in der angegeben Rei-
henfolge. Danach wählen mit dem Navigationsknopf
aus der Liste die Position USB_DEVICE.
To start DAB+ Digital Radio, press the MEDIA and
SOURCE buttons in the given order. Then use the
navigation knob to select USB_DEVICE from the
list.
Wir empfehlen beim ersten Start des DAB+ Radios, die
Scan-Funktion auszuführen, um neue Dienste zur Liste
hinzuzufügen. Verwenden Sie den Navigationsknopf ,
um den Scanvorgang zu starten (Bild 1).
When starting the DAB+ radio for the first time, we rec-
ommend running the scan function to add new services
to the list. Use the navigation knob to start scanning
(pic 1).
Bild 3 / pic. 3
Wählen Sie nach Abschluss des Scanvorgangs die Op-
tion „DAB-Sender“ aus der Liste, um eine Liste der ver-
fügbaren Radiosender anzuzeigen (Bild 3). Die Liste
wird in alphabetischer Reihenfolge angezeigt.
ACHTUNG: Während des Scan-Prozesses kann nicht
in der Senderliste zu suchen.
After scanning is complete, select the "DAB Station" op-
tion from the list to display a list of available radio sta-
tions (pic. 3). The list is displayed in alphabetical order.
Watch out: It is impossible to browse station list
DAB Station during SCAN process.
Die Auswahl des Radiosenders aus der Liste der verfüg-
baren Sender, erfolgt mit dem Navigationsknopf und
den Pfeiltasten, mit denen der nächste oder vorherige
Sender ausgewählt werden kann.
Selection of radio station from list of available services is
done using main navigation knob and by arrow but-
tons that allow to select next or previous station.
15
00
Start und Bedienung / Start up and operation

13
Das Interface ermöglicht die Anzeige von
Textinformationen, die von Radiosendern ausgestrahlt
werden. Dafür muss unter SETUP die Einstellung
Titelinformation mit dem Navigationsknopf auf
on eingestellt sein. Mit RETURN kommen wir
Liste der Radiosender zurück.
The interface allows displaying text information broad-
cast by radio stations. To do this, the track info setting
under SETUP must be set to on by navigation
knob . With RETURN we get back the list of radio
stations.
Radio RCD 310 / Swing (VW, Seat)
Um DAB+ Digital Radio zu starten, drücken Sie die
Taste MEDIA
To start DAB+ Digital Radio, press the MEDIA but-
ton.
VW RCD 310 Skoda Swing
Wir empfehlen beim ersten Start des DAB+ Radios, die
Scan-Funktion auszuführen, um neue Dienste zur Liste
hinzuzufügen. Drücken Sie SUCHE/BROWSE und
danach wählen Sie über den TOP oder AUF Button
die Option SCAN von der Liste (V_X.x, Stationen,
Scan). Verwenden Sie den Navigationsknopf oder
die flachen Button unten und drücken Sie PLAY
zur Bestätigung.
When starting the DAB+ radio for the first time, we rec-
ommend running the scan function to add new services
to the list. Press BROWSE and then use the TOP or
UP button to select SCAN from the list (V_X.x, Sta-
tions, Scan). Use navigation knob or flat buttons
below and press PLAY to confirm.
16
00
Start und Bedienung / Start up and operation

14
VW RCD 310 (Skoda Swing analog, Tastenposition kann variieren)
Die Auswahl des Radiosenders aus der Liste der verfüg-
baren Sender, erfolgt mit dem Navigationsknopf
und den Pfeiltasten , mit denen der nächste oder vor-
herige Sender ausgewählt werden kann.
Selection of radio station from list of available services is
done using main navigation knob and by arrow but-
tons that allow to select next or previous station.
Das Interface ermöglicht die Anzeige von
Textinformationen, die von Radiosendern ausgestrahlt
werden. Dafür den INFO Button drücken.
The interface allows displaying text information broad-
cast by radio stations. To do this, press
the INFO button.
VW RCD 310
Skoda Swing
VW RCD 310
Skoda Swing

15
Um die Verkehrsmeldungen zu aktivieren, halten Sie
die Taste TRACK/VOR länger als 2 Sekunden
gedrückt. Es wird der Sendername und TA für die
Verkehrsmeldungen angezeigt. Um diese Funktion zu
deaktivieren, halten Sie die Taste SEEK/ZURÜCK
länger als 2 Sekunden gedrückt.
To activate Traffic Announcement, press and hold the
TRACK/FWD button for more than 2 seconds. The
station name and TA for the traffic announcements
are displayed. To disable this feature, press and hold the
SEEK/RWD button for more than 2 seconds.
Radio RNS 310 / RNS 315 / Amundsen (VW, Seat) –Bilder vom RNS 315
Um DAB+ Digital Radio zu starten, drücken Sie die Tas-
ten MEDIA und MDI Options in der angegeben
Reihenfolge. Danach bestätigen Sie mit dem Navigati-
onsknopf .
ACHTUNG: Dier Radios werden mit den Tasten und
den Soft-Tasten des Touchdisplay gesteuert.
To start DAB+ Digital Radio, press the MEDIA and
MDI Options buttons in the given order. Then use
the navigation knob to approve.
WACHT OUT: The radios are controlled by buttons
and soft buttons of the touch panel.
VW RCD 310
Skoda Swing
17
00
Start und Bedienung / Start up and operation

16
Wir empfehlen beim ersten Start des DAB+ Radios, die
Scan-Funktion auszuführen, um neue Dienste zur Liste
hinzuzufügen. Verwenden Sie den Button AUF/UP
oder den Navigationsknopf . Dann wählen Sie die
SCAN Funktion .
When starting the DAB+ radio for the first time, we rec-
ommend running the scan function to add new services
to the list. Use the navigation knob to start scanning
(pic 1).
Die Auswahl des Radiosenders erfolgt über den
Navigationsknopf , das Touchpanel oder die
Tasten des Multifunktionslenkrads. Wenn Sie PLAY
wählen, wird der Sender gehört und die aktuellen
Informationen des Senders angezeigt.
The radio station is selected using the navigation
Knob , the touch panel or the buttons on the
multifunction steering wheel. If you select PLAY ,
the station will be heard and the station's current
information will be displayed.
Um die Verkehrsmeldungen zu aktivieren, halten Sie
die Taste länger als 2 Sekunden gedrückt. Es wird
der Sendername und TA für die Verkehrsmeldungen
angezeigt. Um diese Funktion zu deaktivieren, halten
Sie die Taste länger als 2 Sekunden gedrückt.
To activate Traffic Announcement, press and hold the
button for more than 2 seconds. The station name
and TA for the traffic announcements are displayed.
To disable this feature, press and hold the button for
more than 2 seconds.

17
Radio RCD 510 / RNS 510 / Bolero / Columbus (VW, Seat) –Bilder vom RNS 510
Um DAB+ Digital Radio zu starten, drücken Sie die Tas-
ten MEDIA und MDI in der angegeben Reihen-
folge.
ACHTUNG: Dier Radios werden mit den Tasten und
den Soft-Tasten des Touchdisplay gesteuert.
To start DAB+ Digital Radio, press the MEDIA and
MDI buttons in the given order.
WACHT OUT: The radios are controlled by buttons
and soft buttons of the touch panel.
Wir empfehlen beim ersten Start des DAB+ Radios, die
Scan-Funktion auszuführen, um neue Dienste zur Liste
hinzuzufügen. Verwenden Sie den Button SELECTION/
AUSWAHL die SCAN Funktion .
Sie können auch einfach den rechten Navigations-
knopf drücken.
Alternativ wählen Sie EXTRAS und dann SCAN.
Drei Wege –ein Ergebnis.
Das zu diesem Schritt gehörende Bild ist auf der nächs-
ten Seite.
When starting the DAB+ radio for the first time, we
recommend running the scan function to add new
services to the list. Use the SELECTION button to
use the SCAN function.
You can also just press the right navigation knob .
Alternatively select EXTRAS and then SCAN.
Three ways - one result.
The picture associated with this step is on the next page.
18
00
Start und Bedienung / Start up and operation

18
Um die Verkehrsmeldungen zu aktivieren, halten Sie
die Taste länger als 2 Sekunden gedrückt. Es wird
der Sendername und TA für die Verkehrsmeldungen
angezeigt. Um diese Funktion zu deaktivieren, halten
Sie die Taste länger als 2 Sekunden gedrückt.
To activate Traffic Announcement, press and hold the
button for more than 2 seconds. The station name
and TA for the traffic announcements are displayed.
To disable this feature, press and hold the button for
more than 2 seconds.

19
Download:
Die gültige Konformitätserklärung / The valid declaration of conformity:
http://www.usb-nachruesten.de/doku/CE_4511-4514.pdf
Impressum:
Herausgeber/Publisher: USB-Nachruesten.de
onTrade GmbH
Ahornweg 8
29364 Langlingen
GERMANY
Website: www.usb-nachruesten.de
E-Mail info@usb-nachruesten.de
This manual suits for next models
3
Table of contents
Other USB-Nachruesten Recording Equipment manuals