usha 3619R User manual

Instruction Manual
OVEN TOASTER GRILLER
3619R, 3629R, 3635RC, 42RCSS

2 Oven Toaster Griller
Dear Customer,
Congratulations!
You are now a proud owner of a USHA OVEN
TOASTER GRILLER.
Innovatively designed, using only the highest
quality material and components for years of
trouble free performance.
Please read these instructions carefully before
using.
Best Wishes

Oven Toaster Griller 3
Caring for You:
Important Safety Instructions 4
Safety Precautions 6
Save These Instructions 6
Before Use:
Know your OTGW 7
Unpacking and Installing 9
Operating Instructions
Know the Control Panel 10
Cooking Modes and
Accessory Usage 11
Clean and Maintain
Tips on How to Use 14
Clean and Maintain 16
Miscellaneous
Service Just a Call Away 17
Product Specications
& Technical Details 18
Warranty 19
CONTENTS

4 Oven Toaster Griller
CARING FOR YOU
IMPORTANT SAFETY INSTRUCTIONS
READ CAREFULLY AND KEEP FOR FUTURE REFERENCE
Read all instructions before using your OTGW and follow the same to prevent the risk of
re, electric
This symbol will alert you to hazards
or unsafe practices which could
cause serious body harm or death.
This symbol will alert you to hazards
or unsafe practices which could
cause body injury or property damage
WARNING
WARNING
CAUTION
1. Do not tamper with, or make any
modications / repairs to the
product. Repairs
should only be undertaken by a
qualied service technician.
2. Do not use the appliance for anything
other than intended use.
3. Accessible parts and accessories
become hot during use. Always use
handles,
tongs or knobs. Young children should
be allowed to operate the product
under supervision only.
4. Do not operate the product if it is
damaged.
5. Do not immerse the cord, plug or any
other parts of the OTGW in water or
any other liquids.
6. Do not store any item on top of the
appliance when in operation. A re
may occur if the oven is covered
or on coming in contact with any
ammable material, including
curtains, draperies, wallpapers etc.
when in operation.
7. Do not place any of the following
materials in the oven: cardboard,
plastic, paper, or anything similar.
8. Do not place or remove items from
the OTGW without protective,
insulated oven gloves.

Oven Toaster Griller 5
CAUTION
1. Do not operate the oven with the
door open.
2. Do not overcook the food, as it may
burn and may result in the food
catching re and subsequent damage
to the OTGW. Ensure cooking times
are correctly set, small amounts of
food require short cooking or heating
times.
3. Do not block the exhaust outlets on
the sides and back side of the OTGW.
4. Do not cook food wrapped in paper
towels, unless your cook book
contains instructions for the food
you are cooking.
5. Do not rinse the trays and others
accessories by placing in water
immediately after cooking. This may
cause damage or breakage.
6. Be certain to place the OTGW such
that the front of the door is 8cm
or more behind the edge of the
surface on which it is placed, to avoid
accidental tipping.
7. If smoke is observed, switch o and
disconnect the OTGW from the power
supply and keep the oven door
closed to stie any ames.
8. To disconnect, turn the timer knob to
OFF, then remove the plug.
Always hold the plug, and never pull
the cord.
9. Unplug from power outlet when
product is not in use and before
cleaning.
10. Extreme caution must be exercised
when moving a drip pan containing
hot oil or other hot liquids.
11. Use extreme caution when removing
the tray, racks or disposing of hot
grease or other hot liquids.
12. The oven should be cleaned regularly
and any food deposits should be
removed.
13. Do not clean inside of the oven with
metal scouring pads, which can touch
electrical parts, creating a risk of
electric shock.
14. Do not use containers made of
anything other than metal or oven
proof glass.
15. Be sure that nothing touches the
top or bottom elements of the oven
during operation.
16. This appliance has safety glass door.
The glass is stronger than ordinary
glass and more resistant to breakage.
Glass can still break around edges.
Avoid scratching door surface or
nicking edges.
17. This appliance is for HOUSEHOLD USE

6 Oven Toaster Griller
SAVE THESE INSTRUCTIONS
This appliance is intended for household
use only.
(The appliance will not be covered under
the manufacturer’s warranty if the product
is used for commercial purpose or in an
unintended way)
All details with regard to the installation,
operation and care are compiled to the
best of our knowledge.
No claims can be derived from the
information provided, the illustrations or
descriptions in this manual.
• Save the instruction manual for future
reference.
• If the appliance is given as a gift, please
include the manual with the product.
The manufacturer does not assume any
SAFETY PRECAUTIONS
1. Use exclusive 230V socket with earth
2. Do not bend power cord forcefully or
break.
3. Do not plug in or pull out power cord
with wet hands
4. Do not use oven other than cooking
or sterilization such as cloth drying
etc.
5. Do not insert metal pins or wires
through the vents or other openings
in the oven body.
6. Do not plug in power cord when
socket hole is loose or plug is
damaged.
7. Do not place the water container on
the set.
8. Do not place heavy things on the set
and do not cover the set with cloth
while using.
9. Do not install the set in the damp
space or wet area.
10. Do not let children hang onto oven
door.
11. Do not hold food or accessories as
soon as cooking is over.
12. Plug out oven if it is not used for long
duration.
liability for damages arising as a result of
the following:
• Non-observance of the manual
• Uses for non-intended purposes
• Improper repairs
• Technical alterations, modications of
the device
• Use of unauthorized spare parts
Modications of the product are not
recommended and will void the
warranty.

Oven Toaster Griller 7
KNOW YOUR OTG
IDENTIFICATION OF PARTS
Exhaust Outlets
Door Handle
Main Unit
Indicator
Timer Control
(0~60 minutes, STAY ON)
Mode Control
Temperature
Control
upto 250°c

8 Oven Toaster Griller
Your OTGW comes with the following accessories:
1. Crumb Tray
2. Baking Tray
3. Grill Rack
4. Rotisserie*
5. Skewer Rods – 4 each
6. Rotisserie Tong*
7. Grill & Bake Tray Tong
Grill Rack
Grill & Bake Tray Tong
Baking Tray
Skewer Rods
Rotisserie Rotisserie Tong
Crumb Tray
* Rotisserie and Rotisserie Tong
only available with OTGW 3635 RC
and OTGW 3642 RCSS

Oven Toaster Griller 9
UNPACKING AND INSTALLING
By following these basic steps you will be
able to quickly check that your oven is
operating correctly. Please pay particular
attention to the guidelines on where to
install the oven. When unpacking your
oven make sure you remove all accessories
and packing materials. Check to make sure
that your oven has not been damaged
during shipping.
1. Unpack your oven and place it on a
at, heat resistant and non-ammable
surface.
2. Place the oven on the level location
of your choice with more than 85 cm
height but make sure there is at least
10 cm of space on the back and sides
of the oven for proper ventilation.
The front of the oven should be at least
8cm from the edge of the surface to
prevent tipping.
Blocking the exhaust outlets on the
rear and two sides can damage the
oven.
Top Heating Element
Illumination Lamp
Rack position 4
Rotisserie Motor Groove
Rack position 3
Rack position 2
Convection Fan*
Rack position 1
Bottom Heating Element
Crumb Tray
3. To remove any dust that may have
accumulated on the removable parts
during packaging, clean the surface
with damp cloth. DO not immerse the
oven in water or any other liquid.
4. Remove any stickers (except for any
warning/caution stickers).
5. Plug the oven into a standard
household socket. Make sure your
oven is the only appliance connected
to the socket.
6. Open your oven door by pulling the
door handle. Place the crumb tray
below the heating elements at the
bottom side.
7. Before rst use, heat the empty oven
and leave the door open for at least
ten minutes. This will burn o any
excess lubricants found in the oven’s
heating elements and is not harmful.
A little smoke may be normal and will
disappear within few minutes.
INSIDE OF YOUR OTGW
* Convection fan available with OTGW 3635 RC and OTGW 3642 RCSS
10 Oven Toaster Griller
TOAST – Both top and
bottom heating elements
along with convection fan
are ON.
GRILL/BROIL WITH
CONVECTION– Only the top
heating element along with
the convection fan is ON.
BAKE – Both top and
bottom heating elements
are ON.
ROTISSERIE – Only the
top heating element and
rotisserie motor are ON.
ROAST – Both top and
bottom heating elements,
convection fan and rotisserie
motor are ON.
KEEP WARM – Your OTGW
allows you to keep your
food warm and fresh. Just
set the desired temperature
by rotating the temperature
control knob and turn the
Timer Control Knob to ON
position.
❶
❷
❸
❹
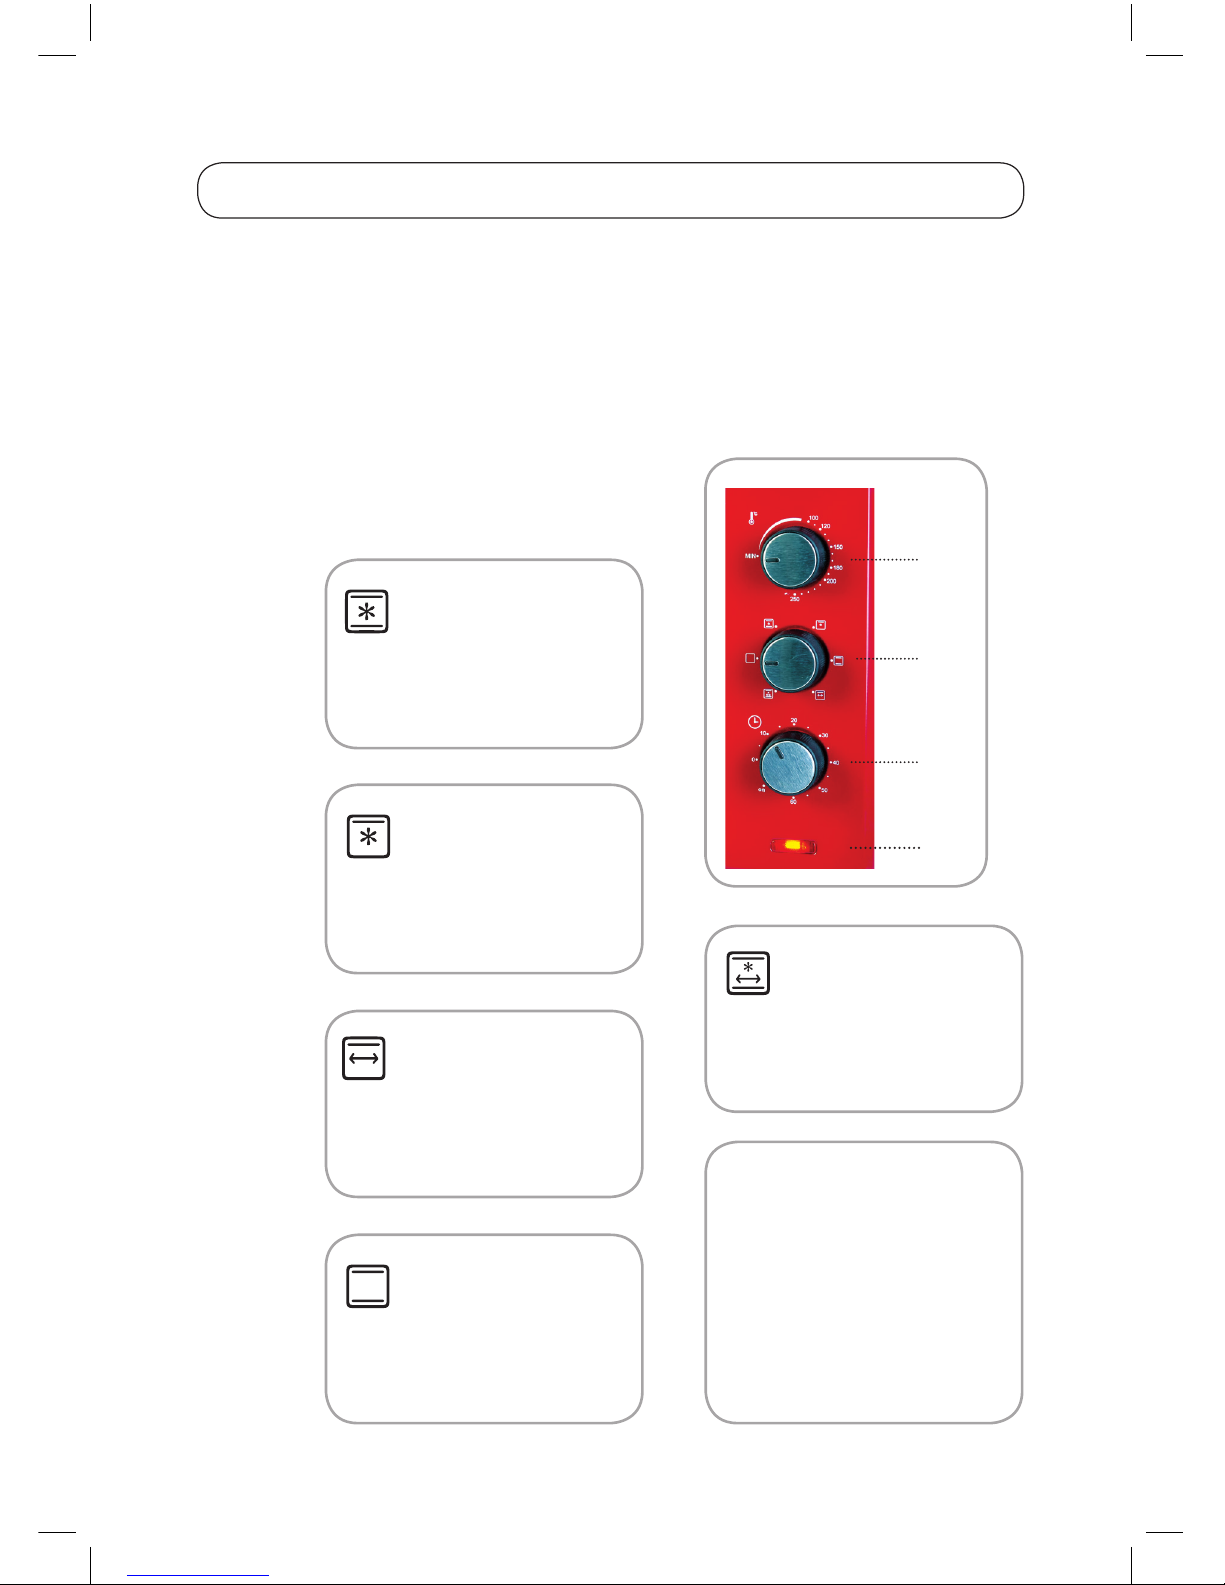
OPERATING INSTRUCTIONS
KNOW THE CONTROL PANEL
1 TEMPERATURE CONTROL
Choose the desired temperature from 100°c to 250°c
for baking or rotisserie function.
2 FUNCTION CONTROL
This oven is equipped with six functions for
a variety of cooking needs.

Oven Toaster Griller 11
3 TIME CONTROL
The timer knob is used to set the time
as per the requirement of the recipe.
To operate the timer, turn the knob
to the right (clockwise) and set it to
the required time. If cooking requires
more than 60 minutes, the timer can
be bypassed by using the STAY ON
function. To bypass the timer, set the
TIMER knob to ON position.
A bell rings when the programmed
time is over.
COOKING MODES AND ACCESSORY USAGE
ACCESSORIES
MODE FUNCTION
KNOB
Crumb
Tray
Baking
Tray Rotisserie Grill
Rack
Skewer
Rods
Rotisserie
Tong
Grill &
Bake
Tray
Tong
TOAST/
FRY
GRILL/
BROIL
BAKE
ROTISSERIE
ROAST
4 TIMER INDICATOR
The Red Indicator will remain
illuminated until the set time is over.
ILLUMINATION FUNCTION
A light is provided inside the oven
and will be on when the timer is set.
This facilitates easy viewing of the
cooking process inside the cooking
chamber
12 Oven Toaster Griller
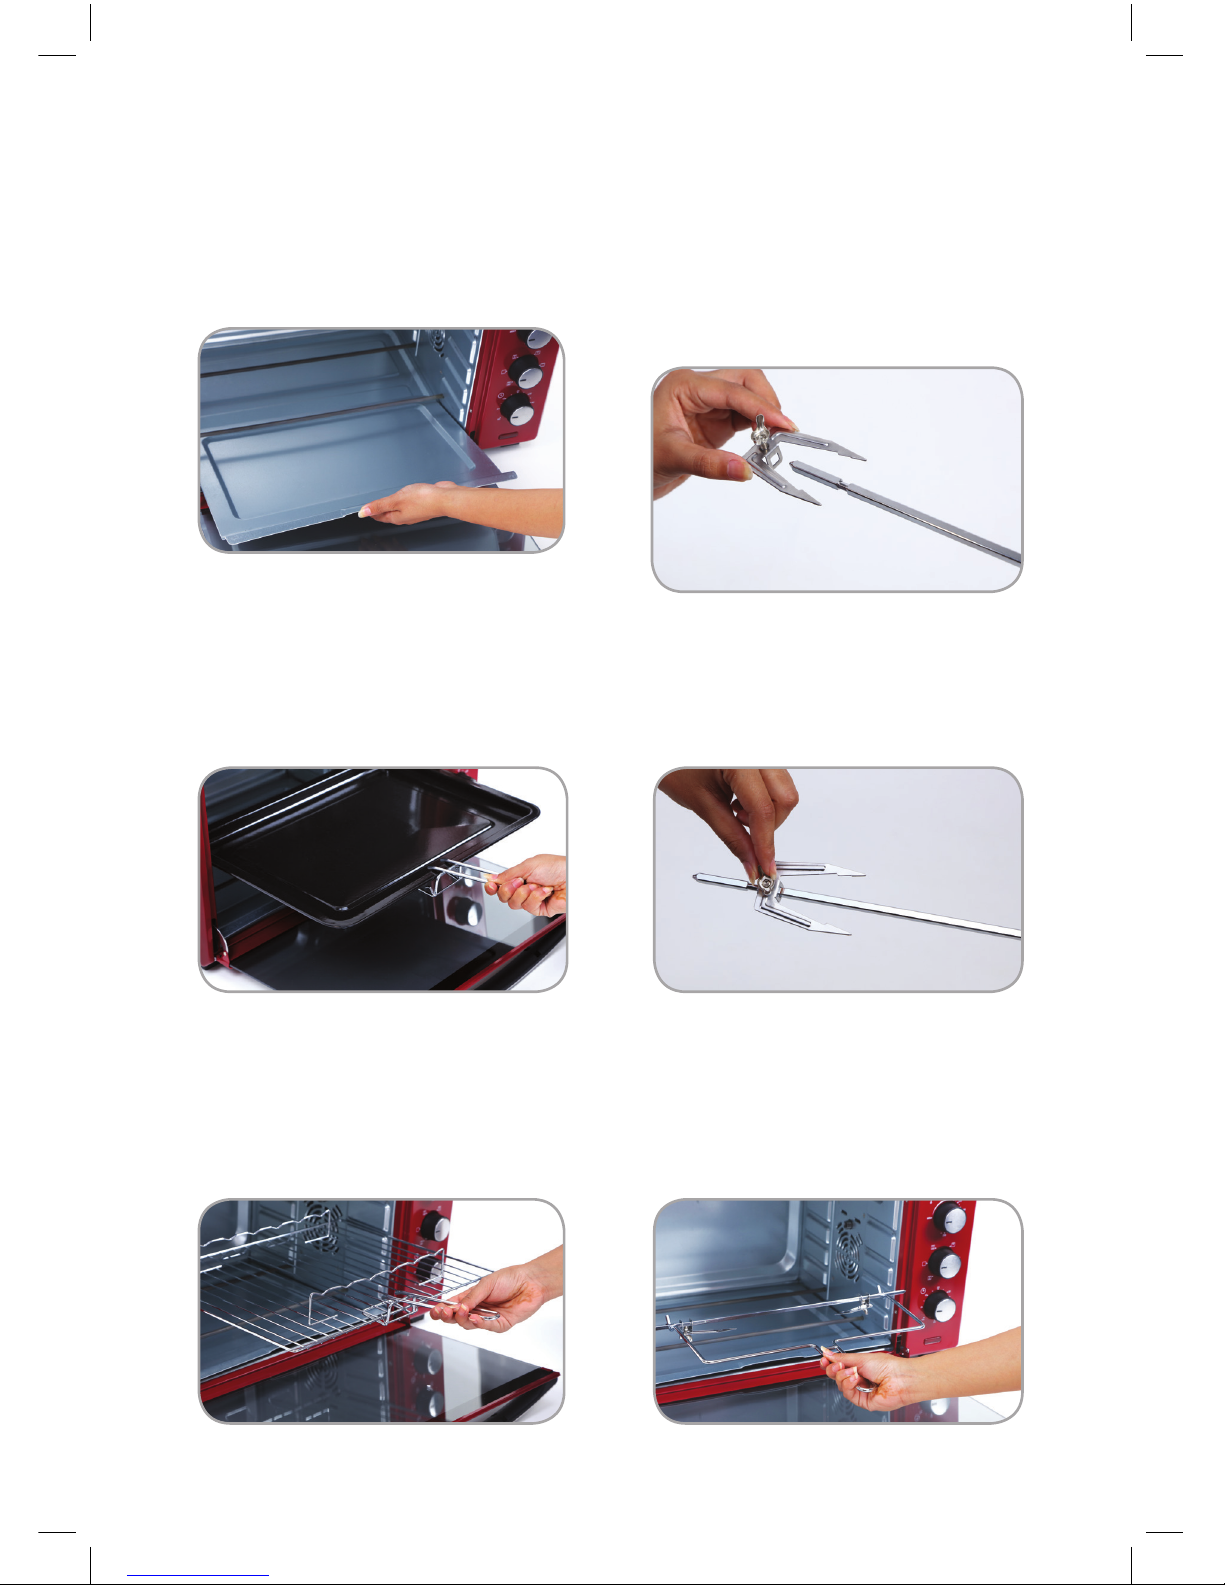
PLACEMENT OF ACCESSORIES
1. Placing the Crumb Tray- Below the
bottom heating element
4. Rotisserie Assembly and Placement-
a. Attach the holding pincers
on the rotisserie
2. Placing the Baking Tray-
a. Place in Slots 1 to 4
b. Use Tongs to place and remove
Slide the pincer on to the rotisserie rod
3. Placing the Grill Tray-
a. Place in Slots 1 to 4
b. Use Tongs to place and remove Tighten the screw to hold the pincer
in place
Oven Toaster Griller 13
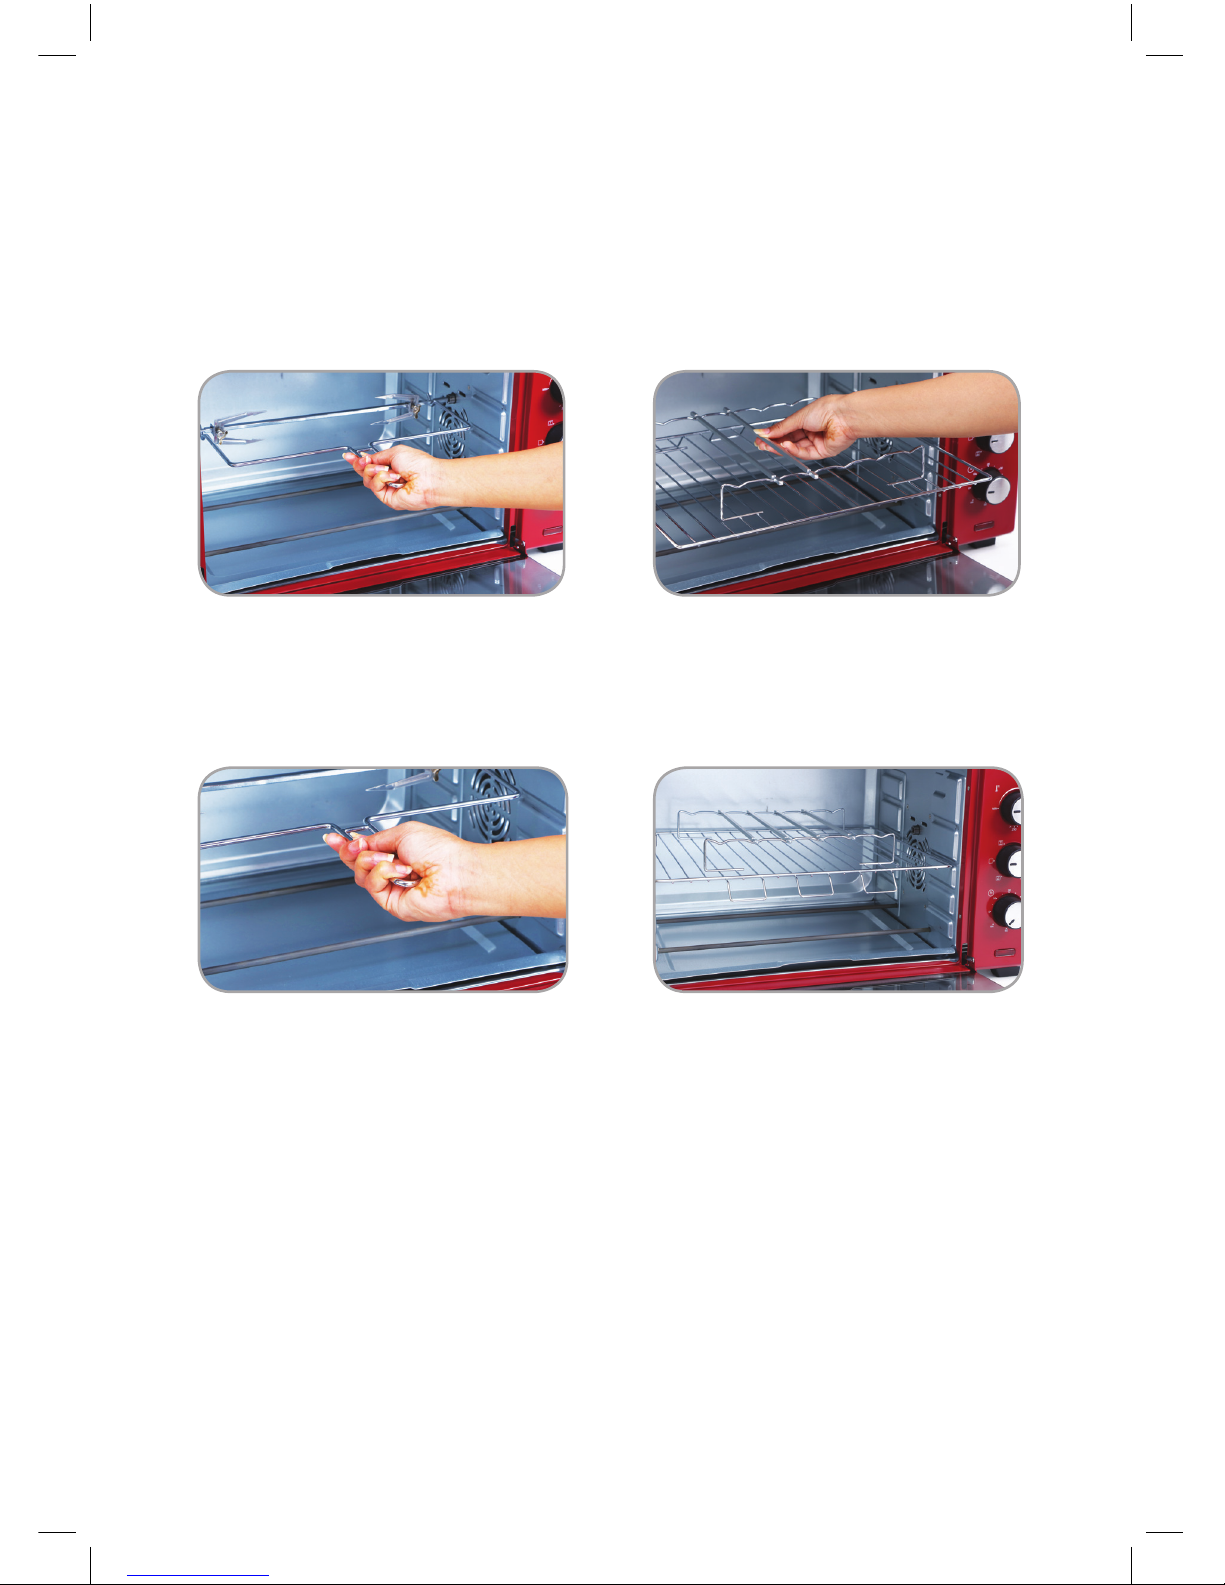
5. Rotisserie Assembly and Placement-
b. Placing the rotisserie in the
motor slot:
Use the Rotisserie tong to hold the
rotisserie, with the pointed end on
the right side
Use the tong to place the rotisserie.
First insert the pointed end in the right
hand side motor groove, then place the
Left side in the resting groove.
6. Placement of Skewers
Skewer the food and place the skewer
rods on the skewer rack.
Slide the rack in place inside the oven.

14 Oven Toaster Griller
For best results, we recommend
preheating the oven.
OPERATION
• Set the temperature control to desired
temperature setting.
• Turn Function control to ROTISSERIE /
ROAST position (as per requirement).
• Slide food through the rotisserie rod
and t the prongs on either side with
the help of the screws provided in the
prongs.
• Place one end of the rotisserie in the
groove provided on the sides of the
chamber.
• Ensure that the food is centered on
the rotisserie.
• Place the other end of the rotisserie on
the opposite groove.
• Slide the crumb tray into the lowest
position
• Rotate the Timer to set required time.
• When cooking is complete, turn the
timer to “OFF” position.
• A bell will ring at the end of cooking
time.
• Remove the rotisserie by placing the
hooks of the rotisserie tong under the
grooves on either side of the rotisserie.
Lift the left side of the rotisserie rst
by lifting it up and out. Then pull the
rotisserie out of the drive socket and
carefully remove it from the oven.
For best results, we recommend
preheating the oven.
OPERATION
• Set the temperature control to desired
temperature setting.
• Turn Function control to GRILL/BROIL
position.
• Slide the crumb tray into the lowest
position.
• Place food on the wire rack and slide it
into the top rack.
• Food should be placed as close as
possible to the top heating element
without it touching the element.
• Brush food with sauces or oil, as
desired.
• Rotate the Timer to set required time.
• When cooking is complete, turn the
timer to “OFF” position.
• A bell will ring at the end of cooking
time.
GRILL/BROILROTISSERIE
TIPS ON HOW TO USE

Oven Toaster Griller 15
Oven size allows you to toast larger
quantities of food. If small amount is
being toasted, place food on the wire
rack in the center of the oven.
OPERATION
• Set the temperature control o desired
temperature setting.
• Turn Function control to TOAST
position.
• Slide the crumb tray into the lowest
position.
• Place food to be toasted on the wire
rack and slide it into the middle slot
with the indentations pointing down.
• Rotate the Timer to set required time.
• Turn the food according to your need
(light or dark).
• When cooking is complete, turn the
timer to “OFF” position.
• A bell will ring at the end of cooking time.
Bake your favourite cookies, cakes, pies,
brownies etc. We do not recommend
usage of oven roasting bags or glass
containers in the oven. Never use plastic,
cardboard or paper or anything similar in
the oven.
OPERATION
• Place the wire rack or baking tray as per
recipe requirement in the lowest rack.
• Preheat the oven for almost 15 minutes.
• Place food to be baked on the wire
rack or baking tray as per recipe
requirement.
• Turn the function control to BAKE
position
• Turn the TIMER knob to ON position.
• When cooking is complete, turn the
timer to “OFF” position.
BAKETOAST
TIPS ON HOW TO USE
Model No. 3619R 3629R 3635RC 3642RCSS
Wattage 1380 W 1600 W 1600 W 2000 W
Input Power 230 V / 50Hz, Single Phase
Capacity 19 Litres 29 Litres 35 Litres 42 Litres
Accessories Crumb tray, Baking tray, Grill rack, Rotisserie*,
Skewers rods (4), Rotisserie tong*, Grill & bake tray tong
Note: In view of USHA policy of continual development, specications may change without notice.
PRODUCT SPECIFICATIONS
AND TECHNICAL DETAILS

16 Oven Toaster Griller
COMPLETELY CLEAN AND DRY ALL
PARTS AFTER EVERY USE
• Unplug the oven and allow it to cool
completely before any cleaning or
maintenance activity.
• Never allow water to spill on the
tempered glass door when it is still
warm.
• Ensure all acidic materials (lemon juice,
oils etc.) are cleaned promptly.
• To clean interior walls, use a damp
cloth and a mild liquid soap solution or
a soapy solution on a sponge. Keep the
oven door open to let it dry.
• Never use harsh abrasives or corrosive
products to clean the interiors.
It can damage the oven.
• Do not use abrasive cleaners for the
exteriors, as they could leave scratches
on the body. Simply wipe the exterior
with clean cloth and dry thoroughly.
• Wire rack and baking tray are
dishwasher safe. If heavily soiled, soak
in warm soapy water or use a nylon
scouring pad or nylon brush.
• Never wrap the power cord around the
oven.
MAINTENANCE & CLEANING
What Is Not Covered:
• Service trips to your home to teach you
how to use the product.
• If the product is connected to any voltage
other than that shown on the rating plate.
• If the fault is caused by accident, neglect,
misuse or Act of God.
• If the fault is caused by factors other than
normal domestic use or use in accordance
with the owner’s manual.
• If the fault is caused by pests for example,
rats or cockroaches, etc.
• Noise or vibration that is considered
normal, for example spin sound,
or warning beeps.
• Normal maintenance which is
recommended by the owner’s manual.
• Removal of foreign objects / substances
from the machine: example, grit, moulds,
food particles etc.
• Replace fuses in or correct house wiring.
• Correction of unauthorized repairs.
• Incidental or consequential damage to
personal property caused by possible
defects with this appliance.
• If this product is used for commercial
purpose, it is not warranted.
• If the product is installed outside
the normal service area, any cost of
transportation involved in the repair of the
product, or the replacement of a defective
part, shall be borne by the owner.

Oven Toaster Griller 17
WARRANTY CARD
This appliance is warranted for 2 year on
product against all manufacturing defects
from the date of sale. In the event of any
complaint, please contact Usha Care at
Toll Free No. 1800 1033 111.
The warranty is valid only when:
1. The appliance has been installed,
used and maintained in accordance
with the instruction manual.
2. The warranty card and cash memo
duly signed by the authorized dealer
are presented with the complaint.
3. The appliance has not been
opened or tampered with, by any
unauthorized person.
This warranty does not apply for:
1. Damages due to chipping, peeling,
Liability for consequential loss or damage is neither accepted nor implied.
S.NO: DATE:
CASH MEMO:
DEALER’S NAME AND ADDRESS:
OWNER’S NAME & ADDRESS:
plating and denting.
2. Breakage or damage to components
made out of Bakelite, Urea, ABS, SAN
and such plastic materials, rubber
parts and cord.
3. Normal wear and tear of parts.
4. Damage resulting from accidents,
mishandling or negligence on part of
the customer.

18 Oven Toaster Griller
OVEN TOASTER GRILLER
3619R, 3629R, 3635RC, 3642RCSS
This manual suits for next models
3
Table of contents
Other usha Oven manuals


