Usl Ultra-Phonic UPC-1 User manual

Film-Tech
The information contained in this Adobe Acrobat pdf
file is provided at your own risk and good judgment.
These manuals are designed to facilitate the
exchange of information related to cinema
projection and film handling, with no warranties nor
obligations from the authors, for qualified field
service engineers.
If you are not a qualified technician, please make no
adjuatments to anything you may read about in these
Adobe manual downloads
www.film-tech.com

INFRARED HEADPHONE TRANSMISSION SYSTEMS
UPC-1
UPC-2
INSTRUCTION
MANUAL
Ultra★Stereo Labs, Inc. • 181 Bonetti Drive
San Luis Obispo, CA 93401
Telephone 805.549.0161 • FAX 805.549.0163
Quality Cinema Products

UPC-1/UPC-2 Installation Manual 2 January, 1999
One Year Limited Warranty
◆◆◆◆◆
Ultra
★
Stereo Labs warrants that each product manufactured by it will
befreefromdefectsinmaterialandworkmanshipundernormalusage
for a period of one year after its purchase new from an authorized
dealer. Our obligation under this warranty is limited to repairing or
replacing any product or component which we are satisfied does not
conform with the foregoing warranty and which is returned to our
factory, freight paid, or serviced by one of our authorized contractors.
The Foregoing Warranty is Exclusive And in Lieu of All Other
Warranties, Whether Expressed or Implied. Such warranty shall not
apply to any product or component (A) repaired or altered by anyone
other than Ultra
★
Stereo Labs or an authorized service contractor; (B)
tamperedwithoralteredinanywayorsubjectedtomisuse,negligence
or accident or (C) which has been improperly connected, installed or
adjusted otherwise than in accordance with Ultra
★
Stereo Labs
instruction.

UPC-1/UPC-2 Installation Manual 3 January, 1999
INFRARED HEADPHONE TRANSMISSION SYSTEMS
The Ultra★Phonic Infrared Headphone Transmission System is designed
to provide intelligible, clear sound for your hearing-impaired customers.
Meets CE Approval Standards
TABLE OF CONTENTS
UPC FEATURES ............................................................................................. 4
UPC-1/UPC-2 INSTALLATION ...................................................................... 5
UPC-1 with IRI-10 SPEAKER BIAMP BOARD .............................................. 10
FACTS ABOUT INFRARED TRANSMISSION SYSTEMS ............................... 11
Illustrations:
UPC FEATURES ................................................................................. 4
UPC-1 AUDIO, POWER CONNECTIONS ......................................... 6
SUMMING RESISTOR NETWORK ..................................................... 6
UPC-2 AUDIO, POWER CONNECTIONS ......................................... 7
DIODE LIFE EXPECTANCY CHART ................................................... 9
FRONT AND REAR MOUNTED VIEWS............................................. 9
UPC-1 with IRI-10 SPEAKER BIAMP BOARD ................................... 10

UPC-1/UPC-2 Installation Manual 4 January, 1999
+–
AC PANEL
#1
PANEL
#2
AC
50
%
CLIP
INPUT
LEVEL
ADJUST
POWER
®
INFRARED HEADPHONE TRANSMISSION SYSTEM
MODEL IRC-20 EMITTER/MODULATOR SYSTEM
IRM-20 MODULATOR
ULTRA
★
STEREO LABS, INC.
•
Tarzana, California
®
5
1423 6
Fig. A – Rear view of the IRC-20 showing connections and
indicators Fig. B – IRP-20 AC Power Pack
UPC FEATURES
1. AUDIO INPUT The IRC-20 will accept an audio signal level from 100 mv to greater
TERMINALS than 30 V rms.
2. AC PANEL #2 Connects to the 24 V AC Power Pack supplied with the IRC-20. For
use only with two-panel systems. See page 7.
3. AC PANEL #1 Connects to the 24 V AC Power Pack supplied with the IRC-20. See
page 6.
WARNING! Use only the AC Power Pack supplied with the IRC-20 or else permanent
damage to the unit may result.
4. LED INDICATORS From left to right, the ‘CLIP’ LED illuminates when the input level
overloads the IRC-20. The ’50%’ LED indicates that the input level
reaches 50% modulation. It will just illuminate when the input level is
correctly set. The ‘POWER’ LED indicates that the unit is on.
5. INPUT LEVEL TRIMPOT This 15-turn trimpot adjusts the input signal level.
6. 24 V AC IRP-20 Connect to the AC PANEL #1 terminals. If you have a two-panel
system, you need two power packs.
Newer transformers have a resetting fuse in the form of an internal
poly switch. In this instance, an external fuse is not required.

UPC-1/UPC-2 Installation Manual 5 January, 1999
UPC-1/UPC-2 INSTALLATION
UNPACK THE BOX AND VERIFY THAT ALL SHIPPING MATERIALS ARE PRESENT.
There should be:
FOR THE UPC-1 System Package
❏One (1) System Manual
❏One (1) IRC-20 Emitter/Modulator Unit
❏One (1) IRP-20 AC Power Pack
❏One (1) Mount Bracket
❏Two (2) 10-32 X 5/8" machine screws for attaching the emitter to the mount bracket.
FOR THE UPC-2 System Package
❏One (1) System Manual
❏One (1) IRC-20 Emitter/Modulator Unit
❏One (1) IRE-10 Emitter Panel
❏Two (2) IRP-20 AC Power Packs
❏One (1) Mount Bracket
❏One (1) IRBS-20 Bracket Strap
❏Two (2) 10-32 X 5/8" machine screws for attaching the emitter to the mount bracket.
YOU WILL NEED TO SUPPLY THE FOLLOWING MATERIALS:
❏A small, jeweler’s type flat blade screwdriver or trim pot alignment tool for adjusting the
modulator gain, and a medium head screwdriver.
❏Shielded audio cable for connecting the IRC-20 modulator to the program source, with
tie-wraps.
❏Eighteen (18) gauge or greater two-conductor zip cord for the 24 V IRP-20 AC Power
Packs. (See tables, pages 6 & 7.)
❏An electric drill with bits suitable for drilling into the surface where the Emitter will be
installed.
❏Suitable metal or wood screws to attach the bracket to the wall.
❏One (1) IRH-601 or IRH 701 Headset Receiver.
❏AAA Batteries for the IR headset(s), if the type ordered does not come with its own
rechargeable cell.

UPC-1/UPC-2 Installation Manual 6 January, 1999
➤CONNECT THE AUDIO INPUT LINE
Connect the Center channel speaker terminals to the + and – (ground) audio input
terminals on the IRC-20 as in Fig. C. If the center channel is bi-amped, you must con-
struct a resistor network, as in Fig. D, that sums the high and low frequency signals, then
feed the output of the network to the IRC-20 audio input. You also may connect the
IRC-20 to the output of a monitor or a processor.
WOOFER
HIGH
FREQUENCY
HORN
100kΩ
50kΩ
+
+
TO IRC-20
+TERMINAL
➤CONNECT THE PROVIDED IRP-20 AC POWER PACK
+–
AC PANEL
#1
PANEL
#2
AC
50
%
CLIP
INPUT
LEVEL
ADJUST
POWER
Processor Center Channel
OR
Center Channel Speaker
+ E
®
INFRARED HEADPHONE TRANSMISSION SYSTEM
MODEL IRC-20 EMITTER/MODULATOR SYSTEM
IRM-20 MODULATOR
ULTRA
★
STEREO LABS, INC.
•
Tarzana, California
®
AC Gnd AC
Connect ground wire to
IRM-20 Chassis (May be
required by local
building code).
AC Power Pack
Fig. C – Connecting the audio input and 24 V AC power pack to the
UPC-1 system
Fig. D
Summing resistor network for
use with bi-amped center
channel speakers
FOR THE UPC-1
(See Figure C)
Connect the provided
IRP-20 AC Power Pack
to the IRC-20 AC Panel
#1 terminals using
standard 18-gauge or
greater zip cord. (See
Table 1 for lengths.)
Make sure there are no
loose wire strands that
could touch any
nearby metal and short
the Power Pack.
DO NOT SHORT THE
POWER SUPPLY.
Connect the Power
Pack to a 115 V AC 50/
60 Hz outlet.
TABLE 1
Maximum lengths
and gauge sizes for
connector cord from
IRP-20 AC Power
Pack to the IRC-20
AC Panel #1 termi-
nals.
60' @ 18 ga.
100' @ 16 ga.
150' @ 14 ga.
200' @ 12 ga.

UPC-1/UPC-2 Installation Manual 7 January, 1999
FOR THE UPC-2
(See Figure E) Connect one of the two IRP-20 AC Power Packs to the IRC-20 AC Panel #1
terminals, and the second IRP-20 to the AC Panel #2 terminals using standard 18-gauge
or greater zip cord. (See Table 2 for lengths.) Make sure there are no loose wire strands
that could touch any nearby metal and short the Power Pack.
DO NOT SHORT THE POWER SUPPLY.
Connect each Power Pack to a 115 V AC 50/60 Hz outlet.
+–
AC PANEL
#1
PANEL
#2
AC
50
%
CLIP
INPUT
LEVEL
ADJUST
POWER
CARRIER
INPUT
(95kHz)
DC
POWER
(Nom. 28v)
H
–+
INFRA-RED TRANSMISSION SYSTEM
MODEL IRE-10 EMITTER PANEL
Processor Center Channel
OR
Center Channel Speaker
+ E
®
INFRARED HEADPHONE TRANSMISSION SYSTEM
MODEL IRC-20 EMITTER/MODULATOR SYSTEM
IRM-20 MODULATOR
ULTRA
★
STEREO LABS, INC.
•
Tarzana, California
®
Connect ground wires to
IRM-20 & IRE-10 Chassis
(May be required by local
building code).
AC Gnd AC AC Gnd AC
AC Power Pack
AC Power Pack
Fig. E
Connecting the
audio input and
both 24 V AC
power packs with
the UPC-2 system
This cable must be
3-conductor.
White = H
Red = +
Black = –
See Table 2 above
for maximum
lengths and
gauges.
TABLE 2
Maximum lengths
and gauge sizes for
connector cord from
IRP-20 AC Power
Packs to the IRC-20
AC Panel #1 and #2
terminals.
50' @ 18 ga.
70' @ 16 ga.
100' @ 14 ga.
150' @ 12 ga.

UPC-1/UPC-2 Installation Manual 8 January, 1999
➤PRELIMINARY LEVEL SETTING
If the system is to be used with a cinema sound system, simply run a standard optical
track 50% modulation loop in the projector (e.g., Dolby®or Ultra★Stereo®). Then adjust
the IRC-20 Input Level Adjust trimpot so that as the gain is increased, the green 50% LED
just comes on. This is the center LED on the IRC-20.
If the system is being used with other sources such as tape, then adjust the Input Level
control so that a standard “0” reference level tape plays back so the 50% indicator light just
begins to illuminate. With normal audio signal, the 50% light should flash occasionally.
Note: The IRC-20 has an automatic shutoff circuit. The unit will shut itself off after an
eight-minute absence of audio signal. When the audio resumes, the panel will switch on
instantly.
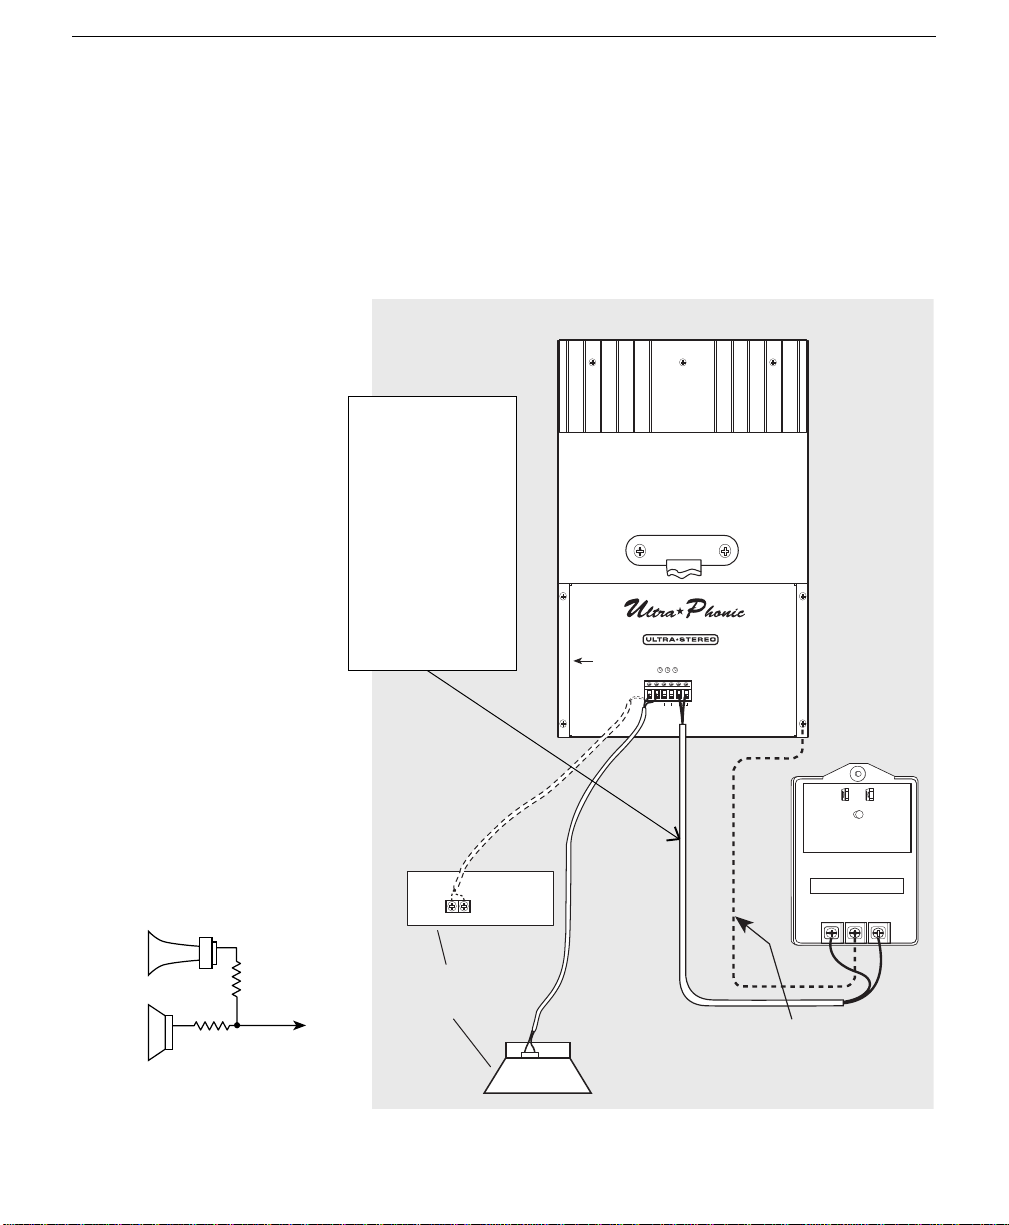
➤MOUNTING THE EMITTER/MODULATOR AT THE FRONT OF THE AUDITORIUM
(See Figures F and G) Attach the supplied mounting bracket to the wall surface and use
the supplied screws to attach the bracket to the emitter. Allow free airflow around the
emitter and be sure to have at least eight inches clearance from all surfaces, preferably
more if at all possible. The rear panel is used as a heat sink and the heat must be allowed
to dissipate. Mount the emitter so that the heat sink fins are at the top. The unit should be
mounted to the side of the screen/stage area, 12 to 15 feet above the audience’s heads
and pointed downward and into the seating area.
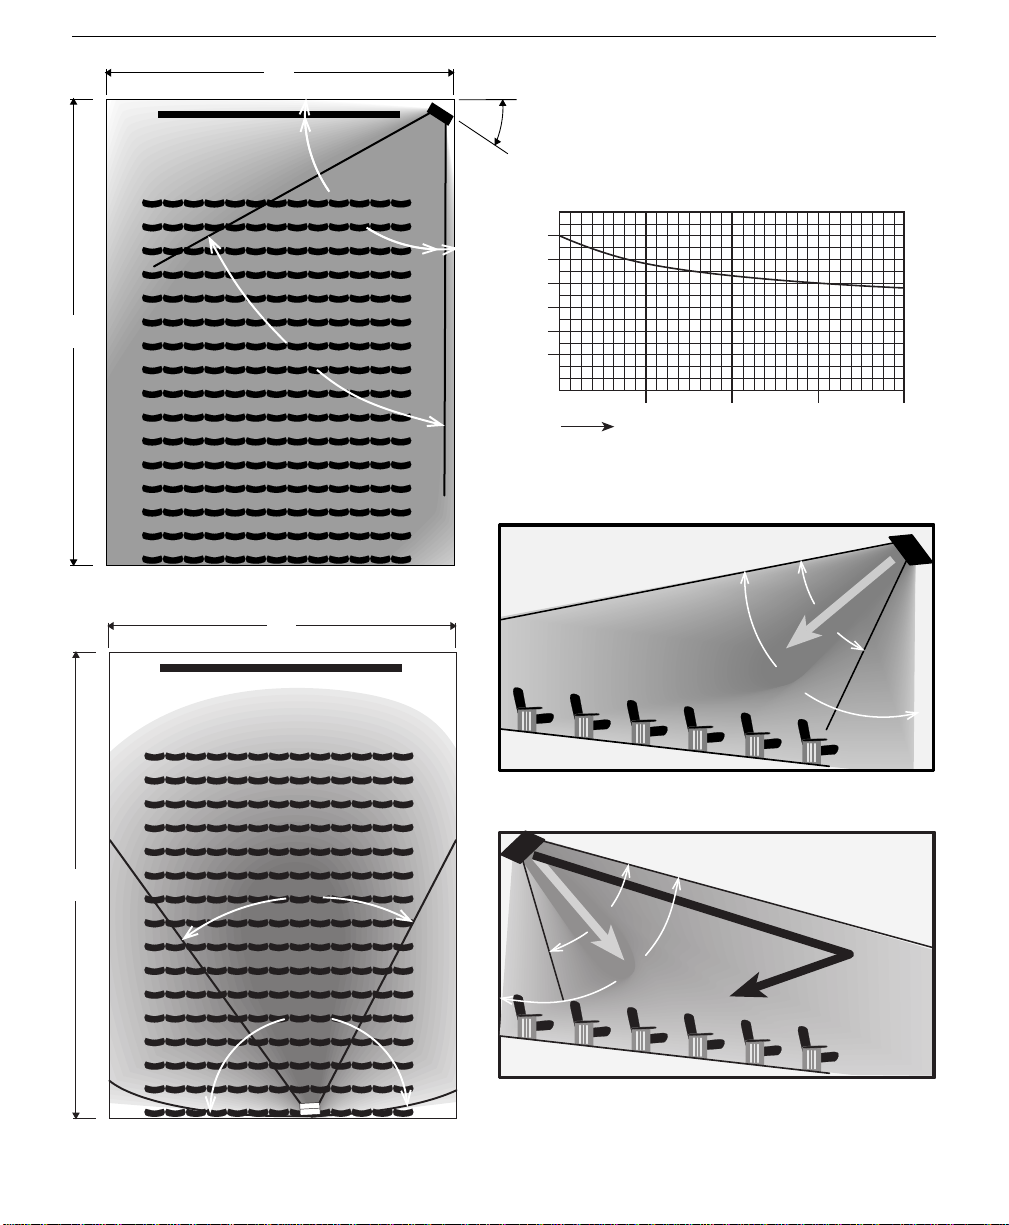
➤MOUNTING THE EMITTER/MODULATOR AT THE REAR OF THE AUDITORIUM
(See Figures H and I) Attach the supplied mounting bracket to the wall surface and use
the supplied screws to attach the bracket to the emitter. Allow free airflow around the
emitter and be sure to have at least eight inches clearance from all surfaces, preferably
more if at all possible. The rear panel is used as a heat sink and the heat must be allowed
to dissipate. Mount the unit so that the heat sink fins are at the top. The emitter will cover
a maximum of 5500 square feet (60' X 84') and has a primary 50°(±25°) vertical and
horizontal coverage angle, usually adequate for a 350-seat theatre. Within 30 feet of the
emitter the horizontal dispersion angle of emission increases to over 140°. Within 18 feet
of the emitter the vertical dispersion angle of emission increases to 80°. The emitter can
be mounted 12 to 15 feet above the audience’s heads. The unit can be pointed either
downward into the seated area (Fig. I-A), or directly towards the screen to reflect back to
the audience (Fig. I-B).
CAUTION: The rear panel may get quite warm to the touch. Power down and allow a
few minutes for the surface to cool before handling the IRC-20.

UPC-1/UPC-2 Installation Manual 9 January, 1999
84'
Screen
60'
50°
APPROX.
25°
140°
Fig. F – Front mounted emitter - top view
84'
Screen
60'
50°
140°
Fig. H – Rear mounted emitter - top view
80°
50°
A
B
Fig. I – Rear mounted emitter - side view
(A) pointed down
(B) pointed toward screen
Fig. G – Front mounted emitter - side view
80°
50°
100%
90%
80%
70%
60%
50%
LED
OUTPUT
8 years* 16 years* 24 years* 32 years*
* Expected LED output if operated 8 hours per day, 7 days
per week, based on manufacturer's ratings.
Infrared Diode Output versus Time
t (years)
Ultra
★
Phonic
UPC-1/2 Emitter / Modulator System

UPC-1/UPC-2 Installation Manual 10 January, 1999
+–
AC PANEL
#1
PANEL
#2
AC
50
%
CLIP
INPUT
LEVEL
ADJUST
POWER
®
INFRARED HEADPHONE TRANSMISSION SYSTEM
MODEL IRC-20 EMITTER/MODULATOR SYSTEM
IRM-20 MODULATOR
ULTRA
★
STEREO LABS, INC.
•
Tarzana, California
®
IRI-10
SPEAKER INPUTS
BI-AMP BOARD
U
ltra
★
P
honic
Use 4-40 x 3/8" Screws
with 1/4" spacers
underneath
RED
BLACK
+
LEFT
WOOFER
+
LEFT
HF HORN
–
+
CENTER
WOOFER
+
CENTER
HF HORN
+
RIGHT
WOOFER
+
RIGHT
HF HORN
UPC-1 with IRI-10 Speaker Biamp Board
The IRI-10 Speaker Biamp Board accessory allows the user to connect
three biamped speaker channels to the UPC-1. The three channels are
mixed together with a center channel emphasis for increased speech
clarity.

UPC-1/UPC-2 Installation Manual 11 January, 1999
FACTS ABOUT
INFRAREDTRANSMISSION SYSTEMS
The UPC-1/UPC-2 Infrared Transmission Systems use light emitting diodes
frequency modulated at 95 KHz, the international standard. All commer-
cially available emitters and receivers will be compatible with this stan-
dard.
The modulated waves radiate from the emitter panels primarily in straight
lines. Depending on the lightness of the wall color, some of this energy
may be reflected and bounce around the room. Infrared energy does not
penetrate walls. The modulated waves remain within the room where the
emitter is placed. This feature makes it perfect for use in multiplex theatre
units and for use in hotel and convention center meeting rooms and
auditoriums. Additionally, this characteristic of infrared transmission
makes it ideal for meetings requiring security of the signal.
USL, Inc. provides the following 95Khz headsets:
IRH-601 – an over-the-head receiver designed with a 360˚ pickup.
IRH-701 – an under-the-chin receiver with a 180˚ pickup.
IRH-801 – a clip-on receiver used in connection with a neck loop or
used with a cable connected to a cochlear hearing device.

INFRARED HEADPHONE TRANSMISSION SYSTEMS
Ultra★Stereo Labs, Inc. • 181 Bonetti Drive
San Luis Obispo, CA 93401
Telephone 805.549.0161 • FAX 805.549.0163
Quality Cinema Products
This manual suits for next models
1
Table of contents
Other Usl Transmitter manuals
Popular Transmitter manuals by other brands

Avtek
Avtek Share quick guide

Pfeiffer Vacuum
Pfeiffer Vacuum CPT 100 operating instructions

ASTEL
ASTEL TTR 202 operating instructions

elero
elero TempoTel 2 operating instructions

ADOLF THIES
ADOLF THIES CLIMA 4.3303.22 Series Instructions for use

Ramsey Electronics
Ramsey Electronics FM25A Assembly and instruction manual