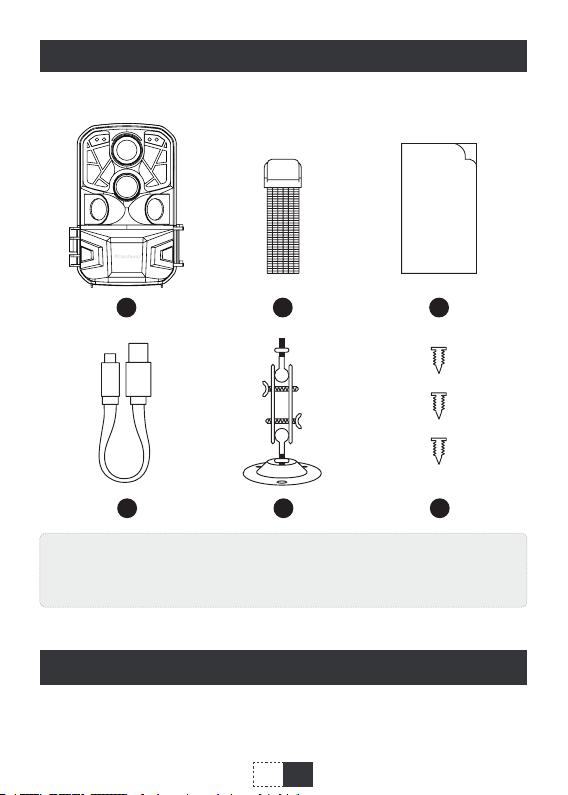
Usogood DL502 User manual

Hunting Camera with Remote Wi
DL502 Trail Camera
User’s Manual


Dear Customer,
We are truly grateful that you have chosen us as your best product
dealer. You are one of our most highly valued customers. We are
honored to have the opportunity to serve you.
Speaking on behalf of the company, we hope you can enjoy the
fantastic quality of our products and services. We will try our best to
meet your requirements and expectations.
Usogood has always been committed to creating high-quality
products and bringing 100% satisfactory service to our beloved
customers. We value the precious feedback of every customer.
At the same time, we provide each customer with a 12-month
guarantee period. During this period, if there are any problems with
the product, or if you have any questions, please feel free to contact
us. You can contact us in any of the following ways.
Kind Regards,
Usogood Team
www.usogood.co
Facebook group Ofcial website
https://www.facebook.com/usogoodofce/


CONTENTS
English 1-23
Deutsche 25-49
Italiano 51-74

English
Packing List....................................................................................... 1
Introduction ...................................................................................... 1
Appearance ....................................................................................... 2
Preparing The Camera...................................................................... 4
Using The Camera And Setup Menu ................................................ 6
WIFI and APP................................................................................... 12
Mounting ......................................................................................... 17
Enter ON Mode ................................................................................ 18
Technical Specications ................................................................ 19
Image / Data Output....................................................................... 20
Simple Trouble Shooting................................................................ 21

1
EN
Please carefully unpack camera and check that below accessories are
contained in the box.
User
Manual
1
4
2
5
3
6
①Wildlife Camera x 1
② Mounting Belt x 1
③ Instruction Manual x 1
④USB cable x 1
⑤Wall Mount x 1
⑥Screws x 3
Packing List
The trail camera can be used in many places. For example, using it for
hunting, wildlife monitor, farm monitor and home security. The infrared
sensor of the camera can detect the temperature change within the
detection range to trigger the camera to take pictures or videos.
Introduction

2
EN
Features of WIFI Trail Camera
1. Built-in wi
2. 24MP photo and 4K HD video
3. 0.2s trigger speed
4. 6.6cm color TFT LCD (320x240 pixels)
5. 34Pcs 940nm no glow IR LEDs
6. 3 Sensors with 120° detection angle
7. IP66 Waterproof
8. Fully automatic IR lter
9. Mini USB 2.0 interface
10. Power indication
11. Password protection
12. Built-in microphone and speaker
13. Time, date, temperature, phase and Serial No.
14. SD card (up to 128GB)
16
7
8
5
2
3
4
5
Appearance
1Light Indicator
2Side PIR Indicator
3Lens
4Main PIR Sensor
5Side PIR Sensor
6System Indicator
7Main PIR Indicator
8IR LED

3
EN
1
5
6
7
8
2
3
4
4
9
10
12
13
8
11
Screen
MODE
OFF/SETUP/ON
Battery Case Release
' '
OK
' '
Battery Case
DC Power Input
AV Output
Mount Screw
Microphone
Mini USB
1 8
2 9
310
11
12
13
4
5
6
7
1
2
3
Speaker
SD Card Slot
Strap Slot
1
2
3

4
EN
X 8
Note:
X 1
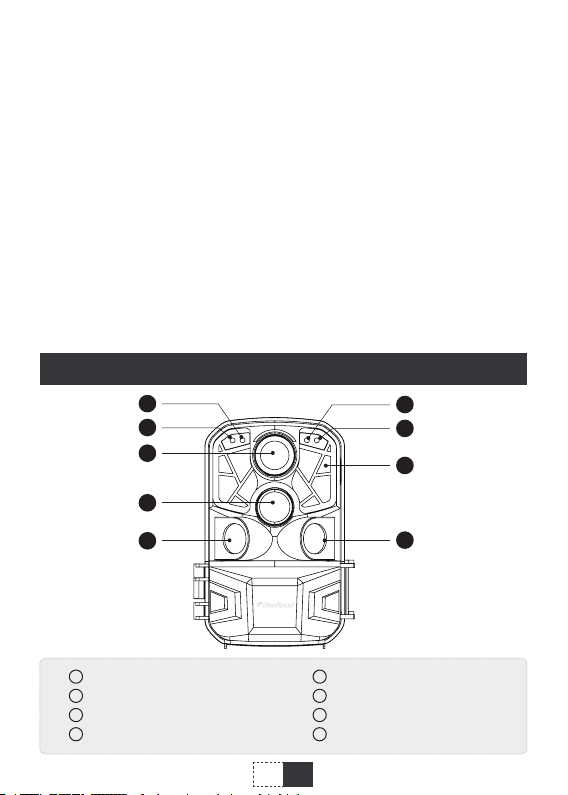
1. The monitor is only switched on in the ‘SETUP’ mode for
changing menu settings or viewing photos and videos.
2. A SD memory card must have been inserted into the memory
card slot to save photos and videos.
3. Using the mini USB connection (USB 2.0), the camera can be
connected to a computer to download photos and videos.
4. Using the mode switch, the three operating modes: OFF,
SETUP and ON can be selected.
AALR6
128
GB
1. SD memory cards up to a capacity of 128 GB are supported.
2. For best using experience , we recommend using 8 alkaline batteries
to power the camera, lithium-ion rechargeable batteries are not
recommended because rechargeable batteries have lower voltage
output and poor performance under low temperature.
3. The camera must be inserted 8 x 1.5V AA batteries . Do not use new
and old batteries together. DC interface need 6V/1.5A adaptor with
3.5mm(outer diameter)*1.35mm(inner diameter) plug head.
4. Insert CLASS 10 or higher class micro 128GB SD card (CLASS 10 is
recommended) . Prior to insert into memory card, ensure that the
lateral write protection on the memory card is unlocked.
5. New memory card is recommended to be formatted when using (as
below described).
6. Please note that the camera will power off when power is very low.
Preparing the Camera

5
EN
1. Push the release button to release the battery case
2. Insert 8x brand new alkaline batteries
3. Install the battery case
4. Insert the SD card
5. Switch to 'SETUP' mode, setting the camera
6. Switch to 'ON' mode,camera start to work
How to start:
128
GB
Assembly with Strap:
①
②

6
EN
Keys Functions
Power Key
Pull Switch:
1. OFF: Power off
2. SETUP: Setting and test mode
3. ON: Working mode
Mode Key
1. Press shortly to switch back and forth between
menus, taking photos, recording videos and
playback
2. In the submenu, Press shortly to return to the
previous menu
UP Key 1. Select ' '
2. Press the ' ' button to close the WiFi
OK
1. In the video or photo taking interface, press shortly
to shot
2. Under the menu settings, press shortly to conrm
as OK
Down Key
1. Select ' '
2. In playback mode, press for 3s the button ' ' to
pop up the ‘delete menu’.
Battery Case
Release Press to release the battery case.
Using the Camera
Using the Camera and Setup Menu
Button 'OFF'
Press 'OFF' button to completely turn off the camera. Only in this
mode, you can unplug the memory card and replace the batteries.
ard and replace the batteries.
Button 'SETUP'
In this mode, you can manually record video or take photos, and you

7
EN
can also review the recorded les or change the setup options
according to the actual situation.
When the camera is in ‘SETUP' mode, the PIR sensors are on. When
the PIR sensors are triggered, the PIR indicators LED will ash.
Button 'ON'
When the camera is switched from ‘SETUP' mode to ‘ON' mode,
it will enter standby with low power consumption, and the screen
display will turn off and button operation will be disabled. The camera
will respond to the PIR sensors only. It will turn on and take photo
or record videos when the PIR sensor is triggered, then return to
standby afterwards.
Camera Mode
‘Photo’, ‘video’ and ‘photo+video' are available.
In the ‘Photo+Video’ mode, the camera rst takes a set number
ofphotos beforerecording a video.
Photo Resolution
24MP/20MP/16MP/12MP/8MP/5MP/3MP/1MP are available. The
higher the resolution, the larger the space occupied on SD card.
Multi-shot
1P/2P/3P are available. You can choose the photo count to be
taken when the camera get triggered.
Video Resolution
3840*2160P, 2688*1520P, 1920*1080P, 1280*720P, 720*480P, 640*480P
are available. The higher the resolution, the larger the space
occupied on SD card.
Universal Keys
Press ‘ ’ and ‘ ’ button to adjust values, press ‘OK’ button to
conrm change and switch to next digit, press ‘MODE’ button to exit
the setting.

8
EN
Video Length
3”~5’ available
Select the duration of the video as needed. Please note that when
recording manually in ‘SETUP’ mode, the camera will stop recording
after 29 minutes / the video size reaches 4GB / the memory card is full /
the battery is low.
Audio Recording
ON / OFF available
Select 'ON' or 'OFF' as needed.
After selecting 'ON', the camera will only record audio during the
recording, and will not record any voice out of this period.
PIR Interval
Photo mode / Video mode, 5"-59'59"available for both of them.
Select the interval as needed. After the selected interval, only when
the animal enters the detection range, the camera will be triggered
and take a picture.
During the selected time interval, the camera will not take any
photos or videos, thus avoiding unnecessary shooting.
Shorter intervals and higher camera frequency will consume power faster.
Side PIR Sensors
ON / OFF available
You can choose to turn on or off the sensors on both sides. Select
‘OFF’ to turn off side PIR sensors. If you want to narrow the detection
range, please turn off the side PIR sensors.
PIR Sensors Sensitivity
High / Medium / Low available
Select the sensitivity according to the actual situation. For example,
if the subject is a small animal, you need to choose high or medium
sensitivity. The PIR sensor determines whether there is an animal by
Notice: The power consumption of 10s video recording is
the same as 150 photos. Therefore please record the video
according to the situation for longer battery life.

9
EN
detecting the temperature difference. The smaller the animal, the
smaller the temperature difference.
Working Timer
Start Timer Setting, End Timer Setting available
Select 'ON' and click 'OK' to conrm, then press ' ' and ' ' button
to set the starting working and ending working time.
After completing the settings, the camera will only take pictures or
videos during the selected working hours every day. Beyond the
period, the camera will be on standby.
For example, if the start time is set to 18:35 and the end time to 8:25,
the camera will be operational from 6:35pm of the current day until
8:25am of the following day. During this period, once the animal
enters the detection range, the camera will be triggered. Beyond the
period, the camera will not take any photos or videos.
Time Lapse
ON / OFF available
Select 'ON' and set the time interval. After this time interval, the
camera will automatically take photos or videos regardless of
whether the animal is within the detection range.
For example, if you want to record the process of owers blooming,
you can use time lapse. The camera automatically takes pictures
after every set time intervals.
Language
English / German / Dansk/ Finnish/ Swedish / Spanish / French
/ Italian / Dutch / Portuguese / Simplied Chinese / Traditional
Chinese / Japanese available
Select the language as needed.
Date/Time
Set Time & Date / Time Format / Date Format available
Press 'OK' button to conrm change and switch to next digit, after
setting the date/time, press 'MODE' button to exit Date/Time
setting.

10
EN
Photo Stamp
Time & Date / Date / OFF available
Select Time & Date / Date, the time & date or date will displayed on
photo. Select 'OFF', the time & date or date will not be displayed.
Password
Setting a startup password can prevent others from changing camera
parameters.
Choosing 'ON' then click 'OK' to set up the password, press the ' '
and ' ' button to adjust values of password, press 'MODE' to switch
to the next password value. When completing the settings, click 'OK'
button to exit the password setting.
If you forget your password, please enter the universal password:
1111.
Beep Sound
ON / OFF available
Select ‘ON’ and then you will hear the beep sound when press
buttons.
Format Memory Card
Yes / No available
Select ‘Yes’ to delete all data from the memory card.
Camera ID
ON / OFF available
Select ‘ON’ to set the camera ID.
Reset Settings
Yes / No available
Select ‘Yes’ to delete all settings.
Auto WIFI Off
1 Minute/3 Minutes/5 Minutes available
Setup the period so the camera will automatically turn off WIFI when
it is not connected to a smartphone within the preset time.

11
EN
WIFI SSID
The default name is Hunting Cam.
The WIFI SSID can be modied, and it will be displayed when WIFI
is opened after modication. You can search the WIFI SSID via smart
phone.
WIFI Password
The default password is 12345678.
The password can be modied. After modication, the phone can
only be connected by entering the password when connecting to the
camera.
Version
Check rmware version.
Playback Mode
①After recording, please switch the camera from the ‘ON' mode
to the 'SETUP' mode. Then press 'MODE' button to switch to
Playback mode.
②Press 'MODE' button to enter the settings menu.
Press ‘ ’ button for 3 seconds in the playback mode to enter the le
setting menu as below.
Delete the current le
With this function, you can delete the current picture or video in the
camera memory card. Press ' ' or ' ' button to select 'Cancel or
delete' and then press 'OK' button to conrm.
Notice: Press ' ' or ' ' button to view the pictures and videos
captured. Press 'OK' button to stop playback of video les,
press 'MODE' button to return to the playback interface.
Notice: If the WIFI connection is disconnected, you need to
open the APP to reconnect manually.

12
EN
Slideshow
With this function, the pictures of memory card can be played in the
form of slideshow. Each picture is displayed for 2 seconds. Press 'OK'
button to stop it.
Write-protection
This function is used to prevent accidental deletion of les.
Setting
Delete all les
Activate slideshow
Write-protection
MODE Back SelectOK
Dele current le
Setting
Delete all les
Activate slideshow
MODE Back SelectOK
Dele current le
Write-protection
Wrie-protect current le
Unlock current le
Wrie-protect all les
Unlock all les
Please scan the following QR code to download the APP on the
smartphone rst.
For the Android system, please search for ‘Hunting Camera’ in Google
Play to download.
For the IOS system, please search for ‘Hunting Camera’ in Apple Store
to download.
Android
iOS
WIFI and APP
Notice: Select 'Write-protect current le' or 'Write-protect all
les' to prevent accidental deletion of les from the memory
card. Select 'Unlock current le' or 'Unlock all les' to cancel
the protection of related les.

13
EN
Turn on the WIFI Manually
Press 'UP ' button for 3 seconds in the 'SETUP' mode to turn on
the built-in WIFI of the camera, the screen will display the WIFI
connection interface. When the indicator light ashes alternately on
the camera, it indicates that the built-in WIFI has been turned on.
Turn on the WIFI via Bluetooth
First open the APP ‘Hunting Camera’ and click ‘Connect Camera’.
Then click ‘Step one Bluetooth on WIFI’ and click ‘Sulong’, the
interface will jump to Wi-Fi setting of smartphone.
Connect the Camera via the APP
1. Click Wi-Fi setting of the smartphone and choose to connect
‘Hunting Cam’. Please enter the password: 12345678 for the rst
time.
2. After connecting, return to the APP ‘Hunting Camera’, click
'Connect Camera', then you can set the camera through the APP.
Hunting Camera
Connect camera
Hunting Camera
Connect camera
Step One Bluetooth On WiFi
Step Two Connect WiFi
WIFI
Wait for connection
SSID: Hunting Cam
Password: 12345678

14
EN
3. After the camera setting through the APP has done, click the
return arrow in the upper left corner and turn off the built-in WIFI.
Click ’Settings‘ on the phone, and then click 'Wi-Fi' option, search
for 'Hunting Camera'(the camera's built-in WIFI name). The initial
password is '12345678'.
4. When the WIFI connected successfully, the camera screen will show
a connection interface as follow. If the camera screen turns to black
after some while, please press any key on the camera and the
screen will light up again.
Hunting Camera
Connect camera
Hunting Camera
Connect camera
Table of contents
Languages:
Other Usogood Scouting Camera manuals