Uspa UB-2235R Instruction Manual

UB-2235R
UB-2245R
USPA [ju:spa]
USPA is a new compound word,
which means your spa.
Welcome to the Cozy Couch"USPA"
* You are kindly requested to read carefully this operation
manual for proper use of this appliance with due attention.
* At any time when you have questions while in your use of
this appliance, please do not hesitate to keep in touch with
the dealer where you bought this appliance or consult us.
* Save this manual and place in an easily accersible location.

Anion (UB-2245R only)
Anion is an atomic element of negatively charged air particle. We feel fresh in the forest or hot spring that is abundant in anion.
Anion increases the ratio of mineral ingredient in blood, and purifies blood through alkalinization.
When the number of anions increases in blood, electric exchange of substances promotes in the cellular membrane. This alkalinizes
and purifies blood.
Furthermore when the number of anions increases in blood, the amount of gamma globulin also increases in blood.
This enhance immunity against infection. That's why anion therapy has a very effective healing effect.
Anion controls autonomic nerve system in a beneficial manner for our body in reaction to the conditions of our blood system and
internal organ, and helps us think.
Nano-Silver Technology
Nanotechnology is a cutting edge technology which is a rapidly growing science of producing and utilizing nano-sized particles that
measure in nanometers (1 nm = 1 billionth of a metre).
Silver has been used for the treatment of medical ailments for over 100 years due to its natural antibacterial and antifungal properties.
The nano-silver when in contact with bacteria and fungus will adversely affect cellular metabolism and inhibit cell growth. In another
words, the nano-silver inhibits multiplication and growth of those bacteria and fungi which cause infection, odour, itchiness and sores.
USPA is manufactured applying new Nano-Silver technologies and absolutely does not allow any bacterial and fungus contamination.
Table of Contents
PREPARATION
3. IDENTIFICATION
4. SAFETY INFORMATION (DANGER)
5. SAGETY INFORMATION (WARNING)
HOW TO USE
6. HOW TO USE
7. HOW TO CLEAN
8. MAINTENANCE
INSTALLATION
9.HOW TO INSTALL
ETC
10. BEFORE CALLING FOR SERVICE
11. SPECIFICATION
1. IMPORTANT SAFEGUARDS
2. CAUTIONS BEFORE INSTALLATION
Notes
1. This product should be installed according to this manual.
2. Please read this manual carefully and install properly.
3. Please save this manual and place an easily accesible location.
4. Do not attempt to service this appliance yourself. Doing so could void warranty.
THIS UNIT WAS MANUFACTURED FOR HOUSEHOLD USE ONLY.
READ ALL OPERATING INSTRUCTIONS BEFORE INSTALLATION.

-
.
1. READ ALL INSTRUCTIONS BEFORE USING
When using electrical products, especially when children are present, basic safety
precautions should always be followed, including the follwing:
DANGER - To reduce the risk of electrocution:
1. Do not place or store this appliance where it can fall or be pulled into a tub or sink.
2. Do not place in, or drop into water or other liquid.
3. Do not reach for a product that has fallen into water. Unplug immediately.
WARNING - To reduce the risk of burns, electrocution, fire or injury to persons.
1. Close supervision is necessary when this appliance is used by or near the very young, the elderly or in invalid. Childern
should not be permitted to use or touch this appliance. do not leave children unattended in any room where this product
has been installed. Be sure to adjust the temperature of the toilet seat for the elderly, those who are incapacitated or pe-
rsons with sensitive skins.
2. Use this appliance only for its intended purpose as described in this manual. Do not use attachments not recommended
by the manufacturer.
3. Never operate this appliance if it has a damaged cord or plug, if it is not working properly, if it has been dropped, dama-
ged or dropped into water.
4. Install the unit properly by following the installation procedure.
5. Only authorized persons can install or repair the unit. Do not attempt to service this appliance yourself. Doing so could
avoid warranty.
6. Keep the cord away from heated surfaces.
7. Never drop or insert any objects into any opening or hose.
8. Do not use outdoors or where aerosol spray products are being used or where oxygen is being administered.
9. Always follow the gounding instruction in this manual before plugging in the unit.
1 Important Safeguards


Tee Valve
Water Supply Tube
to main unit
Water Supply Tube
to water tank
Mounting Bolt (2pcs)
Cone Packing (2pcs)
Washer (2pcs)
Nut (2pcs) De-Odor filter
User Manual
Caution Label
Human Detective Sensor
Seat
Dryer Outlet
Nozzle for Bidet
(anti-bacterial)
Nozzle for Cleansing
(antI-bacterial)
Lid
Power Supply Cord
Catalytic
deodorizer (UB-2235R)
Anion + Catalytic
Deodorizer (UB-2245R)
Control Panel
Remote Control and Holder
Water Purify Filter
3 Idenfication
1. Main unit
2. Accessories

Doing so may result in a short circuit, electic
shorck or fire.
indicates a prohibited use of the appliance.
indicates a required step in use of this appliance.
Prohibition
Do not throw
any firearms
Do not wash
Do not handel with
wet hands
Do not disassemble
Gound connection
Required step
If the outlet obstructed with any objects, it may
result in fire.
If the outlet obstructed with hands, it may result
in injury.
Doing so may result in fire.
Doing so may result in fire or electric shock. If avoided, it may result in short shock or
malfuction.
If not grounded plug used, make sure to
install grounded wire
Grounded wire or outlet must
be installed
Do not wash this appliance with
water.
Do not throw away any firearms
into the toilet.
Do not obstruct the warm air dryer
outlet.
Do not use a faulty or loose
electric outlet or cord.
4 Safety information (Danger)
DANGER Please follow basic instructions
to ensure the safe use of your appliance
Meanins of symbols

Doing so may result in fire or damage.
Be sure to use a dry and clean outlet.
Do not use a faulty or loose outlet.
Do not plug or unplug with wet hands.
It may result in injury or short circuit.
Do not grap the cord when unplugging.
Pull out the plug properly.
Doing so may result in electric shock due to
high voltage inside.
Unplug right away.
Contact your dealer where you bought this
appliance.
Doing so may result in fire or electric shock. Not doing so may occur irritation or injury to
your skin.
Use tap potable water only.
(ground water)
Do not disassemble, repair
modify this appliance.
Do not use when the seat and
lid are disassembled.
Unplug when beeping or
smelling strangely.
Do not use many appliances
in a multi outlet Plug and unplug properly
Danger Please follow basic instructions
to ensure the safe use of your appliance

Do not step or place heavy
objects on this appliance.
Do not force to close the lid.
Be aware of urine splash on a
nozzle or warm air dryer outlet.
Do not sit or lean against
the lid or control panel.
Unplug while not using over
extended period of time.
Unplug while thundering
or lightning.
Doing so may damge the unit.
Do not step on a lid, seat or control panel to
avoid injury or damage.
Doing so may cause malfuction.
Not doing so may result in smelling or
malfuction.
Doing so may cause malfuction or breakage.
5 Saftty Information (Warning)
Please follow basic instructions
to ensure the safe use of your appliance
Warning

Doing so may cause the water leakage.
Not doing so may result in fire, injury or
electric shock.
The unit may be out of order when damaged.
It may result in a low-grade burn if sitting on
the heated seat for a long time.
Be aware of being used by the follwing :
- Children, senior citizens, patients, or who
cannot control the grade of temperature.
- Sleeping pills users, or people who are on
medication that causes drowsiness.
- Who are drunk or very tired and may fall
asleep while sitting on the unit.
If injured in a low-grade burn, see a doctor
immediately.
If high temperature sets up, it may result in
burns due to not recognizing the temperature.
Not doing so may result in fire or electric
shock.
Do not pull out the waterhose
forcedly.
Use this appliance in a toilet only.
Do not put a vase, water cup or
small materials on this appliance. Be aware of a low-grade burn.
Unplug when cleaning. Use the low temperature for
children and disabled.
Please follow basic instructions
to ensure the safe use of your appliance
Warning

Caution
Be aware of not drowning a remote control in water.
It may cause out of order or malfuction.
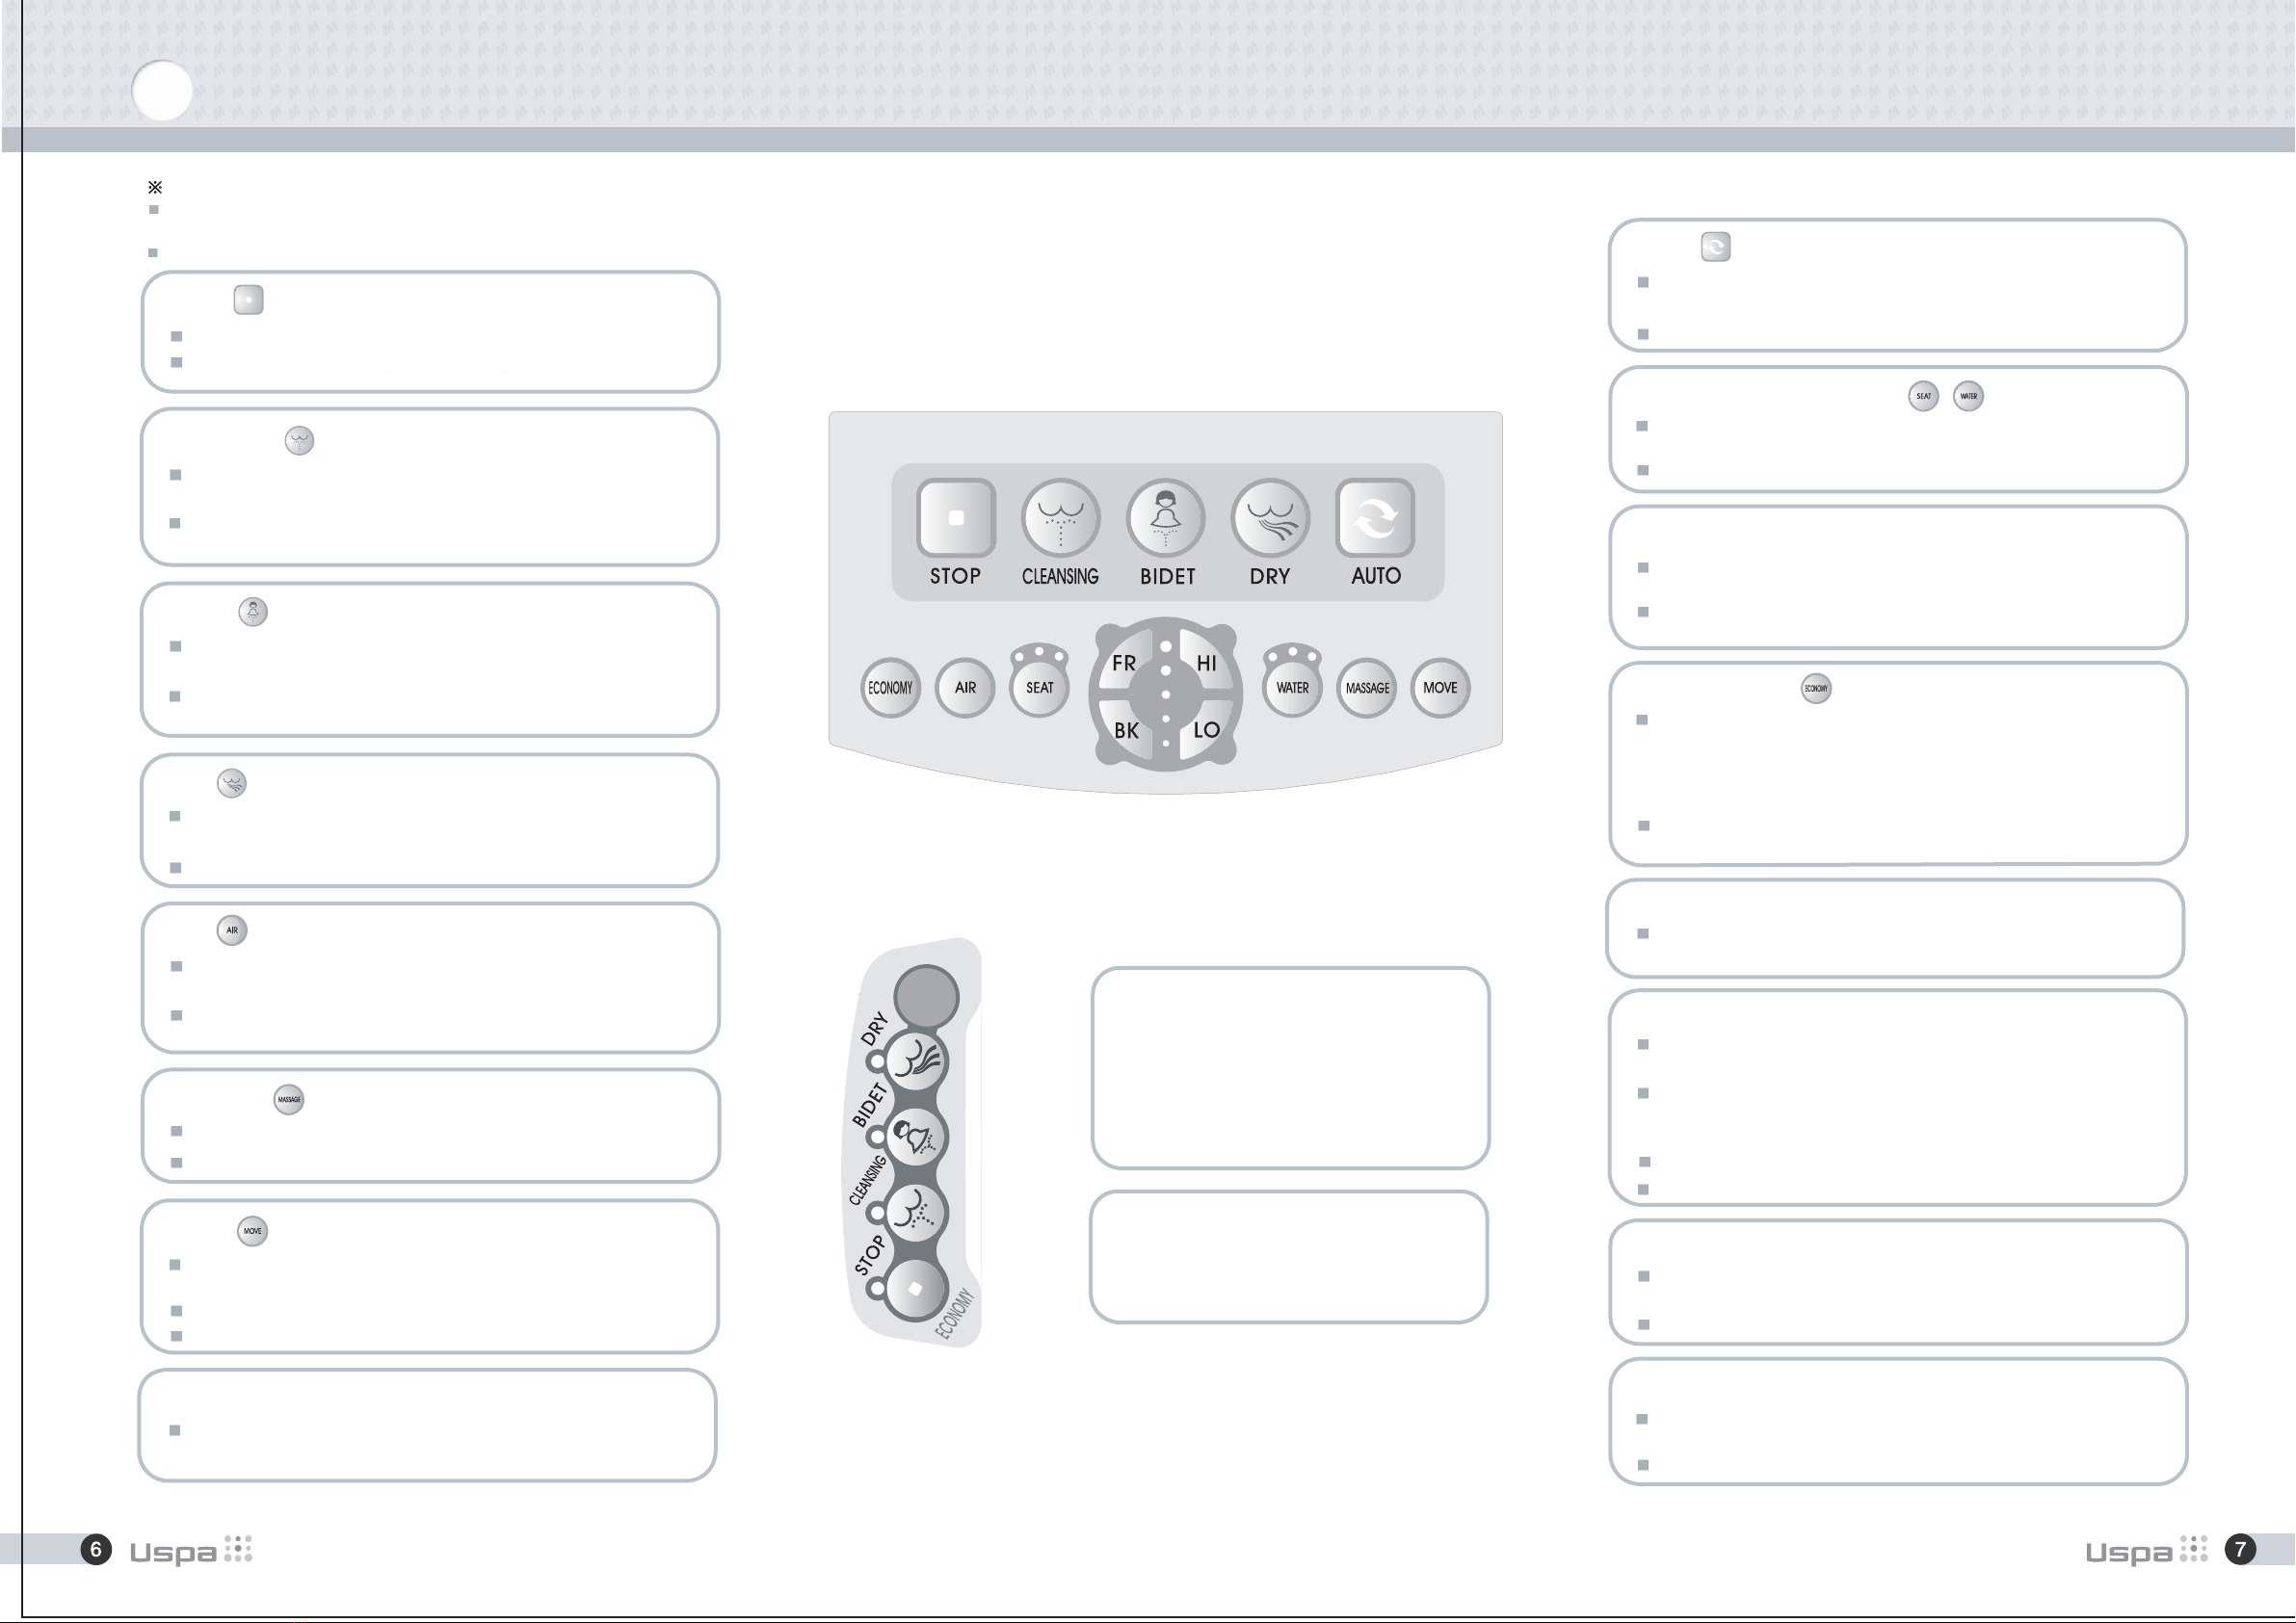
All functions will be operated when the seat is accupied except Nozzle Cleaning.
Press "STOP" to stop all operation.
When a user stands up, all operation will stop automatically.
Press "CLEANSING" to clean the posterior. The function stops in a minute
automatically.
Press "BIDET" for front cleansing. The function stops in a minute automa-
tically.
Press "DRY" button after "CLEANSING" or "BIDET". Dry function stops in 3
minutes automatically.
Press "AIR" to use aerated water spray from a special built in airpump.
Press "MASSAGE" to provide pulsating water spray for feeling better.
During the operation of CLEANSING or BIDET, press "MOVE" to activate
moving wash.
The postion of nozzle can be adjusted by pushing "FR" or "BK" for your
setting position.
Press "AUTO" during the operation of CLEANSING, Cleansing washing,
moving washing and Dry will be operated for each 20 seconds automatically.
Water temperature and seat temperature can be adjusted to your setting
level by pushing "'HI" or "LO".
The strength of water spary pressure can be adjusted by pushing "HI" or "LO"
for your desired level. (5 levels)
Press " ECONOMY" to save the electric power. In the economy mode,
temperature of water and seat keep to 30 celsius degree. Green light will be
shown on the extra panel. When the unit is occupied in the economy mode,
temperature is changed to desired level and goes back to 30 celsius degree
automatically after using.
This appliance keeps clean itself automatically by rinsing off the nozzles
before and after operation of BIDET or CLEANSING.
Press "FR" to clean the CLEANSING nozzle manually while not sitting on the
seat(not occupying)
When the appliance is in use, the deodorizer operates for up to 20 minutes
automatically.
This appliance has a self-dianostic system, whenever the appliance has a
problem, a LED of seat temperature or water temperature will blink.
Self-diagnosis System
Automatic Deodorizer
Nozzle Cleaning
Self Cleaning
Auto
Temperature Adjustment
Water Pressure / Dry Temperature adjustment
Nozzle Position Adjustment
Move
Massage
Air
Dry
Bidet
Cleansing
Stop
Extra Operating Panel
Use this extra panel when the remote control is
broken or its batteries are replaced.
All operation is the same as remote control operation.
Do not use sharp edge things to press a remote
control or extra control panel.
For more information of
Nano-Silver technology or Anion
Please refer to Contents page.
6 How to use
Power Saving
Press "CLEANSING" again to activate moving wash. The nozzle moves back
and forth automatically to widen cleansing area.
Press "BIDET" again to activate oscillating. The nozzle moves back and
forth automatically to widen cleansing area.
To alter the strength of air drying, press "DRY" again.
Stronger but smoother aerated water spray can save water consumption.
Press "MASSAGE" again to stop the opreration.
The nozzle moves back and forth automatically to widen cleansing area.
Press "MOVE" again to stop the operation.
If BIDET AUTO wanted, press "BIDET" and "AUTO" consecutively.
There are 4 levels (room temp, low, middle and high).
Press "FR" again or "STOP" to return the nozzle to stand by mode.
Press "BK" to clean the BIDET nozzle manually while not sitting on the seat
(not occupying)
Press "BK" again or "STOP" to return the nozzle to stand by mode.
Do not forcefully push or pull the nozzles or bend them.
When a user stands up during the operation, it stops in a minutes.
Unplug the electric power cord and contact to your dealer or us.
Press "ECONOMY" again to release the economy mode. Red light will be
turned on. Temperatures are kept to desired level all the times.
The temperature of air dry can be adjusted by pushing "HI" or "LO" for your
desired level. There are 5 levels for both fuctions. (5 levels)

Do not forcefully push or pull the nozzles, or bend them.
Make sure to use "BK" or "FR" when cleaning.
Ensure the human detective sensor is not in use.
(not stting on the seat or not place hands on the sensor part)
Press "FR", then the cleansing nozzle comes out.
Press "BK", then the bidet nozzle comes out.
Do not forcefully push or pull out nozzles, or bend them.
Use a toothblush or soft cloth to clean nozzles.
After cleaning, press "STOP" or "FR" for the cleansing nozzle, or "BK" for the
bidet nozzle.
The nozzles restract themselves.
For a long time cleaning, unplug for your safety.
Do not restract nozzles without a nozzle tip. It may result in malfunction.
Be aware the nozzle tips for lost .
The appliance will not be operated properly if the strainer is clogged.
Be sure to clean the strainer regularly.
Close the shutoff valve by turning clockwise.
Unscrew the unt.
Clean the strainer with a small brush.
RE-screw the nut.
Open the shutoff valve by turning counter clockwise.
Regularly wipe off the body with a dry soft cloth or sponge, or dampened with neutral detergent.
Release the lid.
1. Pull left and up the left hinge part.
2. Release the right hinge part. (Be aware your fingers not to be caught)
For care of plastic body, do not use any cleansers which are not safe to use
in the toilet seats
(toilet cleanser, home cleanser, bleach, bezene, paint thinner, cresol etc)
Toilet cleanser Thinner
Benzebe
Bugs killer Sand paper
Shutoff valve
Nut
Strainer
Water tank
Water purifying filter
Water hose
The water purifying filter is optional.
Nozzle Cleaning
Cleaning the strainer
Cleaning the body
7 How to clean

Water draning - when not using the unit for a long time
Preventing freezing
Unplug the power supply cord. Close the shutoff valve.
Unscrew the mounting bolts.
Uphold the appliance and thoroughly drain the
water by unscrewing the drain bolt.
(beware of losting the drain bolt)
Screw the drain bolt and install the appliance.
Not doing so may be in fire.
Refer to the installation method.
Refer to the trial operation method in oder to use this appliance
again.
Make sure the power coed is
plugged in properly.
Set the temperature of water as low or middle in the control panel.
(Freezing can be prevented by thermal effciency of water tank.)
Not using the unit for a long time in winter, unplug and drain the
water from the water tank and pipes thoroughly.
If there is no heating system in the toilet, wrap pipes with cloth or other materials.
Refer to the water drain method.
8 Maintaning

Do not plug the power cord until installation finished completely.
Not doing so could damage the appliance.
If electric work needed, contact to the qualified electrician or serviceman only.
Remove the existing toilet lid and seat
1. Remove the nuts, washers and cone packings from the toilet seat mounting bolts
in the back of the toilet.
2. Remove the toilet seat, lid and mounting bolts.
3. Keep them in case of installing again.
Install the appliance
Installation Toilet size (elongated)
Insert the mounting bolts through the mounting holes,
and slide cone packings and washers onto the mount-
ing bolts.
Then put the nuts and tighten them.
Mounting bolts
Mounting holes
Cone packings
Washers
Mounting nuts
The toilet demensions must be within those shown
below.
Do not install the USPA on a toilet that does not meet
those demational requirements.
9 How to install
Human Body Detective Sensor
Seat
Human Body Detective Sensor
This appliance is equipped with Human Body Detective
Sensor that prevents working while seat is not occupied.
When a user stands up while using, all operation will stop
automatically.

Connecting the water hose and grounding wire
Close the shutoff valve by turning clockwise.
Empty the water tank completely by flushing.
Remove existing the water supply hose from the tank.
Install the T-valve on the top of stop valve.
Connect one of flexible hose from the T-valve to the water tank.
Connect the water furofying filter to the T-alve.
Open the shutoff valve for 30 seconds to remove floatage.
substance of filter. (if the filter installed only)
Connect another flexible hose from the T-valve to the main appliance.
Open the shutoff valve by turning counter clockwise.
Check for any water leaking or dripping.
Trial operation
Open the shutoff valve and check for any water leaking or dripping.
Plug the power cord into the outlet.
Press the "BIDET" or "CLEANSING", then water tank will be filled with water after about 2 minutes.
After the water tank has filled up, you will hear long buzzer sound.
Cover the toilet bowl using the plastic wrapping sheet of the unit to prevent the washing water from being sprayed out of
the toilet.
Then check for all function described in this manual.
1. Preparation
3. There are possibilities of water coming out that remains in the unit while heating.
2. Checking all function

Problem Solution
Possible cause
Completely fails to work
Seat, water or air is
not enough warm
Water is leaking or dripping
Water does not spray
Is the water shutoff valve closed?
Is the strainer clogged?
Are the nozzles clogged?
Is the water purifying filter clogged?
Check for all hoses are tightened properly If wateris still leaking or dripping, contact to your dealer
Check for any water leaking or dripping
Clean the strainer
Clean the nozzles
Change the water purifying filter
Check for a power cord failure or a tripped breaker
Plug the power ocrd properly
Sit on hte seat completely
Is there a power cord outage?
Does the power cord unplug?
Are you sitting on the seat correctly?
Reset the temperature
Released the economy function
Is the temperature set to OFF?
Is appliance used in economy mode
such a cold weather?
10 Before calling for service
12 Specification
Recommended water supply pressure is 1.0 ~ 7kg
The minimum available water supply pressure is 0.8, however under 1.0 pressure , water spray pressure might not be enough strong.

WARRANTY
USPA Personal Hygiene Appliance Limited Warranty
USPA(we) warrant our products to be free from manufacturing defects under normal use and service for a period of one (1)
year from date of your purchase. Only the ORIGINAL PURCHASE you may make a claim under this limited warranty.
Our obligation to you under this warranty is limited to repair or replacement, at our option, of defective products or parts,
provided that the products were properly installed and used in accordance with instructions. We reserve the right to make
inspections in order to determine the cause of the defect. We will not charge for labor or parts in connection with warranty
repairs or replacement. We are not responsible for the cost of removal, return and/or reinstallation of prodcuts.
This limited warranty does not apply to:
a) Damage or loss from a fire, earthquake, flood, storm, etc
b) Damage or loss resulting from any unresonable use, abuse, negligence, or improper maintenance.
c) Damage or loss from improper installation, removal, repair, or modification.
d) Damage or loss resulting from sediment or other matters contained in your water system.
This warranty gives you specific legal rights.
For warranty or service information, please contact your dealer where you bought this appliance or us.
Only the original purchaser may submit a claim under this limited warranty. To activate your warranty, complete this form.
This limited warranty is our only warranty covering your product. Repair or replacement as provided under this warranty shall
be the exclusive remedy available to you. We shall not be responsible for loss of the product or for other incidental, or conse-
quantial damage or expenses you may incur or for labor or other costs due to installation or removal, or cost or repairs by
others, or for any other expense not specifically stated above. Except to the extent prohibited by applicable law, any implied
warranties, including that of merchantability or fitness for use, are expressly limited to the duration of this warranty.
Warning! We are not responsible or liable for any failure of, or damage to, this plumbing product or product component caused
by in-tank bowl cleaners containing chlorine(calcium hypochlorite).
Note : The use of high concentration of chlorine related products can seriously damage the fittings. This damage can cause
leakage and serious property damage.
For more information, please contact your dealer or us.
Purchase Date Purchased From
Invoice # Amount Paid Serial #
Address City State Country Zip
Phone Fax E-mail
Mail, email or fax the warranty form to :
YOUR LOCAL DEALER FIRST where you bought this appliance
if your dealer is unable to assist you,
SAMHONGTECH CO., LTD
WOOJUNGTOWN 9F, 1488-7, KWANYANG-DONG, DONGAN-KU, ANYANG-CITY, KOREA 431-060
TEL : +82-31-420-2341~5, FAX:+82-31-426-8666
Great products for your healthy living !

This manual suits for next models
1
Table of contents
Other Uspa Bathroom Fixture manuals
Popular Bathroom Fixture manuals by other brands

American Standard
American Standard Elevate AM00837400 owner's manual

Spectrum Brands
Spectrum Brands Pfister Penn LF-049-PE Quick installation guide

Williams-Sonoma
Williams-Sonoma Hughes Towel Ring Assembly instructions

ProFlo
ProFlo PFWSC5240CP manual

Hans Grohe
Hans Grohe 35807803 Assembly

Isenberg
Isenberg Ecomatic 100.6410 installation manual