Uspa UB-6035R Instruction Manual

Personal Hygiene Appliance
Operating
Instruction Manual
■
Thank you for purchasing this USPA product
■
You are kindly requested to read this manual carefully
for proper use of this appliance
■
Please save this manual and place it in an easily accessible
location
■
Please register warranty for proper service
UB-6035R / 6135R
UB-6235 / 6220 / 6210
UB-6335 / 6320 / 6310

EN
THIS UNIT WAS MANUFACTURED FOR HOUSEHOLD USE ONLY.
READ ALL OPERATING INSTRUCTION BEFORE INSTALLATION.
This marking shown on the product or its literature indicates that it should not be disposed of with other
household wasted at the end of its working life. To prevent possible harm to the environment or human
health from uncontrolled waste disposal, please separate this from other types of wastes and recycle it
responsibly to promote the sustainable reuse of material resources.
Householdusersshouldcontacteithertheretailerwheretheypurchasedthisproductortheirlocalgovernmentofce,
for details of where and how they can take this item for environmentally safe recycling.
Business users should contact their supplier and check the terms and conditions of the purchase contract.
This product should not be mixed with other commercial waste for disposal.
Table of contents
PREPARATION
1. IMPORTANT SAFEGUARDS 1
2. CAUTIONS BEFORE INSTALLATION 2
3. IDENTIFICATION 3
4. SAFETY INFORMATION (DANGER) 4
5. SAFETY INFORMATION (WARNING) 6
HOW TO USE
6. HOW TO USE 8
7. HOW TO CLEAN 14
8. MAINTENANCE 15
INSTALLATION
9. HOW TO INSTALL 16
ETC
10. BEFORE CALLING FOR SERVICE 19
11. SPECIFICATIONS 19
12. WARRANTY 20
Notes
1. This product should be installed according to this manual.
2. Please read this manual carefully and install this appliance properly.
3. Please save this manual and place it in an easily accessible location.
4. Do not attempt to repair this appliance by yourself. Doing so could void the warranty.

EN
1
1 Important Safeguards
READ ALL INSTRUCTIONS BEFORE USING
DANGER - To reduce the risk of electric shock:
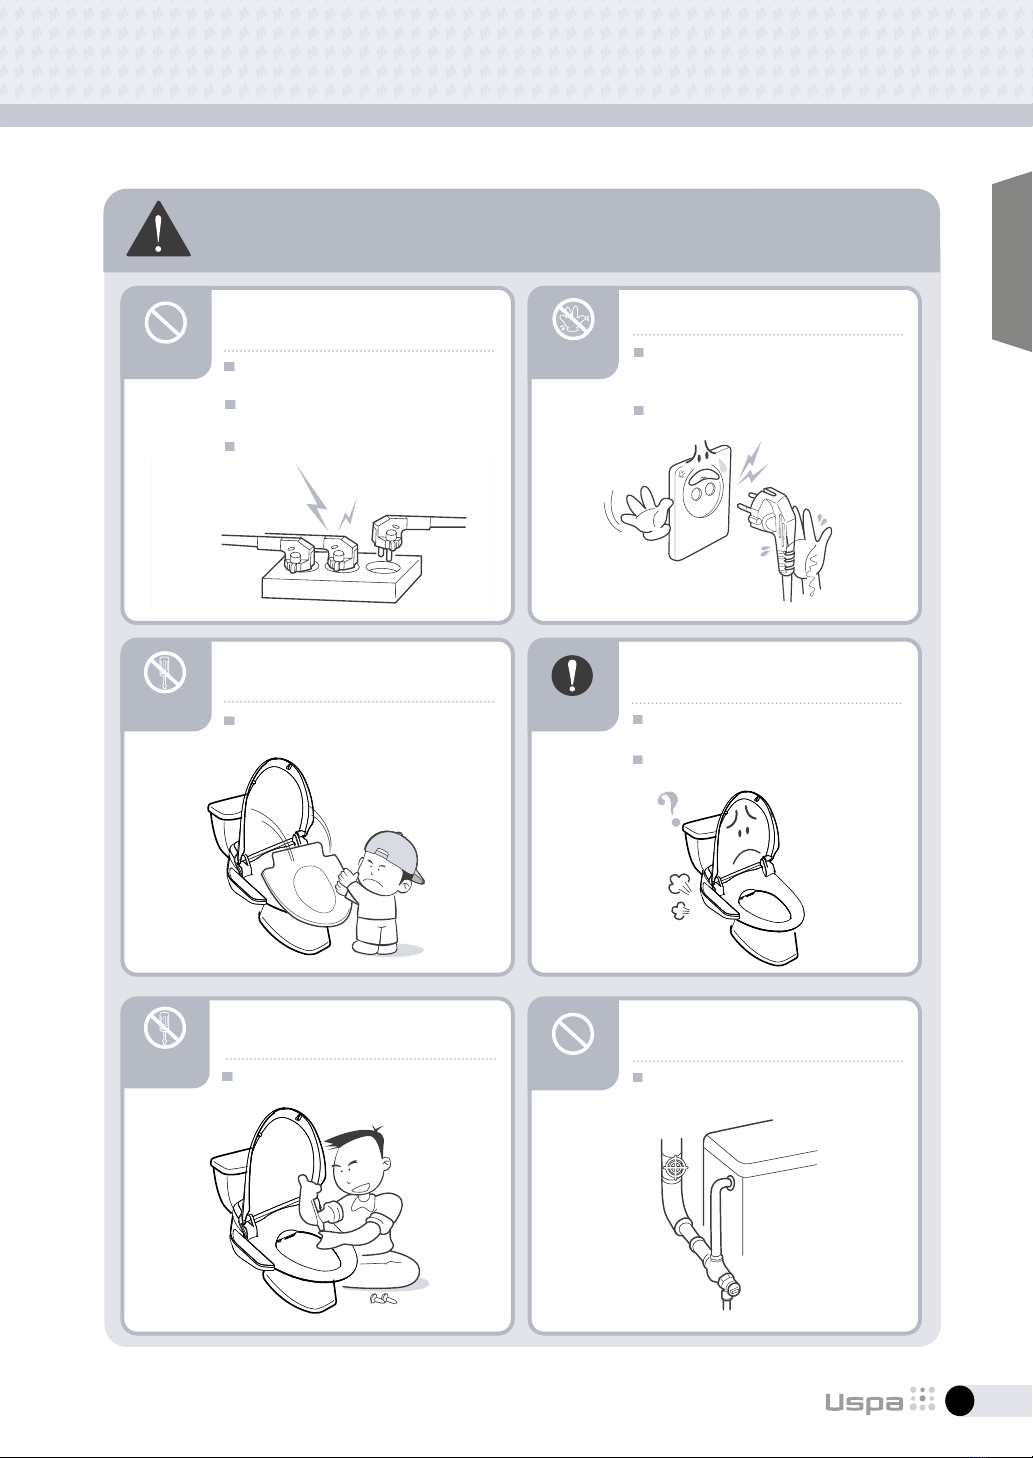
1. Do not place or store this appliance where it can fall or be pulled into a tub or sink.
2. Do not place in, or drop into water or other liquid.
3. Do not reach for a product that has fallen into water. Unplug immediately.
WARNING - To reduce the risk of burns, electric shock, re or injury to people:
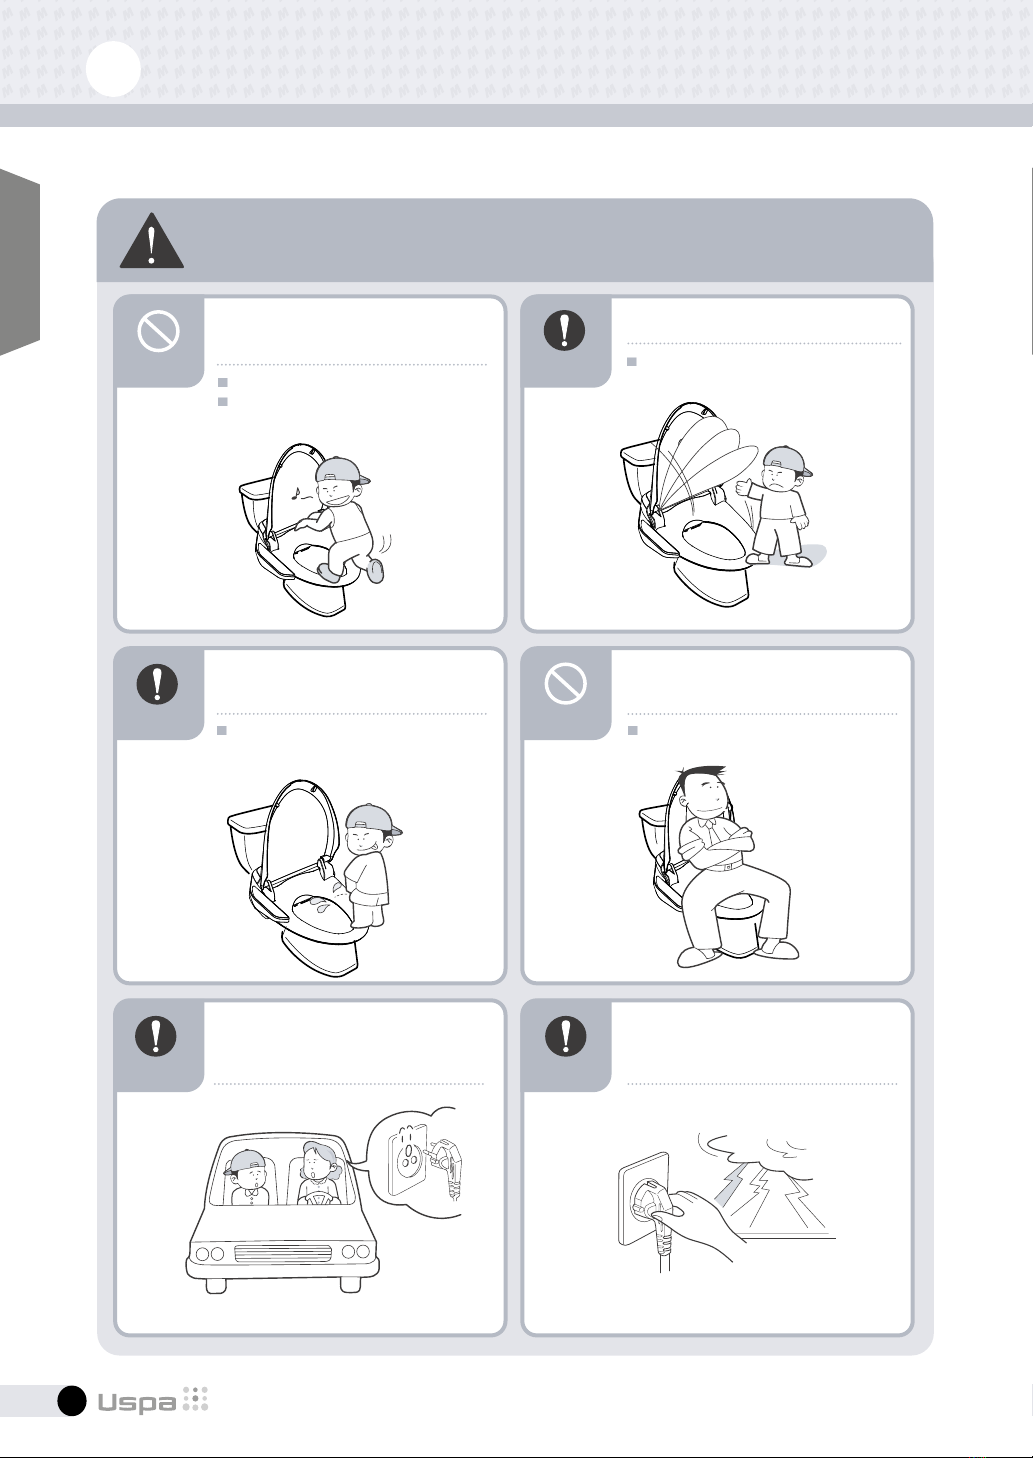
1. Close supervision is necessary when this appliance is used by or near children, elderly or invalid.
Children should not be permitted to use or touch this appliance without the supervision of an adult.
Be sure to adjust the temperature of the toilet seat for the elderly, those who are incapacitated or peo-
ple with sensitive skins.
2. Use this appliance only for its intended purpose as described in this manual. Do not use attachments
not recommended by the manufacturer.
3. Never operate this appliance if it has a damaged cord or plug, if it is not working properly, if it has been
dropped, damaged or dropped into water.
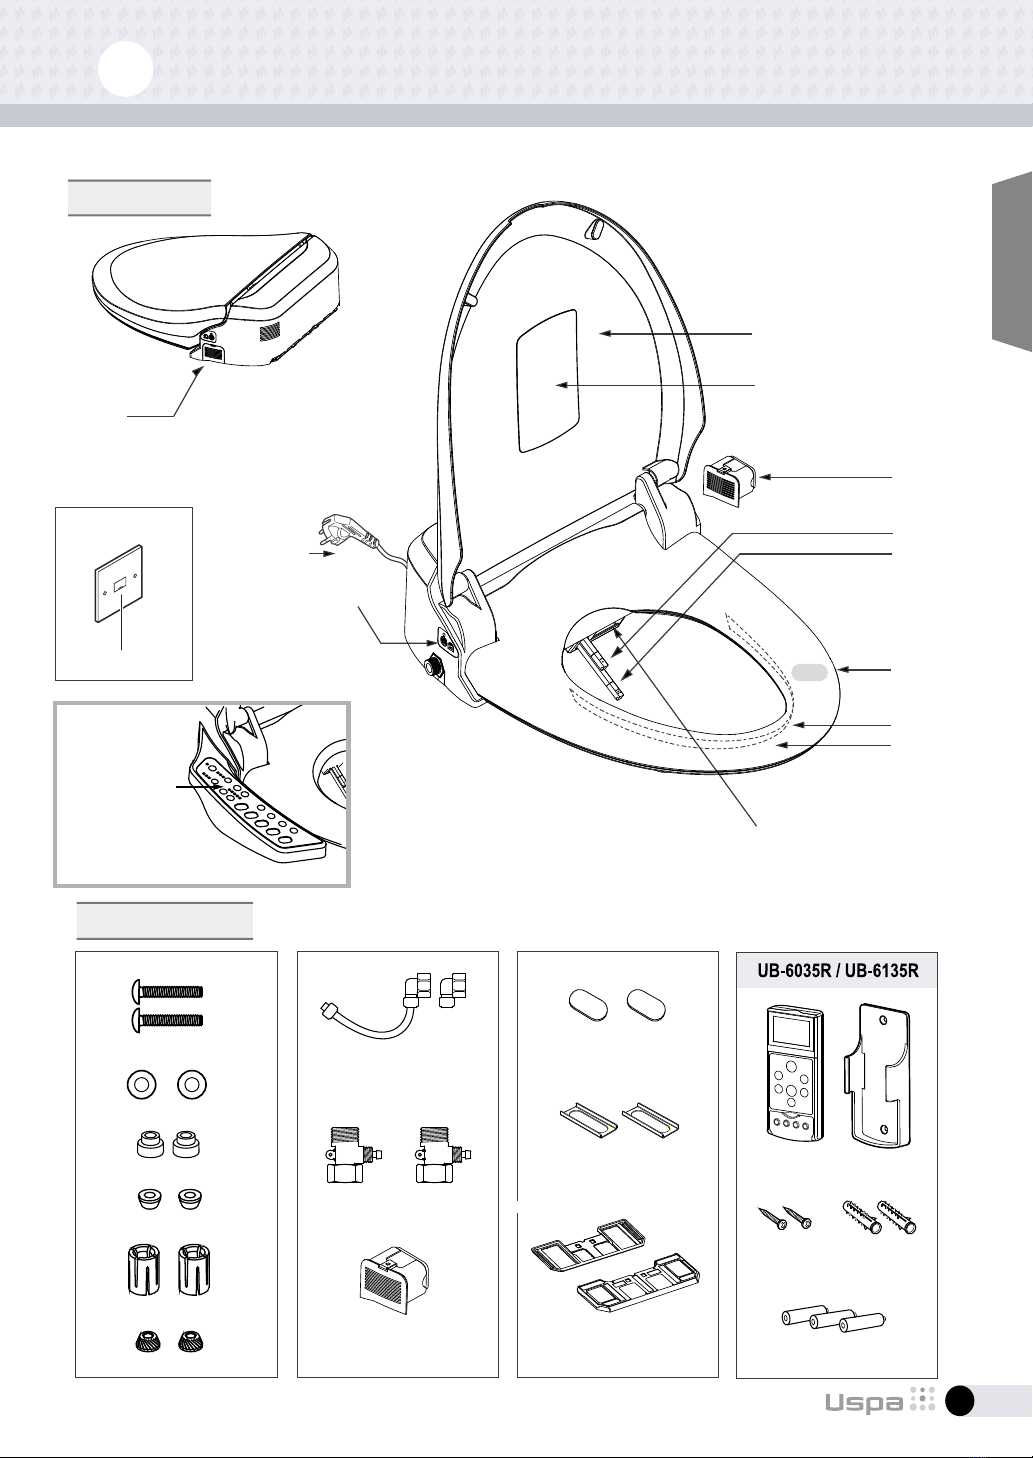
4. Install this appliance properly according to this manual.
5. Only authorized people can install or repair this appliance. Do not attempt to repair this appliance by
yourself, doing so could void the warranty.
6. Keep the cord away from heated surfaces.
7. Never drop or insert any object into any opening or hose.
8. Do not use outdoors. Do not use aerosol or oxygen spray products on the unit.
9. Always follow the grounding instruction in this manual before plugging in.
10. If the supply cord is damaged, it must be replaced by the manufacturer, its service agent or similarly
qualiedpeopleinordertoavoidahazard.
11. This appliance is not intended for use by people (including children) with reduced physical, sensory or
mental capabilities, or lack of experience and knowledge, unless they have been given supervision or
instruction concerning the use of this appliance by a person responsible for their safety.
12. Children should be supervised to ensure that they do not play with this appliance.
SAVE THESE INSTRUCTIONS

EN
2
2 Cautions before installation
1. Do not install in location where water might be splashed on this appliance or in location exposed to such an
excessive moisture that condensation forms on the product surface.
2. To avoid damage to electronic components due to high levels of humidity, provide adequate ventilation by opening
awindowand/ordoorwhenbathing.Youmayndoperatinganexhaustventilatingfanduringthesetimesofhigh
humiditybenecial.
3. The new hose-set supplied with the appliance should be used and the old hose-set should not be reused.
4. Use a water supply having a water pressure 0.08 MPa ~ 0.74 MPa.
5. Connect the product to a pipe carrying potable water. Do not connect to an industrial water line or other water
supply that does not carry water of drinking quality.
6. In areas where water freezes during winter make arrangements to keep the pipes warm. The water remaining in
the unit may sometimes freeze during storage in winter. In that case, warm the unit in the room before installation.
7. The termal protector in the water tank my sometimes trip during storage or transportation in warm weather causing
non-operation. In that case, cool the unit in the room before installation.
8. The rated power voltage is 220-240 V~ / 50/60 Hz
9. Do not supply electrical power to the unit until the plumbing installation work has been completed; it could cause
malfunction.
10. Unplug the appliance during maintenance and cleaning.
NOTE THE FOLLOWING IMPORTANT POINTS
WARNING
Before installing this product, always observe the
local laws and regulations regarding installation.
Incountrieswherepoweroutletsarenotpermittedinbathrooms,suchasU.K.orIreland,pleaseconsultaqualied
electrician for advice on connecting this unit to a power supply. The European two-pin plug should be removed and
theunitshouldbeconnectedtothemainsbyaqualiedelectrician.
In such countries, every time the operating instruction manual refers to unplug the power cord, the user must instead
switch off the circuit.
CONTINENTAL EUROPE U.K. / IRELAND

EN
3
3Identication
1. Main unit
Extra operating panel
[United Kingdom]
Electrical box
Deodorizer
UB-6035R / UB-6135R
UB-6235 / UB-6335
Power cord
Control panel
UB-6235 / UB-6220
UB-6210 / UB-6335
UB-6320 / UB-6310
Lid
Caution label
Nozzle for
posterior
Nozzle for
feminine
Occupied
sensor
Splash guard
Heated seat
Deodorizing
lter unit
2. Accessories
Mounting bolt (2pcs)
Water hose (120 cm)
Elbow connector (2pcs 1/2’’)
T-valve (1/2’’) T-valve (3/8’’)
Extra foot seat (2pcs)
Bolt guide (2pcs) Remote control / Bracket
Battery (AAA 3pcs)
Screw (2pcs) Plastic anchor
(2pcs)
Mounting plate (2 types)
Deodorizing lter
(equipped with this unit)
Washer (2pcs)
Mounting nut (2pcs)
Upper cone
(2pcs)
Lower cone
(2pcs)
Warm dryer
UB-6035R / UB-6135R
UB-6235 / UB-6220
UB-6335 / UB-6320
<Fischer Kit>
Mounting bolt (2pcs)
Washer (2pcs)
Spacers (2pcs)
Upper cone (2pcs)
Mounting nut (2pcs)
Lower cone (2pcs)

EN
4
4 Safety Information (Danger)
DANGER
Please follow basic instructions
to ensure the safe use of your appliance
Indicates a prohibited use of the appliance Do not use a faulty or loose
electric outlet or cord.
Do not throw anything ammable
into the toilet.
Grounded wire or outlet must
be installed.
Do not obstruct the warm air
dryer outlet.
Do not wash this appliance
with water.
Indicates a required step in the use of this appliance
Prohibited
Do not throw
anyrearms
Do not handle
with wet hands
Do not disassemble
Ground connection
Required step
Doing so may result in a short circuit,
electricshockorre.
Doingsomayresultinre.
If avoided, it may result in short circuit
or malfunction, if no grounded wire.
If no grounded plug is used, make sure to
install grounded wire.
If the outlet is obstructed with any object,
itmayresultinre.
Doingsomayresultinreorelectricshock.
If the outlet is obstructed with
hands, it may result in injury.
Do not wash
Meanings of symbols
prohibited
no firearms
ground
connection
required
do not wash

EN
5
DANGER
Please follow basic instructions
to ensure the safe use of your appliance
prohibited
do not
disassemble
do not
disassemble
required
prohibited
no wet hands
Do not use many appliances
in a multiple adapter.
Do not use when the seat and lid
are disassembled.
Do not disassemble, repair
or modify this appliance.
Use tap potable water only
(ground water).
Unplug when beeping or smelling
strangely.
Plug and unplug properly.
Doingsomayresultinreordamage.
Doing so may result in electric shock
due to high voltage inside.
Doingsomayresultinre
or electric shock.
Unplug right away.
Not doing so may cause irritation
or injury to your skin.
Contact your dealer where you bought
this appliance.
Do not plug or unplug with wet hands.
It may result in injury or short circuit.
Do not grab the cord when unplugging.
Pull out the plug properly.
Be sure to use a dry and clean outlet.
Do not use a faulty or loose outlet.
skin.
multiple adapter.

EN
6
5 Safety information (Warning)
Informaciones sobre las medidas de seguridad -
Advertencias
ES
WARNING
Please follow basic instructions
to ensure the safe use of your appliance
Do not step on or place heavy
objects on this appliance.
Be aware of urine splash
on a nozzle or warm air outlet.
Do not force the lid to close.
Do not sit or lean against
the lid or control panel.
Unplug while there is a thunder
or lightening.
Unplug while not using over
extended period of time.
Doing so may damage the unit.
Not doing so may result in smelling
of products or failure.
Doing so may cause malfunction.
Doing so may cause malfunction
or breakage.
Do not step on a lid, seat or control panel
to avoid injury or damage.
prohibited
prohibited
required
required
required required

EN
7
WARNING
Please follow basic instructions
to ensure the safe use of your appliance
Do not pull out water hose
forcefully.
Do not put a vase cup or small
materials on this appliance.
Unplug when cleaning. Use the low temperature
for children and disabled.
Be aware of a low-grade burn.
Use this appliance on a toilet only
Doing so may cause water leakage. Notdoingsomayresultinre,injury
or electric shock.
It may result in a low-grade burn if sitting
on the heated seat for a long time.
If injured in a low-grade burn, see a doctor
immediately.
If high temperature is set up, it may result in
burn due to not recognizing the temperature.
Notdoingsomayresultinreorelectricshock.
Be aware if being used by the following:
- Children, senior citizens, patients,
or who cannot control the grade of
temperature.
- Sleeping pills users, or people who are
on medication that causes drowsiness.
- Who are drunk or very tired and may
fall asleep while sitting on the unit.
Improper use
OK
on a toilet only
prohibited
prohibited required
requiredrequired
prohibited

EN
8
6 How to use UB-6035R / 6135R
When the power is plugged in initially, nozzles for feminine and posterior wash will come out in turn.
Bidet
Bidet
- Press “Bidet” for feminine wash. The function will stop in 60 seconds automatically.
- Press this button again to activate oscillation. The nozzle moves back and forth automatically to widen cleansing
area. Oscillation wash stops if this button is pressed again.
Dry
- Press “Dry” after “Cleansing” or “Bidet”. Far infrared ray typed warm air comes out for 3 minutes.
- To alter the strength of air drying, press this button again.
- Dry temperature can be adjusted in 5 levels by pressing “HI” or “LO” buttons.
IIP (intensive impulse pulsation)
- Press “IIP” for easy defecation. Intensive water pulsation may help you to have easy defecation.
- It works for 60 seconds and stops automatically.
- Press “IIP” button again to change the frequency of the pulsation mode (3 different modes available).
Initially water pressure is set to level 5.
UB-6035-R / 6135R
6 Funcionamiento
ES
ES
UB-6035-R / 6135R
6 Funcionamiento
ES
ES
Aerated spray
Dry (Strong/Mild)
Cleansing
Dry
Economy mode
Time
Water temperature
Seat temperature
Seat
Warm water
Dry temperature
Strong / Mild
Water spray pressure
Stop
- Press “Stop” to stop current operation.
- When a user stands up, all operations will stop
automatically.
Cleansing
- Press “Cleansing” to clean your posterior. The function
will stop in 60 seconds automatically.
- Press this button again to activate oscillation. The nozzle
moves back and forth automatically to widen cleansing
area. Oscillation wash stops if this button is pressed
again.

EN
9
Caution
Be aware of not dropping a remote control in water. It may cause out of order or malfunction.
All functions will be operational when the seat is occupied except Nozzle cleaning.
Before operating, ensure that the water tank is lled up completely.
UB-6035-R / 6135R
6 Funcionamiento
ES
ES
Power / Economy
- Press “Economy”to activate the power saving function. The unit will be in economy mode after 1 hour of last use.
- In the Economy mode, temperature of water and seat will be kept to 30 degrees Celsius. Economy mark (bulb) on the
remote control will be shown.
- When the unit is occupied during the economy mode, the temperature will be returned to the original setting levels and
goes back to the economy mode after 1 hour of last use.
- Press
“Economy”again to release this function. Red light will be turned on in the extra panel.
Nozzle position
- Nozzle position can be adjusted by pressing the Nozzle Position button and then by pressing from 1 to 5
positions when being used.
- Position will be initialized (level 3) after each use.
UB-6035-R / 6135R
6 Funcionamiento
ES
ES
Auto
- Press “Auto” to activate Automatic function: Wash - Oscillation - Pulsation will operate consecutively for 1 min. and
Drying for 3 mins.
- In Bidet Auto wanted, press “Bidet” and “Auto” consecutively.
Water pressure / Dry temperature
Air (aerated spray)
Pulsation (massage)
- Water pressure / Dry temperature can be adjusted in 5 levels by pressing “HI” or “LO” buttons.
- Both functions will be initialized (level 3) after each use.
- Press “Air” to use aerated wash to clean. Gentle, delicate but strong water spray will save water consumption.
- Press this button again to release this function.
- “Cleansing”: this function is always on.
- Press “Pulsation” to activate rhythmical wash for massage effect.
- Press “Pulsation” again to release this function.
Kids
- Press “Kids” to change all functions to be suitable for children.
1 minute for oscillation (level 1 of water pressure and level 5 of nozzle position will be set) and 3 minutes for dry.
- This unit should be used under the supervision of an adult.

EN
ES
ES
10
Do not forcefully push or pull the nozzles or bend them. It may result in failure.
Temperature adjustment (water / seat)
Nozzle cleaning
Time setting
- Temperature of seat and water can be adjustable.
- There are four levels: Room temp-Low-Medium-High.
- Press cleaning button to clean the nozzles manually while not sitting on the seat.
Posterior wash nozzle will come out.
- Press cleaning button again. Posterior nozzle will be returned and feminine
nozzle will come out.
- Press “Stop” to return nozzle to stand-by mode.
ES
ES
- Time on the remote control shows in 12 hours mode.
- To set up the time, press “Time” once and set the time by pressing
- Press “Time” twice and set the minute by pressing
- Time will be re-set if batteries are changed.
ES
ES
ES
ES
Automatic deodorization
- When the appliance is in use, the deodorizer will work automatically (max 20
minutes).
- When a user stands up, it stops after 60 seconds.
Self cleaning
- This appliance automatically cleans its nozzles before and after every use by
rinsing off.
Self-diagnosis system
- This appliance has a self-diagnosis system. Whenever the appliance has a
problem, the “Power” LED on the unit will light on.
- Unplug the unit and contact service center immediately.
Side extra control panels
- Use side control buttons on the unit when the remote control is broken or the charge
of batteries is low.
- Do not use sharp edged items to press buttons.
- To turn off the unit, press “Power/Bidet” while not sitting on the seat.
Right side Left side

EN
11
ES
ES
Identication
How to set ID
• This function is useful for public toilets when more than one unit of this product is installed.
Remote control
• Press “Stop” for 5 seconds and shows up in display.
• Press until your ID appears in display (00~15).
• Press “Stop” again to set ID, and display will return to stand-by mode.
Main unit
• After setting the ID of the remote control, plug in and press “Power/Bidet” on the left side of the main unit to
turn it off without sitting on the toilet seat.
• Press “Power/Bidet” for 1 second at least and simultaneously press “Stop” on the remote control. You will
hear a buzzer sound.
• The ID of the body will be preserved eternally after setting up, even in case of blackout or reactivating the
device after unplugging.
Warning
• If remote control and main unit IDs are different, bidet will not work. Make sure both sides are set with the
same ID. (Initially the respective ID of the remote control and the bidet are “0”).
• To prevent interference among units, main unit and remote control should be set with the same ID.
• If there is only one unit in the bathroom, you don’t need to set ID.
• Initial ID of remote control and main unit is “0”
ES
ES
• There are 16 choices in ID (0~15).
ES
ES
ES
ES

EN
12
6 How to use UB-6235 / 6220 / 6210
UB-6335 / 6320 / 6310
All functions will be operational when the seat is occupied except Nozzle cleaning.
Before operating, ensure that the water tank is lled up completely.
Caution
Stop
- Press “Stop” to stop current operation.
- When a user stands up, all operations will stop automatically.
Cleansing
- Press “Cleansing” to clean your posterior. The function will stop in 60 seconds
automatically.
- Press the button again to activate oscillation. The nozzle moves back and forth
automatically to widen cleansing area.
- Oscillation wash stops if this button is pressed again.
Bidet
- Press “Bidet” for feminine wash. The function will stop in 60 seconds automatically.
- Press the button again to activate oscillation. The nozzle moves back and forth
automatically to widen cleansing area.
- Oscillation wash stops if this button is pressed again.
Dry (far infrared ray) (UB-6220 / 6235 / 6320)
- Press “Dry” after “Cleansing” or “Bidet”. Far infrared ray typed warm air comes
out for 3 minutes.
- To alter the strength of air drying, press this button again.
IIP (Intensive Impulse Pulsation)
- Press “IIP” for easy defecation. Intensive water pulsation may help you to have
easy defecation. It works for 60 seconds and stops automatically. Initially water
pressure is set to level 5.
- Press “IIP” again to change the pulsation mode.
Kids
- Press “Kids” to change all functions to be suitable for children.
- 1 minute for oscillation and 3 minutes for dry, level 1 of water pressure and
level 5 of nozzle position will be set.
- This unit should be used under the supervision of an adult.
Auto
- Press “Auto” to activate Automatic function:
Wash - Oscillation - Pulsation will operate consecutively for 1 min. and Drying
for 3 mins.
- In Bidet Auto wanted, press “Bidet” and “Auto” consecutively.
Self-diagnosis system
- This appliance has a self-diagnosis system.
Whenever the appliance has a problem, the
LED of power on the unit will light on.
Self cleaning
- This appliance automatically cleans its
nozzles before and after every use.

EN
13
Self-diagnosis system
- Unplug the unit and contact service
center immediately.
Self cleaning
Air (aerated spray)
- Press “Air” to use aerated wash to clean. Gentle, delicate but strong water
spray will save water consumption.
- Press this button again to release this function.
- “Cleansing”: this function is always on.
Pulsation (massage)
- Press “Pulsation” to activate rhythmical wash for massage effect.
- Press “Pulsation” again to release this function.
Automatic deodorization (UB-6220 / 6235 / 6320)
- When the appliance is in use, the deodorizer will work automatically (max 20
minutes).
- When a user stands up, it stops after 60 seconds.
Nozzle position
- Nozzle position can be adjusted by pressing the Nozzle Position button.
- Position will be initialized (level 3) after each use.
Water pressure / Dry temperature
- Water pressure / Dry temperature can be adjusted in 5 levels by pressing “HI”
or “LO” buttons.
- Both functions will be initialized (level 3) after each use.
Temperature adjustment (water / seat)
- Temperature of seat and water can be adjustable.
- There are four levels: Room temp-Low-Medium-High.
Economy
- Press “Economy” to activate the power saving function. The unit will be in
economy mode after 1 hour of last use.
- In the economy mode, temperature of water and seat will be kept to 30 degrees
Celsius and green light in the extra panel will be shown.
- When the unit is occupied during the economy mode, the temperature will be
returned to the original setting levels and goes back to the economy mode after
1 hour of last use.
- Press “Economy” again to release this function. Red light will be turned on in the
extra panel.
When the power is plugged in initially, nozzles for feminine and posterior
wash will come out in turn.

EN
14
7 How to clean
This appliance will not operate properly if the strainer is clogged.
Be sure to clean the strainer regularly.
Close the shutoff valve by turning clockwise.
Unscrew the nut.
Clean the strainer with a small brush.
Rescrew the nut.
Open the shutoff valve by turning counter clockwise.
Regularly wipe off the body with a dry soft or sponge, or dampen with neutral detergent.
Release the lid.
1. Pull left and up the left hinge part.
2. Release the right hinge part (be aware your ngers not to be caught).
For care of plastic body, do not use any cleansers which are not safe to use
on toilet seats
(toilet cleanser, home cleanser, bleach, benzene, paint thinner, cresol etc.).
Press “Cleaning” button, posterior nozzle comes out.
Press this button again, feminine nozzle comes out.
Press “Stop” and nozzles will return to stand-by mode.
(for UB-6035R, UB-6135R)
Press “FR” button, posterior nozzle comes out.
Press “BK" button, feminine nozzle comes out.
(for UB-6235, UB-6220, UB6-210, UB-6335, UB-6310)
Do not forcefully push or pull the nozzles, or bend them.
Use a toothbrush or soft cloth to clean nozzles.
Press “Stop”, “FR”, “BK” and nozzles will return to stand-by mode.
For extended period of time cleaning, unplug for safety.
Beware of lost tips and changes. Beware of losing or switching nozzle tips.
Do not retract nozzles without a nozzle tip. It may result in malfunction.
Strainer maintenance
Cleaning the body
Nozzle cleaning Do not forcefully push or pull the nozzles, or bend them. It may result in failure.
Make sure to use “Cleaning” button on the remote control.
Caution
Make sure the occupied sensor is not activated
(not sitting on the seat or not place hands on the seat sensor part).
feminine
feminine
posterior
posterior
Water tank
Water hose
Shutoff valve
Strainer
(1/2'', 3/8'')
T-valve
Toilet cleanser Thinner
Benzene
Bugs killer Sand paper

EN
15
8 Maintenance
ES
Draining water - while not using over extended period of time
Unplug the power supply cord.
Detach the unit.
Make sure the power cord
is plugged in properly.
Set the temperature of water to low or middle.
(Freezing can be prevented by thermal efciency of water tank).
Not using the unit for a long time in winter unplug and
drain the water from the water tank and pipes thoroughly.
Screw the drain bolt and install the appliance.
Close the shutoff valve.
Uphold the appliance and thoroughly drain
the water by unscrewing the drain bolt
(beware of losing the drain bolt).
Notdoingsomaycausere.
Refer to the installation method.
Refer to the trial operation method in order to
use this appliance again.
If there is no heating system in the toilet, wrap pipes with cloth
or other materials.
Refer to the water drain method.
Preventing freezing
Drain bolt

EN
16
9 How to install
430 480
400 450
410 460
ES
Do not plug in until installation is nished completely.
Not doing so may damage the appliance.
If electric work is needed, contact a qualied electrician or serviceman only.
Installation Toilet size
How to mount the plate
Place the plate and guides over each mounting
hole. Insert the mounting bolts respecting the
sequence shown in the picture.
The toilet dimensions must be within those shown below.
Do not install this appliance on a toilet that does not meet
those dimensional requirements.
This appliance is equipped with occupied sensor.
Unit will not work unless seat is occupied.
Occupied sensor
Seat
How to attach and detach the unit
Caution
Remove the existing toilet lid and seat
1. Remove the nuts, washers and cone packings from the toilet seat mounting bolts
in the back of the toilet
2. Remove the toilet seat, lid and mounting bolts.
3. Keep them in case of installing again.
Install the appliance
Mounting plate
Washer
Bolt guide Mounting bolt
Lower coneMounting nutUpper cone
Slide the unit until it clicks
into plate.
Lift the unit up and forward.
Bigger than 40mm~
Bigger than
300mm~
Bigger than
240mm~
Wall
(UNIT: mm)
MODEL
Wall
Occupied sensor

EN
17
ES
Installation of remote control unit
How to insert batteries
How to attach the remote control unit
Recommended position of remote control
Use double sided tape. Use screw with plastic anchor.
Keep the remote control in the bracket
to prevent damage by dropping.
1. Open the battery lid of the remote control and insert 3 AAA batteries into the battery compartment.
2. Check if the display appears properly.
3. Check if the remote control works properly while the seat is occupied.
4. Install the remote control bracket on the wall as shown below.
Note following precautions to prevent ruptured batteries and battery acid leakage.
- Use 3 AAA batteries only. Do not use rechargeable batteries.
- Do not use old and new batteries together. Use same type of batteries only.
- Make sure that all batteries are removed if the remote control is not used for a long time.
- LCD fades or blinks if the batteries are low. Change the batteries immediately.
- Settings (time, power saving mode) will be reset when batteries are replaced.
Magnetic

EN
18
ES
Water tank
(1/2", 3/8")
T-valve
Main unit
Connecting the water hose and grounding wire
Iftheexiblehoseistoolong,itcanbecuteasily
to the required length.
Close the shutoff valve by turning clockwise.
Flush the water tank completely to empty.
Disconnect the existing water supply hose from the shutoff valve.
Install the T-valve as shown on the picture.
Connect the existing water supply hose from the tank to the T-valve.
ConnectthenewexiblehosefromtheT-valvetothemainappliance.
Open the shutoff valve by turning counter clockwise.
Check for any water leaking or dripping.
Trial operation
1. Preparation
Plugthepowercordintotheoutlet.Press“BIDET”or“CLEANSING”,thenwatertankwillbelledwithin2minutes.Afterthe
watertankhaslledup,youwillhearalongbuzzersound.
2. Checking all functions
Cover the toilet bowl using the plastic wrapping sheet of the unit to prevent water from being sprayed out of the toilet.
Then check for all the functions described in this manual.
3. During trial operation there are possibilities of remaining water coming out from the unit while
heating.
1.8m
(W)392mm X (L)520mm X (H)143 mm
(W)392mm X (L)500mm X (H)143 mm
(W)466mm X (L)520mm X (H)143 mm
(W)466mm X (L)500mm X (H)143 mm
(W)392mm X (L)504mm X (H)143 mm (W)466mm X (L)504mm X (H)143 mm
220 ~ 240 V / 280 ~ 333 W
C
M
Y
CM
MY
CY
CMY
K
Other manuals for UB-6035R
2
This manual suits for next models
7
Table of contents
Languages:
Other Uspa Bathroom Fixture manuals
Popular Bathroom Fixture manuals by other brands

KEUCO
KEUCO Stageline 32831 1801Y1 Instructions for use

Panasonic
Panasonic DH-3RL1 operating instructions

Luca Varess
Luca Varess SENSES installation guide

Triton
Triton Opal Installation and operating instructions

Cornat
Cornat T319663 instruction manual

KWC
KWC F5EM1012 Installation and operating instructions