V-tech vt2423 User manual


Important Safety Instructions............1
BEFORE YOU BEGIN ........................2
About Caller Identification ................. 2
Parts Check List ............................... 2
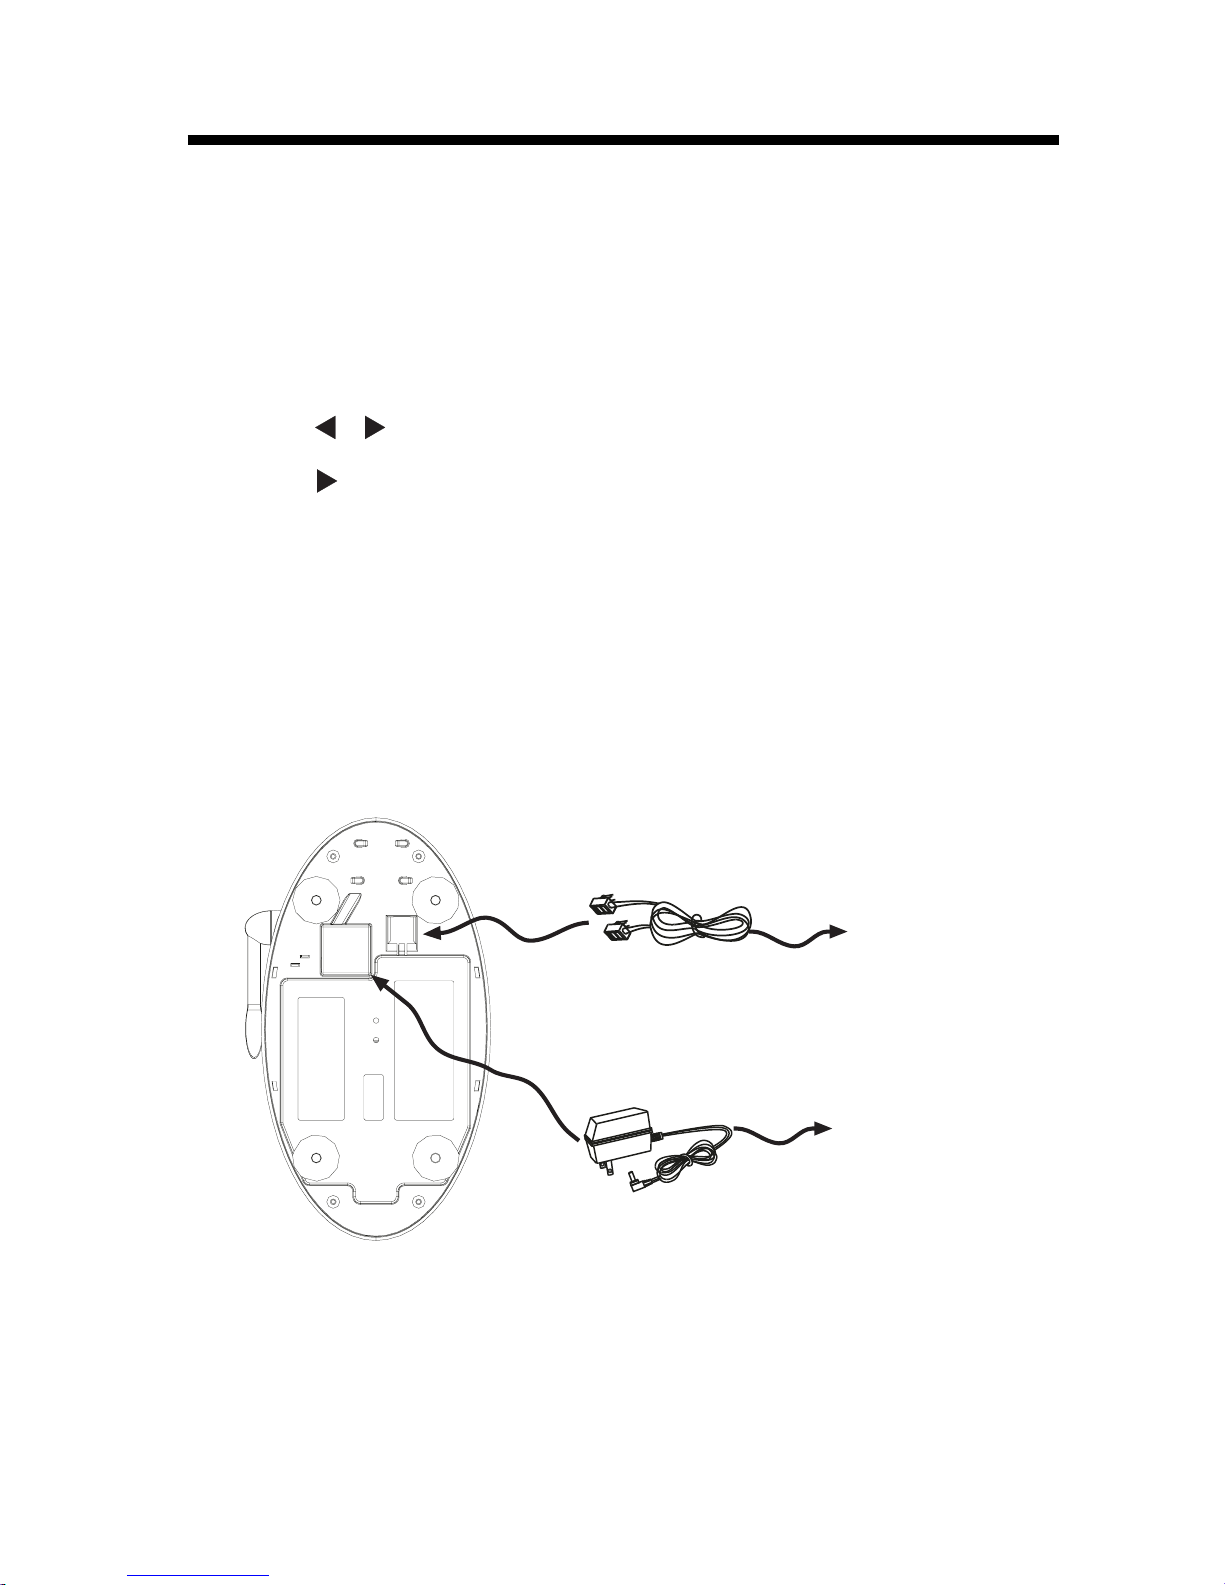
INSTALLATION ................................3
Before You Install ............................. 3
Table/Desk Installation ..................... 4
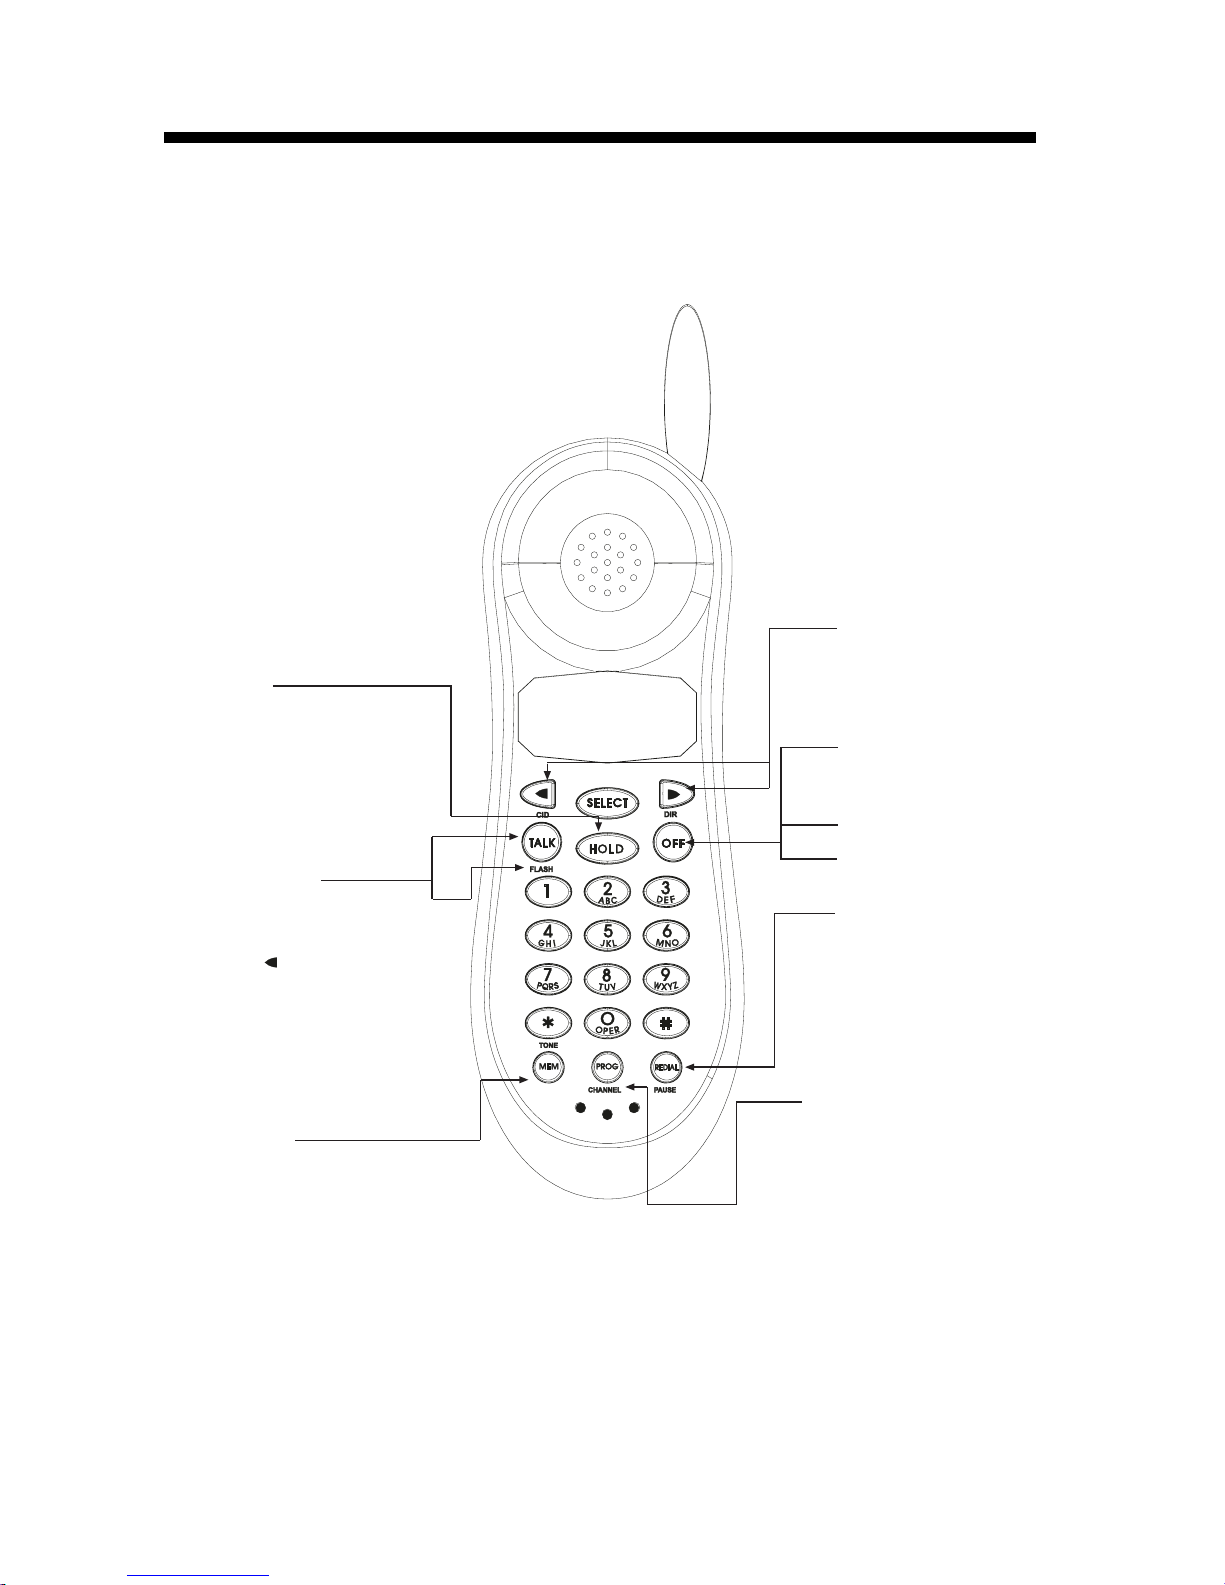
TELEPHONE OPERATION .............. 5
Make a Call....................................... 5
Answer a Call ....................................5
End a Call ........................................ 5
Program/Channel...............................5
Redial ...............................................5
Handset Volume ............................... 5
Memory.............................5
Hold .................................................5
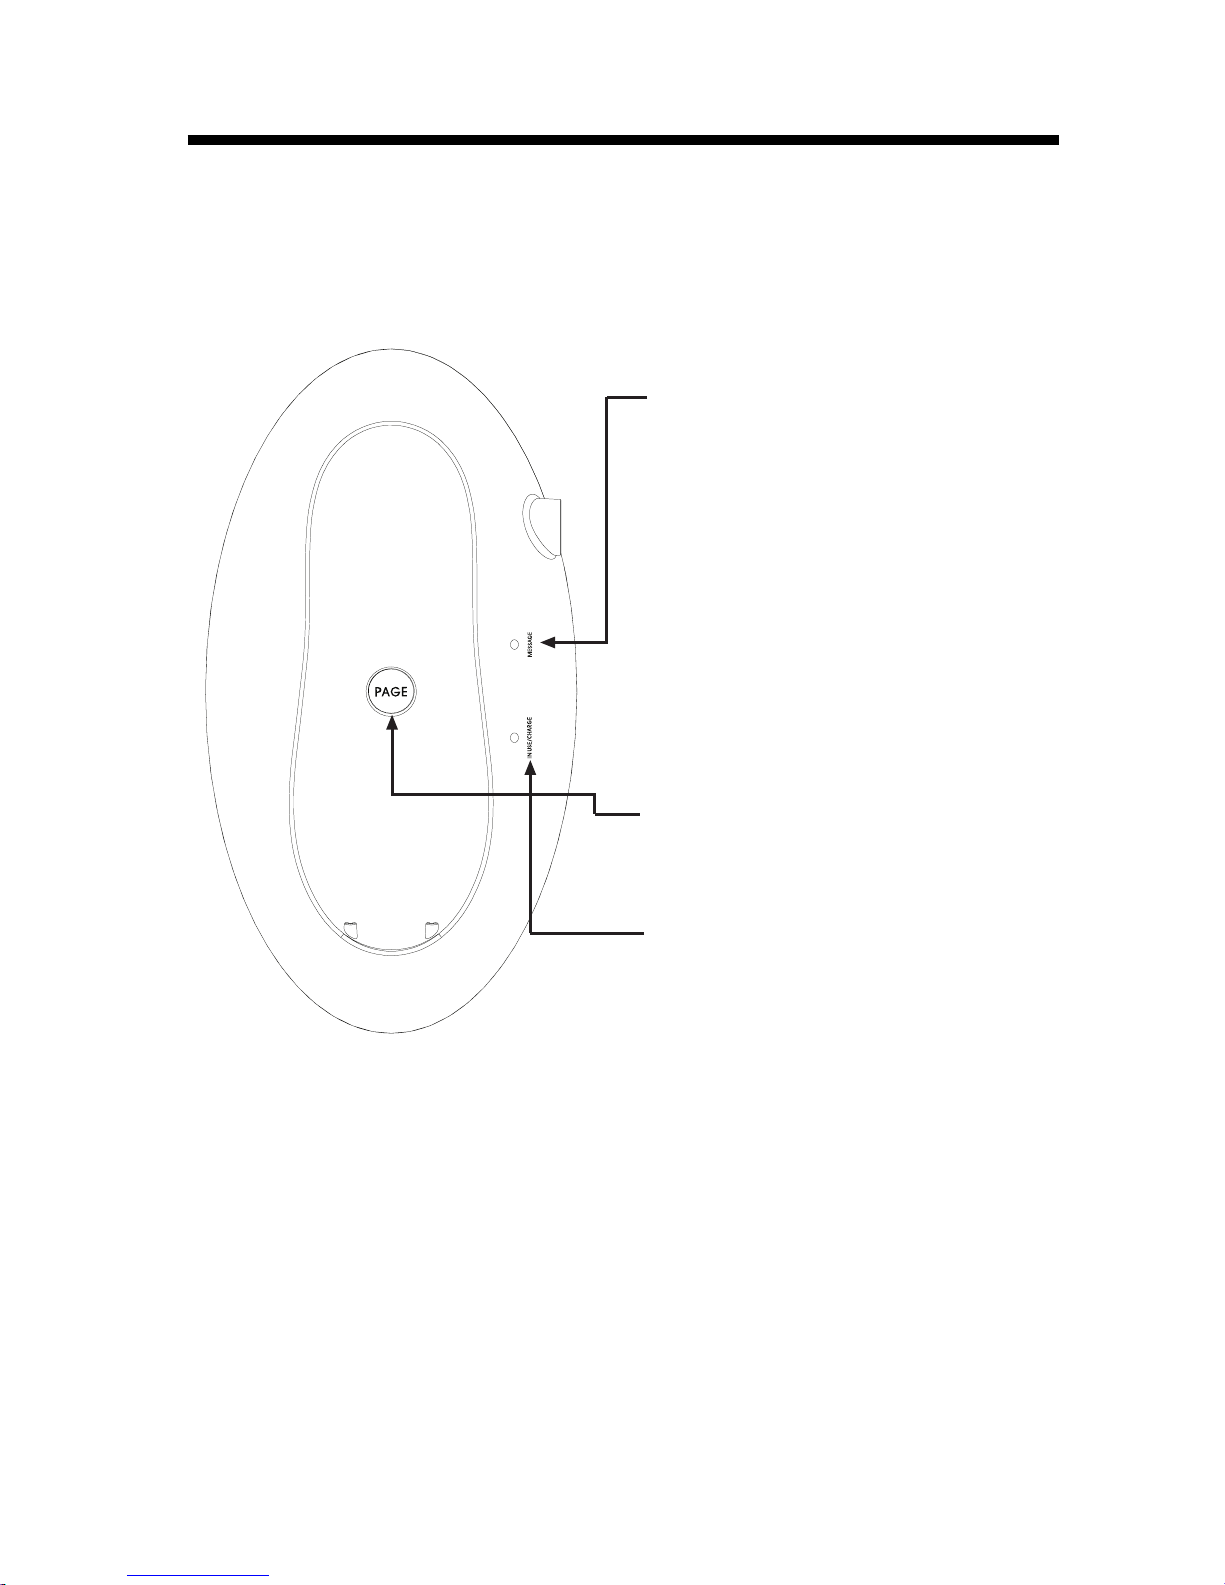
Page/Handset Locator ......................6
Message Waiting Indicator ................6
In Use/Charge Indicator ................6
Handset Ringer Style/ Battery Save......7
Temporary Tone Dialing.................. 7
Operating Range .............................. 8
Display Screen Messages................. 8
TELEPHONE MEMORY .................. 9
Store a Number and Name in Memory
......................................................... 9
Edit a Number/Name Stored in Memory
......................................................... 10
DeleteaNumber/NameStoredinMemory
............................................... 10
Dial a Memory Number ................... 10
TELEPHONE DIRECTORY ............. 11
Store a Number/Name in the Directory
........................................................ 11
Edita Number/Name Stored the Directory
......................................... 12
DeleteaNumber/NameStoredtheDirectory
......................................... 12
Dial a Number from the Directory
........................................................ 12
CALLER ID OPERATION ................. 13
About Call History ............................. 13
Review Call History ........................... 13
Delete Records from Call History
........................................................... 13
Dial a Displayed Number.................... 14
Store a Call History Record in the
Directory............................................. 14
Display Screen Messages.................. 14
BATTERIES ....................................... 15
Charge the Handset Battery Pack
........................................................... 15
Replacing the Handset Battery Pack
........................................................... 15
IN CASE OF DIFFICULTY ...................16
MAINTENANCE....................................18
WARRANTY STATEMENT ...................19
FCC REGULATIONS.......................... 21
The RBRC™ Seal ............................... 23
TECHNICAL SPECIFICATIONS.......... 23
CONTENTS

When using your telephone equipment, basic safety precautions should always
be followed to reduce the risk of fire, electric shock and injury to persons, including the
following:
1. Read and understand all instructions.
2. Follow all warnings and instructions marked on the product.
3. Unplug this product from the wall outlet before cleaning. Do not use liquid cleaners or
aerosol cleaners. Use a damp cloth for cleaning.
4. Do not use this product near water (for example, near a bath tub, kitchen sink, or
swimming pool).
5. Do not place this product on an unstable cart, stand, or table. The product may fall,
causing serious damage to the product.
6. Slots and openings in the cabinet and the back or bottom are provided for ventilation.
To protect it from overheating, these openings must not be blocked by placing the
product on the bed, sofa, rug, or other similar surface. This product should never be
placed near or over a radiator or heat register. This product should not be placed in a
built-in installation where proper ventilation is not provided.
7. This product should be operated only from the type of power source indicated on the
marking label. If you are not sure of the type of power supply to your home, consult
your dealer or local power company.
8. Do not allow anything to rest on the power cord. Do not locate this product where
the cord will be abused by persons walking on it.
9. Never push objects of any kind into this product through cabinet slots as they may
touch dangerous voltage points or short out parts that could result in a risk of fire or
electric shock. Never spill liquid of any kind on the product.
10.To reduce the risk of electric shock, do not disassemble this product. Opening or
removing cabinet parts other than specified access doors may expose you to
dangerous voltages or other risks. Incorrect reassembling can cause electric shock
when the appliance is subsequently used.
11.Do not overload wall outlets and extension cords as this can result in the risk of fire
or electric shock.
12.Unplug this product from the wall outlet and refer servicing to an authorized service
facility under the following conditions:
A.When the power supply cord or plug is damaged or frayed.
B.If liquid has been spilled into the product.
C.If the product has been exposed to rain or water.
D.If the product does not operate normally by following the operating instructions.
Adjust only those controls that are covered by the operating instructions, because
improper adjustment of other controls may result in damage and will often require
extensive work to restore the product to normal operation.
E.If the product has been dropped and the cabinet has been damaged.
F. If the product exhibits a distinct change in performance.
13. Avoid using a telephone (other than a cordless type) during an electrical storm.
There may be a remote risk of electric shock from lighting.
14. Do not use the telephone to report a gas leak in the vicinity of the leak.
SAVETHESEINSTRUCTIONS
1
Important Safety Instructions

Enhanced 2.4GHz Technology -
Dual Band
transmission combines the best of 2.4GHz
and 900MHz technologies, providing enhanced performance over standard cordless
telephones.
About Caller Identification (Caller ID)
This product has a Caller ID with Call Waiting feature that works with service from your
local phone service provider.
Caller ID with Call Waiting lets you see who’s calling before you answer the phone, even
when you’re on another call.
You may need to change your phone service to use this feature. Contact your phone
service provider if:
• You have both Caller ID and Call Waiting, but as separate services (you may need
combined service)
• You have only Caller ID service, or only Call Waiting service
• You don’t subscribe to any Caller ID or Call Waiting services.
You can use this product with regular Caller ID service, and you can use this product’s
other features without subscribing to either Caller ID or combined Caller ID with Call Waiting
service.
There are fees for Caller ID services, and they may not be available in all areas.
This product can provide information only if both you and the caller are in areas offering
Caller ID service, and if both telephone companies use compatible equipment.
Parts Check List:
1. Base Unit 2. Handset
3. AC Power Adapter 4.Telephone Line Cord
5. Battery Pack 6. Owner’s Manual
To purchase replacement battery packs, call 1-800-595-9511.
BEFORE YOU BEGIN
2
Handset Base Unit T
AC Power Adaptor
Battery Pack
Owners Manual

3
Before You Install
1. Choose a location for the Base near an electrical outlet and a telephone jack.
This phone requires a modular telephone jack and a standard electrical outlet (110v AC)
not controlled by a wall switch. Plug the AC power adaptor into the electrical outlet and
the DC connector to the jack on the bottom of the Base Unit.
2. Install the Handset battery pack. Use only battery pack provided or recommended by
the manufacturer.
NOTE: Install the Base Unit away from electronic equipment, such as personal
computers, television sets or microwave ovens. Avoid excessive heat, cold, dust or
moisture.
INSTALLATION
a) Remove battery
compartment cover by
pressing on the indenlation
and siiding downward.
b) Align the two holes in the plug
with the socket pins, then snap
the plug into place.
c) Place battery pack in the
compartment with the wires
in the lower left corner. Run
the wires under the guide
located directly below the
battery pack.
d) Replace cover by sliding
it up into place.

3. Charge the handset battery.
Place the handset in the base. Charge the battery for at least 12 hours the first time.
4. Check for dial tone
After the batteries are charged, connect the modular telephone cord between a live
phone jack and the jack located on the bottom of the Base Unit. Pick up the Handset
and press PHONE. You should hear a dial tone.
5. Set the dial mode.
If you have touch tone service, the phone is ready to use as soon as the batteries are charged.
If you have dial pulse (rotary) service, you’ll need to change the dial mode.
• Press PROG/CHANNEL on the handset to enter programming mode.
• Press or until the screen displays DIAL MODE:and the currently selected mode.
• Press SELECT.The current setting blinks.
• Press to select PULSE (or TONE).
• Press SELECT to save the displayed mode.
INSTALLATION
4
Table/Desk Installation
Connect the power cord
Connect the telephone
line cord
Connect to
modular telephone
jack
Connect to standard
electrical outlet

TELEPHONE OPERATION
5
Answer a call
Press any key
except OFF
HOLD
Press to put a call on hold;
press HOLD again to return
to the call,OR lift the Handset
of an extension phone.
Make a Call
Press TALK / FLASH,
then dial the number
OR Dial the number
(use to backspace
and correct digits),then
press TALK / FLASH
Press TALK/FLASH to
answer call waiting.
Handset Volume
While on a call,
adjust the volume
of what you hear
End a Call
Press OFF or place
Handset in Base
cradle
Exit
programming
Cancel a page
Redial
Press PHONE,
then press
REDIAL / PAUSE
to call last number
dialed(up to
32 digits)
Program/Channel
Switch to a clearer
channel while on a call
Enter programming
mode with Handset
idle(on hook)
Memory
Use MEM to program
and dial stored numbers.

TELEPHONE OPERATION
6
Message Waiting Indicator
If you subscribe to telephone company
voice mail with a visual message waiting
signal, this light will flash when you have
new voice mail. In addition, the Handset
displays: MESSAGE WAITING.
NOTE: The visual MESSAGE WAITING
feature requires a signal from your local
telephone company called
FSK
(Frequency
Shift Keying). Not all local phone companies
can provide this signal. The audible stutter
dial tone alone will not activate the Message
Waiting feature on this telephone. Please
check with your local service provider if
the FSK signal is available in your area.
PAGE / Handset Locator
Press to page the Handset for up to 60
seconds. Press again to cancel,
or press OFF on the Handset.
IN USE/CHARGE indicator
Flashes when the Handset is in
use, or on steady when the Handset
is charging in the Base.
This indicator flashes rapidly
while a call is on HOLD.

Handset Ringer Style/Battery Save
You can select from four different handset ringer styles, or turn the ringer off and
extendthebatterylife.
1Makesurethe handset is off.
2PressPROG/CHANNELtoenterprogrammingmode.
3Press untilthe screen displaysRINGER: and the currentselection.
4PressSELECT. The current setting flashes.
5Press or toselect1, 2, 3, 4,or OFF.Youwillhearasampleofeach ring.
6PressSELECT to choose thedisplayedringer setting.
Temporary Tone Dialing
Ifyou have dial pulse (rotary) service,youcan change from dial pulsetotouch tone
dialing during acall by pressing *TONE.Thisisusefulif youneed to send touch tone
signalsforaccessto telephone banking or long distance services.
1Dialthenumber.
2 Press *TONE.Buttonspressedafterthis send touch tone signals.
3 Afteryouhangup,thephoneautomaticallyreturns to dial pulse (rotary) service.
TELEPHONE OPERATION
7

Operating Range
Thiscordless telephone operateswithinthemaximum power allowedbytheFederal
CommunicationsCommission(FCC). Even so, this handset and basecancommunicate
overonly a certaindistance—which can varywiththelocations ofthebaseand handset,
theweather,andthe construction of yourhomeor office.Forbest performance,keepthe
baseantenna fullyupright.
If you receive a call while you are out of range, the handset mightnotring — or if
it does ring, the call might not connect when you press TALK. Move closer to the base,
then press TALK to answerthe call.
If you move out of range during a phone conversation, you might hear noise or
interference.Toimprove reception, movecloser to the base.
If you move out of range without pressing OFF,yourphone willbe left“offthe hook.”
To hang upproperly, walk back intorange,periodically pressing OFF .
TELEPHONE OPERATION
8
DisplayScreen Messages
Screen Displays: When:
NO LINE
RINGING
CONNECTING...
PHONE ON
MESSAGES WAITING
**PAGING**
HOLD
EXIBNSION IN USE
BATTERY LOW
The base is not connected to the telephone line,
or the line is not working.
There is a call coming in.
The handset is waiting for dial tone.
The handset is in use.
You have received telephone company voice mail.
There is a call on hold.
Another extension on this line is off hook.
The battery needs to be recharged.
The base is paging the handset.

9
Thiscordlessphonecanstore10telephonenumbers with names, each up to 16 digits
longin memory locations youassign(0-9).
Note:Press
OFF
atany time to exitmemory dial mode.
Store a Number and Name in Memory
1Press PROG/CHANNEL, then press until the screen displays MEM DIAL.
2Press MEM. The screen displays ENTER 0-9.
3Pressthe key (0-9) for the memory location whereyou’re storing this entry.Ifthe
selectedlocation isempty,thescreen displaysENTER NAME.
Note:If the location is not empty, the current entry is displayed.Press
OFF
toexit
memorydialmodeand start again, or followtheinstructionsto dial, edit or erasethe
current entry.
4Usingthechartbelow, enter up to 15 charactersforthenameyou’re storing with
thenumber.Use tobackspaceand makecorrections;use toadvanceand
adda space.
5Whenyoufinish entering the name,press SELECT orPROG/CHANNEL.The
screen displays ENTER NUMBER.
6Enterthetelephone number.Use to backspaceand make a correction.Press
REDIAL/PAUSEto store apauseinthedialing sequence.
7 Press SELECT or PROG/CHANNEL to store your entry. The screen displays
DISTINCTIVE RING? and the current setting.
TELEPHONE MEMORY
Dial Key:
Presses
123456
1
2
3
4
5
6
7
8
9
0
*
#
1
ABC2
DEF3
GHI 4
JKL5
MNO6
PQRS7
TUV8
WXYZ9
0
*
&,-.#

10
8 Press or tochange thesetting.ChooseY(forYes)ifyouwish thephoneto alert
youto callsfromthisnumber bychangingtoa distinctiveringingpatternafter thefirst
ring.ChooseN(forNO)fora normal ringing pattern.
9 PressSELECT orPROGRAM toconfirm yourselection.Ifyouchoose Y, a Dwill be
displayed with thedirectory entry.
Edit a Number/Name Stored in Memory
1Press MEM.The screen displays ENTER 0-9.
2Pressthememory location key of the entry youwishto edit.
3Whenthescreendisplays the numberyouwantto edit, pressSELECT.Then
press until EDIT flashes.
4Press SELECT.The screen displays the name and number.The flashing cursor
appearsattheendofthename.Use ,andthedialpadkeystoeditthename.Press
SELECT tomoveonto edit thenumber.Use , andthedialpad keystoedit the
number.Press SELECT to move on to edit the DistinctiveRing setting.
5PressSELECT to save theeditedinformation.
Delete a Number/Name Stored in Memory
1PressMEM.ThescreendisplaysENTER 0-9.
2Pressthememorylocation key of the entry you wish to edit.
3Whenthescreendisplaysthe number youwanttodelete,press SELECT.Then
press until ERASE flashes.
4PressSELECT.ThescreendisplaysERASE NO YES andthenumber.
5Press until YES flashes.
6PressSELECT.
Dial a Memory Number
1PressMEM.ThescreendisplaysENTER 0-9.
2Pressthememorylocation key of the entry you wish to edit.
3Whenthe screendisplaysthenumberyouwantto dial,pressSELECT. DIALwillbe
flashing.
4PressSELECT.Thephoneautomaticallydialsthenumber.
TELEPHONE MEMORY

11
Thiscordlessphonecanstore40telephonenumberswithnames,eachup
to16digitslong.Entries arestoredalphabetically.Forconsistency with
CallerIDentries,youmaywishtoenterlastnamesfirst.
Note:Press OFF at anytimeto exitdirectory.
Store a Number/Name in the Directory
1PressPROG/CHANNEL.ThescreendisplaysDIRECTORY .
2PressSELECT.ThescreendisplaysENTER NAME .
3Usingthechartbelow,enterupto15characters forthe name you’re storing with the
number.Use to backspaceand makecorrections;use to advanceand add a
space.
4Whenyoufinish entering the name,pressSELECT orPROG/CHANNEL.The
screen displays ENTER NUMBER .
5Enterthetelephone number.Use tobackspaceand makeacorrection.Press
REDIAL/PAUSEto store apauseinthedialing sequence.
6Press SELECT or PROG/CHANNEL.The screen displays DISTINCT RING?
andthecurrentsetting.
7Press or to change the setting.Choose Y(forYes) if you wish the phone to
alertyoutocallsfromthisnumberbychangingtoadistinctiveringingpatternafter
thefirstring. Choose N(for NO) for a normal ringing pattern.
TELEPHONE DIRECTORY
Dial Key:
Presses
123456
1
2
3
4
5
6
7
8
9
0
*
#
1
ABC2
DEF3
GHI 4
JKL5
MNO6
PQRS7
TUV8
WXYZ9
0
*
&,-.#

8 Press SELECTorPROG/CHANNEL toconfirm your selection.Ifyouchose Y,a
Dwill be displayed with the directory entry.
NOTE:
Whenmemory is full thescreendisplaysMEMORY FULL,anerrortone sounds,
andyou will not be ableto store a new numberuntil youdelete a stored number.
Edit a Number/Name Stored in the Directory
1 Press ( DIR ).The screen displays DIRECTORY .
2 Press or toscrollalphabetically through entries stored in memory
-OR-
Press the dial pad key for the first letter of the entry you want to edit.
3 Whenthescreendisplaysthenumberyouwanttoedit,pressSELECT.Thenpress
until EDIT flashes.
4 Press SELECT.The screen displays the name and number.The flashing cursor
appearsattheendofthename.PressSELECT tomove on to edit the number.Use
, andthedialpad keystoedit thename. PressSELECT tomoveontoeditthe
DistinctiveRing setting.
5 PressSELECT to save theeditedinformation.
Delete a Number/Name Stored in the Directory
1 Press ( DIR ).The screen displays DIRECTORY.
2 Press or to scroll alphabetically through entries storedinmemory -OR-
Pressthe dial pad key for thefirstletter of the entry youwantto delete.
3 When the screen displays the number you want to delete, press SELECT . Then
press until ERASE flashes.
4 PressSELECT.ThescreendisplaysERASE NO YES andthenumber.Thecurrentchoice
flashes.
5 Press until YES flashes.
6 PressSELECT. You’ll hearaseries of beepsconfirming the deletion.
Dial a Number from the Directory
1 Press ( DIR ).The screen displays DIRECTORY.
2 Press or to scroll alphabetically through entries storedinmemory -OR-
Pressthe dial pad key for thefirstletter of the entry youwantto dial.
3 Whenthescreendisplaysthenumberyouwant todial,press SELECT. DIALwillbe
flashing.
4 PressSELECT.Thephoneautomaticallydialsthenumber.
TELEPHONE DIRECTORY
12

CALLER ID OPERATION
Caller s
name
Caller s
telephone
number
Date of call Time of call Position of call
in call history
About Call History
Thisphoneassignseachincomingcallanumberfrom1to99.Themostrecentcallwillhave
thehighestnumber.When thememoryisfull,theoldest callinformationisdeletedtomake
roomfor new incomingcallinformation.
Foreach callthatcomes in,thescreendisplays thefollowinginformation betweenthefirst
andsecondrings:
• Yourcaller’sname(15lettersare sent byyour telephone company)
• Thecaller’s areacodeand telephonenumber
• Thetime and dateofthecall
• Thepositionofthe call in call history.
Ifyou answer a call before theinformationappears on the screen, itwillnot be in the call
history.
Note:Press OFF atanytime toexitcall history.
Review Call History
Thescreendisplayscallinformationforabout15 seconds after it has been received.
1 Press (CID) to viewcall history.
2 Use or to scroll through records in call history.
Delete Records from Call History
Delete a Specific Call
1 Locatethe record you wantto delete from call history.
2 Press SELECT,then press until ERASE flashes.
3 PressSELECT.Thescreen displaysERASE NO YES ALL and thephone number.
Thecurrentchoice flashes.
4 Press untilYES flashes.
5 PressSELECT.You’llhear aseriesofbeeps confirmingthedeletion.
Delete All Calls
1 Whileviewingcall history, press SELECT,thenpress untilERASE flashes.
2 PressSELECT.ThescreendisplaysERASE NO YES ALL andthephonenumber.The
currentchoice flashes.
3 Press untilALL flashes,thenpressSELECT.The screen displays ERASE ALL
NO YES.The current choice flashes.
13

4 Press until YES flashes.
5 Press SELECT.Youwillhearaseriesofbeepsconfirming the deletion.
NOTE: If there are new CID records not yet reviewed , the “ ALL” option will not be
displayedasaselection.
Dial a Displayed Number
1 Locatetherecordin call history that you want to dial.
2 If you wish to change how the number is dialed, press #.
Thescreendisplaysanyalternatedialingsequencesavailable forthis call(areacode
+number; 1+area code+number; 1+number;number only).
3 Press SELECT.DIAL willbe flashing.
4 Press SELECTtodialthenumber.
Store a Call History Record in the Directory
1Locatethe record in call history youwantto storein memory.
2If you wish to change how the number is stored, press #. The screen displays
anyalternatedialing sequences available for this call (areacode+number;1+
areacode+number; 1+number;number only).
3PressSELECT, then press until PGM flashes.
4PressSELECT fourtimestostorethecallrecordinmemory.You’ll hear a beep
confirmingthat the name number werestored.
Display Screen Messages
Screen Displays: When:
The other party is blocking name information.
The other party is blocking name and number
information.
Your phone company is unable to receive information
about this caller s name.
Your phone company is unable to receive information
about this caller s name and number.
CALLER ID OPERATION
14

Charge the Handset Battery Pack
Thisbatteryshould remain charged up to six dayswiththe ringer turned on and up to
12 days with the ringer off. A fully charged battery provides an average talk time of
aboutsixhours.
The battery pack needs charging when:
—Anewbattery is installed in the handset.
— The phone beeps twice every 5 seconds.
—ThescreendisplaysBATTERY LOW andthelowbatteryicon.
Placethehandsetin the base so the CHARGING light turnson.The batterypack is
typicallyfullychargedineighthours.
Youcankeepthe batteryfullychargedbyreturning the handset to the base after
eachuse.
Ifyou repeatedly get a lowbattery indicator,even after charging overnight,thebattery
shouldbereplaced.
CAUTION:To reduce the risk of fire orinjury topersonsor damage to the
telephone,read andfollowtheseinstructions carefully:
Chargethebattery provided with or identified for usewiththisproductonly
inaccordance with the instructionsandlimitationsspecified in thisUser’s
Manual.
Replacing the Handset Battery Pack
1 Removethebatterycompartmentcoveronthehandsetbypressingontheindentation
and sliding the cover downward.
2 Liftouttheoldbatterypackanddisconnect.
3 Alignthe two holes inthenewbattery pack’s plug withthesocketpins, and snap the
pluginto place.Placethe batterypackin thecompartmentwith thewiresin thelower
leftcorner, along the bottom of the battery pack.
4 Replacethecover by sliding it up into place.
5 Thenewbatterypackmustbechargedbefore usingthe phone.PlacetheHandsetin
the base and allow it to charge at least 12 hours for the first time.The telephone
mightoperatebeforethat, butforbestperformance,let thebattery packcharge fully.
BATTERIES
15
•
•
•
•
•

Ifyou havedifficulty operatingthis phone, try the suggestionsbelow.
For Customer Service, call 1-800-595-9511.Please retain your receipt as your proof of
purchase
If the phone doesn’t work at all, check these items first:
Make sure the ACadapterispluggedinto an outlet not controlled by a wall switch.
Makesurethetelephonelinecordispluggedfirmlyintothebaseunitandthemodular
jack.
Makesurethebaseantennaisfullyupright.
IfthehandsetdoesnotbeepwhenyoupressTALK,thebatterymight needcharging.
Makesure the battery packisinstalled correctly.
Ifyou havedialpulse (rotary) service onyourphone line, make surethedial mode
issettodial pulse (see INSTALLATION).
Microwave appliances may cause interference with this phone. If you experience
interference,moveawayfrom the microwave
If the above suggestions don’t solve the problem, try re-initializing the handset
and base:
1 Disconnectthepowertothebase.
2 Removethehandsetbatterypack.
3 Waitafewminutes.
4 Connectthepowerto the base.
5 Insertthehandsetbattery pack.
6 Putthe handset inthebaseto re-initialize.
If you hear 5 rapid beeps when you try to use the handset:
You might be out of range.Moveclosertothebaseandtry again.
Ifmovingclosertothebasedoesn’thelp, try following the directions above for re-
initializingthehandsetand base.
If the phone does not ring when you receive a call:
Makesurethe handset ringer is on.
Makesurethetelephonelinecordisconnectedfirmlytothebaseandthe
telephonejack.
• Makesurethe AC adapter is plugged firmly intoanoutletnotcontrolledbya wall
switch.
• You might be toofar from the base;move closer.
• Youmighthavetoomanyextensionphonesonyourtelephoneline to allowall of
themtoring.Try unpluggingsomeof them.
If you hear noise or interference when using the phone:
• Makesurethebaseantennaisfullyupright.
• You may be out of range.Move closer to the base.
• PressandreleasePROG/CHANNEL tochangetoanotherofthe30channelsavailable.
Ifnoiseis exceptionally loud, move closer to thebasebeforechangingchannels.
• Household appliances plugged into the same circuit as the base can sometimes
causeinterference.Try moving the appliance or the basetoanotheroutlet.
IN CASE OF DIFFICULTY
16
•
•
•
•
•
•
•
•
•
•

IN CASE OF DIFFICULTY
17
• Usingthehandset near household appliances (microwaves, computers, television,
stereos,etc.) can sometimes causeinterference.Moveaway from appliances while
usingthe handset.
• Thelayoutofyourhomeorofficemightbelimitingtheoperatingrange.Trymovingthe
basetoanotherlocation,preferablyon an upper floor.
• Ifthebuttons don’t work, try placing the handsetinthebaseforatleast 15 seconds.
If you hear other calls while using your phone:
• PressPROG/CHANNEL tochangetoanotherchannel.
• Disconnectthebasefrom themodularjackandplugina cordedtelephone.Ifyoustill
hearothercalls,the problemisprobablyinyourwiringor localservice.Callyourlocal
telephoneservice company.
If you lose a call after changing channels:
Youwereprobablyalmostoutofrange.Moveclosertothebasebeforechangingchannels.
Beforeplacinganother call, set the handset in thebasefor at least 15 seconds.
If you are unable to operate special telephone services or other equipment
requiring touch tone signals:
Ifyouhavedialpulse (rotary)service,followthedirectionsunder“TemporaryToneDialing”
intheTELEPHONEOPERATIONsectionofthismanual.
If the MESSAGE light on the base does not go off even after you’ve listened to
voice mail messages:
1 PressPROG/CHANNEL.
2 Press untilthescreendisplaysMESSAGESWAITING.
3 PressSELECT.ThescreendisplaysLIGHTSOFF:YES.
4 PressSELECT againtoturnofftheMESSAGElightonbase.

Taking Care Of YourTelephone
Your cordlesstelephonecontains sophisticatedelectronicparts,soitmustbetreatedwith
care.
Avoid rough treatment
PlacetheHandsetdowngently.Savetheoriginalpackingmaterialstoprotectyourtelephone
ifyou ever need to ship it.
Avoid water
Yourtelephonecanbedamagedifitgets wet.Donotusethe Handsetoutdoorsintherain,
orhandleitwithwethands.Do not install yourBaseUnitnearasink,bathtuborshower.
Electricalstorms
Electricalstormscansometimes cause power surges harmful to electronic equipment.
Foryourownsafety, use cautionwhenusingelectric appliances during storms.
Cleaning your telephone
Your telephone has a durable plastic casing that should retain its luster for many years.
Clean it only with a soft cloth slightly dampened with water or a mild soap. Do not use
excesswater or cleaning solvents ofany kind.
Rememberthat electricalappliancescan causeseriousinjuryif usedwhenyou arewetor
standingin water.IfyourBase Unit should fallinto water, DO NOTRETRIEVE IT UNTIL
YOUUNPLUGTHEPOWERCORDANDTELEPHONELINECORDSFROMTHEWALL.
Thenpullthe unit out by the unplugged cords.
Maintenance
18
Table of contents
Other V-tech Cordless Telephone manuals

V-tech
V-tech DS6621 User manual

V-tech
V-tech ia5847 User manual

V-tech
V-tech CS6429 User manual

V-tech
V-tech gz 2334 User guide

V-tech
V-tech t2450 User manual

V-tech
V-tech gz 2404 User manual

V-tech
V-tech vz2655 User manual

V-tech
V-tech CS6114 User manual

V-tech
V-tech PMX-S5410 User manual

V-tech
V-tech 18450 User manual

V-tech
V-tech DS3101 User manual

V-tech
V-tech t2350 User guide

V-tech
V-tech AM18047 User manual

V-tech
V-tech CS6114-11 User manual

V-tech
V-tech DS6072 User manual

V-tech
V-tech gz 2436 User guide

V-tech
V-tech IP 811 User manual

V-tech
V-tech LS640V-1F User manual

V-tech
V-tech PDL GX User manual

V-tech
V-tech CS6114 User manual