V-Zon TF3DVD7019 User manual

Instruction Manual
Please read this manual carefully before operation.
7″ Widescreen TFT LCD Portable DVD/CD/MP3 Player with 3D display, USB and SD Slot
TF3DVD7019
Portable 3D DVD Player

2
For Customer Use:
Enter below the serial number that is located on the
bottom of the unit. Retain this information for future
reference.
Model No. TF3DVD7019
Serial No.
CAUTION
RISK OF ELECTRIC SHOCK
DO NOT OPEN
CAUTION: TO REDUCE THE RISK OF FIRE AND ELEC-
TRIC SHOCK, DO NOT REMOVE THE COVER (OR BACK)
OF THE UNIT. REFER SERVICING ONLY TO QUALIFIED
SERVICE PERSONNEL.
The lightning ash with arrowhead symbol within an equilateral triangle is intended to alert
the user to the presence of uninsulated “dangerous voltage” within the product’s enclosure
that may be of sufcient magnitude to constitute a risk of electric shock.
The exclamation point within an equilateral triangle is intended to alert the user to the pres-
ence of important operation and servicing instructions in the literature accompanying the
appliance.
WARNING:
To prevent re or shock hazard, do not expose this device to rain or moisture. Dangerous high voltage is present inside the
enclosure. Do not open the cabinet.
Handling the cords on this product will expose you to lead, a chemical known to the State of California to cause cancer, and
birth defects or other reproductive harm. Wash hands after handling.
CAUTION:
This Digital Video Disc player employs a laser system. To prevent direct exposure to the laser beam, do not try to open the
enclosure or defeat the safety interlocks. When open and the interlocks are defeated, visible laser radiation is present.
To prevent electric shock, match wide blade of plug to wide slot of outlet and fully insert.
Use of controls, adjustments, or performance of procedures other than those specied herein may result in hazardous radiation
exposure. DO NOT STARE INTO THE BEAM.
NOTICE:
This product incorporates copyright protection technology that is protected by U.S. patents and other intellectual property
rights. Use of this copyright protection technology must be authorized by Rovi, and is intended for home and other limited
viewing uses only unless otherwise authorized by Rovi. Reverse engineering or disassembly is prohibited.
FCC Notice:
PRECAUTIONS
FCC Statement:this device complies with Part 15 of the FCC Rules. Operation is subject to the follow-
ing two conditions:
(1) This device may not cause harmful interference, and(2) This device must accept any interference
received, including interference that may cause undesired operation.
Note: This equipment has been tested and found to comply with the limits for Class B digital devic-
es, pursuant to Part 15 of the FCC rules. These limits are designed to provide reasonable protection
against harmful interference in a residential installation. This equipment generates, uses and can radi-
ate radio frequency energy and, if not installed and used in accordance with the instructions, may cause
harmful interference to radio communications. However, there is no guarantee that interference will not
occur in a particular installation. If this equipment does cause harmful interference to radio or television
reception, which can be determined by turning the equipment off and on, the user is encouraged to try
to correct the interference by one or more of the following measures:
- Reorient or relocate the receiving antenna.- Increase the separation between the equipment and
receiver.- Connect the equipment into an outlet on a circuit different from that to which the receiver is
connected.- Consult the dealer or an experienced radio/TV technician for help.
Use of shielded cable is required to comply with Class B limits in Subpart B of Part 15 of the FCC
rules.

3
For recycling or disposal information about this product, please
contact your local authorities or the Electronics Industries Alliance:
www.eiae.org.
PRECAUTIONS
Do not make any changes or modifications to the equipment unless otherwise specified in
the manual. If such changes or modifications should be made, you could be required to stop
operation of the equipment.
The apparatus shall not be exposed to dripping or splashing and that no objects lled 1.
with liquids, such as vases, shall be placed on the apparatus.
The power adaptor was used as the disconnect device, the disconnect device shall2.
remain readily operable.
The excessive sound pressure form earphones and headphones can cause hearing3.
loss.
Warning:

4
IMPORTANT SAFETY INSTRUCTIONS
Read Instructions: All the safety and operating instructions should be read before the product 1.
is operated.
Retain Instructions: The safety and operating instructions should be retained for future refer-2.
ence.
Heed Warnings: All warnings on the product and in the operating instructions should be3.
adhered to.
Follow Instructions: All operating and usage instructions should be followed.4.
Cleaning: Unplug this product from the wall outlet before cleaning. Do not use liquid cleaners 5.
or aerosol cleaners. Use a dry cloth for cleaning.
Attachments: Use only attachments recommended by the manufacturer. Use of other attach-6.
ments may be hazardous.
Water and Moisture: Do not use this product near water (e.g., near a bath tub, washbowl,7.
kitchen sink, laundry tub, in wet basements, or near a swimming pool and the like).
Heat: The product should be situated away from heat sources such as radiators, heat regis-8.
ters, stoves, or other products (including ampliers) that produce heat.
Accessories: Do not place this product on an unstable cart, stand, tripod,9.
bracket, or table. Use only with carts, stands, tripods, brackets, or
tables recommended by the manufacturer or sold with the product.
Any mounting of the product should follow the manufacturer’s in-
structions and should use a mounting accessory recommended by
the manufacturer.
A product and cart combination should be moved with care. Quick 10.
stops, excessive force, and uneven surfaces may cause the product
and cart combination to overturn.
Ventilation: Slots and openings in the cabinet are provided for ventila-11.
tion to ensure reliable operation of the product and to protect it from overheating. These
openings should never be blocked by placing the product on a bed, sofa, rug, or other similar
surface. This product should not be placed in a built-in installation such as a bookcase or
rack unless proper ventilation is provided or the manufacturer instructions have been ad-
hered to.
Power Sources: This product should be operated only from the type of power source indi-12.
cated on the rating label. If you are not sure of the type of power supply to your home, consult
your product dealer or local power company. For products intended to operate from battery
power or other sources, refer to the operating instructions.
Power Sources:13. Do not connect the power plug to a power outlet other than that which is
indicated here and on the label as this may result in the risk of re or electric shock. Do not
handle the power plug with wet hands. Doing so may cause electric shock.
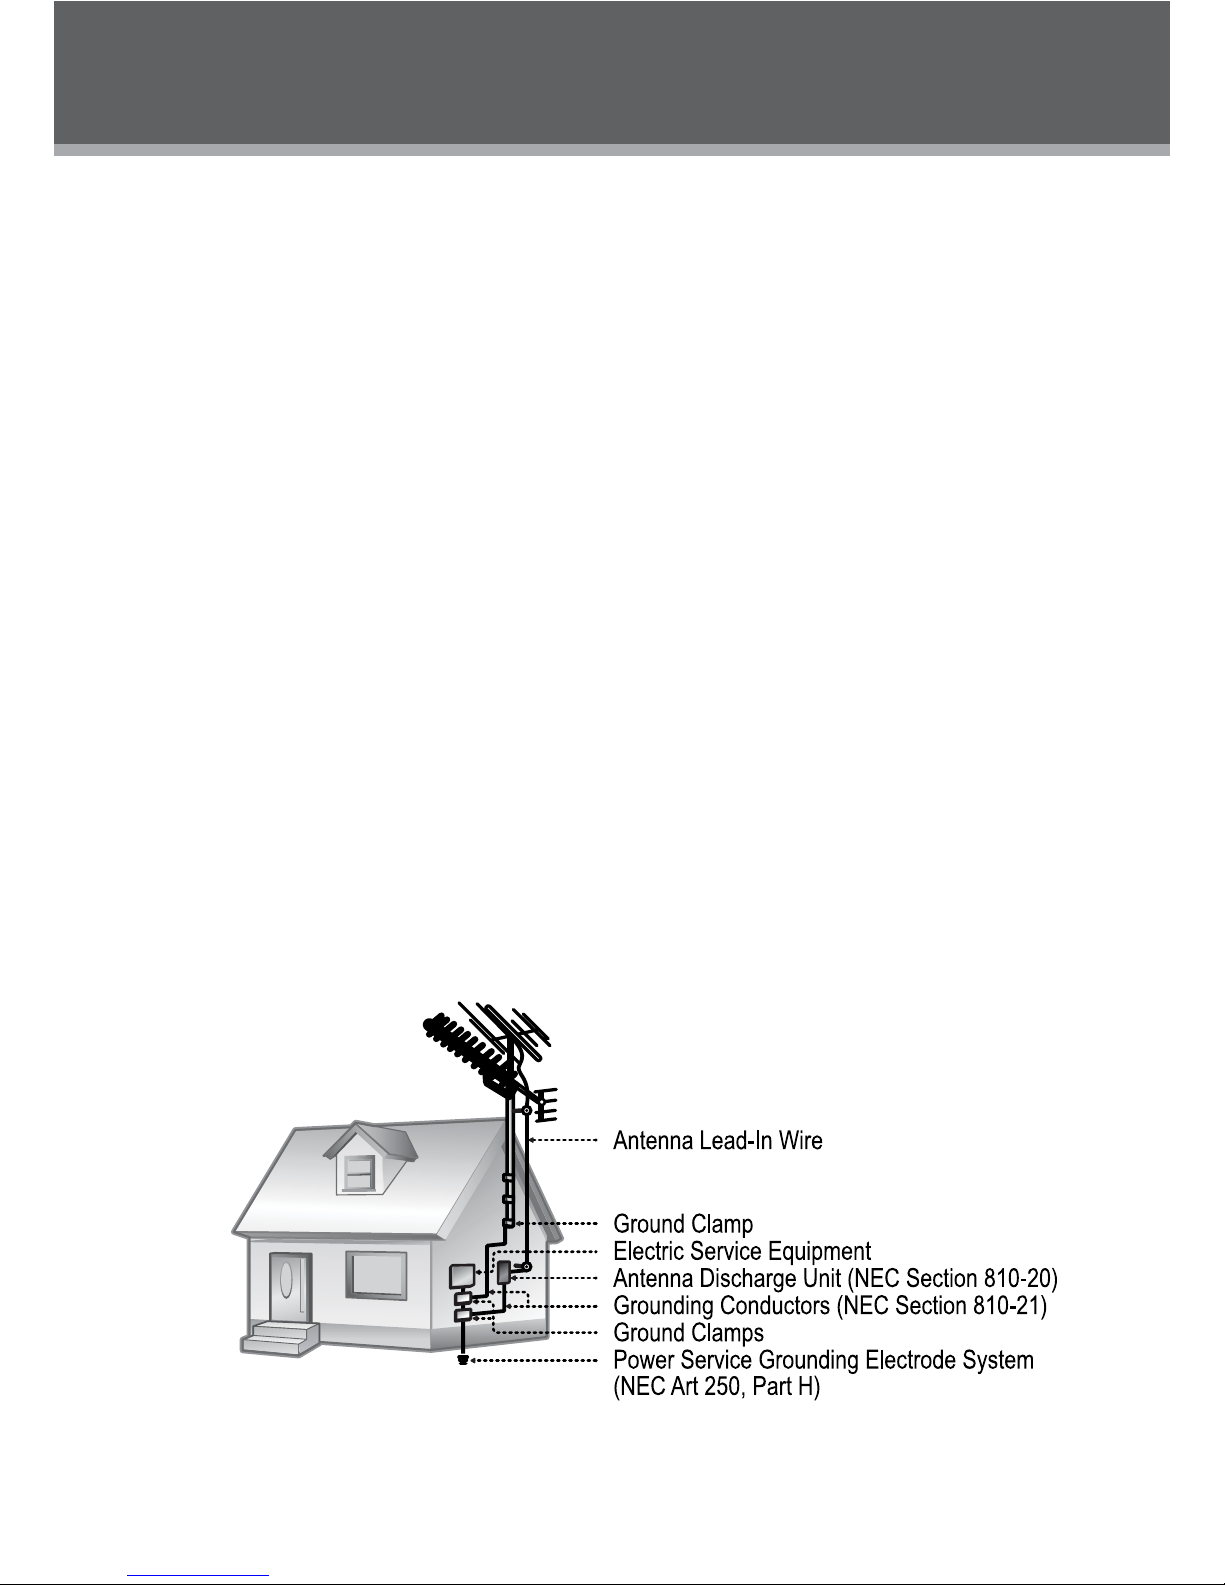
Power Lines: An outside antenna system should not be located in the vicinity of overhead 14.
power lines or other electric light or power circuits, or where it can fall into such power lines
or circuits. When installing an outside antenna system, extreme care should be taken to keep
from touching such power lines or circuits, as contact with them might be fatal.
Battery: Danger of explosion if battery is incorrectly replaced. Replace only with the same or 15.
equivalent type. Battery pack or batteries installed shall not be exposed to excessive heat
such as sunshine, re or the like.
12V Car Power Adaptor: 16. Disconnect this car power adaptor when not in use. Not for use in
24V vehicles.

5
IMPORTANT SAFETY INSTRUCTIONS
Using the unit in a Vehicle17. : On no account should this unit be used by the driver of a moving
motor vehicle, or left unsecured in the vehicle whilst driving. If this unit is being used by a
passenger in your vehicle, be sure that it is secured or held safely, and does not obstruct any
safety device (i.e. airbag, seat belt etc.) that is tted. All passengers should wear seat belts
when using this unit in a moving vehicle. If in doubt, please contact your vehicle manufacturer
for further advice. Using other car power adaptors could damage the unit.
Using18. Headphones or Earphones: Hearing experts advise against the constant use of per-
sonal stereos played at high volume. Constant high volume use can lead to hearing loss.
If you experience ringing in the ears or hearing loss, discontinue use and seek medical
advise.
Grounding or Polarization: This product may be equipped with a polarized alternating-current 19.
line plug that has one blade wider than the other. This plug will only t into the power outlet in
one direction. This is a safety feature. If you are unable to insert the plug fully into the outlet,
try reversing the direction of the plug. If the plug should still fail to t, contact an electrician to
replace the obsolete outlet. Do not defeat the safety purpose of the polarized plug.
Power-Cord Protection: Power supply cords should be routed so that they are not likely to 20.
be walked on or pinched by items placed upon or against them, paying particular attention to
cords at plugs, convenience receptacles, and at the point which they exit from the product.
Protective Attachment Plug: The product may be equipped with an attachment plug with 21.
overload protection. This is a safety feature. See the operating instructions for replacement
or directions to reset the protective device. If replacement of the plug is required, be sure the
service technician has used a replacement plug that has the same overload protection as the
original plug as specied by the manufacturer.
Outdoor Antenna Grounding: If an outside antenna is connected to the product, be sure the22.
antenna system is grounded so as to provide some protection against voltage surges and
built-up static charges. Article 810 of the National Electrical Code, ANS/NFPA 70 provides
information with regard to proper grounding of the mast and supporting structure, ground-
ing of the lead-in wire to an antenna-discharge unit, size of grounding conductors, location
of antenna-discharge unit, connection to grounding electrodes, and requirements for the
grounding electrode (see gure).
Lightning: For added protection for this product, unplug it from the wall outlet and disconnect23.
the antenna or cable system during a lightning storm or when it is left unattended and unused

6
IMPORTANT SAFETY INSTRUCTIONS
for long periods of time. This will prevent damage to the product due to lightning or power-line
surges.
If at any time in the future you should need to dispose of this product please note24.
that Waste electrical products should not be disposed of with household waste.
Please recycle where facilities exist. Check with your Local Authority or retailer for
recycling advice.(Waste Electrical and Electronic Equipment Directive)
Overloading: Do not overload wall outlets, extension cords, or integral convenience25.
receptacles as this can result in a risk of re or electric shock.
Object and Liquid Entry: Never push objects of any kind into this product through openings 26.
as they may touch dangerous voltage points or shout-out parts that could result in a re or
electric shock. Never spill liquid of any kind on the product.
Servicing: Do not attempt to service this product yourself as opening or removing covers may 27.
expose you to dangerous voltage or other hazards. Refer all servicing to qualied service
personnel.
Damage Requiring Service: Unplug this product from the wall outlet and refer servicing to 28.
qualied service personnel under the following conditions: a) when the power-supply or plug
is damaged; b) if liquid has been spilled or if objects have fallen into the product; c) if the
product has been exposed to rain or water; d) if the product does not operate normally by fol-
lowing the operating instructions. Adjust only those controls that are covered by the operating
instructions as improper adjustment of other controls may result in damage and will often
require extensive work by a qualied technician to restore the product to its normal operation;
e) if the product has been dropped or damaged in any way; f) when the product exhibits a
distinct change in performance—this indicates a need for service.
Replacement Parts: When replacement parts are required, be sure that your service techni-29.
cian has used replacement parts specied by the manufacturer or have the same charac-
teristics as the original part. Unauthorized substitutions may result in re, electric shock, or
other hazards.
Safety Check: Upon completion of any service or repairs to this product, ask the service tech-30.
nician to perform safety checks to ensure that the product is in proper operating condition.
Wall or Ceiling Mounting: The product should be mounted to a wall or ceiling only as recom-31.
mended by the manufacturer.

7
TABLE OF CONTENTS
PRECAUTIONS ...............................................................................................................................2
IMPORTANT SAFETY INSTRUCTIONS ........................................................................................4
TABLE OF CONTENTS ...................................................................................................................7
PACKAGE CONTENTS...................................................................................................................9
ABOUT OPTICAL DISCS..............................................................................................................10
Disc Requirements.................................................................................................................10
Disc Care and Maintenance ..................................................................................................10
Handling a Disc..............................................................................................................10
Cleaning a Disc..............................................................................................................10
LOCATION OF CONTROLS..........................................................................................................11
Front View ..............................................................................................................................11
Right View ..............................................................................................................................12
Left View ................................................................................................................................12
Bottom View...........................................................................................................................12
Remote Control......................................................................................................................13
CONNECTIONS ............................................................................................................................14
Audio & Video Connections...................................................................................................14
USB Connection ....................................................................................................................14
Earphone Connection............................................................................................................14
Power Connection .................................................................................................................15
Connecting to the wall outlet .........................................................................................15
Using the car plug..........................................................................................................15
Using the Built- in battery ......................................................................................................15
GETTING STARTED .....................................................................................................................16
Using the Remote Control .....................................................................................................16
Power Supply .........................................................................................................................16
BASIC OPERATIONS....................................................................................................................17
Basic Playback.......................................................................................................................17
Play/Pause/Stop ....................................................................................................................17
Next/Previous (Skip) ..............................................................................................................17
Forward/Reverse (Search) ....................................................................................................17
Slow........................................................................................................................................17
Menu Navigation ....................................................................................................................17
Numeric Keypad ....................................................................................................................18
2D/3D Display ........................................................................................................................18
Adjusting the Volume .............................................................................................................18
Disc Error Messages .............................................................................................................18
Power Management...............................................................................................................18
FUNCTION BUTTONS ..................................................................................................................19
Display/Setup.........................................................................................................................19
Zoom ......................................................................................................................................19
Multi-Subtitle/Audio................................................................................................................19

8
Angle/Program.......................................................................................................................19
Menu/Title ..............................................................................................................................20
Repeat A-B Mode ..................................................................................................................20
Repeat Playback of a chapter/Title / All of a Disc .................................................................20
Display Menu .........................................................................................................................20
To acess the USB/Card mode...................................................................................................20
SETUP ...........................................................................................................................................21
General ..................................................................................................................................21
Video ......................................................................................................................................21
Audio ......................................................................................................................................22
SPECIFICATIONS .........................................................................................................................23
TROUBLESHOOTING...................................................................................................................24
TABLE OF CONTENTS

9
Please make sure the following items are included in the package. If any items are missing, please
contact your local dealer.
PACKAGE CONTENTS
1 2
AC Adapter
2D/3D
3
TF3DVD7019 Remote Control
HEarphones
Menu
/Title
Angle
/Pro-
gram

10
ABOUT OPTICAL DISCS
Disc Requirements
This DVD player supports playback of the following discs.
Type Disc Mark Content Type Disc Size Max. Playback Time
DVD-Video Discs Audio + Video
(moving picture) 12 cm
133 min (SS-SL)
242 min (SS-DL)
266 min (DS-SL)
484 min (DS-DL)
Audio Compact Discs (CDs) Audio 12 cm 74 min
JPEG CDs -- Still Picture 12 cm --
This unit can play back CD-R and CD-RW discs that contain JPEG picture les. Discs not listed
above are not supported by this unit (eg, PC CD-ROM, CD-Extra, CD-G, CD-I, etc.)
Disc Care and Maintenance
Optical discs (DVDs, CDs) contain high-density compressed data and need proper handling.
Handling a Disc
Hold a DVD/CD by its edges. Avoid touch-•
ing the recorded side of the disc. To remove
a DVD/CD from its storage case, press down
on the center retention mechanism of the case
and lift the disc out.
Do not subject discs to prolonged exposure to direct sunlight, high humidity, or high tem-•
peratures.
Do not bend or press discs.•
To reduce the risk of scratches, always put discs back in their case after use. Store discs •
vertically in a cabinet.
Do not place stickers or labels on either side of a disc.•
Cleaning a Disc
Use a dry, soft cloth to wipe off any ngerprints and dusts from the playing surface of the disc.
Wipe in a straight line radially from the center to the outside edge of the disc. Small dust particles
and light stains will not affect playback quality.
Never use chemicals such as record sprays, anti-static sprays, benzene, or thinners to clean •
a disc. Doing so will damage the surface of the disc permanently.

11
LOCATION OF CONTROLS
7″ TFT LCD
Speaker
Enter Button
Direction Buttons
Next (Right) Button
Previous (Left) Button
Play/Pause Button
Stop/USB/SD Card Button
Setup/Display Button
LCD Mode/2D/3D Button
Front View
LCD Mode/2D/3D button
2D/3D Display•
Briey press this button to switch among 2D to 3D
Mode, 3D to 3D Mode, By Pass Mode.
2D to 3D Mode: Convert the 2D videos/images
into 3D format.
3D to 3D Mode: View the 3D videos/images.
By Pass Mode: View the normal 2D videos/
images.
LCD Display Menu•
Press and hold this button to enter the display
menu.
Press up/down direction button to highlight1.
item and then make adjustment by left/right
direction button.
Select RESET and press ENTER to return the2.
settings of brightness, contrast and color to
their factory default settings.
Press and hold this button again or press the3.
LCD Mode/USB button on the remote to exit.
Stop/USB/Card button
Stop•
Press this button once to prestop the playback,
press twice to stop completely.
To access the USB/Card•
Insert a USB drive/SD card into the USB port/Card
slot. Press and hold this button for a short while to
display the USB/CARD/DISC menu, you can access
a USB/CARD/DVD using this menu.
Play/Pause button
To start/pause playback of a loaded disc.
Setup/Display button
Press this button once to show the LCD display
menu.
Press it twice to access the setup menu in which
various features of the player can be adjusted.
Direction / Enter buttons
Press the direction buttons to select an item and
press the Enter button to conrm.
Press the UP direction button to slow forward.
Fast Forward /Reverse buttons
Press the Next button to skip forward one track.
Press the Previous button to skip back one track.
Press and hold the NEXT / PREVIOUS button to
fast forward/reverse during video / audio playback.
Open Button
Charge

12
LOCATION OF CONTROLS
Right View
DC 9V IN Jack
To connect to the AC Adapter / DC 16V Car adapter for power supply.
USB Port
For use with USB flash drives.
Video Jack
To connect to an external TV screen by the AV cable.
Audio Jack
To connect to an external speaker system by the AV cable.
Headphone Jack
Volume Dial
To Adjust the Volume Level.
Bottom View
Ventilation Slots
Battery compartment
Left View
SD Slot
Front View
Power Switch
To turn on/off the unit.
Remote Sensor
DC 9V in Jack
USB Port
Video Jack
Audio Jack
Headphone Jack
Volume Dial
SD Slot
Battery Compartment
Ventilation Slots
Power Switch
Remote Sensor

13
LOCATION OF CONTROLS
Remote Control
Display/Setup
Power
Previous
Fast Reverse
Play/Pause
Numeric Buttons
LCD Mode/USB/SD
Zoom
Subtitle
Repeat A-B
Repeat All
Menu/Title
Audio
Angle/Program
2D/3D
Next
Fast Forward
Direction Buttons
Enter
Menu
/Title
Angle
/Prp-
gram
2D/3D
UP/Slow Forward

14
CONNECTIONS
Audio and Video Connections
Refer to the owner’s manual of the external device as well.1.
Before connecting the power source,2. ensure that all the connections are properly done.
USB/SD Card Connection
Insert the USB/SD card into the USB port on the right panel/the card slot on the left panel of the main unit.1.
Press and hold the Stop/USB button on the unit or the LCD Mode/USB button on the remote to enter source
mode. Press the Up/Down direction button to select USB/Card and then press ENTER to access.
It takes a short while for the unit’s reading data. After the device is detected, the screen will display the 2.
working menu, press the direction buttons to select the desired le from the menu and press Play/Pause to
start playback.
Be sure that your unit is at low volume level before
connecting the earphones. Increase the volume gradually
for your comfortable listening.
CAUTION:
Hearing experts advise against the constant use of per-
sonal stereos played at high volume. Constant high vol-
ume use can lead to hearing loss. If you experience ring-
ing in the ears or hearing loss, discontinue use and seek
medical advise.
Earphone Connection
To Earphone Jack

15
Power Connections
To DC 9V in Jack
AC adapter:
This AC adapter operates on
100-240V~~50/60Hz 0.5A MAX
DC OUT: 9V
DC current: 1.5 A
Connecting to the wall outlet•
Using the car plug•
CONNECTIONS
To the cigarette
lighter socket.
To DC 9V in
Caution:
Do not connect the power plug to a•
power outlet other than that which
is indicated here and on the label
as this may result in the risk of re
or electric shock.
Do not handle the power plug with•
wet hands. Doing so may cause
electric shock.
Only use AC adapters of the type •
specied here. Failure to do so may
case a re or damage the player.
Using the Built- in battery
The unit has a built-in rechargeable battery (lithium-polymer). Charge the built-in battery before using it for the
rst time. It takes about 4 hours to fully charge the battery.
To charge the built-in battery, just connect the AC adapter to the player and a specied wall outlet. see •
above. The built-in battery can be charged while the unit is turned off or in operation. (The Battery Charge
indicator will light red while it is charging; it will go off when the battery is fully charged.)
The built-in rechargeable battery can be used for approximately 300 charge-cycles without any notice-•
able change in performance.
When the built-in battery power is low, the low battery icon will ash on the upper right corner of the •
screen for a while, and then the player will turn itself off automatically.
Note:
Use the specied charger. •
Never dispose of in re or heat up. •
Do not use in high temperature or near heat sources.•
Do not open the cover.•
Refer servicing only to qualied service personnel. •
To get the longest service life of the built-in battery, charge at indoor-temperature.•
Disconnect this car power adaptor when not in use. Not for use in 24V vehicles.

16
GETTING STARTED
Using the Remote Control
To load a battery in the remote:
Pull in the direction of the arrow.1.
Slide the compartment out.2.
Place the battery in the compartment with the positive side ( + ) facing up.3.
Push the compartment in to close.4.
Point the remote at the remote sensor of the photo frame at a distance of no more than 15 feet•
and at an angle no greater than 60 degrees.
Batteries will last for about one year under typical usage. •
Replace the batteries if the remote is no longer working.•
Do not spill water on the remote control.•
Do not use the remote control for other equipment at the same time.•
Remove the batteries if the remote control will not be in use for an extended period of time.•
See Power Connections section.
.

17
BASIC OPERATIONS
Prepare the connections and power supply.
Load a disc.
Press the Open button to open the disc compartment lid. Load a disc with the label-side facing up. Close
the lid manually. If a single-sided disc is loaded upside-down, the player will display “BAD DISC”.
Start playback.
Press Play/Pause button to start playback (some discs may start playing automatically).
1.
2.
3.
Play/Pause/Stop
Press• to play the disc for the rst time.
Press• during playback to pause. Press again to resume playback.
Press• during playback to stop the disc (“Pre-Stop”). Press to resume playback.
Press• when the disc is “Pre-Stopped” to stop playback completely. (When is pressed, the
disc will start playing from the beginning.)
Next/Previous (Skip)
Press• to skip forward one track (DVD, CD, MP3, etc).
Press• to skip back one track (DVD, CD, MP3, etc).
Forward/Reverse (Search)
Press / to fast-forward / reverse through the disc.
Each successive press of• / will change the rate of fast-forward / reverse playback.
Slow
To slow-forward through the disc, press the UP direction button.
Each successive press of UP direction button will change the rate of slow-forward playback.•
Press• to resume normal playback.
x32
x1/7x1/6
54
3

18
BASIC OPERATIONS
Adjusting the Volume
Turn the Volume Control dial to adjust the volume level up or down.•
Disc Error Messages
The following messages will be displayed on-screen if there is a problem with the format of the loaded disc.
WRONG REGIONAL DISC.• The region code of the disc does not match the player’s region code (Region
1).
WRONG PASSWORD.• The parental rating level of the disc is higher than the parental rating level setting
of the player. The player will not play the disc.
BAD DISC. T• he player is equipped with automatic disc quality detection software. If the player detects
a disc that is damaged or has a format problem, it may play the disc at a lower quality or stop play com-
pletely, depending on how damaged the disc is.
Note:
DVD disc production quality may vary; some discs may deviate from the industry standard.
Some incorrectly-formatted discs may still play, however, the playback and operational quality of the disc may
be substandard.
Power Management
If the player will not be in use for a long period of time, set the Power Switch to the OFF position and unplug
the player.
2D/3D Display
This player using the state of the art glasses free 3D display technogy, it means you can enjoy the 3D video
without glasses. And it’s very convenient to switch between 2D and 3D display modes.
To view the videos (or images) in 2D/3D format:
1. If you want to view the normal (2D) videos/images in 3D, please press the 2D/3D button to select the “2D
to 3D Mode”, the player will convert the 2D videos/images into 3D format.
2. If you use this player to view a 3D video/image, just press the 2D/3D button to select the “3D to 3D Mode” .
3. If you want to view the videos/images in normal 2D format, please press the 2D/3D button to select the “By
Pass Mode”.
Note: The best position to view the 3D Video/Image is : The distance between the viewer’s eyes and the
screen is 85 centimetre, then move a little to the left or right direction.

19
FUNCTION BUTTONS
Display/Setup
Press the DISPLAY button once to show playback information.•
Press it twice to enter the player’s setup menu. Enter the Setup menu to adjust the player’s •
internal settings, please see the SETUP section for more details.
Zoom
Press ZOOM to change the magnication level of the picture.
During DVD playback, each successive press of ZOOM will change the level of magnication •
to:
Zoom 2x, Zoom 3x, Zoom 4x, Zoom Off.
In picture mode, each successive press of ZOOM will change the level of magnication to: •
Zoom 2x, Zoom 3x, Zoom 4x, Zoom Off.
When the magnication level is greater than Normal/100%, use the direction keys to pan around
the magnied picture.
Note: The picture quality will decrease as the zoom level increases.
The Zoom function doesn’t work in “3D TO 3D” mode.
Multi-Subtitle / Audio
During playback of a DVD that has been mastered with subtitles, press SUBTITLE to view the •
available subtitle tracks. (A DVD may have up to 32 selectable subtitles.)
During playback of a DVD that has been mastered with alternate language/audio tracks, press •
AUDIO to hear the alternate tracks. (A DVD may have up to 8 selectable audio tracks.)
Angle/Program
During playback of a DVD that has been mastered with multiple angles, press ANGLE to view •
the available alternate camera angles. (A DVD may have up to 9 selectable angles.)
Load a DVD, then press and hold this button to enter the Program menu.•
Press the DIRECTION buttons to select the Title (T) and press the ENTER button to1.
conrm.
Press the2. DIRECTION buttons to select the desired chapter (C) and press the ENTER button
to conrm.
The programmed selection will be listed in the left column.3.
Repeat steps 1-3 until you have nished programming your selections or when you have 4.
programmed the maximum tracks.
Press the CLEAR button to delete.5.
Press the Play button to start playback. 6. Press PROGRAM to cancel.
Angle
/Prp-
gram
PROGRAM PLAY CLEAR
TC
:
:
1
2
3
4
:
:
TC
:
:
5
6
7
8
:
:
TC
:
:
9
10
11
12
:
:
TC
:
:
13
14
15
16
:
:

20
FUNCTION BUTTONS
LCD Display Menu
Briey press this button to display the LCD display menu.
Press up/down direction button to highlight item and then make adjustment by left/right direc-1.
tion button.
Select RESET and press ENTER to return the settings of2. brightness, contrast and color to
their factory default settings.
In 3D TO 3D mode, the aspect ratio can be set to 16:9 format only.3.
To access the USB/SD mode: insert a USB ash drive/SD card into the USB port/SD slot. Press
and hold this button for a short while to display the source mode, you can access a DVD/USB/SD
using this menu.
2D/3D
2D/3D
Press 2D/3D button to switch between 2D and 3D display modes. Please refer to the 2D/3D display
for details.
Menu / Title
Press the Menu/Title button during DVD playback to return to the DVD’s Main menu.
Press and hold the Menu/Title button during DVD playback to return to the DVD’s Title menu.
Repeat A-B Mode
To repeat playback of a specic section of a disc (loop):
Press A-B to set the desired start point (“A”) of the section to be repeated.1.
Press A-B again to set the desired end point (“B” )of the section to be repeated.2.
The section “A-B” will now play repeatedly as a loop. Press A-B again to resume normal 3.
playback.
Repeat Playback of Chapter/Title/ALL of a Disc
Press REPEAT to change the repeat mode of the player. Each successive press of REPEAT will
change the mode as follows:
Repeat Chapter Repeat Title Repeat All Repeat Off
Menu
/Title
Table of contents
Other V-Zon Portable DVD Player manuals