VACBOT S200 User manual
USER MANUAL
Vacuum and Floor Mopping Robot myVacBot S200


CONTENTS
01 FEATURES ...............................................................................................................
02 SAFETY INSTRUCTIONS .........................................................................................
03 PARTS ......................................................................................................................
04 ASSEMBLY ..............................................................................................................
05 FUNCTIONS ...........................................................................................................
06 FEATURES & CLEANING MODE ............................................................................
07 CLEANING FEATURES ............................................................................................
08 CLEANING MODES ................................................................................................
09 BATTERY INSTALLATION ........................................................................................
10 BATTERY REMOVAL ...............................................................................................
11 CHARGING .............................................................................................................
12 DOCK ......................................................................................................................
13 DOCKING TEST ......................................................................................................
14 ROBOT BATTERY RECHARGE ................................................................................
15 ROBOT BATTERY CARE .........................................................................................
16 ROOM LIMITER (SONIC WALL) ..............................................................................
17 SPINNING SIDE BRUSHES ......................................................................................
18 CONTROL PANEL ...................................................................................................
19 REMOTE CONTROL ...............................................................................................
20 SCHEDULING THE VACUUM AND FLOOR MOPPING ROBOT ............................
21 SETTING YOUR LOCAL TIME .................................................................................
22 SCHEDULING THE VACUUM AND FLOOR MOPPING ROBOT ............................
23 AUTO START ...........................................................................................................
24 CLEANING & MAINTENANCE ...............................................................................
25 DUST BIN & FILTER CLEANING .............................................................................
26 WET MOPPING BASE INSTRUCTIONS ..................................................................
27 SETTING ID WITH MAIN UNIT ...............................................................................
28 APP INSTRUCTION .................................................................................................
29 USEFUL TIPS ...........................................................................................................
30 TROUBLESHOOTING .............................................................................................
31 PRODUCT SPECIFICATIONS ..................................................................................
4
5
6
6
7
8
8
8
9
9
10
10
10
11
11
12
13
14
15
16
16
17
17
18
18
20
21
23
25
27
28

4
01 FEATURES
We bring you an easy to use vacuum and oor mopping robot that works both on hard oor surfaces and
carpets and also can be used for wet mopping operations.
This is not just sweeper but a real vacuum cleaner with powerful suction, side brushes and a main brush.
You can now enjoy your personal time while the vacuum and oor mopping robot will clean for you.
Slim prole at only 8.0cm height and 33cm diameter this time saving device will get in hard to reach places,
including under furniture where other vacuum and oor mopping robots will fail to operate.
Simple operation with touch controls and adjustable cleaning timer also features and advanced remote
control.
Easy to use to automated cleaning pattern, your robot benets from an advanced cleaning algorithm that
ensures that maximum effective cleaning is achieved with minimum iterations. There are ve advanced
programs in operation that will advance from spot cleaning, around the wall cleaning and pattern cleaning.
According to the set timer the programs will be intelligently combined for maximum cleaning efciency.
Two extra-long side brushes around the outer edges ensure that dirt is gathered even from corners and
borders. The middle suction vacuum will ensure dirt and debris are efciently collected.
This vacuum and oor mopping robot features smart ultrasonic navigation sensors. There are also cliff
sensors that will stop the vacuum and oor mopping robot from falling of any steps. *
Great on hard oor and low and medium pole carpet. Easy to empty bagless side loading sealed dust
container. This antibacterial vacuum and oor mopping robot features an easy to clean HEPA type lter that
will improve air quality in your household during the cleaning operation.
* In difcult lighting or dirty bottom sensors, errors could happen. Please clean the bottom sensors regularly and put an obstacle in
front of high abysses or use the sonic wall (f.ex. stairs).

5
Important
• Carefully read the instructions before operating the unit. Please retain the manual for future reference.
• This appliance is for indoor use only.
• Rating: this unit must be only connected to a 220-240V / 50Hz earthed outlet. Always check the ratting
label against your electrical supply.
• If you are in any doubt about the suitability of your electrical supply have it checked and, if necessary,
retested by a qualied electrician.
• This vacuum and oor mopping robot has been tested and is safe to use. However, as with any
electrical appliances – use it with care.
• Disconnect the power plug from unit before dismantling, assembling or cleaning.
• Do not clean the unit by spraying it or immersing it in water. The device is not waterproof.
• Never operate this appliance if the cord or power supply is damaged. Ensure the power cord is not
stretched or exposed to sharp object/edges.
• Do not use the appliance if any part or any accessory is damaged or defective.
• A damaged power supply should be replaced only with original parts from the manufacturer. Otherwise
warranty is lost.
• Avoid touching any moving parts of the appliance.
• Never insert ngers, or any other objects while machine is in operation.
• This appliance is not intended for use by persons (including children) with reduced physical, sensory or
mental capabilities. It is also not intended for use by those with a lack of experience and knowledge,
unless they have been given supervision or instruction concerning the use of the appliance by a person
responsible for their safety.
• Do not leave children or animals unsupervised with this appliance.
• Only use original battery or charger form manufacturer, any third party components may damage the unit.
• Any service other than regular cleaning should be only performed by an authorized service
representative. Failure to comply could result in a voided warranty.
• Do not use the appliance for any other purposes than its intended use.
• Do not use the appliance in places with high humidity (>80% Relative Humidity)
• Do not immerse the robot in water or other liquids. If the robot is immersed in water or other liquids by
mistake, do not touch it with your hands. If the appliance is immersed in water or other liquids, discard
it. Do not use if you spilled liquids on the oor.
• Do not use to clean printer tonner spilled on the oor as this could cause re.
• Before using the vacuum and oor mopping robot, remove any fragile objects from the oor e.g. glass
pieces or any other objects that could block or damage the robot.
• Do not place any object on the top of the vacuum and oor mopping robot.
• Do not leave any fragile objects on the side of the tables, cabinets etc. where the vacuum and oor
mopping robot could bump into and cause them to fall.
• Secure stairs with the Sonic Wall or an obstacle.
Unit Safety Protection and Performance Tips
• Make sure unit is assembled correctly before use.
• Charge for 24 hours before operating for the rst time. If not using the vacuum and oor mopping
robot for a long time, please fully charge and remove the battery.
• Clean vacuum and oor mopping robot and brushes regularly. Empty and vacuum the dust container.
• If the vacuum and oor mopping robot becomes entangled, remove brushes, clean the debris and
reassemble.
02 SAFETY INSTRUCTIONS
6
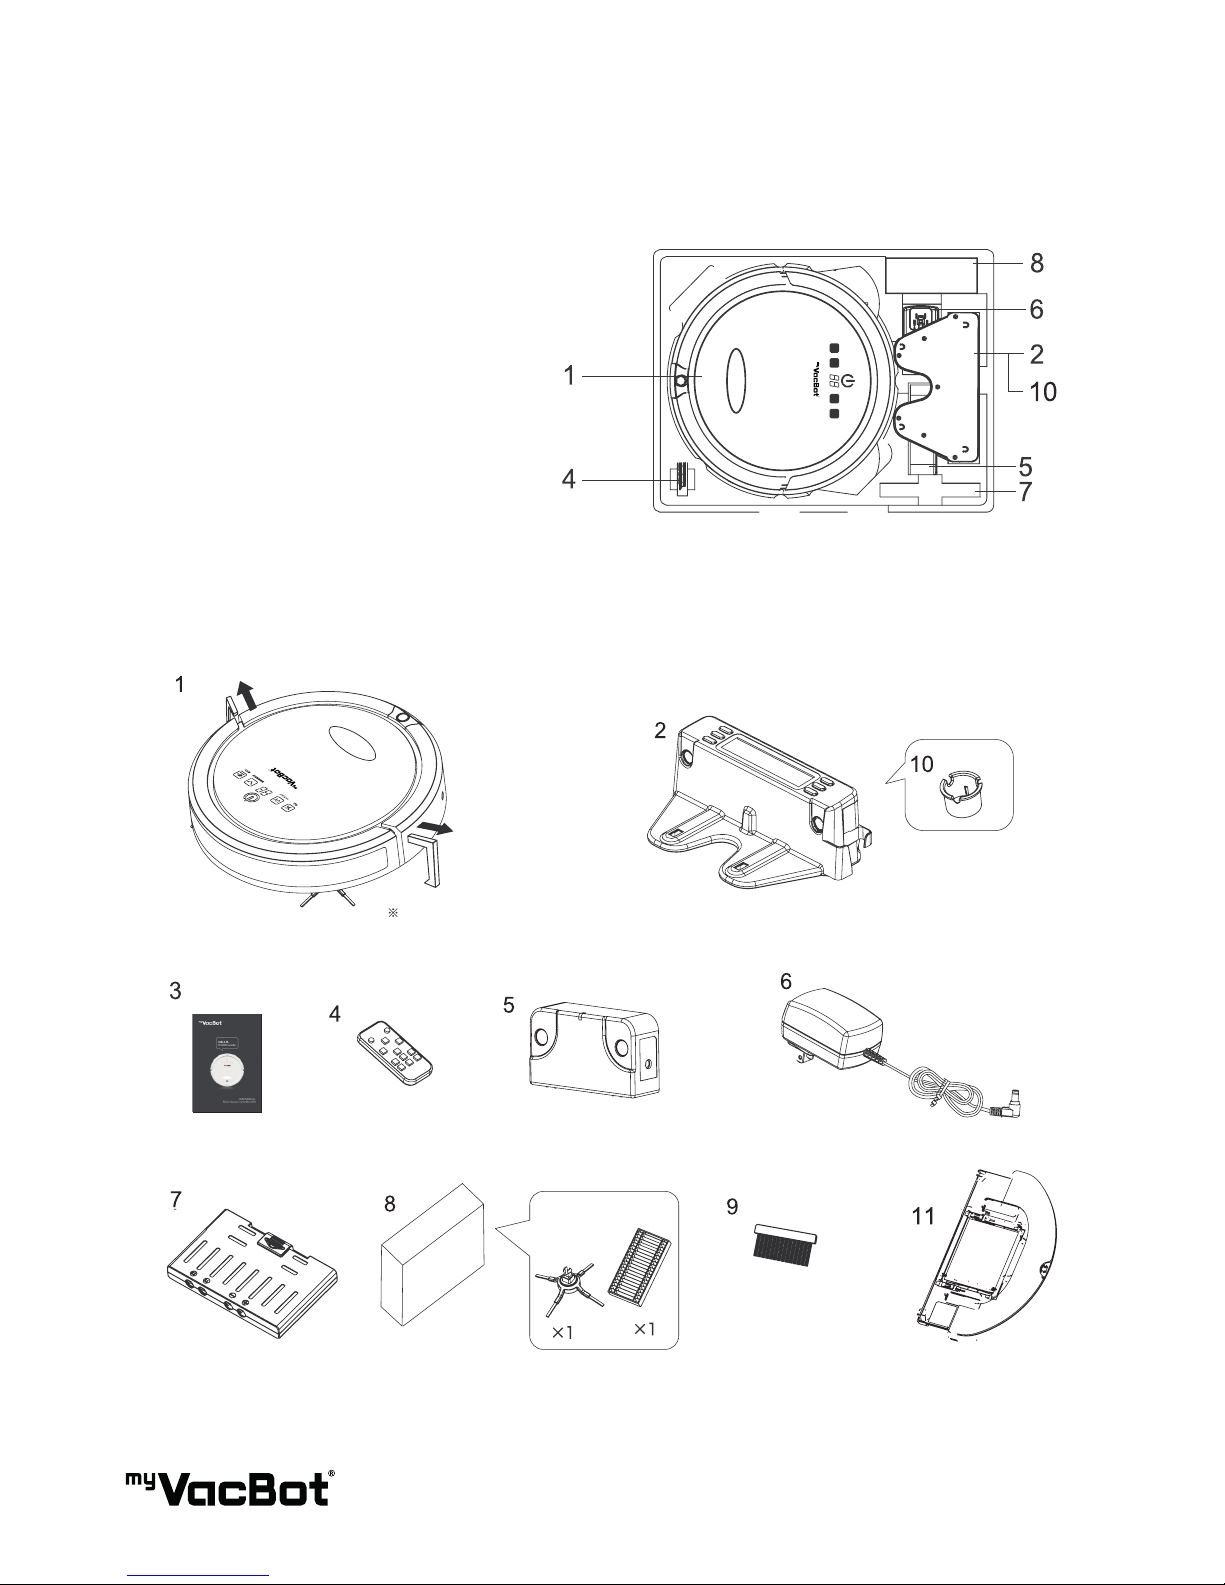
1. Vacuum and oor mopping robot
2. Home Base
3. User Manual
4. Remote Control
5. Room Limiter (Sonic Wall)
6. Power Supply Adaptor
7. Battery
8. Spare Parts Box
9. Cleaning Brush
10. Hair Removal Tool (inside the Home Base)
11. Wet Mopping Base
03 PARTS
04 ASSEMBLY
7
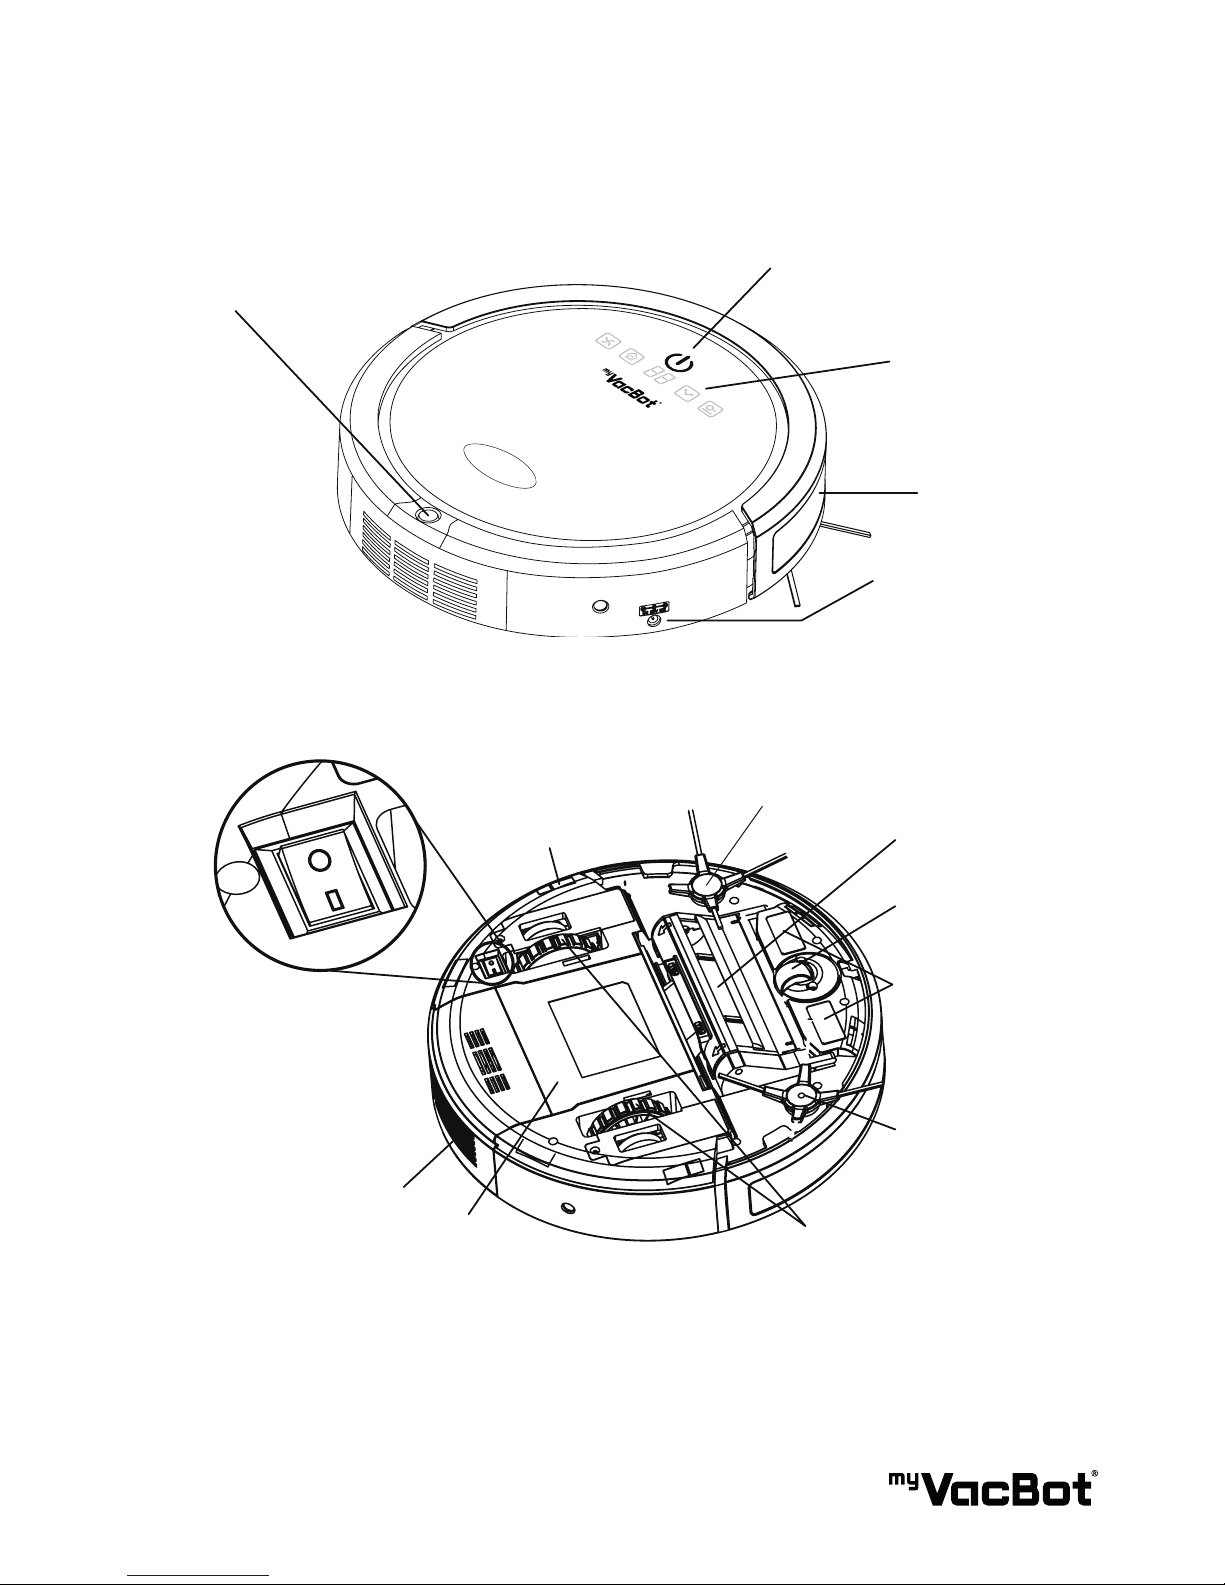
05 FUNCTIONS
Dust-bin button
Function display
Bumper
Charger Inlet
Power switch
Start / Stop switch
Drop-Sensor (*4)
Side-Brush
Main-Brush
Universal Wheel
Charging-Pad
Side-Brush
Wheel set
Dust-bin unit
Air-outlet
Power switch
– : ON
o : OFF
8
06 FEATURES & CLEANING MODE
07 CLEANING FEATURES
08 CLEANING MODES
Robotic Features
1. Scheduler/Recharging Home Base – Auto cleaning with scheduler & auto recharge when low on
battery
2. Ultrasonic Obstacle Detection
3. Ultrasonic Collision Obstacle Detection
4. Anti-Falling Cliff Detection Sensor
5. Ultrasonic Dust Sensors
6. Ultrasonic Room Limiter (Sonic Wall): can be used if needed to limit the access of the vacuum and oor
mopping robot in certain areas
7. Remote Control
1. Side brushes and powerful suction inlet – powerful suction and full coverage of cleaning.
2. Floating Roller Brush – allows the roller brush and suction to stay close to the ground, covers all the
dead spot while having full suction power.
3. Dust Filter & HEPA type Filter – Dust Filter holds normal debris and extends HEPA Filter’s life span. High
efciency particulate air lter traps the ne particles which trigger allergy and asthma symptoms.
4. Wet Mopping Base: uses wet mop with reservoir
5. Mop Track: to fully use every part of the mop
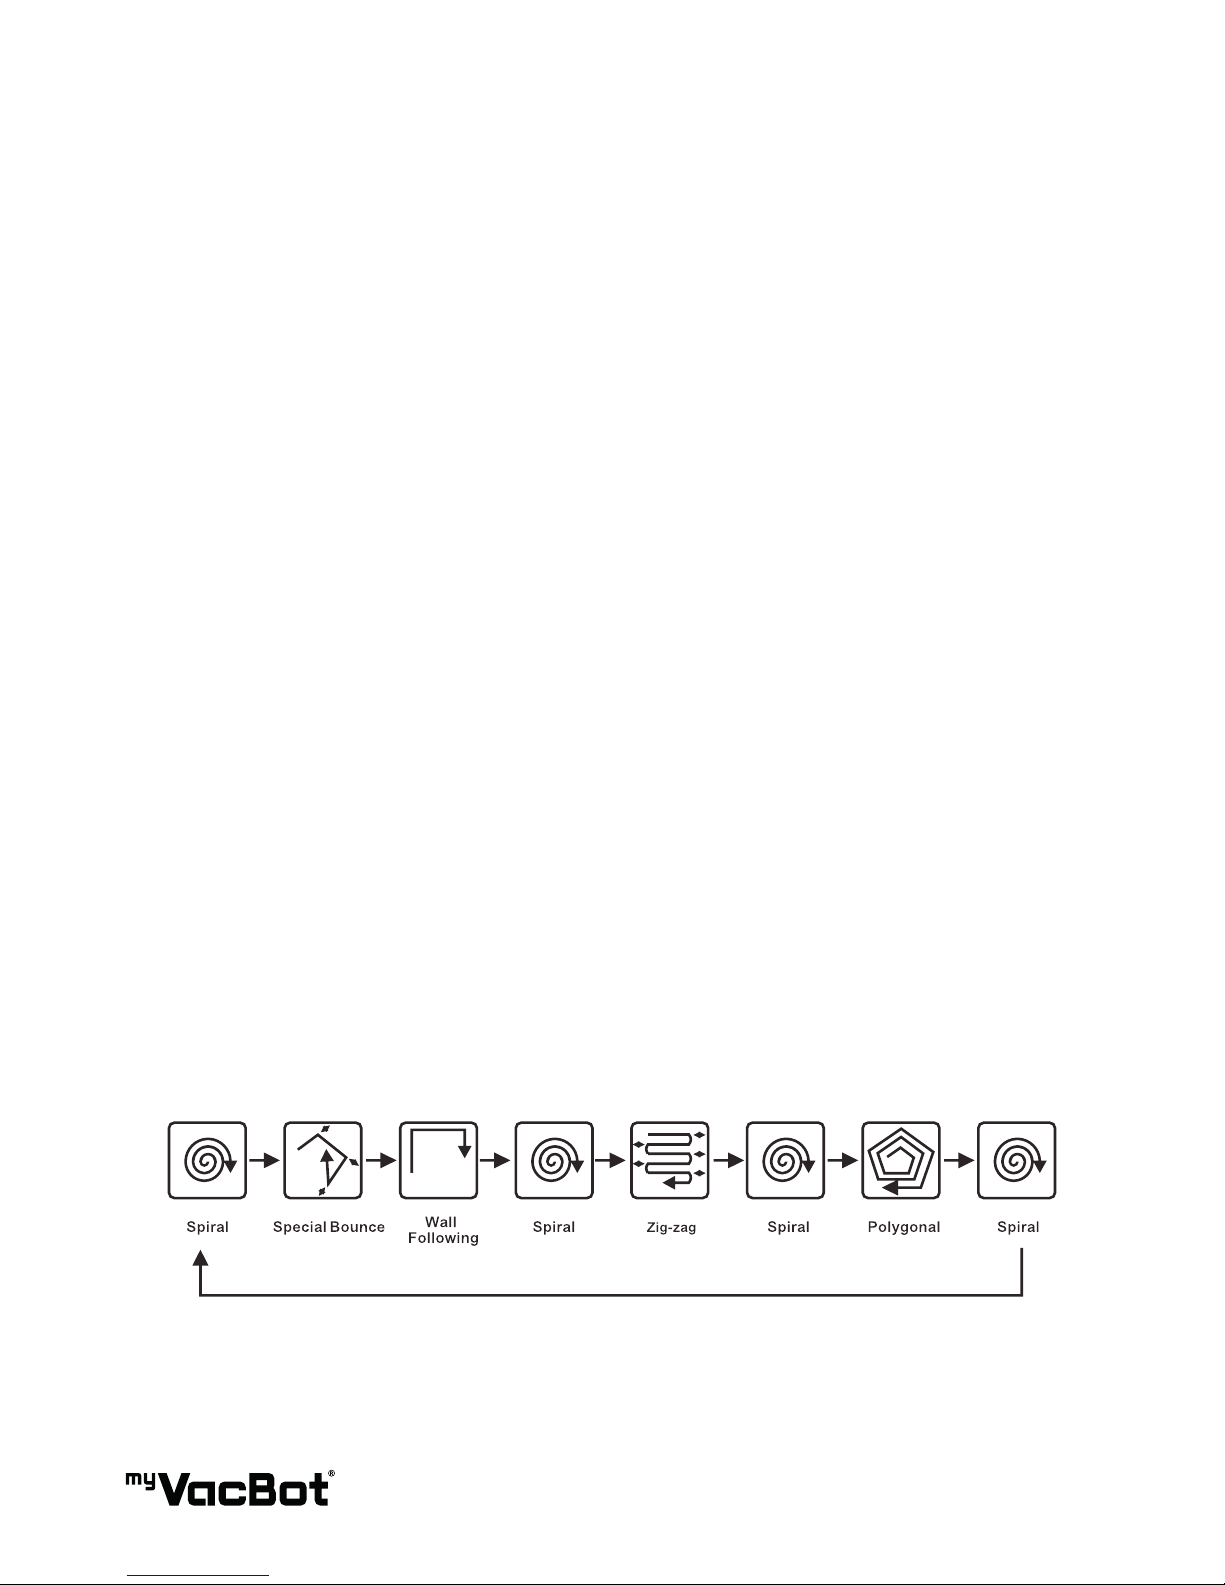
1. Auto Mode
Once the vacuum and oor mopping robot is activated without specic cleaning instructions, it will
automatically execute the auto function by repeating the ve different modes. The combination of different
cleaning patters will ensure the vacuum and oor mopping robot nishes the cleaning of any given space or
area.
2. Manual Mode
User can manually instruct the vacuum and oor mopping robot to perform any specic cleaning patterns
depending on different spaces to be cleaned.
9
NOTES
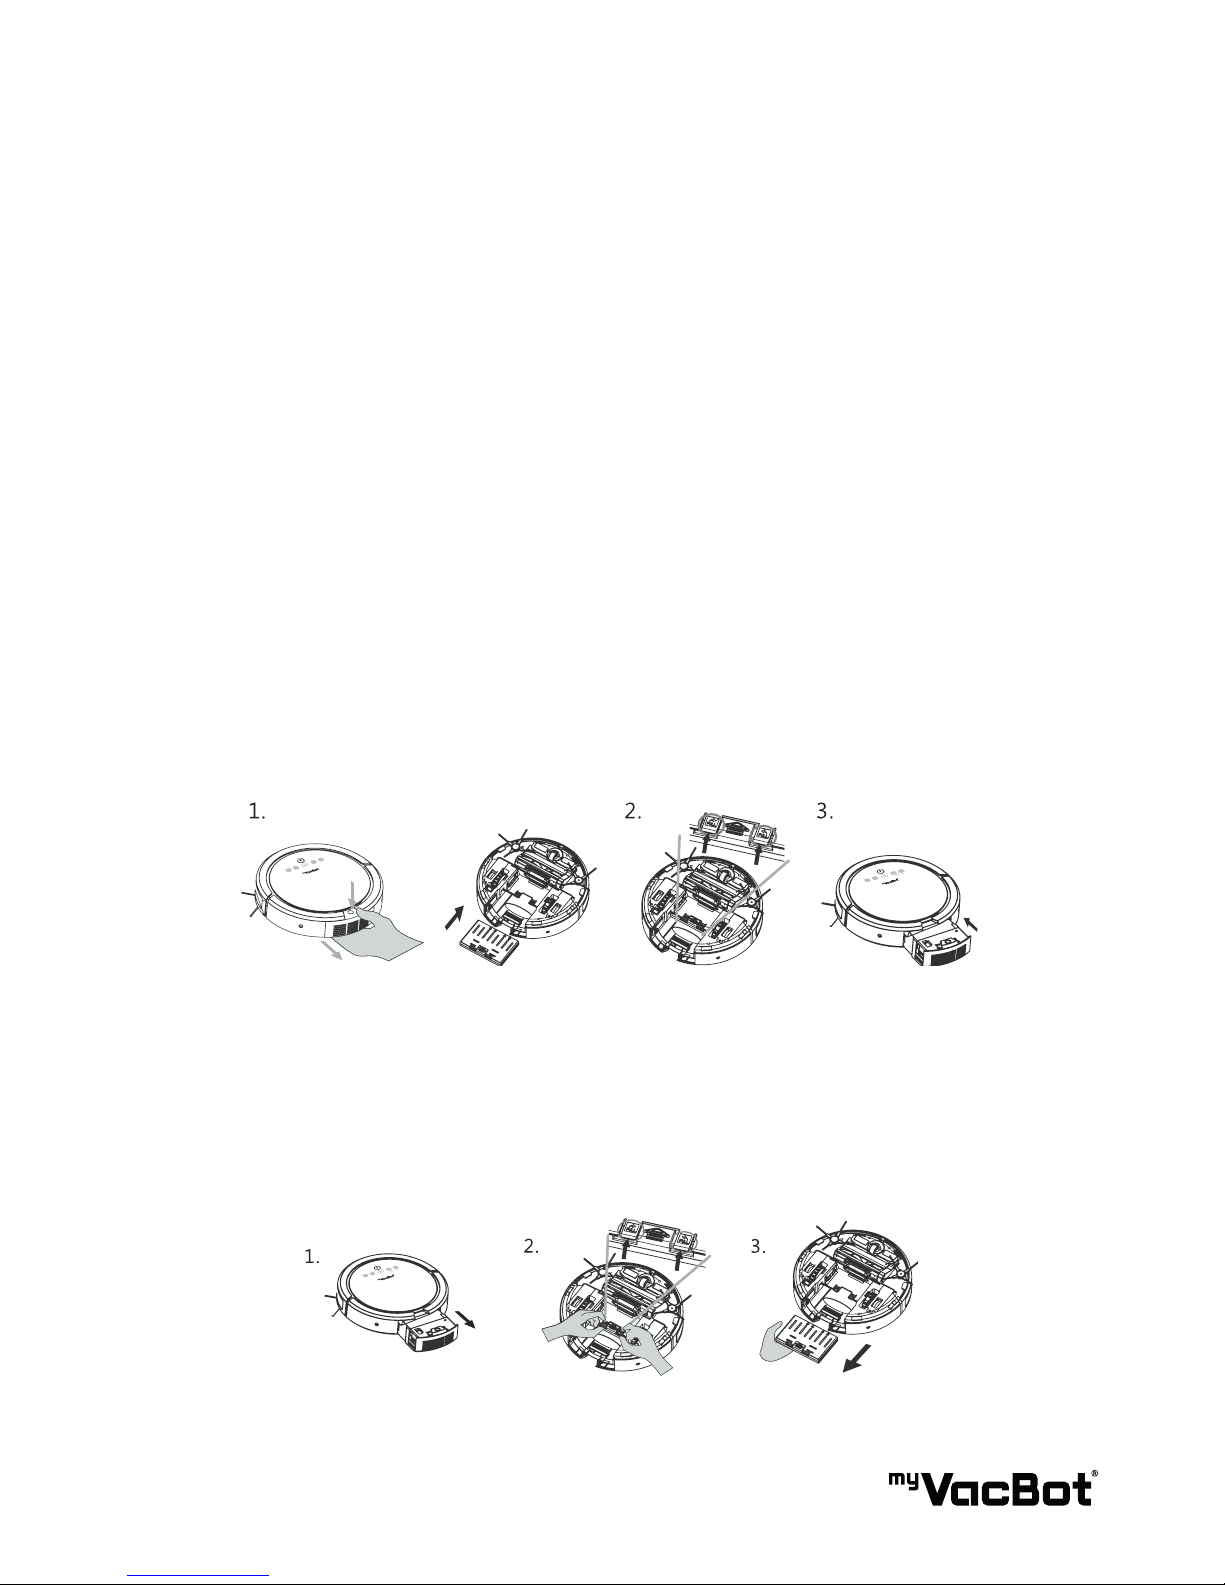
09 BATTERY INSTALLATION
10 BATTERY REMOVAL
1. The vacuum and oor mopping robot is suitable for hard oors and low to medium pile carpets.
2. This vacuum and oor mopping robot is not suitable for very uneven surfaces. Do not use in long pile/
tick carpet. Fold carpet fringes under the carpet before starting operation.
3. Please note that this robot will collect dust and small particles. It will not clean paper, plastic bags and
other large debris. It will get entangled in wires, so please declutter oor surfaces before using.
4. Do not leave bottles, lamps or other breakables on the oor.
5. Do not use in tight spaces less than 38cm wide as the vacuum and oor mopping robot may get blocked.
6. Do not use on wet or greasy dust.
The vacuum and oor mopping robot battery is user replaceable. If the battery stops keeping its hold,
please re-order replacement form the manufacturer or service centre.
1. Push the dust bin release button and pull out the dust-bin. Flip the robot over and push the battery into
the slot.
2. Push the battery until it clicks in.
3. Flip the vacuum and oor mopping robot over again and insert the dust bin back into the body.
1. Remove the dust bin rst and ip the vacuum and oor mopping robot over.
2. Push the two battery hook buttons simultaneously. The battery will pop out automatically.
3. Remove the battery.
10
11 CHARGING
12 DOCK
13 DOCKING TEST
If the vacuum and oor mopping robot shuts down while working or the battery indicator ashes, please
charge the vacuum and oor mopping robot immediately. When the vacuum and oor mopping robot
completes its cleaning cycle or the battery level is low, the vacuum and oor mopping robot will return to its
Home Base automatically if there is enough power left to do so.
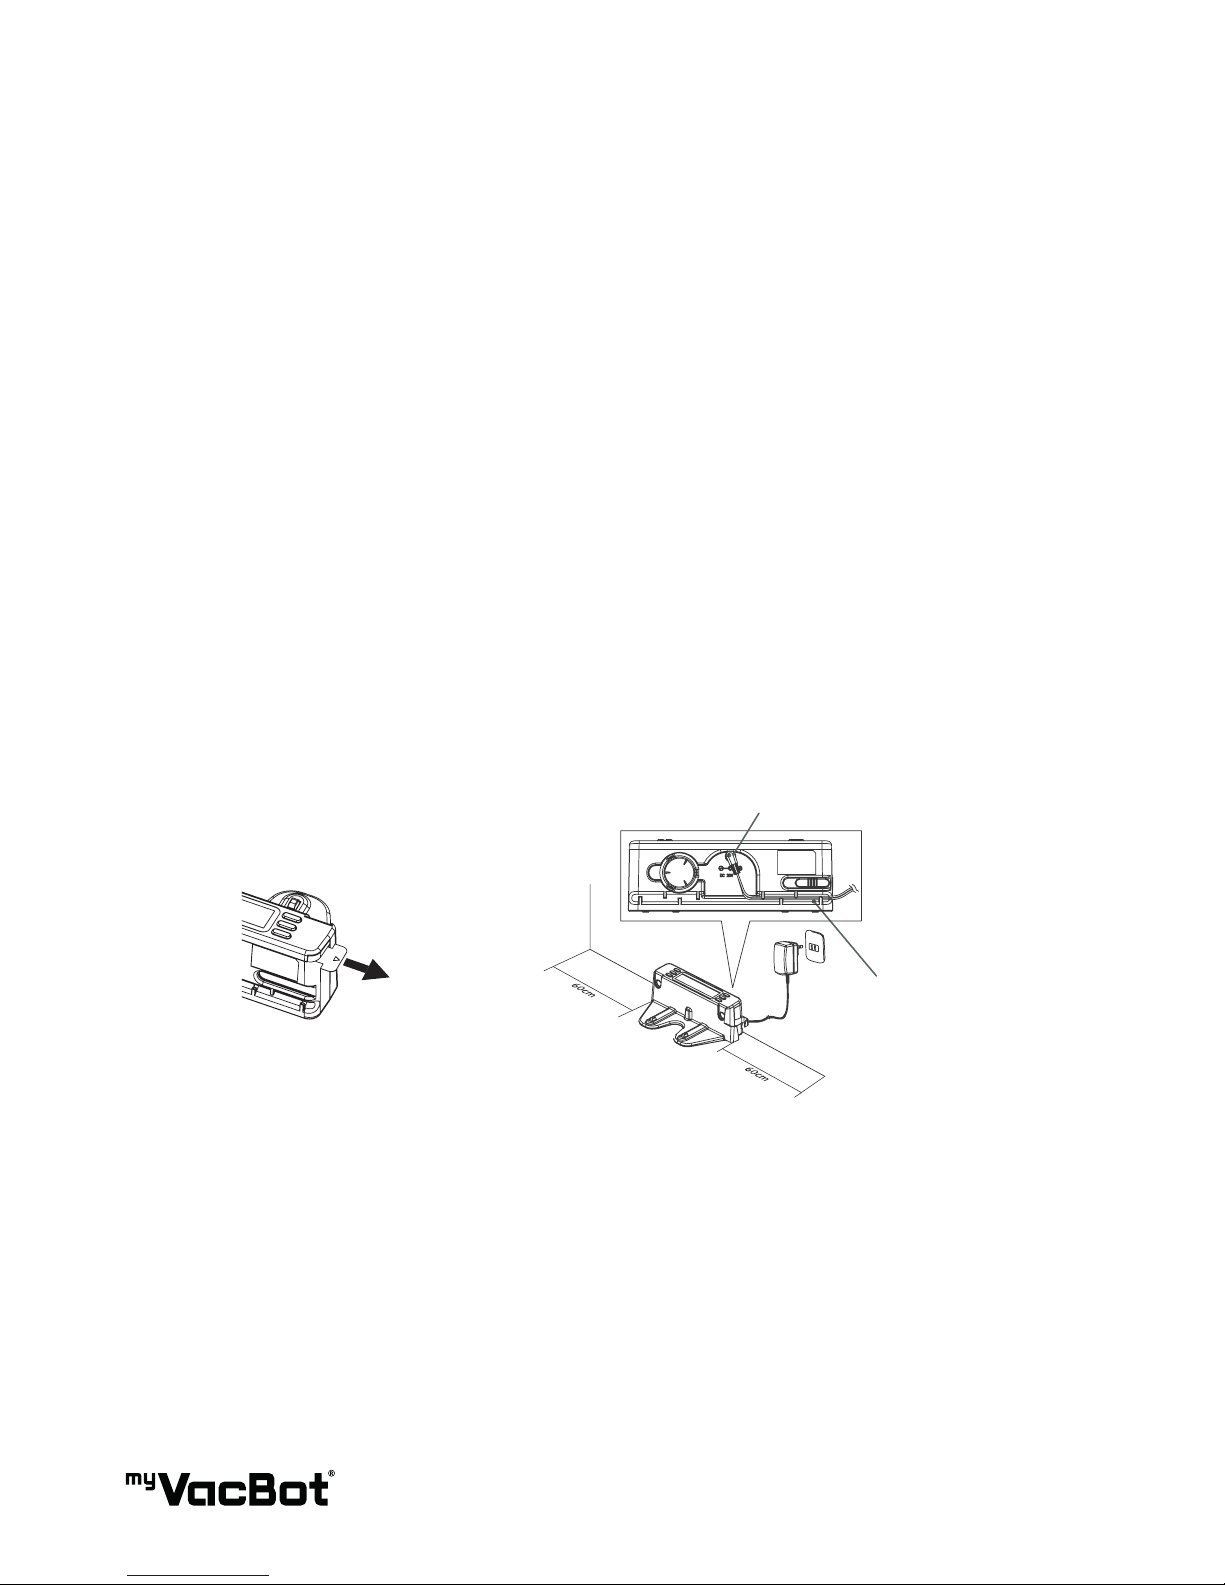
1. Plug the charger in the power outlet. Insert the power cable into the Home Base and
place the robot to charge.
2. The power plug can be inserted in the side of the vacuum and oor mopping robot. If the battery
indicator ashes, it means the vacuum and oor mopping robot is charging normally.
• The Home Base must be positioned on an even oor surface against a wall with at least a 60cm (2ft)
clearance around.
• Connect the AC adaptor to the power socket on the rear side of the dock or robot.
• Only use the AC adaptor provided by the manufacturer. The LCD display on the charging dock will turn
on when it is plugged in.
• Always keep the dock plugged in.
• Leave the vacuum and oor mopping robot on the oor somewhere near the dock.
• Press the “HOME” button on the remote control.
• The vacuum and oor mopping robot will return to the Home Base automatically. If the vacuum and
oor mopping robot fails to dock, check the installation process to make the necessary adjustments to
the docking station until the robot can dock properly.
Pull out
Remove the insulation sheet
Charger socket
Wire slot
Please sattle down the cable of
charger into the back side slot
of base.
Table of contents
Other VACBOT Vacuum Cleaner manuals


