Vag HYDRUS G Instruction Manual

KAT B - 1622 Edition 1 - 02/2011
VAG HYDRUS®G Underground Hydrant
DN 100 - PN 16
Operation and Maintenance Instructions

Content
VAG reserves the right to make technical changes and use
materials of similar or better quality without express no-
tice. The pictures are non-binding.
1 General 3
1.1 Safety 3
1.2 Proper use 3
1.3 Identification 3
2 Transport and Storage 3
2.1 Transport 3
2.2 Storage 4
3 Product features 4
3.1 Features and function description 4
3.2 Applications 4
3.3 Permissible and impermissible modes of
operation 4
3.3.1 Claw dimensions 4
3.3.2 Suitable surface box 5
4 Installation into the pipeline 5
4.1 Conditions required on site 5
4.2 Assembly instructions and fitting 5
4.3 Assembly of the VAG HYDRUS®G Underground
Hydrant 5
4.4 VAG HYDRUS®G flange version 5
5 Set-up and operation of the valve 5
5.1 Visual inspection and preparation 5
5.2 Function check and pressure test 5
5.3 Initial operation 6
5.4 Operation 6
5.4.1 Opening the hydrant 6
5.4.2 Closing the hydrant 7
6 Maintenance and repair 7
6.1 General safety instructions 7
6.2 Inspection and operation intervals 7
6.3 Maintenance work and replacement of parts 8
6.3.1 Design 8
6.3.2 Cleaning and lubrication 9
6.3.3 Visual and function check 9
6.4 Maintenance 9
6.4.1 Disassembly of the entire bonnet (7.1) 9
6.4.2 Replacing the stem (7.3); packing sleeve (7.2) or
sliding disks (7.4) 9
6.4.3 Replacement of the complete main valve assem-
bly (15) or the valve cone (15.3) 9
7 Trouble-shooting 10
8 How to contact us 10

VAG Operation and Maintenance Instructions • 3
VAG HYDRUS®G Underground Hydrant.
Observing these Operation and Maintenance Instructions helps
you to:
• Prevent hazards
• Reduce repair costs and down-times of the valve and/or the
entire equipment
• Improve the operational safety and useful life of the equipment.
1.3 Identification
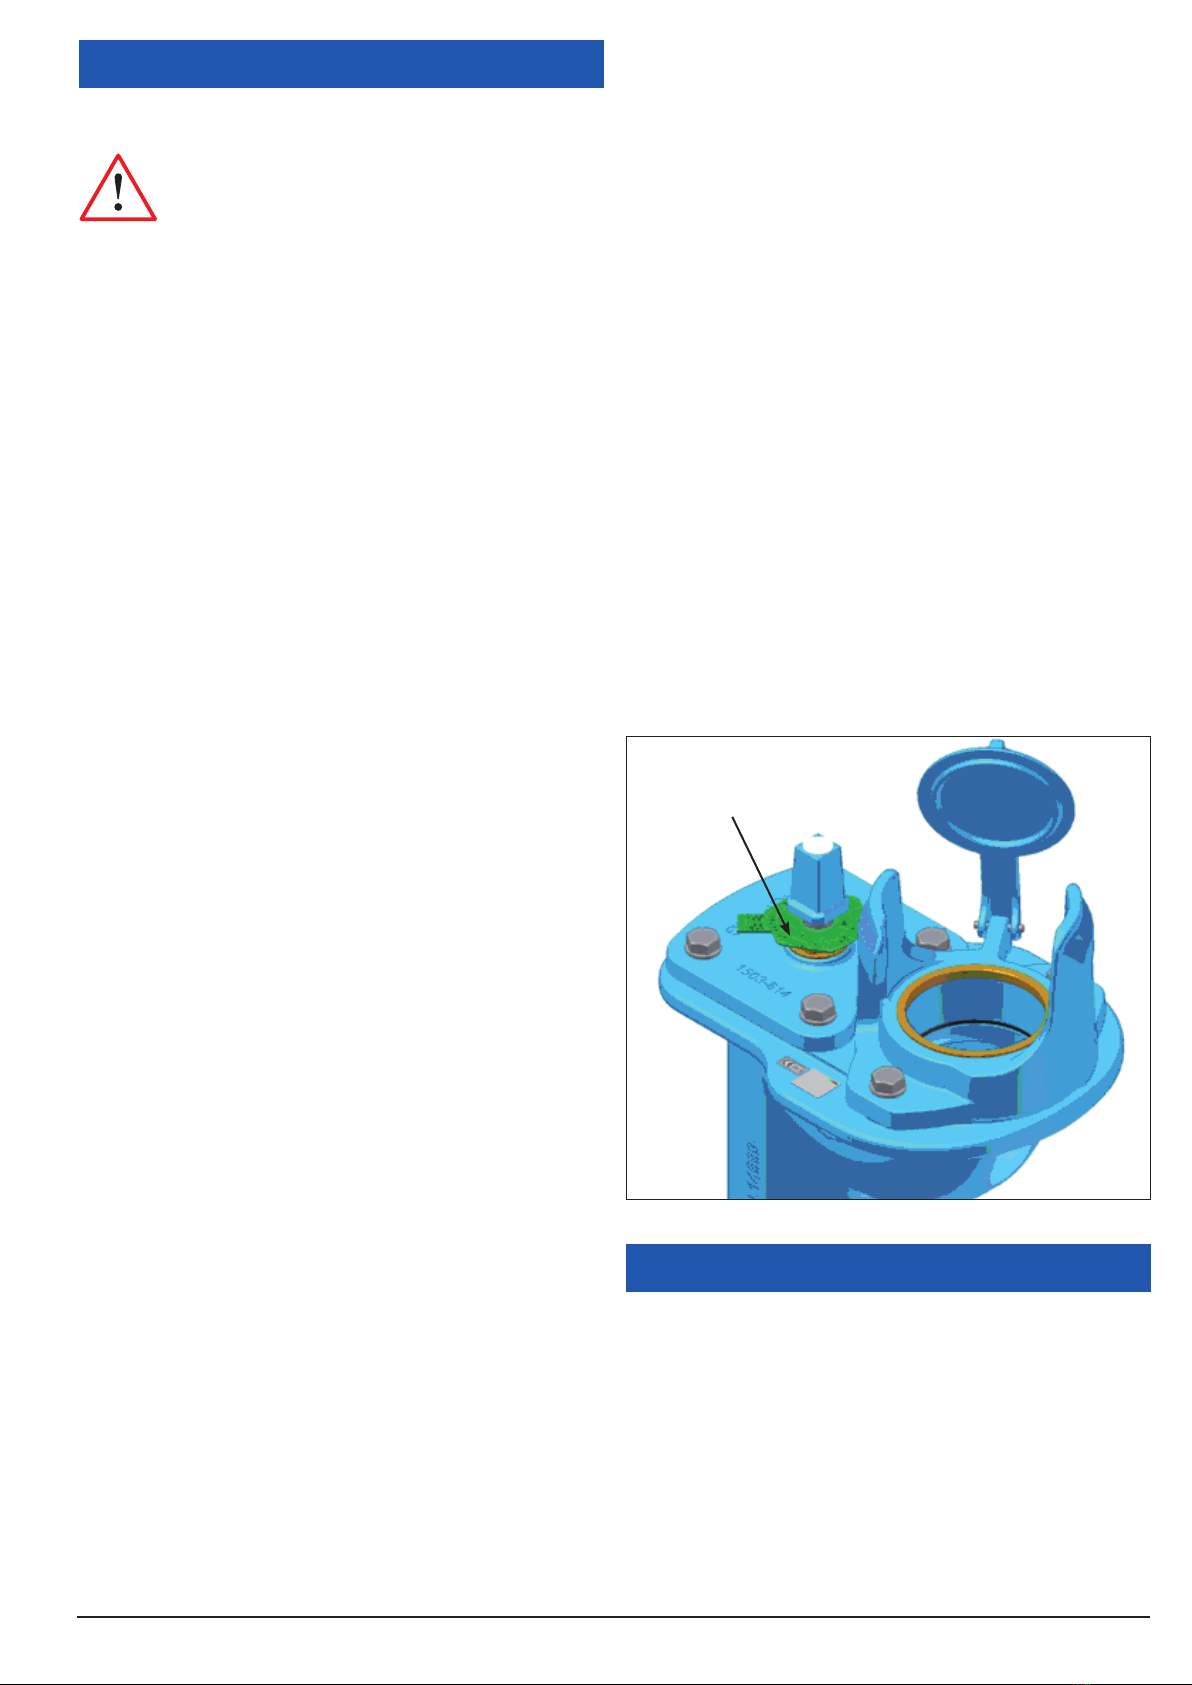
According to DIN EN 19 all valves bear an identification label
specifying the nominal diameter (DN), nominal pressure (PN),
body material and the manufacturer’s logo.
After installation in the pipeline cap, the following information can
been seen on the name plate when viewed from above.
VAG Manufacturer’s name
DN Nominal diameter of the valve
PN Nominal pressure of the valve
Installation depth (important for spare part definition)
Date of manufacture
2 Transport and Storage
2.1 Transport
For transportation to its installation site, the valve must be packed
in stable packaging material suitable for the size of the valve. It
must be ensured that the valve is protected against atmospheric
influences and external damage. When the valve is shipped under
specific climatic conditions (e.g. overseas transport), it must be
specially protected and wrapped in plastic film and a desiccant
must be added.
The factory-applied corrosion protection and any assemblies
must be protected against damage by external influences during
transport and storage.
1 General
1.1 Safety
These Operation and Maintenance Instructions must
be observed and applied at all times along with the
general “VAG Installation and Operation Instructions
for Valves” (see www.vag-group.com / Category: In-
stallation and Operation Instructions).
Arbitrary alterations of this product and the parts supplied with it
are not allowed. VAG will not assume any liability for consequen-
tial damage due to non-compliance with these instructions.
When using this valve, the generally acknowledged rules of tech-
nology have to be observed (e.g. national standards, EN 1074-6
hydrants, fitness for purpose requirements and appropriate veri-
fication tests, etc.). The installation must only be carried out by
qualified staff (see also Section 6.1 General safety instructions).
For further technical information such as dimensions, materials or
applications, please refer to the respective documentation (KAT
1622-A).
VAG valves are designed and manufactured to the highest stand-
ardst and their safety of operation is generally ensured. However,
valves may be potentially dangerous if they are operated improp-
erly or are not installed for their intended use.
Everyone dealing with the assembly, disassembly, operation,
maintenance and repair of the valves must have read and under-
stood the complete Operating and Maintenance Instructions (Ac-
cident Prevention Regulations, VBG 1 §§ 14 [Regulations issued
by the Trade Associations], ANSI Z535).
Before removing any protective devices and/or performing any
work on the valves, depressurise the pipeline section and ensure
it is free of hazards. Unauthorised, unintentional and unexpected
actuation as well as any hazardous movements caused by stored
energy (pressurised air, water under pressure) must be prevented.
In case of equipment that must be monitored and inspected, all
relevant laws and regulations, such as the Industrial Code, the
Accident Prevention Regulations, the Ordinance of Steam Boilers
and instructional pamphlets issued by the Pressure Vessels Study
Group must be complied with. In addition, the local accident pre-
vention regulations must be observed.
When a valve needs to be dismantled from a pipeline, fluid may
emerge from the pipeline or the valve. The pipeline must be emp-
tied completely before the valve is dismantled. Special care needs
to be taken in case of residues which may continue flowing.
1.2 Proper use
The VAG HYDRUS®G Underground Hydrant is a valve for installa-
tion in drinking water pipeline networks.
Refer to DVGW technical standard W331 for deployment and cor-
rect installation.
For the respective technical application ranges (e.g. operating
pressure, medium, temperature) please refer to the product-relat-
ed documentation (KAT 1622-A).
For any alternative operating conditions and applications, the
manufacturer’s written approval must be obtained!
These Operation and Maintenance Operation Instructions contain
important information on the safe and reliable operation of the
VAG name plate
Picture 1: VAG name plate

VAG Operation and Maintenance Instructions • 4
Caution!! Extracting water while the shut-off cone is in
a partially open position can cause cavitation effect in
the seat area, resulting in leakiness.
For correct operation of the valve DVGW standard W 331 must be
complied with.
The metallic limit stops when the hydrant is in open and closed
position are clearly noticeable. The design of the installed sealing
system guarantees tightness in this position. It is thus not neces-
sary to exert extra force to close the valve into an end position.
This may cause an overload of the limit stops, or result in the valve
being stuck in an end position or damaged.
3.3.1 Claw dimensions
The VAG HYDRUS®G DN 100 is available with two claw sizes (DN
100 and DN 80) from the factory.
Caution!! The hydrant with claw size DN 100 cannot
be used in public supply networks for the public fire
brigade as only standpipes with a claw connection size
DN 80 are available there. It is essential to consider
this fact for planning and ordering. Should you have
ordered the wrong claw size, the claw can be replaced
afterwards even with the hydrant installed.
2.2 Storage
The VAG HYDRUS®G Underground Hydrant must be stored with
the opened stopper in the horizontal position.
The elastomeric parts (seals) must be protected against direct
sunlight and/or UV light otherwise their long-term sealing function
cannot be guaranteed. Store the valve in a dry and well-aerated
place and avoid direct radiator heat. The protective cover protects
functionally important components from dust and other external
impurities.
Do not remove the protective caps of the connections / flanges
and the packaging materials until immediately prior to assembly.
The valve can be stored in ambient temperatures ranging from -20
°C to + 50 °C (protected by adequate covers). If the valve is stored
at temperatures below 0 °C, it should be warmed up to at least +5°
C before installation and before it is put into operation.
3 Product features
3.1 Features and function description
In its dimensions, function and hygienic characteristics the VAG
HYDRUS®G Underground Hydrant meets current standards.
• VP 325 Hydrants, requirements and tests
• EN 1074-6 Hydrants, requirements, fitness for purpose and veri-
fication tests
3.2 Applications
Due to the EPDM gasket materials used the standard version of
the VAG HYDRUS®G Underground Hydrant is suitable for the fol-
lowing media:
• Water, at a maximum temperature of 50°C
The use of media containing oil and gas may damage the lining
and gaskets and is thus not permissible.
For information about the corresponding temperature limits,
please refer to the product-related technical documentation (KAT
1622-A).
In case of deviating operating conditions and applications, please
consult the manufacturer.
3.3 Permissible and impermissible modes of
operation
The maximum operating temperatures and operating pressures
specified in the technical documentation (KAT 1622-A) must not
be exceeded.
The pressure applied to the closed valve must not exceed its rated
pressure.
For reasons of cavitation safety the maximum flow rate should not
exceed 1.5 times the Kv-value according to applicable technical
standards.
The valve may only be operated in fully opened position. Regu-
lation of the flow may only take place via the extraction valves
located on the standpipe.
Claw DN 100
Claw DN 80 with
intermediate flange adapter
Picture 2: Claw varieties

VAG Operation and Maintenance Instructions • 5
3.3.2 Suitable surface box
To install the VAG HYDRUS®G Underground Hydrant
DN 100 the large surface box DN 100 to DIN 4055 is
required.
4 Installation into the pipeline
4.1 Conditions required on site
Observe the provisions of the DVGW standard W 331 when in-
stalling the VAG HYDRUS®G Underground Hydrant.
The flange version of the VAG HYDRUS®G is delivered with a
multifunction seal integrated in the flange. An additional flat seal
for the flange connection to the pipeline should not be used. The
multifunction seal should not be removed, because doing so will
impair the function of the hydrant during operation.
To reliably drain the underground hydrant we recommend the ad-
ditional installation of the VAG seepage stone. (Fig. 4).
Without a seepage stone the lower draining point must be sur-
rounded by packed gravel or crushed rock that permits draining.
The draining area (immediately above the flange connection) must
never be blocked by the external application of sealants!
4.2 Assembly instructions and fitting
Check the valve for possible damage that it may have occurred
during transport and storage. Until installation the valve is pro-
tected from dirt accumulating during construction site operations
via a factory mounted cover (13).
4.3 Assembly of the VAG HYDRUS®G
Underground Hydrant
Remove the protective flange cover (13) prior to attachment to the
pipeline.
Before filling in the pipe trench install the appropriate VAG seep-
age stone for the safe draining of the underground hydrant.
Picture 4: Installation into the pipeline
In addition, observe the installation guidelines set out in DVGW
worksheet W 331 to install the HYDRUS®G.
5 Set-up and operation of the valve
5.1 Visual inspection and preparation
Before putting the valve and the equipment into operation, per-
form a visual inspection of all functional parts.
The fittings are sufficiently lubricated at the factory for purposes of
assembly, storage and transport. For maintenance work specified
in accordance with DVGW W392 the lubricant for drinking water
lines approved for foodstuffs or drinking water, must be used.
• KLÜBERSYNTH VR 69-252 N (with KTW approval for drinking
water) manufactured by Klüber Lubrication München AG,
5.2 Function check and pressure test
Prior to installation the working parts of the valve must be opened
up completely and closed at least once and the movement
checked. Caution! During a pressure test of the pipeline the closed
valve may only be put under a load up to its nominal pressure (see
technical data sheet KAT 1622-A).
According to the technical standard a leakage rate of
only E in accordance with DIN EN 1226-1 is guaran-
teed for the draining seal that is active when the cone is
open. This means that there is no tightness guarantee
Picture 3: Detailed view flange version
6
13
4.4 VAG HYDRUS®G flange version
Multifunction sealing ring (6) is pressed in at the factory and is
used as a sealing for the pipeline flange. An additional flat seal
should not be used.
After attaching the underground hydrant tighten the flange bolting
crosswise.
Seepage stone
Street cap DN 100
acc. DIN 4055

VAG Operation and Maintenance Instructions • 6
on the part of the manufacturer for a pressure test in this position.
For test pressures higher than the approved nominal pressure the
hydrant must be disassembled and the flange blanked using a
blind flange.
Newly installed pipeline systems should first be carefully flushed
to remove all foreign matter. Should any residue or impurities ex-
ist in the pipeline they may clog the internals during the flushing
process. This may impact the tightness function of the fitting or
damage the lining of the shut-off cone.
In particular, after repairs are carried out, but before putting new
systems into operation, the pipeline system must be flushed again
with a fully opened valve. Any cleaning or disinfecting agents used
may not corrode the fitting materials. The fitting is normally closed
by being turned in clockwise direction.
5.3 Initial operation
VAG HYDRUS®G Underground Hydrants are delivered in the fol-
lowing versions:
• Claw DN 100 with self-closing claw cover (2)
• Claw DN 80 with self-closing claw cover (2)
Select the standpipe according to the claw version.
• Lift up self-closing outlet claw cover (2) (Wire with bent hook),
• Attach and tighten standpipe. Check that the base pins are
properly seated in the claw (1.1) by shaking the standpipe.
• Fill the piping section. In doing so the underground hydrant can
be used to release air and be flushed afterwards.
Caution!! The hydrant shut-off valve must always be
completely open. Throttling of the flow may only take
place via the valves on the standpipe.
Throttling the hydrant shut-off valve may result in high flow veloci-
ties occurring within the valve.
5.4 Operation
5.4.1 Opening the hydrant
Lift street cap cover at lifting support and turn sideways until the
street cap is freely accessible.
Clean claw (1.1) and claw cover (2) in street cap. Lift up self-clos-
ing outlet claw cover (2.) (Wire with bent hook). From above insert
standpipe with claw nuts bolted downwards into the claw (1.1.)
and turn clockwise until the claw (1.1) is firmly seated. Check that
the base pins are properly seated in the claw (1.1) by shaking the
standpipe.
Caution!! Make sure the standpipe valve is wide open,
allowing air to escape when opening the hydrant shut-
off valve. !!!
Open by slowly and completely turning the hydrant shut-off han-
dling key anti-clockwise (approx. 12 turns) until the clearly notice-
able metallic limit stop.
Picture 5: Assembly of standpipe and self-closing claw cover
Picture 6: Hydrant operation, metallic limit stop
Limit stop in
closed position
Limit stop in
open position
The metallic limit stops when the hydrant is in open and closed
position are clearly noticeable. The design of the installed sealing
system guarantees tightness in this position.
It is thus not necessary to exert extra force to close the valve into
an end position. This may cause an overload of the limit stops, or
result in the valve being stuck in an end position.
Flush underground hydrant and standpipe with the water flowing
out. In new condition the underground hydrant requires torque of
approx. 60 Nm to open. This can increase significantly during op-
eration depending on maintenance condition.
Caution! Before opening the underground hydrant the
operator must make sure that no initial gate valve im-
mediately upstream from the underground hydrant is
closed. Because the underground hydrant closure de-
vice opens down into the pipeline, a strong rise in op-
erating torque would occur due to the incompressibility
of the water, perhaps causing damage to internal parts.
Standpipe
2
1.1

VAG Operation and Maintenance Instructions • 7
Caution !! The hydrant shut-off valve must always be
completely open. Regulation of the quantity dispensed
many only take place via the valves on the standpipe.
When throttling the hydrant shut-off valve high flow ve-
locities occur in interim position that may result in cav-
itational effects.
5.4.2 Closing the hydrant
Do not close the standpipe completely. With the standpipe valve
open slightly close it by evenly turning the handling key for the
hydrant shut-off slowly and completely (approx. 12 turns) in clock-
wise direction towards the metal limit stop.
Caution !! By not opening the standpipe valve strong
overpressure can build up when closing the hydrant
shut-off.
Make sure to drain the hydrant.
After approx. 5 minutes loosen the standpipe from the claw (1.1)
by turning anti-clockwise. Then remove the standpipe, the self-
closing claw cover (2) closes automatically, and close the surface
box so that it is safe for traffic.
6 Maintenance and repair
6.1 General safety instructions
Prior to the performance of inspection and maintenance work on
the valve or its assemblies, shut-off the pressurised pipeline, de-
pressurise it and secure it against inadvertent activation.
After completing the maintenance works and before resuming op-
eration, check all connections for proper fastening and tightness.
Perform the steps described for initial set-up as described under
Section 5 “Set-up and operation”.
Statutory and local provisions as well as the safety and accident
prevention regulations must be observed and complied with at all
times.
Servicing, maintenance and inspection work as well as the re-
placement of spare parts must only be done qualified staff. The
plant operator is responsible for determining the suitability of the
staff or for ensuring that they have the relevant qualifications.
If the operator’s employees do not have the qualifications re-
quired, they need to attend a training course. This training course
can e.g. be held by VAG Service employees.
In addition to this, the plant operator needs to ensure that all em-
ployees have understood these Operation and Maintenance In-
structions as well as all further instructions referred to in them.
Protective equipment such as safety boots, safety helmets, gog-
gles, protective gloves etc. must be worn during all work requiring
such protective equipment or for which such protective equip-
ment is prescribed.
Improper or wrong use of the valve should be avoided. Prior to the
performance of any work on the valve and equipment it must be
ensured that the relevant pipeline section has been depressurised
and/or de-energised.
6.2 Inspection and operation intervals
Tightness, movement and corrosion protection of the VAG HYD-
RUS®G Underground Hydrant should be checked at least once
every 4 years (DVGW worksheet W 392).
Depending on operating experience this maintenance schedule
can be shortened or prolonged.

VAG Operation and Maintenance Instructions • 8
Picture 7: Design and assemblies
Item Assembly Single part Material Spare part
1 Complete self-closing claw
1.1 Self-closing claw EN-JS 1050
•1.2 Sealing ring Brass
1.3 O-ring NBR
3 Disk DIN 125-17 A2-70
6 Sealing ring DN 100 NBR / Polyamide •
7 Complete bonnet
7.1 Bonnet EN-JS 1050
•
7.2 Packing sleeve Brass
7.3 Stem 1.4021
7.4 Sliding disk Polyamide
7.5 O-ring NBR
8 Hexagonal bolt M16 A2-70
9 SET Stem square cap EN-JS 1050 •
11 Name plate Plastic •
13 Protective cap Plastic PP
15 Complete main valve assembly
15.1 Stem nut retainer with stem nut
EN-JS 1050
Brass
•
15.2 Pressure tube 1.4301
15.3 Valve cone EN-JS 1050/ EPDM
15.4 Bolt rivets 1.4305
16 Draining protection Polyethylene •
17 Hollow ball Aluminium / EPDM •
VAG HYDRUS®G1 DN 100
Single shut-off
VAG HYDRUS®G2 DN 100
Double shut-off
6.3 Maintenance work and replacement of
parts
6.3.1 Design
The design view in picture 7 is a partial overview of the following
descriptions of work procedures.

VAG Operation and Maintenance Instructions • 9
6.3.2 Cleaning and lubrication
For maintenance work specified in accordance with DVGW W392
the lubricant for drinking water lines approved for foodstuffs or
drinking water must be used.
• KLÜBERSYNTH VR 69-252 N (with KTW approval for drinking
water) manufactured by Klüber Lubrication München AG
6.3.3 Visual and function check
• Easy movement of hydrant shut-off
• Check whether the claw (1.1) and the self-closing cover for
standpost application are undamaged.
• Drain function of the hydrant. Complete draining should be com-
pleted within 5 minutes. Should draining not take place within
this period it is highly probable that the drain hole is clogged.
The following may resolve the problem:
a) Create internal pressure (max. 24 bar) using a manual pump
with the shut-off closed
b)Disassemble main valve assembly and mechanically clean ( e.g.
slat with nails) drain hole (see 7.1)
c) If a) and b) are unsuccessful, the fitting will have to be excavated
and replaced
• Function and cleanliness of internal parts of hydrant, cleaning
by flushing a short time, water always leads away from stand-
pipe and hose without any problem.
• Tightness of the hydrant shut-off. The frequent cause of leaks
is foreign matter (e.g. plastic shavings, etc.) These can be re-
moved by flushing or by extraction using auxiliary tools.
6.4 Maintenance
Make sure to follow 6.1 for all maintenance and servicing work.
Refer to VAG spare parts list KAT 1622-E for all required spare
parts.
Figure 8 shows a schematic representation of the safety interlock.
Depending on the type of hydrant, this may look different in some
details.
The VAG HYDRUS®G Underground Hydrant has an integrated
safety interlock for the main valve assembly. If after removing the
bonnet (7.1) the main valve assembly is moved upwards it can-
not be expelled from the jacket pipe. The integrated internal fixed
stop on the front side of the jacket pipe prevents this. After turning
approx. 30° clockwise the main valve assembly is unlocked and
can be extracted. This makes it impossible for the main valve as-
sembly to be expelled unintentionally due to uncontrolled residual
pressure.
6.4.1 Disassembly of the entire bonnet (7.1)
Clean the upper section of the underground hydrant in the area of
the bonnet. Remove the two bolts (8) on the bonnet attachment.
Turn stem square cap (9) clockwise until stem (7.3) is completely
unwound from stem nut (15.3). Remove the bonnet from above.
Caution!!! The stem nut is inserted loosely in the stem
nut retainer and may fall into the pipe jacket!
6.4.2 Replacing the stem (7.3); packing sleeve
(7.2) or sliding disks (7.4)
Disassemble bonnet as described in 7.5.1. Remove the stem
square cap (9) by loosening the cylinder screw on the front side.
Pull off the stem square cap and the name plate. Completely undo
the screw connection between the packing sleeve (7.2) and the
bonnet (7.1). Pull off the stem (7.3) and completely disassemble
all individual components. Replace parts as necessary in accord-
ance with Spare parts list KAT 1622-E. Assembly is done in the
opposite order.
6.4.3 Replacement of the complete main valve
assembly (15) or the valve cone (15.3)
When removing the main valve assembly (15) make sure to ob-
serve the general safety instructions in 6.1.
Before beginning disassembly open the hydrant for a short time
with opened initial gate valve (approx. 3-4 turns clockwise) to allow
any air collected upstream from the hydrant shut-off to escape.
The initial gate valve can then be closed with the hydrant shut-off
in open position.
Clean the upper section of the underground hydrant in the area of
the bonnet. Remove the two bolts (8) on the bonnet attachment.
Turn stem square cap (9) clockwise until stem (7.3) is completely
unwound from stem nut (15.3). Then turn the stem (7.3) back ap-
prox. 3 turns in clockwise direction.
Use both hands to grasp below the bonnet (7) and pull up as far as
it goes. You may need to employ additional tools. Then screw off
the stem in clockwise direction and pull off the complete bonnet
from above.
Caution!!! The stem nut is inserted loosely in the stem
nut retainer and may fall into the pipe jacket!!!
Use stem nut (15.1) to turn main valve assembly approx. 30° anti-
clockwise and then completely remove from above.
Then grind off the front part of the bottom bolt rivet (15.4) below
the valve cone (15.3) and knock out the bolt rivets. From below pull
the valve cone out of the pressure pipe (15.2) and insert the pre-
drilled replacement valve cone and fasten using the included bolt
and the self-securing cap nut.
30°
Picture 8: Maintenance

VAG Operation and Maintenance Instructions • 10
Installation is done in the opposite order.
Figure 9 shows a schematic representation of the spare parts kit
(pre-drilled shut-off cone, bolt and self-locking cap nut made of
stainless steel). Depending on the type of hydrant, this may look
different in some details.
7 Trouble-shooting
For all repair and maintenance work, please observe the general
safety instructions described in Section 6.1!
Picture 9: Spare parts set shut-off cone with bolt and self-securing cap nut
Problem Possible causes Solutions
Hydrant hard to open Initial gate valve closed Open initial gate valve and try again
Hydrant sticky Wear and tear and bearing Replace the entire bonnet or sliding disk, as described in 6.4.1/6.4.2.
Tightness on the hydrant shut-off. Foreign material (e.g. plastic shavings)
are stuck between the valve cone
(15.3) and valve seating socket
Flush hydrant by opening the hydrant shut-off valve
for a short time. Then check tightness again.
Still leaking from hydrant shut-off Damage to the valve cone (15.3)
or the valve seating socket
Remove the main valve assembly (see 6.4.3) and re-
place the valve cone (15.3). If valve seating socket is dam-
aged the complete hydrant will have to be replaced.
8 How to contact us
Head office
VAG-Armaturen GmbH
Carl-Reuther-Str. 1
68305 Mannheim
Germany
Phone: +49 (621) 749-0
Fax: +49 (621) 749-2153
http://www.vag-group.com
Service
Our service hotline can be reached 24/7 world-wide. In case of
emergency, please contact us by phone.
Servicehotline: +49 621 - 749 2222
Other manuals for HYDRUS G
1
Table of contents
Other Vag Firefighting Equipment manuals