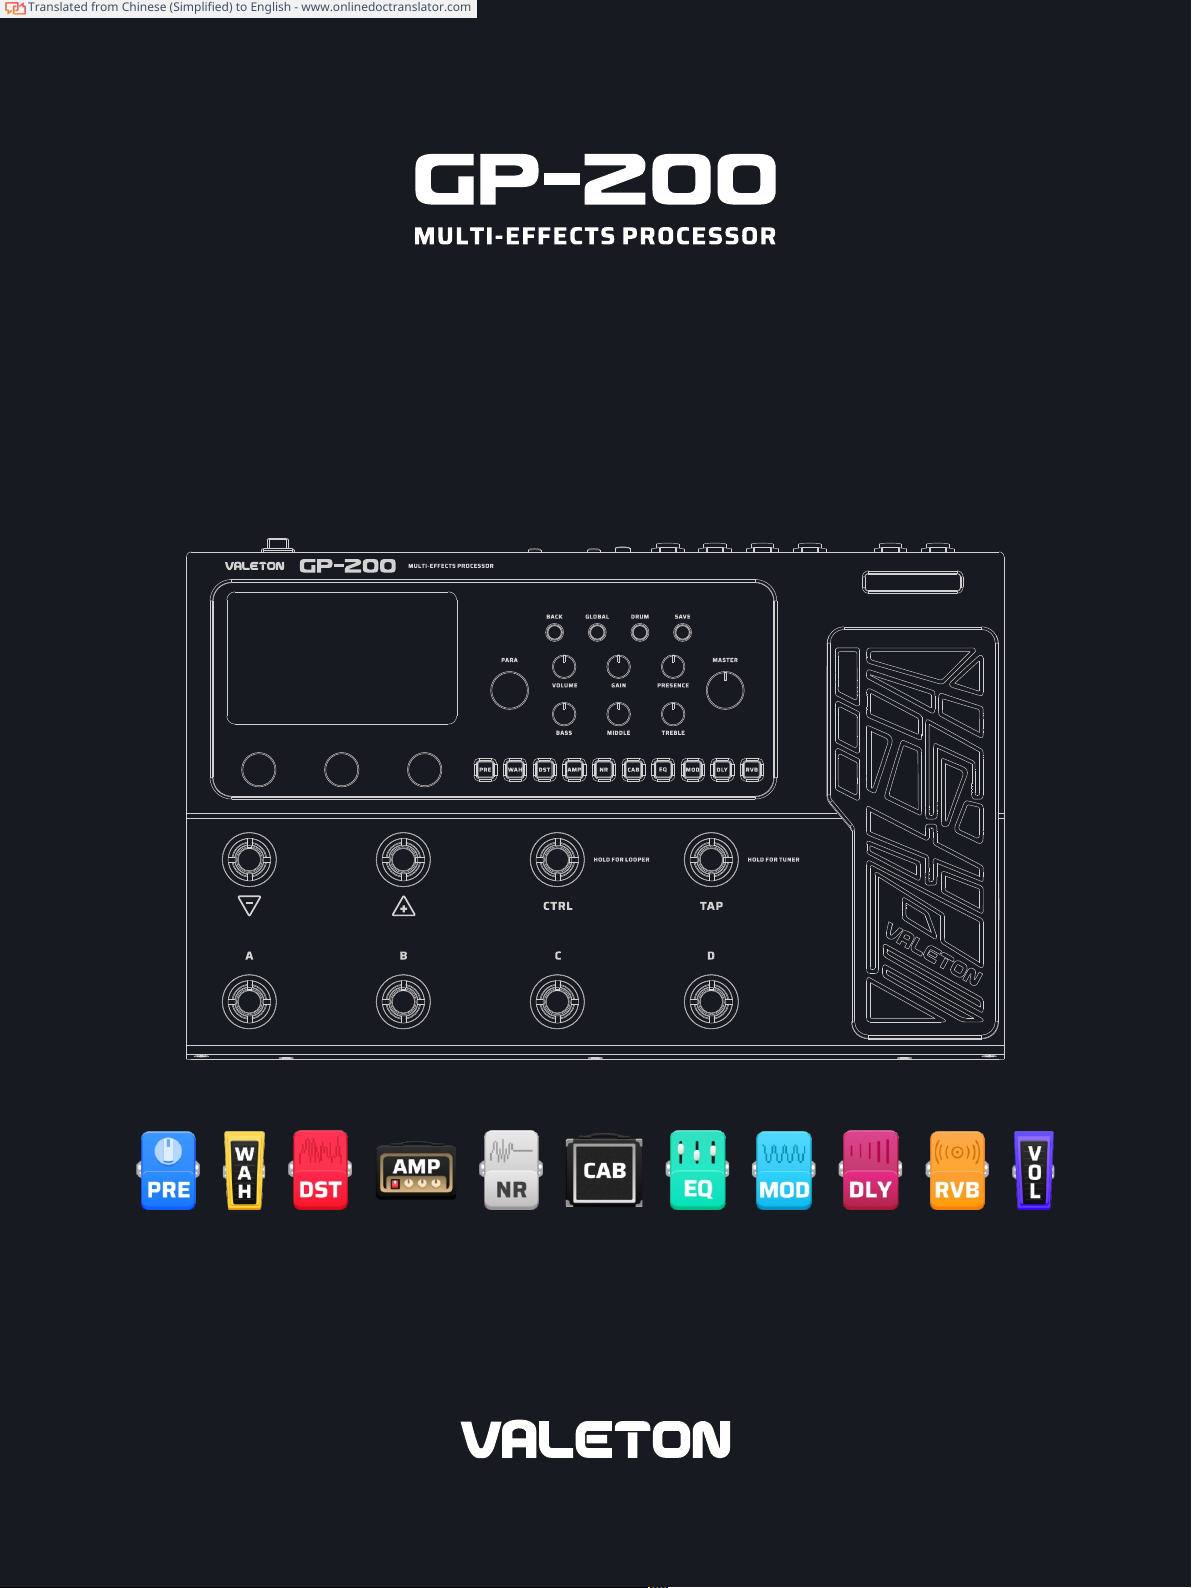
Valeton GP-200 User manual

User manual
Suitable for firmware V1.0.4
※-We will continue to improve our products and reserve the right to modify certain functions and specifications (including but not limited to appearance, packaging design, operating manuals, accessories, sizes, specifications, display screens, etc.), without exception 行Notification.
Please confirm product features and specifications with your local dealer before purchasing. The product image and color may differ from the actual product due to the camera light error and screen settings. Please refer to the actual product.
Translated from Chinese (Simplified) to English - www.onlinedoctranslator.com

Contents
Welcome······················1 ··1 Product
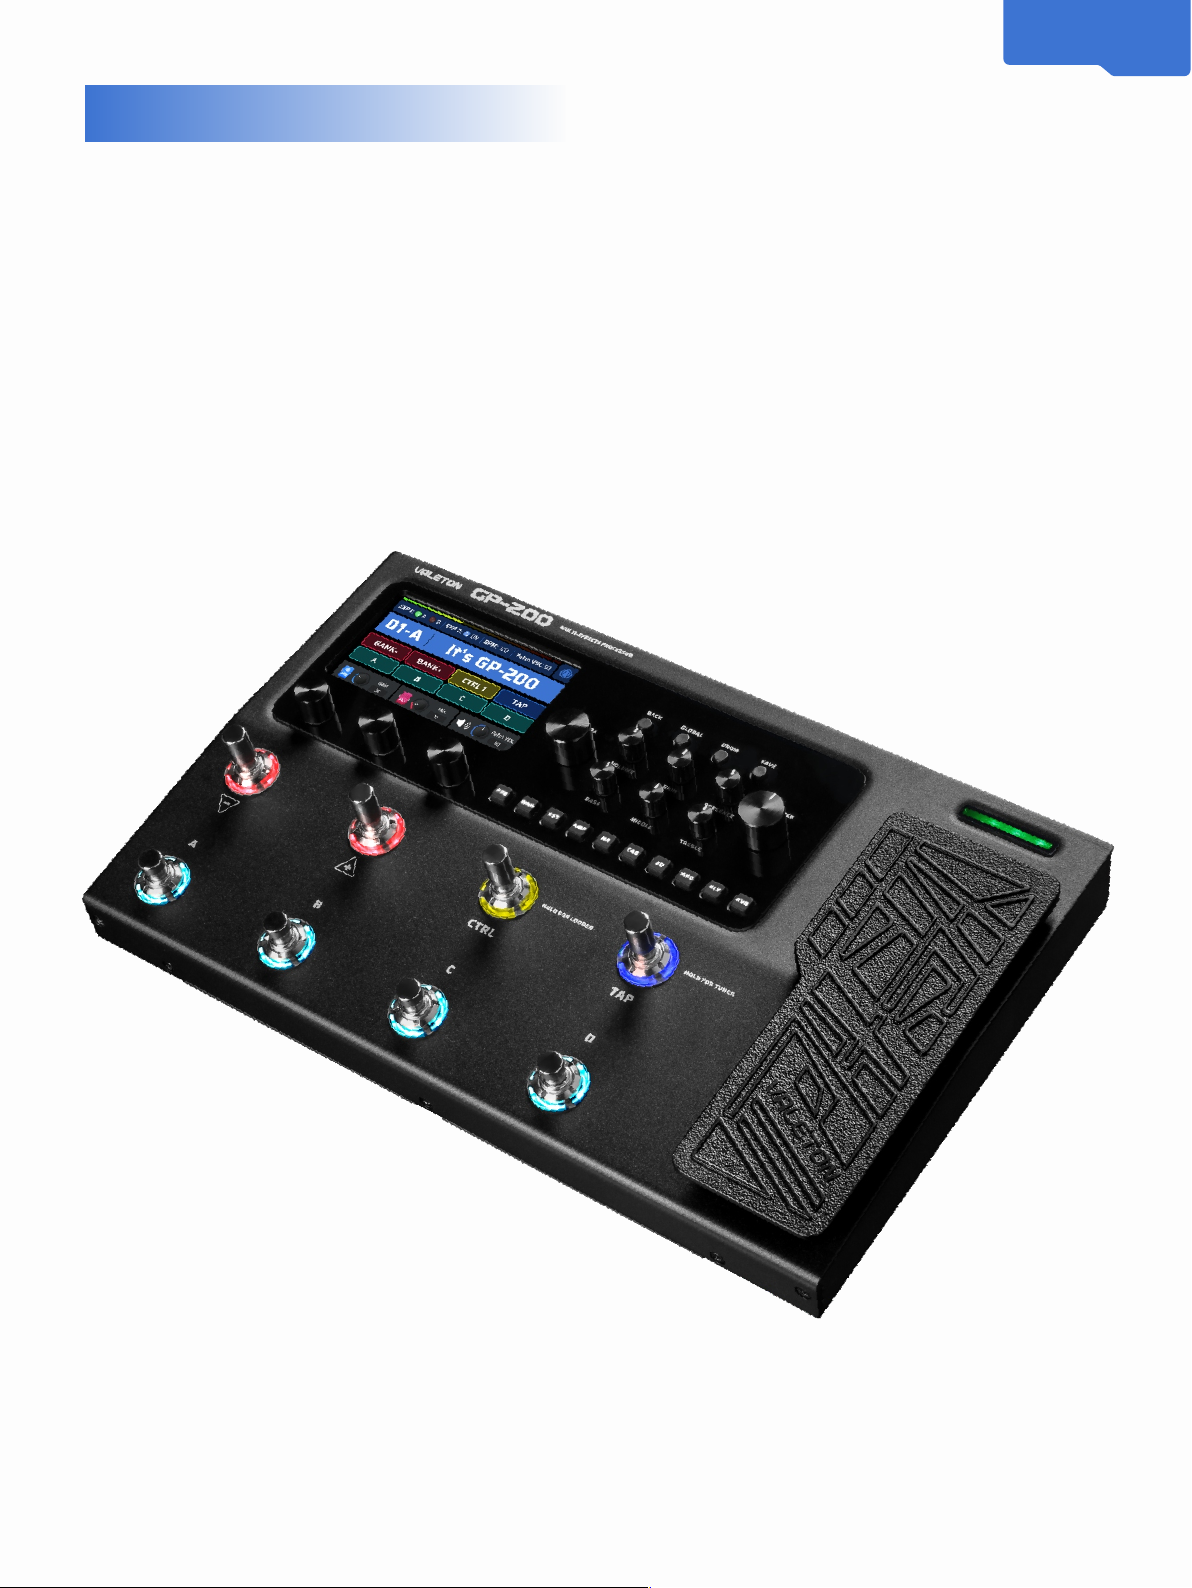
Overview·······················2 Panel
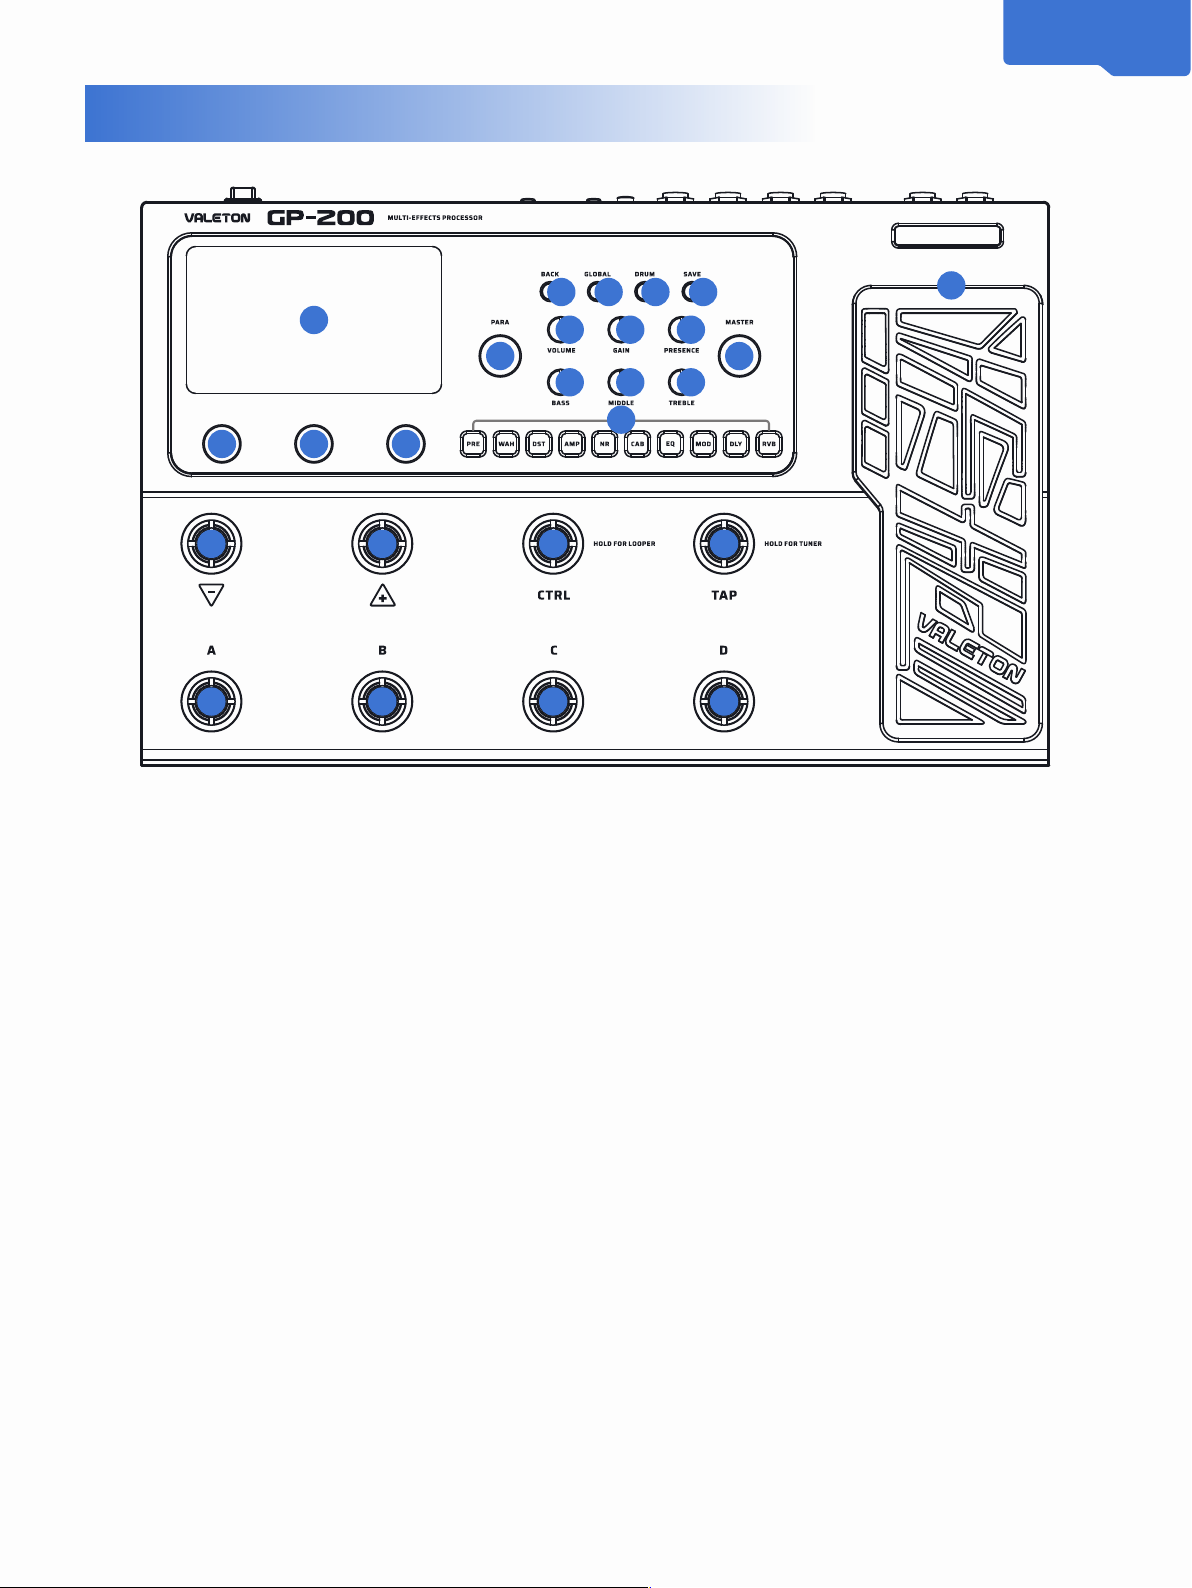
Introduction····················· ···3 Top
interface introduction···················4
Quick access······················ ··5 Boundary
overview························5
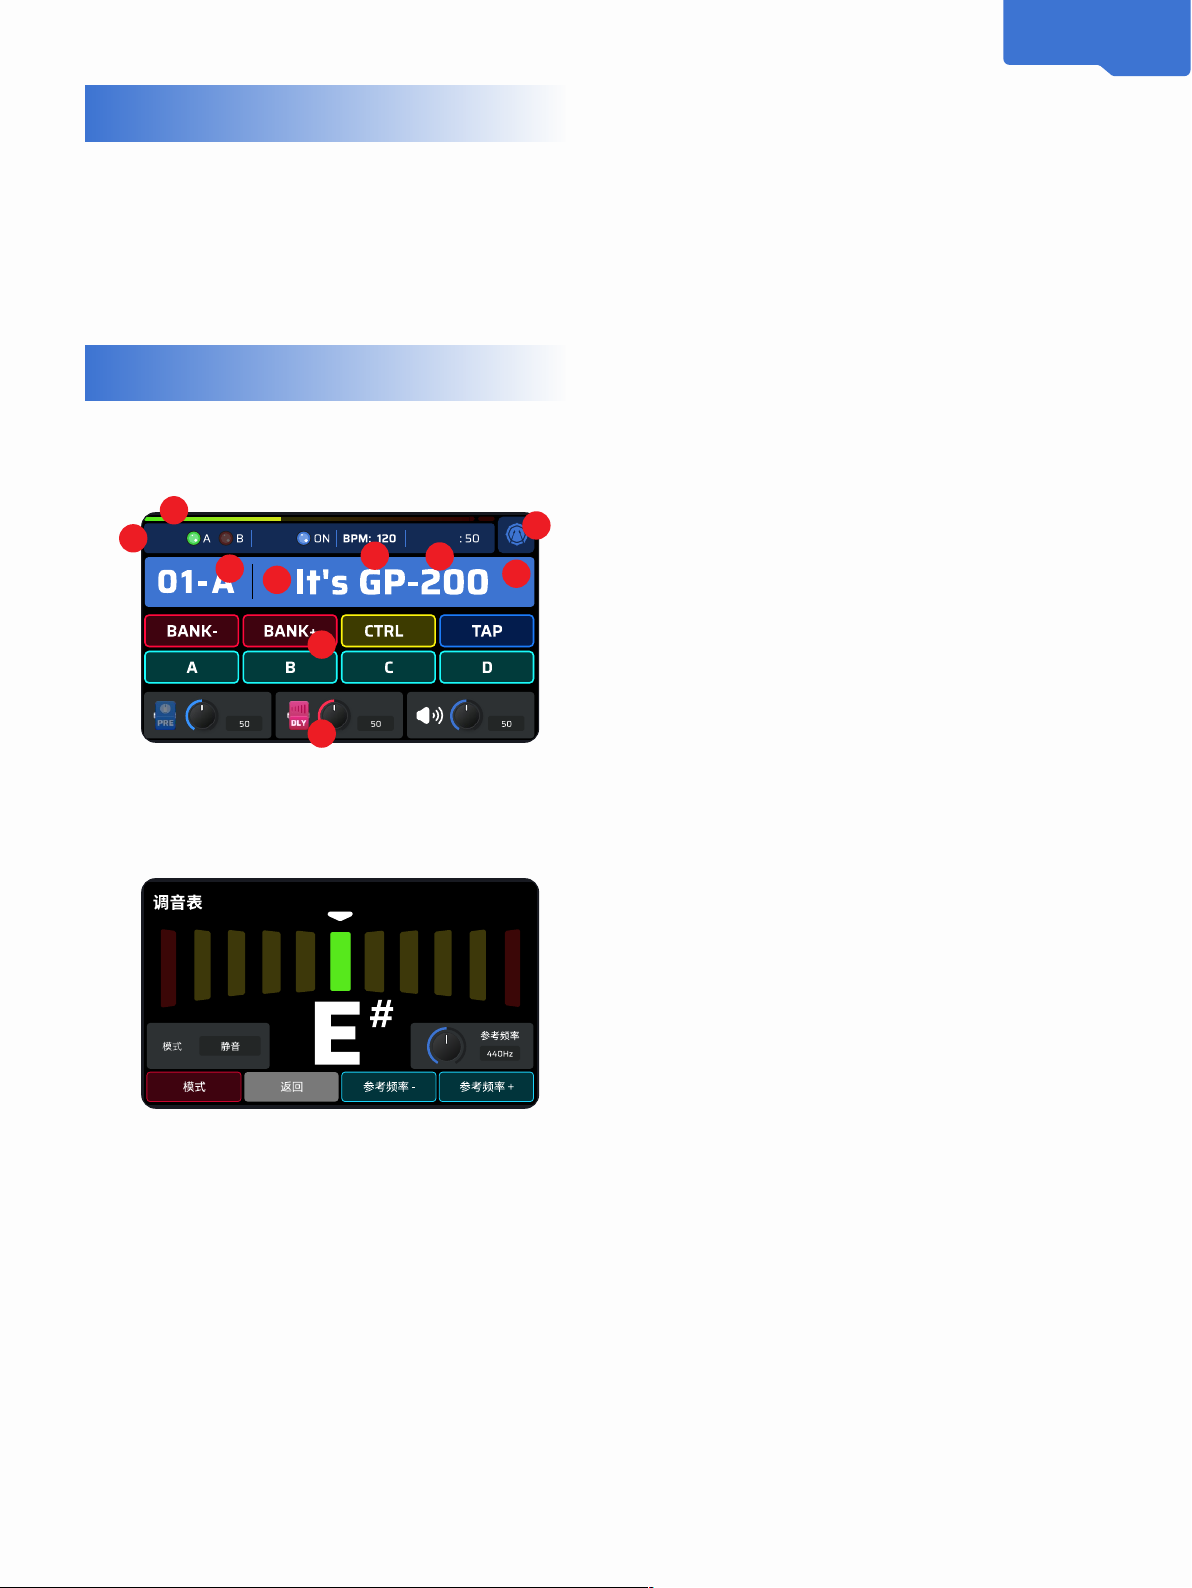
Main boundary······················5 Use
Tuner·············5 Use Phrase loop function
(LOOPER)······6 Using the machine
(DRUM)···············6 Using the expression
pedal (EXP- Pedal)····· ···7Preset
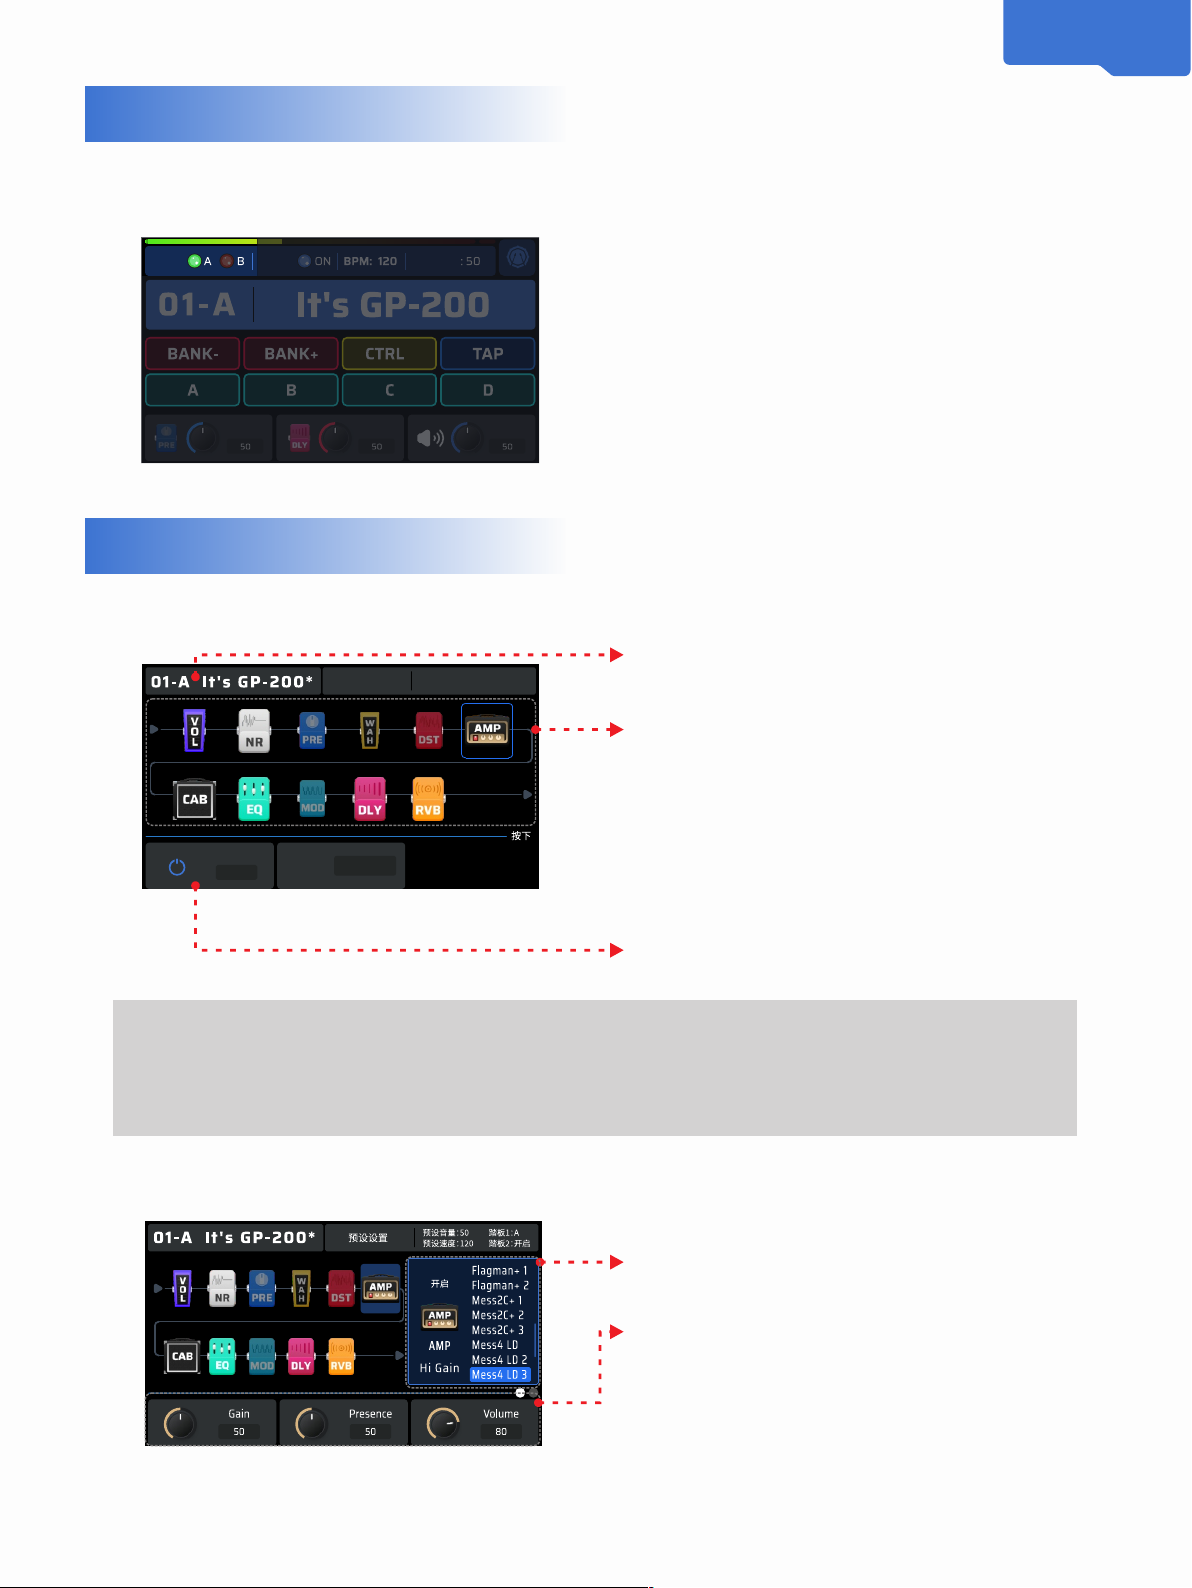
settings···················7
Editing World·····················7 Editing a
module··················7 Adjustments Effect
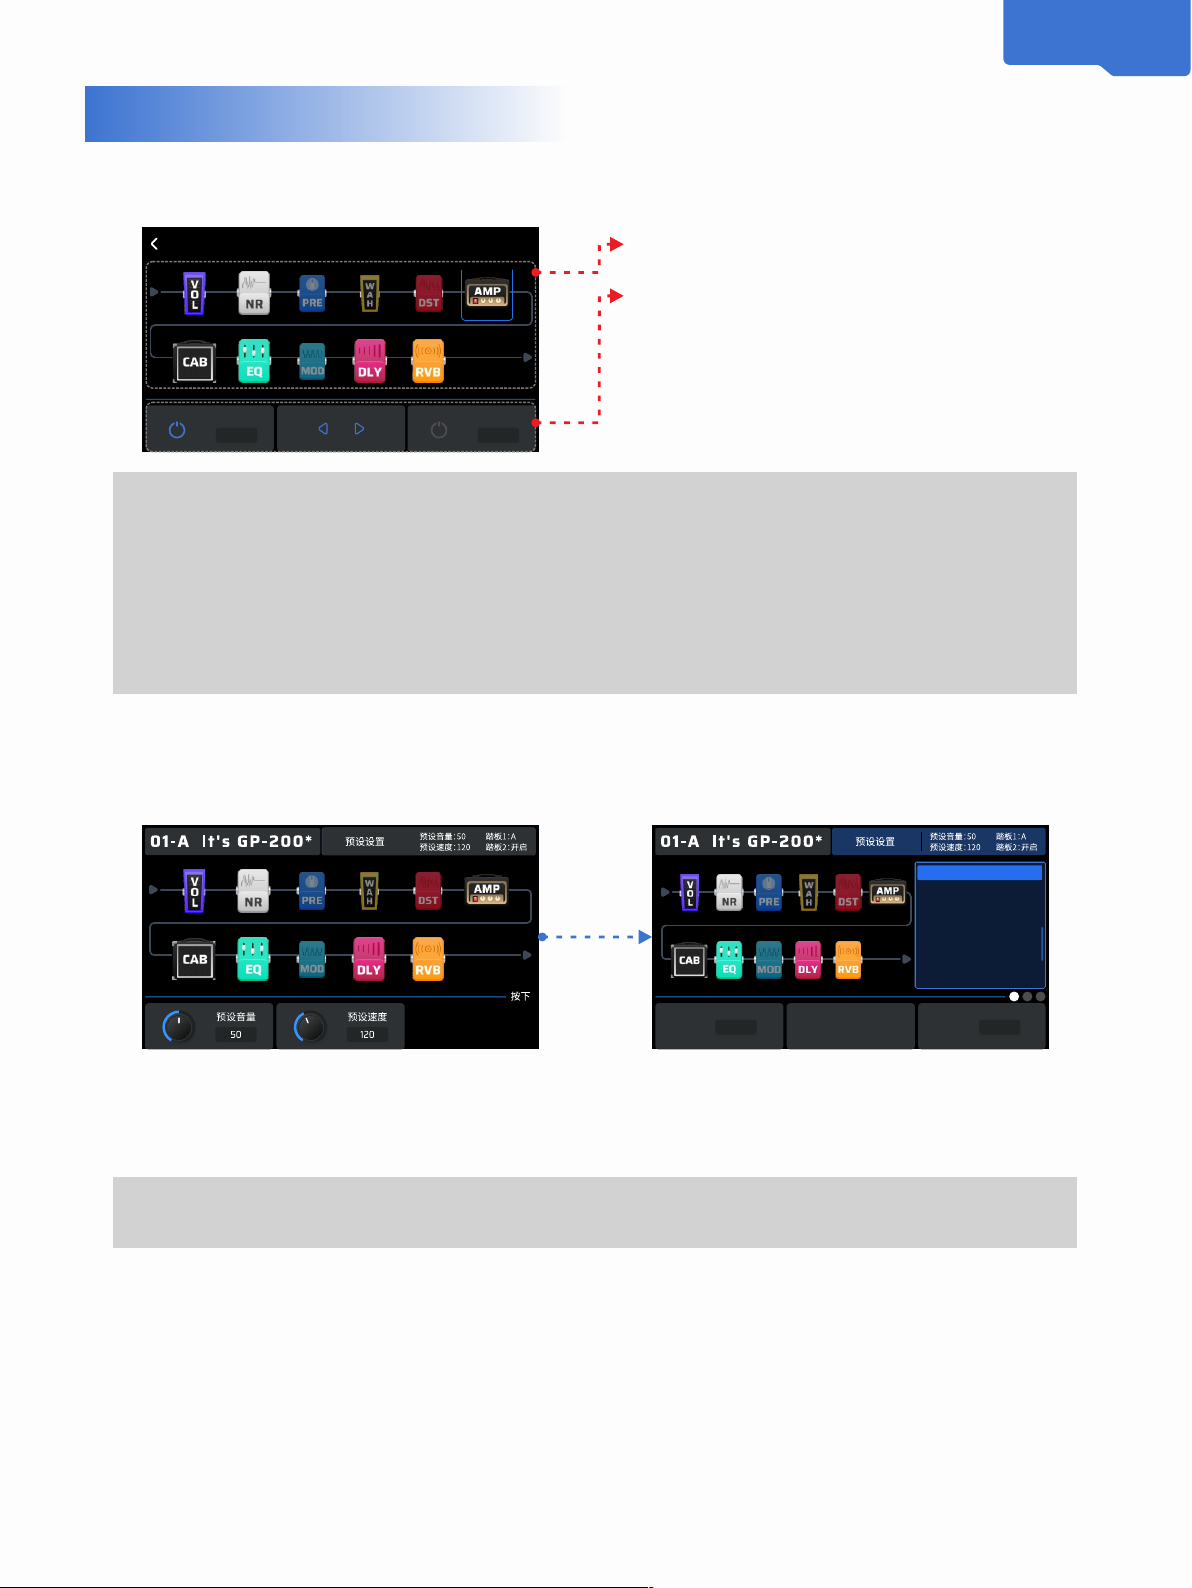
chain sequence················8 Preset
related settings···················8 Storage
interface (SAVE)· ···············9Global
Settings (GLOBAL)··············9
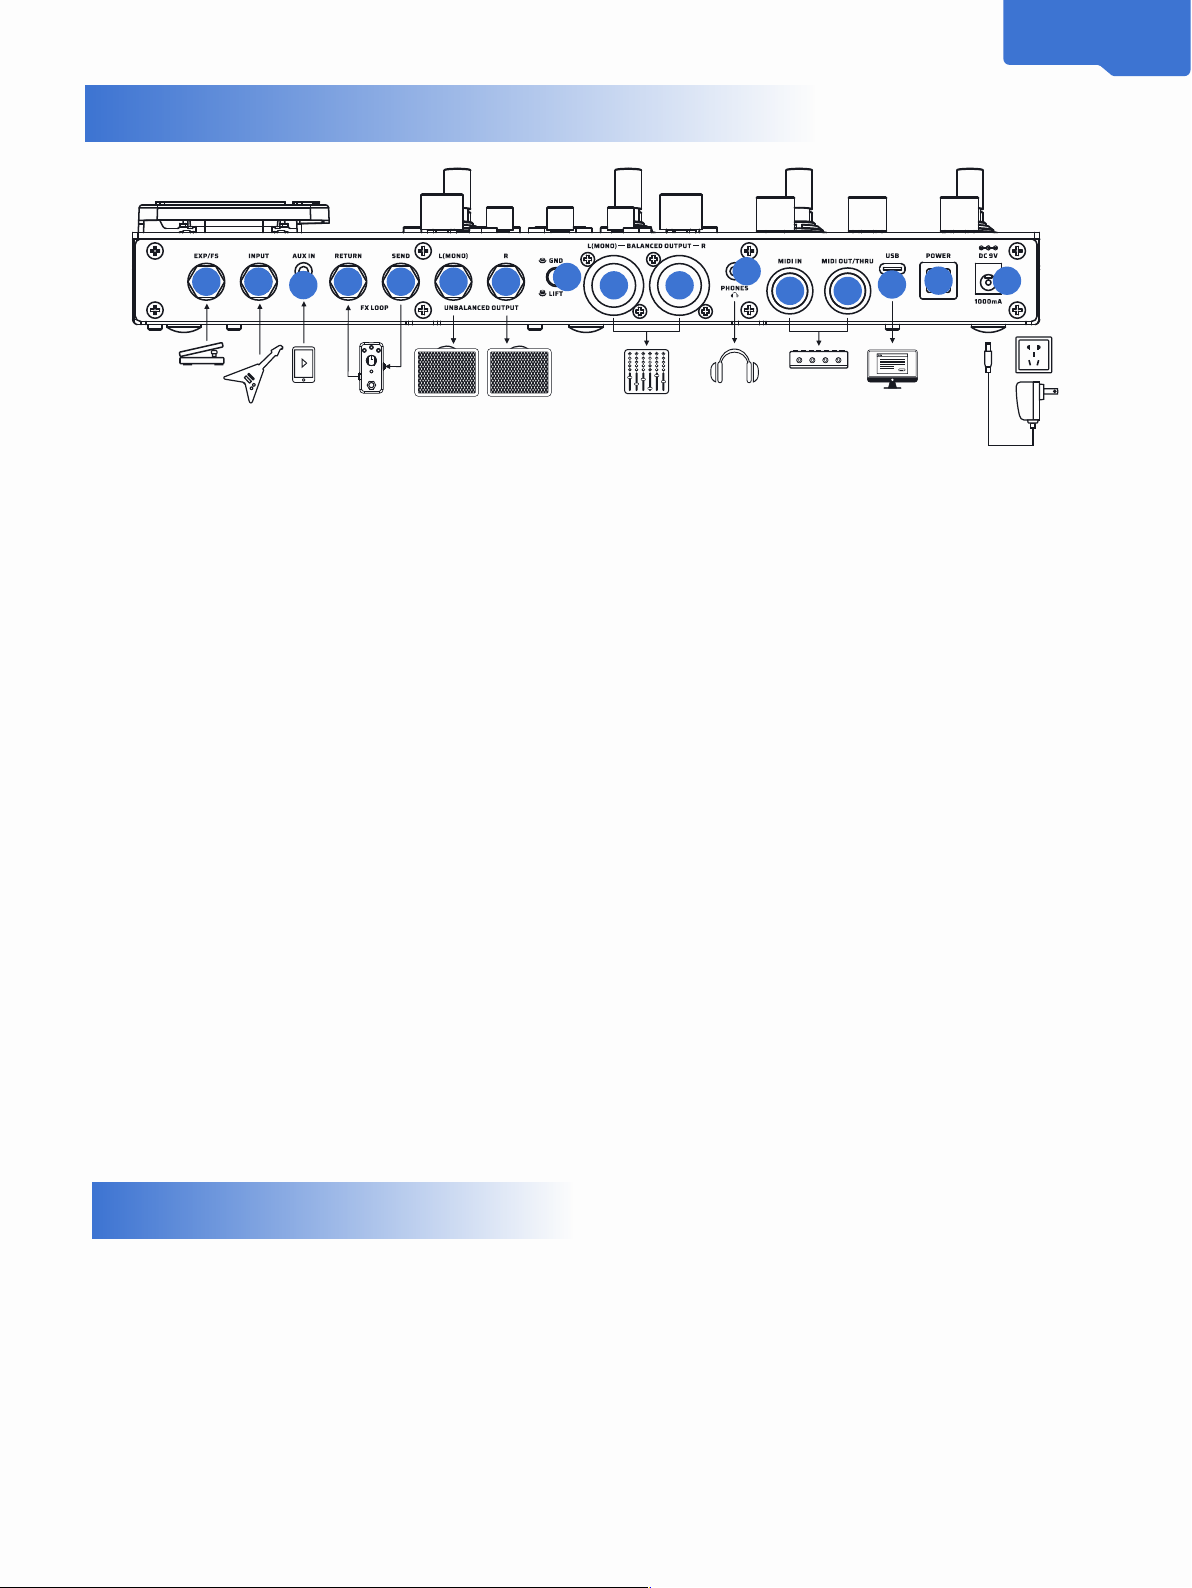
Input/Output (I/O)················10 USB-
Audio···········10 Footswitch (Footswitch)
············10 Pedal Calibration (EXP-
Calibrate)·········12 External Pedal/
Footswitch (EXP-2/Footswitch)·13
MIDI····· ···················13 Display
(Display)·················14 CAB automatic
follow (Auto-CAB -Match···14 Global-
EQ············14 About·················15
Recovery Factory-Reset····15Supporting
software·················16
With full-range sound reinforcement equipment···············16
With a guitar box (INPUT connector)········17 With a guitar box
(before using the FX-Loop function) Set
GP-200)····················17With guitarSound
box (using the FX-Loop function rear
GP-200)····················18
With guitarSound box (using FX-Loop
function, 4CM connection)······················18
Audio frequency work room (Live
performance)··········18Effect list·····················19
Pre (PRE)···················19Wow (WAH)
··················· 21 Distortion
(DST)·····················22 Amplifier (AMP)··
·················25 Noise (NR)····················34
Cabinet (CAB)·· ·················35 Equalization
(EQ)······················37 Modulation (MOD)···
················37 Delay (DLY)····················40
Reverberation (RVB)····· ··············42
Volume (VOL)····················42鼓Machine
rhythm type list················43 MIDI
control information list··············46
Troubleshooting········ ··············48
Specification Parameters······················49

1
welcome
Ÿ
Ÿ
Ÿ
Ÿ
Thank you for purchasing VALETON products.
Please read this manual carefully, which will help you fully understand the features and functions of
GP-200. Please keep this manual in a safe place for reference at any time.
Please be sure to follow the rules below to ensure safe use.
Instructions for use
Usage suggestions
Ÿ
Ÿ
Ÿ
Ÿ
Don't get the machine wet. If any liquid spills on the machine, turn off the power immediately. Do not block any
connections on the machine, and keep away from heat sources.
In the event of thunderstorms, the power supply and cables should be disconnected to prevent damage.
Be sure to stay away from strong magnetic fields.
Notes on power connection and frequency
Ÿ
Ÿ
Before plugging in or unplugging the audio cable, be sure to disconnect the power of the device and turn off the power of other devices. When
moving the device, be sure to unplug all cables and disconnect the power supply first.
clean
Ÿ Only use a dry cloth for wiping.
move
Ÿ Do not try to open the casing or repair the machine yourself, otherwise you will lose the warranty of the machine!
Electricity distribution operation instructions
ŸBe sure to use a 9V-1000mA DC internal negative and external positive power adapter. Using a power adapter outside of this specification will not only damage the equipment, but
also endanger your safety.
When the power adapter is plugged into the power outlet, be sure to pay attention to the voltage range requirements marked on the power
supply. In case of thunder, lightning, sky or when it is not in use for a long time, be sure to disconnect the power adapter from the outlet.
Ÿ
Ÿ
Therefore
ŸIf the equipment fails, please immediately disconnect the power supply, disconnect all equipment and send an email to contact Valeton (email
address:[email protected]).
Please indicate the product name, serial number, failure situation, your name, address, contact telephone number and purchase route and other information.Ÿ
Thank you for choosing and using Valeton products

2
product description
GP-200- is a new generation of high-definition digital modeling comprehensive effects, its birth is derived from-Valeton-the previous generation product GP-100
upgrade pursuit of craftsmanship spirit. The new digital platform brings a better tone experience. More pins, larger screens, richer connections, more personalized
buttons and knobs, 11-piece effect modules that can be moved at will, built-in more than -240- world-famous The classic sound box, IR-box body and effector tone are all
just to create a more ideal stage partner for you.
Of course, in addition to live performances, it also includes -180-second phrase loop function, 100-high quality machine, easy-to-use supporting software and multi-
system (Windows/Mac/iOS/Android) sound card function, allowing you to easily control the practice, Various scene requirements such as creation and recording.
GP-200 is stronger than what you see.

3
Panel introduction
4 5 6 7 12
18 8 8
23
8 8 8
9
10 10 10
11 11 11 11
11 11 11 11
1. LCD display screen-
The 4.3" full-color LCD display shows the GP-200's preset numbers,
names, and other operating information.
7.-Save button-
When a preset parameter is changed, the default name of the main interface
A "*" will be displayed next to the save prompt, press the SAVE
button, you can save, dump and change the preset name;
Press to save quickly at the current location.
2.-PARA knob (with key rotary encoder)
Rotate to select menu or adjust parameters, press to enter the menu
Or switch the parameter page. 8.-Box head control knob
The AMP module of the GP-200 can be adjusted by using the real sound
box to easily control the changes in the music scene environment.
3.-Main volume knob-
Control the total output volume of GP-200.
9.-Module button-
Press this button to quickly enter the effect menu of the corresponding module.
Press to switch the corresponding module.
4.-Back button-
Press this button to return to the previous menu, press to return to the main interface.
10.-Quick adjustment knob
Rotate this knob to quickly adjust the
Corresponding parameters, this knob performs different functions in different
Yes, depending on the operating field you are in.
5.-Global button-
Press this button to enter the global setting interface, where you can proceed
Specific settings such as input/output and foot pedal.
6.-鼓machine button-
Press this button to turn on/off the machine, press this button to
Enter the computer editing interface to switch more parameters (such as grid,
Rhythm type, volume).
11.-Foot switch
The foot pegs can be set for a variety of functions, including switching presets
Settings, switch effects, dotting and recording, etc.
12.-Expression pedal
Use the expression pedal to perform real-time adjustment of one to multiple parameters
control.

4
Top interface introduction
20
13 14 15 16 16 17 17 18 19 19 twenty one twenty one
twenty two twenty three twenty four
13.-EXP/FS
1/4"-TRS connector, used to connect external expression pedals or foot spikes.
19.-BALANCED-OUTPUT
Use balanced cables with XLR connectors to connect to the recording room equipment,
Tuner or full-range playback device.
When using only one speaker, please first select the connection to
L(MONO) connection.
14.-INPUT-
1/4"-mono connector to connect guitars, music or other musical instruments.
15.-AUX-IN-
The 1/8"-stereo interface is used to connect an external device (CD
player or MP3 player) for practice, improvisation or recording.
20.-PHONES-
The 1/8"-stereophonic connector can be used with earphones with an
impedance of 60 ohms or less.
16.-SEND/RETURN
This set of 1/4-connectors provides the function of an effect loop, which
can connect the effects of other effectors to the GP-200.
21.-MIDI
This interface is used to connect external MIDI devices.
22.-USB
The USB-2.0-Type-C interface supports multiple operating systems,
provides high-quality sound card functions, and provides rich
MIDI function.
17.-UNBALANCED-OUTPUT
1/4"-non-balanced output connector, can be configured as mono or
stereo. Use them to connect to a single guitar cabinet, a pair of speakers
Acoustic guitar box, or directly connected to the input of a PA or recording device
入. 23.-POWER-
Used to turn on/off the power of GP-200.
18.-GND/LIFT-switch-
Press the GND/LIFT switch to cut off the ground connection (Ground-
Lift) of the two XLR connectors to avoid noise caused by the ground
loop (Ground-Loop). Lift the GND/LIFT switch to make the XLR
connection The ground wire is connected normally.
24.-DC-9V
The specification of the power supply used is 9V-1000mA DC power supply, the polarity is negative inside and
positive outside.
Get up quickly
1.-Connect your device. Plug your guitar into the input connector of the GP-200, and connect your sound box to the output connector.-
Warm mention:-
Ÿ
Ÿ
2.-Connect the power supply and turn on the GP-200.-
3.- String calibration. Step on the TAP spike to turn on the tuner. Pluck each string, the tune turns to green in the middle of the screen. When all the strings have been tuned, follow the
screen prompts to exit the tuner function. -
Turn down the volume of the amplifier.-
Connect the cable to the Return connector of the FX circuit of the guitar box for the best effect."Please refer to page 16 for the connection method." -

5
Get up quickly
Use preset tone
This machine contains 256 preset tones. By default, the first 100 presets (01-A~25-D) contain export parameters. When the export settings are restored, the 100 preset data can be
individually selected to restore the original values.
Step on the foot pin BANK- and BANK+ to switch between different tone groups, and step on the ABCD foot pin to switch between tones within a tone group (BANK). When you switch the
tone group, the screen will enter the preset standby mode, and the ABCD foot pin down indicator will light up to remind you to choose the tone you want to use next.
Boundary overview
Main world
The boundary displayed after booting is called the "main boundary" , In this interface, you can intuitively and quickly browse the settings of important information in the current presets.
CH
F Pedal 1: Pedal 2: Preset volume
DE
ABGA .-Preset number
B.-Default name
C.-Preset volume monitoring
D.-Preset speed
E .-Preset volume
F.-Pedal state
G.-Default state
H.-鼓machine status
I .-Current pin settings
J.-Quick adjustment display
1
I
Gain Mix Preset volume
J
Use the tuning table (-TUNER)
长Press the [Tap] foot pin to enter the tuning mode.
In the tuner interface, the characters in the middle of the screen represent the recognized tone
The tone name of the high, the left and right sides of the tone block represent the string accuracy, the more to the left,
the lower the current pitch, you need to tighten the strings; the more to the right, the more the strings are higher, the
more you need to relax the strings ; The pitch of the strings deviates from to
In the case of calibration, the displayed color block will gradually move to the middle,
Until it becomes green, it indicates that the strings have been calibrated to the tone of the character display
The pitch of the table.
ŸRotate the No. 1 quick adjustment knob or use foot pin A to select the operation mode of the tuner:
◦ Direct school (Thru):Your tone will not change at this time.
◦ Bypass: The effect chain will be bypassed at this time, and you will hear the sound of the guitar input.
◦ Mute: There will be no output at this time.
Rotate the No. 3 quick adjustment knob or use the foot pins C and D to change the reference frequency of standard A. The range is 432Hz to 447Hz, and the default is 440Hz.
Step on other spikes or click the BACK button to exit the tuner and return to the main interface. -
Ÿ
Ÿ

6
Get up quickly
Use the phrase loop function (LOOPER)
In the main interface, press the [Ctrl] foot pin to enter the LOOPER interface.
Recording playing Recording
Recording-Red Play-Green Overdub-Blue
Rotate the PARA knob in this interface to change the currently used preset. Press PARA to quickly adjust the
display area to scroll through. When dual options are provided in the foot pin function display, the left side
corresponds to the short step, and the right side Corresponding to step down.
Ÿ
Ÿ
Ÿ
Ÿ
Ÿ
Recording volume: change the recording volume of the phrase looper;
Pre/Post: select the phrase looper at the very end of the effect chain, "Post" needs to take up twice the recording time;
Playback volume: change the playback volume of the phrase looper;
Recording time: When the "Undo/Redo" function is not needed, 180 seconds of recording time can be selected. Camera synchronization*: The timeline of LOOPER can be aligned
with the speed of the camera. When this function is activated and the camera is played, the audio will be adjusted in a small amount of time to be aligned with the camera.
Automatic recording: Turn on the automatic recording mode, and when the automatic recording function is activated, stepping on the recording pin will not burn into the recording state, but when
the GP-200 detects a certain intensity The input signal will be recorded into the recording state immediately.
Ÿ
The function of the foot pegs in the LOOPER interface will be different from the default mode. The specific functions of the default state are as follows:
Stepping nail 1 Stepping nail 2 Stepping nail 3 Stepping nail 4 Stepping nail 5 Stepping nail 6
[-] [+] [CTRL] [TAP] [A] [B]
Tread nail 7
[C]
Tread nail 8
[D]
Tread nail number
Single step
Down
1/2 speed
Reverse /Tuning table redo
Stop
Empty
Features Preset group Record/play quit
* Notice:
鼓The error of machine synchronization needs to be controlled within 50ms, otherwise the alignment will fail and no actual effect will be produced.
Use 鼓machine (DRUM)
Press the DRUM button to turn on the camera, and press the button to enter the interface of the camera.
Rotate PARA on the camera interface to switch between the camera frames, and press
PARA to switch between the frame list and the rhythm pattern list.
There are a total of 100 rhythm patterns in the GP-200 鼓machine (please refer to the 鼓machine
rhythm pattern list for details). -
Rock
Funk
Blues
Pop
Jazz
Electronic
World
Metro
Classic Rock 1
Classic Rock 2
Classic Rock 3
Classic Rock 4
Classic Rock 5
Classic Rock 6
Hard Rock 1
Hard Rock 2
ŸRotate the No. 1 quick adjustment knob to change the speed of the machine, the range is
40-250;
Rotate the No. 2 quick-tuning knob to change the output volume of the machine, the range is
0-100;
Rotate the No. 3 quick adjustment knob to adjust the machine speed to the preset speed
Steps, after synchronization, you can use the dot and fixed speed to control the speed of the camera
system.
You can exit the camera interface by pressing the BACK button.
Ÿ
Ÿ
After the machine is turned on, the machine on the right side of the main interface
The symbol prompts the current status of the camera switch. -Ÿ

7
Get up quickly
Using the expression pedal (EXP-Pedal)
The expression pedal icon on the left side of the main interface shows the current working status of the built-in expression pedal:
You can use the built-in expression pedal to control the parameters in real time,
The built-in expression pedal of GP-200 provides two states. --
To switch the A/B state of the built-in expression pedal, just press the front end of the
pedal with one hand.
Some of the settings for the built-in expression pedal have been made in the first
hundred presets of GP-200, and you can call them directly.
You can also refer to "Preset Settings---Pedal Settings" to customize the
expression pedal settings.
Pedal 1: Pedal 2: Preset volume
1
Gain Mix Preset volume
Preset settings
Editor
Press PARA in the main interface to enter the editing interface.
Indicates the preset number and preset name currently being edited.
Preset settings
Default volume:50
Preset speed:Spend:120
Pedal 1:A
Pedal 2:Turn on
In the complete effect chain simulated by GP-200, you can intuitively see the arrangement order
and switch status of the 11 modules through the colors of the icons. The dark icon means the
module is closed, and the bright icon means the module is activated.
The default effect chain sequence is: PRE (pre-effect)-WAH (wow)---
DST (overload distortion)-AMP (box simulation)-NR (noise reduction)-CAB
(box simulation)-EQ (equalization)-MOD (modulation effect)-DLY (delay)-
RVB (reverberation)-VOL ( Volume pedal), you can move and adjust the
order of the effect modules to get the perfect effect you want.
Effect switch current
Effect Mess4 LD 3
Turn on
The quick adjustment parameter display area can quickly switch the selected module, or
Browse to the currently loaded effect in the module.
Notice:
After editing the effect parameters, if you need to keep these changes, please remember to save them. After you edit the parameters in a certain preset tone
(Patch), the “*” on the screen will light up, suggesting that the effect parameters have been edited but not stored.
Edit a module
Select a module through PARA and press or through the module button on the machine to browse the list of effects contained in the module.
The list provides the effects available in the module, and you can browse or switch the effects
through PARA.
Press PARA to scroll through the effect parameters in the quick adjustment
display area.
For specific parameters and ranges in the effect module, please refer to the "Effect List" chapter
on page 19.

8
Preset settings
Adjust the order of the effect chain
After selecting a module in the editing interface, press PARA to enter the effect chain sequence switch:
Mobile effect chain Rotate the PARA knob to select the effect module that needs to be moved
Ÿ
Ÿ
Ÿ
Quick adjustment knob -1- switch the current effect module
Quick adjustment knob -2- move the currently selected effect module
The quick adjustment knob -3- provides a quiet mode (only effective in this boundary), which can
avoid the potential noise generated during the process of moving the effect module.
Effect switch Quiet At the bottom of this screen, press PARA or press the BACK button to return to the
editing screen.
move
Turn on closure
Notice:
ŸWhen you are assigning/editing effects in the module, in some extreme cases, a prompt will appear on the screen that the system resources are insufficient. If this prompt
appears, please change to another effect and try again.
All module switch states and effect parameters will change with your preset switching. If you switch the preset or
switch the machine before saving, all the edits made before will disappear. So please be sure to click the SAVE button
after setting to save your settings.
In the editing interface, the foot pin function remains consistent with the main interface.
Ÿ
Ÿ
Preset related settings
When the cursor selects a preset setting, use the quick adjustment knob to adjust the preset volume and preset speed. When you click to enter the
preset setting menu, the list provides settings for fast-tuning knobs, pedals, CTRL, and effect loop functions.
Quick adjustment knob 1-3
Pedal settings
CTRLset up
Effect loop
Module 1 PRE Boost Parameter 1 Gain
Ÿ
Ÿ
Quick-tuning knobs 1-3: Set the effect parameters currently preset to be controlled by the quick-tuning knobs in the main interface. Pedal settings: The current preset expression pedal settings,
including EXP-1A, EXP-1B, and EXP-2, each pedal can be associated with up to 3 effect parameters at the same time, and it also has the setting of pedal extreme values. Among them, EXP-2
represents an external pedal, which can be used normally after selecting related functions and calibrating through global settings.
Notice:
The parameters associated with the pedal are regarded as the use of the module parameters, and no markup for saving will be produced.
ŸCTRL setting: You can specify the switch of one or more modules. There are four CTRLs for you to configure. With the "Global-Foot" option, your GP-200 can
implement multiple modules in the same preset. The switch is switched to achieve a single-block matrix-like operation experience. Effect loop: the setting of the effect
loop in the current preset. The sending and returning nodes are fixed behind the AMP module. Parallel/series indicates the coexistence relationship between the
effect circuit and the effect chain:
◦ When parallel connection is selected, the signal returned through the external effect chain will be mixed with the signal of the AMP module and then enter the signal of the effect chain behind
the AMP module for processing;
◦ When serial is selected, the internal effect chain is disconnected, and only the signal returned by the external effect chain is entered into the AMP module for processing. At this time, if the effect
circuit connection is not connected to a physical effect device, the output of this unit will be silent.
Ÿ

9
Preset settings
Send Return Send Return
Tandem in parallel
Storage boundary
In the storage interface, you can save the preset parameters, control information, etc., and you can also adjust the preset positions to personalize the
original presets.
When you press the SAVE button, you will enter the preset location selection interface (see Figure 1 below), select a storage location through PARA, and press PARA to enter the preset
name editing interface for that location (see Figure 2 below).
In the preset name editing interface, you can complete the editing operation through the PARA knob or using 3 fast-adjusting knobs:Ÿ
Ÿ
Ÿ
Ÿ
Ÿ
Please remember that if you have edited your tone or control information, please remember to save it in time.
Quick-tuning knob 1: Switch character type. There are four character types to choose from: small letters, small letters, numbers, and symbols (including spaces). Fast
adjustment knob 2: Switch the cursor position.
Fast adjustment knob 3: Delete the character at the cursor position.
After editing the name, press the SAVE button to confirm the storage.
Press the BACK key to cancel editing and return to the previous menu.
Global Settings
You can set global functions in this world. Different from the previous settings, the global settings will affect the working status of the whole machine and will not change with the
preset changes. All setting changes take effect immediately. In this interface, you can set the input output, USB audio, pedal control, language selection, foot pins, etc. You can also
restore the export settings in this interface.
Rotate the PARA knob to move the cursor
Page progress, click the PARA knob to scroll
The options available for adjustment under the currently selected submenu, follow
Depending on the menu item, the display there will also change.
When you select some submenus, the button will appear in the option bar.
Button, click and press the PARA knob to perform the next step
operate.
Use the quick adjustment knobs 1-3 to adjust the option bar at the bottom of the screen
The corresponding option.

10
Global Settings
Input/output
This item is used to adjust input and output related parameters.
ŸInput mode:Adjust the input impedance value, including three options: guitar, electric
guitar and linear input:
◦ 木Guitar: Impedance is 1MΩ, used to connect electric box guitar or
piezoelectric pickup;
◦ Electric guitar: Impedance is 4.7MΩ, used to connect electric guitar with
coil pickup and use;
◦ Linear input: The impedance is 10kΩ, which is used to connect analog audio equipment such
as synthesizers.
◦ The default value is an electric guitar.
Input gain:Make different choices for the different instruments you use to get the
best experience. The adjustment range is -20dB to +20dB, and the default is 0dB.
No cabinet mode (L/R):By activating the boxless mode of the left and right channels, the corresponding
analog output interface output does not include the audio effects processed by the CAB module, so that
different external sound boxes can be used at the same time. The default is off.
Ÿclosure
No cabinet mode (R)
closure
Ÿ
USB audio
This item is used to set the related settings when using GP-200 as a USB sound card.Recording
volume:Used to adjust the total output volume during internal recording, the range is ±20dB, and the
default is 0dB.
ŸLeft channel/Right channel:GP-200 has a USB stereo virtual output channel. When the sound
mode is selected, the corresponding channel outputs a pass-through signal; when the effect
sound mode is selected, the corresponding channel outputs a signal with effects. This function
can easily realize the function of "listening to wet recording", and the default is the effect sound.
AUX connects to USB:After turning on this function, the audio input from the auxiliary input
interface (AUX-IN) can be recorded by the USB device. This means that when using GP-200 for live
streaming, you can mix the audio input from AUX with the effects of this unit, and then output to
the live streaming device via USB.
Monitoring volume:Used to control the volume during playback via USB, the adjustment range is
-20dB to +20dB, the default is 0dB.
ŸRecording volume
Left channel Effect sound Right channel Effect sound
Aux connects to USB
Turn on
Monitor volume
Ÿ
Foot spikes
This item is used to set the template for the use of foot spikes and the foot spike function settings in the template.
ŸThe fast adjustment knob -1 selects the preset group switching mode. This setting affects both internal
and external feet. Two modes are provided: real-time mode and waiting mode.
◦ Real-time mode: When switching the preset group, the preset group will jump instantly
◦ Pre-selected mode: the default mode. When switching the preset group, the preset does not jump
directly. The screen enters the preselection interface, and the pin function is fixed in this interface.
The preset will not jump until a confirmed preset number is selected change
Turn the quick adjustment knob 2 or press the PARA knob to enter the foot nail editing interface, and start to set
the specific functions of the foot nails in the template in detail, as shown in the figure below:
Preset group
Switch mode
Preselection set up Ÿ

11
Global Settings
Foot nail templates are divided into preset mode, single block mode and custom mode. Each mode
contains the same options, and you can switch between them only through different settings. The
foot nail template is effective by selecting the label page. The changes are saved, no need to save
operation.
You can enter the template through PARA and then enter the template to assign the single stepping and
stepping functions to each foot nail. You can also quickly locate the selected state of the foot nail through
the foot nail that needs to be set for single stepping.
Ÿ
Ÿ
Ÿ
Rotate the quick adjustment knob 1 to select the foot nail single step function
Rotate the quick adjustment knob 2 to select the foot pedal function
Rotate the quick adjustment knob 3 to select the combination of foot nails
The reset function of the modified template is provided in each foot nail template. Using this function,
the foot nail function in this template can be restored to the original state.
Stepping nail 1+5 Step nail 5+6 Stepping nail 6+7 Step nail 7+8
Reset
Reset
Foot nail functions include:
Foot nail function
Preset group (BANK)
Preset group+ (BANK+)
Preset group (-BANK-)
Preset+ (Patch+)
Preset (-Patch-)
A
B
C
D
Phrase loop (LOOPER)
鼓machine (DRUM)
Foot nail function description
Enter the preset pre-selection waiting interface
Adjacent preset group after loading
Load the adjacent preset group before loading
Adjacent presets after loading
Load the adjacent preset before loading
Load the A preset in the current preset group
Load the B preset in the current preset group
Load the C preset in the current preset group
Load the D preset in the current preset group
Enter the phrase loop function
Play/stop machine
Foot nail function Foot nail function description
鼓Machine preset-
(Drum-Patch-) Load the previous adjacent machine preset
Tuner (TUNER) Enter the tuning table boundary
CTRL-1
CTRL-2
CTRL-3
CTRL-4
TAP
Perform CTRL-1 function
Perform CTRL-2 function
Perform CTRL-3 function
Perform CTRL-4 function
Resetting the tempo value using the dot notch
鼓Machine preset+
(Drum-Patch+) After loading, the neighboring machine presets

12
Global Settings
Pedal correction
This menu is used for the expression pedal correction function. When you use the expression
pedal, the effect change is not obvious or the effect changes more when you lightly step on
the pedal, please consider correcting the expression pedal.
Pedal 1 Pedal 2 As shown in the figure, turn the quick adjustment knob 1 or 2 to calibrate the corresponding pedal.
Raise the pedal fully Fully lower the pedal
Raise the pedal completely, then press the PARA knob button to continue Depress the pedal fully, then pressPARA knob button to continue
Step on the front end of the pedal Calibration completed
Depress the front end of the pedal with one hand, and then press the PARA knob button to continue If the pedal calibration is successful, the screen will display as follows, you can press
PARA knob or BACK button to exit this interface
Calibration failed
If the pedal calibration fails, the screen displays as follows, if you need to recalibrate
Please repeat the previous operation.
You can also click the BACK button at any time to abandon the expression pedal calibration
process and return to the previous menu.

13
Global Settings
External pedal/foot spike
This menu is used to adjust the related parameters of the GP-200 EXP/FS interface interface
device.
You need to set this option according to the connected device. If you connect the pedal, you need
to select the corresponding option, which is EXP-2. The operation of its specific related parameters
will be in the "Preset Settings---Pedal Setting" ”; if the connected device is a single-pin or double-
pin, the options in the quick-tuning display area will be expanded to the settings related to the
pins.
model pedal
Foot nail 9
Step on
Foot nail 10
Step on
model Two foot spikes Preset- Preset+
MIDI
This menu is used to set the source of GP-200 receiving MIDI information, the receiving and sending channel of MIDI information, and the sending and receiving of MIDI clock.
Ÿ
Ÿ
MIDI signal source:Used to select where the unit receives MIDI messages from.Input
channel (USB), input channel (DIN) -, output channel (USB), output channel (DIN):
They are used to set the channels for the unit's USB interface and MIDI interface to
receive/send MIDI messages.
Clock source:Used to select the signal source of the MIDI clock. By setting the clock signal source
to synchronize the speed with other MIDI-enabled devices or computers, live performances or
effect production are more convenient.
Clock output (DIN), clock output (USB):It is used to select whether the MIDI-OUT
interface or USB interface will send a MIDI clock. You can use this function to use
this unit as the master clock of all your devices.
Ÿ
MIDI
signal source
Input channel (DIN)
Omni
Input channel (USB)
Omni
Ÿ
USB only
Options Adjustment range
DIN only
USB only
Hybrid (default)
Parameter adjustment instructions
Only receive MIDI messages from the MIDI-IN interface
Only receive MIDI messages from the USB interface
Simultaneously receive information from MIDI-IN interface and USB interface
MIDI source
Input channel (USB)
Input channel (DIN) Omni~1~16
Output channel (USB) (default Omni)
Output channel (DIN)
They are used to set the channel for receiving/sending MIDI messages on the USB interface and MIDI interface of this unit
Built-in
DIN only
Only use internal clock
Clock information received using only MIDI-In interface When the option is "DIN only","USB Only" or "External
Set”, the internal clock of this unit is not working, at this time
The built-in fixed speed function of this machine will not work
USB only
External
Clock information received using only the USB interface
Use only external clock
Clock source
mix
(default)
Use the clock information received by the built-in clock, MIDI-IN, and USB interface at the same time. If you use different
Clock source, the last received clock information will overwrite the previous clock information
Clock output (DIN) on/off
Clock output (USB) (default closed)
When the clock output switch is turned on, the unit will ignore the clock input signal; in addition, when your clock source is set
When it is "DIN only" or "USB only", the unit will not send out MIDI clock

14
Global Settings
Show CAB auto follow
This menu is used to adjust the parameters related to the GP-200's display content. This menu is used to adjust the connection status of AMP module and CAB module in the
effect chain of GP-200.
Screen brightness
50
Display time
Chang Liang
Language Chinese
switch
Turn on
Ÿ
Ÿ
Screen brightness:Adjust the display brightness of the GP-200 monitor
Display time:After the time in the option, GP-200 will enter the sleep
mode to prevent screen damage due to the period of inactivity.
Language:Turn the fast adjustment knob 3 to select the system language to be used.
言.
After this function is turned on, the effect in the CAB module will change with the
change of the effect of the AMP module.
Ÿ
Global EQ
This menu is used to set the GP-200's global equalization function, which can change the overall effect tone of the unit. After
clicking this menu, you will enter the lower level:
Press the PARA knob to edit
The global equalization of GP-200 is with low/high cut and four-band parametric equalization (Parametric-EQ). Each frequency band can be freely switched according to your needs.
There are 6 frequency bands adjustable:
Options
switch
Volume
Low cut
Adjustment range
on off
0~100 (default 50)
Off ~20Hz~20000Hz (default off) High pass filter, used to cut low frequency signals below the selected frequency
Parameter adjustment instructions
Turn on/off global EQ
Adjust the total volume of the global balance
Band 1-4: Four
Selectable peaks
Filter (Peak-
Filter) for
In a certain range
Internal whole or fine
Fine-tuning the frequency response
20Hz~20000Hz
(The default frequencies of bands 1 to 4 are
100Hz, 500Hz, 1000Hz, 5000Hz)
Band 1-4-
frequency
Adjust the corresponding filter frequency
Band 1-4-
Q
0.1~10.0
(Default 0.71)
Adjust the filter formant width (or filter inflection point smoothing
Degrees), the larger and narrower the number (the steeper and sharper the inflection point)
Band 1-4-
Gain
-20dB~+20dB
(Default 0dB) Adjust filter gain
20Hz~20000Hz~off
(Default closed)
High cut Low-pass filter, used to cut high frequency signals above the selected frequency

15
Global Settings
Notice:
Ÿ
Ÿ
Ÿ
Ÿ
Please carefully adjust the global equalization parameters to protect your equipment and listening
Global equalization will not affect the GP-200's USB audio output
If the adjustment of a frequency band is not effective, please check whether the frequency band or the master switch
is turned on first. ), at this time, turning on the global balance may cause the system to overload
about
This menu is used to view the GP-200's firmware and hardware version information.
Firmware version-V1.0.4
Hardware version-V1.0.0
©Valeton-All rights reserved
Restore factory settings (Factory-Reset)
This menu is used to restore your GP-200 to the state it was in when it was shipped. Please note that performing this operation will clear all the presets and personalized settings you have previously
edited, and once you perform this operation, this operation cannot be undone. Be sure to make a backup before performing this operation. -
Press the PARA knob to edit
In order to improve the accuracy of restoring export settings and reduce accidental deletion of presets, GP-200 has prepared three methods for you to restore export settings. After
clicking this menu, the following three options will appear on the screen:-
◦ Restore global settings: only restore the global settings to the export state
◦ Restore the original preset: only restore the original preset (01-A-~-25-D) to the export state
◦ Restore all content: delete all stored data and restore to export status. After selecting an item, enter the confirmation interface, at this time, click OK to
perform the recovery export setting operation, click Cancel ) Will return to the global setting interface.
Restore export settings
!
Data reset
Do not turn off the power!
30%
After restoring the export settings, click OK to return to the main interface.

16
Supporting software
When you connect the GP-200 to a computer, you can use the free GP-200 software to manage your GP-200, such as adjusting the tone, importing and exporting preset
files, firmware upgrades, and loading third-party software. IR files, etc. The GP-200 software supports dual platforms of Windows and macOS. Please log on to
www.valeton.net/support, download the GP-200 software from the relevant page, and use it after installation. -
Use scene
In this chapter, you can learn about the commonly used connection methods of GP-200.
Cooperate with full-frequency sound reinforcement equipment
Full-range equipment includes sound cards, monitor speakers, PA systems, earphones, etc. In this scenario, you can connect the GP-200's output connector or earphone connector according to the needs of the back-end connector.
Balanced and non-balanced output connector signals are the same, and balanced output is more suitable for long-distance signal transmission.
If there is only one speaker, please select the L (MONO) connector first. In order to get the correct tone performance, please keep the AMP and
CAB modules turned on, and keep the “No-CAB” mode turned off.

17
Use scene
To match the guitar box (INPUT connector)
In this scenario, simply connect the non-balanced output connector of the GP-200 to the input connector of the guitar cabinet. If
there is only one speaker, please select the L (MONO) connector first.
In order to get the correct tone performance, please keep the AMP and CAB modules closed to avoid adverse effects on the tone.
With guitar box (using FX-Loop function front GP-200)
In this scenario, connect the non-balanced output connector of the GP-200 to the RETURN connector of the guitar cabinet. In this mode, by shielding the front stage of the guitar box and
using the rear stage of the guitar box, several excellent effects in the AMP module can be matched with your rear stage to obtain realistic sound effects.
If there is only one speaker, please select the L (MONO) connector first. In order to get the correct tone performance, please keep the CAB module closed or
turn on the "No-CAB" mode to avoid adverse effects on the tone.

18
Use scene
With guitar box (using FX-Loop function to rear GP-200)
In this scenario, the AMP module (included) will be blocked before, and the effect chain after the AMP module will be used between the front and back stages of the sound box. In order to
get the correct tone performance, please keep the CAB module closed or turn on the "No-CAB" mode to avoid adverse effects on the tone. In addition, pay attention to the GP-200's level
meter indication. If there is an explosive sound, please reduce the input volume in "Global-Input/Output", or adjust the input mode to Line to try to get a satisfactory tone.
With guitar box (using FX-Loop function, 4CM connection)
Use this connection method to divide the effect chain of GP-200 into two parts (as shown in the figure below). This method can place the PRE and DST modules of GP-200 before the front stage of the guitar
cabinet, and simultaneously set the EQ, The MOD, DLY and RVB modules are placed between the front and back stages of the sound box.
In order to get the correct tone performance, please keep the AMP and CAB modules closed to avoid adverse
effects on the tone. Also note that, please adjust the FX-Loop usage mode to: Series in the preset settings.
INPUT
SEND RETURN
Audio Studio (Live Performance)
In this scenario, GP-200 will be used as a sound card for computers or mobile phones. Use the supplied USB cable to connect to the computer. If it is
connected to a mobile phone, an additional OTG adapter cable may be required. When used under Windows systems before Windows-10, it needs to be used
with the official ASIO driver; plug and play on systems after MacOS, iOS, Android and Windows10. At this time, GP-200's input signal (INPUT) and auxiliary
input signal (AUX-IN)* will all be used by USB connected devices.
* Please make sure that the "Global-USB Audio-AUX Connect to USB" function is turned on.
Table of contents
Other Valeton Music Equipment manuals