Valex LI-HOME2V IMPACT212 User manual

Final dimension: A5
S429411
15.10.2018
LI-HOME2V IMPACT212
ATTENZIONE! Prima di usare la macchina, leggete e comprendete le istruzioni d’uso e le istruzioni di sicurezza fornite
WARNING! Before using the machine, read and understand the operating instructions and the supplied safety instruction
Trapano avvitatore a batteria
ISTRUZIONI D’USO
Istruzioni originali
Cordless drill
OPERATING INSTRUCTIONS
Translation of the original instructions


- 4 -
i
ATTENZIONE! Il trapano-avvitatore a bat-
teria è idoneo alla foratura di metallo, legno,
plastica, laterizio e al serraggio-svitamento
di viteria. E’ vietato l’utilizzo di materiali pe-
ricolosi e in ambienti con pericolo di incendio/
esplosione.
Queste istruzioni riportano le informazioni e quanto
ritenuto necessario per il buon uso, la conoscenza
e la normale manutenzione dell’utensile. Esse non
riportano le informazioni sulle tecniche di foratura
ed avvitamento; l’utilizzatore troverà maggiori
notizie su libri e pubblicazioni specifiche o parte-
cipando a corsi di specializzazione.
SIMBOLOGIA
Osservate con attenzione la simbologia della
Fig. B e memorizzate il rispettivo significato. Una
corretta interpretazione dei simboli consente un
uso più sicuro della macchina.
1 Modello macchina.
2 Dati tecnici.
3 Numero di lotto.
4 Marchi di certificazione.
V Volt
Hz Hertz
~ Corrente alternata
Corrente continua
A Ampere
W Watt
kg Chilogrammi
nOVelocità a vuoto
mm Millimetri
s Secondi
h Ore
min-1 Giri al minuto
dB Decibel
°C Gradi centigradi
Li-Ion Ioni di Litio
Wh Wattora
COMPONENTI
Fare riferimento alla Fig. A e seguenti, allegate
alle presenti istruzioni.
1 Interruttore di avvio/arresto e modulatore
elettronico velocità
2 Selettore senso di rotazione e blocco ac-
censione
3 Batteria ricaricabile
4 Pulsanti di sblocco batteria
5 Ghiera per variazione coppia di serraggio
6 Mandrino
7 Luce di illuminazione area di lavoro
8 Impugnatura principale
9 Feritoie di ventilazione
10 Selettore delle velocità meccaniche
11 Ghiera per selezione funzione di percussione,
foratura, serraggio
12 Caricabatterie
13 Indicatore stato di carica della batteria
14 Spia led, stato di carica
16 Presa di ricarica batteria
17 Jack caricabatterie
INSTALLAZIONE
ATTENZIONE! La Ditta costruttrice de-
clina ogni responsabilità per gli eventuali
danni diretti e/o indiretti causati da un errato
allacciamento.
ATTENZIONE! Prima di effettuare le se-
guenti operazioni assicuratevi che la spina
sia scollegata dalla rete elettrica.
TRASPORTO
Per trasportare l’utensile utilizzate sempre il suo
imballo o la sua valigetta; questo lo preserverà
da urti, polvere e umidità che ne possono com-
promettere il regolare funzionamento.
Durante il trasporto sganciate la batteria dall’u-
tensile.
MOVIMENTAZIONE
Posizionate il commutatore del senso di rotazio-
ne nella posizione di mezzo in modo da impedire
avviamenti accidentali.
Afferrate l’utensile per l’impugnatura e dopo l’u-
so appoggiatelo in piedi senza battere utilizzando
la base della batteria.

- 5 -
MESSA IN SERVIZIO
Nel luogo che utilizzerete l’utensile elettrico è
opportuno considerare:
- che la zona non sia umida e sia al riparo dagli
agenti atmosferici.
- che attorno sia prevista un’ampia zona opera-
tiva libera da impedimenti.
- che vi sia una buona illuminazione.
- che sia utilizzata in vicinanza dell’interruttore
generale con differenziale (per il caricabatterie).
- che l’impianto di alimentazione sia dotato di
messa a terra conforme alle norme (solo se
l’utensile elettrico è di classe I, cioè dotato di
spina con cavo di terra).
- che la temperatura ambiente sia compresa tra
10° e 35° C.
- che l’ambiente non sia in atmosfera infiamma-
bile/esplosiva.
Estraete la macchina ed i componenti e verificate
visivamente la loro perfetta integrità.
CARICA DELLA BATTERIA (Fig.E)
ATTENZIONE! Prima di utilizzare il trapano
è necessario effettuare una carica completa
della batteria.
ATTENZIONE! Ricaricare soltanto con
il caricabatterie specificato dal costruttore.
Un caricabatterie che è adeguato per un tipo
di gruppo di batterie può creare un rischio
di incendio quando viene utilizzato con altri
gruppi di batterie.
1)Estraete la batteria dalla sede dell’utensile
agendo sul dispositivo di bloccaggio (Fig.E
pos.4).
2)Inserite lo spinotto (Fig.E pos.17) nella presa
(Fig.E pos.16) posta nella batteria.
3)Inserite la spina del caricabatterie in una presa
di alimentazione 230V~50Hz.
4)L’accensione del led rosso (Fig.E pos.14),
segnala l’inizio della carica della batteria. La
durata della carica per una batteria completa-
mente scarica è indicata nei dati tecnici allegati
alle presenti istruzioni.
5)A carica ultimata, la luce led diventa verde
(Fig.E pos.14).
6)A carica ultimata staccate la spina del cari-
cabatterie, sganciate la batteria ed inseritela
nell’alloggiamento del trapano, fino a sentire
il “click” di innesto.
TEST DI LETTURA DI CARICA DELLA BATTERIA
(fig.E)
Premere il tasto (pos.1)
Tutti i led accesi batteria carica (pos.13).
Un led acceso batteria da ricaricare (pos.13).
Per mantenere efficiente la batteria, non
scaricarla completamente.
Eseguite una successiva ricarica completa:
- Dopo ogni utilizzo.
- Almeno ogni 4 mesi, anche in caso di inutilizzo.
- Se durante il lavoro notate un calo evidente
delle prestazioni dell’apparecchio.
I fattori che influiscono sulla durata della batteria
sono: numero dei cicli di carica/scarica, stress
da utilizzo gravoso, tempo dalla sua fabbricazio-
ne, assenza di manutenzione,
assenza di ricarica, permanenza a temperature
maggiori di 20°C.
MONTAGGIO UTENSILE DI TAGLIO (Fig.C)
ATTENZIONE! Durante il montaggio e lo
smontaggio di punte e inserti, posizionate
centralmente il selettore del senso di rota-
zione (Fig.A pos.2) in modo che sia impedito
l’azionamento dell’interruttore e quindi l’avvio
inatteso.
ATTENZIONE! Osservate le seguenti istru-
zioni (Fig.C)
- Ruotate la ghiera pos.1 per aprire e chiudere
le griffe trattenendo la ghiera pos.2.
Controllate che la punta o l’inserto sia ben
centrato e ben serrato dalle griffe del mandrino.
AVVIAMENTO E ARRESTO
ATTENZIONE! Prima di avviare l’utensile
elettrico è obbligatorio indossare occhiali,
guanti, cuffie di protezione (non in dotazione).
ATTENZIONE! Durante l’utilizzo fate in
modo che nessuno si avvicini alla vostra zona
di lavoro.
Avviamento
1) Inserite la batteria carica nel trapano.
2) Posizionate il selettore del senso di rotazione
(Fig.A pos.2) in una delle due posizioni opera-
tive (non al centro).
3) Afferrate saldamente l’impugnatura (Fig.A
pos.8) con la mano.

- 6 -
4) Per avviare premete il pulsante (Fig. A pos.1).
L’interruttore è del tipo ad “azione mantenuta”;
pertanto l’utensile elettrico rimarrà acceso per il
tempo che voi mantenete premuto l’interruttore.
Arresto
Per arrestare il trapano rilasciate l’interruttore
(Fig. A pos.1).
Vi consigliamo di ripetere queste operazioni
alcune volte prima di iniziare il lavoro in modo
da familiarizzare il più possibile con i comandi.
Se osservate delle anomalie di funzionamento
spegnete l’utensile elettrico e consultate il capi-
tolo “Problemi, cause e rimedi”.
Quando non lavorate spegnete e staccate la
spina dalla presa.
CONSIGLI D’USO
Dopo aver letto attentamente i capitoli prece-
denti, seguite scrupolosamente questi consigli
che vi permetteranno di ottenere il massimo
delle prestazioni.
Procedete con calma in modo da prendere
familiarità con tutti i comandi; solo dopo aver
acquisito una buona esperienza riuscirete a
sfruttarne a fondo tutte le potenzialità.
REGOLAZIONE ELETTRONICA DELLA VELOCITÀ
MANDRINO
Premere gradualmente l’interruttore (Fig. A
pos.1) fino al raggiungimento della velocità
desiderata. Con una minor pressione si otter-
ranno velocità basse, mentre con una maggior
pressione si otterranno velocità alte.
REGOLAZIONE MECCANICA VELOCITÀ MAN-
DRINO
ATTENZIONE! Il cambio di velocità deve essere
eseguito con l’utensile spento ed il mandrino
fermo.
Muovendo il selettore (Fig. A pos.10) è pos-
sibile selezionare meccanicamente la velocità
desiderata.
Velocità 1: numero di giri basso e coppia elevata
(per fori con diametro elevato o avvitamento di
viti grosse su materiale duro).
Velocità 2: numero di giri elevato e bassa coppia.
REGOLAZIONE SENSO DI ROTAZIONE DEL
MANDRINO (Fig.C)
ATTENZIONE! L’operazione di inversione del
senso di rotazione deve essere eseguita con
l’utensile spento ed il mandrino fermo.
Per operazioni di foratura e avvitamento viti a
filetto destro (rotazione oraria) spostate il se-
lettore senso di rotazione (Fig. A pos.2) su ‘R’.
Per operazioni di svitamento, rimozione di punte
incastrate e avvitamento viti con filetto sinistro
(rotazione antioraria) spostate il selettore senso
di rotazione (Fig. A pos. 2) su ‘L’.
REGOLAZIONE DELLA FRIZIONE
La frizione è regolabile dal valore ‘1’ al valore
massimo e normalmente è da regolare solo
per le operazioni di avvitatura. Agendo sulla
ghiera per variazione coppia di serraggio (Fig.
A pos.5), fate combaciare uno dei valori indicati
col riferimento posto sulla sommità del corpo
trapano, ricordando che:
- al valore ‘1’ corrisponde una coppia minima,
da utilizzare per avvitare piccole viti su materiale
tenero
- la coppia aumenta all’aumentare del numero
indicato sulla ghiera fino al raggiungimento del
massimo valore , da utilizzare per forare.
Per regolare la coppia torcente è necessario
che sulla ghiera di percussione (Fig. A pos.11)
sia contemporaneamente selezionato il simbolo
avvitatura ; è inoltre possibile che la posizione
di massima coppia torcente sia dislocata sulla
stessa ghiera percussione invece che su quella
di regolazione della coppia.
INSERIMENTO E DISINSERIMENTO PERCUS-
SIONE
Ruotare la ghiera (Fig. A pos.11) sul simbolo
per inserire la percussione, oppure in un’altra
posizione qualsiasi per disinserirla.
ILLUMINAZIONE ZONA DI LAVORO
La luce di illuminazione (Fig. A pos.7) si accen-
de/spegne automaticamente all’azionamento
dell’interruttore dell’utensile.
CAMBIO UTENSILE DI TAGLIO E INSERTO
Vedere capitolo “MESSA IN SERVIZIO”.
PUNTE DA FORARE
Acquistate delle punte di qualità, con attacco
idoneo alle caratteristiche del mandrino del
trapano e adatte al materiale da forare. Rivol-
getevi al vostro rivenditore di fiducia che potrà

- 7 -
consigliarvi al meglio.
La nostra azienda produce un’ampia gamma di
punte adatte ai più svariati impieghi (metallo,
legno, laterizio ecc.).
OPERAZIONE DI FORATURA
Fissate sempre il pezzo con una morsa durante
la foratura. Usate un punteruolo per marcare il
punto di inizio foratura. Mantenete le punte da
foratura ben affilate. Per l’esecuzione di fori di
diametro elevato, eseguite prima dei fori più
piccoli per evitare il bloccaggio della punta nel
foro e di sovraccaricare l’utensile.
Quando siete in prossimità dell’uscita della punta
dal pezzo, riducete la pressione di foratura.
Fate attenzione ai trucioli prodotti che oltre ad essere
molto caldi sono anche moto taglienti. Indossate
occhiali e guanti di protezione!
Foratura su metallo
Utilizzate punte in acciaio super rapido HSS. Se
il pezzo è una lamiera sottile, ponete un blocco
di legno sotto la lamiera per evitare che la punta
si blocchi.
Per forare un pezzo di ghisa, utilizzate punte
idonee a questo materiale.
Con pezzi in acciaio utilizzate liquido refrigerante
apposito, con l’alluminio usate paraffina come
refrigerante, mentre con ottone e ghisa non usate
liquidi ma ritirate frequentemente la punta dal
foro per raffreddarla.
Foratura su legno e plastica
Usate sempre punte da forare idonee per legno
e plastica. Tenete a mente che sono materiali
fragili ed è possibile che durante la foratura si
inneschino cricche nel pezzo.
Foratura su laterizi
Usate sempre punte con inserti in metallo duro
(tipo widia ecc.) e che siano sempre in buone
condizioni. Applicate una pressione costante
durante la foratura. Ritirate frequentemente la
punta dal foro per estrarre la polvere.
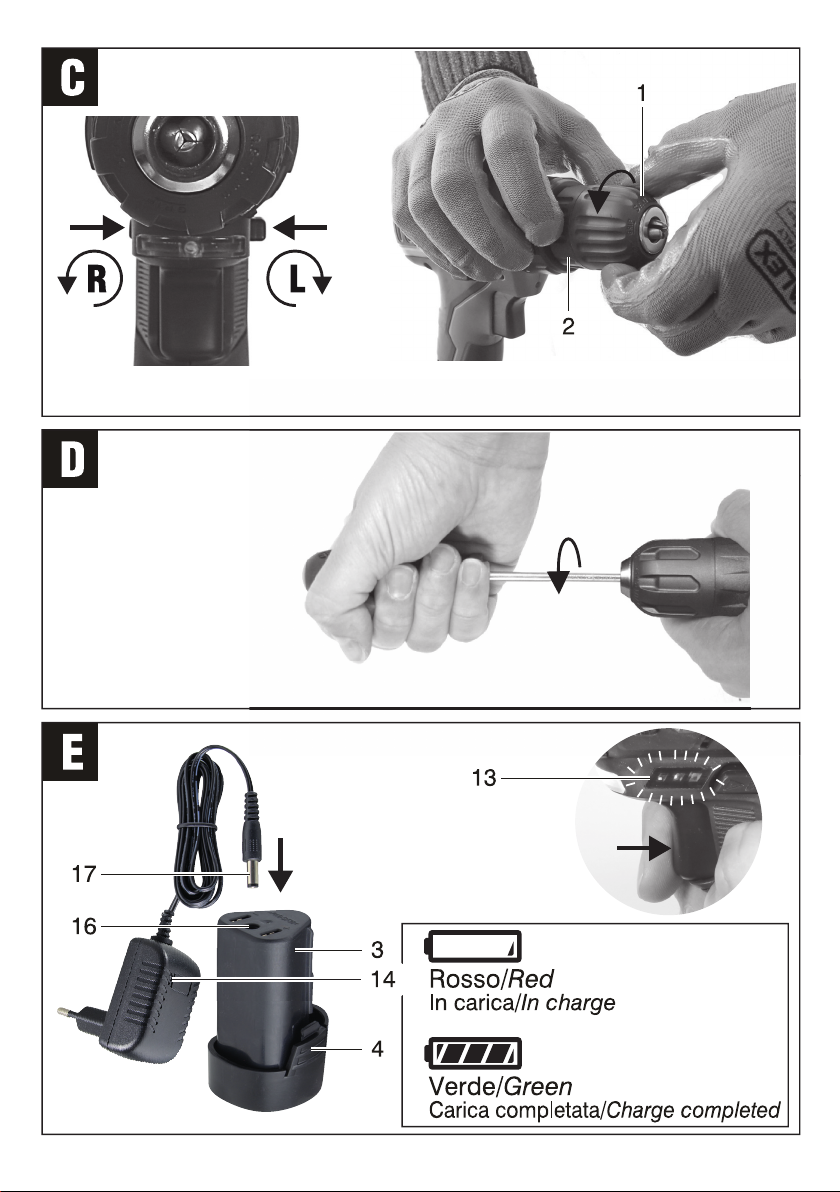
Impostate la funzione percussione (Fig. A
pos.11), per agevolare l’azione della punta.
Per forare piastrelle escludete la funzione per-
cussione, per evitare che la piastrella si crepi
improvvisamente.
INSERTI DI AVVITAMENTO “BIT”
Acquistate degli inserti di qualità, con attacco
idoneo alle caratteristiche di questo avvitatore
e con puntale di avvitamento adatto alla viteria
usata. Rivolgetevi al vostro rivenditore di fiducia
che potrà consigliarvi al meglio.
La nostra azienda produce un’ampia gamma di
inserti adatti ai più svariati impieghi.
OPERAZIONE DI AVVITAMENTO
Posizionate la vite sul pannello da fissare e con
un martello piantatela leggermente in posizione
perpendicolare.
Per alcuni materiali è necessario eseguire un
preforo, questo per facilitare l’avvitamento e
per evitare che il pannello si spacchi (in modo
particolare con il legno e la plastica).
Impugnate saldamente l’avvitatore con una
mano e infilate la punta dell’inserto nella testa
della vite. Premete leggermente sulla vite ed
avviate l’avvitatore, azionando gradualmente
l’interruttore per modulare la velocità di rotazione
e conseguentemente la velocità di penetrazione
della vite.
Al termine dell’operazione, che in genere dura
alcuni secondi, estrarre l’avvitatore e spegnetelo
rilasciando l’interruttore.
La velocità di avvitamento dipende da alcuni
fattori: materiale del pannello, dimensioni della
vite, passo della filettatura, presenza o meno di
un preforo ecc.
Al termine dell’avvitamento il giunto di rotazione
interno all’avvitatore si disaccoppierà e l’uten-
sile elettrico diverrà molto rumoroso e vibrerà
maggiormente; questo e il momento di togliere
l’avvitatore e spegnerlo.
Insistere con l’avvitamento può provocare: la
rottura dell’inserto, rovinare la testa della vite, un
guasto all’utensile elettrico (in questo caso non
coperto dalla garanzia). In questo caso svitate
la vite, eseguite un preforo con un trapano e
riavvitate modificando le regolazioni.
Non insistete su viti che non si avvitano!
MANUTENZIONE
ATTENZIONE! Prima di ogni controllo o
regolazione staccate la batteria dall’utensile
e staccate l’alimentazione elettrica del cari-
cabatterie scollegando la spina.
ATTENZIONE! Non manomettete o tentate
di riparare l’utensile elettrico.
La durata e il costo d’esercizio dipendono anche
da una costante e scrupolosa manutenzione.
Pulite regolarmente ed abbiate cura del vostro
utensile elettrico, vi garantirete una perfetta effi-

- 8 -
cienza ed una lunga durata dello stesso.
- Rimuovete la polvere e i residui di lavorazione
con un pennello a setole morbide.
- Non spruzzate o bagnate d’acqua l’utensile
elettrico, pericolo di infiltrazioni interne.
- Non usate infiammabili, detergenti o solventi
vari.
- Le parti in plastica sono aggredibili da agenti
chimici.
- Non utilizzate un getto d’aria compressa per la
pulizia: pericolo lancio materiale!
- Prestate particolare attenzione alla pulizia
dell’interruttore, alle feritoie di ventilazione
del motore, al mandrino, alla batteria e cari-
cabatteria.
L’utensile non richiede particolari manutenzioni
in quanto è lubrificato con grasso permanente
all’interno dello stesso. Una eventuale revisione
interna deve essere effettuata solo da un centro
assistenza autorizzato.
SOSTITUZIONE MANDRINO (Fig. D)
1) Aprite completamente le ganasce del man-
drino.
2) Inserite un cacciavite nella parte anteriore del
mandrino fino a raggiungere la vite di sicurezza.
3) Svitate la vite di sicurezza ruotando in senso
orario (filetto sinistro).
4) Posizionate la frizione su una coppia alta
(numero alto).
5) Sbloccate ora il mandrino con un colpo
deciso in senso antiorario e svitatelo poi
manualmente.
Per il montaggio del nuovo mandrino eseguite le
operazioni precedenti in senso inverso.
Effettuate una prova di funzionamento a vuoto.
IMMAGAZZINAMENTO
Effettuate una accurata pulizia di tutto l’utensile
e sue parti accessorie (vedi paragrafo Manuten-
zione). Proteggete le parti non verniciate con un
olio protettivo ed utilizzate l’imballo originale o la
valigetta (se presente) per proteggerla.
Riponete la macchina lontano dalla portata dei
bambini, in posizione stabile e sicura. Il luogo
dovrà essere asciutto, privo da polveri, tempe-
rato e protetto dai raggi solari diretti.
Al locale di rimessaggio non devono avere
accesso i bambini e gli estranei.
SMALTIMENTO
Per la salvaguardia ambientale procedete se-
condo le leggi vigenti del Paese in cui vi trovate.
Rivolgetevi alle autorità competenti per maggiori
notizie in merito.
Quando la macchina non è più utilizzabile né
riparabile, consegnatela con l’imballo ad un
punto di raccolta per il riciclaggio. Estraete le
batterie e smaltitele in modo separato.
I rifiuti elettrici ed elettronici possono con-
tenere sostanze pericolose per l’ambiente e per
la salute umana; non devono pertanto essere
smaltiti con quelli domestici ma mediante una
raccolta separata negli appositi centri di raccolta
o riconsegnati al venditore nel caso di acquisto di
una apparecchiatura nuova anologa. Lo smalti-
mento abusivo dei rifiuti comporta l’applicazione
di sanzioni amministative.
Smaltimento batterie: Le batterie incluse
nell’apparecchio possono essere smaltite assie-
me ad esso. Non gettate nel fuoco e non disper-
dete nell’ambiente le batterie esauste ma con-
segnatele agli appositi centri per il loro smalti-
mento. Non smaltire assieme ai rifiuti domestici.

- 9 -
PROBLEMI, CAUSE E RIMEDI
PROBLEMA CAUSE RIMEDI
L’utensile
elettrico non
si avvia
Batteria scarica Effettuare una ricarica completa alla batteria
Batteria non inserita correttamente nell’al-
loggiamento dell’utensile Sganciate la batteria e inseritela correttamente
Selettore del senso di rotazione inserito in
posizione centrale di blocco Spostate il selettore in una delle due posizioni
R o L
La batteria è surriscaldata ed è intervenuta
la protezione interna autoripristinabile Attendere che la batteria si raffreddi
Utensile elettrico o batteria guasti Sostituite la batteria o/e rivolgetevi ad un
centro di assistenza autorizzato
La batteria
non si ricarica Battery charger jack not inserted correctly
in the battery Insert the jack correctly into the battery
Caricabatteria o batteria non pronto per
la carica.
Batteria surriscaldata.
Attendere che la batteria si raffreddi
Caricabatterie o batteria guasti Sostituite la batteria o/e rivolgetevi ad un
centro di assistenza autorizzato
Il trapano si
arresta du-
rante una fase
di foratura
Batteria scarica Se disponibile inserire un nuova batteria cari-
ca, oppure sganciare la batteria ed effettuare
una ricarica completa.
La batteria è surriscaldata ed è intervenuta
la protezione interna autoripristinabile Attendere che la batteria si raffreddi
ATTENZIONE! Se dopo aver eseguito gli interventi sopra descritti l’utensile elettrico non
funziona correttamente o in caso di anomalie diverse da quelle indicate, portatelo presso un
centro di assistenza autorizzato esibendo la prova di acquisto e richiedendo ricambi originali.
Fate sempre riferimento alle informazioni riportate sull’etichetta dati tecnici.
GARANZIA
Il prodotto è tutelato a norma di legge contro non conformità rispetto alle caratteristiche dichiarate
purché sia stato utilizzato esclusivamente nel modo descritto dalle istruzioni, non sia stato mano-
messo in alcun modo, sia stato conservato correttamente, sia stato riparato da tecnici autorizzati
e, ove previsto, siano stati utilizzati solo ricambi originali.
In caso di utilizzo industriale o professionale oppure in caso di impiego simile la garanzia ha
validità di 12 mesi.
Per emettere una richiesta di intervento in garanzia è necessario presentare la prova di acquisto
al rivenditore o ad centro assistenza autorizzato.

- 10 -
g
IMPORTANT! The battery-operated drill
- screwdriver is suitable for drilling metal,
wood, plastic and brick and for tightening
- loosening screws. It is prohibited to use
dangerous materials in environments with risk
of fire/explosion.
These instructions contain information deemed
necessary for proper use, knowledge and
standard tool maintenance. They do not include
information on drilling and screwing techniques;
the user can find additional information in speci-
fic books or publications or by attending special
training courses.
SYMBOLS
Carefully observe the symbols in Fig.B and
memorise the respective meaning. Correct
interpretation of the symbols allows safer use
of the machine.
1 Type.
2 Technical data.
3 Lot number.
4 Trademarks of certifications.
V Volt
Hz Hertz
~ Alternating current
Direct current
A Ampere
W Watt
kg Kilograms
nONo-load speed
mm Millimetres
s Second
h Hour
min-1 R.P.M.
dB Decibel
Double electric insulation
°C Celsius degree
Li-Ion Lithium Ion
Wh Watt-hour
COMPONENTS
Refer to Fig. A and the following figures, atta-
ched to these instructions.
1 Start/stop switch and electronic speed
modulator
2 Rotation direction and start lock switch
3 Rechargeable battery
4 Battery release buttons
5 Ring nut for tightening torque variation
6 Chuck
7 Light for work area
8 Main handle
9 Air vents
10 Switch of speed mechanical
11 Ring to hammer mechanism selection, dril-
ling, tightening
12 Battery charger
13 Checks battery status
14 Led indicator, charging status
16 Battery charging socket
17 Charger Jack
INSTALLATION
IMPORTANT! The manufacturer is not
liable for any direct and/or indirect damage
caused by incorrect connections.
IMPORTANT! Before carrying out the fol-
lowing operations, make sure that the plug is
disconnected from the mains.
TRANSPORT
Always use the packaging or case (when provi-
ded) when transporting the tool; this will protect
it from impact, dust and humidity which can
compromise normal operation.
When transporting the tool remove the battery.
MOVING
Position the rotation direction switch in the
middle position in order to prevent accidental
start-up.
Grip the tool by its handle and after use put it
down upright without banging using the base
of the battery.

- 11 -
STARTING UP
When choosing where to use the electrical tool,
the following should be considered:
- that the place is not damp and is protected
from the elements.
- that there should be a large operational area
free from obstacles.
- that there is good lighting.
- that it needs to be used close to the general
differential switch (for the battery charger).
- that the power supply system is earthed and
conforms to the standards (only if the electrical
tool is class 1, which is equipped with a plug
with earth cable).
- that the room temperature should be between
10° and 35° C.
- that the environment is not in a flammable/
explosive atmosphere.
Take out the machine and components and
visually check that they are perfectly intact.
BATTERY CHARGING (Fig. F)
IMPORTANT! Before using the drill it is
necessary to fully charge the battery.
IMPORTANT! Recharge only with the bat-
tery charger indicated by the manufacturer.
An inappropriate battery charger can cause a
fire hazard when used with other battery units.
1)Take out the battery from its housing in the tool
by operating the locking device (Fig.E pos.4).
2)Insert the plug (Fig.E pos.17) into the socket
(Fig.E pos.16) of the battery.
3)Plug the battery charger into the 230V~50Hz
power socket.
4)The ignition of the red led (Fig.E pos.14),
signals the start of the battery charge. The
operating time for a fully discharged battery
is indicated in the specifications attached to
these instructions.
5)Once the charge is complete, the led turns into
green (Fig.E pos.14).
The charging time for a completely empty bat-
tery is indicated in the technical data attached
to these instructions.
6)After charging unplug the battery charger, take
out the battery and insert it in the drill housing
until you hear it click into place.
BATTERY CHARGE READ TEST (Fig.E)
Press the button (pos.1)
All LEDs on: battery is charged (pos.13).
One LED on: battery needs recharging (pos.13).
In order to keep the battery efficient, do not
fully discharge it.
Fully charging the battery:
- After every use.
- At least every 4 months, even in cases of
disuse.
- If while working you notice a clear drop in the
performance of the tool.
The factors that influence the battery lifetime are:
number of charge/empty cycles, stress from he-
avy use, time since it was manufactured, lack of
maintenance, absence of charging, permanence
of temperatures greater than 20°C.
CUTTING TOOL ASSEMBLY (Fig.C)
IMPORTANT! During the assembly and
disassembly of drills and inserts, positioned
centrally the selector of the direction of rota-
tion (Fig. A pos.2) so that it is prevented the
actuation of the switch, and then the unex-
pected startup.
IMPORTANT! Observe the following in-
structions and Fig.C:
Turn the ring nut pos.1 to open and close the
jaws holding back the ring nut pos.2.
Check that the tip or the insert is centered and
tightly fastened by the chuck jaws.
STARTING AND STOPPING
IMPORTANT! Before starting the electrical
tool it is compulsory to wear protection gog-
gles, gloves and headphones (not provided).
IMPORTANT! Make sure nobody is ap-
proaching the working area while the tool is
running.
Starting
1) Insert the charged battery in the drill.
2) Position the rotation direction switch (Fig. A
pos.2) in one of the two operating positions
(not in the centre).
3) Firmly grasp the hand grip (Fig. A pos.8) in
your hand.

- 12 -
4) To start press the button (Fig. A pos.1).
The switch is a ‘maintained action’ switch so
the electrical tool will stay on when you keep
the switch pressed.
Stopping
To stop the drill release the switch (Fig. A pos.1).
If you notice any working defects, switch off
the electrical tool and consult the chapter “Pro-
blems, causes and solutions”.
When not using the tool, turn it off.
OPERATIONAL TIPS
After reading the previous chapters carefully,
apply these tips scrupulously to obtain maximum
performance.
Proceed calmly so as to become familiar with
all the controls; after having gained sufficient
experience you will be able to make full use of
its potential.
ELECTRONIC CHUCK SPEED ADJUSTMENT
Press the switch (Fig. A pos.1) gradually until
the desired speed is reached. With less pressure
low speeds are obtained, whereas with more
pressure high speeds are obtained.
CHUCK ROTATION DIRECTION REGULATION
(fig. C)
IMPORTANT! The rotation direction inversion
operation must be performed with the tool off
and the chuck stationary.
For drilling operations and tightening right thread
screws (clockwise), move the rotation direction
switch (Fig. A pos.2) to ‘R’.
For unscrewing operations, or removal of em-
bedded bits and tightening left thread screws
(anti-clockwise), move the rotation direction
switch (Fig. A pos.2) to ‘L’.
MECHANICAL CHUCK SPEED ADJUSTMENT
IMPORTANT! The mechanical speed adjustment
operation must be performed with the tool off
and the chuck stationary.
By moving the switch (Fig. A pos.10) it is pos-
sible to mechanically select the desired speed.
Speed 1: low number of revolutions and high tor-
que (for holes with a large diameter or screwing
large screws into a hard material).
Speed 2: high number of revolutions and low
torque.
FRICTION REGULATION
The friction can be adjusted from ‘1’ to the
maximum setting and normally only needs
adjusting for screwing operations. Using the
ring nut to vary the tightening torque (Fig. A
pos.5), match up one of the values indicated
with the reference on the top of the drill body,
remembering that:
- ‘1’ corresponds to minimum torque, to use for
screw small screws in soft material.
- the torque increases with the number indica-
ted on the ring nut until the maximum value is
reached , to use for drilling.
In some models to adjust the torque it is neces-
sary for the screwing symbol to be selected
on the percussion ring nut (Fig. A pos.11) at the
same time; it is also possible that the maximum
torque position is dislocated on the same
percussion ring nut instead of on the torque
adjustment one.
PERCUSSION ACTIVATION / DEACTIVATION
Turn the ring nut (Fig. A pos.11) to the symbol
for activating the percussion function, or to
any other position to deactivate it.
LIGHTING FOR WORK AREA
The light (Fig. A pos.7) comes on or off auto-
matically when the tool is switched on.
CHANGING THE CUTTING TOOL
See chapter “STARTING UP”.
DRILL BITS
Buy good quality bits, with a suitable connection
for the characteristics of the chuck and suitable
for the material to be drilled. Contact your retailer
who will be able to give you the best advice.
Our company produces a wide range of bits
suitable for the various uses (metal, wood,
brick, etc.).
DRILLING OPERATION
Always secure items in a vice when drilling. Use
a punch to mark the initial drilling point. Keep
the drill bits sharp. To drill large holes first drill a
number of small holes to avoid the bit jamming
in the hole and thus overloading the tool.
Reduce the drilling pressure when the bit is
nearly out of the item.
Be cautious with the sawdust produced which
is very hot and also very sharp. Wear goggles
and protective gloves!

- 13 -
Drilling metal
Use HSS bits. If the item is a thin metal sheet,
place a block of wood under the metal sheet to
prevent the bit getting stuck.
To drill a cast iron item, use bits suitable for
this material.
With steel items, use special liquid coolant; with
aluminium use paraffin as a coolant, whereas
with brass and cast iron do not use liquids but
take the bit out of the hole frequently to allow it
to cool down.
Drilling wood and plastic
Always use bits that are suitable for drilling wood
and plastic. Keep in mind that they are fragile
materials and it is possible that the item can
crack during drilling.
Drilling bricks
Always use bits with hard metal inserts (such
as Widia etc.) that must always be in good
condition. Apply a constant drilling pressure
throughout the job. Frequently take the bit out
of the hole to remove dust.
Set the percussion function (Fig. A pos.11)
to facilitate the action of the bit. For drilling tiles
deactivate the percussion function, to prevent
the tile cracking unexpectedly.
SCREWING INSERTS (BITS)
Buy only high quality inserts with connection
suitable for the characteristics of this screwdri-
ver and with a push rod suitable for the screws
in use. Contact your retailer who will be able to
give you the best advice.
Our company produces a wide range of inserts
suitable for the various uses.
SCREWS
It is important to use high quality bolts and
screws so as to obtain the best possible final
result. For each kind of material to be fixed there
is a suitable type of bolts and screws; therefore,
buy it according to necessity. If necessary, use
washers to increase the surface area.
SCREWING OPERATION
Place the screw on the panel to be fixed and
with a hammer tap it lightly in a perpendicular
position.
For some materials it is necessary to make a
pre-hole in order to facilitate the screwing and
to prevent the panel breaking (especially with
wood and plastic).
Grip the screwdriver firmly with one hand and
insert the tip of the bit in the screw head. Lightly
press on the screw and run the screwdriver,
activating the switch gradually so as to modulate
the rotating speed and, consequently, the speed
of screw penetration.
At the end of this operation, which usually lasts
a few seconds, remove the screwdriver and turn
it off by releasing the switch.
The screwing speed depends on the following
factors: panel material, screw size, thread, pre-
sence or absence of a pre-hole, etc.
After the screwing phase, the internal rotation
joint will be uncoupled, the electrical tool will
become very noisy and will vibrate; now, remove
the screwdriver and turn it off.
Continuing to screw may cause: the breakage of
the insert, damage to the screw head, and failure
of the electrical tool (in this case not covered by
the warranty). In this case, unscrew the screw,
perform a pre-hole with a driller and re-screw
modifying the adjustments.
Do not force screws that do not screw!
MAINTENANCE
IMPORTANT! Before any checks or
adjustments take the battery out of the tool
and unplug the battery charger from the mains.
IMPORTANT! Do not tamper or attempt to
repair the electrical tool.
The working life and costs also depend on con-
stant and meticulous maintenance.
Take good care of your electrical tool and clean it
regularly. In this way its efficiency will be ensured
and its lifespan extended.
- Remove dust and machining residuals with a
brush with soft bristles.
- Do not wet or spray water over the electrical
tool - risk of internal infiltrations.
- Do not use any inflammables, detergents or
solvents.
- The plastic parts can easily be damaged by
chemical agents.
- Do not use compressed air for cleaning: Risk
of material ejection!
- Be careful when cleaning the switch, motor
fan slots, chuck, battery and battery charger.
The tool does not require any special maintenan-
ce inasmuch as it is lubricated with permanent
grease inside. Any internal servicing must only

- 14 -
be performed by an authorised service centre.
CHUCK REPLACEMENT (fig.D)
1) Open the chuck jaws completely.
2) Insert a screwdriver in the front part of the
chuck until reaching the safety screw.
3) Loosen the safety screw by turning it
clockwise (left thread).
4) Position the friction on high torque (high
number).
5) Now unlock the chuck with a sharp hit in
an anti-clockwise direction and unscrew it
manually.
To assemble the new chuck, follow the previous
operations in the reverse order.
Carry out a trial run.
STORAGE
Clean the tool and all its accessories thoroughly
(see Maintenance section). Protect the unpainted
parts with protective oil and use the original
packaging or case (where fitted) to protect it.
Keep the machine out of reach of children, in a
stable and safe position. The place must be dry,
free from dust, temperate and protected from
direct sunlight.
Keep children and unauthorised personnel out
of the storage room.
DISPOSAL
In order to protect the environment, proceed
according to the local laws in force. Contact the
relevant authorities for more information.
When the machine is not longer useable or re-
pairable, deliver the machine and packaging to
a recycling centre. Take out the batteries (where
fitted) and dispose of them separately.
Electric and electronic waste may contain
substances that are dangerous for the envi-
ronment and for human health. For this reason
they must never be disposed of together with do-
mestic waste, but collected separately in specific
collection centres or returned to the retailer when
similar new equipment has been purchased. The
illegal disposal of such equipment may result in
prosecution to the full extent of the law.
Battery disposal: The batteries included in
the equipment can be disposed of along with it.
Do not throw the used batteries on the fire and
do not dispose of them in the environment, but
take them to special disposal centres. Do not
dispose of them with domestic waste.

- 15 -
PROBLEMS, CAUSES AND SOLUTIONS
PROBLEM CAUSES SOLUTIONS
The electrical tool
fails to start Battery empty Fully charge the battery
Battery not correctly inserted in the
tool housing Take out the battery and insert it correctly
Rotation direction switch in central lock
position Move the switch to one of the two posi-
tions R or L
The battery has overheated and the
internal auto reset protection has cut in Wait for the battery to cool down
Electrical tool or battery faulty Replace the battery and/or contact an
authorised service centre
The battery does
not charge Battery not correctly inserted in the
battery charger housing Take out the battery and insert it correctly
Battery charger or battery not ready for
charging.
Battery overheated.
Wait for the battery to cool down
Battery charger or battery faulty Replace the battery and/or contact an
authorised service centre
The drill stops whi-
le drilling Battery empty If available insert a new charged battery,
or take out the battery and fully charge it.
The battery has overheated and the
internal auto reset protection has cut in Wait for the battery to cool down
IMPORTANT! If the electrical tool still fails to operate correctly after you have carried out
the above operations, or in the event of anomalies other than those described above, take it to
an authorised service centre with proof of purchase and ask for original spare parts. Always
provide the information shown on the technical data label.
WARRANTY
The product is protected by law against non-compliance with the declared characteristics provided
it is used only in the manner described in the instructions, it has not been tampered with in any
way, it has been stored properly, has been repaired by authorized and, where applicable, have
been used only original spare parts.
In the case of industrial or professional use or when using such a guarantee is valid for 12 months.
To issue a claim under warranty you must present proof of purchase to your dealer or authorized
service center.

DICHIARAZIONE DI CONFORMITA’
La ditta indicata in etichetta dichiara sotto la
propria responsabilità che il prodotto ivi citato
è conforme ai requisiti essenziali di sicurezza e
salute contenuti nelle seguenti direttive europee:
2006/42/CE, 2014/30/CE, 2011/65/CE
DECLARATION OF CONFORMITY
The firm indicated on the label declares, under
its own responsibility, that the product cited there
complies with the essential health and safety re-
quirements contained in the following European di-
rectives:
2006/42/EC, 2014/30/EC, 2011/65/EC
DATI TECNICI
1. Trapano
a. Tensione
b. Giri al minuto
c. Capacità mandrino
d. Livello di pressione acustica LpA
e. Livello di potenza acustica LwA
f. Livello di vibrazioni con trapanatura nel metallo ah,D
g.
Livello di vibrazioni con foratura a percussione su calcestruzzo
2. Caricabatteria
a. Tensione e frequenza nominale
b. Tensione in uscita
c. Corrente media in uscita
d. Tempo di ricarica
e. Classe di isolamento
3. Batteria Li-Ion
a. Tensione di alimentazione
b. Capacità nominale
c Energia
TECHNICAL DATA
1. Drill
a. Voltage
b. R.P.M.
c. Chuck capacity
d. Acoustic pressure level LpA
e. Acoustic power level LwA
f. Vibrations level drilling into metal ah,D
g. Vibration level of impact drilling on concrete
2. Battery charger
a. Voltage and nominal frequency
b. Output tension
c. Average output current
d. Charging time
e. Insulation class
3. Battery Li-Ion
a. Power supply voltage
b. Nominal capacity
c. Energy
1 a 12 V
b n00-400 / 0-1350 min-1
c 10 mm
d 81,5 dB(A) K=3
e 92,5 dB(A) K=3
f 1,168 m/s2 K=1,5
g 11,962 m/s2 K=1,5
2 a 230V~50/60 Hz
b 12,6V
c 500 mAh
d 3-5 h
e II
3 a 12 V
b 1,3 Ah
c 15,6 Wh
Persona autorizzata a costituire fascicolo tecnico presso:
The person authorized to compile the technical file is in:
Valex SpA
Via Lago Maggiore, 24
36015 Schio (VI) - Italy
Schio, 10.2018
Un procuratore - Attorney
SMIDERLE STEFANO
Table of contents
Languages:
Other Valex Power Screwdriver manuals
Popular Power Screwdriver manuals by other brands

Black & Decker
Black & Decker KC460LN Original instructions

Black & Decker
Black & Decker 5145342-00 instruction manual

Makita
Makita FS4000 instruction manual

DeWalt
DeWalt DW979K2 instruction manual

Performance Tool
Performance Tool M194 owner's manual

Kilews
Kilews SKT-CGS10 Operation and maintenance manual

EINHELL
EINHELL TP-CI 18 Li BL operating instructions

Ingersoll-Rand
Ingersoll-Rand 5 series Product information

SNOWJOE
SNOWJOE POWERJOE PJ4SDFLX-RM Operator's manual

Kilews
Kilews SKD-BN830L Operation and maintenance manual

Black & Decker
Black & Decker KR2000K manual

Hilti
Hilti SF4000 operating instructions