manuals.online logo
Brands
  1. Home
  2. •
  3. Brands
  4. •
  5. Valor Multimedia
  6. •
  7. Car Receiver
  8. •
  9. Valor Multimedia ITS-701W User manual

Valor Multimedia ITS-701W User manual

Other manuals for ITS-701W

1

Other Valor Multimedia Car Receiver manuals

Valor Multimedia ITS-700W User manual

Valor Multimedia

Valor Multimedia ITS-700W User manual

Valor Multimedia SD-900W User manual

Valor Multimedia

Valor Multimedia SD-900W User manual

Valor Multimedia ITS-701W User manual

Valor Multimedia

Valor Multimedia ITS-701W User manual

Valor Multimedia DD-806W Plus User manual

Valor Multimedia

Valor Multimedia DD-806W Plus User manual

Valor Multimedia DD-806W User manual

Valor Multimedia

Valor Multimedia DD-806W User manual

Popular Car Receiver manuals by other brands

Linear Series LS5050 Operation and installation manual

Linear Series

Linear Series LS5050 Operation and installation manual

Kenwood KRC-160 instruction manual

Kenwood

Kenwood KRC-160 instruction manual

Sony XR-CA430X Service manual

Sony

Sony XR-CA430X Service manual

T+A Elektroakustik K1 CD-RECEIVER operating instructions

T+A Elektroakustik

T+A Elektroakustik K1 CD-RECEIVER operating instructions

SoundMax SM-CDM1052 instruction manual

SoundMax

SoundMax SM-CDM1052 instruction manual

Xtrons HD107HD user manual

Xtrons

Xtrons HD107HD user manual

Mopar RB3 manual

Mopar

Mopar RB3 manual

Clarion ADDZEST DMZ615 owner's manual

Clarion

Clarion ADDZEST DMZ615 owner's manual

Sony XAV-601BT Specifications

Sony

Sony XAV-601BT Specifications

PIE GM12-POD/S Operation manual

PIE

PIE GM12-POD/S Operation manual

Hyundai H-910H instruction manual

Hyundai

Hyundai H-910H instruction manual

Sony XR-C6100 Service manual

Sony

Sony XR-C6100 Service manual

Sony CDX-L600X - Fm/am Compact Disc Player Installation/connections

Sony

Sony CDX-L600X - Fm/am Compact Disc Player Installation/connections

Motorola VWA63 Service manual

Motorola

Motorola VWA63 Service manual

Sound Storm STM93R user manual

Sound Storm

Sound Storm STM93R user manual

Nextar D3201 instruction manual

Nextar

Nextar D3201 instruction manual

Alpine CDE-163BT owner's manual

Alpine

Alpine CDE-163BT owner's manual

Kenwood KDC-X303 quick start guide

Kenwood

Kenwood KDC-X303 quick start guide

manuals.online logo
manuals.online logoBrands
  • About & Mission
  • Contact us
  • Privacy Policy
  • Terms and Conditions

Copyright 2025 Manuals.Online. All Rights Reserved.

ITS-701W
Preparation
Features
Tools and Supplies
!!!WARNING
Disconnecting the Battery
Controls and Indicators
Button Operation
LCD Display / Indicators
The Key Areas Of the Touch Screen
Remote Control
Front Zone Remote Control
Using the TFT Monitor
Open/Close the TFT Monitor
TFT Monitor Auto Open
Monitor Tilt Angle Adjustment
Camera Mode
Image Setting
Parking Brake Interlock
Monitor Movement Mechanism
Operating Instructions
Power On / Off
Playing Source Selection
Volume Adjustment
Audio Control Menu
System Reset
Mute
System Setup Menu
MAIN Menu
Screen Setting
General Setup Menu
Standby
Tuner Operation
Tuner Operation Display
Switch to Radio Tuner source
Select FM/AM Band
Auto Tuning
Manual Tuning
Using Preset Stations
Auto Store (AS)
Program Scan (PS)
Local Radio Stations Seeking (LOC)
C O N T E N T S
Thank you for your choosing our product. We hope you will find the instructions in this user manual clear and
easy to follow. If you take a few minutes to look through it, you’ll learn how to use all the features of your new ITS-
701W for maximum enjoyment.
Monitor Section
Screen Size: 7” (Measured diagonally).
Screen Type: TFT Liquid Crystal Display (LCD) active matrix
Response Time: 30mSec rise time, 50mSec fall time
Resolution, DVD/Composite Video in: 336,960 sub pixels,
1440 (W) X 234 (H)
Viewing angle:
• 60 degrees left or right
• 30degrees up
• 60 degrees down
General
Auxiliary Input impedance: 10k
Power Supply: 10.5 to 16V DC, negative ground
Fuse: 10-amp, mini ATM type
DIN chassis dimensions: 7" X 7" X 2" (178mm x 178mm x50mm)
* Specifications subject to change without notice.
36
1
1
1
1
2
3
3
5
5
6
6
8
8
8
8
8
8
9
9
10
10
10
10
10
11
11
12
12
12
13
15
16
16
16
16
17
17
17
17
17
17
DVD Player Operation
Opening/Closing the TFT Video Screen
Insert/Eject Disc
Reset the Loading Mechanism
Accessing DVD Mode
Using the Touch-Screen Controls
Controlling Playback
Accessing the DVD Menu
Moving Through Chapters
Fast Forward/Fast Reverse
GOTO Search
Direct Chapter / Track Selection
Viewing an Alternate Picture Angle (DVD Only)
Zooming
Multi-Language Discs (DVD Only)
Playback Information
General Disc Information
DVD Setup Menu
Accessing the DVD Setup Screen
LANGUAGE Menu
AUDIO Menu
VIDEO Menu
RATING (Parental Lock) Menu
CD/MP3/WMA/JPEG Operation
CD Player Operation Display
MP3/WMA Discs
JPEG Discs
Troubleshooting
Specifications
NOTE:
1. certain descriptions in this book may differ from the actual unit.
2. Some pictures or icons in the book may differ from actual display.
3. Specifications subject to change without notice.
CEA Power Ratings
Main Amplifier
Power Output: 15 watts RMS X 4 channels into 4-ohms @ < 10% THD+N
Signal to Noise Ratio: 70dBA below reference. (Reference: 1 watt, 4-ohms)
MAX Power: 45 X 4 watts into 4-ohms, all channels driven
Frequency Response: 20Hz to 20kHz, -3dB. Aux input used as source reference
Reference Supply Voltage: 14.4VDC
DVD/CD Player
Compatible formats: DVD-R, DVD-RW, DVD+R, DVD+RW,
CD-R, CD-RW, CD-DA, MP3, WMA, HDCD, SVCD, VCD,
MPEG, JPEG, MP3/WMA files burned onto a DVD+R/W or
DVD-R/W and CD-R/RW
Signal to Noise Ratio: 85dBA
Dynamic Range: >95dB
Frequency Response: 20Hz to 20kHz, -3dB
Channel Separation: > 60dB @ 1kHz
D/A Converter(s): 6-channel high performance 24-bit, 192kHz, multi-bit Sigma Delta
modulation.
DAC supports sample rates from 8~192kHz.
Electronic Skip Protection (ESP):
DVD: 2-3 sec, CD-DA: 10 sec, MP3: 100 sec, WMA: 200 sec
(ESP time is approximate)
Mechanical anti vibration ability: 10~200Hz, X/Y/Z direction: 1.0G
Video Section
Format: NTSC, PAL (auto-detection)
Output: 1Vp-p (75-ohm), buffered
Input: 1Vp-p (75-ohm)
FM Tuner Section
Tuning Range: 87.5MHz - 107.9MHz
Mono Sensitivity (-30dB): 10dBu
Quieting Sensitivity (-50dB): 15dBu
Alternate Channel Selectivity: 70dB
Signal to Noise Ratio @ 1kHz: 58dB
Image Rejection: 60dB
Stereo Separation @ 1kHz: 30dB
Frequency Response: 30Hz - 15kHz, -3dB
AM Tuner Section
Tuning Range: 530kHz - 1710kHz
Sensitivity (-20dB): 20dBu
Signal to Noise Ratio @ 1kHz: 50dB
Image Rejection: 60dB
Frequency Response: 50Hz - 2kHz, -3dB
SPECIFICATIONS
35
18
18
18
18
18
18
19
19
20
20
20
21
21
21
21
21
22
24
24
24
25
25
25
27
27
28
29
30
35
Please read all of the instructions below before beginning your installation. We recommend that you have your unit
installed by a mobile video/navigation installer.
Features
• Single DIN size, all-in-one integrated entertainment system.
• Built-in DVD Player, slot-in mechanism.
• Built-in ISS FM/AM Tuner,
• High resolution 7” (16:9) TFT color monitor, contrast and brightness adjustment, with LCD dot
matrix display.
• Built-in 45W X 4 amplifier, 4 channel surround sound output.
• Smart Touch-screen operation.
• All functions can be operated by included remote controls.
• Powerful graphic user interface and software update ability.
Tools and Supplies
You will need these tools and supplies to install the unit.
• Torx type, flat-head and Philips screwdrivers
• Wire cutters and strippers
• Tools to remove existing radio (screwdriver, socket wrench set or other tools)
• Electrical tape
• Crimping tool
• Volt meter
• Crimp connections
• 18 gauge wire for power connections
• 16 – 18 gauge speaker wire
WARNING!!
1. Only connect the unit to a 12-volt negative ground system.
2. Never install this unit where operation and viewing could interfere with safe driving
conditions.
3. To reduce the risk of a traffic accident (except when using for rear view video camera) never
use the video display function while driving the vehicle.
4. To reduce the risk of a traffic accident, never driving with the sound at a level that prevents
you from hearing sounds outside around the vehicle.
5. Never disassemble or adjust the unit without the assistance of a professional. For details,
please consult your local car assembly specialty shop.
6. To prevent injury from shock or fire, never expose this unit to moisture or water.
7. Never use irregular discs.
8. To prevent damage to the mechanism inside this unit, avoid impact to the TFT monitor.
9. Do not change the fuse on the power wire without professional guidance. Using an improper
fuse may cause damage to the unit and result in a fire.
10. The monitor employs an automatic motorized mechanism. To prevent damage to the core
mechanism, please do not push, pull or swivel the monitor manually.
PREPARATION
1
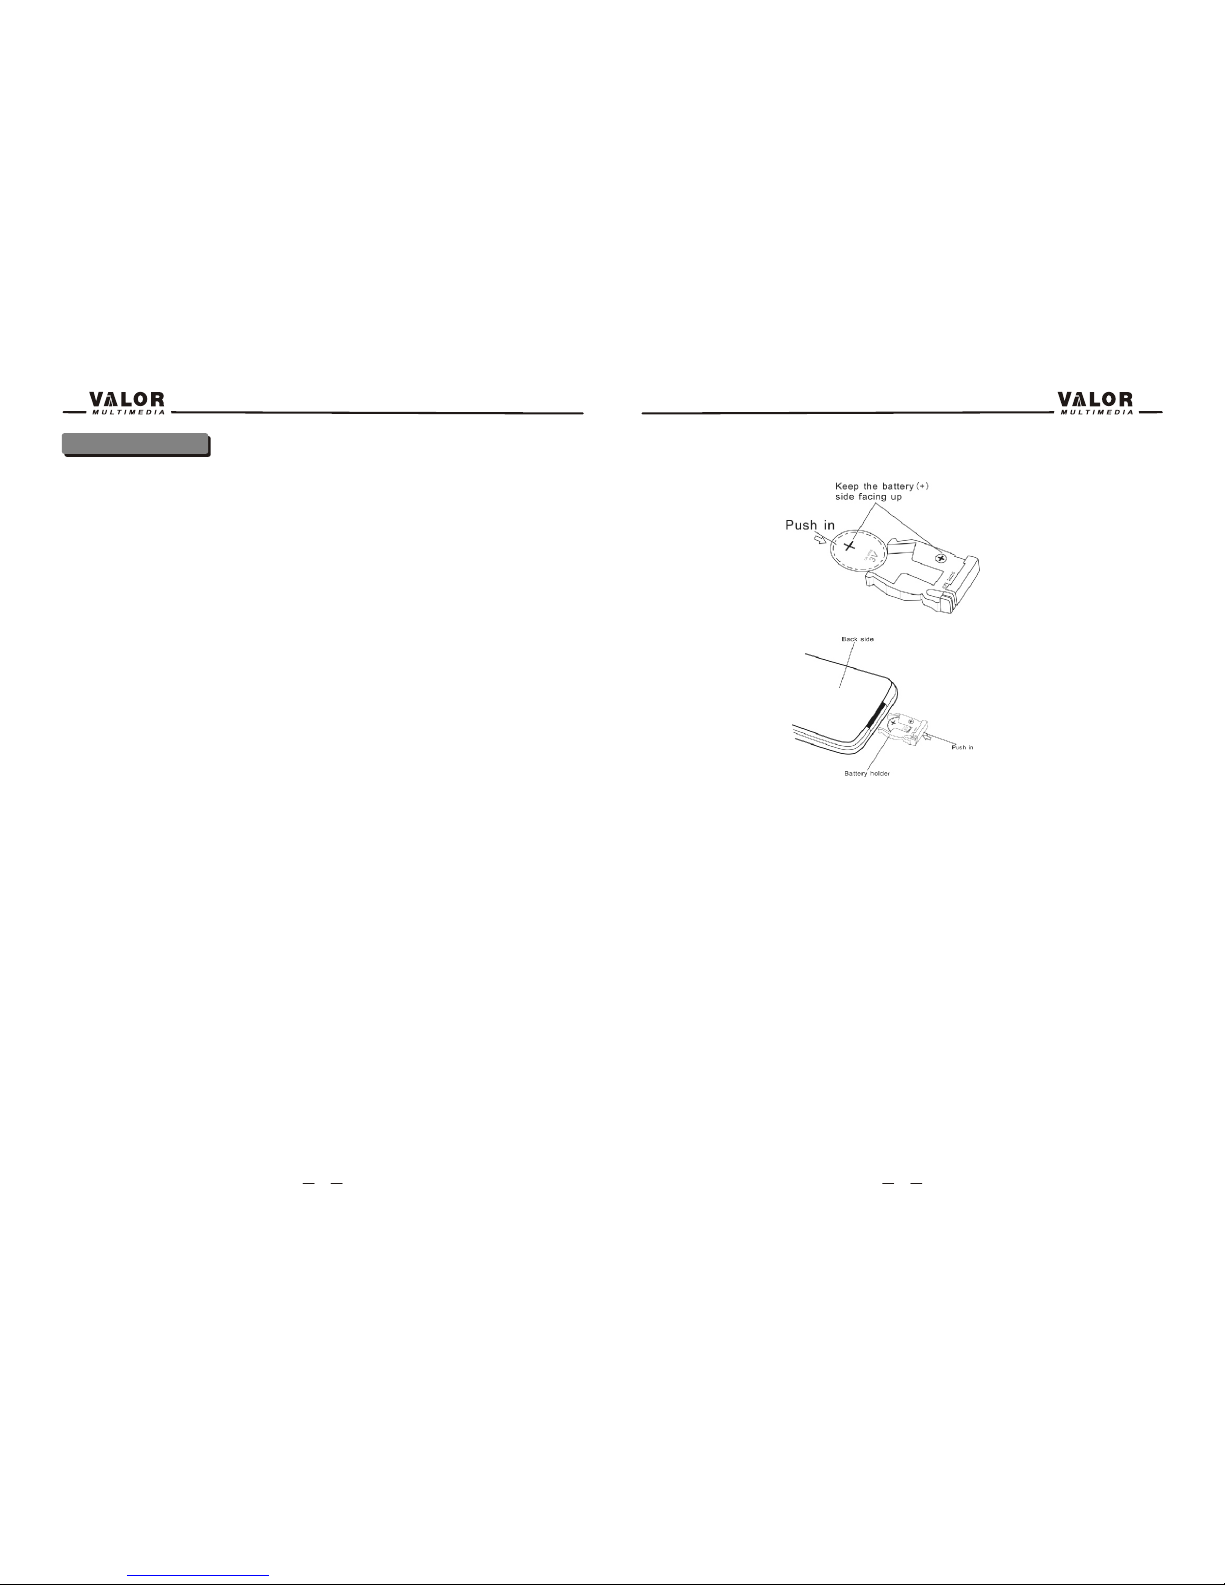
Insert the battery holder
NOTE: Use only one CR2025(3V) lithium battery.
Danger of explosion if battery is incorrectly replaced. Replace only with the same or
equivalent type.
Do not recharge, disassemble, heat or dispose of the battery in fire.
Keep batteries away from children to avoid the risk of accident.
Suggestions
1. Only use a piece of clean silicone cloth and neutral detergent to clean the front panel or
monitor. A rough cloth and non neutral detergent (such as alcohol) may result in scratching or
discoloration.
2. Keep off water and other liquid things.
3. If the temperature inside the player gets too high, a protective circuit automatically stops
playing the disc. And then, please wait for the unit to cool down before operating the player
again.
4. Never insert anything other than a 5” (12 cm) compact disc into the player as the mechanism
can be damaged by foreign objects.
5. Do not attempt to use a 3” (8 cm) CD-Single disc in this unit, either with or without an adaptor,
as it will damage the player and disc. Such damages are not covered by the Warranty on this
product.
6. When the vehicle warms up during cold weather or under damp conditions, condensation may
appear on the LCD panel. If this occurs, the screen will not operate properly until the moisture
has evaporated.
7. We suggest that you should clean the discs used in this unit more frequently than used in your
home, because of the environmental conditions of the vehicle.
34
Disconnecting the Battery
To prevent a short circuit, be sure to turn off the ignition and remove the negative (-) battery
cable prior to installation.
NOTE:
If the unit is to be installed in a car equipped with an on-board drive or navigation computer, do
not disconnect the battery cable. If the cable is disconnected, the preset memory may be
erased. Under these conditions, use extra caution during installation to avoid causing a short
circuit.
NOTE:
It is especially important that you read the WARNINGS and NOTES in this manual.
2
1. When using the remote for the first time, you must pull out the insulation tape.
2. Remove the battery if the remove control is not used for a month or longer.
Remove and dispose of the old battery immediately.
Do not store the battery with metallic materials.
3. Inserting/Replacing the Battery:
Remove the battery holder
Remove the battery from the battery holder
Install the battery
33
Button Operation
1.POWER OFF/VOL
Rotary encoder.
Press the encoder to turn on the unit, press and hold to turn off.
Rotate clockwise/counterclockwise to adjust the volume.
Press to enter the audio adjust menu when the unit is on.
2. MUTE
Press the button to mute the volume, and press the button again to restore the volume.
3. SEEK DOWN
4. SEEK UP
5. PLAY/PAUSE
Press to play/pause.
6. DISC SLOT
CONTROLS AND INDICATORS
1 2 345678 9 10 11 12
13
14
15
16
17 18
19
20
21
22
3 32
7.STOP
8.PREVIOUS
9.NEXT
10.MODE
11. SMART DIAL
Rotary encoder.
Press the encoder to access MAIN menu.
Rotate clockwise/counterclockwise to select a desired item and press to access or confirm.
12. RESET
13. EJECT
Press once for disc insertion/ejection.
14.INFO
Press to display playback information on the screen on DVD mode, if the TFT monitor
is closed DVD playback information will display on the LCD screen.
Press and hold to access the picture setup.
15 ANGLE+
Press the button to adjust the upward tilt angle of the screen one step at a time.
Press and hold this button to continuously adjust the upward tilt.
Press this button to adjust the picture settings in picture setup.
16. ANGLE-
Press the button to adjust the downward tilt angle of the screen one step at a time.
Press and hold this button to continuously adjust the downward tilt.
Press this button to adjust the picture settings in picture setup.
17. LCD DISPLAY
18. DISC INDICATOR LIGHT
It is blue when there is no disc in the slot, otherwise, it is red.
19. OPEN
Press the OPEN button to activate the motorized system and move the TFT monitor into
viewing position.
Press again to close the TFT.
20. DISP
Press to display system information on the front LCD screen when the main screen is closed.
21. BAND
Press to switch between FM and AM.
22.AS/PS (Auto store/program scan)
Press to auto store strong radio stations in the 12 preset channels in the current band.
Press and hold to start to scan radio stations.
4
31
LCD Display / Indicators
1.Main display area, displays the time, tuning frequency and other text information.
2.Local indicator, Indicates the local radio station seeking function is activated or not
3.Stereo broadcasting indicator, Indicates the radio is in stereo mode or not
4.Loudness indicator, Indicates the LOUD function is activated or not.
The key areas of touch screen
The touch key areas are outlined below, for DVD, VCD mode and all other operating modes.
A — Return to MAIN menu
B — DISP key: Displays playing information
C — Select previous chapter
D — Select next chapter
E — Display the on-screen control keys, according to different playing mode.
F — Display the GOTO search menu on DVD/VCD mode.
5
TROUBLESHOOTING
30
REMOTE CONTROL
6
9. : Touch to display previous folder
10. : Touch to display next folder
11. : Touch to fast forward current track
12. : Touch to activate/deactivate Repeat Single Mode
13. : Touch to activate/deactivate Random Mode
14. : Touch to display the numeric keypad on the screen, and use it to access a track
directly.
15. The disk format indicator, display the current track and total number of tracks on disk
16. Elapsed playing time
17. playback information
18. Volume indicator
Playing MP3/WMA Files
After inserting a MP3/WMA disc, files will play in the sequence of the all directory. In playing
back, you can press the numeric button on the remote control or touch a track directly to play.
Change Directory
Touch the or on the screen to navigate through the directories/folders.
Previous/Next Page
Touch the or on the screen to navigate through the pages/files.
JPEG Discs
1. Stop playback and return to the picture list
2. Rotate picture clockwise 90°
3. Rotate picture anticlockwise 90°
1 2 3
29
7
Playing CD Files
After inserting a CD disc, files will play in the sequence of the all directory. In playing back, you
can press the numeric button on the remote control or touch a track on the onscreen directly to
play.
Previous/Next Page
Touch the or on the screen to navigate through the pages/files.
Fast backward/fast forward
Touch the or on the screen to fast backward or fast forward play.
MP3/WMA Discs
This player allows you to playback MP3 files recorded on CDROM, CD-R, CD-RW, DVD+R/RW
and DVD-R/RW. For CD-RW discs, please make sure it is formatted using the full method and
not the quick method to prevent illegal disc operation. Use the following settings when
compressing audio data for your MP3 disc:
• Transfer Bit Rate: 320kbps
• Sampling Frequency: 48kHz
When recording MP3 up to the maximum disc capacity, disable additional writing. For recording
on an empty disc up to maximum disc capacity, use the "Disc at once" setting.
The touch keys for MP3/WMA CD/DVD playback are described below.
1. Current source indicator, touch this area to access MAIN menu.
2. Disk title
3. Track title
4. Current time
5. : Touch to play/pause
6. : Touch to stop disc playback
7. : Touch to turn to the previous page
8. : Touch to turn to the next page
1 2 34
5678 9 10 11
12
13
14
15
16
17
18
28