Valor DV-170 User manual

DV-170
In-Dash DVD player with USB/SD Card reader
OWNER’S MANUAL

1
CONTENTS
CONTENTS................................................................................................................................................... 1
PRECAUTION...............................................................................................................................................2
FRONT PANEL & REAR PANEL ..................................................................................................................4
BASIC OPERATION......................................................................................................................................5
REMOTE CONTROL ....................................................................................................................................7
SPECIAL FUNCTION PLAYBACK.............................................................................................................. 11
SYSTEM SETUP......................................................................................................................................... 19
ELECTRICAL CONNECTION..................................................................................................................... 23
TECHNICAL SPECIFICATIONS ................................................................................................................. 24
TROUBLESHOOTING ................................................................................................................................ 26

2
PRECAUTION
This unit is designed and manufactured with the users safety in mind, however any improper use or operation may result in
certain dangers. It is therefore highly recommended to read this thoroughly and adhere to the following precautions.
SAFETY PRECAUTIONS
* To prevent an electrical shock, do not open the housing of the unit.
In any case of malfunctioning, only have the unit serviced by an approved and qualified service centre.
* Do not expose to any water or to a very humid environment. Do not operate the unit when your hands are wet as this may
cause a short circuit.
* For safe driving, keep the volume low in order to concentrate on traffic conditions.
* Do not clean the unit with alcohol, only clean with a soft dry cloth.
* If the unit has been kept at a high temperature or in a high humidity environment, cool down the car interior before turning on
the unit.
* Do not use the unit for a long time without running the vehicle engine, it may drain the battery and the engine’s vehicle may
not be able to start.
* Before final installation in the dashboard opening, connect the wiring and make sure the unit is working properly.
* Only use parts provided with the unit to ensure proper installation.
* Do not route wiring in places that the heat may melt the wiring insulation.
* When replacing the fuse, ensure that the new fuse has the capacity recommended by the manufacturer.
* The driver must not watch any video or photo files while driving.

3
PRECAUTION
OPERATION PRECAUTIONS
* Do not operate the player with scratched, bent or broken discs. When a disc is not loaded properly, do not force it into the
disc loader.
* Never insert any other objects into the disc loader like a coin or pin, etc as this may cause damage or a short circuit.
* Do not use different disc formats other than 12cm round discs.
* Please dispose of used batteries according to the regulations in your country.
* If the unit is disconnected to the battery, it will lose memorized data.
* If the source disc has poor sound quality due to scratches, dirt or a bad recording, the playback sound quality may be poor.
Remote control:
* Do not let the remote control fall onto the floor, where it may become jammed under the brake or accelerator pedals;
* Do not short-circuit, disassemble or heat the battery;
* Do not dispose of the battery in a fire;
* Dispose of used batteries properly.
* Manufactured under license from Dolby Laboratories.
* Dolby and the double-D symbol are trademarks of Dolby Laboratories.
Dolby
4
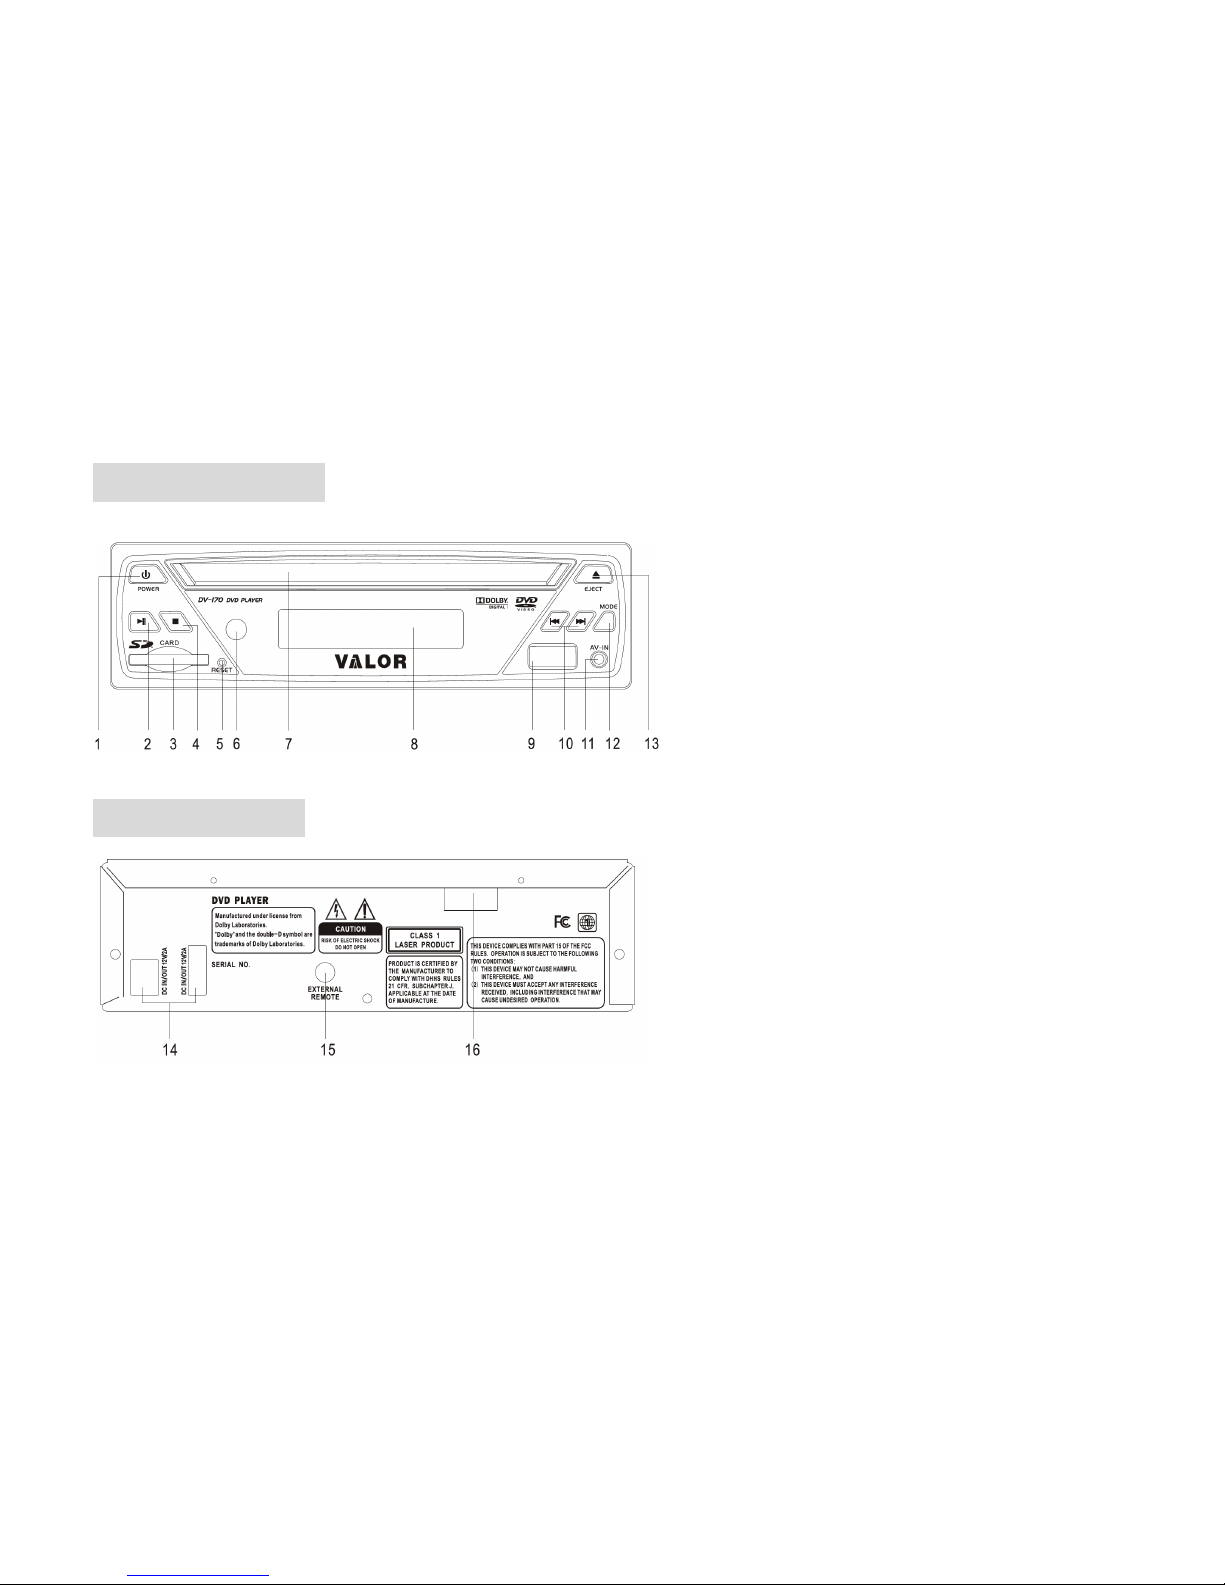
FRONT PANEL
REAR PANEL
1. POWER SWITCH
2. PLAY/PAUSE button
3. SD/MMC CARD Slot
4. STOP button
5. RESET
6. IR window
7. DISC Loading Slot
8. VFD display
9. USB port
10. PREVIOUS/NEXT button
11. AV IN
12. MODE button
13. Disc eject
14. DC IN/OUT
14. EXTERNAL REMOTE
15. CABLE (Audio/Video Input,
Audio/Video Output, Digital Audio Output

5
BASIC OPERATION
1. POWER
Press the button to turn on the unit. If a disc already in the tray, it will begin playing.
2. PLAY/PAUSE
Press the button first time to pause playback (still mode). The sound will be muted during still mode.
Press the button twice to resume normal playback.
3. SD/MMC CARD Slot
Insert SD/MMC Card, the unit will play the files automatically.
Note: Once the cards could not eject automatically after pressing, just take it out manually.
4. STOP
Press the button to go to stop mode. As some disc the unit can recall the location where stopped, such as DVDs and audio CDs.
Press PLAY/PAUSE to playback to resume playback form the location where playback is stopped or from the beginning of
the disc.
Press the button twice to stop completely.
5. RESET
Press the button to reset the unit using a sharp object such as a pencil to reset the unit.
6. IR window: To receive IR signal from the remote control.
7. DISC Loading Slot
8. VFD display
9. USB port

6
BASIC OPERATION
10. / PREVIOUS/NEXT
During playing, press PREV button can go back to the start of this chapter if the playing time is more than one second, or if
the playing time is short of one second, then press this key to go back to previous chapter.
Each press of NEXT button during playing will skip the current chapter and play the next one.
11. AV IN
Connect the AV cable (not supplied) to your external AV device, then press MODE button to switch to AV mode.
12. MODE
Press the button to select a source: DVD/USB/CARD/INPUT REAR/INPUT FRONT.
Note: select DVD mode to play DVDs, VCDs, CDs or MP3.
13. Disc eject
Press the button to eject a disc when it is loaded into the unit.
14. DC IN/OUT
15. EXTERNAL REMOTE
16. CABLE
It includes Audio/Video Input, Audio/Video Output, and Digital Audio Output.

7
REMOTE CONTROL
Installing the battery
1. Open the battery compartment cover.
2. Insert the new batteries. Make sure that the positive and
negative terminals of the batteries are oriented as
indicated.
3. Close the cover.
Use and care of the remote control
Point the remote control to the IR window on the front panel
for operation.
Notes:
Using the battery incorrectly can cause malfunctions. Take
note of the following points for the remote control:
* Keep the battery out of the reach of children. Should the
battery be swallowed, immediately consult a doctor.
* use one CR2023 (3V) lithium battery.
* Remove the battery if the remote control is not to be used for
a month or longer.

8
REMOTE CONTROL
1. MUTE
Press to mute the sound, press it again to resume the sound.
2. POWER
Press it to turn on the unit. When the unit is on, press it to turn the unit off.
3. 0-9
Numeric buttons.
4. SUB-T
Press to display the subtitle information of the DVD disc.
5. AUDIO
Press to display the audio information of the disc.
6. SETUP
In media play mode, press to enter into the DVD setup menu.
7. ENTER
Press to confirm your selection.
8. / , /
In case of menu mode, the buttons served as cursor buttons to select item left/right, up/down.
9. SLOW
For some discs, press to start slow forward function.
10. ZOOM
Press to allow the picture to be increased in size.

9
REMOTE CONTROL
11. RANDOM
Press to play all tracks in random order.
12. P/N
Press to change between PAL/NTSC.
13. PROG
In media play mode, press to enter into program mode to play the track in your desired sequence.
14. MODE
Refer to the front panel on MODE button.
15. EJECT
Press to eject the disc on the disc slot.
16. A-B
A-B repeat allows a passage to be repeated continuously.
17. REPEAT
In media play mode, press to switch the repeat mode of programs.
18. TITLE
Press to display the title menu of the DVD disc.
19. ANGLE
Press to change the view angle on multi-angle DVD disc.
20. VOL+
Press to increase the volume level.
Table of contents
Other Valor Car Receiver manuals


