Vax Air Cordless Installation instructions

vax.co.uk
U86-AL-B
Let’s get started
REGISTER YOUR 6
YEAR GUARANTEE.
VISIT VAX.CO.UK/GUARANTEES
Please retain your original receipt as
proof of purchase

Basic safety precautions
This vacuum cleaner is intended for
household use only and NOT for
commercial or industrial use.
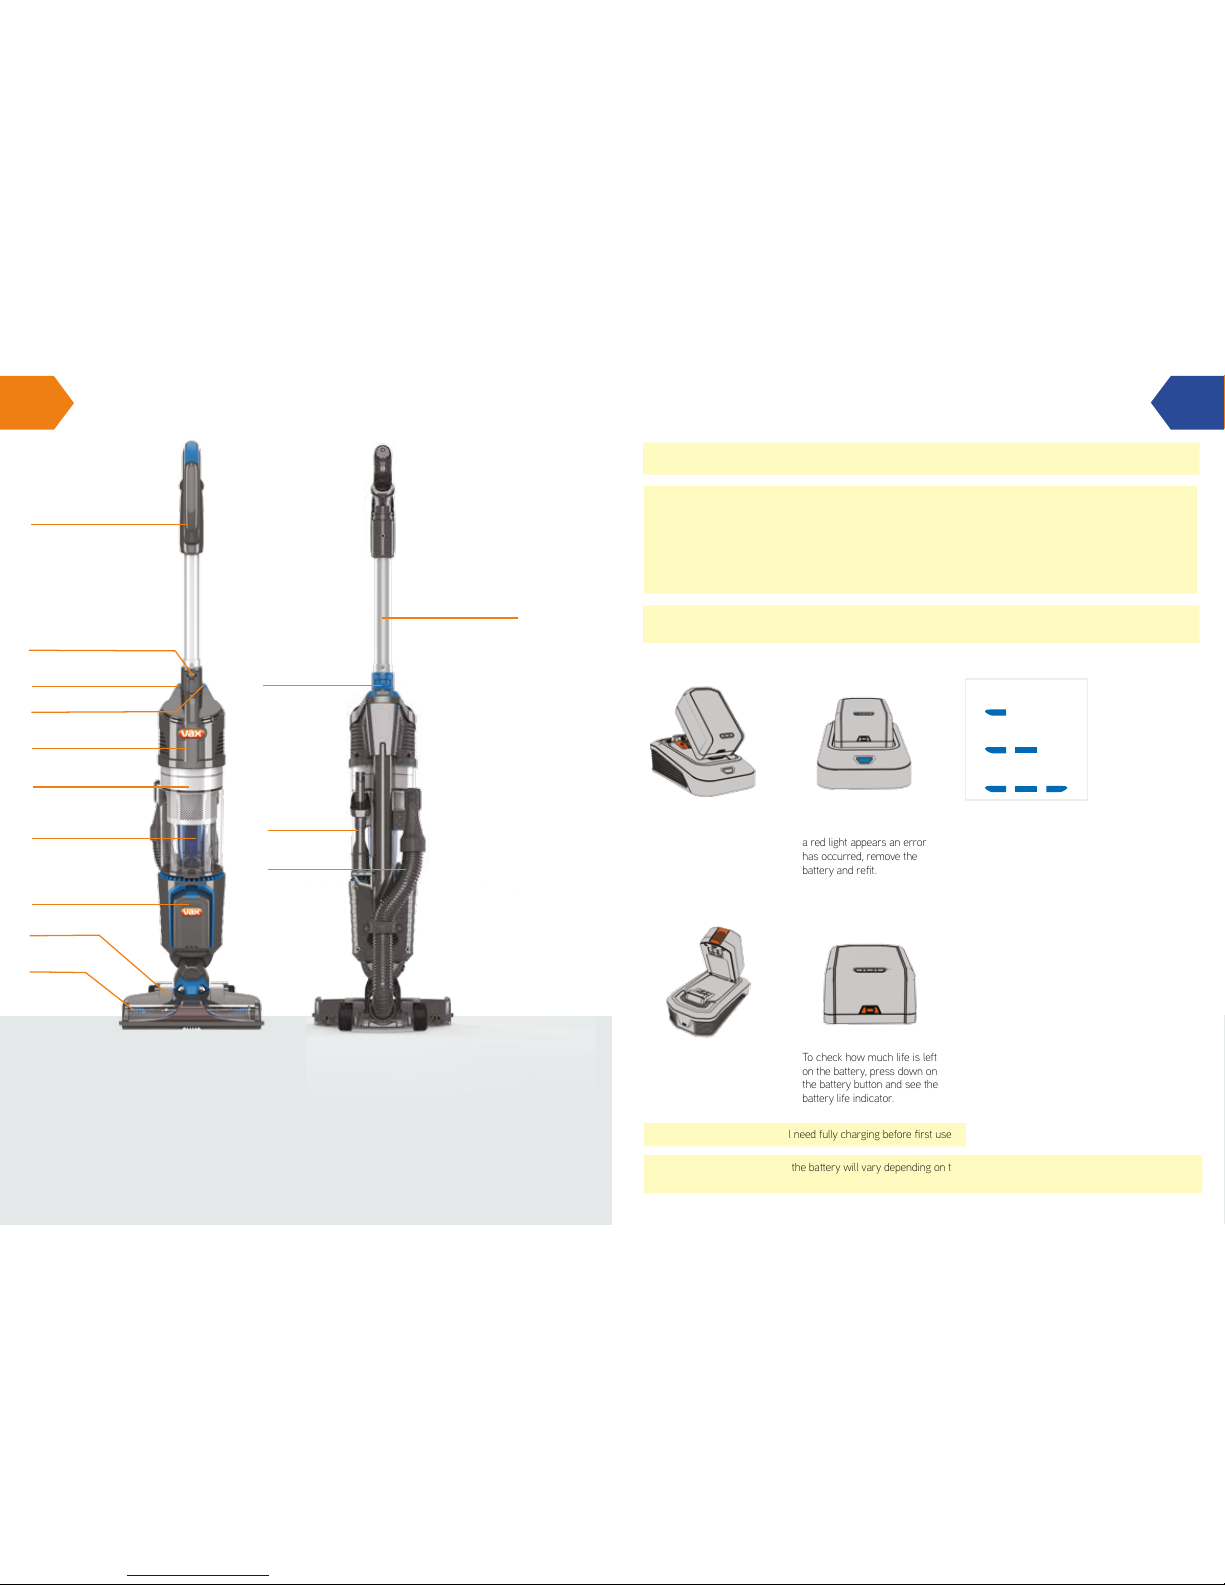
• It is a battery-operated appliance, the
battery being charged outside the
appliance.
• Only use the vacuum cleaner indoors
and keep the area you’re cleaning
well lit.
• Keep ngers, hair and loose clothing
from moving parts and openings
whilst using the vacuum cleaner.
• This vacuum cleaner can be used
by children aged from 8 years and
above and persons with reduced
physical, sensory or mental
capabilities or lack of experience and
knowledge if they have been given
supervision or instruction concerning
use of the vacuum cleaner in a safe
way and understand the hazards
involved. Children should not play
with the vacuum cleaner. Cleaning
and user maintenance should not be
made by children without supervision
• Only Vax recommend tools and
accessories should be used with
this vacuum cleaner
• Keep the charger and batteries
in a dry place, and use them
indoors only.
• If the charger cord is damaged,
it must be replaced by the
manufacturer, its service agent or
similarly qualied persons in order
to avoid a hazard.
Please keep instructions for
further use.
Let’s talk safety Let’s talk safety
Do's
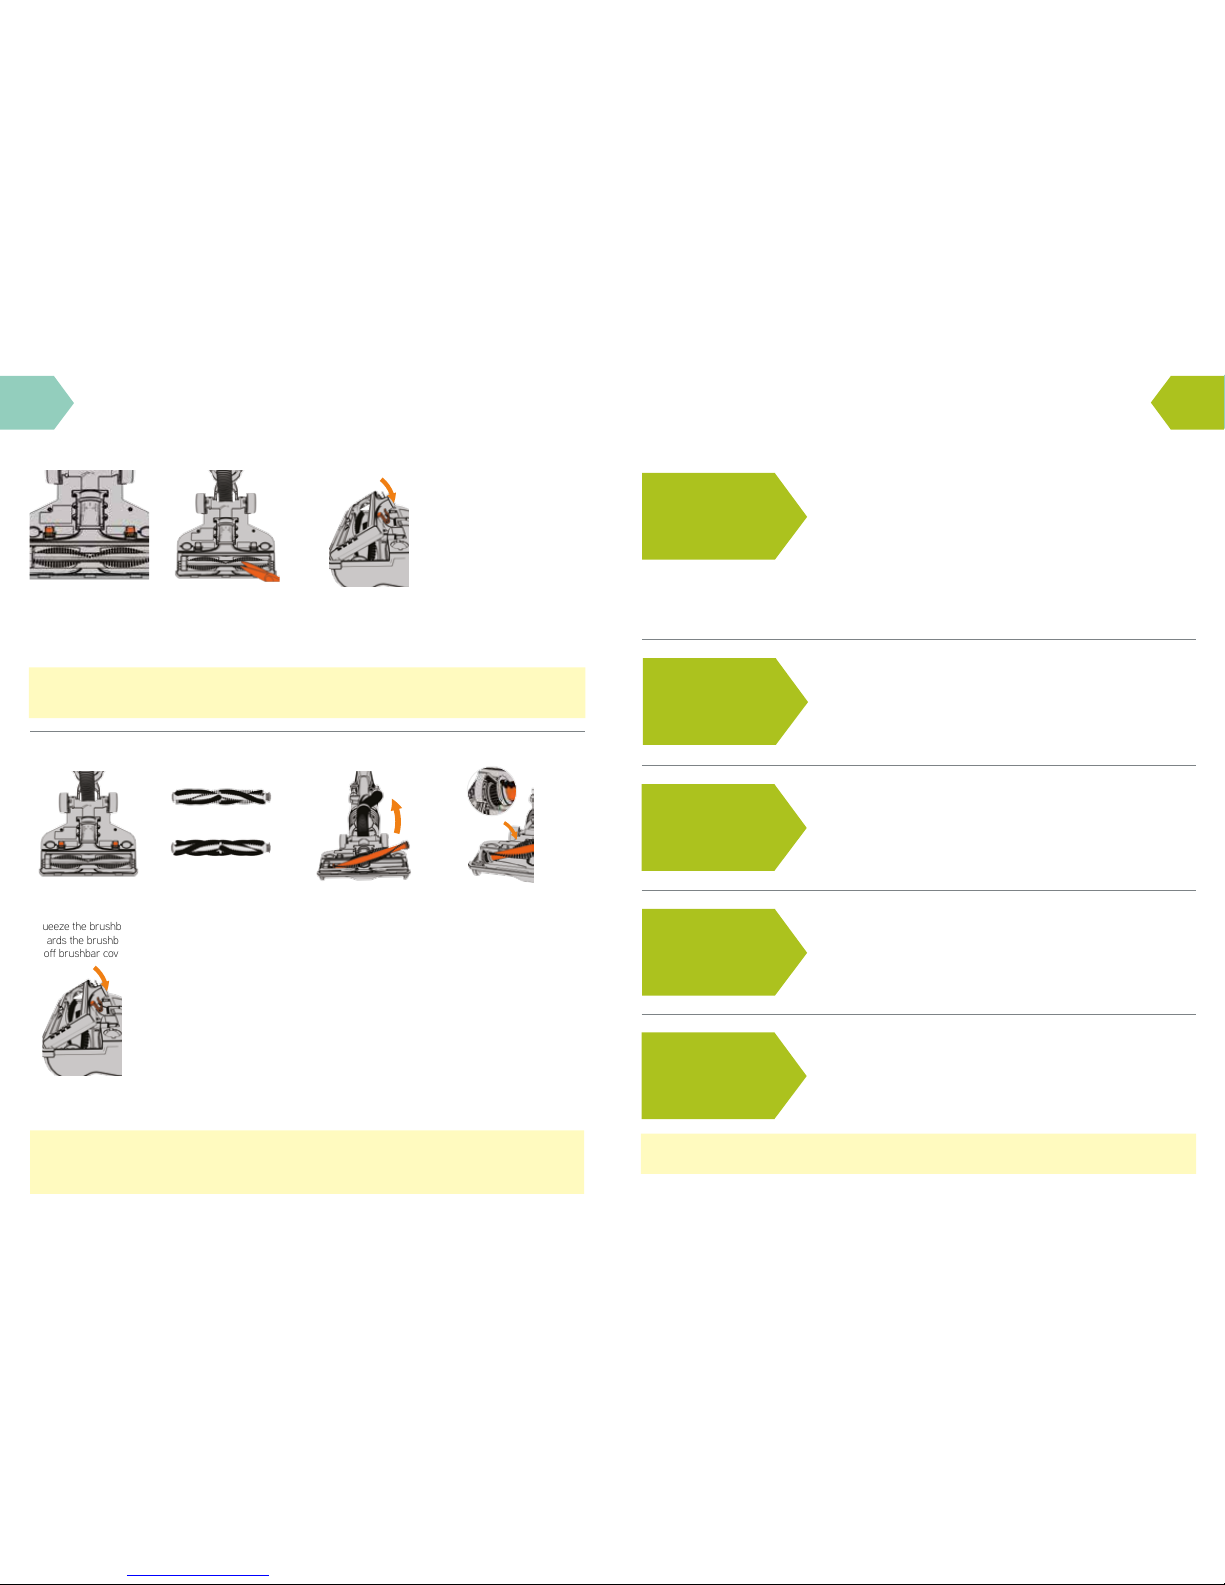
3Always make sure the lter and dirt
container are tted correctly before
using your vacuum cleaner.
3Always turn o and remove the
battery from the vacuum cleaner
or charger before carrying out
maintenance.
3Turn o all controls on the vacuum
cleaner before disconnecting or
connecting the battery.
3Take extra care when cleaning on
the stairs.
3Always replace the fuse in the
charger plug with a 13amp fuse.
3Always protect the charger cord
from heated surfaces or near
open ames.
3Use only CE approved 13amp
extension cords, non-approved
extension cords may overheat.
Care should be taken to arrange the
extension cord as it can be a trip
hazard.
3Always carry the vacuum cleaner by
the handle.
3Store your vacuum cleaner in a cool,
dry area.
Don’ts
8Don’t use this vacuum cleaner if
it has been dropped, damaged,
immersed in water or left outdoors.
8Don’t handle the charger plug or use
the vacuum cleaner with wet hands.
8Don’t run over the charger cord
or use the vacuum cleaner if the
charger cord or plug is damaged.
Please contact our Customer Care
Line on: 0844 4128 455 (Mon-Fri
8:30 am to 6:30 pm, Sat 9.00 am
to 5:00 pm)
8Don’t attempt to remove blockages
with sharp objects as this may cause
damage to the vacuum cleaner.
8Don’t use the vacuum cleaner with
incorrect voltage as this may result
in damage or injury to the user.
The correct voltage is listed on the
ratings label.
8Don’t vacuum up hot coals, cigarette
butts, matches or smoking hot
burning items or use in an area
where there may be harmful uids
(chlorine, bleach, and ammonia drain
cleaner).
8Don’t try to short the terminals of the
battery and the charger.
CAUTION: The battery used in this
device may present a risk of re or
chemical burn if mistreated.
Do not disassemble or heat above
manufacturer’s maximum temperature
limit (60° C/140°F) or incinerate.
Replace battery with Vax battery only.
Use of another battery may present
a risk of re or explosion. Dispose of
used battery promptly. Keep away
from children.
Do not disassemble and do not dispose
of in re. Do not attempt to disassemble
the battery or remove any component
projecting from the battery terminals.
The battery and charger have no
user serviceable parts. Fire or injury
may result.
Prior to disposal, protect exposed
terminals with heavy insulating tape to
prevent shorting.
WARNING: For best performance
terminals on battery, battery charger
and vacuum cleaner must be clean
and free from dust and dirt.
Do not attempt to recharge non-
rechargeable batteries.

Thank you for buying this Air Cordless.
Taking care of your oors
The Air Cordless is designed to make vacuuming your oors regularly, as eective and ecient
as possible and this user guide will help you get the most out of your machine.
Maintaining your oors will ensure they keep their appearance for longer and smell fresh and
clean. You’ve chosen carpets for your home for a reason and Vax will help you take good care
of them.
Taking care of your Air Cordless
Also inside this guide are instructions on maintaining your new machine, so that it’s always ready
when you are to tackle your oors.
Let us know what you think @VaxUK
Taking care of you
We’re here if you need us. Instead of taking me back
to the shop, simply visit:
vax.co.uk/support or call:
(UK) 0844 412 8455 (ROI) 1-800 928 308
Monday-Friday 8.30am to 6.30pm, Saturday 9.00am to 5.00pm
Calls are charged at the UK local rate. Please make a note of the serial number and model number
of the product before calling.
Alternatively, you can write to us at:
Vax Ltd., Kingswood Road, Hampton Lovett, Droitwich, Worcestershire, WR9 0QH, UK
This user guide can also be found online at: vax.co.uk/support
Contents
Let’s talk safety
Getting to know your machine
Getting started
Using your machine
Taking care of your machine
Let’s talk technical
What to do if it goes wrong
Getting in touch
Accessories
Notes
Air Cordless
2x LithiumLife batteries
Included with
your machine
Battery charger
2-in-1 tool (Type 2)
Soft dusting brush

Getting started
Hose
2-in-1 tool
Extension tube
Handle release button
Handle
On/o button
Brushbar On/o button
Dirt container release button
Pre-motor lter
Dirt container
Separator
Battery
Floorhead
Brushbar
Technical Specication
Name Air Cordless
Battery voltage 20V
Weight 4.6kg
Part number 1-1-134090-00
Product code U86-AL-B
Dirt container capacity 1.05L
Battery Specication
Type Lithium-Ion rechargeable
battery pack
Nominal voltage 18VDC
Capacity 4Ah/72Wh
Battery Model No. BH03120UK
Battery Charger Specication
Model No. BH03200UK
Subject to technical change without notice.
Accessories & Consumables
Battery Charger* 1-1-134171-00
LithiumLife Battery 1-1-134164-00
2-in-1 Tool (Type 2) 1-1-132115-00
Filter Kit (Type 88) 1-1-134162-00
Soft Dusting Brush (Type 1) 1-1-133836-00
*To purchase consumables and accessories, please visit vax.co.uk
Getting to know your machine
Charging the battery
Fit the battery onto the
battery charger.
The battery charger light will
turn blue when charging. If
a red light appears an error
has occurred, remove the
battery and ret.
The battery will be fully
charged after 3 hours
and the charger light will
turn o.
PLEASE READ ‘LET’S TALK SAFETY’ AT THE BEGINNING BEFORE USE
CAUTION: The battery used in this device may present a risk of re or chemical burn if mistreated. Do not
disassemble or heat above manufacturer’s maximum temperature limit (60° C/140°F) or incinerate. Replace battery
with Vax battery only. Use of another battery may present a risk of re or explosion. Dispose of used battery
promptly. Keep away from children. Do not disassemble and do not dispose of in re. Do not attempt to disassemble
the battery or remove any component projecting from the battery terminals. The battery and charger have no user
serviceable parts. Fire or injury may result. Prior to disposal, protect exposed terminals with heavy insulating tape to
prevent shorting.
IMPORTANT: The battery will need fully charging before rst use.
NOTE: The life expectancy of the battery will vary depending on the usage of the vacuum cleaner. If you require a
replacement battery contact us - Vax Careline: (UK) 0844 412 8455
Removing the battery
Press the release button,
hold base of battery
charger and lift the battery
to remove.
To check how much life is left
on the battery, press down on
the battery button and see the
battery life indicator.
25% Charged
50% Charged
75% Charged
WARNING: For best performance terminals on battery, battery charger and vacuum cleaner must be clean and free
from dust and dirt. Do not attempt to recharge non-rechargeable batteries.

TIP
Using your machine Using your machine
Assembling your vacuum cleaner
Push the handle into
the body of the vacuum
cleaner. The handle will
click into position when
correctly tted.
Fit the battery onto the
vacuum cleaner (below the
dirt container). The battery
will click into position
when correctly tted.
Remove the lter insert by
pressing the dirt container release
button, remove dirt container o
the vacuum cleaner, turn the dirt
container lid anti-clockwise to
remove the lter insert.
Remove tag attached to
lter, ret lter with the
tab at the bottom into
vacuum cleaner.
The battery can remain on the
battery charger once fully charged.
You may want to charge the spare
battery so it is ready to use.
Using your Air Cordless
Press the on/o button
to turn the vacuum
cleaner on.
Place your foot on the
base and pull backwards
to recline.
Press the brushbar button
to activate the brushbar if
on carpets.
Stand the vacuum cleaner
in the upright position to
use the hose. The brushbar
will stop.
The brushbar should be ON for
carpets and OFF for hard oors.
IMPORTANT

Taking care of your machine
TIP
Use the handle on the top of the
dirt container lid to carry the
vacuum cleaner.
The brushbar will not rotate when
the vacuum cleaner is in the
upright position.
Using your extension tube
Remove hose from base of
the vacuum cleaner.
Press handle release clip
and remove handle.
Attach hose to handle .
IMPORTANT: When cleaning stairs to prevent the vacuum cleaner falling always place the vacuum cleaner at the
bottom of stairs on the oor. Do not place the vacuum cleaner on stairs or furniture.
Attach required tool to
the handle.
Replace handle and hose
into the vacuum cleaner
after use.
Using your machine
Tap the lter over a bin
to remove any dirt/debris.
Wash the lter under running
water (40 degrees max).
Leave for 24hrs or until
fully dry before replacing.
Using a soft brush or
cloth to remove any dirt/
debris from separator.
Emptying and cleaning the dirt container
Cleaning terminals
Press dirt container
release button to remove
dirt container.
Using a dry cloth or soft
dusting brush remove any
dust/debris from terminals
on battery charger, battery
and vacuum cleaner.
Hold dirt container over a
bin, press the dirt release
button to open, allow the
dirt to fall out.
Turn the dirt container lid
anti clockwise to remove.
Pull the lter tab to remove
the lter.
IMPORTANT: For best cleaning results lters require cleaning every 4-6 uses or as needed. Do not use your vacuum
cleaner without the lter in place.
IMPORTANT: Remove battery before carrying out any maintenance on your machine.
24hr

Let’s talk technical What to do if it goes wrong
Clearing a blockage from the brushbar
Remove battery and lie
the vacuum cleaner at.
Squeeze the brushbar clips
towards the brushbar and
lift o brushbar cover.
Using a pair of scissors
cut any hair or debris from
around the brushbar.
Replace the
brushbar cover by
clicking into place.
IMPORTANT: If the brushbar has been obstructed the Motor Protection Sensor may have been activated. Remove the
battery and clear any obstruction. Wait 30 minutes for the vacuum cleaner to reset itself. Replace the battery, recline
and switch on the vacuum cleaner. If the brushbar still does not turn press the brushbar on /o button.
Changing the brushbar – additional brushbars are available at vax.co.uk
Remove battery and lie
the vacuum cleaner at.
Squeeze the brushbar clips
towards the brushbar and
lift o brushbar cover.
Remove brushbar rstly
lifting the side of brushbar
not connected to belt.
Choose brushbar.
Multi-oor brushbar
Hard-oor brushbar
Replace brushbar, tting
the belt to the brushbar
rst. Then aligning both
sides of the brushbar
into base.
TIP: Multi-oor brushbar has longer, softer bristles designed for all round cleaning on carpets and hard oors.
Hard-oor brushbar has extra soft bristles, designed specically for the gentle removal of dirt/debris from hard oors.
To purchase go to vax.co.uk
Replace the brush
bar cover by clicking
into place.
• Check the battery is inserted correctly into the vacuum cleaner.
• The battery may not be charged, remove and charge battery.
• Battery might be too hot, remove and allow to cool for 30 minutes.
Replace battery.
• The motor thermostat may have tripped. If this has happened, switch
o the vacuum cleaner. Remove and empty the dirt container and
check for blockages. Clean the lters and allow the vacuum cleaner
to cool for approximately 1 hour (if you have washed the lters you
will need to wait 24 hours for the lters to fully dry before putting
them back into the vacuum cleaner).
• Empty the dirt container and clean lters. Go to ‘Taking care of
your machine.’
• There may be a blockage in the vacuum cleaner. Check hose, handle
and brushbar.
• The brushbar may not be turning. Go to ‘Why isn’t my brushbar
turning?’ below.
• Check the battery charger is plugged in.
• Check the battery is inserted correctly into the charger.
• The battery may not be connecting with the charger. Remove battery
and unplug charger, wait 10 seconds then retry.
• Check the battery is inserted correctly into the charger.
• The battery or charger has an error. Remove the battery and unplug
charger, wait 10 seconds then plug charger into socket and reinsert
the battery.
• Check terminals on battery and vacuum cleaner are clean. Go to ‘Let’s
talk technical.’
• The brushbar may not be switched on, please check the brushbar
on/o switch.
• The brushbar may be obstructed. Go to ‘Let’s talk technical.’
SolutionProblem
Warning: To reduce the risk of personal injury, unplug the vacuum cleaner before performing maintenance
/troubleshooting checks.
Why does my vacuum
cleaner have no power?
Why won’t the vacuum
cleaner pick up?
Why isn’t my
brushbar turning?
Why isn’t the
battery charger light
lit when the battery
is charging?
Why is the battery
charger light
continually ashing?

Getting in touch Accessories
* Calls are charged at the UK local rate. Please make a note of the serial number and model number of the vacuum cleaner
before calling.
Don’t forget your accessories!
Order at: www.vax.co.uk/spares-and-solutions
Battery Charger
1-1-134171-00
LithiumLife Battery
1-1-134164-00
LithiumLife battery technology brings power and
cordless convenience for whole-home cleaning.
Radiator Tool (Type 1)
1-1-133835-00
Long slim design, is perfect for cleaning behind
and inside the radiator.
Mattress Tool (Type 1)
1-1-133837-00
Quickly and easily removes embedded dust
from mattresses.
Up Top Tool (Type 1)
1-1-133834-00
Ideal for reaching those hard to reach
high areas.

Accessories Notes
Multi-Floor Brushroll
1-1-134222-00
Specially designed to clean both carpet and hard
oors. Firm bristles lift deep down dirt from carpets
while soft bristles gently remove dirt from hard oors.
Hard Floor Brushroll
1-1-134223-00
Extra soft bristles gently remove dirt and debris
from hard oors.
Soft Dusting Brush (Type 1)
1-1-133836-00
Gently removes dust and dirt from delicate
surfaces such as tiles and glass without scratching.
Crevice Tool Set (Type 1)
1-1-133833-00
Crevice tool – for awkward gaps and crevices.
Upholstery attachment – gently cleans large
areas of upholstery, curtains, sofas and chairs.
Pet hair removal attachment – tackles stubborn
pet hair on furniture, rugs and carpets.
Stubborn dust brush attachment – removes built
up dust from skirting, banisters and corners.
2-in-1 Tool (Type 2)
1-1-132115-00
2-in-1 tool includes crevice tool for awkward areas
and corners and a dusting brush for areas such
as skirting.

Notes Notes

Vax Ltd., Kingswood Road, Hampton Lovett, Droitwich, Worcestershire, WR9 0QH, UK
email: inf[email protected] website: vax.co.uk
Version 1.0
EEC Statement of Compliance: Manufacturer/EEC importer: Vax Limited, hereby on our own responsibility,
declare that the U86-AL series is manufactured in compliance with the following Directives:
Safety: 2006/95/EC Low Voltage Directive. EMC: 2004/108/EC Electromagnetic Compatibility Directive.
Waste electrical products should not be disposed of with household waste. Please recycle where facilities exist.
Check with your Local Authority or retailer for recycling advice.
© 2014 All rights reserved. VAX®, VAX Lozenge, Air Cordless are trade marks or registered trade marks of Techtronic Floor Care Technology Ltd.
@VaxUK
Table of contents
Other Vax Vacuum Cleaner manuals

Vax
Vax VX32SK User manual

Vax
Vax U90-CX-P-A User manual

Vax
Vax X-004B Product information sheet

Vax
Vax VX49 Installation instructions

Vax
Vax Power midi2 User manual

Vax
Vax Essentials VEC-01 User manual

Vax
Vax Swift V-075 User manual

Vax
Vax V-303 Wash "N' Dry User manual

Vax
Vax LiFE2-in-1 Specification sheet

Vax
Vax V-031B Series User manual

Vax
Vax Air3 Agile User manual

Vax
Vax Mach Air U90-MA User manual

Vax
Vax MACH 5 User manual

Vax
Vax Blade 2 Max User manual

Vax
Vax VC-H4510E-1/2/3 User manual

Vax
Vax H89-12V Series User manual

Vax
Vax Rapide Spring V-021AA User manual

Vax
Vax Essentials VEC-104 User manual

Vax
Vax Energise Pulse U86-E2e Series Installation instructions

Vax
Vax Merlin VR230 User manual