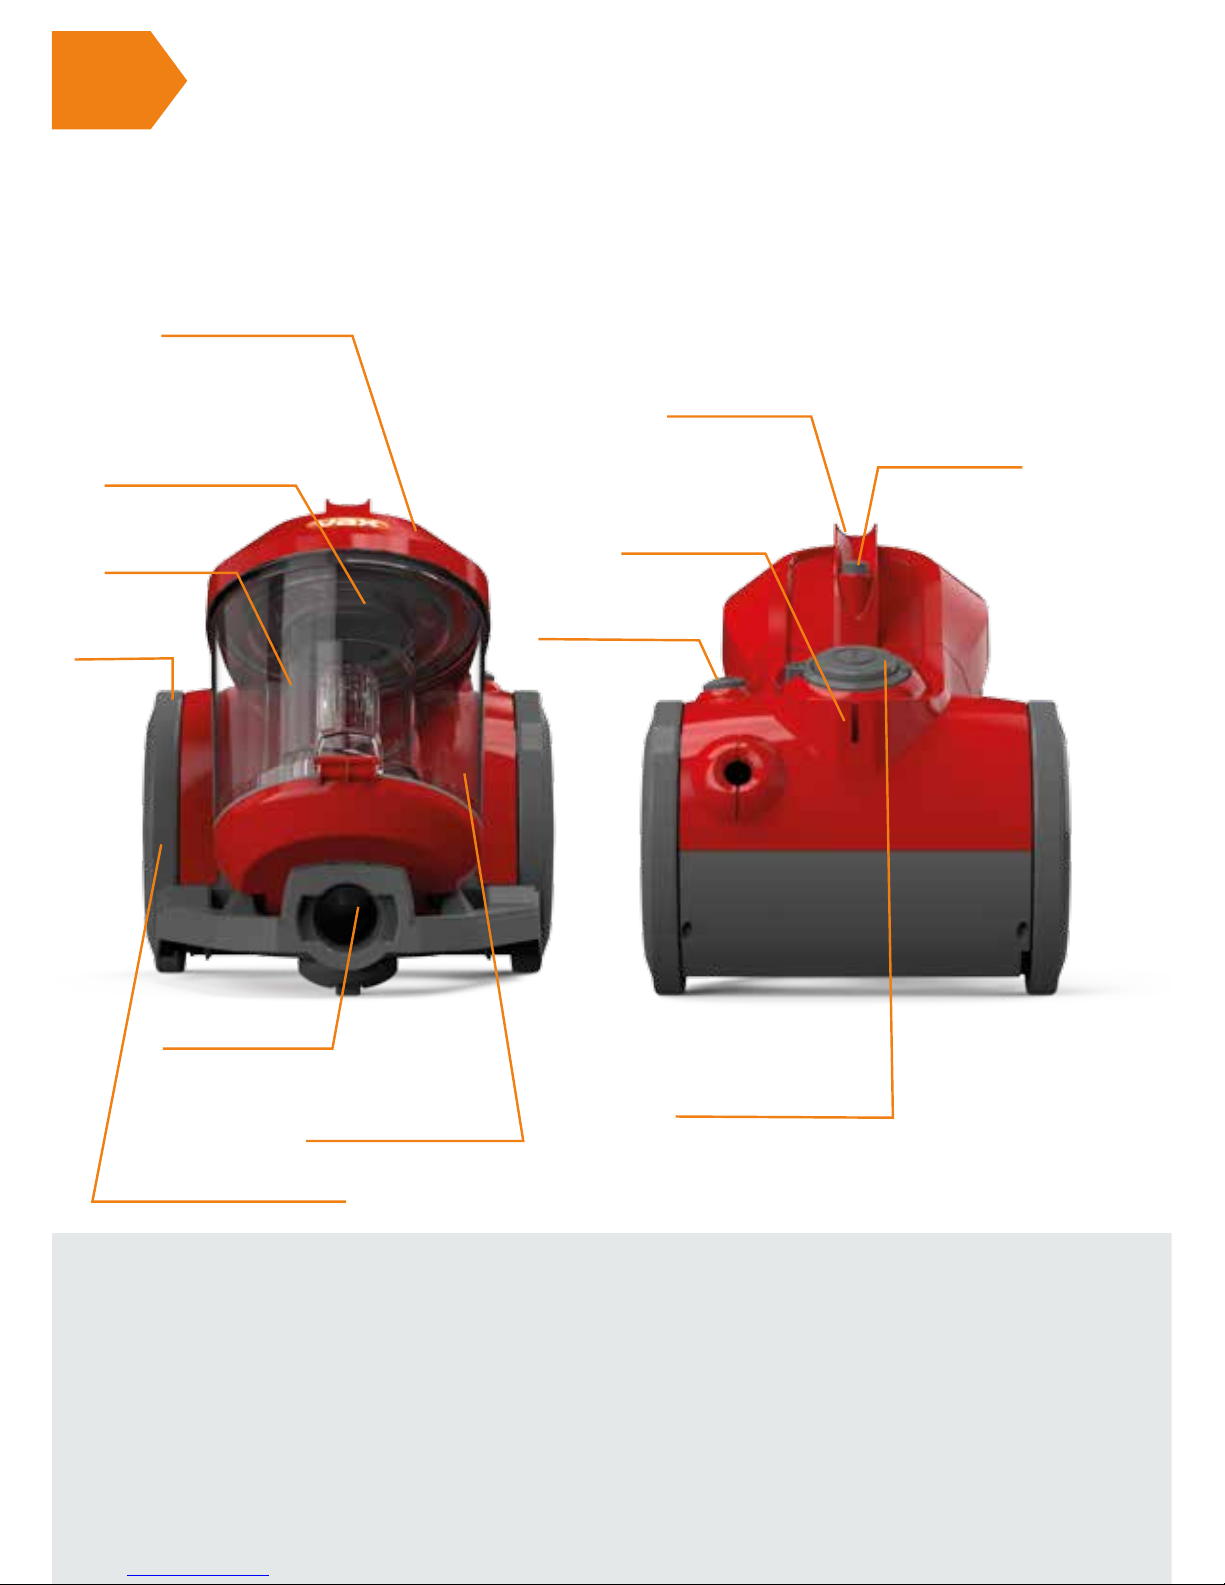
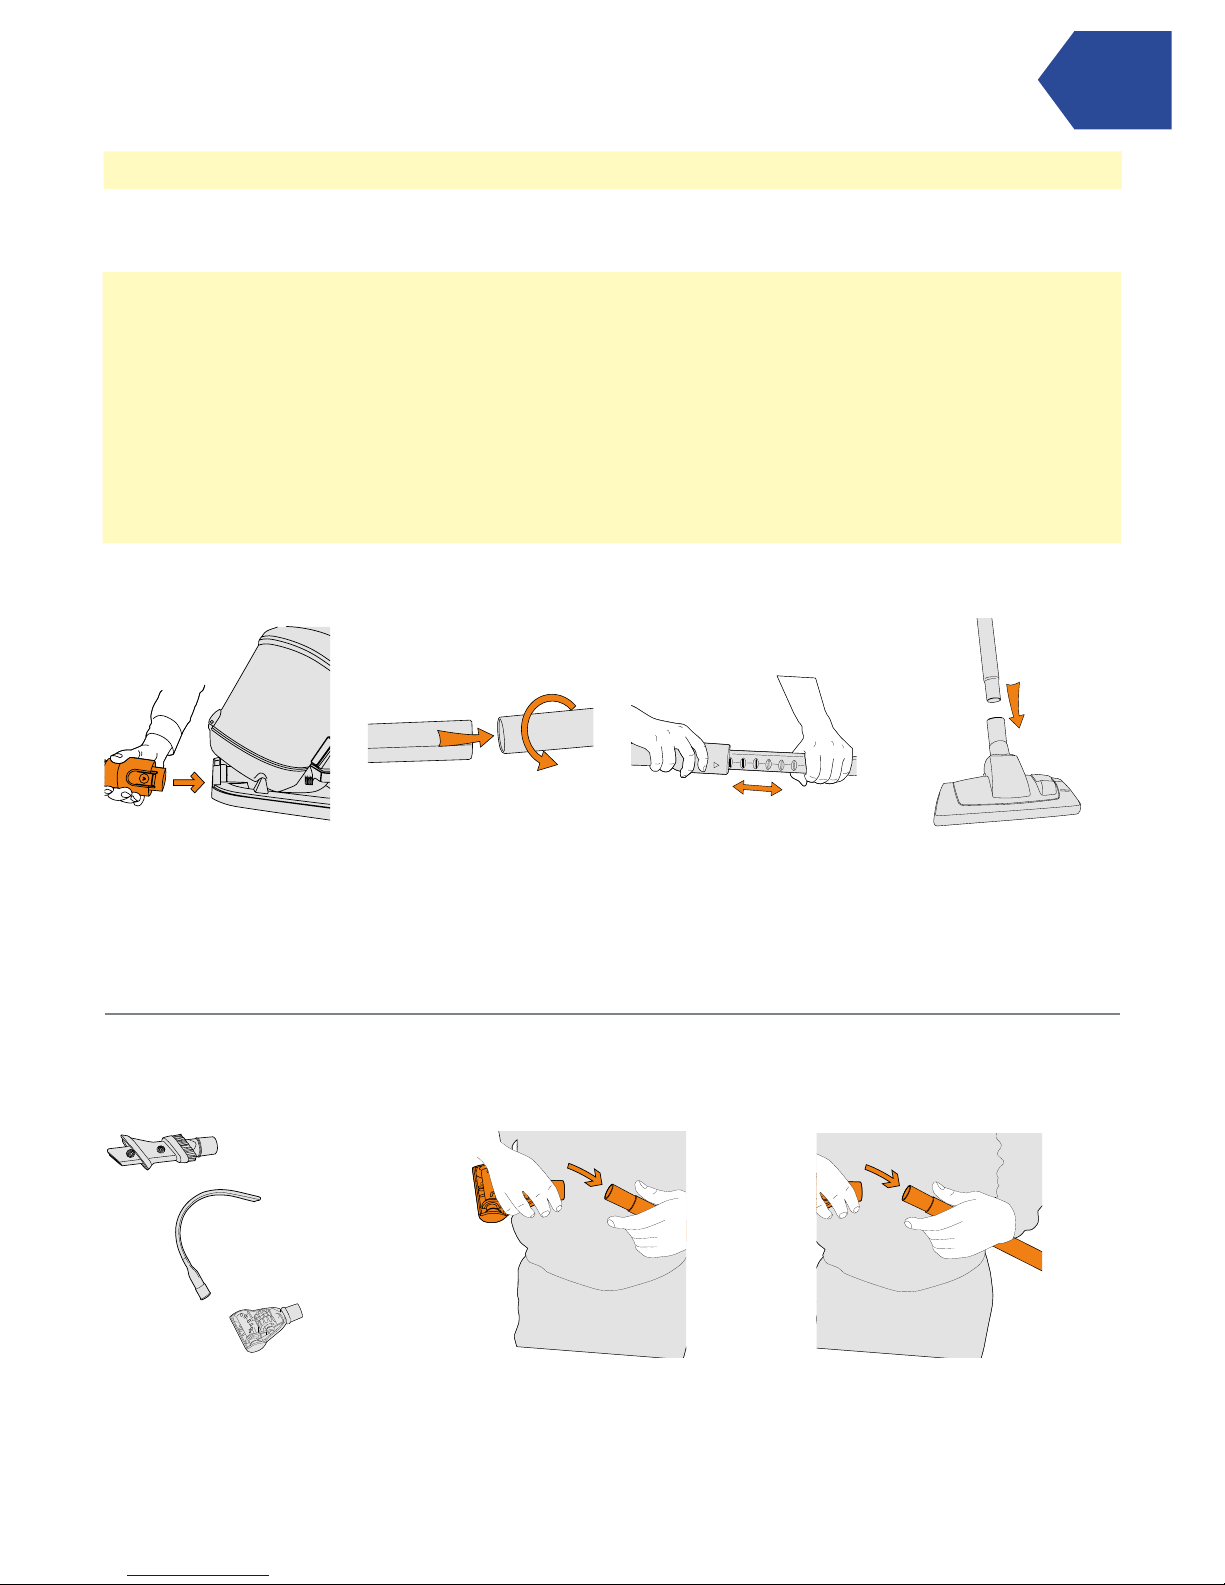
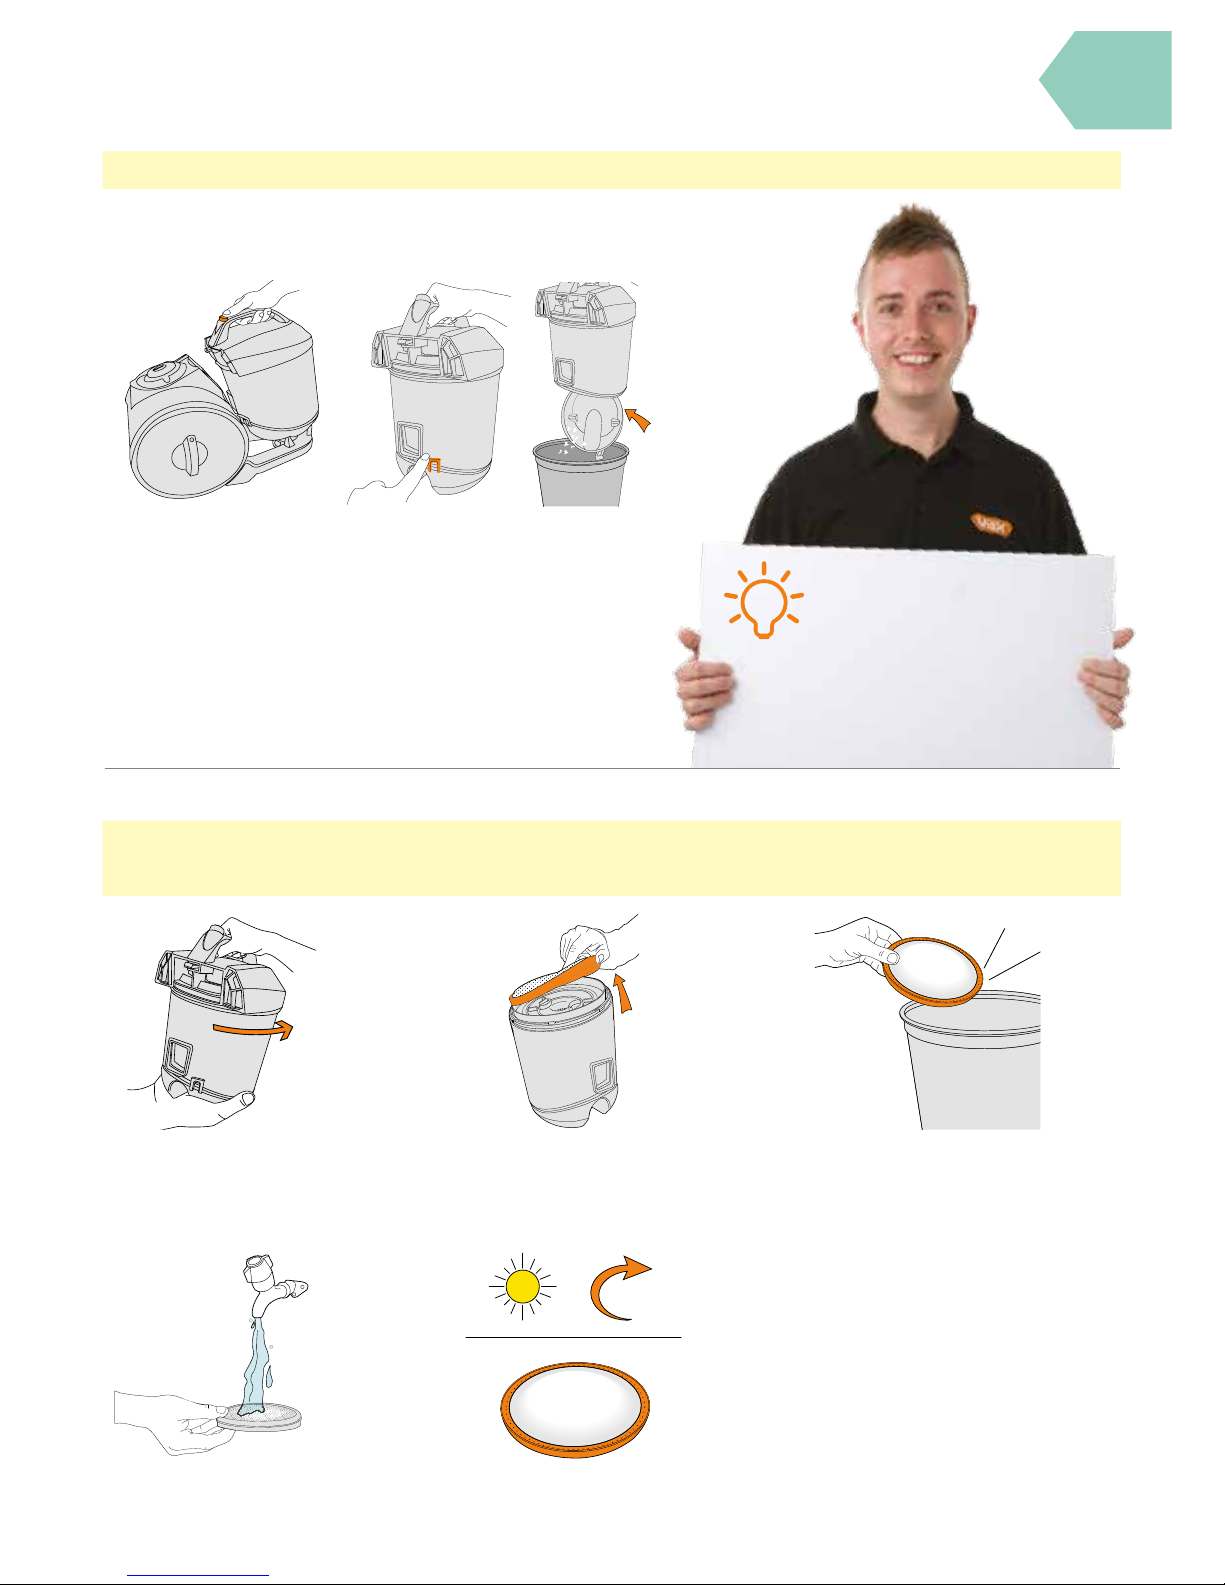
Vax Energise Vibe C85-E2-Be Installation instructions

vax.co.uk
Energise Vibe™
Let’s get started
C85-E2-(Be,Pe,Re)

Let’s talk safety
This vacuum cleaner is intended for household use only and
NOT for commercial or industrial use.
• Only use the vacuum cleaner indoors on dry surfaces and
keep the area you’re cleaning well lit.
• Keep ngers, hair and loose clothing away from moving parts
and openings whilst using the vacuum cleaner.
• This vacuum cleaner can be used by children aged from
8 years and above and persons with reduced physical,
• Don’t use the vacuum cleaner if it has been dropped, damaged
or left outdoors.
• Don’t run over the power cord or use vacuum cleaner if the
power cord or plug is damaged. Please contact our Customer
Care Line on: 0330 026 8455 (Mon-Fri 8:30am to 6:30pm,
Sat 9:00am to 5:00pm).
• Don’t handle the plug or use the vacuum cleaner with wet hands.
• Don’t pull or carry the vacuum cleaner by the power cord.
• Don’t use the power cord as a handle, pull the power cord
around corners, sharp edges or close a door over the power cord.
• Don’t unplug vacuum cleaner by pulling on the power cord.
• Turn o all controls on the vacuum cleaner before
disconnecting or connecting the power cord.
• Always make sure the lters are in place before use.
• Always switch o the vacuum cleaner before disconnecting
or connecting the hose and accessories.
• Keep all openings clear and free from debris as this may
aect the airow/suction.
• Always replace the fuse in the plug with a British 13amp
fuse. Always protect the power cable from heated surfaces
and open ames.
Basic
safety
precautions
Don’ts
Do’s

sensory or mental capabilities or lack of experience and knowledge if they
have been given supervision or instruction concerning use of the vacuum
cleaner in a safe way and understand the hazards involved. Children shall
not play with the vacuum cleaner. Cleaning and user maintenance shall not
be made by children without supervision.
• Only Vax recommended tools and accessories should be used with this
vacuum cleaner.
Please keep instructions for further use.
• Don’t vacuum up any ammable or combustible materials (lighter uid, petrol,
kerosene etc.) or use the vacuum cleaner in an area with explosive vapours
or liquid.
• Don’t vacuum up hot coals, cigarette butts, matches or smoking hot burning
items or use in an area where there may be harmful uids (chlorine, bleach,
and ammonia drain cleaner).
• Don’t attempt to remove blockages with sharp objects as this may cause
damage to the vacuum cleaner.
• Don’t vacuum up hard or sharp objects such as glass, nails, screws
or coins etc.
• Don’t use the vacuum cleaner with incorrect voltage as this may result in
damage or injury to the user. The correct voltage is listed on the ratings label.
• Take extra care when positioning and using the vacuum cleaner
on the stairs.
• Use only CE approved 13amp extension cords, non-approved extension
cords may overheat. Care should be taken to arrange the extension cord
as it can be a trip hazard.
• Store the vacuum cleaner in a cool, dry area. If lters have been cleaned
as per user guide instructions ensure they are thoroughly dry before
storing away.

Thank you for buying this Energise Vibe™ product.
Taking care of your carpets and hard oors
The Energise Vibe™ product is designed to make vacuuming carpets and hard oors regularly,
as eective and ecient as possible and this user guide will help you get the most out of
your machine.
Maintaining your carpets and hard oors will ensure they keep their appearance for longer.
You’ve chosen the carpets and hard oors for your home for a reason and Vax will help you take
good care of them.
Taking care of your Energise Vibe™ product
Also inside this guide are instructions on maintaining your new machine, so that it’s always ready
when you are to tackle your carpets and hard oors.
Let us know what you think @VaxUK
Taking care of you
We’re here if you need us. Instead of taking me back
to the shop, simply visit:
vax.co.uk/support or call:
(UK) 0330 026 8455 (ROI) 1-800 928 308
Monday-Friday 8.30am to 6.30pm, Saturday 9.00am to 5.00pm
Calls are charged at the UK local rate. Please make a note of the serial number and model number
of the product before calling.
Alternatively, you can write to us at:
Vax Ltd. Plot 302, Stonebridge Cross Business Park, Hampton Lovett, Droitwich, WR9 OLW, UK
This User Guide can be found online at: vax.co.uk/support

Contents
Let’s talk safety
Getting to know your machine
Getting started
Using your machine
Taking care of your machine
Let’s talk technical
Accessories
What to do if it goes wrong
Getting in touch
Energise Vibe™
(Included with all models)
Included with
your machine
Initial Setup for normal operation
1. Use the base accessories.
a. Shortest hose
b. Extension tube set to shortest practicable length.
2. Clean lters installed.
3. Dust receptacle empty.
4. All Bleeds must be closed.
5. Floorheads/tools set to Carpet Mode for carpet cleaning.
6. Mechanical Agitation turned ON for carpet cleaning.
7. Floorheads/tools set to Hard Floor Mode for hard oor cleaning.
8. Mechanical Agitation turned OFF for hard oor cleaning.
Combination oorhead
Flexi-crevice tool
Energise Vibe™ Reach
Energise Vibe™ Pet
Hose
Telescopic
extension tube
4.2m accessory
stretch hose
Pre-motor
lter
Tool connector
Post-motor
lter
TurboTool
3-in-1 Tool

Getting to know your machine
Name Energise Vibe™
Voltage See rating label on machine for details
Wattage See rating label on machine for details
Cord Length 5m
Weight 4.3kg
Technical Specication
Subject to technical change without notice.
Filter Kit (Type 95)
1-1-134231-00
Upholstery Tool (type 3)
1-1-132116-00
TurboTool (Type 6)
1-1-134419-00
Crevice Tool (Type 9)
1-3-128633-00
Dusting Brush (Type 5)
1-9-127512-00
Hard Floor Tool (Type 3)*
1-1-135705-00
Accessories & Consumables
*To purchase consumables and accessories, please visit vax.co.uk
On/O button
Dirt container lid
Dirt container
Separator
and shroud
Carry handle
Hose entry point
Dirt container
release button
Parking slot
Dirt container release
button (hidden)
Post-motor
lter cover
Post-motor lter (hidden)
Cord rewind button

*To purchase consumables and accessories, please visit vax.co.uk
Getting started
Assembling your vacuum cleaner
Using your accessories
Before you begin cleaning
PLEASE READ ‘LET’S TALK SAFETY’ AT THE BEGINNING BEFORE USE
CAUTION: Always switch o the vacuum cleaner before connecting or disconnecting the hose/attachments, or
removing and emptying the dirt container.
IMPORTANT: The vacuum cleaner is equipped with a thermal cut-out. If for any reason the vacuum cleaner does
overheat the thermostat will automatically turn the vacuum cleaner o. If this happens, switch the vacuum cleaner o
and unplug. Remove and empty the dirt container also check the vacuum cleaner for blockages. Allow the vacuum
cleaner to cool for approximately 1 hour (if you have cleaned the lters please wait 24 hours for the lters to fully dry
before putting back into the machine).
Clean the pre-motor lter every time the dirt container is emptied and replace the post-motor lter every 12 months.
If the vacuum cleaner is blocked, switch o and unplug before removing the blockage.
Press both buttons at the
end of hose and insert into
hose entry point.
Insert the other end of
the telescopic tube into
the oorhead.
Insert hose grip into
telescopic extension tube.
Press button on telescopic
extension tube and adjust
to required length.
Push the accessory onto
the telescopic extension
tube or hose end.
For some tools you may
need to use the tool
connector if it does
not t.
Choose an accessory.

IMPORTANT: The base of the vacuum cleaner should always be positioned at on the oor when starting and in use.
The dirt container should be locked into place before lifting the vacuum cleaner by the carry handle.
IMPORTANT: The power cord must always be completely unwound, do not pull further than the yellow marker.
Using your machine
Operating the appliance and accessories
Unwind the power cord.
Do not pull further than
the yellow marker.
Plug into mains and press
the On/O button to switch
the machine on.
For use on carpets, click
rocker switch forward.
For use on hard oors
click rocker switch back.
Slide vent cover on hose grip open
to reduce suction if required.
Lower brushes for hard oors.Raise brushes for carpets.
Brushes on the oorhead
should be visible when
using on hard oors.
TIP

Turn the dirt container
lid anti-clockwise
to remove.
Wash pre-motor lter
under running water.
Lift to remove the
pre-motor lter out
of dirt container.
Tap the lter against a bin
to remove excess debris.
Leave to dry for 24 hours or
until fully dry before placing
back in the machine.
Using your machine
Taking care of your machine
MAX
40˚C
TAP
24hr
Emptying and cleaning the dirt container
Cleaning the pre-motor lter
Hold dirt container over the bin.
Press release clip at the bottom
of the container, the dirt release
door will open allowing dirt/debris
to fall out.
Press dirt container
release button. Lift to
remove dirt container
from machine.
IMPORTANT: Unplug and switch o vacuum cleaner before performing maintenance or troubleshooting checks.
NOTE: Clean the pre-motor lter every time the dirt container is emptied and replace the lters every 12 months.
Filters available at www.vax.co.uk
Don’t over ll the dirt container to
avoid blocking the air ow through
the vacuum cleaner.
Slide vent cover on hose grip open
to reduce suction if required.
TIP

Cleaning the shroud
Taking care of your machine
Turn the dirt container
lid anti-clockwise.
to remove.
Tap the separator
against a bin to
remove any dirt
or debris.
Using central grips lift
to remove separator
from dirt container.
Line up lugs on separator
cap with separator.
Twist grips anti-clockwise
to lock into place.
Lift to remove the
pre-motor lter out
of dirt container.
Line up lugs on separator with lugs on dirt
container rim. Make sure the rectangular hole
in the dirt container lines up with the rectangular
hole on the separator.
Twist grips clockwise
and remove cap
from separator.
T
AP
IMPORTANT: Incorrect tting of the shroud and separator will reduce suction.
For any stubborn dirt/debris remaining
in the shroud or separator use a soft
brush to remove.
Retting separator and shroud
TIP

Taking care of your machine
Turn the post-motor lter
cover anti-clockwise
to remove.
Line up the lter cover tabs with the wheel and turn
clockwise. The lter cover will be locked into place
when the centre trim is in the horizontal position.
Check the post-motor lter
for discolouration.
Unplug from the mains
and hold the cord rewind
button in, the cord
will retract into the
vacuum cleaner.
Pull to remove
post-motor lter.
Place oorhead into
parking slot located at
back of vacuum cleaner
for storage and carrying.
Push post-motor lter into
wheel and re-t.
Post-motor lter maintenance
Storing your vacuum cleaner
!
40˚C
MAX
24hr
CAUTION: Make sure to hold the cord with your other hand to prevent injury when re-winding.
IMPORTANT: The exhaust lter is designed to oer long life with no maintenance. The lter should be checked
periodically and when heavily discoloured it should be replaced. Please do not wash, scrub or brush the lter as
this will damage the delicate lter media.

Let’s talk technical
Removing blockages from the TurboTool (some models only)
Remove the hose from the vacuum
cleaner and telescopic extension tube.
Insert a broom handle or similar
blunt instrument into the hose
to remove blockage.
Removing a blockage from the hose
Slide the locking ring
to remove.
Lift and separate
the housing.
Using a pair of scissors,
remove any threads
or hair caught around
the brushbar.
Line up the tabs on front of
housing and push together
to ret. Slide locking ring
into groove to secure.
Tabs

Accessories
Don’t forget your accessories!
Order at: www.vax.co.uk/spares-and-solutions
Pro Cleaning Kit (Type 2)
1-1-133326-00
All our best tools all in one kit that makes cleaning
your home quicker, easier and with even better results.
We’ve taken care of cleaning all of the hard to reach
areas such as on top of cupboards and in between
blinds to the dust that collates behind and
within the radiator.
TurboTool (Type 6)
1-1-134419-00
Use the TurboTool for vacuuming your stairs, upholstery
and car interiors. It’s great for picking up stubborn pet hair.
Fur ‘n’ Flu Tool
1-1-131392-00
Specically designed to remove extra stubborn
pet hair from upholstery, furniture and carpets.

• Check the ‘This pack contains’ panel on the box to make sure
the part is included with your vacuum cleaner.
• The dirt container may not be correctly tted, remove the dirt container
from the vacuum cleaner and check it’s assembled correctly, ret
ensuring it’s locked into place.
• The shroud is blocked. Go to ‘Taking care of your machine’.
• The separator and shroud are incorrectly tted. Go to ‘Taking care
of your machine’.
• The lter may be clogged, clean the lter. Go to ‘Taking care
of your machine’.
• The dirt container may be blocked, empty the dirt container.
Go to ‘Taking care of your machine’.
• There may be a blockage in the hose/tube. Disconnect from the vacuum
cleaner and carefully remove any blockages. Go to ‘Let’s talk technical’.
• The lters may be clogged, clean the lter. Go to ‘Taking care
of your machine’.
• The plug may not be fully pushed into the electrical socket.
• Check the fuse in the plug if this needs replacing, always replace with
a 13amp fuse.
• The motor thermostat may have tripped. If this has happened, unplug
the vacuum cleaner. Remove and empty the dirt container and check
the hose for blockages. Clean the lters and allow the vacuum cleaner
to cool for approximately 1 hour (if you have washed the lters you will
need to wait 24 hours for the lters to fully dry before putting them back
into the vacuum cleaner).
SolutionProblem
CAUTION: To reduce the risk of personal injury, unplug the vacuum cleaner before performing maintenance
/troubleshooting checks.
What to do if it goes wrong
Is there an accessory
missing?
Why won’t the vacuum
cleaner pick up?
Why does my vacuum
cleaner have no power?
Why is dust escaping
from the vacuum?

* Calls are charged at the UK local rate. Please make a note of the serial number and model number of the product before calling.
†Registration required. Terms and conditions apply, see vax.co.uk for details.
†
Getting in touch

Vax Ltd., 5th Floor 2 Colmore Square, 38 Colmore Circus, Queensway, Birmingham, B4 6BN, UK
EEC Statement of Compliance: Manufacturer/EEC importer: Vax Limited, hereby on our own responsibility,
declare that the C85-E2-(Be,Pe,Re) series is manufactured in compliance with the following Directives:
Safety: 2006/95/EC Low Voltage Directive. EMC: 2004/108/EC Electromagnetic Compatibility Directive.
Waste electrical products should not be disposed of with household waste. Please recycle where facilities exist.
Check with your Local Authority or retailer for recycling advice.
@VaxUK
© 2014 All rights reserved. VAX®, VAX Lozenge are trade marks or registered trade marks of Techtronic Floor Care Technology Ltd.
This manual suits for next models
2
Table of contents
Other Vax Vacuum Cleaner manuals

Vax
Vax V-118 User manual

Vax
Vax Astrata V-107APP User manual

Vax
Vax Edge Pet & Car CLUP-EGKS User manual

Vax
Vax Mach Air U91-MA series User manual

Vax
Vax Power7 VCP7P2400 User manual

Vax
Vax Mach 8 User manual

Vax
Vax X3 User manual

Vax
Vax Silence 420 User manual

Vax
Vax Mach Air SERIES User manual

Vax
Vax C91-MX SERIES User manual

Vax
Vax GATOR VGH108V User manual

Vax
Vax Power 7 SERIES User manual

Vax
Vax U85-ACLG-B-E User manual

Vax
Vax Rapide Plus 5140 Product information sheet

Vax
Vax Performance C91-PF Series User manual

Vax
Vax V-044B Series User manual

Vax
Vax SLIDER V-016 User manual

Vax
Vax Powermax VRS6W User manual

Vax
Vax U85-ACLG-BA User manual

Vax
Vax KONE K-001 User manual