CLI120FV
RECARGABLE DE LITIO DE 120 PSI
COMPRESOR DE AIRE
CON INDICADOR DIGITAL
MANUAL DE INSTRUCCIONES
6
2
1
5
7
4
10 11 12
3
4
8 9
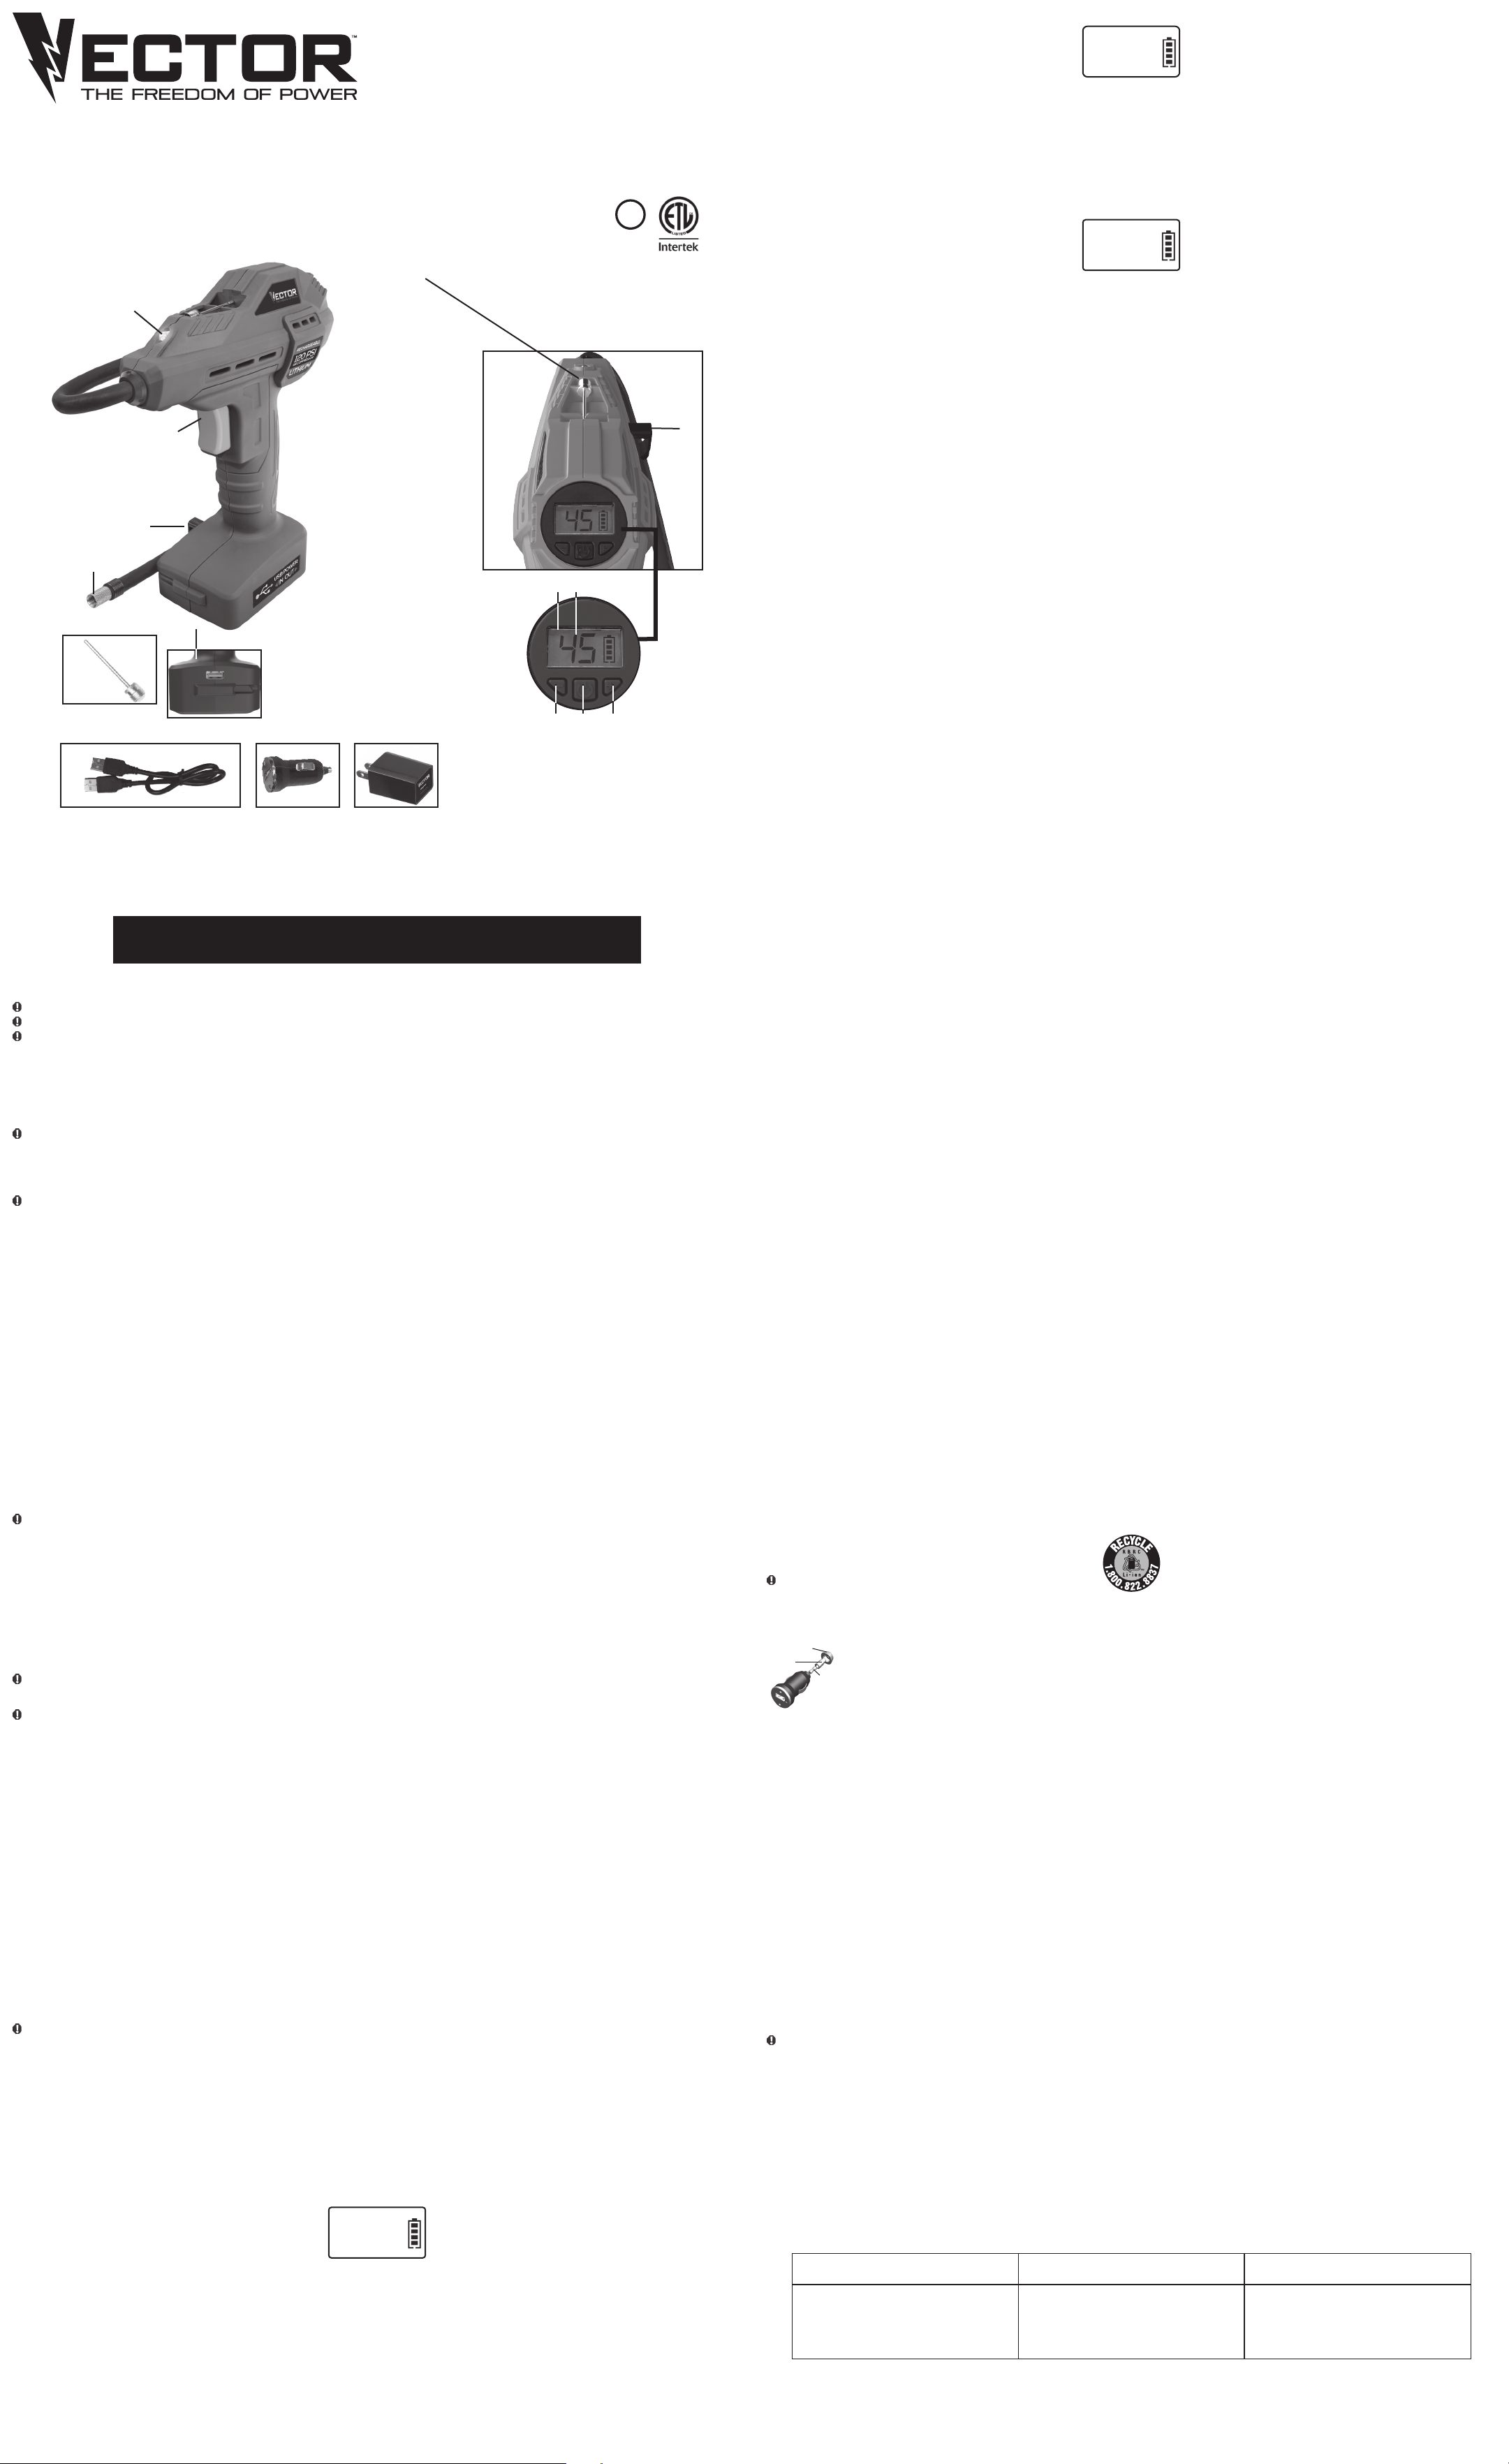
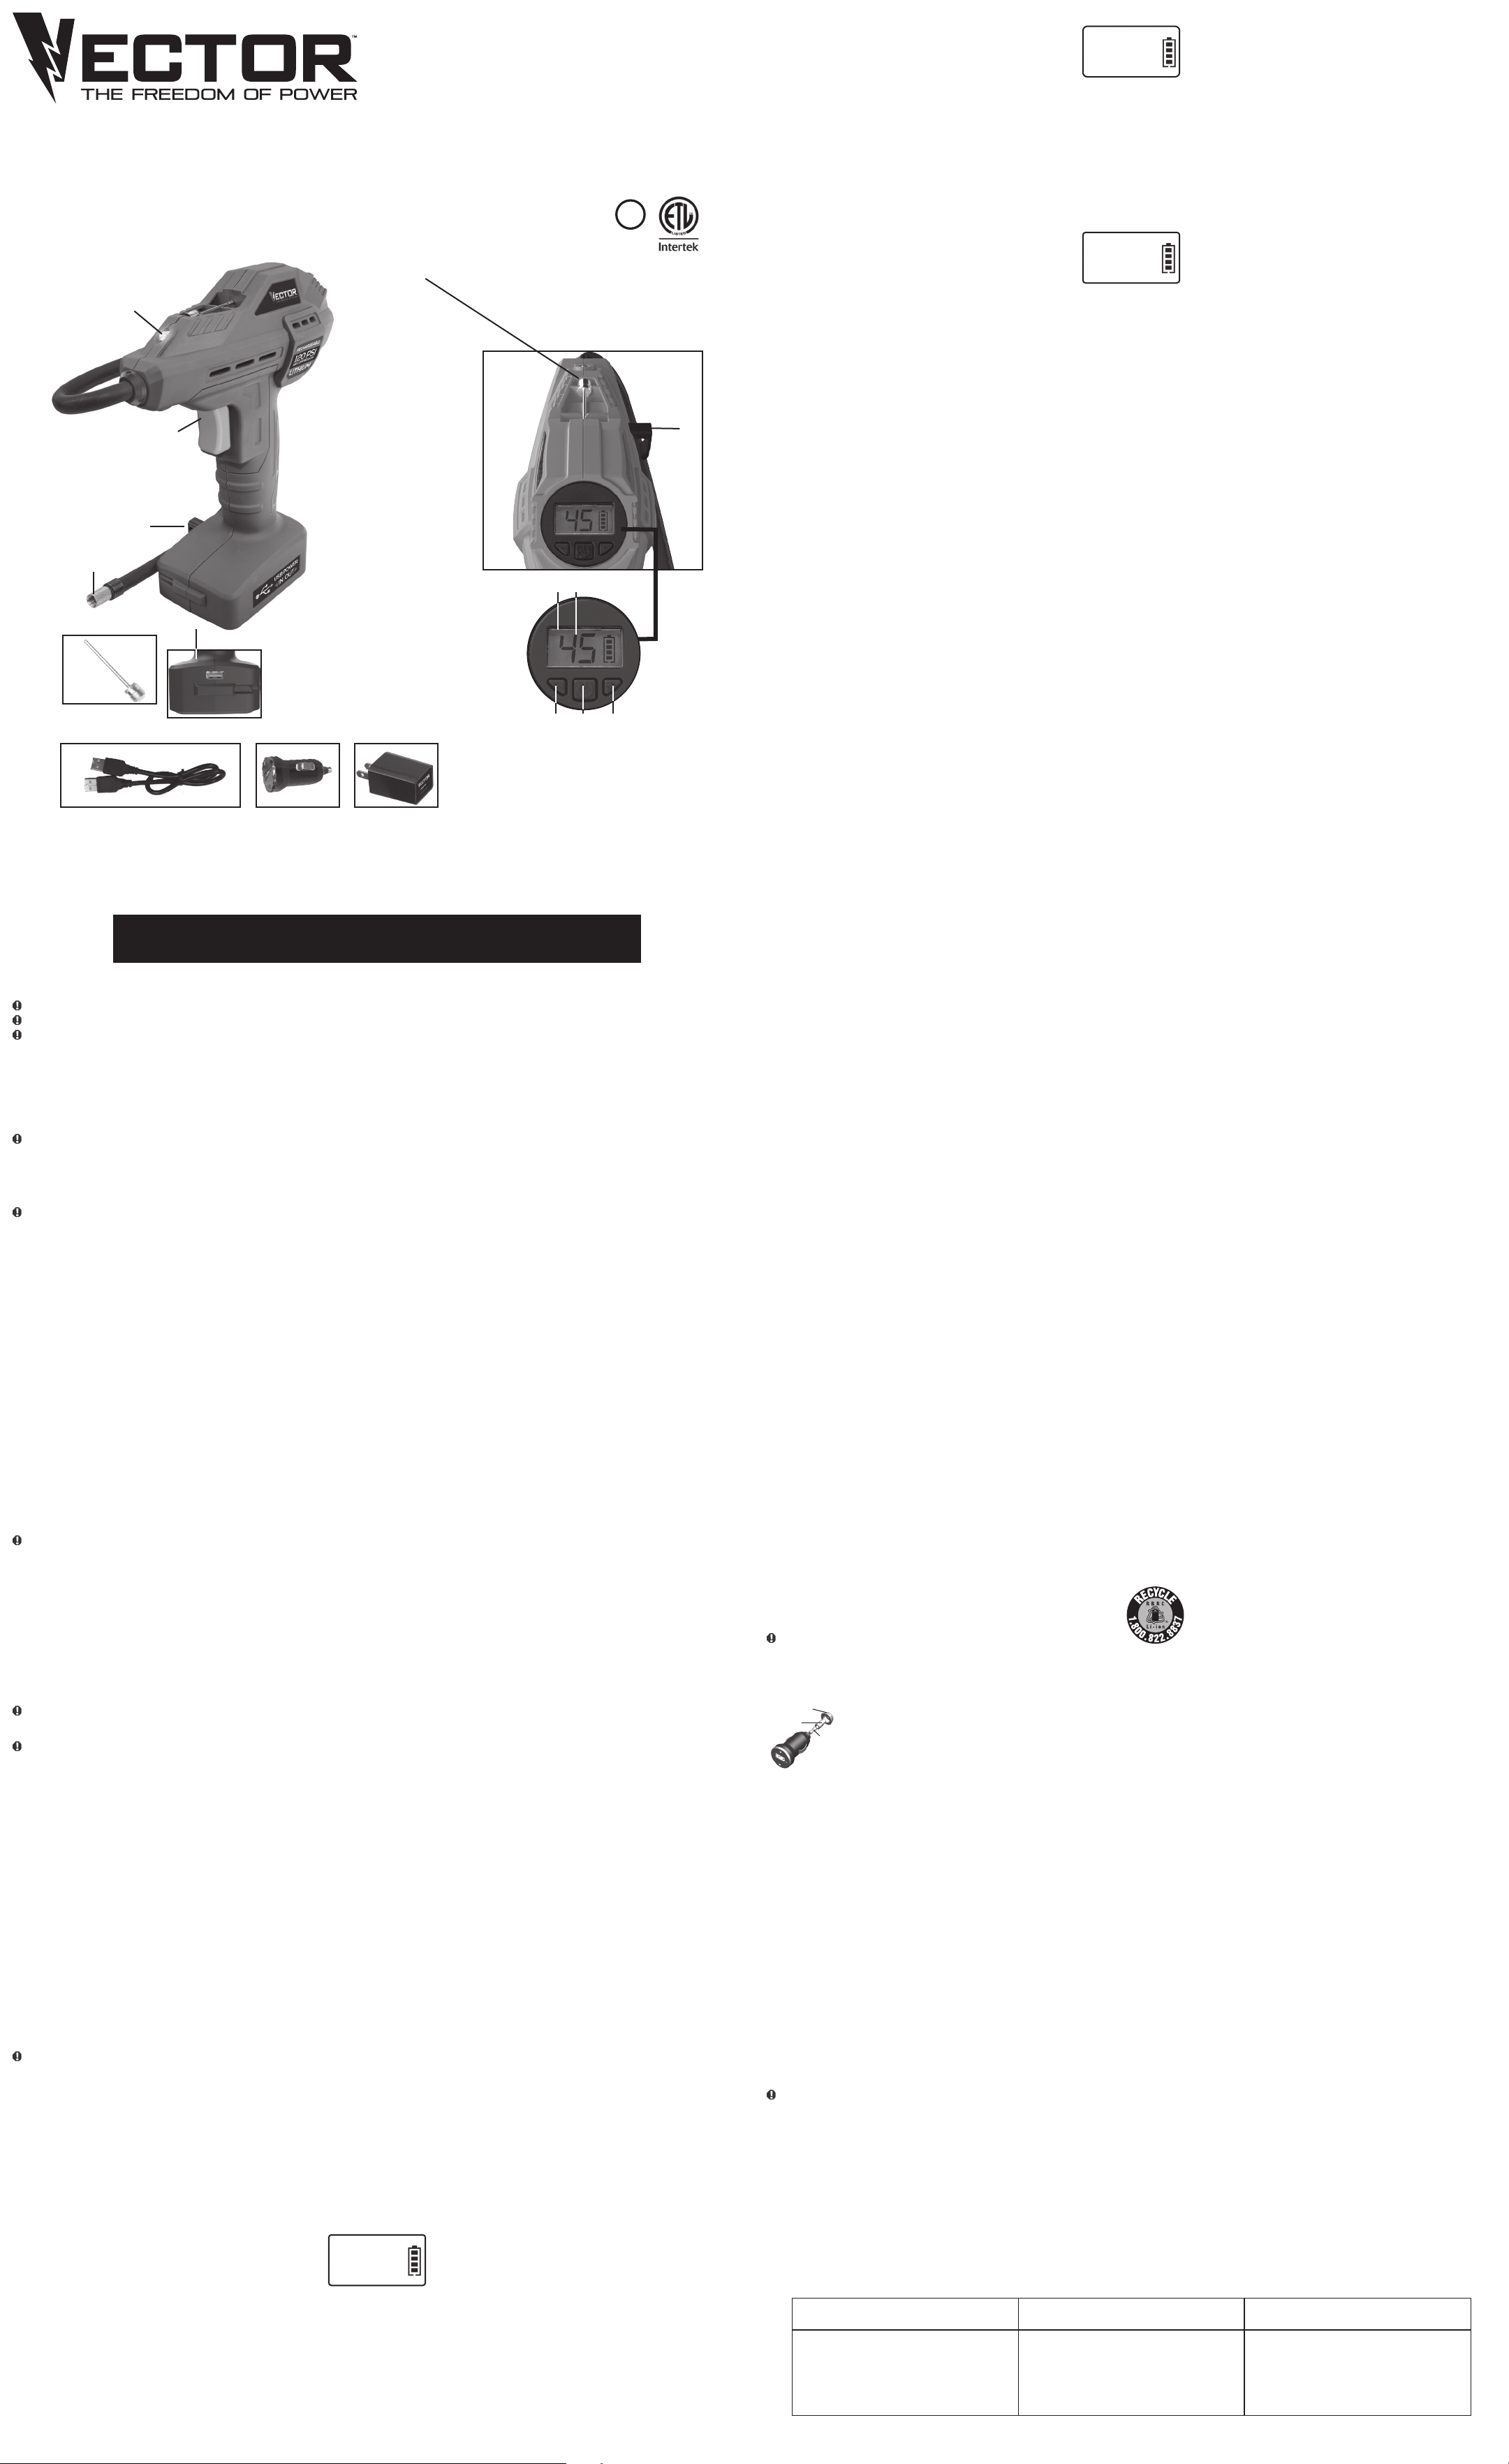
FUNCIÓN
1. Luz de área LED
2. Compartimento de
almacenamiento del adaptador
de boquilla
3. Gatillo del compresor
4. Clips de almacenamiento
5. Manguera de aire y boquilla
SureFit®
6. Adaptador de boquilla
7. Puerto USB-A
8. Pantalla LCD
9. Pantalla digital (valor de
presión PSI)
10. Botón de control de
disminución de presión (–)
11. Botón de encendido
12. Botón de control de aumento
de presión (+)
13. Cable de carga USB (para uso
con adaptadores de carga
de 120 voltios AC/USB y 12
voltios DC/USB)
14. Adaptador de carga de CC/
USB de 12 voltios (accesorio
opcional)
15. Adaptador de carga USB/
CA de 120 voltios (accesorio
opcional)
GUARDE ESTE MANUAL DE INSTRUCCIONES PARA FUTURAS CONSULTAS.
© 2022 Baccus Global LLC, Boca Raton, FL 33487 1-877-571-2391
DIRECTRICES DE SEGURIDAD/DEFINICIONES
PELIGRO: Indica una situación de peligro inminente que, si no se evita, provocará la muerte o lesiones graves.
ADVERTENCIA: Indica una situación potencialmente peligrosa que, si no se evita, podría provocar la muerte o lesiones graves.
PRECAUCIÓN: Indica una situación potencialmente peligrosa que, si no se evita, puede provocar lesiones leves o moderadas.
PRECAUCIÓN: Usado sin el símbolo de alerta de seguridad indica una situación potencialmente peligrosa que, si no se evita, puede provocar daños a la propiedad.
RIESGO DE FUNCIONAMIENTO INSEGURO. Al usar herramientas o equipos, siempre se deben seguir las precauciones básicas de seguridad para reducir el riesgo de lesiones personales. La
operación, el mantenimiento o la modificación inadecuados de herramientas o equipos pueden provocar lesiones graves y daños a la propiedad. Hay ciertas aplicaciones para las cuales se diseñan herramientas
y equipos. El fabricante recomienda encarecidamente que este producto NO se modifique ni se utilice para ninguna otra aplicación que no sea para la que fue diseñado. Lea y comprenda todas las advertencias
e instrucciones de operación antes de usar cualquier herramienta o equipo.
LEE TODAS LAS INSTRUCCIONES
ADVERTENCIA: Lea y comprenda este manual de instrucciones antes de usar esta unidad. Si no se siguen todas las instrucciones enumeradas a continuación, se pueden producir descargas
eléctricas, incendios y/o lesiones graves.
INSTRUCCIONES DE SEGURIDAD IMPORTANTES
INSTRUCCIONES DE SEGURIDAD ESPECÍFICAS PARA BATERÍAS DE LITIO
ADVERTENCIA – Para reducir el riesgo de incendio, descarga eléctrica, peligro de explosión o lesiones a personas o propiedades: Las baterías de litio son pequeñas, compactas e ideales para
proporcionar energía de larga duración a esta unidad. Sin embargo, deben usarse y cargarse correctamente. El uso inadecuado puede provocar lesiones graves, incendios o la muerte.
•Las baterías de litio pueden explotar en presencia de una fuente de ignición. No utilice el producto en presencia de una llama abierta.
•No coloque esta unidad alimentada por batería de litio en el fuego ni le aplique calor.
•No someta esta unidad alimentada por batería de litio a fuertes impactos o golpes. La batería de esta unidad contiene dispositivos de seguridad y protección que, si se dañan, pueden provocar que la batería
genere calor, se rompa o se encienda.
•No use esta unidad si está dañada de alguna manera.
•No exponga esta unidad alimentada por batería de litio al agua o al agua salada, ni permita que la batería se moje.
•Evite almacenar esta unidad alimentada por batería de litio en el sótano, el baño u otras áreas de la casa que estén o puedan estar mojadas o húmedas o donde la humedad pueda concentrarse.
•No deje esta unidad alimentada por batería de litio expuesta a la luz solar directa, ni la use o almacene dentro de automóviles en climas cálidos. Si lo hace, la batería podría generar calor, romperse o encenderse.
El uso de la batería de esta manera también puede provocar una pérdida de rendimiento y una esperanza de vida más corta.
•Nunca cargue esta unidad cerca del calor o de objetos inflamables.
•¡NUNCA ECHE AGUA SOBRE UNA BATERÍA DE LITIO ARDIENTE! Si una batería de litio se incendia, se quemará aún más violentamente si entra en contacto con agua o incluso con la humedad del
aire. Se debe utilizar un extintor de incendios.
Carga y capacidad de la batería
Esta unidad se entrega parcialmente cargada; debe cargarla completamente antes de usarla por primera vez.
Cuando se almacenan a temperatura ambiente con una carga completa, las baterías de litio comenzarán a descargarse desde el momento en que se fabrican, incluso cuando no se usan. Las descargas
profundas también disminuyen su capacidad. La vida útil de la batería se puede extender de la siguiente manera:
•Cargue la batería a su máxima capacidad antes de guardarla.
•Almacene esta unidad a temperaturas entre 5 °C y 20 °C (41 °F y 68 °F).
•Nunca descargue la batería por completo.
•Cargue después de cada uso.
•Cargue siempre al menos una vez cada 3 a 6 meses si no se usa con frecuencia para evitar una descarga excesiva.
TRANSPORTE DE BATERÍAS DE LITIO
•Compruebe siempre todas las normativas locales, nacionales e internacionales aplicables antes de transportar una unidad que contenga una batería de litio.
•El transporte de una batería al final de su vida útil, dañada o retirada del mercado puede, en ciertos casos, estar específicamente limitado o prohibido.
ADVERTENCIAS E INSTRUCCIONES GENERALES DE SEGURIDAD
•Esta unidad fue diseñada para uso doméstico únicamente.
ADVERTENCIA – Riesgo de incendio, descarga eléctrica, peligro de explosión o lesiones personales o materiales:
•Evita los ambientes peligrosos. No use electrodomésticos en lugares húmedos o mojados. No use electrodomésticos bajo la lluvia.
•Mantenga a los niños alejados. Todos los visitantes deben mantenerse a una distancia del área de trabajo.
•Guarde el aparato inactivo en el interior. Cuando no estén en uso, los electrodomésticos deben guardarse bajo techo en un lugar seco, alto o bajo llave, fuera del alcance de los niños.
•Desconecte los electrodomésticos. Desconecte el aparato de la fuente de alimentación cuando no esté en uso, antes de darle servicio y cuando cambie accesorios.
•Uso de accesorios y aditamentos. El uso de cualquier accesorio o aditamento no recomendado para usar con este aparato podría ser peligroso. Consulte la sección de accesorios de este manual para obtener
más detalles.
•Manténgase alerta. Usa el sentido común. No opere este equipo cuando esté cansado o incapacitado.
•Compruebe si hay piezas dañadas. Cualquier pieza que esté dañada debe ser reemplazada por el fabricante antes de su uso posterior. No use la herramienta si el interruptor no la enciende y apaga. Comuníquese
con el fabricante al 1-877-571-2391 para obtener más información.
•No opere este aparato cerca de líquidos inflamables o en atmósferas gaseosas o explosivas. Los motores de estas herramientas normalmente encienden chispas y las chispas pueden encender los humos.
•Nunca cubra la unidad mientras está en funcionamiento.
•Desconecte la unidad de cualquier fuente de alimentación antes de intentar el mantenimiento o la limpieza.
•Riesgo de incendio y quemaduras, no abra, aplaste, caliente a más de 60˚C ni incinere la unidad. Siga el manual de instrucciones.
INSTRUCCIONES DE SEGURIDAD ESPECÍFICAS PARA INFLADORES
ADVERTENCIA – Peligro de explosión:
•Siga cuidadosamente las instrucciones de los artículos que se van a inflar. Nunca exceda las presiones recomendadas. Los artículos reventados pueden causar lesiones graves.
•Controle siempre la presión en la pantalla LCD.
PRECAUCIÓN – Para reducir el riesgo de lesiones o daños a la propiedad:
•Nunca deje el inflador desatendido mientras está en uso.
•El Inflador es capaz de inflar a una presión de 120 libras por pulgada cuadrada (PSI). Siga las instrucciones de la sección “Inflador portátil”.
•Cuando no esté en uso, siempre apague el inflador.
•Para evitar daños en la manguera, asegure la manguera del inflador y la boquilla Sure Fit® con los clips de almacenamiento después de cada uso.
•Siempre permita que la unidad se enfríe antes de guardarla.
INSTRUCCIONES RELATIVAS A LOS PUERTOS USB
• IMPORTANTE: algunos dispositivos electrónicos domésticos alimentados por USB no funcionarán con los puertos USB proporcionados con este dispositivo. Consulte el manual del dispositivo electrónico
correspondiente para confirmar que se puede utilizar con este tipo de puerto USB.
• Los puertos USB no admiten la comunicación de datos. Solo proporcionan alimentación a un dispositivo externo alimentado por USB (5 V CC/2,4 A mediante el puerto USB de la unidad, o 5 V CC/2 A mediante
el puerto USB del adaptador de carga CA/USB o el adaptador de carga CC/USB). Asegúrese de que la clasificación del equipo conectado al puerto USB no exceda el amperaje indicado.
•Siempre conecte el adaptador de carga adecuado a la fuente de alimentación de 120 voltios CA o 12 voltios CC antes de conectar cualquier dispositivo.
•No conecte concentradores USB que permitan la conexión de varios dispositivos electrónicos personales a cualquiera de los puertos USB de los adaptadores de carga.
FIRST AID
LCD liquid crystal display: If liquid crystal comes in contact with your skin: Wash area off completely with plenty of water. Remove contaminated clothing. If liquid crystal gets into your eye: Flush the affected
eye with clean water and then seek medical attention. If liquid crystal is swallowed: Flush your mouth thoroughly with water. Drink large quantities of water and induce vomiting. Then seek medical attention
CARGANDO / RECARGANDO
Esta unidad se envía en un estado parcialmente cargado. Cargue la unidad después de la compra y ANTES del primer uso y después de cada uso hasta que el ícono de estado de la batería muestre 4 barras
sólidas. Antes de cada uso, verifique el estado de la batería de la unidad en la pantalla LCD:
• Cuatro barras sólidas en el icono de la batería indican que la batería está llena. La unidad está lista para usar.
• Solo una o dos barras sólidas en el icono de la batería indican que el nivel de carga de la batería de la unidad es bajo. En este caso, la batería DEBE recargarse antes de su uso o la protección de bajo voltaje
integrada puede activarse (el icono de batería vacía puede parpadear durante un breve período antes de que se apague automáticamente). Si la unidad se apaga, DEBE recargarse inmediatamente o es posible que
la unidad no se encienda.
IMPORTANTE: Cuando la unidad no está en uso, recomendamos que la batería se cargue al menos cada 3 a 6 meses.
PRECAUCIÓN – PARA EVITAR EL RIESGO DE DAÑO A LA PROPIEDAD: Si no se mantiene la batería cargada, se producirán daños permanentes y se producirá un rendimiento deficiente.
NOTAS:
•Al presionar el botón de encendido durante el proceso de carga, ingresará al modo de inflado y las luces LED.
•Cuando la batería de la unidad esté completamente cargada, el proceso de carga terminará y la unidad se apagará automáticamente.
•Se requiere un USB de 2 A para recargar la unidad (adaptadores de carga de CA y CC de 2 A incluidos).
•Durante el proceso de carga, la unidad dejará de cargar si la batería de la unidad se sobrecalienta debido a un uso prolongado o recarga y/o está demasiado fría. La pantalla LCD retroiluminada parpadea. Se
reanudará automáticamente después de un período de enfriamiento o calentamiento. Deje que la unidad se caliente o se enfríe durante un tiempo antes de reanudar la carga.
•Cargue la unidad únicamente con cargadores listados Clase 2.
CARGA/RECARGA CON EL ADAPTADOR DE CARGA USB/CA DE 120 VOLTIOS
IMPORTANTE: Siempre conecte el adaptador de carga USB/CA de 120 V a la fuente de alimentación de CA de 120 voltios (usando el cable de carga USB) ANTES de conectarlo a la unidad.
1. Asegúrese de mantener presionado el botón de encendido durante un segundo para apagar la unidad (la pantalla LCD no está iluminada).
2. Inserte un extremo del cable de carga USB en el adaptador de carga USB/CA de 120 V.
3. Inserte el adaptador de carga USB/CA de 120 V en un tomacorriente de pared estándar de 120 voltios CA o en una fuente de alimentación de 120 voltios CA que funcione.
4. Inserte el otro extremo del cable de carga USB en el puerto USB de la unidad.
Cuando la unidad está correctamente conectada a una fuente de alimentación de CA, la pantalla LCD retroiluminada mostrará lo siguiente:
Las barras en el ícono de estado de la batería cambiarán de vacío a sólido (de abajo hacia arriba) repetidamente para indicar que la unidad se está cargando. La luz de fondo se encenderá durante 10 segundos (solamente).
5. Cargue durante aproximadamente 6 horas o hasta que la unidad se apague automáticamente.
6. Desenchufe el adaptador de carga USB/CA de 120 V de la fuente de alimentación de CA de 120 voltios y luego desconecte el cable de carga USB del adaptador de carga USB/CA de 120 V y de la unidad.
7. Presione el botón de encendido para encender la unidad. Si el ícono de estado de la batería muestra 4 barras sólidas, la batería de la unidad está completamente cargada.
8. Cuando se complete la carga, guarde el adaptador de carga USB/CA de 120 V y el cable de carga USB en un lugar seguro.
CARGA/RECARGA CON EL ADAPTADOR DE CARGA DE 12 V CC/USB
IMPORTANTE: Siempre conecte el adaptador de carga USB/CC de 12 V a la fuente de alimentación de CC de 12 voltios (usando el cable de carga USB) ANTES de conectarlo a la unidad.
1. Asegúrese de mantener presionado el botón de encendido durante un segundo para apagar la unidad (la pantalla LCD no está iluminada)..
2. Inserte un extremo del cable de carga USB en el adaptador de carga USB/CC de 12 V.
3. Inserte el adaptador de carga USB/CC de 12V en el tomacorriente para accesorios de CC de 12voltios de un vehículo u otra fuente de alimentación de CC de 12voltios que funcione. El indicador LED del
adaptador de carga USB/CC de 12V se iluminará en verde cuando esté conectado correctamente a la fuente de alimentación de CC de 12voltios.
Nota: Algunos vehículos requieren que la ignición se cambie a la posición de salida de accesorios para encender la salida de accesorios.
4. Inserte el otro extremo del cable de carga USB en el puerto USB de la unidad.
Cuando la unidad está correctamente conectada, la pantalla LCD retroiluminada mostrará lo siguiente:
Las barras en el ícono de estado de la batería cambiarán de vacío a sólido (de abajo hacia arriba) repetidamente para indicar que la unidad se está cargando. La luz de fondo se encenderá durante 10 segundos (solamente).
5. Cargue hasta que la unidad se apague automáticamente.
6. Desenchufe el adaptador de carga USB/CC de 12 V de la fuente de alimentación de CC de 12 voltios y luego desconecte el cable de carga USB del adaptador de carga USB/CC de 12 V y la unidad.
7. Presione el botón de encendido para encender la unidad. Si el ícono de estado de la batería muestra 4 barras sólidas, la batería de la unidad está completamente cargada.
8. Cuando se complete la carga, guarde el adaptador de carga de 12 V CC/USB y el cable de carga USB en un lugar seguro.
CARGA/RECARGA MEDIANTE EL CABLE DE CARGA USB Y UN DISPOSITIVO CON UN PUERTO DE ALIMENTACIÓN USB NO
SUMINISTRADO
IMPORTANTE: Siempre conecte el cable de carga USB al puerto de alimentación USB del dispositivo externo ANTES de conectarlo a la unidad. Se requiere una fuente de alimentación USB 2A para recargar la unidad.
1. Asegúrese de mantener presionado el botón de encendido durante un segundo para apagar la unidad.Inserte un extremo del cable de carga USB en el puerto de alimentación USB funcional de un dispositivo
externo.
2. Inserte el otro extremo del cable de carga USB en uno de los dos puertos USB de la unidad.
3. Cuando la unidad está correctamente conectada, la pantalla LCD retroiluminada mostrará lo siguiente:
Las barras en el ícono de estado de la batería cambiarán de vacío a sólido (de abajo hacia arriba) repetidamente para indicar que la unidad se está cargando. La luz de fondo se encenderá durante 10 segundos (solamente).
4. Cargue hasta que la unidad se apague automáticamente.
5. Desconecte el cable de carga USB del puerto de alimentación USB del dispositivo y de la unidad.
6. Presione el botón de encendido para encender la unidad. Si el ícono de estado de la batería muestra 4 barras sólidas, la batería de la unidad está completamente cargada.
7. Cuando se complete la carga, guarde el cable de carga USB en un lugar seguro.
GUARDA ESTAS INSTRUCCIONES
INFLADOR PORTÁTIL
USO DEL INFLADOR EN MODO AUTOMÁTICO
Este inflador recargable de litio fue diseñado para inflar la mayoría de los neumáticos de vehículos, neumáticos de remolques e inflables recreativos. La manguera del inflador con el ajuste de la llanta se
guarda en los clips de almacenamiento al costado de la unidad. Se suministra un adaptador de boquilla y se guarda en el compartimento de almacenamiento del adaptador de boquilla. Consulte la sección
“Características” para ubicar todos los componentes.
El inflador recargable de litio se puede usar en modo automático o modo manual, como se detalla en las siguientes secciones.
IMPORTANTE: Cuando el inflador se opera en el modo manual o a un PSI bajo en el modo automático, la unidad puede comenzar en bajo y acelerar gradualmente. Cuando el inflador se opera a PSI más
altos en modo automático, la unidad puede funcionar normalmente durante varios minutos, luego se acelera durante unos minutos antes de volver a la operación normal. Esta función protege la unidad del
sobrecalentamiento durante el uso normal. En cualquier caso, no haga funcionar el inflador de forma continua durante largos períodos de tiempo (aproximadamente 10 minutos, dependiendo de la temperatura
ambiente), ya que puede sobrecalentarse. Esto podría dañar el inflador. Si el inflador debe funcionar durante períodos más largos: cada 10 minutos, mantenga presionado el botón de encendido durante un
segundo para apagar el inflador, luego vuelva a encenderlo después de un período de enfriamiento de aproximadamente 30 minutos.
Nota: La luz de área LED permanecerá encendida mientras la unidad esté en modo de inflado. En el modo de inflado, si no se realizan más acciones después de 1 minuto, la unidad saldrá del modo de inflado y el USB
permanecerá encendido. La pantalla digital mostrará únicamente el icono de estado de la batería.
Inflado de neumáticos o productos con vástagos de válvula en modo automático
En el modo automático, el valor de presión deseado se puede preestablecer y almacenar en la memoria de la unidad y el inflador se detendrá automáticamente una vez que se alcance esta presión preestablecida.
El botón de encendido enciende y apaga la unidad. El botón de control de aumento de presión (+) y el botón de control de disminución de presión (–) se usan para seleccionar un valor de presión para cuando el
inflador se usa en modo automático. Los tres botones están ubicados en el panel de control en la parte posterior de la unidad (consulte la sección “Características” para ubicarlos).
1. Enrosque la boquilla Sure Fit® en el vástago de la válvula. No apriete demasiado.
2. Presione el botón de encendido para encender la unidad. La unidad está en modo de inflado y la luz del área LED se enciende. El USB también se enciende. La pantalla digital mostrará alternativamente el
valor PSI preestablecido parpadeante (que fue configurado por última vez con los botones de control de presión) durante 2segundos; luego mostrará la presión actual del artículo que se está inflando durante
5 segundos. Así como el icono de estado de la batería.Presione los botones de control de presión para aumentar (+) y disminuir (–) para seleccionar la presión deseada de un rango de valores preestablecidos
(entre 3 y 120), que se mostrará en la pantalla LCD retroiluminada. Mantenga presionado el botón para desplazarse hacia arriba o hacia abajo más rápidamente. Una vez alcanzada la presión deseada, suelte el
Botón y espere dos segundos. La pantalla digital parpadeará la nueva presión seleccionada. Este valor de presión ahora se almacena en la memoria de la unidad hasta que se restablece manualmente.
3. Presione el botón de encendido una vez más para comenzar a inflar. La pantalla digital solo mostrará la presión actual del objeto (que se iluminará sin parpadear) para indicar que el inflador está funcionando.
Controle la presión en la pantalla LCD.
4. Cuando se alcanza la presión preestablecida deseada, el inflador se detendrá automáticamente. Mantenga presionado el botón de encendido durante un segundo para apagar la unidad.
5. Desenrosque y retire la boquilla Sure Fit® del vástago de la válvula.
NOTAS IMPORTANTES SOBRE EL FUNCIONAMIENTO DEL MODO AUTOMÁTICO:
•Para interrumpir el proceso de inflación, presione el botón de encendido una vez. Para reanudar el proceso de inflación, presione el botón de encendido nuevamente.
•No cambie al modo manual cuando la unidad esté funcionando en modo automático o la presión que se muestra en la pantalla puede ser incorrecta.
•Para apagar la unidad en cualquier momento, mantenga presionado el botón de encendido durante un segundo.
•Si ocurre una falla de voltaje de batería baja, la unidad se apagará automáticamente de inmediato, o la pantalla parpadeará el ícono de estado de batería vacío por un período breve antes de que la unidad se apague
automáticamente. La unidad debe recargarse inmediatamente o es posible que no se encienda.
•En cualquier caso, el compresor se apagará automáticamente después de operar continuamente durante 10 minutos.
USO DEL INFLADOR EN MODO MANUAL
Inflado de neumáticos o productos con vástagos de válvula en modo manual
En el modo Manual, el gatillo del inflador en la parte delantera de la unidad se usa para operar el inflador hasta alcanzar el valor de presión deseado.
1. Enrosque la boquilla Sure Fit® en el vástago de la válvula. No apriete demasiado.
2. Presione el botón de encendido para encender la unidad. La unidad está en modo de inflado y la luz del área LED se enciende. El USB también se enciende. La pantalla digital mostrará alternativamente el
valor PSI preestablecido parpadeante (que fue configurado por última vez con los botones de control de presión) durante 2segundos; luego mostrará la presión actual del artículo que se está inflando durante 5
segundos. Así como el icono de estado de la batería.
3. Presione el gatillo del inflador para comenzar el proceso de inflado. La pantalla digital solo mostrará la presión actual del objeto que se iluminará para indicar que el inflador está funcionando. Controle la presión
en la pantalla LCD.
4. Cuando se alcance la presión deseada, suelte el gatillo del inflador y el inflador se detendrá. Mantenga presionado el botón de encendido durante un segundo para apagar la unidad.
5. Desenrosque y retire la boquilla SureFit® del vástago de la válvula.
NOTAS IMPORTANTES SOBRE EL FUNCIONAMIENTO DEL MODO MANUAL:
•Para interrumpir el proceso de inflado, suelte el gatillo del inflador. Para reanudar el proceso de inflado, vuelva a presionar el gatillo del inflador.
•Para cambiar al modo automático, suelte el gatillo del inflador, luego presione los botones de control de presión para aumentar (+) o disminuir (-) para configurar la presión y presione el botón de encendido. (La
unidad no puede cambiar al modo automático mientras se está inflando).
•Para apagar la unidad en cualquier momento, mantenga presionado el botón de encendido durante un segundo.
•Si ocurre una falla de voltaje de batería baja, la unidad se apagará automáticamente de inmediato, o la pantalla parpadeará el ícono de estado de batería vacío por un período breve antes de que la unidad se
apague automáticamente. La unidad debe recargarse inmediatamente o es posible que no se encienda.
Inflado de otros inflables sin vástagos de válvula
El inflado de otros artículos requiere el uso del adaptador de boquilla.
1. Enrosque el adaptador de la boquilla en la boquilla Sure Fit®. No apriete demasiado.
2. Inserte el adaptador de la boquilla en el artículo a inflar.
3. Presione el botón de encendido para encender la unidad. La unidad está en modo de inflado y la luz del área LED se enciende. El USB también se enciende. La pantalla digital mostrará alternativamente el
valor PSI preestablecido parpadeante (que fue configurado por última vez con los botones de control de presión) durante 2segundos; luego mostrará la presión actual del artículo que se está inflando durante 5
segundos. Así como el icono de estado de la batería.
4. Siga los pasos 4 a 6 en la sección “Inflado de neumáticos o productos con vástagos de válvula en modo automático” o los pasos 4 a 5 en la sección “Inflado de neumáticos o productos con vástagos de
válvula en modo manual”.
NOTA IMPORTANTE:
Los artículos pequeños como balones de voleibol, fútbol, etc. se inflan muy rápidamente. No infle demasiado.
5. Desconecte el adaptador de la boquilla del artículo inflado.
6. Desenrosque y retire el adaptador de la boquilla de la boquilla Sure Fit®.
IMPORTANTE: Si la batería de la unidad se sobrecalienta (debido a un uso prolongado o recarga) o está demasiado fría (la temperatura ambiente ha descendido por debajo de –20 °C), el inflador y la luz del
área se apagan automáticamente de inmediato. La pantalla LCD retroiluminada parpadea durante un minuto antes de que la unidad se apague automáticamente.
USO DE LA LUZ DE ÁREA LED
La luz de área está controlada por el inflador. Cuando se enciende el inflador, se activa la luz de área. Cuando el inflador está apagado, la luz de área se apaga. Presione el botón de encendido (consulte la sección
“Características” para ubicar) para encender el inflador y la luz de área. Presione el botón de encendido y manténgalo presionado durante un segundo para apagar la unidad. Asegúrese de que el botón de
encendido esté apagado cuando se guarde la unidad.
FUNCIONAMIENTO DEL PUERTO USB
El puerto USB está ubicado en la parte inferior trasera de la unidad. Se controla mediante el botón de encendido (consulte la sección “Características” para localizar).
1. Presione el botón de encendido para encender la unidad. La unidad está en modo de inflado y la luz del área LED se enciende. El USB también se enciende. El puerto USB está listo para usar. La pantalla digital
mostrará alternativamente el valor PSI preestablecido parpadeante (que fue configurado por última vez con los botones de control de presión) durante 2 segundos; luego mostrará la presión actual del artículo que
se está inflando durante 5 segundos. Así como el icono de estado de la batería.
2. Enchufe el dispositivo alimentado por USB en el puerto de alimentación USB y opere normalmente.
3. Mantenga presionado el botón de encendido durante un segundo para apagar la unidad.
IMPORTANTE:
• Si la batería de la unidad se sobrecalienta (debido a un uso intensivo o recarga) o está demasiado fría (la temperatura ambiente ha descendido por debajo de –20 °C), el USB se apaga automáticamente de
inmediato. La pantalla LCD retroiluminada parpadea durante un minuto antes de que la unidad se apague automáticamente.
• Si ocurre una falla de sobrecarga o un cortocircuito, la pantalla LCD retroiluminada parpadea durante un minuto antes de que la unidad se apague automáticamente.
• Si ocurre una falla de voltaje de batería baja, la unidad se apagará automáticamente de inmediato, o la pantalla parpadeará el ícono de estado de batería vacío por un período breve antes de que la unidad se
apague automáticamente. La unidad debe recargarse inmediatamente o es posible que no se encienda.
• El USB se apagará automáticamente después de cuatro horas.
Verifique periódicamente el estado de la batería de la unidad. Cuatro barras sólidas en el icono de la batería indican que la batería está llena. La unidad está lista para usar. Solo una o dos barras sólidas en el ícono
de la batería indican que el nivel de carga de la batería de la unidad es bajo. En este caso, la batería DEBE recargarse antes de su uso o la protección de bajo voltaje integrada puede activarse (el icono de batería
vacía parpadeará durante un breve período antes de que se apague automáticamente). Si la unidad se apaga, DEBE recargarse inmediatamente.
CUIDADO Y MANTENIMIENTO
Todas las baterías pierden energía por autodescarga con el tiempo y más rápidamente a temperaturas más altas. Cuando la unidad no está en uso, recomendamos que la batería se cargue al menos cada 3 a 6
meses. De vez en cuando, limpie el exterior del aparato con un paño suave. No sumerja el aparato en agua. No hay piezas reemplazables por el usuario. Inspeccione periódicamente el estado de los adaptadores,
conectores y cables. Comuníquese con el fabricante para reemplazar cualquier componente que se haya desgastado o roto.
Reemplazo/eliminación de la batería
CAMBIO DE BATERÍA
La batería debe durar la vida útil de la unidad. La vida útil depende de una serie de factores que incluyen, entre otros, la cantidad de ciclos de recarga y el cuidado y mantenimiento adecuados de la batería por
parte del usuario final. Comuníquese con el fabricante para cualquier información que pueda necesitar.
ELIMINACIÓN SEGURA DE BATERÍAS
Contiene una batería de litio, que debe desecharse correctamente. Se requiere reciclar. falta de
cumplir con las regulaciones locales, estatales y federales puede resultar en multas o encarcelamiento.
Por favor recicla.
ADVERTENCIAS:
•No arroje la batería al fuego, ya que podría provocar una explosión.
•Antes de desechar la batería, proteja los terminales expuestos con cinta aislante resistente para evitar cortocircuitos (los cortocircuitos pueden provocar lesiones o incendios).
•No exponga la batería al fuego o al calor intenso, ya que puede explotar.
Sustitución del fusible en el adaptador de carga de 12 V CC/USB
TAPA DE EXTREMO
CONTACTO
DEL CENTRO
FUSIBLE
2A
1. Desenrosque la tapa del extremo del enchufe de CC (en sentido contrario a las
agujas del reloj).
2. Retire el contacto del centro del resorte y el fusible.
3. Compruebe el fusible con un comprobador de continuidad.
4. Si está fundido, busque un fusible de repuesto de 2 amperios.
5. Vuelva a colocar el fusible, el resorte, el contacto y la tapa del extremo.
6. Atornille la tapa del extremo en el sentido de las agujas del reloj hasta que quede
apretada con los dedos; NO APRIETE DEMASIADO.
7. Pruebe el funcionamiento correcto del adaptador de carga de 12 V CC.
SOLUCIÓN DE PROBLEMAS
El inflador de aire no enciende
•Asegúrese de que el botón de encendido esté presionado para encender la unidad y que todas las instrucciones de la sección “Inflador portátil” se hayan seguido exactamente.
•La batería interna puede estar completamente descargada. Cargue la unidad siguiendo las instrucciones dadas en este manual.
El inflador de aire no carga
•Verifique que todas las funciones de la unidad estén apagadas (la pantalla LCD no está iluminada).
•Verifique que el cable de carga USB esté correctamente conectado al adaptador de carga de 12 V CC/USB o al adaptador de carga de 120 V CA/USB y a la unidad.
•Compruebe la conexión a la fuente de alimentación de CA o CC. Asegúrese de que haya un buen contacto.
•Confirme que haya corriente CA o CC funcionando.
•Confirme que la unidad esté enchufada a una fuente de alimentación USB 2A.
•Compruebe el fusible del enchufe en el adaptador de carga de 12 V CC/USB. Reemplace el fusible siguiendo las instrucciones de este manual, si es necesario.
•Es posible que la unidad se haya apagado para proteger la batería del sobrecalentamiento después de un largo período de funcionamiento o carga. Desenchufe el adaptador de carga de la fuente de alimentación
y desconecte el cable de carga USB de la unidad. Deje que la unidad se enfríe durante un tiempo antes de reanudar la carga.
El inflador de aire no infla
•Asegúrese de que el botón de encendido esté presionado para encender la unidad y que todas las instrucciones de la sección “Inflador portátil” se hayan seguido exactamente.
•Asegúrese de que la boquilla esté bien atornillada al vástago de la válvula cuando intente inflar los neumáticos; o que el adaptador de la boquilla esté bien atornillado en la boquilla Sure Fit® y esté correctamente
insertado en el artículo que se va a inflar en todos los demás inflables.
•Es posible que la unidad se haya apagado para proteger la batería del sobrecalentamiento después de un largo período de funcionamiento o carga, o que esté demasiado fría (la temperatura ambiente ha
descendido por debajo de –20 °C). Deje que la unidad se caliente o se enfríe durante un tiempo antes de reanudar la función.
La luz de área LED no se enciende - Asegúrese de que se haya presionado el botón de encendido para encender la unidad (cuando el inflador está encendido, la luz de área se enciende).
Si la unidad no funciona después de seguir los pasos anteriores, comuníquese con el fabricante al 1-877-571-2391.
ACCESORIOS
Los accesorios recomendados para usar con su herramienta pueden estar disponibles a través del fabricante. Si necesita ayuda con los accesorios, comuníquese con el fabricante al 1-877-571-2391.
ADVERTENCIA: El uso de cualquier accesorio no recomendado para usar con este aparato podría ser peligroso.
SERVICIO DE INFORMACIÓN
Ya sea que necesite asesoramiento técnico, reparación o repuestos originales de fábrica, comuníquese con el fabricante al 1-877-571-2391.
GARANTÍA LIMITADA DE UN AÑO
El fabricante garantiza este producto contra defectos en materiales y mano de obra por un período de UN (1) AÑO a partir de la fecha de compra minorista por parte del comprador usuario final original (“Período
de garantía”). Si hay un defecto y se recibe un reclamo válido dentro del Período de garantía, el producto defectuoso puede reemplazarse o repararse de las siguientes maneras: (1) Devuelva el producto al
fabricante para que lo repare o lo reemplace a opción del fabricante. El fabricante puede solicitar una prueba de compra. (2) Devolver el producto al minorista donde se compró el producto para un intercambio
(siempre que la tienda sea un minorista participante). Las devoluciones al minorista deben realizarse dentro del período de tiempo de la política de devolución del minorista solo para cambios (generalmente de
30 a 90 días después de la venta). Es posible que se requiera un comprobante de compra. Consulte con el minorista para conocer su política de devolución específica con respecto a las devoluciones que están
más allá del tiempo establecido para los intercambios.
Esta garantía no se aplica a accesorios, bombillas, fusibles y baterías; defectos resultantes del uso y desgaste normal, accidentes; daños sufridos durante el envío; alteraciones; uso o reparación no autorizados;
negligencia, mal uso, abuso; e incumplimiento de las instrucciones de cuidado y mantenimiento del producto.
Esta garantía le otorga a usted, el comprador minorista original, derechos legales específicos y puede tener otros derechos que varían de un estado a otro o de una provincia a otra. Este producto no está
diseñado para uso comercial. Las fotos de este manual pueden diferir del producto real. No todos los objetos están incluidos. Asegúrese de registrar su producto en https://www.baccusglobal.com/registration
para recibir información importante sobre el producto, promociones y ofertas especiales, y más.
ESPECIFICACIONES Adaptador de carga de 12 V CC/USB (conforma
a UL STD. 2089) (Accesorio opcional) Adaptador de carga de CA/USB de 120 V
(cumple con UL STD. 62368-1) (Accesorio opcional)
Entrada: 5V CC, 2A
Luz de área LED: 1 LED blanco
Inflador: 120 PSI máximo (3 minutos
encendido, 30 minutos
apagado)
Puerto USB: 5 V CC, 2,4 A máx.
Capacidad de la batería: Polímero de litio
Entrada: 12 V CC, 1,1 A.
Salida: 5V CC, 2A
Fusible: 2A
Entrada: 120 V CA, 60 Hz, 13,3 W
Salida: 5V CC, 2A
Imported by Baccus Global LLC, 621 NW 53rd St., Suite 450, Boca Raton, FL 33487 • www.baccusglobal.com 1-877-571-2391
RD092222
13 15
14
BC