Veho DISCOVERY DX-3 User manual

VMS-008-DX3
User Manual

2 3
Introduction
The Veho DX-3 microscope allows you to explore the microscopic world. Highly useful for
students, teachers, laboratory research, medical analysis, repair services or hobbyists.
Please take a moment to read through this manual to ensure you get the most out of the
microscope. Keep this manual safe for future reference.
Before using the microscope, please read the safety precauons below. Always ensure
that the unit is operated correctly:
nThe DX-3 microscope is not waterproof
nUse and store within a cool, dry environment (-5°C – 50°C), avoid using in damp
condions
nDo not point the lens towards the sun or a strong light source, this may damage
the microscope
n Avoid touching the lens, unless with the supplied cleaning cloth
nDo not stare directly into the LEDs; they may damage your eyes
If you require assistance or have any quesons about the DX-3 Microscope,
please contact us through our Live Chat on our website at:
veho-world.com
nVeho DX-3 Microscope
nHeight adjustable stand
n AC adapter
nCapture remote control
nHDMI cable
nUSB cable
nTV cable
nmicroSD card
n Calibraon ruler
n Soware CD
nQuick start guide
What’s in the box?
4 5
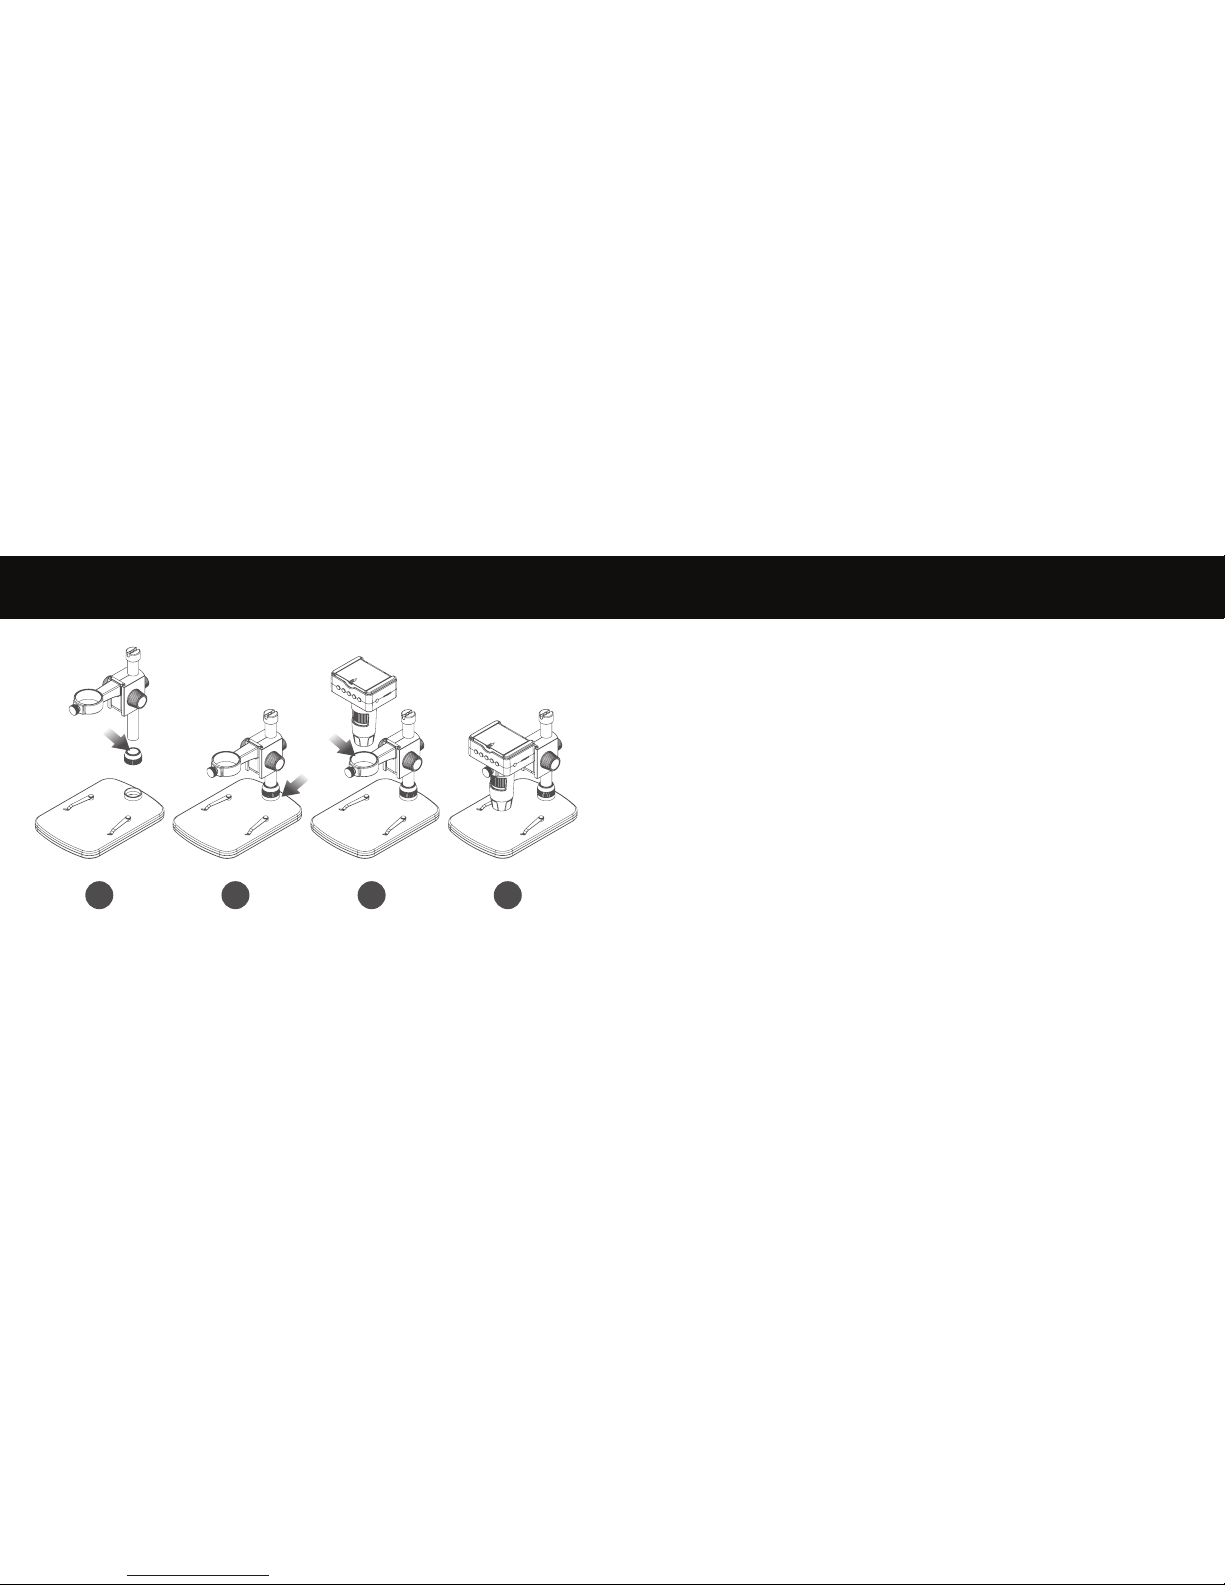
Assembling the DX-3 Microscope
1234
To install the PortableCapture HD soware, use the supplied
soware CD or visit our website download area at:
veho-world.com/downloads
Once downloaded onto your desktop, double-click the install
buon for ‘PortableCapture HD’ and accept to install the
soware onto your PC; the installaon will begin.
Installing microscope software
Operang system requirements
nWindows - 7/8/10
Mac OS - 10.9 - 10.13
nP4 1.8 or above
n RAM 1GB
nVideo Memory 126M
nUSB port 2.0
Place the metal
pole and mount
through ‘Screw 7’.
Next, insert metal pole
into the stand and
ghten ‘Screw 7’.
Slide microscope
through mount ring
and ghten ‘Screw 5’.
Ensure the USB cable
is secured in top of
metal pole.

6
Guide to the DX-3 Microscope & stand
1
2
3
4
5
6
8
9
10
11
12 13
14
15
16
17
18
20 21
22
23
19
7
7
Up
Down
Setup/Menu
OK
Power buon
LED Dimmer
Remote control input
Charging indicator
microSD slot
2.4” LCD
Focus wheel
HDMI output
Tripod screw
TV output
Power input
Mode selector
Capture
Playback
Zoom funcon
Lock/unlock wheel
Pole screw
Height adjustment wheel
Clamp screw
2
12
1
11
10
20
21
22
23
3
13
8
18
9
19
4
14
5
15
6
16
7
17
8
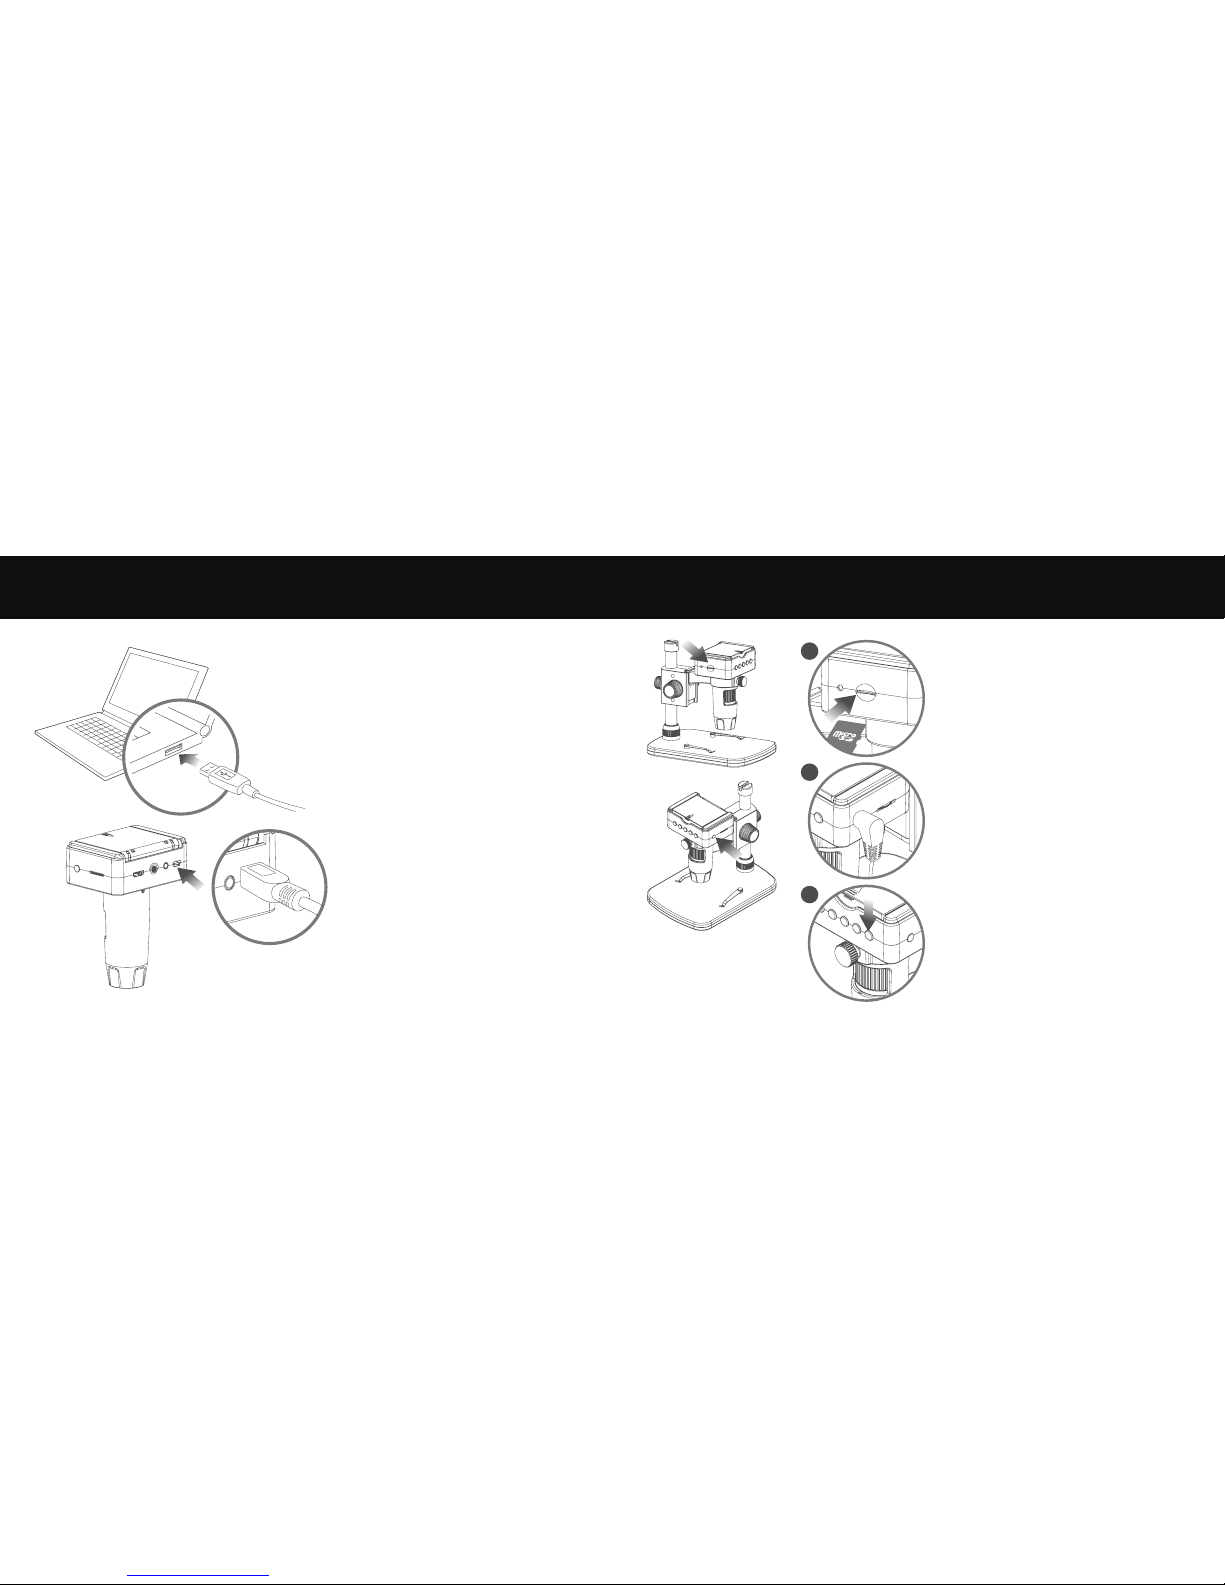
We recommend fully charging the microscope
before its rst use.
To charge the microscope, plug the supplied USB
charging cable into the DC/USB port, connecng
the USB end into a computer USB port or suitable
plug. The LED charging indicator will turn solid red,
turning o when fully charged.
TIP: Use a Veho Portable Pebble (hps://bit.ly/2lJLEoQ) to
charge the device while using away from a socket.
With the microscope turned o insert the microSD
card (1), you may need to reformat the card which is
done within the microscope sengs.
Next, plug the remote control into the correct port
(2) and power on the microscope. Press and hold
the power buon (3) for approx 1 second.
To power o the microscope press and hold the
power buon again, also for approx 1 second.
Charging the microscope
2
3
1
9
Getting started

10 11
Capturing and playback
On the remote control, select either photo or video
mode (1). To capture an image or footage press the
‘Capture’ buon (2). You can playback images and
recorded videos by pressing the ‘Playback’ buon (3),
using the arrow keys to scroll through the list.
Firstly ensure the LCD screen is open. To focus the
microscope rotate the focus wheel on the front
of the microscope; clockwise to zoom-in or an-
clockwise to zoom out. You will be able to see on the
ip up LCD screen as to whether the DX-3 is focused.
Using the zoom
To zoom in and out use the Zoom funcon switch
located on the side of the remote. This funcon
works in preview mode, before capturing an image,
and also during playback of images.
1 2 3
Using the remote control Focusing the microscope

12 13
HDMI & TV output
The DX-3 has both HDMI (1) and TV (2) outputs so
you can experience a live directly to your TV screen
or computer monitor.
Use either of the supplied HDMI or TV cables to
connect the microscope to your TV or monitor. When
viewing via a TV, the live view should appear once
the Source sengs have been adjusted. If viewing
via a computer monitor, the monitor should default
to the scope, or you may need to adjust the source
sengs on the monitor.
1
2
To download images and video footage onto your
computer from the DX-3 use the supplied USB cable,
using the DC/USB port. This will allow you to access
your the les on the microSD card.
You can also use a card reader to access the les on
the microSD card.
Downloading files

14 15
When using the DX-3 in Telescope Mode, we recommend using a camera
tripod to avoid shake. Select Telescope Mode in the sengs menu, as outlined
in the ‘Menu & Sengs guide’ secon.
Focusing the telescope using the ‘Focus Wheel’, adjust unl you achieve the
desired result. You may use the ‘Zoom Funcon’ on the remote control to
zoom in or out, use the ‘Capture’ buon on the remote to record an image.
Menu & Settings guide Using as a telescope
To view the sengs press the (sengs) buon. Use the p(up) and
q(down) arrows to navigate through the opons, when you nd the seng
you wish to view press OK.
To edit a seng, use the p(up) and q(down) arrows to select your choice
and conrm by pressing OK. Exit the seng by pressing the (sengs)
buon once more.
Below is a list of menu opons:
Languages
Microscope/Telescope Mode
Photo Resoluon
Time-lapse Capture
Video Resoluon
Exposure
Date/Time
Date Stamp
TV Output
Loop Recording
Automac Power o
Format microSD card
Default Sengs
Version

16 17
Using the software
Capture a sll photo or video footage at
any point when using the microscope, use
the icons or dropdown menu within the
PortableCapture HD soware.
Seng and preferences can also be
adjusted within the soware, these
include:
n Resoluon
n Date and me
nInterface language
nFull screen mode
nTimer for photo/video capture
Calibraon
Ensure ‘Display Crossing’ is turn on, go to
‘Opons > XY Guide > On/O’.
The microscope will default to crossing
‘On’, we recommend that this is le on.
Step 1 Focus the microscope on the
supplied calibraon ruler, adjust the
magnicaon wheel unl the picture is
clear. Take a picture of the selected area
when the ruler lines are parallel to the
blue XY guides, as shown in the image.
Step 2 Double-click on the image
captured to enter the measurement
interface.
Calibration & Measurements

18 19
Step 3 Once the image is open, click on
the calibraon icon. Using the mouse,
click on the beginning and ending points;
you must know the distance between the
points (using the ruler). A dialogue box
will pop up, enter the exact value of the
measurement into ‘Actual dimension’.
The soware will automacally calibrate
the magnicaon rate. Click ‘OK’ and the
adjusted magnicaon rate will show in
the upper right corner.
Step 4 Now using ‘Any Angle Line’,
under the measurement icon, measure
the same distance again. If the value
measured is approximately the same as
the actual value, then calibraon has
been successful.
Measurements
Double-click on the image to enter the
measurement interface. Under the
‘Measurement’ icon, choose any of the
following opons to measure.
Any Angle Line Measurement Click and hold
from one point and drag to the next point,
then release.
Connuous Line Measurement Allows you
to measure any connuous length. Click,
hold and drag from one point to other
points, then release.
Radius Circle Measurement Click, hold and
extend out to the chosen radius. The radius,
circumference and area of the circle will be
calculated.
Table of contents
Other Veho Microscope manuals


Popular Microscope manuals by other brands


VWR
VWR VisiScope 384 Series instruction manual

Nikon
Nikon ECLIPSE E200 POL instructions

Leica
Leica DI C800 User's manual & installation instructions

ThermoFisher Scientific
ThermoFisher Scientific Continuµm manual

ThermoFisher Scientific
ThermoFisher Scientific Continuµm manual

Olympus
Olympus SZ61 instructions