Veho Renovo Series User manual

Table of Contents i
English
Read this first................................................. 1
Important safety instructions ......................................1
Disclaimer ...................................................... 2
Copyright ....................................................... 2
Notes about copyrighted materials .............................3
Disposal of this product..............................................3
Introduction ................................................... 5
Package contents ........................................................5
Parts of the scanner and their functions......................5
Front view...................................................................... 5
Rear view....................................................................... 6
Indicators ....................................................................7
Using the scanner .......................................... 8
Preparation..................................................................8
Making a scan.............................................................9
Connecting the scanner to a computer .......................11
System requirements (for computer) ............................. 11
Making connection ........................................................ 11
More information .......................................................13
Suitable and unsuitable types of originals..................... 13
Orientation of the original and scanned image.............. 14
Cropping on scanned images......................................... 14
Using the anti-curl sheath.............................................. 15
Supported memory card types ....................................... 15
File naming and storage rules........................................ 16
The Scan2PC Utility...................................... 17
Installing the Scan2PC Utility....................................17
Table of Contents

Table of Contentsii
English
System Requirements.................................................... 17
Performing Installation ................................................. 17
Using the Scan2PC Utility .........................................17
Care and maintenance .................................. 19
Cleaning the scanner ..................................................19
Cleaning the outer casing.............................................. 19
Cleaning the image sensor ............................................ 19
Calibrating the scanner...............................................20
Storing the scanner .....................................................21
Troubleshooting............................................. 22
Specifications ................................................. 24

Read this first 1
English
Read this first
Please read the following important safety instructions carefully
before using this scanner. Failure to observe these instructions may
result in personal injuries or damages to this scanner.
Important safety instructions
Do not place this scanner under direct sunlight or near heat
sources, such as in a closed car under sunlight or near a
stove. The outer casing of this scanner may become
deformed and the sophisticated sensors inside may become
damaged due to excessive heat.
Do not use this scanner near water, in the rain or allow any
liquid to get inside this product. Water and moisture may
cause short-circuit to the electronic components and lead
to malfunctions.
Do not use this scanner in dusty environments. Dust grains
may cover this scanner and scratch the original to be
scanned. Do not scan originals that are contaminated by
dusts or other particles.
Do not use this scanner near strong electromagnetic
sources, such as a microwave oven or television. The
electromagnetic interference may cause this scanner to
malfunction.
Do not attempt to disassemble or modify this scanner.
There are no user serviceable parts inside this scanner, and
unauthorized modifications will void your warranty.
Do not drop or apply shock/vibration to this scanner.
Strong impacts may damage the components inside.
Do not insert objects other than compatible memory cards
into the memory card slots of this scanner. The metal
contacts inside the slots can easily become damaged by
foreign objects.

Disclaimer2
English
Disclaimer
Veho Renovo makes no representations or warranties, either
expressed or implied, with respect to the contents of this
publication. Veho Renovo reserves the right to revise this
publication and to make changes from time to time in the contents
thereof without obligation to notify any person of such revision or
changes.
Copyright
Copyright by Veho Renovo. All rights reserved. No part of this
publication may be reproduced, transmitted, transcribed, stored in a
retrieval system or translated into any language or computer
language, in any form or by any means, electronic, mechanical,
magnetic, optical, chemical, manual or otherwise, without the prior
written permission of Veho Renovo. Brand names, product names
and trademarks used in this publication are the properties of their
respective owners.
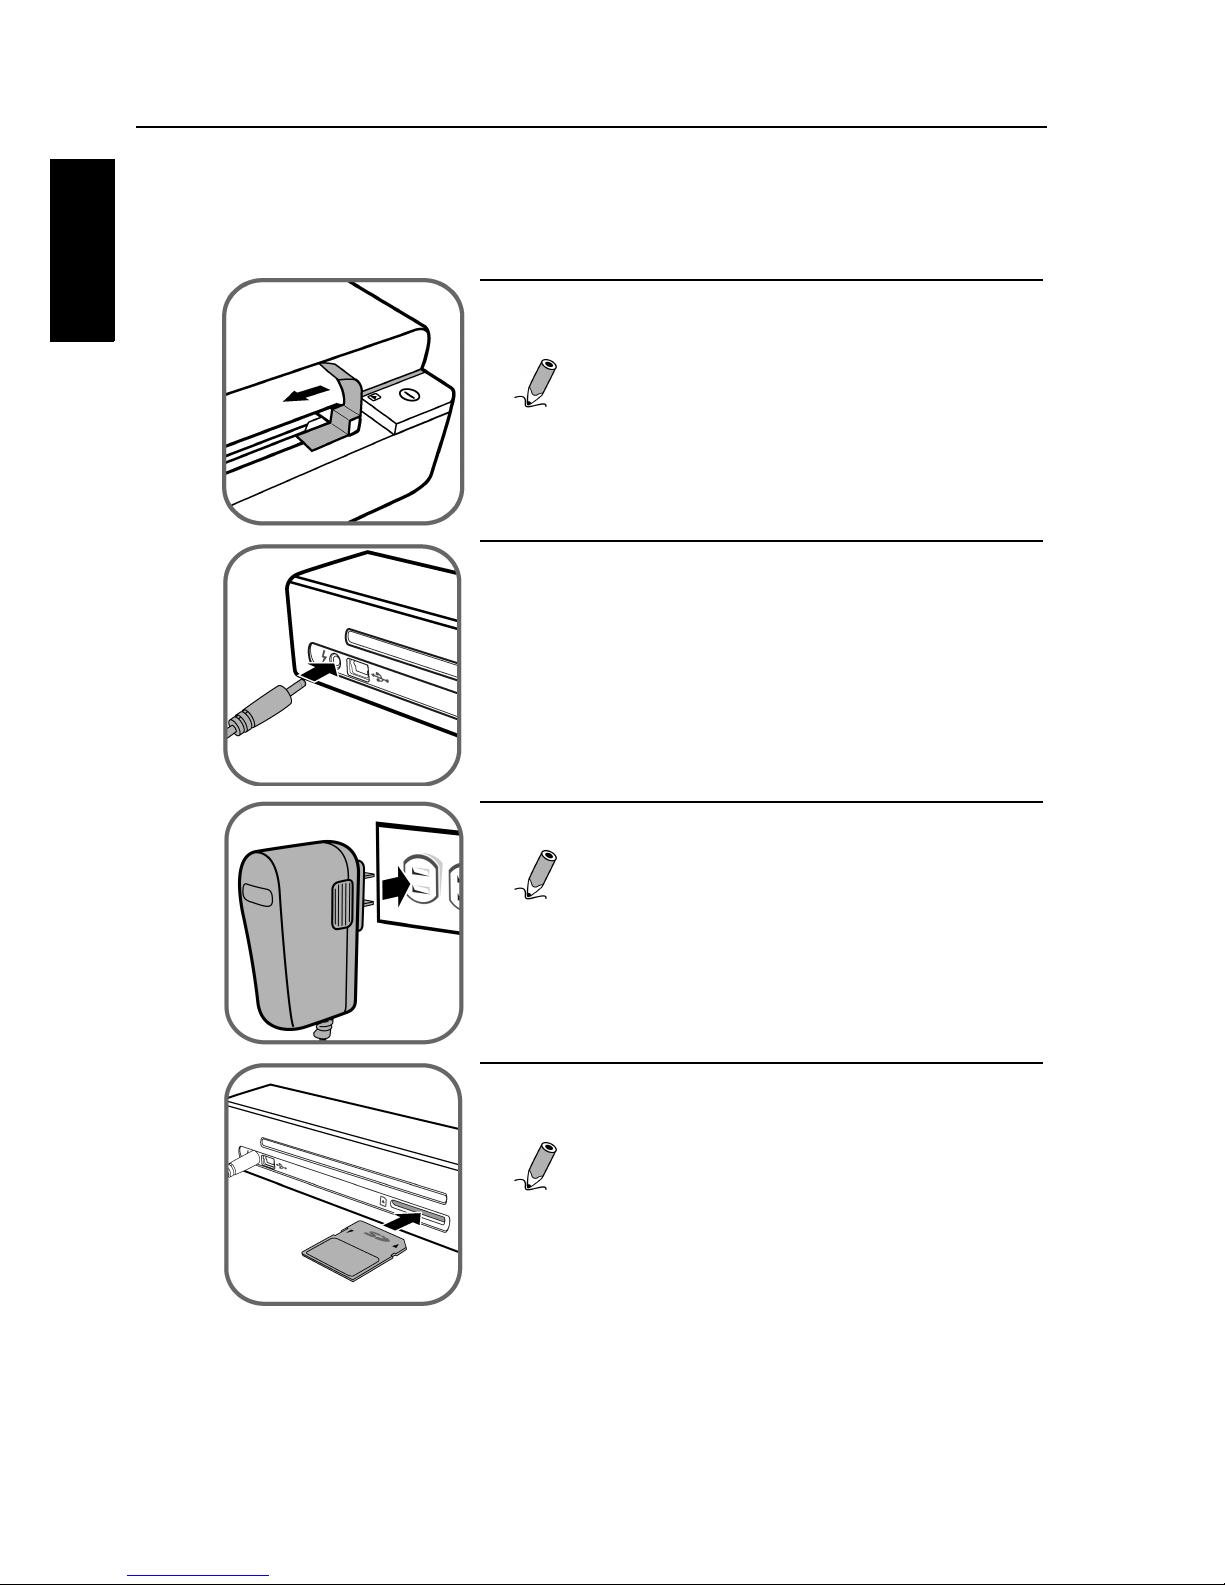
Do not use an unknown power adapter other than the one
supplied with this scanner. Connecting this scanner to an
unknown power adapter is very dangerous and may lead to
fire or explosion.
Do not cut, bend, modify, place heavy objects or step on
the cable of the power adapter. Otherwise the external
insulation may be damaged and result in short-circuit or
fire.
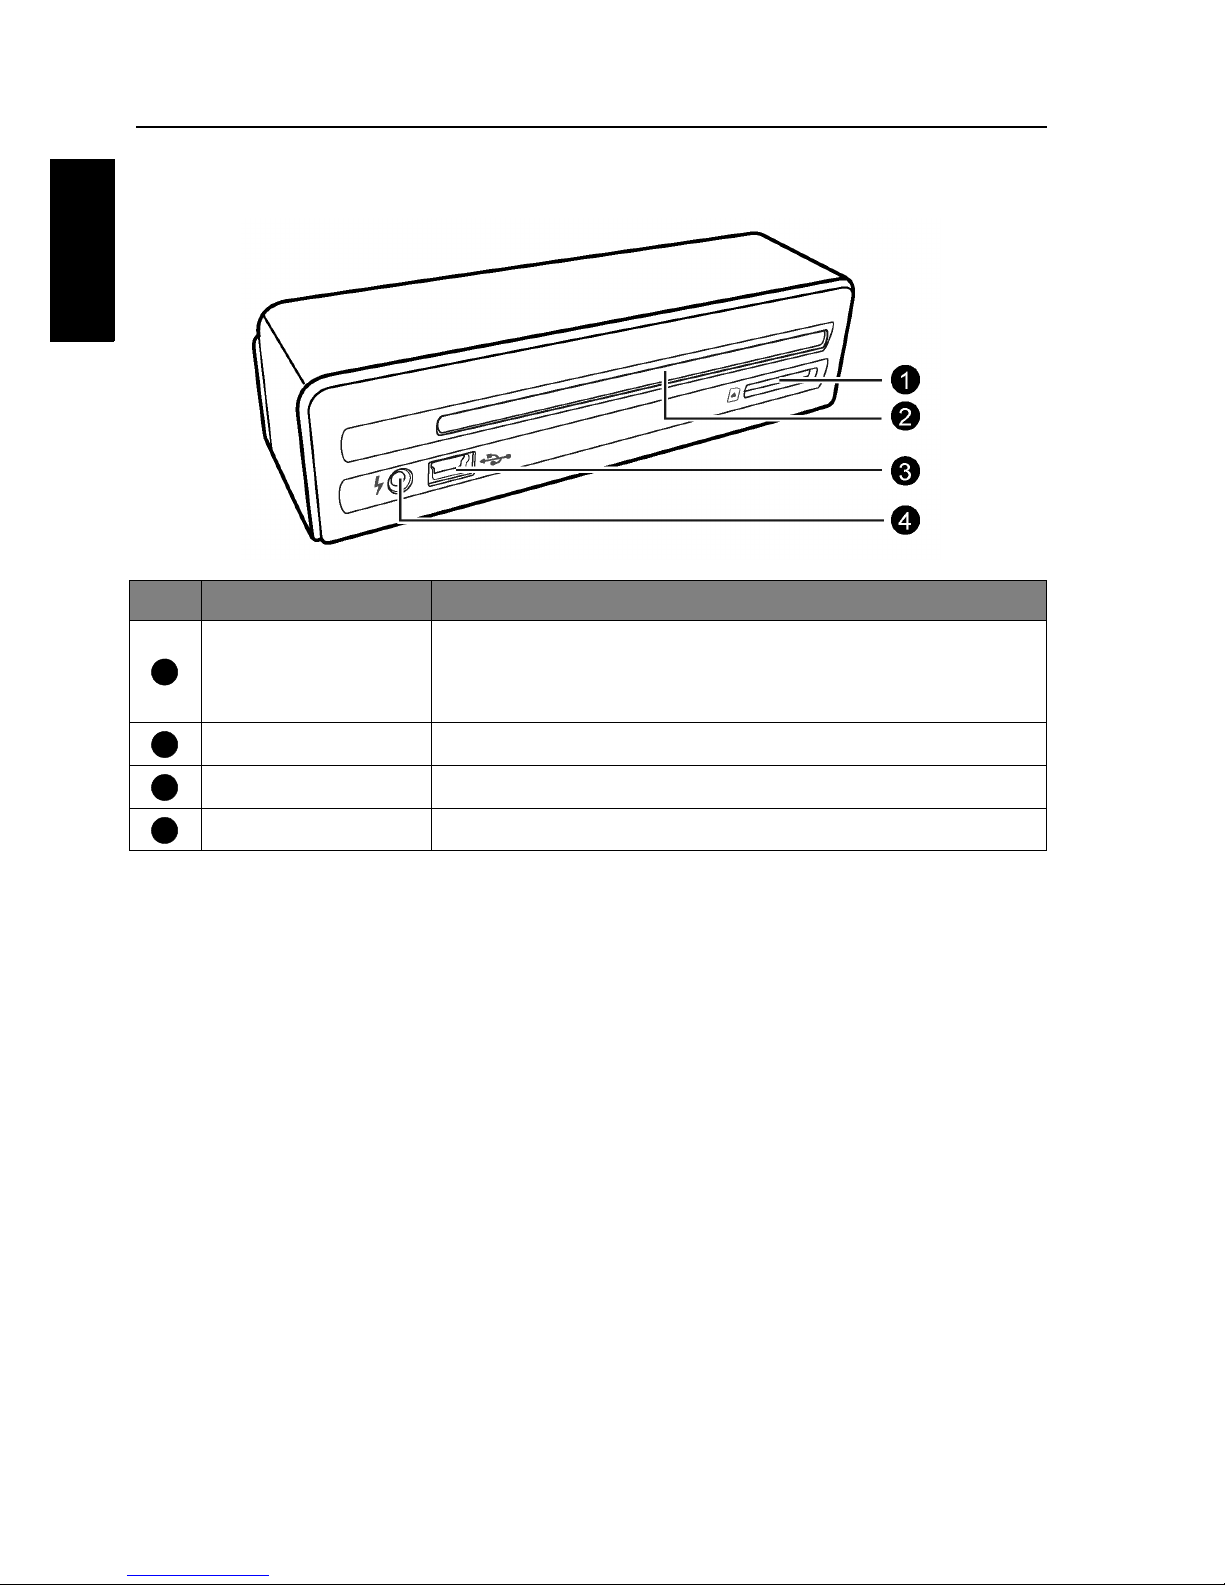
The power socket and USB port on this scanner are
designed solely for connecting to the supplied power
adapter and optional USB cable. Do not insert any other
objects into these sockets.
If there are strange odors or heat emitting from this scanner
or any signs of malfunction, disconnect this scanner from
the power immediately and contact your dealer for
inspection or service.

Copyright 3
English
Notes about copyrighted materials
Avoid scanning and re-distributing copyrighted originals and
images or those of unknown sources. Doing so may violate your
local copyright laws and related regulations. Veho Renovo cannot
be made liable for the losses that may result from breaching the laws
described above.
Disposal of this product
To help protect the environment, dispose of this scanner properly
according to your local regulations regarding the disposal of waste
products.

Copyright4
English
<Memo>

Introduction 5
English
Introduction
Package contents
Check the sales package for the following items. If any item is
missing or damaged, contact your place of purchase immediately.
Parts of the scanner and their functions
• Photo scanner x 1 • Calibration card x 1 • Anti-curl sheath x 1
• Power adapter x 1 • User manual x 1
• USB cable x 1 (optional, depending on your region)
• Sensor cleaning swab x 1
No. Name Function/description
Status/card
indicator
Indicates the operating status of the scanner and
memory card. See "Indicators" on page 7.
Power button Press this button to turn the power on or off.
Power indicator Indicates the power status of the scanner. See
"Indicators" on page 7.
Paper guide Used to guide the original to ensure the alignment.
Feeding slot Insert an original into this slot to begin scanning.
Orientation
mark Indicates the correct original orientation.
Front view
1
2
3
4
5
6

Introduction6
English
Rear view
No. Name Function/description
SD/xD/MMC/
MS card slot
Accepts the following types of memory cards:
SD, xD, MMC and MS. See "Supported memory
card types" on page 15 for details.
Output slot The scanned original comes out from this slot.
Mini USB socket For connecting to a computer via a USB cable.
Power socket For connecting to the supplied power adapter.
1
2
3
4

Introduction 7
English
Indicators
Please see below for the lighting patterns of the indicators and the
meanings they represent.
: Blinking slowly; : Blinking rapidly; : Steadily on; : Off
Lighting
patterns
and their
functional
meanings
Scanning current original. Please wait
until the process is complete before
scanning another original.
The scanner is ready for use.
The scanner power is off.
• Initializing system and memory card.
Please wait until the initialization
process is complete before using the
scanner.
• Busy storing image file. Please wait
until the process is complete before
scanning another original.
Paper jam. Please refer to page 22 to
remove the paper jam.
No memory card, card full (free space
below 1MB), card error or SD card
locked. Please use another card, unlock
the card or remove some files on the card.
Power Status/card

Using the scanner8
English
Using the scanner
Preparation
1. Peel off the tape that secures the guide
lever.
NOTE: This step is only required
when you use the scanner for the first
time.
2. Connect the plug on the power adapter
cable to the power socket on the scanner.
3. Plug the power adapter into a power outlet.
NOTE: The type of power plug and
socket illustrated may differ from that
of your region.
4. Insert an unlocked (writable) memory card
into the memory card slot.
NOTE:
• Be sure to insert a memory card before
scanning.
• The scanner only accepts memory cards
in FAT16 or FAT32 format. NTFS and
other file formats are not supported.

Using the scanner 9
English
Making a scan
5. Press the Power button. The Power
indicator blinks.
NOTE: For more information on the
indicators, see "Indicators" on page 7.
6. Wait until the Power indicator stops
blinking and then goes off. The Status/card
indicator will light up instead, indicating
that the scanner is ready.
NOTE: Do not insert a photo into the
feeding slot when the Power indicator
is blinking. The photo will not be
scanned.
1. With the side to be scanned facing upward
and in correct orientation as indicated by
the orientation mark, place one edge of the
original on the scanner and adjust the guide
lever so that the original aligns against the
left side of the feeding slot.
Insert the original into the feeding slot.
WARNING: Do not scan glossy
photos in humid environments
(humidity higher than 70% RH).
Otherwise the surface of the photo
will become sticky and cause the
scanner to jam.
2. The original will be fed into the slot and
scanned automatically. The Power and
Status/card indicators blink while scanning.
NOTE: See "More information" on
page 13 for how to insert photos and
other types of originals.
Align left

Using the scanner10
English
3. When scanning is completed, the Power and
Status/card indicators will keep blinking for
a while, indicating that the scanner is
processing the image and storing the file
onto the memory card.
Wait until the indicators stop blinking
before inserting and scanning the next
original.
WARNING:
Insert only one sheet at a time. Insert the next original only when
the previous one is done. Otherwise the scanner will fail to
function normally.
NOTE:
• Do not remove the memory card or disconnect the power supply
while the indicators are blinking.
• This scanner only supports output images in JPEG (.jpg) format,
and the date/ time attribute will not be added.
• For more information on how this scanner stores the scanned
image files on the memory card, see "Orientation of the original
and scanned image" on page 14.
• If the memory card is near full (lower than 1MB), the Status/card
indicator blinks (see "Indicators" on page 7). Use another card
or delete some files on it if necessary.
4. To turn off the scanner after all originals are
scanned, press and hold the Power button
for 1 second. The power indicator will blink
and then go off.
Now it is OK to disconnect the power and
remove the memory card from the scanner.

Using the scanner 11
English
Connecting the scanner to a computer
By connecting the scanner to a computer, you can access the
scanned images on the memory card directly, or use the scanner as a
memory card reader, so that you can freely copy, paste or delete
files from or to the memory card using the computer.
System requirements (for computer)
• Operating system:
Windows: Windows 2000, XP, Vista or later versions
Macintosh: Mass Storage Class Mac OS 9.x or Mac OS X
• An available USB 1.1 or 2.0 port
Making connection
1. Connect one end of the USB cable (with a
Mini USB connector) to the Mini USB
socket on the scanner.
2. Turn on the computer, and connect the other
end (with an A-type USB connector) of the
USB cable to the USB port of the computer.
3. Insert a memory card into the memory card
slot.
4. Follow steps 1 and 2 in "Preparation" on page 8 to connect the
power.

Using the scanner12
English
5. Press the Power button. The Power
indicator blinks.
NOTE: For more information on the
indicators, see "Indicators" on page
7.
6. The scanner will be recognized by the computer as a removable
disk (Windows system). Now you are ready to view or edit the
files on the memory card.
NOTE: Do not remove the memory card while the computer
is accessing the files on it.
7. To safely disconnect the scanner from the computer:
Windows systems
a. On Windows System Tray, click the hardware removal icon as
indicated below.
b. Click to select the Safely remove USB Mass Storage Device
option that appears.
c. When the following message displays on-screen, you can
safely remove your hard disk.
d. Unplug the scanner from your computer.
Macintosh systems
a. Click and drag the hard disk icon to Trash.
b. Disconnect the scanner from your computer.
Hardware removal icon

Using the scanner 13
English
More information
Suitable and unsuitable types of originals
This scanner is designed to obtain the best scanning results for the
following types of originals:
• 3.5”x5” and 4”x6” photos
• Business cards
Do not use the following types of originals for scanning. Otherwise
the scanner will malfunction, the original may become jammed in
the slot or the image auto-cropping function will not work properly.
• Photos/business cards thicker than 1mm
• Photos/business cards with either side shorter than 55mm
• Photos/business cards with lots of black or dark colors
• Photos/business cards with dark colors surrounding the edges
• Transparencies (filmstrips, celluloids..., etc.)
• Printed images (pictures on newspapers, magazines..., etc.)
• Soft and thin materials (thin paper, cloth..., etc.)
• Photos/business cards that exceed the following acceptable size:
Length: 12 inches (304.8mm) (standalone scanning)
Width: 4.1 inches (105mm)

Using the scanner14
English
Orientation of the original and scanned image
Please refer to the illustrations below for the relationship between
the orientation of the original when scanning and that of the scanned
image when displayed on the computer screen.
NOTE: Scanning the same original in different orientations
may produce scanned images that look slightly different in
color tones and brightness. This is not a malfunction.
Cropping on scanned images
In order for the scanner to determine the correctness of the scanned
image data, some cropping on the scanned image may occur. Please
refer to the illustration below.
NOTE: When scanning darker originals (for example, a photo
of the night sky), over-cropping may occur. Please insert the
original in a different direction (orientation) and try again.
Scanner
Original
Scanned image when
displayed on-screen
Scanner
Original
Original Scanned image
Cropping size (as measured on the original)
Scanning direction Max. 1.5mm
Max.
1.5mm
Max. 1.5mm
Max.
1.5mm
Original Scanned image
(over-cropped)

Using the scanner 15
English
Using the anti-curl sheath
For your older, fragile photographs, we suggest to use the supplied
anti-curl sheath before scanning. It also helps eliminate the
possibility of de-focusing due to the uneven surface of the curled
photos.
NOTE: To prevent the photos stuck in the sheath over time,
please do not leave the photo in the anti-curl sheath after
scanning.
Supported memory card types
• MS (MemoryStick)
• MS Pro
• MS Pro Duo (adapter required)
• MS Duo (adapter required)
• MMC (MultiMediaCard)
• RS-MMC (adapter required)
• xD (extreme Digital, H-type and M-type)
• SD (SecureDigital)
• Mini SD (adapter required)
• micro SD/T-Flash (adapter required)
1. Insert the photo into
the anti-curl sheath as
shown.
2. Insert the anti-curl
sheath (with the folded
side first) into the
feeding slot of the
scanner.
Fuzzy areas that result
from the uneven surface
of the curled photo
Curled photo
Insert the
folded side
first

Using the scanner16
English
File naming and storage rules
• If the memory card is used with the
scanner for the first time, the scanner
creates a folder named “FotoIMG” in
the root directory to store the
scanned image files. Each image file
has a prefix “IMG_” followed by a 4-
digit serial number in the sequence
the image is stored.
• If the file name reaches
IMG_9999.jpg in the “FotoIMG”
folder, another new folder named
“FotoIMG1” will automatically be
created to store subsequent new files,
and so on.
• If the memory card already contains
folders created by the scanner, the
scanner will store the images in the
last folder created.
• There can be up to 10 folders
(FotoIMG, FotoIMG1... FotoIMG9)
on a memory card. If exceeded,
delete some files on the memory card
or use another one if necessary.
IMG_0001.jpg
....
IMG_0002.jpg
IMG_9999.jpg
IMG_0001.jpg
IMG_0002.jpg
IMG_9999.jpg
....
IMG_0001.jpg
IMG_0002.jpg
IMG_9999.jpg
....
....
Memory card

The Scan2PC Utility 17
English
The Scan2PC Utility
Installing the Scan2PC Utility
System Requirements
Before installing the Scan2PC Utility, make sure that your computer
is compatible with the following system requirements:
• Operating system: Windows 2000, XP, Vista or above
• Free hard disk space: 100MB
NOTE:
The Scan2PC Utility does not support Macintosh operating
systems.
Performing Installation
To install the Scan2PC Utility:
1. Insert the Scan2PC Utility installation CD into the optical drive of
your computer.
2. Locate the file named “scan2PC_V1.3.5.0.exe” on the CD, and
double-click it.
3. Follow the on-screen instructions to complete the installation.
NOTE:
• Once installed, the Scan2PC Utility runs automatically upon PC
startup, and the icon stays on the system tray.
• If you wish to close the Scan2PC Utility temporarily, right-click
on the icon and select Exit.
Using the Scan2PC Utility
With the Scan2PC Utility, you can scan photos and transfer scanned
images to the connected PC easily. You can also change the default
location where the scanned images will be saved.
1. Refer to "Connecting the scanner to a computer" on page 11 to
connect the scanner to the PC correctly, and then turn on the
power of the scanner.

The Scan2PC Utility18
English
2. When the scanner is detected by the PC, the following Scan2PC
Utility dialog will pop up automatically:
3. Now you can specify the location where the scanned images will
be saved: on the memory card (Memory Card) or to a specific
folder on the PC (Scan To PC). If Scan to PC is selected, the
scanned images will be saved to the following location by
default:
• Windows 2000 and XP: C:\Documents and Settings\(your
username)\My Documents\My Pictures\Photo\
• Windows Vista: C:\Documents and Settings\(your username)\My
Documents\Pictures\Photo\
You can also click the button to select a location you prefer.
4. Scan the original. The scanned images will be saved to the
location you selected in step 3.
NOTE:
• If you wish to open the Scan2PC Utility dialog manually, double-
click the icon on the Desktop, or right-click on the icon
on the system tray and select Setting.
• Each scanned image file is given a name with the prefix "IMG"
followed by a 4- digit serial number in the sequence the image
is stored. For example, IMG0001.jpg, IMG0002.jpg... If the file
name reaches IMG9999.jpg in the "Photo" folder, another new
folder named "Photo1" will automatically be created to store
subsequent new files, and so on.
Table of contents
Other Veho Scanner manuals