manuals.online logo
Brands
  1. Home
  2. •
  3. Brands
  4. •
  5. Velbon
  6. •
  7. Camera Accessories
  8. •
  9. Velbon Pole Pod User manual

Velbon Pole Pod User manual

Identification of Parts
Thank you for purchasing this Velbon product. Please study this instruction manual carefully before use.
Camera screw
QB-3
Stability improves when the
tripod legs are opened, however
the role of these legs is to assist
the monopod, so please ensure you hold
your camera firmly when attached. Do not
step on the legs as this can cause damage.
When moving from place to
place, please ensure you
detach your camera from the
monopod, otherwise movement
could cause your camera to
detach and fall.
Head Locking Lever
Leg Locking Lever
Monopod
(inverted)
Tripod Leg Section
Column Lock
Rubber Foot for Monopod
Rubber Foot
Leg Angle Selector
Direct Contact Pipe
(Twist-lock system)
The twist-lock system enables
easy set-up as well as excellent
rigidity when extended.
To extend tripod legs,
twist anti-clockwise to
unlock, then extend
as required and twist
clockwise to lock.
Specifications
Ball Head
Extended height
Minimum height
Closed length
Diameter of Monopod Tubes
Diameter of Tripod Legs
Monopod
Tripod
Weight
Ideal load
Pole Pod
QHD-41Q
1785mm
605mm
680mm
29/26/23/20mm
21/18mm
4 section
2 section
930g
1500g
Vertical Tilt
Horizontal Panning
Head Locking Lever
Head Locking Lever
Rotate locking lever until quick-shoe (QB-3) can
be removed from the socket.Turn camera screw
clockwise to attach QB-3 to the base of your
camera. Replace QB-3 in socket and lock in
place by rotating locking lever.
2. How to use Ball Head QHD-41Q1. How to attach camera to QHD-41Q 3-1. How to remove QHD-41Q from Pole Pod
You can freely adjust the angle of your camera,
when the Head Locking Lever is undone. Once
happy with the framing of your shot, tighten the
lever to lock the head in position.
Caution: Please hold onto your camera
when loosening the locking lever, otherwise
it could tip and become damaged.
Should you wish to remove the ball-head from
the pole, tighten the Head Locking Lever and the
Column Lock, then turn the ball-head
anti-clockwise to unscrew.
(it is also possible to attach a different head, as
long as it has a 1/4"-20 thread)
Pole Pod
Manual
Column Lock
※Please note that the figures quoted above are intended as a guide and may vary slightly due to ongoing product improvements.
Back
Front
⇒
9. Using as an Extension Pole
Thick stages should be downward.
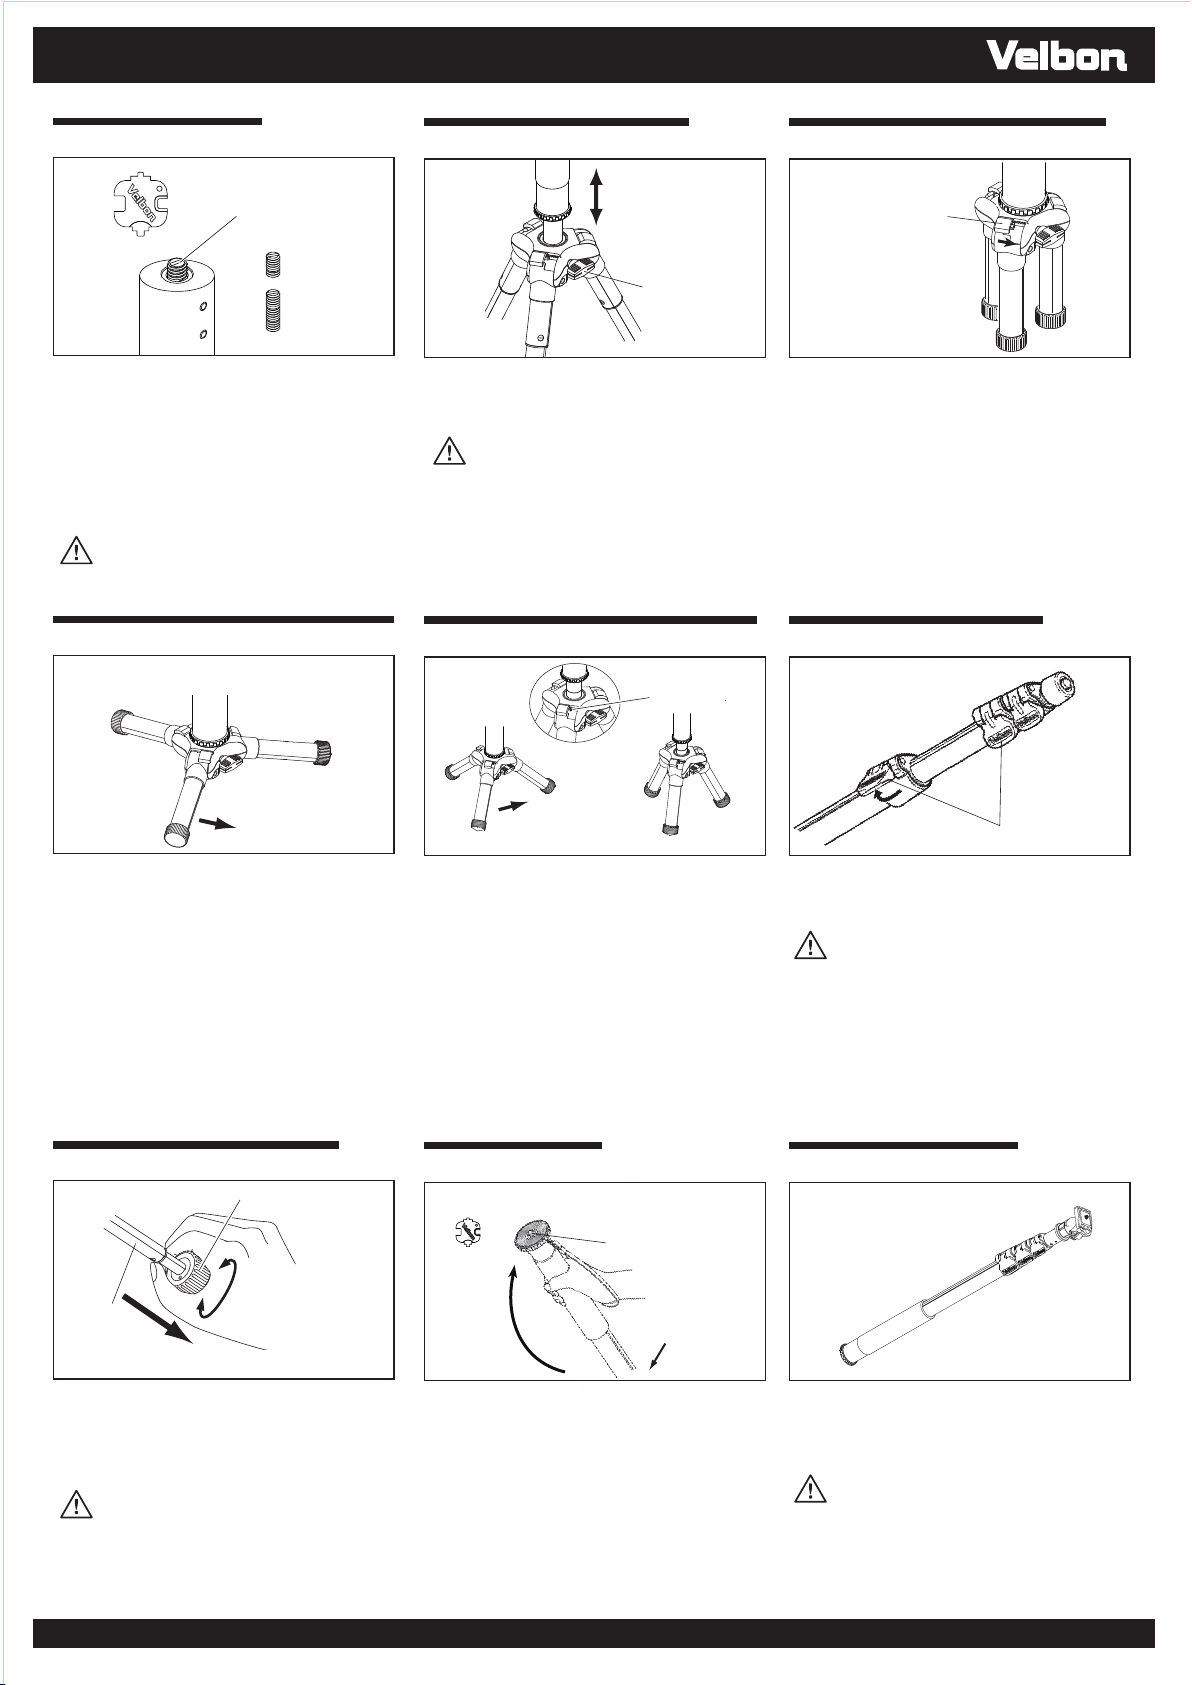
Once removed from the tripod legs, the Pole can
be used as an extendable boom. Ensure that the
panhead is fully tightened onto the long screw
and locked before extending.
Caution: When using at arm's length or at
height, use carefully to avoid damaging
your camera.
Detach Pole section from tripod legs and invert.
Fit Camera Screw and Rubber Foot to top and
bottom ends. Now it can be used as a Monopod.
To avoid accidents and increase stability, please
use the wrist strap as in the illustration. If you
install a panhead onto the monpod, please use
the long screw, otherwise, use the short screw
to attach a camera directly to it.
Install Camera screw onto the Pedestal.Use the Screw driver supplied.
Remove panhead
 and install Rubber
 Foot.
8. Using as a Monopod
To extend or retract the Pole, raise each Leg
Locking lever, adjust length as necessary and
close Locking Levers to fix as required.
Caution: Take care not to pinch fingers
when opening or closing the Locking Levers.
In order to extend each leg, grip the Rubber Foot
with one hand and twist anti-clockwise to unlock.
Slide leg section smoothly until fully extended
and twist Rubber Foot clockwise to lock. To
retract leg, repeat process in reverse order.
Caution: Take care when gripping Rubber
Foot to avoid staining hands with mud etc.
Avoid pinching fingers or hands between Rubber
Foot and legs.
7. Extending and Locking Tripod Legs
Rubber shoe
Leg Locking Lever
6. Extending and Locking the Pole
From Semi-Low-Angle, close each leg until
another click is heard. This returns the Leg Angle
Selector to the original position and allows legs
to open to Normal Angle. If the Leg Angle
Selector is pushed to the right by mistake, simply
push it back to the left to cancel.
Close
Close
5-2. Selection of Leg Angles ('Semi-Low-Angle')
5-3. Selection of Leg Angles (back to 'Normal Angle')
5-1. Selection of Leg Angles ('Low-Angle')
Once in low-angle position, slowly close each
leg until a click is heard, then stop. The Leg
Angle Selector will automatically move to the left
and lock. This is now the semi-low-angle
position.
Semi-low position
selector
Standard Leg angle
Then Adjustment knob slides towards the left
automatically until click sound occurs.
With legs closed, slide the Leg Angle Selector to
the right until you hear a click. Now open the legs
completely - this is the 'Low-Angle' position.
The pole height can be adjusted manually. Simply
loosen the Column Lock, adjust to desired height
then tighten to fix at the desired height.
Caution: Support camera by hand whilst
adjusting pole height, otherwise you may
pinch your fingers.
4. How to adjust height of the Pole
This product is supplied with a choice of two
camera screws: one long and one short.The long
screw is installed at time of manufacture, but this
can be changed as necessary.
*When attaching a panhead, please use the
long screw.
*When attaching a camera directly to the pole,
use the short screw.
Caution: The screws can be removed and
inserted using the screw-driver supplied.
Do not lose screws.
Screw driver
3-2. Panhead screw options
Screw driver
Pole Pod
Column Lock
※You may feel 'click' sensation
Manual
Camera screw
(Panhead installment screw)
Camera screw
(Panhead installment screw)
For camera
For panhead
Leg angle selector
(slide to right)
Click !
Click !
Line up ridges, then extend
To tighten
To loosen

Other Velbon Camera Accessories manuals

Velbon ULTRA 655(A) User manual

Velbon

Velbon ULTRA 655(A) User manual

Velbon SPT-1 User manual

Velbon

Velbon SPT-1 User manual

Velbon Videomate 438 User manual

Velbon

Velbon Videomate 438 User manual

Velbon UT 45L User manual

Velbon

Velbon UT 45L User manual

Velbon Super Mag Slider User manual

Velbon

Velbon Super Mag Slider User manual

Velbon ULTRA REXi L(A) User manual

Velbon

Velbon ULTRA REXi L(A) User manual

Popular Camera Accessories manuals by other brands

Aputure Trigmaster 2.4G user manual

Aputure

Aputure Trigmaster 2.4G user manual

Digital Watchdog DWC-PMB-WLW quick start guide

Digital Watchdog

Digital Watchdog DWC-PMB-WLW quick start guide

Vello BG-N6 user manual

Vello

Vello BG-N6 user manual

Yuba Dual Battery Bracket instructions

Yuba

Yuba Dual Battery Bracket instructions

F&V Z720 UltraColor quick start guide

F&V

F&V Z720 UltraColor quick start guide

Dynex DX-TRPFLX Guide d'installation rapide

Dynex

Dynex DX-TRPFLX Guide d'installation rapide

Solar MD SS4143-11 installation manual

Solar MD

Solar MD SS4143-11 installation manual

Vinten V3955-0002 Operator's guide

Vinten

Vinten V3955-0002 Operator's guide

Rollei C50i user guide

Rollei

Rollei C50i user guide

HutchColor HCT user guide

HutchColor

HutchColor HCT user guide

Pentax 90 Degree Mirror Adapter operating manual

Pentax

Pentax 90 Degree Mirror Adapter operating manual

Remco Lithium Series user guide

Remco

Remco Lithium Series user guide

Ikelite SD870 IS Supplemental instructions

Ikelite

Ikelite SD870 IS Supplemental instructions

Metz MECABLITZ 50 AF-1 Operating	 instruction

Metz

Metz MECABLITZ 50 AF-1 Operating instruction

Tiffen Glimmerglass & Bronze Glimmerglass Filters brochure

Tiffen

Tiffen Glimmerglass & Bronze Glimmerglass Filters brochure

Atomos Connect quick start guide

Atomos

Atomos Connect quick start guide

ServoCity SPT200 quick guide

ServoCity

ServoCity SPT200 quick guide

Quanum Q-3D user manual

Quanum

Quanum Q-3D user manual

manuals.online logo
manuals.online logoBrands
  • About & Mission
  • Contact us
  • Privacy Policy
  • Terms and Conditions

Copyright 2025 Manuals.Online. All Rights Reserved.