Manual
UT
45L
Velban
1.
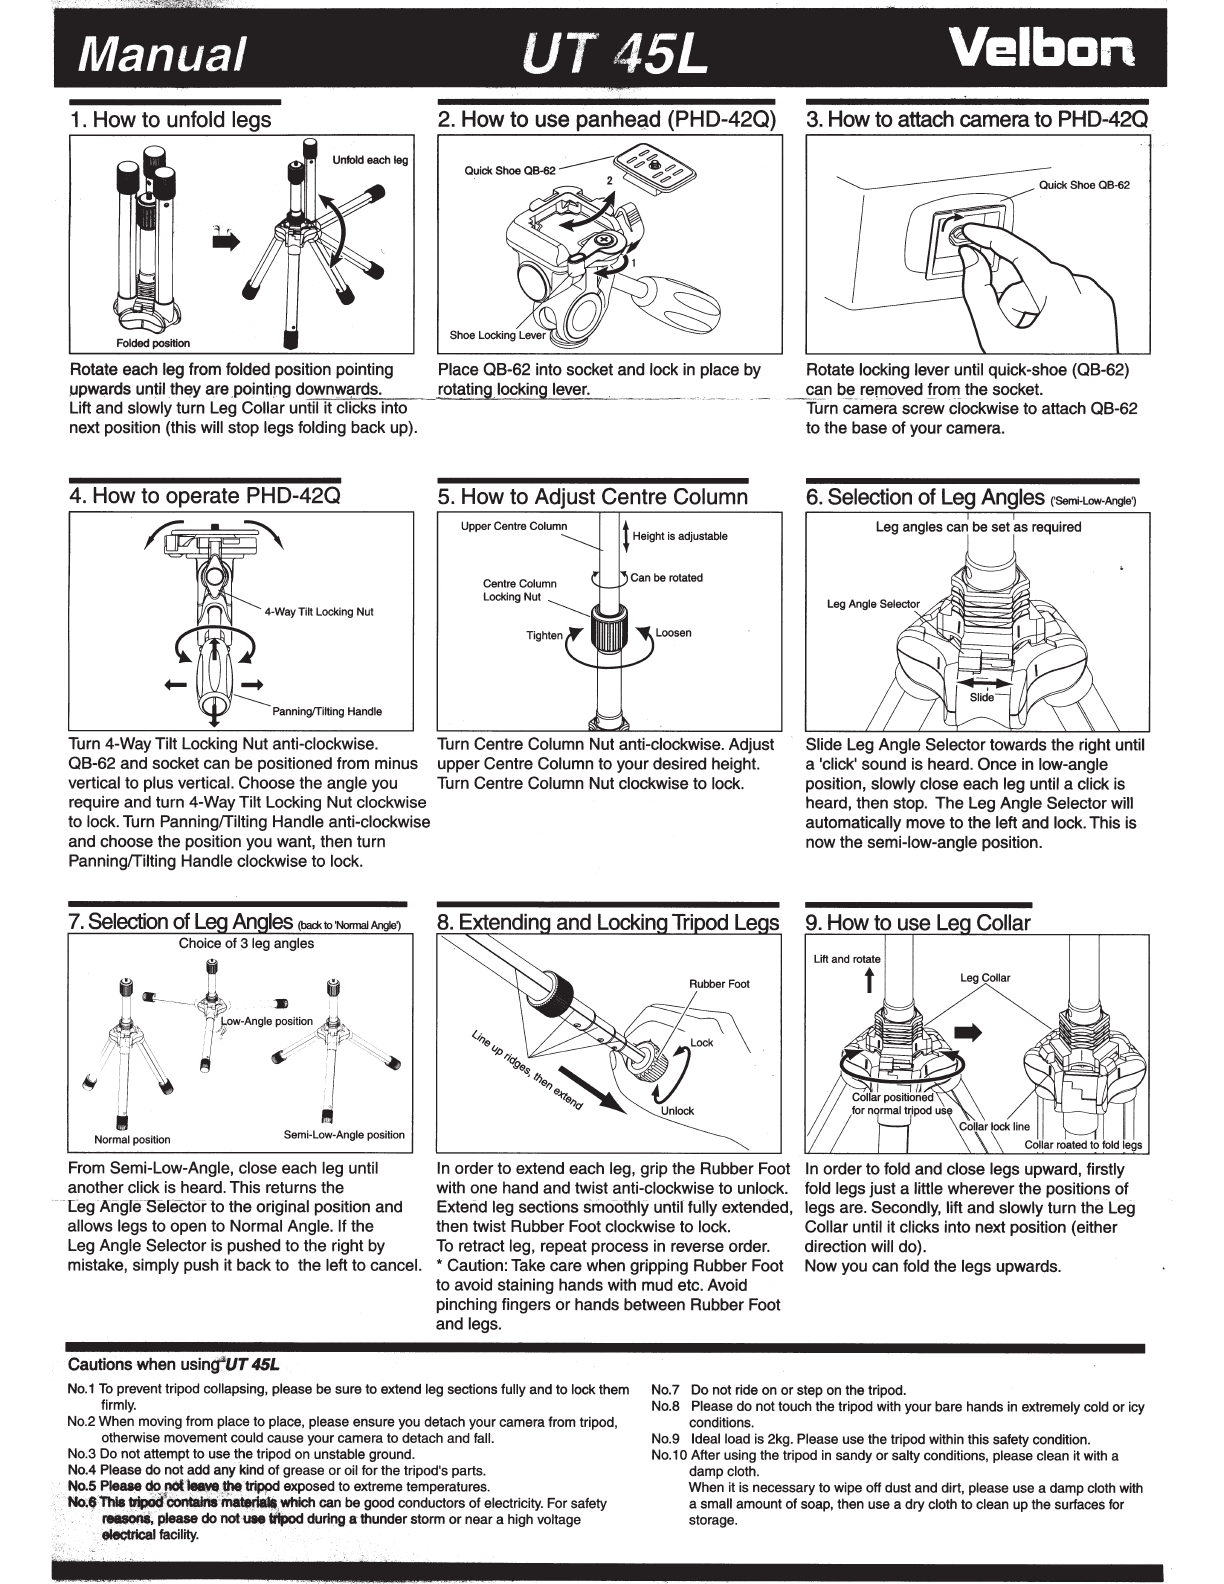
How to unfold legs
Unfold each leg
Rotate each leg from folded position pointing
upwards until
thE!Y
~re
pointi[lg downwards.
Lift and slowly turn Leg Collar until it clicks into
next position (this will stop legs folding back up).
4.
How to operate PHD-420
'1:~.·~~'"
'
........
--..___
Panning(Tilting Handle
Turn 4-Way Tilt Locking Nut anti-clockwise.
QB-62 and socket can be positioned from minus
vertical to plus vertical. Choose the angle you
require and turn 4-WayTilt Locking Nut clockwise
to
lock.Turn Panning/Tilting Handle anti-clockwise
and choose the position you want, then turn
Panning/Tilting Handle clockwise to lock.
7.
Selection
of
Leg
Angles
(bad<
to·-
Angle~
Choice of 3 leg angles
. .
~
.._
_
(-)
"Jil
I
Normal position
Semi
~
Low
·
Angle
position
From Semi-Low-Angle, close each leg until
another click is heard.This returns the
-
[eg
.1'\ngre-serectorlo the original position and
allows legs to open to Normal Angle. If the
Leg Angle Selector is pushed to the right by
mistake, simply push it back to the left to cancel.
Cautions when
usin{fUT
45L
2.
How to use
panhe~d
(PHD-420)
Place QB-62 into socket and lock in place by Rotate locking lever until quick-shoe (QB-62)
can be removed from the socket.
rotating locking lever. -
~
c
--
--
- - -Turn camera screw Clockwise
to
attach OB-62
to the base ofyour camera.
5.
How to
UpperCentre
Centre Column
Locking Nut
Centre Column
be rotated
Loosen
Turn Centre Column Nut anti-clockwise. Adjust
upper Centre Column to your desired height.
Turn Centre Column Nut clockwise to lock.
In
order to extend each leg, grip the Rubber Foot
with one hand and twist anti-clockwise to unlock.
Extend leg sections smoothly until tufty extended,
then twist Rubber Foot clockwise to lock.
To
retract leg, repeat process in reverse order.
* Caution:Take care when gripping Rubber Foot
to avoid staining hands with mud etc.Avoid
pinching fingers
or
hands between Rubber Foot
and legs.
6.
Selection of
Leg
Angles
<
'
Semi-Low-Angle~
Leg angles can
be
set as required
Slide Leg Angle Selector towards the right until
a 'click' sound is heard. Once in low-angle
position, slowly close each leg until a click is
heard, then stop. The Leg Angle Selector will
automatically move to the left and lock.This is
now the semi-low-angle position.
9.
How
to
use
Le
Collar
Lift and rotate
t
In
order to fold and close legs upward, firstly
fold legs just a little wherever the positions of
legs are. Secondly, lift and slowly turn the Leg
Collar until it clicks into next position (either
direction will do).
Now you can fold the legs upwards.
No.1
To
prevent tripod collapsing, please be sure to extend leg sections fully and to lock them
firmly. No.7 Do not ride on
or
step on the tripod.
No.8 Please do not touch the tripod with your bare hands
in
extremely cold or icy
conditions.
No.2 When moving from place to place, please ensure you detach your camera from tripod,
otherwise movement could cause your camera to detach and fall.
No.3 Do not attempt to use the tripod on unstable ground.
No.4 Please do not add any kind of grease or oil for the tripod's parts.
N9.5
Pleaae do
not
:
~
lhe
trlppd exposed to extreme temperatures.
·'
'NcdfThlll
tllpJli:on~Uiit
'
~
.
which
can
be
good conductors of electricity. For safety
~
please
do
not
·
UM
~
during a-thunder storm
or
neara high voltage
.
eleCtrical
facility.
No.9 Ideal load is 2kg.Please use the tripod within this safety condition.
No.10 After using the tripod in sandy
or
salty conditions, please clean it with a
damp cloth.
When it is necessary to wipe off dust and dirt, please use a damp cloth with
a small amount
of
soap, then use a dry cloth to clean up the surfaces for
storage.
 User manual")


 User manual")


