manuals.online logo
Brands
  1. Home
  2. •
  3. Brands
  4. •
  5. Velleman
  6. •
  7. Stereo System
  8. •
  9. Velleman PROMIXCD4 User manual

Velleman PROMIXCD4 User manual

PROMIXCD4 GB1
PROMIXCD4 – DOUBLE CD PLAYER, MIXING PANEL + AMPLIFIER
1. Introduction
Thank you for buying the PROMIXCD4 ! Read this manual carefully before bringing the device into service. Remove
the packaging carefully to avoid damage to the device. Respect the instructions printed on the front panel and clean
the lasers regularly.
The crossfader may well need to be replaced after some time as it is heavily used and therefore prone to wear.
2. Safety Instructions
• Protect the device against direct sunlight
• Avoid locations where the device will be exposed to excessive dust, heat, cold or moisture.
• The temperature range for this device lies between 5-35°C (41-95°F)
• Clean the lasers regularly as they are exposed. Use a good cleaning disk. Do not touch the optics as they are
very delicate.
• At no time should the laser sensors be obstructed.
• Never pull the cord when disconnecting the device. Always grasp it by the plug.
• Do not use excessive force when operating the switches and control knobs
• Do not use chemical solvents when cleaning the device to avoid damage to the surface. Use a dry and clean cloth
instead.
• Do not open the housing and try to repair this device yourself, as this will automatically invalidate the warranty.
Declaration of Conformity : This device conforms to the following standards : EN55013, EN55020, EN6055-2 &
EN60555-2
3. Handling Discs
• Click the disc into place with the label facing upward
• Return the disc to its case after use to avoid serious scratches that could cause the laser to skip when reading the
disk
• Do not expose your discs to direct sunlight or high temperatures for extended periods.
• Do not stick papers or write with a ballpoint pen on the surface of the disc
4. Cleaning Discs
Use a soft cloth to wipe fingerprints and dust from the glossy side of the disc. Wipe in a radial motion, i.e. in a straight
line and from the inside to the outside of the disc. Small dust particles and light stains have no effect on the
reproduction quality.
5. CD Laser Maintenance
Keep the lenses of the players clean and do not touch them. The lenses are fragile and the system may not operate
properly if they are touched.
Use a high-quality laser lens cleaning disk to prolong the life of the product. Dirty lasers will cause the music to
“jump” on some or all discs.
PROMIXCD4 GB2
CAUTION
Switch off the power to each component before connecting this device with or disconnecting it from an audio system.
Make the right connections :observe the L (left channel) and R (right channel) marks. Connect the cable in a secure
manner. Loose connections will result in unsatisfactory sound reproduction and are likely to cause noise problems.
6. Case Maintenance
Use only a damp cloth to wipe the case clean. Do not use solvents or abrasives.
7. Replacing the Crossfader Module
The crossfader will probably need to be replaced after some time as it is very heavily used. This is quite normal.
Switch off the power and disconnect the device from the mains.
Undo the top screws with a screwdriver. Lift the crossfader module clear of the device while avoiding damage to the
internal wiring.
Unplug the cable loom from the bottom of the module. Handle only the white connector block and do not pull the
cable itself. Insert the new crossfader module and replace the screws.
8. Front Panel Description
1. Speaker connections Connect the device to your main stereo speakers with the supplied 6.3mm
jack
2. Amp output Connect the Amp output’s RCA sockets to a power amp or similar
installation using good quality cables (not supplied)
2. Rec output To record your mixes connect the REC OUT RCA sockets to the input of
your tape recorder or similar device.
3. Headphone socket This socket accepts a standard ¼” (6.3mm) stereo jack.
4. Aux inputs Use these inputs to connect your cassette deck, tuner or other line level
sources (NOT a CD player)
PROMIXCD4 GB3
5. Ground connection If you have a turntable with a ground connection wire, connect it with this
binding post to prevent hum.
6. Phono Inputs Suitable for all standard turntables using a magnetic element.
7. Microphone input This socket accepts a standard 6.3mm jack. The microphone level control
(29) should be set to its minimum before inserting or unplugging a
microphone.
8. Microphone equalisation To adjust the tonality (bass/treble) of the microphone input
9. Master Level Control Varies the amplifier volume level that the speaker connection (1) supplies
to the speakers.
10. Master HF Equalisation Control Use it to adjust the master output of the device. Rotating the controls
clockwise will add boost to the treble and vice versa.
11. Master LF Equalisation Control To adjust the master output of the device. Rotating the controls clockwise
will add boost to the bass and vice versa.
12. Pitch Bend Increases or decreases the playing speed while held down to enable you
to match the beat on both discs (see page 5)
13. Pitch Switches the pitch control on or off.
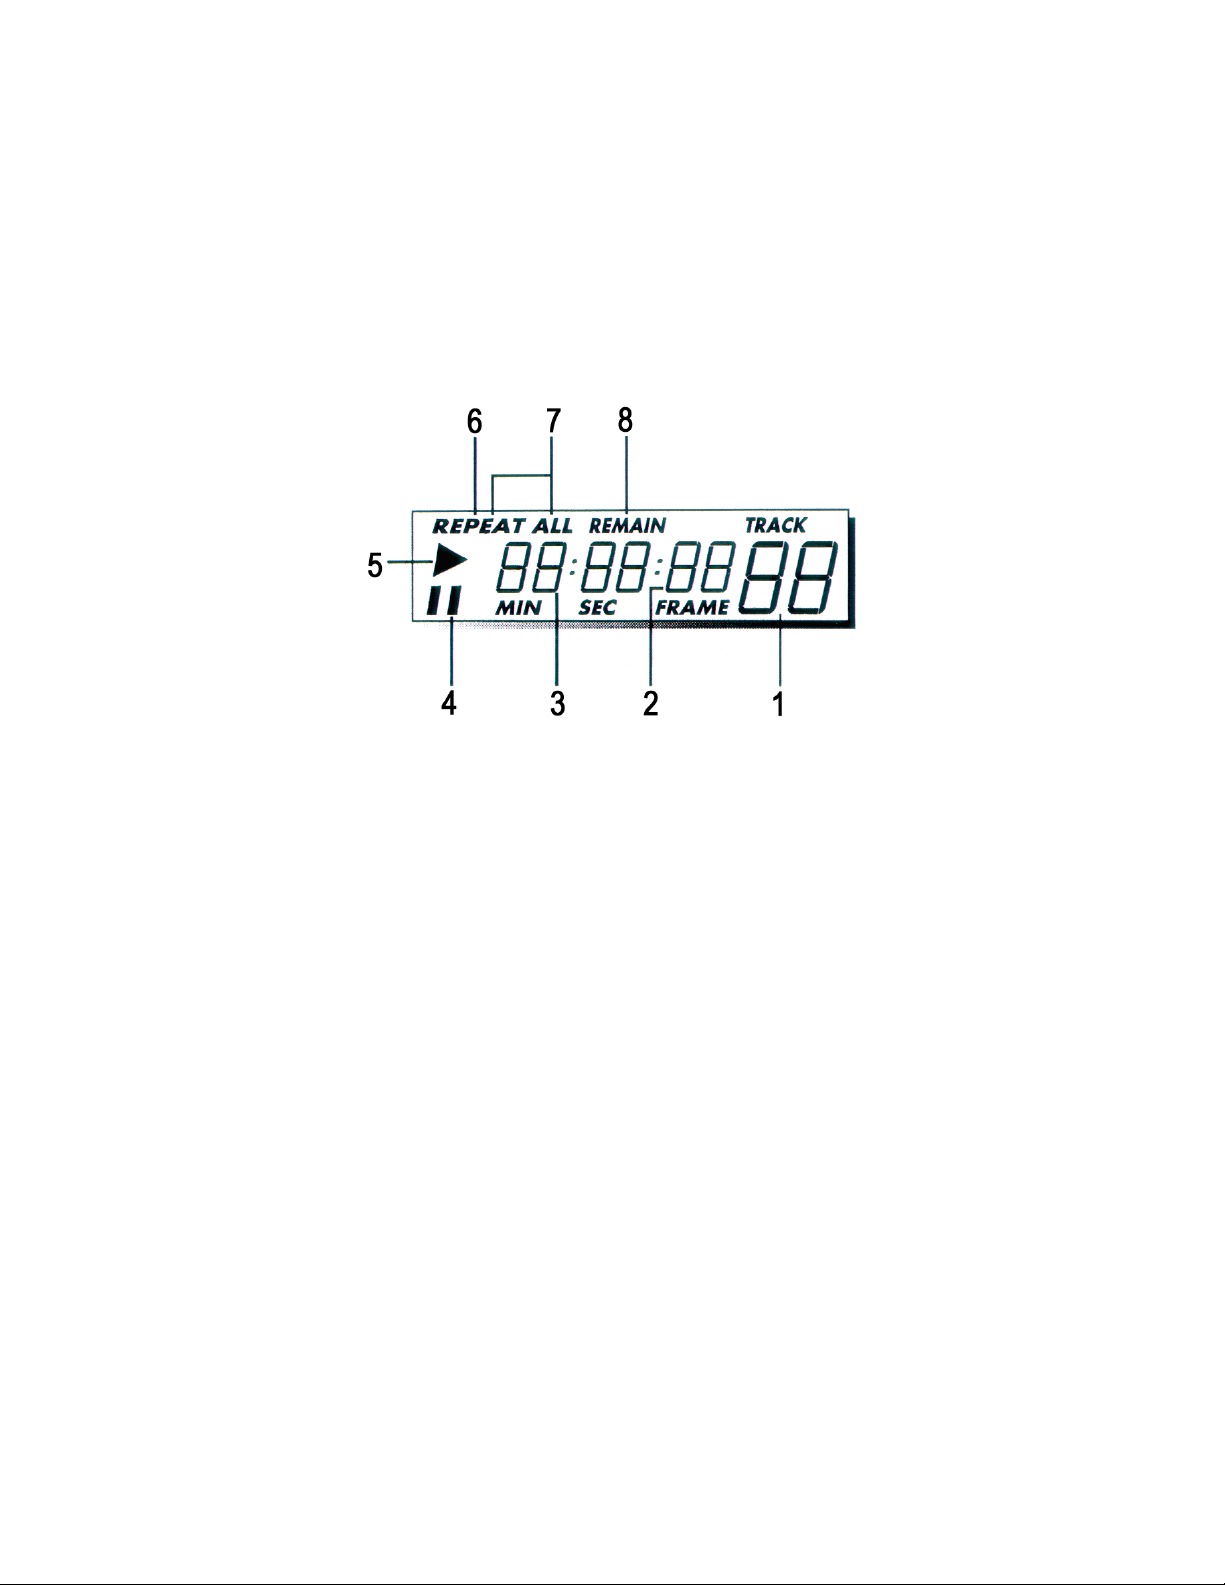
14. Time Switches the time display to remaining playing time or elapsed time of
either the current track or the entire disc.
15. Frequency Kill Switches This facility is channel-independent and allows the user to filter out the
low, mid and high frequencies. Press the buttons to filter out one of the
three or all three frequencies.
16. Crossfader module Generally this control is set to the centre position. However, both subtle
and dramatic mixing effects can be achieved. This is really only a matter of
experimentation. Moving the crossfader to the left will increase the output
of channel 1. Moving the crossfader to the right will increase the output of
channel 2.
If your personal mixing style involves extensive crossfader use, you will
undoubtedly have to replace the crossfader module at some point in time
(see page 2 “.7. Replacing the Crossfader Module”)
17. Input Line Faders Raising the fader to highest position will increase the output level and vice
versa.
18. Punch In To add “scratch” effects to a mix : press the appropriate punch-in button
repeatedly. This enables the channel in question to override the output
faders. Place the crossfader (16) in the centre position. You can now use
both punch-in buttons to add effects to channels 1 and 2 simultaneously.
19. Pitch Control Slides up or down to change the pitch (see also page 5)
20. Play/Pause Starts or pauses the disc.
21. Search Scans in both directions to a particular point.
22. Skip Backward Jumps to the beginning of the track being played or skips track per track if
pressed repeatedly.
23. Stop Stops disc play or clears the programme settings. The total number of
tracks and the total playing time will appear on the display panel to
indicate that the player is in STOP mode.
24. Repeat Plays the current track or the entire disc again and again.
25. Cue Pre-fade listening (see page 5)
26. PFL Volume Sets the headphone output level (3)
27. LCD Display Displays information regarding the status of the disc
28. PFL Pan Control Headphones make pre-fade listening possible on both channels. This
allows the user to listen to an input without it being heard by the audience.
29. Microphone Level Control Determines the microphone volume
30. Input Selector switches Three positions make it possible to select the appropriate input for each
individual channel.
PROMIXCD4 GB4
31. CD Send & Receive Sensors For safety reasons, the CD laser cannot be activated unless a disc is
placed onto the player. Do not obstruct the lasers !
32. CD Turntable Place the discs on the reader and gently press down until the disc clicks
into place.
33. CD Laser This is the laserhead for the CD player. Do not touch the laser ! Refer to
the maintenance guide on page 1 “5. CD Laser Maintenance”
34. Power Switch Switches the power on or off
35. AC Power Accepts a standard IEC mains cord (supplied). 230V / 50Hz / 250W.
9. Description of the Display
1. 88 displays the current track number (or total number of tracks on the disc when in STOP mode)
2. 88. indicates the selected frame number (see below)
3. 88:88 indicates the total disc time and running time for the track
4. PAUSE illuminates when the player is in PAUSE mode
5. PLAY Illuminates when the disc is playing
6. REPEAT Illuminates when a single track has been selected for repetition
7. REPEAT ALL Illuminates when you have chosen to repeat all tracks
8. REMAIN displays the remaining running time for a track or the entire disc
Frame Display : This display shows the 75 frames per second, which enables the user to align the two discs with
each other in a very precise way.
10. Quick Start Guide
Connect all the source inputs while the PROMIXCD4 is not connected to the mains.
Now connect the left speaker output to the left speaker and do the same for the right output. Connect the microphone
or headphones you may wish to use to the appropriate sockets.
Check that all controls are set to their minimum positions and switch the power ON.
Select CD on the channel 1 input selector switch. The CD modules function in the same way as other CD players,
the only difference being that the PROMIXCD4 has no eject button. Just place the disc on the player and press
gently. Use the skip function to select the track you want to listen to and press PLAY/PAUSE twice so that the disc is
ready to go.
PROMIXCD4 GB5
Move the crossfader to the left (channel 1) and slide the channel 1 fader to the top adjust the master output to a
minimum level.
Pressing PLAY/PAUSE starts the disc and you should now hear music through the speakers. You can now adjust
the master level and also the HF and LF controls.
The procedure for channel 2 is identical, the only difference being that the crossfader should be pushed to the right.
You can now experiment with the special cue, pitch and pitch bend controls as described in more detail below.
11. Pitch & Cue Controls
Pitch Control
This feature allows you to increase or decrease the speed of a track, enabling you to match the BPM count of two
independent tracks. Moving the control up will increase the speed of the disc and vice versa. Set the control to zero
(centre) to play the disc at normal speed.
The PITCH indicator comes on when the PITCH button is pressed. Push the PITCH CONTROL up or down to adjust
the playing speed.
Beat Matching Using Pitch Bend
This feature allows you to increase or decrease the playing speed by 8% when the button is held down.
Once the BPM’s are matched you can alternate between discs 1 and 2 without audible transition. Remember to keep
the button pressed down or the disc will return to its former speed.
Cue Control
Pressing the CUE button will illuminate the Cue LED. You will hear the selected fragment when PLAY/PAUSE is
pressed during playback and the CUE function is ON. The SEARCH buttons enable the user to position the disc on
any fragment of any track he chooses. Press the CUE button again to disable the CUE function.
12. Specifications
Input Sensitivity
DJ mic 1mV / 600 ohm
Phono 3mV : 47 Kohm
Line / CD 150mV / 100Kohms
Output Level
Amp out (RCA) 1.0V
Rec out (RCA) 0.35V
Power Output 40Wrms (6 ohm)
Harmonic Distortion < 0.1%
Frequency Response 20Hz – 20KHz
Headphones impedances 8-300 ohm
General
Power Supply (AC) 230Vac/50Hz
Dimensions 550 (W) x 325 (D) x 190 (H)
Weight ± 18kg
The specifications are subject to change without prior notice.
PROMIXCD4 GB6
13. Troubleshooting Guide
SYMPTOM CAUSE ACTION
No power, even when the
power switch is ON
Poor power plug connection at the
AC outlet. The fuse in the plug has
blown.
Insert the power plug firmly into the
AC outlet. Check the fuse and the
socket.
The disc is loaded upside down Reload the disc right side up.
The disc is too dirty Clean the disc with a soft cloth.
Wipe in a radial fashion.
Disc will not play
Disc code error Reload the disc (wait 5 seconds)
and then switch the unit back on
and try again.
No sound Improper output cable connections Check the output cable for breaks
and short circuits.
Improper amplifier operation Make sure the amplifier controls
are set properly. Check the master
output level.
Disc skips The player is subjected to
vibrations or physical shock.
Select a different location
Laser lens is dirty Clean the lens with a high-quality
cleaning disc
Disc is dirty Clean the disc
Hum Loose cable connections Firmly connect all audio plugs.
If the fault remains, try to clear it by switching your player off and on again (wait 5 seconds to switch it back on).
Consult your dealer if this doesn’t help. Under no circumstances should you attempt to repair the device yourself :
this will invalidate the guarantee if you do.

Other Velleman Stereo System manuals

Velleman PA5U User manual

Velleman

Velleman PA5U User manual

Velleman HQ Power SOUND MACH I User manual

Velleman

Velleman HQ Power SOUND MACH I User manual

Popular Stereo System manuals by other brands

Telefunken TF-PS2104 instruction manual

Telefunken

Telefunken TF-PS2104 instruction manual

Philips AZ1836-37B Quick use guide

Philips

Philips AZ1836-37B Quick use guide

SetonixSynth Macropod user manual

SetonixSynth

SetonixSynth Macropod user manual

Aiwa XR-H1100 Service manual

Aiwa

Aiwa XR-H1100 Service manual

Sharp CD-ES770 Operation manual

Sharp

Sharp CD-ES770 Operation manual

Sanyo AWM-660 instruction manual

Sanyo

Sanyo AWM-660 instruction manual

Philips FW-C100/25 user manual

Philips

Philips FW-C100/25 user manual

Sony CMT-U1BT - Micro Hi-fi Component System operating instructions

Sony

Sony CMT-U1BT - Micro Hi-fi Component System operating instructions

LG OK55 owner's manual

LG

LG OK55 owner's manual

Philips MCM167 Service manual

Philips

Philips MCM167 Service manual

Philips MCM279/55 user manual

Philips

Philips MCM279/55 user manual

LG CM4550 Service manual

LG

LG CM4550 Service manual

Sony MHC-DP1000D operating instructions

Sony

Sony MHC-DP1000D operating instructions

Samsung MM-C550D user manual

Samsung

Samsung MM-C550D user manual

Tivoli Audio ART MUSIC SYSTEM HOME manual

Tivoli Audio

Tivoli Audio ART MUSIC SYSTEM HOME manual

LG XC102 owner's manual

LG

LG XC102 owner's manual

Panasonic SC-HC28DB operating instructions

Panasonic

Panasonic SC-HC28DB operating instructions

Sony HCD-DX90 Service manual

Sony

Sony HCD-DX90 Service manual

manuals.online logo
manuals.online logoBrands
  • About & Mission
  • Contact us
  • Privacy Policy
  • Terms and Conditions

Copyright 2025 Manuals.Online. All Rights Reserved.