VeloBene Bicycle Products CleatMaster SPD Assembly instructions

VeloBene Bicycle Products, Inc.
Cleat Fitting Guide
CleatMasterTM SPD
CleatMasterTM KēO
CleatMasterTM SPD-SL

Introduction
This CleatMaster fitting guide shows you how to perform a
cleat fitting service using the CleatMaster line of tools
from VeloBene Bicycle Products.
Once the cyclist has been fit to a bicycle, you can then set
the cleat alignment. f you do not have a fit method
currently in use, please visit the VeloBene web site for a
free fitting method guide.
www.velobene.com
A complete cleat adjustment service performed in concert
with a VeloBene fitting service can be performed in ~30
minutes by an experienced bicycle fitter.
This manual shows a pair of Shimano SM-SH51 cleats
being fit to a cyclist using a dedicated fit cycle and the
CleatMaster SPD. The steps are the same for Shimano
SPD-SL and Look KēO.
Thank you for using CleatMaster; Cleat Position Matters!
VBP-DOC-901 -2- May 2013

Safety First
The CleatMaster, like any other tool, can lead to injury if
not used properly. Please read and follow the safety
instructions below.
N V R allow a cyclist to stand out of the saddle and
pedal while using CleatMaster. The cyclist must remain
seated at all times while pedaling.
STOP the cyclist’s pedaling motion immediately if the
cyclist’s foot comes out of the CleatMaster. When the
CleatMaster is used with a fitness bike, there is the chance
of continued pedal motion by the fitness bike. Make sure
both you and the cyclist know how to immediately stop
both the pedaling action and the momentum of the fitness
bicycle in the event that the cyclist's foot becomes
disengaged from the CleatMaster while pedaling.
DO NOT over tighten any of the fasteners. f fasteners
are over tightened, they may strip the threads that secure
them and lead to tool failure.
VBP-DOC-901 -3- May 2013

Performing a Cleat Fitting
Step One: Select a cleat fitting platform.
The cleat fitting platform should match the cyclist's usual
cycling position as closely as possible. The most accurate
platform to use is the cyclist’s own bicycle in a stationary
trainer.
Your options for a cleat fitting platform are:
A dedicated fit cycle.
Set resistance level as low as
possible. Set the fit cycle to match
the cyclist's position.
An indoor studio cycle, such as
those from Real Ryder™, Keiser™,
or Schwinn Fitness™.
Set the resistance level to
freewheel and adjust the bicycle to
the cyclist's standard position.
The cyclist's personal bicycle in
a stationary trainer.
Make sure that the bicycle has
been fit to the cyclist.
VBP-DOC-901 -4- May 2013

Select the largest chain ring and smallest cog with no
additional resistance supplied by the stationary trainer.
Once the platform has been selected, raise the saddle
25mm to account for the stack height of the tool.
NOT : When raising the saddle, pay attention to the torque
specification of the seat post clamping mechanism. Many
carbon fiber race bicycles can be severely damaged if the
clamp is over tightened.
n the picture is a bicycle from Specialized. This model
specifies 55 in-lbs of torque for the seat post. The font on
the seat collar for the torque specification is quite small.
This specification changes from bicycle to bicycle and from
manufacturer to manufacturer. Always verify the torque
specification before tightening a seat post.
VBP-DOC-901 -5- May 2013

Step Two: Set up the tool.
Snap the CleatMaster tool into the existing pedals of the
cleat fitting platform.
Engage the front edge of the right pedal with the cleat on
the bottom of the right CleatMaster and using the heel of
the hand, apply downward force to snap the tool into the
right side pedal, repeat for the left side.
Step Three: Set up the cyclist's shoes.
Loosely set cleats into the cyclist's shoes:
•
Secure the cleats to the cyclist’s shoes by using the
hardware and instructions supplied by the shoe/pedal
manufacturer. (The procedure is the same for Shimano
SPD, SPD-SL and Look KēO)
•
Tighten these bolts 1/8 of a turn beyond finger tight.
VBP-DOC-901 -6- May 2013

•
Set the cleats into the neutral angular position with a
fore and aft position aligned with the center of the ball
of the foot.
•
The cleat should take moderate pressure to align.
The ball of the foot is not a straight line across the foot, it is
made up of all five toes.
Examine the cyclist's foot and take a mental note of where
the joints are for each toe. Draw an imaginary line through
all five toe joints that make up the ball of the foot and
visualize the center of that line. t is usually ahead of the
small toe and just behind the big toe.
n the step three pictures, the cleats were set for an
individual with a normal foot, where the joints of the toes
form a slight arc from the big toe to the little toe.
Once you have determined where the center line of the ball
of the foot is located, use the pedal and shoe
manufacturer's instructions for setting the initial cleat fore-
aft position.
VBP-DOC-901 -7- May 2013

Step Four: Pedal and Adjust.
Have the cyclist pedal for 5 minutes and make no
adjustments during this first five minute period. This loosens
the cyclist's legs and allows the cyclist to acclimate to the
pedaling motion with the CleatMaster.
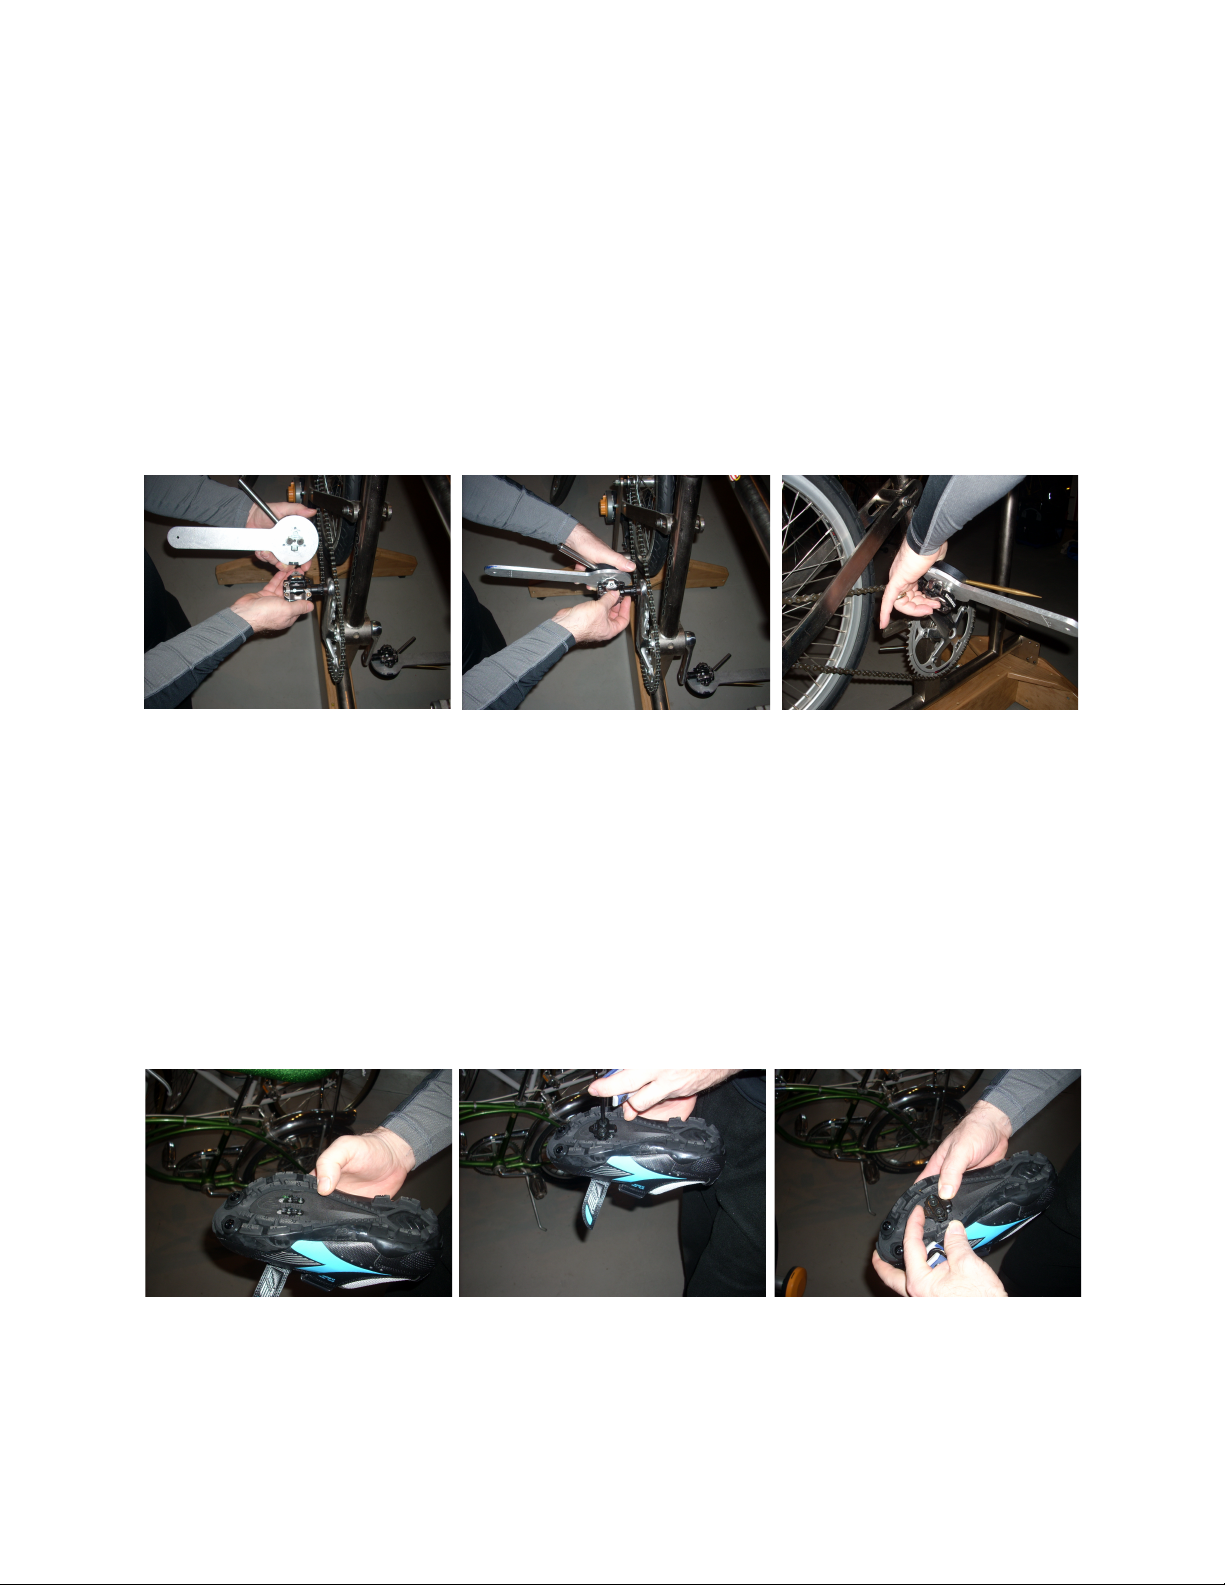
After the initial 5 minutes of pedaling, observe the angular
alignment while the cyclist is pedaling. The cyclist will settle
into their neutral foot position. This may or may not be the
pedal neutral position. n the left figure, the alignment rod
is over 6 degrees forward. n the right figure, the rod is over
6 degrees rearward. Both of these positions have been
exaggerated for purposes of clarity.
Make appropriate adjustments. Grasp the cyclist's shoe
firmly in one hand and with the other hand grab the tool
handle and pull back/ push forward to adjust the point of
the brass alignment rod to center. n the case of forward
position grasp the shoe and pull back on the handle. This is
shown in the next series of pictures.
NOT : When the cyclist stops pedaling, they may realign
VBP-DOC-901 -8- May 2013

their foot when they relax. Prior to stopping the cyclist's
pedal motion, make a mental note of the adjustment
required.
Pedal for 1 minute after each adjustment. Repeat until the
alignment rod is centered while pedaling. n the next figure,
you can see neutral alignment.
VBP-DOC-901 -9- May 2013

When centered, the cleat position in the cyclist's shoe
matches the angular alignment of the cleat attached to the
pedal system. When the rod is in this position, or oscillates
neutral to this position, the cleat adjustment is complete.
Step Five: Tighten the cleat bolts.
With the cyclist seated on the saddle, gently lift their feet
out of the pedals (one at a time) and tighten the cleats.
Next, have the cyclist climb off of the bicycle and remove
their shoes. Using a torque wrench, further tighten the cleat
bolts to the manufacturer's specification. f the specification
can not be found, use 51 inch-pounds, as this is the value
specified by Shimano and Look for their cleats.
VBP-DOC-901 -10- May 2013

The cleats are now set. Return the saddle to its original
position (we raised it in Step One, and again take special
note of the torque specification of the seat post binder
bolt).
f the cyclist is new to cycling or if this is their first pair of
shoes with cleats, then proceed with Step Six.
Step Six: Test Cleat ngagement
Have the cyclist engage the pedals on the fit platform and
click in with both feet. The pedal tension may need to be
reduced until the cyclist is comfortable with the operation of
the cleat engagement of their pedal system. See the
manufacturer's documentation for instructions on adjusting
the pedal tension.
To engage the pedal (this works for all systems), start with
the ball of the foot just slightly behind the pedal axle, slide
the shoe forward until the front of the cleat engages the
pedal, then apply downward force with the heel to “click”
into the back of the pedal.
To disengage from the pedal,
rotate the heel outward until
it releases.
Once the cyclist is
comfortable with this action,
they are ready to ride.
VBP-DOC-901 -11- May 2013

The Full CleatMaster Line
KēO SPD-SL SPD
VeloBene Bicycle Products, nc.
373 Reservoir St.
Holden, MA 01520
www.velobene.com
508-662-5588
info@velobene.com
This manual suits for next models
2
Table of contents