Bell COCOON 300 Series User manual

COCOON 300™AND SKIPPER™

Two Adjustable Wrenches
WARNING: Failure to follow each of the following
instructions can result in injury to your child.
1. Read all the instructions before assembling or
using the Bicycle Child Carrier.
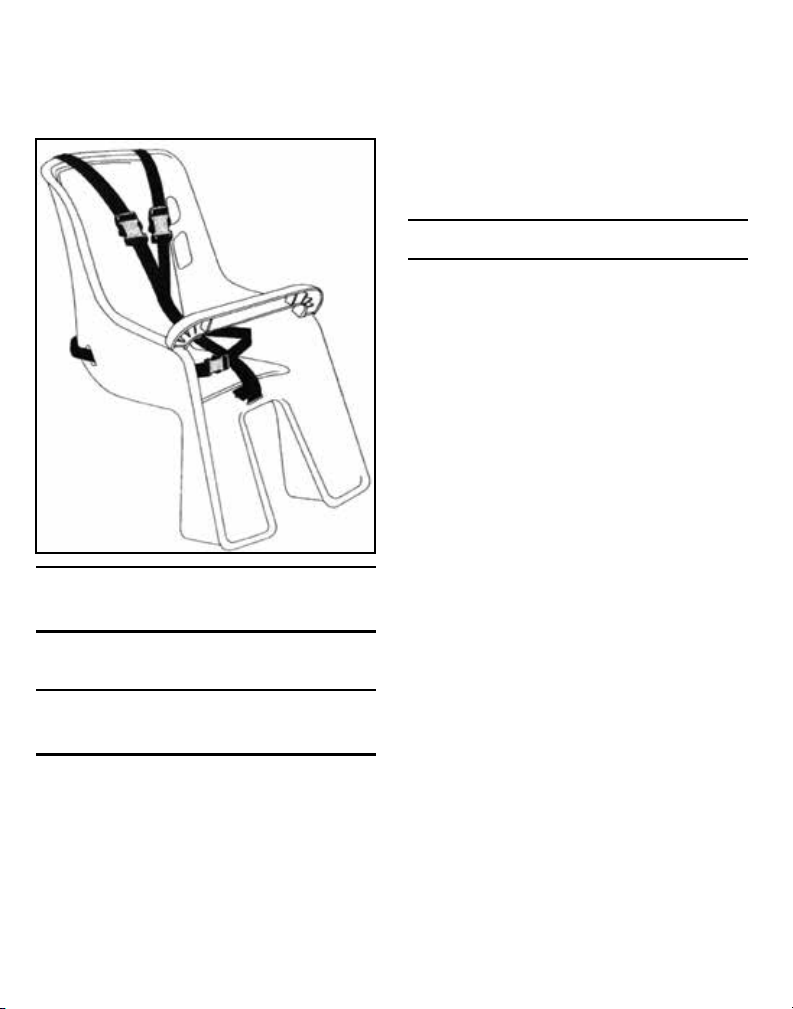
2. For snug but comfortable t see that the Quick-
Release buckles are fastened properly and that
straps are adjusted correctly. Test shoulder slack
by pulling the straps away from child’s chest. They
should not move by more than one inch.
3. In the event that the child carrier is involved in an
accident, check to be sure that it functions properly
before it is used again. Check for structural damage
and replace the seat if it is damaged.
1. Only children who are able to hold their head up-
right while wearing a bicycle helmet (approximately
1 year old) and are not over 40 pounds should be
passengers in a child carrier
2. Make sure bicycle is stable and under control
when loading and unloading child
3. Stability of the bicycle is affected by the weight of
the child in the carrier
4. Child should always wear a bicycle helmet which
complies with the CPSC 1203 standards
5. Never leave child unattended
6. Never leave the child in the carrier with only the
kickstand supporting the bicycle
7. The bicycle rider should avoid busy streets and bad
weather and ride with extra care and reduced speed
8. When walking bicycle, hold carrier with one hand
and handlebar with the other
9. Before each use check to be certain carrier and
hardware are intact and secure
10. Make sure carrier does not interfere with braking
or pedaling
11. Do not use the seat if any component is broken
or if the straps or other components show signs of
signicant wear
12. Do not modify the seat or the restraint system
13. Discard and destroy after ve years of use
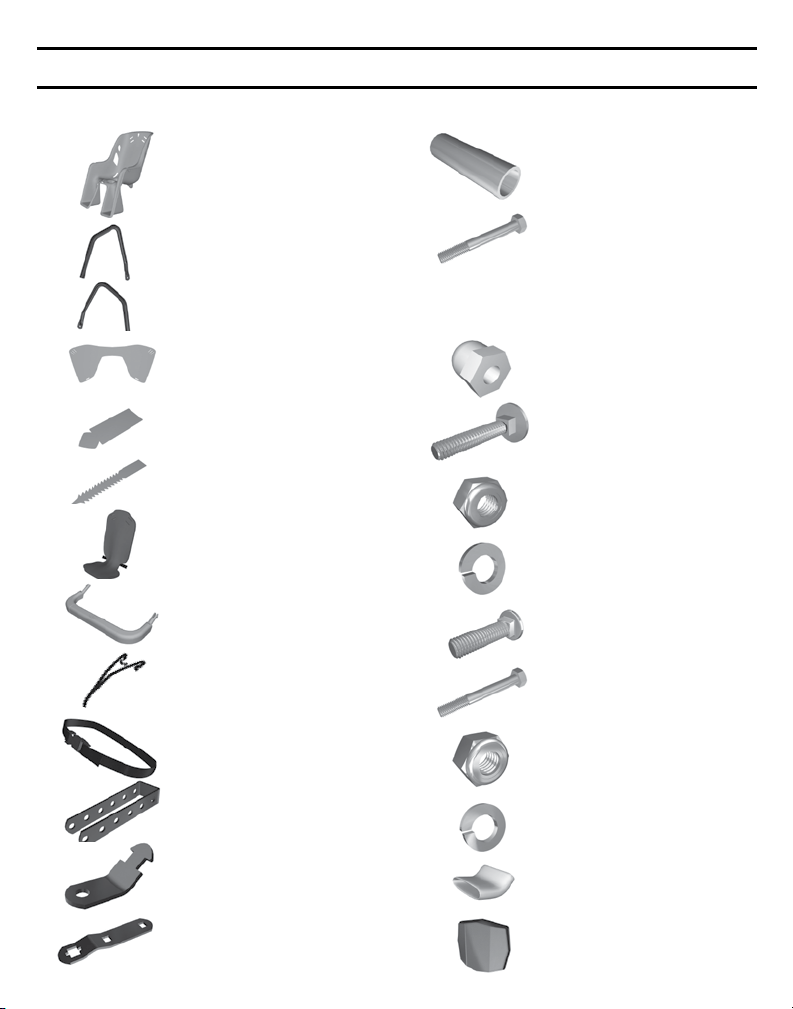
BICYCLE CHILD CARRIER
INSTRUCTION MANUAL
TOOLS REQUIRED
FOR ASSEMBLY
IMPORTANT
SAFETY INFORMATION
CAUTION
COCOON 300™AND SKIPPER™

ITEM DESCRIPTION QTY
1. Seat 1
2. Right Seat Support 1
3. Left Seat Support 1
4. Foot Guard 1
5. Spring Guard 2
6. Foot Guard Fasteners 3
7. Seat Pad 1
8. Grab Bar 1
9. Shoulder Harness 1
10. Lap Belt 1
11. U-Bracket 1
12. Short Lower Bracket 2
13. Long Lower Bracket 2
ITEM DESCRIPTION QTY
14. Spacer Tube 1
15.
6mm x 58mm Hex Bolt
1
16.
Metal Spacer
2
17.
6mm (1)/8mm (2) Plastic Thread Protector
18. 6mm x 35mm Round Head 4
Square Neck Bolt
19. 6mm Nylock Nut 5
20. 6mm Split Lock Washer 5
21.
8mm x 30mm Bolt
4
22. 8mm x 58mm Hex Bolt 2
23. 8mm Nylock Nut 6
24. 8mm Split Lock Washer 6
25. Vinyl Paint Protector 4
26. Red Reector With Adhesive Tape 1
PARTS LIST

Place the seat on its side. Insert (2) 6mm by 35mm
round head square neck bolts into the (2) holes in the
left side of the bottom of the seat.
While holding the bolts rmly in place fasten the
left seat supports to the bottom of the plastic seat
using (2) 6mm split lock washers and (2) 6mm
Nylock nuts.
Note: You cannot hand tighten Nylock nuts. An
adjustable wrench is required to complete this step.
STEP 1 STEP 2
ITEM #18
6mm x 35mm
ITEM # 19
6mm Nylock
Nut
ITEM # 20
6mm Split
Lock Washer

ITEM # 19
6mm Nylock
Nut
ITEM # 20
6mm Split
Lock Washer
Insert (2) 6mm by 35mm round head square neck
bolts into the right (2) holes in the bottom of the seat.
While holding the bolts rmly in place, fasten the
right seat supports to the bottom of the plastic
seat using (2) 6mm split lock washers and (2) 6mm
Nylock nuts.
Attach the long lower bracket to the bottom of the
seat support using an 8mm by 30mm round head
square neck bolt, an 8mm split lock washer and an
8mm Nylock nut. Be sure that the bolt head faces
outward and the lock washer is in place.
Attach the long lower bracket to the bottom of the
seat support using an 8mm by 30mm round head
square neck bolt, an 8mm split lock washer and an
8mm Nylock nut. Be sure that the bolt head faces
outward and the lock washer is in place
STEP 3
STEP 4
STEP 5
STEP 6
ITEM #18
6mm x 35mm
ITEM #21
8mm x 30mm Round
Hd. Sq. Neck Bolt
ITEM #21 8mm x 30mm
Round Hd. Sq. Neck Bolt
ITEM #23
8mm Nylock
Nut
ITEM #23
8mm Nylock
Nut
ITEM # 24
8mm Split Lock
Washer
ITEM # 24
8mm Split Lock
Washer

Slide the vinyl paint protectors over the (4) brackets.
STEP 10
Remove the seat post clamp from your bicycle.
This step is for the 8mm hex bolt. Attach the
U-bracket using an 8mm by 58mm hex bolt, an
8mm split lock washer, and an 8mm Nylock nut.
Note: This step will require (2) adjustable wrenches.
Note: If the 8mm bolt doesn’t t, the following step
will show you how to use the included 6mm bolt
with spacers
This step is for the 6mm hex bolt. Insert the
spacers on the inside of the U-bracket. Attach the
U-bracket using a 6mm hex bolt, a 6mm split lock
washer, and a 6mm Nylock nut.
Note: This step will require (2) adjustable wrenches.
STEP 7
STEP 8
STEP 9
ITEM #22
8mm x 58mm
Hex Bolt
ITEM #15
6mm x 58mm
Hex Bolt
ITEM #17
Plastic Thread
Protector
ITEM #16
Metal Spacer
ITEM # 24
8mm Split Lock
Washer
ITEM # 20
6mm Split Lock
Washer
ITEM #23
8mm Nylock
Nut
ITEM #19
6mm Nylock Nut
Position the right and left seat supports on both
sides of the u-bracket.
STEP 11

Insert the spacer tube and secure using an 8mm by
58mm hex bolt, an 8mm split lock washer and an
8mm Nylock nut.
Note: Do not completely tighten at this time. This
step will require (2) adjustable wrenches.
Insert the short lower bracket into the slotted end of
the long lower bracket and twist into position. Insert
the 8mm by 30mm round head square neck bolt and
secure it with an 8mm split lock washer and an 8mm
Nylock nut.
Repeat on other side of wheel by inserting the
short lower bracket into the slotted end of the long
lower bracket and twist into position. Insert the
8mm by 30mm round head square neck bolt and
secure it with an 8mm split lock washer and an
8mm Nylock nut.
The child carrier must be in a level position when
installed. Several adjustment holes are provided
in the U-bracket which will enable you to clear all
obstructions and level the carrier. When level, tighten
all of the fasteners securely.
STEP 12
STEP 13
STEP 14
STEP 15
ITEM #22
8mm x 58mm
Hex Bolt
ITEM # 24
8mm Split Lock
Washer
ITEM #23
8mm Nylock
Nut

Place the plastic thread protectors onto the ends of
the hex bolts.
Note: If you are using the 6mm bolt, use the thread
protector with the number 6 on the inside.
Remove the foot guard, spring guards and the foot
guard fasteners from the plastic sheet.
Install the foot guard by wrapping it over the top of
the right and left seat supports and tucking it under
the front edge of the seat. Secure foot guard to the
bicycle frame by inserting the fasteners through
the slots in the foot guard and around the bicycle
frame. If bicycle has exposed springs, wrap spring
guards around springs.
Lay the seat pad into the carrier and thread the
hook and loop straps through the lower lap belt
holes. Secure the hook and loop straps behind the
seat.
STEP 16
STEP 17
STEP 18
STEP 19

Remove the male end of the quick-release buckle.
Reinstall the male end of the quick-release buckle
and pull on the strap to conrm that the strap locks
in the buckle.
Thread the lap belt through the holes in the seat.
Pass each of the two top buttery ends of the
3-point harness through the holes in the seat and
through the holes in the seat pad.
Attach the bottom end of the 3-point harness
through the center hole in the bottom of the seat.
STEP 20
STEP 22
STEP 21
STEP 23
STEP 24

Grab the straps and pull on them to conrm that the
harness is properly anchored to the seat in both the
upper locations as well as the center lower location.
Push the grab bar into the holes in the seat. The grab
bar can be removed by pinching the tabs together
and pushing upward.
Peel the backing off the adhesive tape and adhere
the reector to the untextured area of the back of the
seat. Press rmly in position.
Double check to make sure that all of the fasteners
are securely tightened.
This completes the assembly and installation of the
Child Carrier.
STEP 25
STEP 26
STEP 27
STEP 28
CONGRATULATIONS!


Deux clés réglables
un tournevis à tête cruciforme
AVERTISSEMENT : Le non-respect de chacune
des instructions suivantes peut entrainer des
blessures pour votre enfant.
1. Lisez toutes les instructions avant d’assembler ou
d’utiliser le siège de vélo pour enfant.
2. Pour un ajustement serré, mais confortable,
assurez-vous que les boucles à dégagement rapide
sent correctement xées et que les courroies sent
bien ajustées. Testez le jeu de l’épaule en tirant sur
les courroies tout en les eloignant de la poitrine de
l'enfant. Elles ne devraient pas bouger de plus de 2,5
cm (1 po).
3. Dans le cas où le siège pour enfant est impliqué
dans un accident, assurez-vous qu’il fonctionne
correctement avant d’etre utilisé de nouveau. Vériez
les dommages structurels et remplacez le siège s’il
est endommagé.
1. Seuls les enfants qui sent en mesure de se tenir la
tête droite tout en portant un casque de vélo (environ
1 an) et pesant un maximum de 18,2 kg (40 lb)
devraient prendre place dans un siège d’enfant.
2. Assurez-vous que la bicyclette est stable et bien
contrôIée en y installant et en y désinstallant l’enfant.
3. Le poids de l’enfant assis dans le siège a une
incidence sur la stabilité du vélo.
4. L’enfant doit toujours porter un casque de vélo
qui respecte les normes CPSC 1203.
5. Ne JAMAiS laisser un enfant sans surveillance.
6. Ne laissez jamais l’enfant dans le siege alors que
seule la bequille soutient le velo.
7. Le cycliste doit éviler les rues occupées et le
mauvais temps, et etre particulièrement vigilant tout en
roulant à une vitesse réduite.
8. En marchant à côté du vélo, maintenez le siège
pour enfant d’une main et le guidon de l’autre.
9. Avant chaque utilisation, vériez le siège pour
enfant et la quincaillerie pour vous assurer que tout
est intact et sécurisé.
10. Assurez-vous que le siège pour enfant
n’interfère pas avec le freinage ou le pédalage.
11. N’utilisez pas le siège si un composant est brisé
ou si les sangles ou autres composants présentent
des signes d’usure importants.
12. Ne modiez pas le siège ou le système
de retenue.
13. Jetez et détruisez après cinq ans d’utilisation.
SIÈGE DE VELO POUR ENFANTS
MANUEL D’INSTRUCTION
OUTILS REQUIS
POUR L’ ASSEMBLAGE
MISE EN GARDE
COCOON 300™AND SKIPPER™
IMPORTANTS RENSEIGNEMENTS
SUR LA SÉCURITÉ

ARTICLE DESCRIPTION QTÉ
1. Siége 1
2. Supportdroit de siége 1
3. Support gauche de siége 1
4. Repose-pied 1
5. Protecteur de ressort 2
6. Attache de repose-pied 3
7. Coussin de siége 1
8. Barre d’appui 1
9. Harnais de sécurité 1
10. Ceinture abdominale 1
11. Support en U 1
12. Support Inférieur 2
13. Long Lower inférieur 2
ARTICLE DESCRIPTION QTÉ
14. Tube d’espacement 1
15.
Boulon rond hexagonale
1
de 6mm x 58mm
16.
Entretoise métalique
2
17.
6mm (1)/8mm (2) Fil protecteur en plastique
18.
Boulon rond à tête hexagonale
4
de
6mm x 35mm
19. Écrou Nylock de 6 mm 5
20. Rondelle fendue de 6 mm 5
21.
Boulon de
8mm x 30mm
4
22.
Boulon de hexagonale
2
de
8mm x 58mm
23. Écrou Nylock de 8mm 6
24. Rondelle exible de 8mm 6
25.
Protecteur de peinture en vinyle
4
26.
Réecteur rouge avec ruban adhésif
1
PARTS LIST

ÉTAPE 1 ÉTAPE 2
ARTICLE #18
6mm x 35mm
ARTICLE # 19
Écrou Nylock de
6 mm
ARTICLE # 20
Rondelle fendue
de 6 mm

ARTICLE #19
Écrou Nylock
de 6 mm
ARTICLE #20
Rondelle fendue
de 6 mm
ÉTAPE 3
ÉTAPE 4
ÉTAPE 5
ÉTAPE 6
ARTICLE #18
6mm x 35mm
ARTICLE #21
8mm x 30mm Round
Hd. Sq. Neck Bolt
ARTICLE #21 Boulon
de 8mm x 30mm
ARTICLE #23
Écrou Nylock
de 8mm
ARTICLE #23
Écrou Nylock
de 8mm
ARTICLE #24
Rondelle exible
de 8mm
ARTICLE # 24
Rondelle exible
de 8mm

ÉTAPE 10
Retirez la pince du montant du siege de votre velo. Cette étape concerne le boulon hexagonal de 6
mm. Insérez les entretoises à l’intérieur du support
en U. Fixez le support en U à l’aide d’un boulon
hexagonal de 6 mm sur 6 mm, d’une rondelle-frein
fendue de 6 mm et d’un écrou Nylock de 6 mm.
Remarque : Cette étape nécessitera (2) clés ajustables.
ÉTAPE 7
ÉTAPE 8
ÉTAPE 9
ARTICLE #22
Boulon hexagonal de
8mm x 58mm
ARTICLE #15
Boulon hexagonal
de 6 mm x 58 mm
ARTICLE #15
Protecteur de letage
en plastique
ARTICLE #16
Entretoise
métalique
ARTICLE # 24
Rondelle exible
de 8mm
ARTICLE # 20
Rondelle fendue
de 6 mm
ARTICLE #21
Ecrou Nylock
de 8mm
ARTICLE #19
Écrou Nylock de
6 mm
Positionnez les supports de siege droit et gauche
sur les deux cotes du
support en U.
ÉTAPE 11
Cette étape concerne le boulon hexagonal de 8
mm. Fixez le support en U à l’aide d’un boulon
hexagonal de 8 mm sur 58 mm, d’une rondelle-frein
fendue de 8 mm et d’un écrou Nylock de 8 mm.
Remarque : Cette étape nécessitera (2) clés ajustables.
Remarque : Si le boulon de 8 mm ne convient pas,
l’étape suivante vous montrera comment utiliser le
boulon de 6 mm inclus avec entretoises Glissez les protecteurs de peinture en vinyle sur les
(4) supports.

lnserez le tube d’ecartement et xez-le a l’aide d’un
boulon hexagonal de 8 mm par 58 mm, d’une ron-
delle exible de 8 mm et d’un ecrou Nylock de 8mm.
Remarque : Ne pas serrer completement pour le mo-
ment. Cette etape necessitera (2) cles ajustables.
lnsérez le court support inférieur dans l’extrémité
fendue du long support inférieur et tournez-le en
position. lnsérez le boulon à collet carré à tête ronde
de 8mm par 30mm et xez avec une rondelle exible
de 8mm et un écrou Nylock de 8mm.
Repetez de l’autre côté de la roue en insérant le
court support inférieur dans l’extrémité fendue
du long support inférieur. puis tournez en position.
lnsérez le boulon à collet carré a tête ronde de
8 mm par 30 mm, puis xez-le avec une rondelle
exible de 8 mm et un écrou Nylock de 8 mm.
ÉTAPE 12
ÉTAPE 13
ÉTAPE 14
ÉTAPE 15
ARTICLE #22
Boulon hexagonal de
8mm x 58mm
ARTICLE # 24
Rondelle fendue
de 8mm
ARTICLE #23
Ecrou Nylock
de 8mm
Le siège pour enfant doit être de niveau au moment
de !’installation. Plusieurs trous de réglage sont fournis
dans le support en U qui vous permettront d’enlever
toutes les obstructions et de niveler le support.
Une fois de niveau, serrez ferrnement toutes
les attaches.

Placez les protecteurs de letage en plastique aux
extrémités des boulons hexagonaux.
Remarque : Si vous utilisez le boulon de 6 mm,
utilisez le protège-l portant le numéro 6 à l’intérieur.
Retirez le repose-pied, les ressorts et les attaches de
protection repose-pied de la feuille de plastique.
lnstallez le repose-pied en le faisant rouler sur
le dessus des supports de siege de droite et de
gauche, et en le plac;:ant sous le bord avant du
siège. Fixez le repose-pied au cadre du velo en
inserant les éléments de xation à travers les fentes
de la protection des pieds et autour du cadre du
vélo. Si le vélo a des ressorts exposés, enveloppez-
les protèges ressorts.
Posez le coussin dans le siège pour enfant et en-
lez les sangles de crochet et les boucles à travers
les trous de la courroie inférieure. Fixez les sangles
de crochets et de boucles derrière le siège.
ÉTAPE 16
ÉTAPE 17
ÉTAPE 18
ÉTAPE 19

Réinstallez l’extrémité male de la boucle à dégage-
ment rapide et tirez sur la sangle pour conrmer
qu’elle se verrouille bien dans la boucle.
Enlez la ceinture sous les trous du siège.
Passez chacune des deux extremités papillons
supérieures du harnais à trois points à travers les
trous du siège et du coussin du siege.
Fixez l’extrémite inférieure du harnais à trois points à
travers le trou central situé au bas du siège.
ÉTAPE 20
ÉTAPE 22
ÉTAPE 21
ÉTAPE 23
ÉTAPE 24
Retirez l’extremité mâle de la boucle à
dégagement rapide.

Poussez la barre d’appui dans les trous du siège.
La barre d’appui peut être retirée en pinçant les
languettes et en poussant vers le haut.
Decollez la protection du ruban adhésif et collez le
réecteur sur la zone non texturée du dossier du
siege. Appuyez fermement en position.
Veriez à deux reprises que toutes les attaches sont
bien serrées.
Ceci complète !’assemblage et !’installation du
siège pour enfant.
ÉTAPE 25
ÉTAPE 26
ÉTAPE 27
ÉTAPE 28
FELICITATIONS!
Prenez les sangles et tirez-les pour conrmer que le
harnais est correctement ancre dans le siège, aux
deux endroits supérieurs ainsi que dans l’endroit
inférieur central.
This manual suits for next models
1
Table of contents
Languages:
Other Bell Bicycle Accessories manuals

Bell
Bell Platinum series User manual

Bell
Bell BICYCLE HELMET User manual

Bell
Bell cocoon 500 User manual

Bell
Bell Dark Flyer User manual

Bell
Bell WALLABY User manual

Bell
Bell SMOOTH SAILER Series User manual

Bell
Bell BICYCLE HELMET User manual

Bell
Bell FreeFit User manual

Bell
Bell COCOON 300 User manual

Bell
Bell iPulse User manual