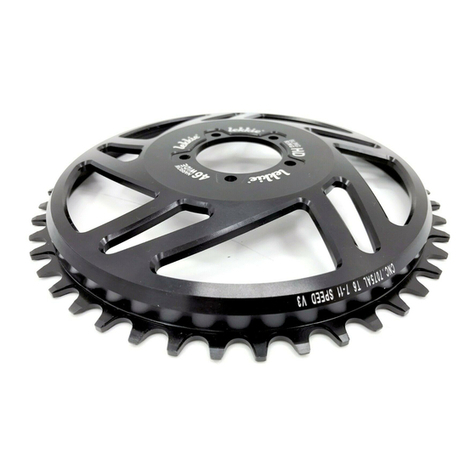
Lekkie Bling Ring PRO 40T HD User manual

www.lekkie.Techlekkie Bling ring PrO 40T hD user Manual
FOR BLING RING PRO 40T HD PACKAGE
COMPATABLE WITH BAFANG BBSHD, M625, M325
INCLUDES
1X LEKKIE BLING RING PRO 40T HD
1X 2MM BLING RING HD SPACER
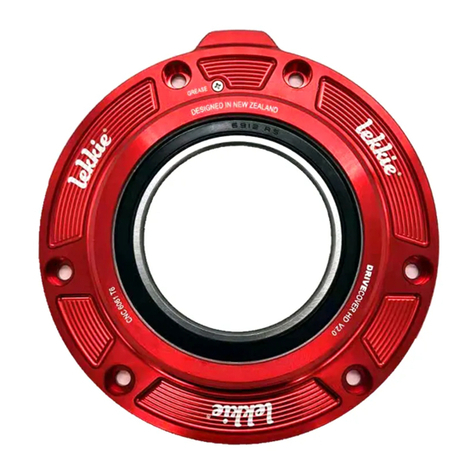
1X DRIVE COVER HD ASSEMBLY
PARTS LIST
a
B
c
a
B
c
Doc V2.0

www.lekkie.Techlekkie Bling ring PrO 40T hD user MAnuAl
YOU MUST INSTALL THE LEKKIE DRIVE COVER HD FIRST
INCLUDES
1X DRIVE COVER HD V2
1X MAIN BEARING
1X GREASE PORT SCREW
NOTE: FOR V2 OR NEWER
a
B
c
INSTALL TIPS
Here are some tips to keep in mind while completing the install.
• Check paper gasket and replace if damaged.
• When the motor is open check all bearings and replace/re-grease if need be.
• To keep everything running smooth make sure you grease all moving metal to metal surfaces.
• Clean any excess grease out of the motor while it is open.
• Clean and grease the main gear and pinion.
• Always grease the axle taper before installing cranks.
TOOLS REQUIRED
• 8mm hex/Allen key
• 4mm hex/Allen key
• Rubber mallet
• Bearing press
• Moly-grease
• All purpose lithium grease
• High viscosity cassette grease
• Loctite 243
• Scribe/netipmarker
• Smallmetalle
When installing the Lekkie Drive Cover HD you will require some tools and some hands on experience with
yourmotor.Ifyoudonotthehaverequiredtools,condenceorskillstoinstallthistakeyourmotortoyour
local bike shop or engeering shop and they should be able to help you out.
TIPS AND TRICKS
a
c
B

www.lekkie.Techlekkie Bling ring PrO 40T hD user Manual
Before you can install the Lekkie Drive Cover HD you need to remove the stock Bafang cover and bearing.
This also gives you the opportunity to check the condition of your drive gear, pinion and bearings and
replace any parts as needed. It is important to keep the internal compontents free from dirt/grit, so before
opening the housing thoroughly wipe down external surfaces and keep a clean work area to ensure it all
goes back together without contamination. Thedrivecovercanbettedwithouttheneedtoremovethe
motorfromthebike,howeveryouwillneedtoremovebothcranksandthechainringrst.
DISASSEMBLY
1. Using a 4mm hex/Allen key unscrew the
six screws holding on the stock cover and
remove.
4. Screw 3 M4 screws into the back side of
the drive gear until they are touching the
bearing. (If you don’t have any m4 screws on
hand, the screws holding the controller on
are M4).
To remove without jamming, start turning
one screw one turn, then the next screw
one turn and so on, repeating in a circular
pattern until the gear is released.
Note: Occasionally the large bearing comes
out of the OEM drive cover. It needs to be
removed from the gear Assembly before
proceeding.
2. Tap the axle from left side of motor,
loosening the drive assembly and sliding it
out towards the drive side.
3. Holding the stock drive cover, gently tap
the axle from the drive side and pull out the
axle assembly.
Note: This will remove the whole axle
assembly so be careful not to lose any parts.

www.lekkie.Techlekkie Bling ring PrO 40T hD user MAnuAl
You must complete the motor modification steps or your Bling Ring PRO 40T HD will hit your motor
and damage the Bling Ring voiding warranty.Thismodicationwillrequireyoutoleasmallamountof
material off your motor. When completed correctly, the performance and durablitly of the motor will not
be effected.
MOTOR MODIFICATION
1. Place the Lekkie Drive Cover HD on the
motor and mark the edge of the cover,
scribing onto the motor housing in the area
shown.
4. Place the Lekkie Drive Cover HD on the
motorandchecktheshape,itmustsitush
with the motor cover. Repeat previous steps
if more material removal is required.
2. Remove the Lekkie Drive Cover HD.
Note the scribed mark showing material
requiring removal.
3.Usingale,carefullyremovehighlighted
material down to the scribed line making it
the same shape as the Lekkie Drive Cover
HD. You may also need to trim the paper
gasket.
Note: We advise covering the pinion and
inside of the motor so that the metal lings
do not make it into the motor.

www.lekkie.Techlekkie Bling ring PrO 40T hD user Manual
Re-assembly is easy and painless. When re-assembling the motor, make sure you grease all metal-on-
metal parts. Do not force any parts and if you are unsure, stop the assembly and contact us.
ASSEMBLY
1. Press the main drive gear into the new
bearing in the Lekkie Drive Cover HD.
Note: Grease the inner edge of the bearing.
2. Insert the clutch assembly into the drive
gear, making sure the pawls are engaging
the correct way.
Note: If the motor is well used, check that
the Pawls in the clutch move freely and are
not worn. You can lubricate the clutch with a
light coating of a medium viscosity oil used to
maintain cassette freewheels.
3. Slide the remaining axle assembly in.
Note: Grease all touching surfaces to make
maintanance easy.
4. Install paper gasket then slide the new
drive assembly in. Clean and apply Loctite
243 to the threads of the six M5 drive cover
bolts. Tighten to 6Nm.
Note: Replace gasket if damaged.

www.lekkie.Techlekkie Bling ring PrO 40T hD user MAnuAl
To keep your motor running its best its important to regularly grease the main drive gear and pinion.
We have added a grease port to the Lekkie Drive Cover HD V2 to allow this.
To do so simply remove the grease port screw and using a grease gun, squirt moly-grease in while slowly
turning the motor.
The port is postitioned at the junction of the drive gear and pinion.
Note: The grease port is only on Drive Covers V2 or later.
GREASE PORT
Grease Port

www.lekkie.Techlekkie Bling ring PrO 40T hD user Manual
NEXT YOU CAN INSTALL THE BLING RING PRO 40T HD
INSTALL TIPS
• Double-check clearance between the inside edge of the chainring and the motor (where material has
been removed). ensure the ring turns freely without rubbing.
• Clean and lubricate axle with a multi-pupose grease before install.
• Apply Loctite 243 to bolt threads.
• Always install a new chain when installing a Bling Ring
• If you are spacing the ring out by more than 2mm, use longer bolts (minimum 6mm thread
engagement into the motor).
• Make sure when you install your Bling Ring you have at least 1.5mm gap between wide tooth and
chainstaytoallowex.
• Tighten mounting bolts to 6Nm
• Try to get the chainline to the centre of your cassette - see below for details.
• Clean and lubricate chain and ring regularly to maximise chain and chainring lifespan.
• DO NOT use half links in the chain.
• Always grease axle tapers before re-installing cranks.
TIPS AND TRICKS
TOOLS REQUIRED
• 4mm hex key

www.lekkie.Techlekkie Bling ring PrO 40T hD user MAnuAl
Here are the basic dimensions of the Bling Ring.
DIMENISONS
Note the package includes a 2mm Spacer so that you can space the Bling Ring out to clear chain-stays but
you may require more spacers.
Remember to install longer bolts if you are spacing the Bling Ring out.
The Bling Ring PRO was designed with an extra 2mm offset over the standard Bling ring HD, so that users
with 73mm BB frames could try get that perfect chainline.
If you are building with a 73mm BB frame,(or have had to space your motor out on the drive side) try
installingwithoutthespacerrst.Youmusthaveatleast1.5mmgapbetweentheringandchain-stay,
space out as required.
Measurements in mm, illustration not to scale.

www.lekkie.Techlekkie Bling ring PrO 40T hD user Manual
When building your machine you ideally want to replicate the chainline that was on the bike before you
converted it. Normally you would aim to have the chainline in-line with the centre of your cassette.
The Blingring PRO is designed to give you the best possible chainline however sometimes you may need to
adjust your offset using spacers to get that chainline perfectly suited to the unique geometry of your build.
Some frames will not allow for a central chain line. With modern 1x mountain bikes it is often the
chainstay width that dictates how close the motor/Chainring can be run. In this case do the best you can to
get the chain central.
CHAINLINE
CHAIN COMPATIBILITY
The Lekkie BLINGRING PRO is compatible with most chains up to 12-speed but suits 10-12-speed best.
Somechainsdonottsoifyouareusnsurepleasegetintouchwithus.
CENTERCENTER
OFF CENTEROFF CENTER
GEOMETRY
The 40T, 42T and 46T Blingring offsets give you the best possible
chainline without interfering with the motor. However, chainstay
width/interference is often the limiting factor when building
your bike - the larger the sprocket the closer the chainstay gets,
so you may need to use a spacer to clear the chainstay.

www.lekkie.Techlekkie Bling ring PrO 40T hD user MAnuAl
At Lekkie we don’t accept anything but the best workmanship and quality. If a part has slipped through our
QC system and made it to your hands let us know and we will put it right.
If one of our products fails we want to know so we can make our products better. If you destroy a lekkie
product in extreme use tell us. We can learn from this and sell you something so suit your needs.
If you are in anyway unhappy with your Lekkie product get in touch so we can put it right.
WARRANTY
Table of contents
Other Lekkie Bicycle Accessories manuals