VendNet 3532M User manual

DEC 2009 4218450•A
3WIDE COMBI
STAND ALONE COLD/FROZEN FOOD VENDOR
(GVC2 Controller)
MODELS:
3532M/3532MA – MULT-ZONE
(Cold and Frozen Food)
3532F/3532FA – SINGLE-ZONE
(Frozen Food)
3532C/3532CA – SINGLE-ZONE
(Cold Food)
SERVICE
MANUAL

COMBI VENDOR •3532 •4218450
ii
Table of Contents
INTRODUCTION ............................ 1
SPECIFICATIONS.......................... 2
UNPACKING.................................. 3
LOADING PRODUCTS ................... 5
TRAY ADJUSTMENTS................... 7
AUGER TIMING ............................. 9
CONTROLLER FUNCTIONS ........ 10
SERVICE MODE........................... 11
BASIC PROGRAMMING SETUP .. 12
REFRIGERATION
CONFIGURATION SETTINGS ..... 16
PRICING ...................................... 17
ADVANCED OPTIONS ................. 18
TEST ALL MOTORS..................... 19
TEMPERATURE CONTROL .........22
HEALTH SAFETY FIELD TEST.... 25
REFRIGERATION.........................26
REMOVING THE REFRIGERATION
SYSTEM.......................................30
PREVENTIVE MAINTENANCE.....30
CONVERTING FROM SINGLE
ZONE TO MULTI-ZONE MODE ....31
CONVERTING FROM MULTI-ZONE
MODE TO SINGLE ZONE.............31
REPLACE AIR FILTER .................32
PARTS ORDERING PROCEDURE 34
BEFORE CALLING FOR SERVICE34
Please have the model and serial
numbers if you need service and parts
information. The numbers are on the
identification plate located on the back
side of the cabinet of the vending
machine.
If you have any questions pertaining
to information in the manual,
replacement parts or the operation of
the vendor, then you should contact
your local distributor or:
VendNet
165 North 10th Street
Waukee, Iowa 50263
Phone: (888) 259-9965
Parts Fax: (515) 274-5775
Sales Fax: (515) 274-0390
E-mail: vendnet@vendnetusa.com
SERIAL NUMBER: ___________________________________

COMBI VENDOR • 3532 | 1
INTRODUCTION
This manual contains instructions, service and installation guidelines for the 3W
COMBI Vendor. Please read this manual thoroughly and follow instructions. The
initial set-up of a vending machine is a very important step of insuring that the
equipment operates in a trouble-free manner.
The 3W COMBI Vendor can be factory configured to have two
temperature compartments (top and bottom) in a single
vending machine separated by moveable air deflectors and
insulating barrier. The vending machine has an air duct that
runs up and down on the back inner wall of the cabinet. Each
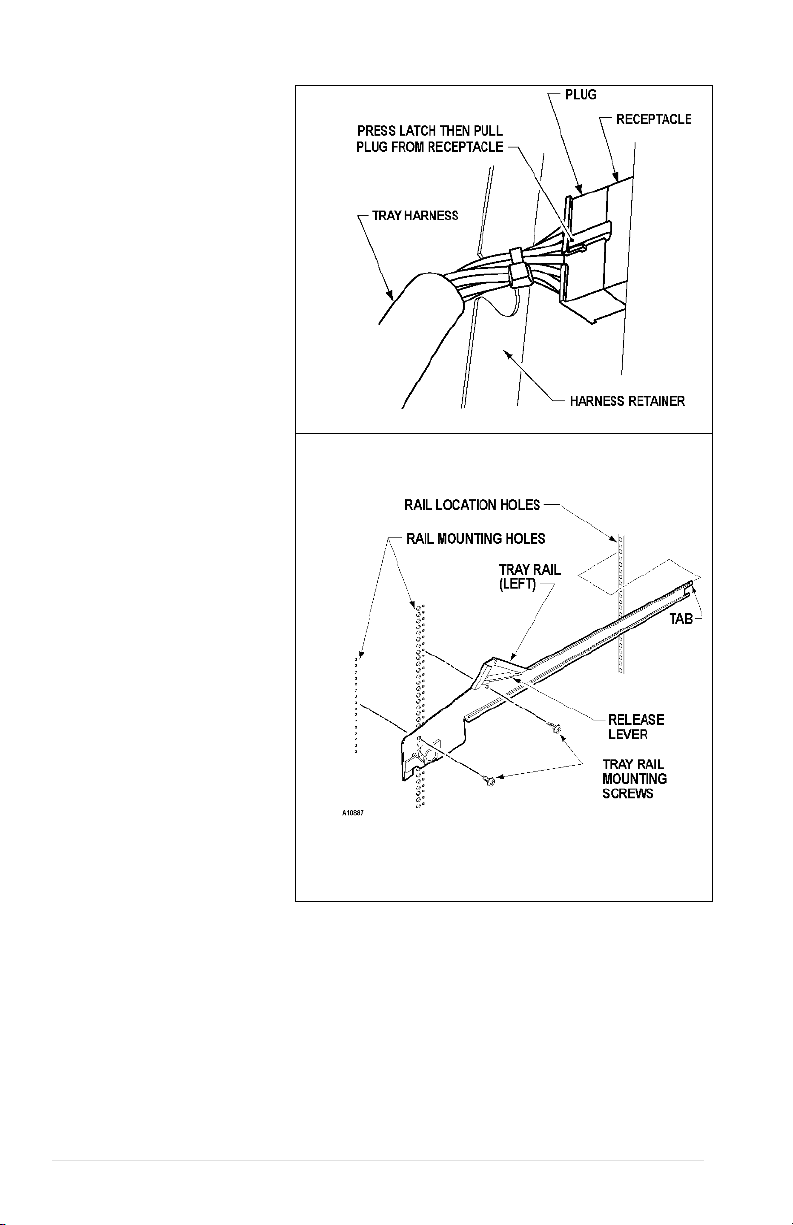
compartment can have 3 moveable trays and a total of 6 trays
for the entire vending machine. The vending machine will
maintain 2°C (36°F) in the Top compartment and down to -
24°C (-12°F) in the bottom compartment at an ambient range
of 4.4°C-32°C (40°F-90°F). The temperature setting for both
compartments are set by the controller (program).
TOP
BOTTOM
The top compartment has a heater system to maintain constant temperature
across varying ambient temperatures. This consists of a heater, temperature
sensor, air circulating blower and relays
The bottom compartment has a temperature sensor and an insulated
refrigeration system. Cool air is drawn from the refrigeration system’s evaporator
coils through the air duct and is deflected into the bottom zone by a moveable air
deflector. There are openings in the bottom trays to allow air to circulate around
the products.
All programming of the pricing, vend functions and features are also done at the
controller. Changes can be made without any additional accessories or remote
parts. Selections can be priced individually from $00.00 to $655.35 in five cent
increments (US currency). Cash accountability records, total cash transactions,
total vend cycles performed by the vendor, information for individual selections,
complete rows or total machine can be compiled and used for inventory and
ordering records. Electrical malfunctions are recorded and displayed when the
vending machine is placed in the Service Mode. Non-functional motors or
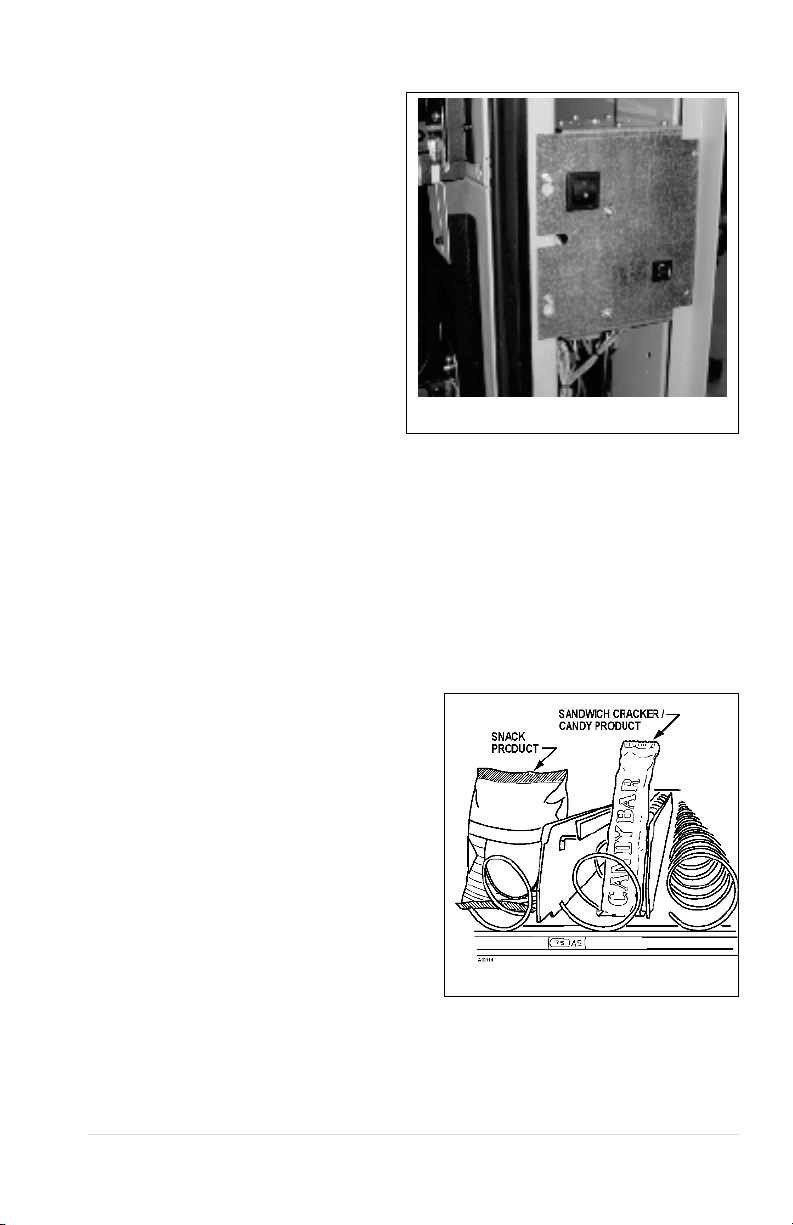
selections are indicated. Each selection has an individual motor. Functional
selections will continue to operate if other motors become nonfunctional.
The vending sequence is "first-in, first-out" for each selection, permitting stock
rotation to maintain fresh products in the vending area.
Each 3W COMBI Vendor has the capability of supporting a "satellite" vending
machine, such as a direct wire CB300-SAT, or a USD satellite such as a CF-
1000. The satellite vendor utilizes the 3W COMBI Vendor’s existing controller,
coin mechanism, bill validator and keypad to perform the vend functions they
require. For details on the satellite vendor, refer to the Service Manual pertaining
to the specific vendor for installation instructions.

COMBI VENDOR • 3532 | 2
SPECIFICATIONS
DIMENSIONS & WEIGHT
TYPE MULTI-ZONE (3 WIDE)
MODEL 3532 3532A
WIDTH 29.5 in. (74.9 cm)
DEPTH 38 in. (96.5 cm)
HEIGHT 72 in. (182.9 cm)
ESTIMATED WEIGHT 693 lbs (614 kg)
1
EST. SHIPPING WT. 722 lbs (327 kg)
1
Note: 1
ELECTRICAL
Weights will vary depending on optional equipment installed.
MODEL Danfoss 5/8 Hp
VOLTAGE 115 VAC 230 VAC
CYCLE 60 Hz 50 Hz
NOMINAL AMPS
9.0 Amps 4.5 Amps
TRANSFORMER 110/24 VAC 230/24 VAC
REFRIGERATION
HORSEPOWER Danfoss 5/8 Hp
TYPE Hermetically Sealed
CONTROLS Electronic
REFRIGERANT R-404a
CHARGE 17 oz
COIN CHANGER, BILL VALIDATOR, CARD READER
TYPE MDB Coin Changer level II or III, Bill Validator Level I, Card Reader
Level I or II
VENDOR OPERATION
LOCATION Suitable for indoor use only
RECOMMENDED
OPERATING
TEMPERATURE
Between 40° and 90° Fahrenheit (4° and 32° Celsius)

COMBI VENDOR • 3532 | 3
UNPACKING
This vending machine was thoroughly inspected before leaving the factory and
the delivering carrier has accepted this vendor as their responsibility. Note any
damage or irregularities at the time of delivery and report them to the carrier.
Request a written inspection report from the claims inspector to file any claim for
damage. File the claim with the carrier (not the manufacturer) within 15 days
after receipt of the vending machine.
Carefully remove the outside packing material so as not to damage the finish or
exterior of the vending machine. Inspect the vending machine for concealed
shipping damage. Report any damage hidden by the shipping material directly to
the delivering carrier on a hidden damage report.
Record the model number and serial number of the vendor for your records.
These numbers can be found on the Serial Plate on the rear of the cabinet
and/or inside the vendor. Refer to these numbers on all correspondence and
inquiries pertaining to this vendor.
Remove the shipping skids by placing a 2x6 under the vendor, inserting a large
screwdriver or prying tool into the grove and splitting it in two. Turn the leveling
screws in as far as possible. See Figure 3a.
Figure 3a. Remove Shipping Skids
INSTALLATION
•Consult local, state and federal codes and regulations before installing the vendor.
•Retrieve the keys to the vendor from the coin return cup.
•Open outer door and remove all internal packing material.
This manual suits for next models
5
Popular Commercial Food Equipment manuals by other brands

Diamond
Diamond AL1TB/H2-R2 Installation, Operating and Maintenance Instruction

Salva
Salva IVERPAN FC-18 User instructions

Allure
Allure Melanger JR6t Operator's manual

saro
saro FKT 935 operating instructions

Hussmann
Hussmann Rear Roll-in Dairy Installation & operation manual

Cornelius
Cornelius IDC PRO 255 Service manual

Moduline
Moduline HSH E Series Service manual

MINERVA OMEGA
MINERVA OMEGA DERBY 270 operating instructions

Diamond
Diamond OPTIMA 700 Installation, use and maintenance instructions

Diamond
Diamond G9/PLCA4 operating instructions

Cuppone
Cuppone BERNINI BRN 280 Installation

Arneg
Arneg Atlanta Direction for Installation and Use