3. Download the “Tuya Smart” app.
Scan the QR code or download from
Apple Store (iOS) or Google Play
(Android).
It’s also compatible with the
Smartlife App.
‘Instruction Manual ‘Heading.
‘SKYFAN DC’ ‘APP WiFi Control Module’
Image of Actual Module. Model no: SKYAPPCM
1. Remove Orange rubber cover from app control slot on Skyfan receiver box.
(ADD FIRST PICTURE SHOWING
RECIECER WITH ORANGE COVER BEING REMOVED)
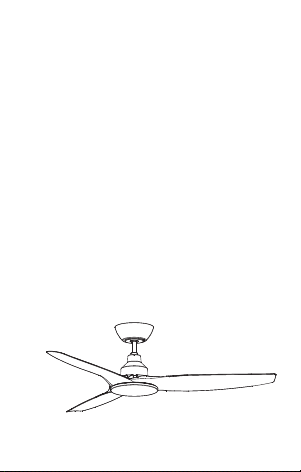
2. Finalise Installing your Skyfan DC ceiling fan (must be installed by licenced and qualified tradesperson) (ADD
small IMAGE OF INSTALLED FAN HERE
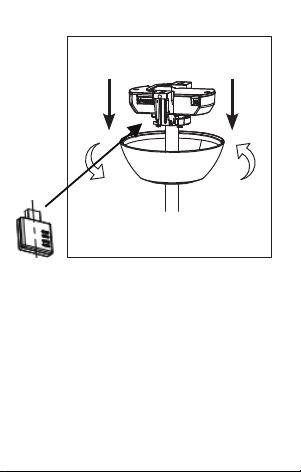
Note: If fan has already been installed ,turn off main power supply , remove fan upper canopy by twisting in
a clockwise direction and lowering to expose reciever box.(FIGx ) then insert App control module (fig x).
This can be completed without removing the reciever but should be completed by a licenced and qualified
tradesperson.
(ADD downward facing arrow to indicate canopy dropping)(arrows look like anti
clockwise)
Replace Canopy by sliding upward and refixing by twisting Anticlockwise. (FIX ARROWS)
3. DOWNLOAD THE TUYA SMART APP
Scan the QR code (fig 4) to Download the “Tuya Smart”app ,or download from Google Play (android
phones) or Apple Store (iOS phones)
‘Instruction Manual ‘Heading.
‘SKYFAN DC’ ‘APP WiFi Control Module’
Image of Actual Module. Model no: SKYAPPCM
1. Remove Orange rubber cover from app control slot on Skyfan receiver box.
(ADD FIRST PICTURE SHOWING
RECIECER WITH ORANGE COVER BEING REMOVED)
2. Finalise Installing your Skyfan DC ceiling fan (must be installed by licenced and qualified tradesperson) (ADD
small IMAGE OF INSTALLED FAN HERE
Note: If fan has already been installed ,turn off main power supply , remove fan upper canopy by twisting in
a clockwise direction and lowering to expose reciever box.(FIGx ) then insert App control module (fig x).
This can be completed without removing the reciever but should be completed by a licenced and qualified
tradesperson.
(ADD downward facing arrow to indicate canopy dropping)(arrows look like anti
clockwise)
Replace Canopy by sliding upward and refixing by twisting Anticlockwise. (FIX ARROWS)
3. DOWNLOAD THE TUYA SMART APP
Scan the QR code (fig 4) to Download the “Tuya Smart”app ,or download from Google Play (android
phones) or Apple Store (iOS phones)
Fig 4
also compatible with Smartlife App
4. Register/sign up your Tuya smart account. Follow the prompts using a choice of either mobile phone number
or email address.
5. Turn on wifi on your mobile phone and ensure fan is in the same wifi area.
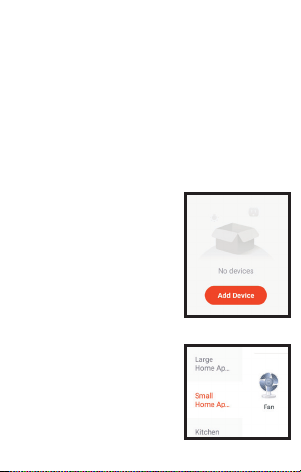
6. Open your Tuya Smart APP, Screen shot. And choose ‘add device’
7. Choose ‘Small Home Appliances’ then choose ‘Fan’
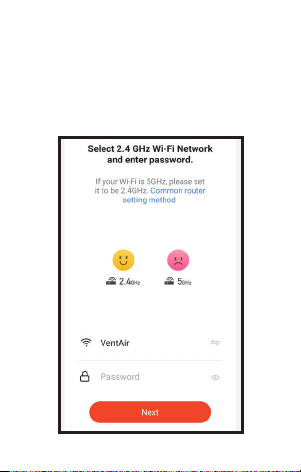
8. Select a 2.4GHz WiFi network and enter password. (if your WiFI is 5GHz, it should also display a 2.4GHz version
as a wiFi option available) please set to the 2.4GHz option. Select ‘Next’(
9. Reset the Fan ,ready for pairing/syncing.
• Ensure Remote control is set to fan ‘OFF’ and Light off’ (if ‘with Light’ model)Image of remote blank
screen)
• Turn isolation switch (found on the wall in same room as fan) to ‘ON’(the fan will emit one beep, the
‘with light’ models will also turn the light on as is default setting) and ‘‘within 10 seconds’ press and hold
the ‘TIMER’ BUTTON on the fan remote (3-5sec) . (Image of timer button on remote)
a. The Skyfan DC fan ‘without light’ will emit a “beep-beep” sound to indicate that your fan is ready to be
paired with your Tuya Smart App.
b. The Skyfan DC fan ‘with light’ , the light will flash to indicate that your fan is ready for pairing with your
also compatible with Smartlife App
4. Register/sign up your Tuya smart account. Follow the prompts using a choice of either mobile phone number
or email address.
5. Turn on wifi on your mobile phone and ensure fan is in the same wifi area.
6. Open your Tuya Smart APP, Screen shot. And choose ‘add device’
7. Choose ‘Small Home Appliances’ then choose ‘Fan’
8. Select a 2.4GHz WiFi network and enter password. (if your WiFI is 5GHz, it should also display a 2.4GHz version
as a wiFi option available) please set to the 2.4GHz option. Select ‘Next’(
9. Reset the Fan ,ready for pairing/syncing.
• Ensure Remote control is set to fan ‘OFF’ and Light off’ (if ‘with Light’ model)Image of remote blank
screen)
• Turn isolation switch (found on the wall in same room as fan) to ‘ON’(the fan will emit one beep, the
‘with light’ models will also turn the light on as is default setting) and ‘‘within 10 seconds’ press and hold
the ‘TIMER’ BUTTON on the fan remote (3-5sec) . (Image of timer button on remote)
a. The Skyfan DC fan ‘without light’ will emit a “beep-beep” sound to indicate that your fan is ready to be
paired with your Tuya Smart App.
b. The Skyfan DC fan ‘with light’ , the light will flash to indicate that your fan is ready for pairing with your
5