VeriFone Cybera SCA-315 User manual

Verifone Enhanced POS
Zone Router
Approved by Verifone, Inc.
Installation Guide
Date: January 23, 2015

Verifone Enhanced POS Zone Router Installation Guide
January 23, 2015
Verifone®, Inc.
2099 Gateway Place
Suite 600
San Jose, CA 95110
Telephone: 408-232-7800
http://www.verifone.com
Printed in the United States of America.
© 2015 Verifone, Inc. All rights reserved.
No part of this publication covered by the copyrights hereon may be reproduced or copied in
any form or by any means - graphic, electronic, or mechanical, including photocopying, taping,
or information storage and retrieval systems - without written permission of the publisher.
The content of this document is subject to change without notice. The information contained
herein does not represent a commitment on the part of Verifone. All features and
specifications are subject to change without notice.
Verifone, Ruby SuperSystem, and Secure PumpPAY are registered trademarks of Verifone, Inc.
Ruby Card, iOrder, and Commander Site Controller are trademarks of Verifone. All other brand
names and trademarks mentioned in this document are the properties of their respective
holders.

Verifone Enhanced POS Zone Router Installation Guide
Revision History
Date Description
January 23, 2015 Initial Documentation Release


January 23, 2015 i
Contents
Installation . . . . . . . . . . . . . . . . . . . . . . . . . . . . . . . . . . . . . . 1
Before You Begin . . . . . . . . . . . . . . . . . . . . . . . . . . . . . . . . . . . 1
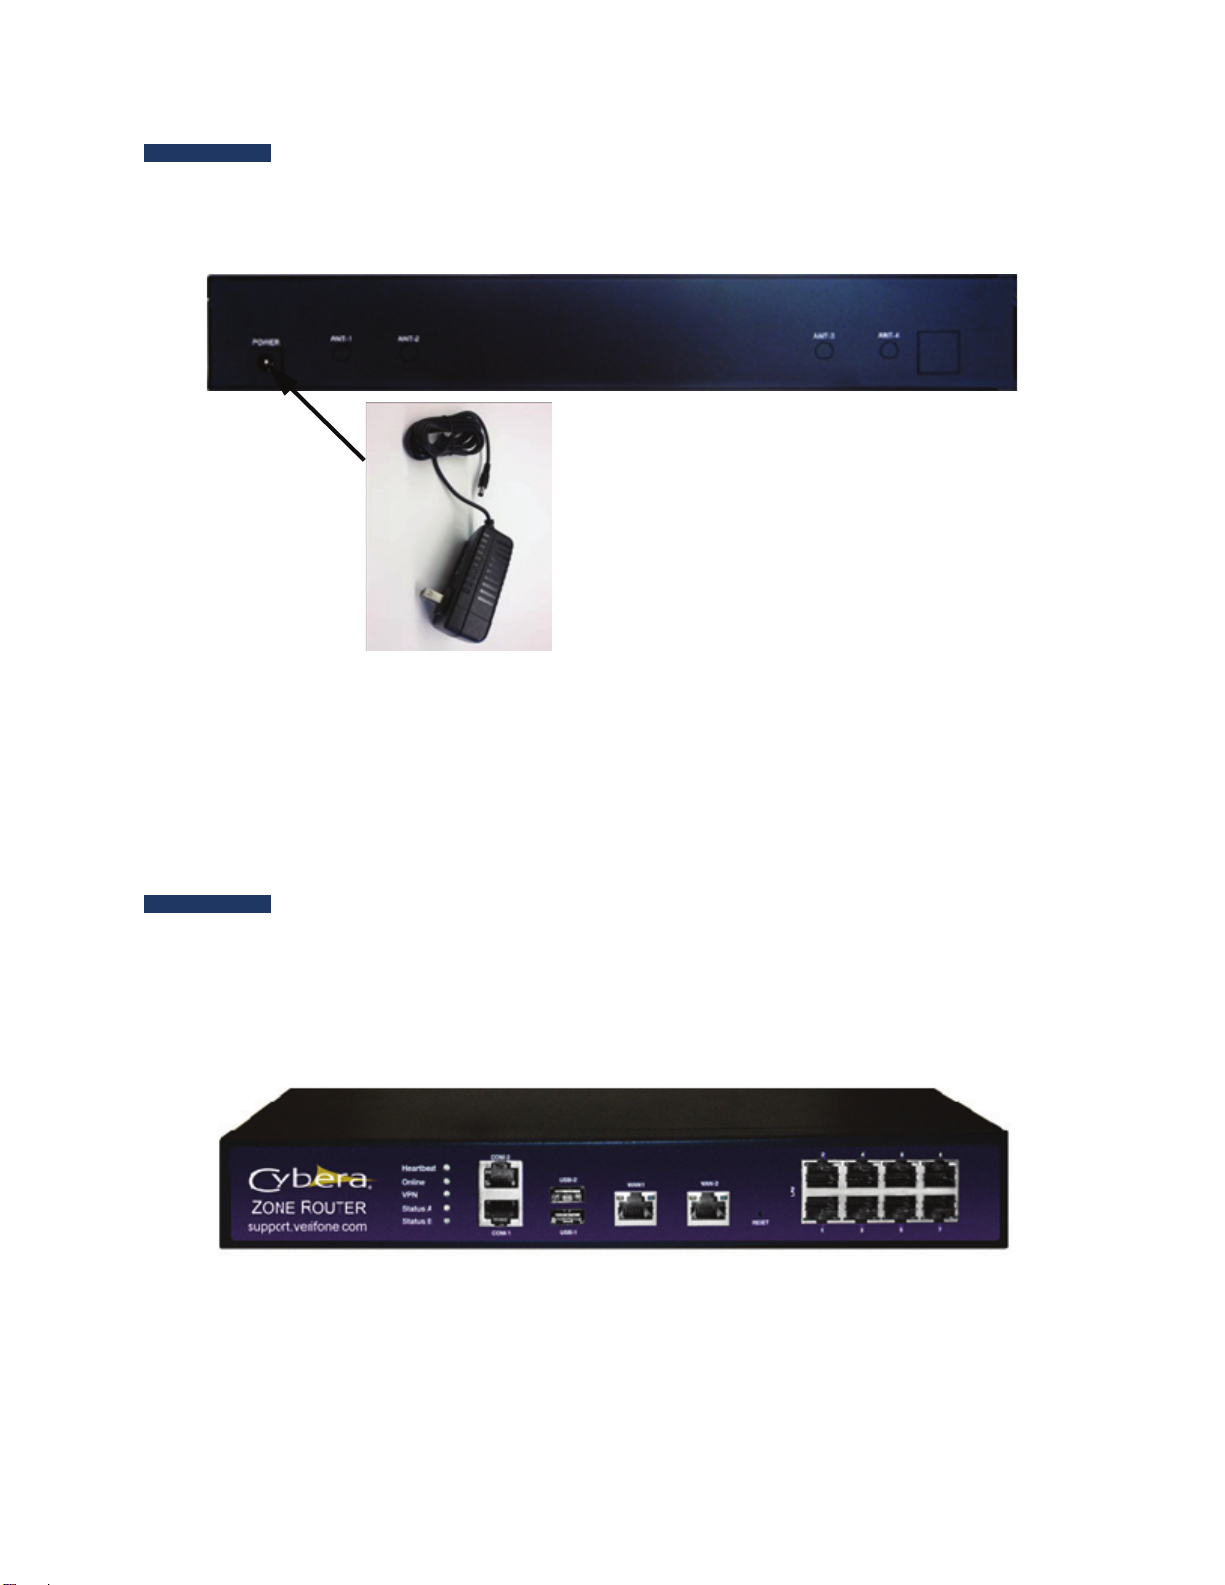
Connecting to a Power Source . . . . . . . . . . . . . . . . . . . . . . . . . . 2
Connecting the POS Equipment to the Enhanced Zone Router . . . . . 2
Topaz/Sapphire/V950 . . . . . . . . . . . . . . . . . . . . . . . . . . . . . 3
Commander Site Controller . . . . . . . . . . . . . . . . . . . . . . . . . . 3
Connecting to Broadband Internet . . . . . . . . . . . . . . . . . . . . . . . 3
Access Configuration Portal . . . . . . . . . . . . . . . . . . . . . . . . . . . . 5
View or Update the Router Settings. . . . . . . . . . . . . . . . . . . . . . . 6
VASC Contact Tab . . . . . . . . . . . . . . . . . . . . . . . . . . . . . . . . 6
Site Info Tab . . . . . . . . . . . . . . . . . . . . . . . . . . . . . . . . . . . 6
Select POS Type . . . . . . . . . . . . . . . . . . . . . . . . . . . . . . . . . 7
WAN Tab Settings . . . . . . . . . . . . . . . . . . . . . . . . . . . . . . . . 8
POS Network LAN Tab Settings. . . . . . . . . . . . . . . . . . . . . . . . 9
Port Forwarding Tab Settings. . . . . . . . . . . . . . . . . . . . . . . . . 10
Static Routes Tab . . . . . . . . . . . . . . . . . . . . . . . . . . . . . . . . 11
Save Changes . . . . . . . . . . . . . . . . . . . . . . . . . . . . . . . . . . . 11
Configuration Update. . . . . . . . . . . . . . . . . . . . . . . . . . . . . . 12
Single Port ISP Broadband/Firewall Device Connection . . . . . . . . 13
Multi-Port ISP Broadband/Firewall Device Connection. . . . . . . . . 15
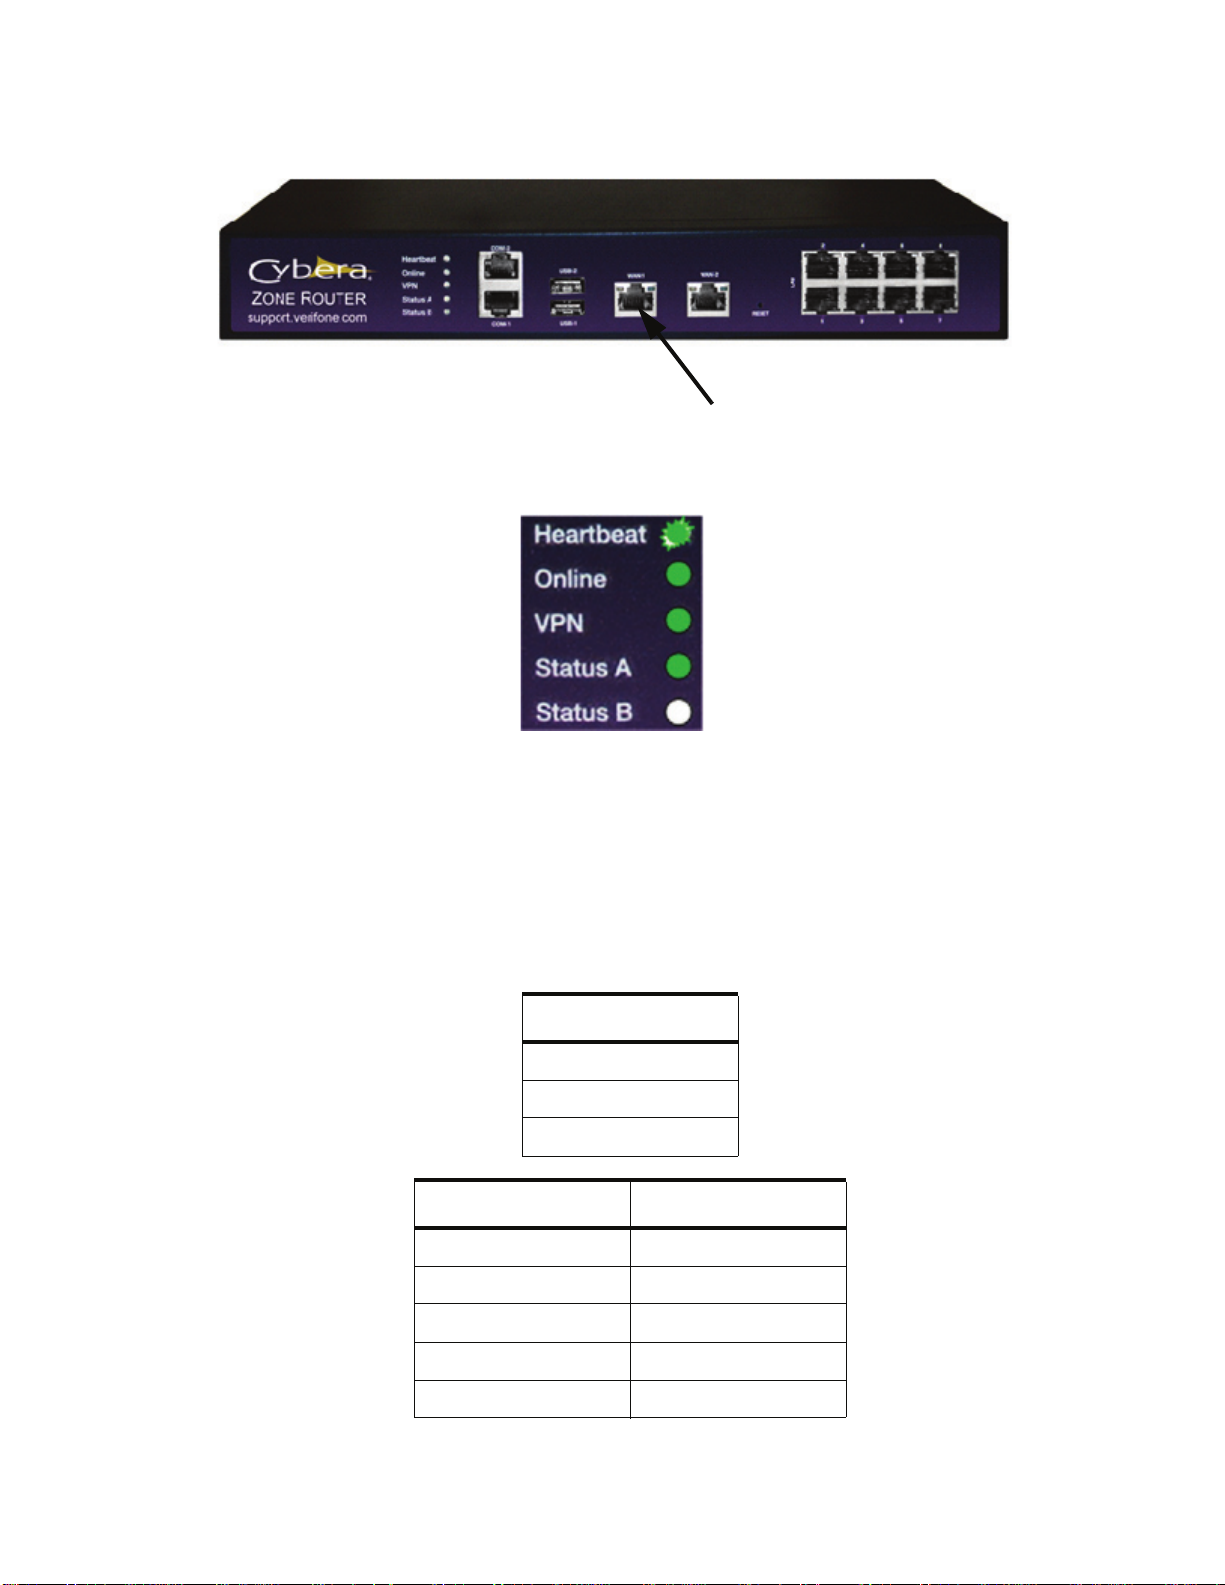
Light Status Troubleshooting . . . . . . . . . . . . . . . . . . . . . . . . . . 17
Light Indicators . . . . . . . . . . . . . . . . . . . . . . . . . . . . . . . . . . . . 17
Hardware Issue . . . . . . . . . . . . . . . . . . . . . . . . . . . . . . . . . . . . 18
There is no power OR the Heartbeat is NOT blinking green. . . . . 18
Broadband Connection Issue . . . . . . . . . . . . . . . . . . . . . . . . . . . 18
No Internet Service to Enhanced Zone Router . . . . . . . . . . . . . . 18
No Secure Tunnel . . . . . . . . . . . . . . . . . . . . . . . . . . . . . . . . 19

Verifone Enhanced POS Zone Router Installation Guide
ii January 23, 2015

January 23, 2015 1
1 INSTALLATION
This chapter describes how to install the Enhanced Zone Router.
Before You Begin
To complete the install with ease, please verify the following information before
proceeding:
■For configuration questions, call 888-777-3536 or support.verifone.com using an
Internet Browser.
■Laptop and standard Ethernet cable is required.
■Internet Web browser on laptop must be the most recent version of Internet
Explorer, Chrome or Firefox for the portal to function properly.
■If this is the first time the Zone Router is being installed, you will not need to set a
static IP on your laptop. If this is any time after completed install, please set your
laptop IP statically to 192.168.31.250.
■Record WAN 1 MAC address on the bottom of the appliance and site information
including Wholesaler/Dealer name, Store/Site Identifier, physical address, and site
phone number.
■Notate any Zone Router configuration parameters desired that differ from the
Verifone standard default settings.
■Determine if site has existing broadband connection that will be used to process
card network transactions.
Note: Site may later be connected to broadband internet when available.
– If 'YES', refer to the site as “Online”
– If 'NO', refer to the site as “Offline”
■Place the Zone Router appliance near the site's modem/router (or existing Cybera
SCA-315) and/or the Verifone POS (point-of-sale) equipment being connected to the
Zone Router. Additional cabling may be needed to complete installation depending
on the distance between the required elements.

Verifone Enhanced POS Zone Router Installation Guide
2January 23, 2015
Connecting to a Power Source
Enhanced Zone Router - Back View
1. Connect the power adapter to the power socket.
2. Connect the other end of the power adapter to a Surge Protector (not included, but
recommended).
3. Connect the Surge Protector to a wall outlet.
Connecting the POS Equipment to the Enhanced Zone Router
The heartbeat light status of the router should be blinking green. The other four light
status indicators below it are not important at this time.
Enhanced Zone Router - Front View

Verifone Enhanced POS Zone Router Installation Guide
January 23, 2015 3
Topaz/Sapphire/V950
Individually connect each device with a standard Ethernet cable to one of the LAN ports on
the Enhanced Zone Router indicated with a green light.
Note: The Ruby does not physically connect to the Enhanced Zone Router.
Devices:
■To p a z
■Sapphire
■V950
Commander Site Controller
Individually connect each device with a standard Ethernet cable to one of the LAN ports on
the Zone Router indicated with a green light.
Note: Topaz and/or PINpads may be connected to a switch due to port density.
Devices:
■Commander Site Controller
■To p a z
■POS Switch
■PINpads
Connecting to Broadband Internet
Note: If the Enhanced Zone Router will be “Online” (broadband connection), continue
with these instructions. If the Enhanced Zone Router will be “Offline”, go to
Access Configuration Portal.
■Connect the Enhanced Zone Router directly to the Internet provider's
modem/firewall or the site router/switch/firewall providing Internet connectivity
where present. If a Cybera SCA-315 is present, WAN 1 of the Enhanced Zone Router
device should be plugged into LAN port 2 of the SCA-315. See example connections
in Appendix A and B.

Verifone Enhanced POS Zone Router Installation Guide
4January 23, 2015
■After the Enhanced Zone Router is connected to the Internet, it may take 3-5
minutes for the status lights to change. The status lights should change to:
This indicates that the Enhanced Zone Router is correctly connected to the
Internet. If the heartbeat is blinking green and Online and VPN are solid green,
begin test transactions. Status A and B do not apply.
■If Online and VPN are not solid green, verify with the Site Network Administrator or
Internet Service Provider that the site's modem/router or firewall settings are
configured to allow the IPs, protocols and ports below. Also, verify if Zone Router
should be provided an IP by the modem (DHCP) or if a static IP is required.
Appendix C contains additional light status information.
IP Blocks
64.202.128.0 / 20
199.241.176.0 / 21
162.223.200.0 / 22
Protocols Ports
ICMP
DNS 53 UDP
HTTP 80 TCP/UDP
NTP 123 TCP/UDP
HTTPS/SSL 443 TCP/UDP
WAN 1

Verifone Enhanced POS Zone Router Installation Guide
January 23, 2015 5
Access Configuration Portal
1. With a standard Ethernet cable, connect your laptop to one of the remaining LAN
ports above (indicated in green).
2. Open your Internet browser and enter the following address and credentials:
– https://192.168.31.31
– User Name: zonerouter
– Password: cyberasca

Verifone Enhanced POS Zone Router Installation Guide
6January 23, 2015
View or Update the Router Settings
VASC Contact Tab
Note: This information MUST be completed at time of initial installation or if there are
configuration changes.
1. Enter your name.
2. Enter the Contact phone number.
3. Click the “Site Info” tab.
Site Info Tab
1. Complete all fields under the “Site Info” tab.
2. Continue to the “POS Type” section.

Verifone Enhanced POS Zone Router Installation Guide
January 23, 2015 7
Select POS Type
1. Click the dropdown button under POS System and select one of the following:
– Commander Site Controller
– Verifone Sapphire
2. Click the dropdown button under Connectivity and select on the of following:
– “Offline” — No broadband internet connection
– “Online” — You must know whether the WAN is DHCP or requires a Static IP.
(Internet connection before continuing).
3. If the site is “Offline”, go to POS Network LAN settings section.
4. If site is “Online”, continue to the WAN Settings section. If the site is “Offline”, the
WAN settings do not need to be configured.

Verifone Enhanced POS Zone Router Installation Guide
8January 23, 2015
WAN Tab Set tings
■If the site is “Online”, select Type: DHCP or Static.
– If DHCP, go to the next section: POS Network LAN Settings.
– If Static, the following MUST be completed to continue.
• IP Address
•Mask
• Gateway
• DNS 1 and DNS 2 are optional
Note: The Enhanced Zone Router is configured by default to receive an IP address via the
Dynamic Host Configuration Protocol (DHCP) from the provider modem or site
router/switch/firewall. If a static IP is required (an IP address must be manually
assigned to the Enhanced Zone Router), determine the IP address and proceed with
the installation. If you are unsure of whether the site used DHCP or requires a
static IP, contact the site's Internet provider or their Network Administrator
regarding the settings of the site modem.
■If undo changes is selected, all settings will revert back to previous saved settings.

Verifone Enhanced POS Zone Router Installation Guide
January 23, 2015 9
POS Network LAN Tab Settings
Note: If the Enhanced Zone Router is already configured with the default Verifone
settings, and:
– If NO changes are needed and the Enhanced Zone Router is offline, click
“Save Changes” button at the bottom right of your screen and skip to the
Configuration Update section.
– If the Enhanced Zone Router is “Online” and additional port forwards or routes
need to be configured, continue to the next section.
■VLAN1 will be the POS network (also called the “Card” network)
– These settings are Verifone defaults.
– If different settings were provided by the site's corporate IT department, make
changes accordingly.
– Clicking +VLAN on the right side will display any additional VLAN rules, if
applicable.
■If undo changes is selected, all settings will revert back to previous saved settings.
■If the minus button to the right of each VLAN is clicked, it will “delete” that VLAN.

Verifone Enhanced POS Zone Router Installation Guide
10 January 23, 2015
Port Forwarding Tab Settings
■Clicking on +Rule to the right displays all rules and adds any additional rule(s) if
needed.
■When creating a rule
–Src Interface — Select one of the following:
•WAN — Allows traffic from the site network to the POS network.
•Tunnel — Allows traffic from the secure tunnel with Verifone to the POS
network.
–Dst IP Address — Enter the IP address of the device that it needs to reach on the
POS network.
–Forward Port — Enter the network port where the traffic is coming from.
–Destination Port — Enter the network port the destination will be listening on.
■If undo changes is selected, all settings will revert back to previous saved settings.
■If the minus button to the right of each VLAN is clicked, it will “delete” that VLAN.

Verifone Enhanced POS Zone Router Installation Guide
January 23, 2015 11
Static Routes Tab
■Clicking on +Route to the right displays all rules and add any additional route(s), if
needed.
■When creating a route:
–Dst IP Address — Enter the IP/device that the Verifone equipment can initiate
communication.
–Dst Mask — Enter the subnet that is allowed to accept communication.
–Gateway — Enter the gateway of the device that the Verifone devices are
attempting to reach.
■If undo changes is selected, all settings will revert back to previous saved settings.
■If the minus button to the right of each VLAN is clicked, it will “delete” that VLAN.
Save Changes
Click “Save Changes” button at the bottom right of the screen to save and update site
information and configuration of Enhanced Zone Router.

Verifone Enhanced POS Zone Router Installation Guide
12 January 23, 2015
Configuration Update
After clicking “Save Changes”, the Enhanced Zone Router reboots twice. All five status
lights will become blank or unlit, and then in consecutive order, they will restore:
The Enhanced Zone Router reboots again and end with the light status above.

January 23, 2015 13
A SINGLE PORT ISP BROADBAND/FIREWALL
DEVICE CONNECTION
The following diagram shows an example of a single port ISP Broadband/Firewall Device
connection.
Note: The equipment at your site might be different from that shown below.
ISP Broadband/Firewall Device with Single LAN Port

Verifone Enhanced POS Zone Router Installation Guide
14 January 23, 2015
Table of contents
Popular Network Router manuals by other brands

Draytek
Draytek Vigor 2800i Declaration of conformity

Fluke
Fluke Network Router user guide

Shenzhen Hongdian Technologies
Shenzhen Hongdian Technologies H7960 user manual

Digi
Digi TransPort LR54 user guide

B&B Electronics
B&B Electronics Elinx EIRP410-2SFP-T manual

Beamz
Beamz DMX-240 Controller 192-Channel instruction manual