VERIS INDUSTRIES, INC. GWN Series User manual

Installation Guide
Air Quality
Z206728-0A Page 1 of 3 ©2014 Veris Industries USA 800.354.8556 or +1.503.598.4564 / suppor[email protected] 05143
Alta Labs, Enercept, Enspector, Hawkeye, Trustat, Aerospond, Veris, and the Veris ‘V’ logo are trademarks or registered trademarks of Veris Industries, L.L.C. in the USA and/or other countries.
Other companies’ trademarks are hereby acknowledged to belong to their respective owners.
TM
NOTICE
• This product is not intended for life or safety applications.
• Do not install this product in hazardous or classied locations.
• Read and understand the instructions before installing
this product.
• Turn off all power supplying equipment before working on it.
• The installer is responsible for conformance to all applicable codes.
No responsibility is assumed byVeris Industries for any consequences arising out of the
use of this material.
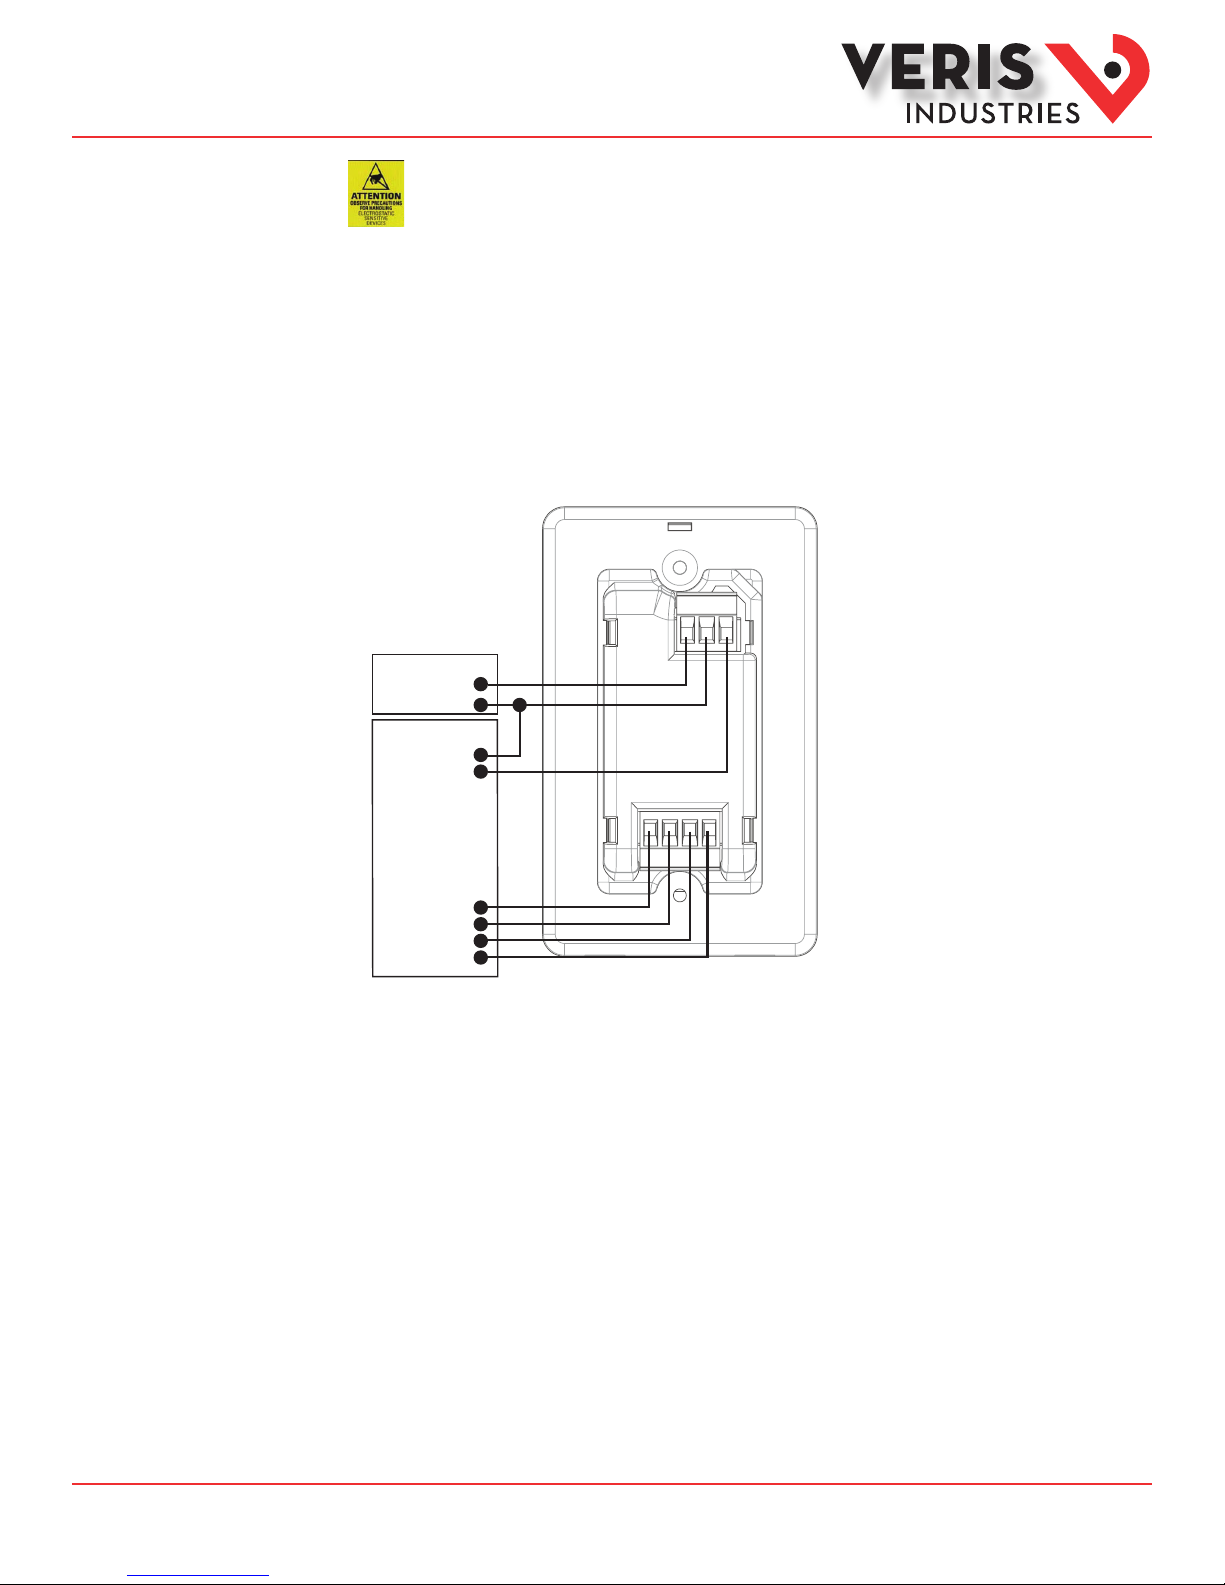
Product Overview
The GWN Series wall mounted gas platform converts gas sensor readings into a signal that is compatible with
building control sensors. To operate, the GWN must be used with a Veris AG Series gas sensor (sold separately). The
GWN board has a connector for mounting a single AG sensor, and this sensor can be replaced at any time without
removing the GWN from its installed location. Simply remove the GWN cover, replace the AG sensor inside, and
reinstall the cover (see the installation guide for the AG sensor for more information). The GWN oers multiple
output options: 0-5/0-10 VDC with relay, 4-20 mA with relay, or relay only. To maintain accuracy, keep all vents free
of dust and debris. The GWN is warranted for a period of ve years.
GWN Series
Wall Mounted Platform for Gas Sensors
Specifications
Input Power 15-30VDC/24VAC ±20%, Class 2; 50/60Hz
Relay Contact Ratings 1A/30VDC, Normally Open
Operating Temperature Range -20° to 50°C (-4° to 122°F)
Operating Humidity Range 0-90% RH noncondensing
Terminal Block Wire Size 30-12 AWG
Terminal Block Torque 0.5-0.6 N-m (0.37-0.44 ft-lb)
Protection Class IP20
The GWN operates only when an AG Series gas sensor is installed (sold separately). Accuracy, sensitivity,
setpoints, and measurement range are dependant on the AG Series sensor connected to the GWN platform.
See the AGxx sensor installation guide for details.
Product Identification
GWN
V = 0-5VDC/0-10V (selectable)
M = 4-20mA
1 = Relay only
Output
X X
Dimensions
0.6”
(15 mm)
4.5”
(113 mm)
2.75”
(70 mm)
1.2”
(30 mm)
1.1”
(27 mm)
1.7”
(42 mm)
3.25”
(83 mm)

Z206728-0A Page 2 of 3 ©2014 Veris Industries USA 800.354.8556 or +1.503.598.4564 / suppor[email protected] 05143
Alta Labs, Enercept, Enspector, Hawkeye, Trustat, Aerospond, Veris, and the Veris ‘V’ logo are trademarks or registered trademarks of Veris Industries, L.L.C. in the USA and/or other countries.
Other companies’ trademarks are hereby acknowledged to belong to their respective owners.
Installation Guide
Air Quality
GWNSeries TM
Product Diagram
Relay Setpoint Selection Switch
(see the applicable AGxx sensor
installation guide for setpoint
information)
Pin Connector for AGxx gas sensor
An AGxx sensor is required for GWN
operation. Sensors are sold separately.
Voltage Output
Selection Switch
(Not present on mA/relay
or relay only models)
OUTPUT
5V 10V
SETPOINT
LO HI
LED Indicators
left - red
center - yellow
right - green
The voltage output selection switch is only available on voltage output models. For mA/relay output and relay only models, this
space is empty.
Use the relay setpoint selection switch to select either the high or low levels of the low setpoint. These values vary among the
available AGxx sensors. See the applicable AGxx sensor installation guide for more information about relay setpoint options.
The LED indicators allow determination of device status at a glance. The GWN includes a light blocking insert that can be set in
place of the light pipes if this visibility is not desired.
LEDBlink Codes LED Description
Yellow • O during normal conditions.
• On solid when the low setpoint is reached.
• 1 ash every 10 seconds if possible sensor damage is detected.
• 2 ashes every 10 seconds if the sensor requires replacement.
• 4 or more ashes every 10 seconds if internal problems are detected, such as if the unit needs servicing or if the operating
temperature is out of range.
Green • On solid during normal operation.
Red • O during normal conditions.
• On solid when the high setpoint is reached.
• Flashes continuously when the sensor reading is over range.
All LEDs • Flash once when the device is initially powered.
• Flash while the platform is auto-resetting, such as when a sensor is installed.

Z206728-0A Page 3 of 3 ©2014 Veris Industries USA 800.354.8556 or +1.503.598.4564 / suppor[email protected] 05143
Alta Labs, Enercept, Enspector, Hawkeye, Trustat, Aerospond, Veris, and the Veris ‘V’ logo are trademarks or registered trademarks of Veris Industries, L.L.C. in the USA and/or other countries.
Other companies’ trademarks are hereby acknowledged to belong to their respective owners.
Installation Guide
Air Quality
GWNSeries TM
Installation Observe precautions for handling static sensitive
devices to avoid damage to the circuitry that
is not covered under the factory warranty.
1. Disconnect and lock out all power supplies before beginning the installation.
2. Choose a location on a wall in the area to be monitored. Install the unit on a standard electrical box centrally, near main trac
paths but away from outside air vents and excessive drafts.
3. Remove the front cover of the GWN unit, and set it aside.
4. Wiring terminals are located on the back of the unit. Determine whether these terminals t into the electrical box chosen
for the installation. In the case of some electrical boxes, such as weatherproof style boxes, the GWN may not make a snug t
against the box. If this happens, use the Veris AA66 Foam Gasket Kit accessory to improve the t (sold separately).
5. Run wires through the back of the electrical box and wire the GWN as shown.
Power Supply
Control System
Relay
+
–
–
Common
Gas Sensor Input*
Common
High Setpoint
End of Life
Low Setpoint
* Not available on relay only models.
6. Mount the GWN on the box. Use the two mounting holes on the unit and the included #6 screws. The wiring terminals must
face into the electrical box, with the board facing outward.
7. Install the AGxx Series gas sensor according to the directions included with the sensor.
8. Adjust the selection switches as needed. Set the voltage output switch to either 0-5V or 0-10V if using a voltage output model.
If the AGxx sensor has a selectable low setpoint value, use the setpoint selection switch to choose the higher or lower of the
options. High setpoint values are xed for all AGxx sensors.
9. If desired, replace the LED light pipes with the black plastic light blocking insert (included with the GWN). The light pipes are
located inside of the front cover.
10. Replace the front cover. Reconnect power.
Other VERIS INDUSTRIES, INC. Accessories manuals