Verizon UM595-HD-3GV User manual

Page1
Watch the set up video on our website at:
www.covertscoutingcameras.com
Wireless Infrared Scouting Camera
UM595-HD-3GV

Page3
Table of Contents
Camera Button Control Diagram............................05
Main Screen Info....................................................06
Installing the Batteries............................................07
Downloading the Mobile App.................................08
Purchasing Your Plan..............................................09
Setting up the Wireless Network............................11
Send a Test Photo...................................................14
Customizing Camera Settings.................................16
PIR Tab....................................................................19
SYS Tab...................................................................24
Formatting the SD Card..........................................28
Viewing Photos on Color Display............................29
Troubleshooting.....................................................31
Tricks and Tips on Field Setup................................33
Warranty Policy......................................................34
International Warranty Policy................................37
Technical Specifications..........................................43

Page4
Congratulations on your purchase of the 2016
Blackhawk Covert Scouting Camera! We truly value
your business and will continue to provide you top
quality customer service should you ever need help
with any of our products.
Check out our other products on our website at:
www.covertscoutingcameras.com
New for 2016 is the highly anticipated Verizon
“network ready” certified 3G model compatible
with our mobile app and web portal. The Verizon
camera will reach those hard to get areas in rural
America!
We hope you enjoy hassle free performance from
this quality product for years to come.
Covert Scouting Cameras, Inc.
4338 Greenridge Spa Road
Lewisburg, KY 42256

Page5
Antenna
Color LCD
Navigation
arrows
Selector switch
Camera Button Control Diagram:
Play
Select/OK
Menu
Delete
Take photo
manually
USB
SD card
slot
Figure 1
MEID
Number

Page6
Type of Signal
Acquired by
Verizon
Understanding main screen info:
Figure 2
Camera Mode /
Video Mode Icon
# of
megabytes
remaining
on card
Cellular service
indicator
# of photos
taken
Battery life
indicator
Megapixels
Chosen

Page7
Installing the batteries:
Your Blackhawk can function short term on 4-AA
batteries. Improved battery life on 8-AA, but we
suggest you use 12-AA batteries to get the most out
of your cameras battery life. Using Covert
rechargeable NiMH, 2300mAh, AA batteries will
extend the battery life significantly when paired
with a Covert Solar Panel.
DISCLAIMER: Do not use external power source
(Example: Solar Panel) with non-rechargeable AA
battery installed in camera.
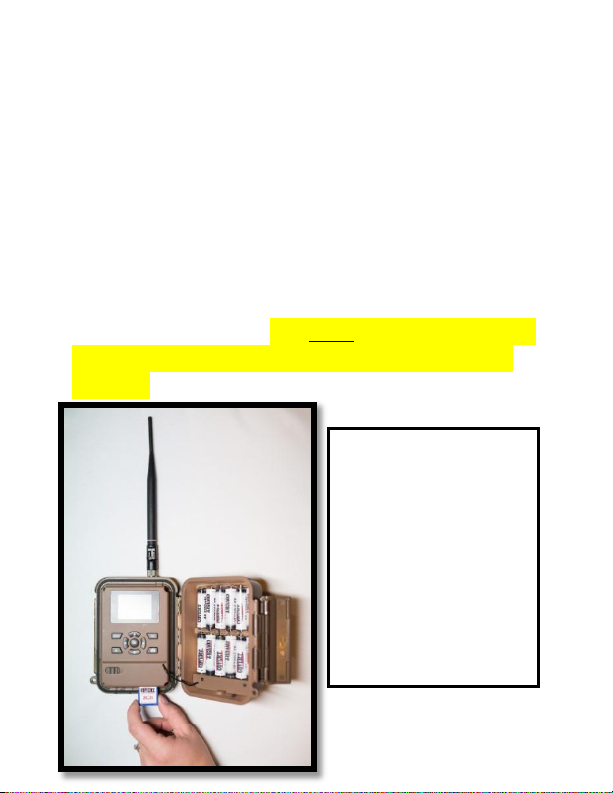
Install batteries by sliding the top battery into the
sleeve, then depressing the spring with the other
battery and snapping down in place. Pay attention
to the (+) or (-) molded into each sleeve to
determine if you insert the positive or negative end
into the sleeve first. Negative battery terminal
always contacts the spring.

Page9
Purchasing your Plan:
Follow these simple steps to activate or renew a
Verizon plan:
1. Open your web browser to:
https://secure.covert-wireless.com
2. Select the type of plan you'd like to add
3. Enter the MEID for your Covert Blackhawk
found on the inside white label of the
camera or on the outer packaging. (Figure 5.)
4. Follow the prompts to select your rate plan,
enter your personal/billing information
and complete your purchase.
Figure 5

Page10
Installing the SD card:
Now that you have activated your Verizon plan, you
will need to install a SD card in the bottom of the
camera, (Covert SD card recommended). See Figure
6 for card orientation. Push in until it clicks and
release. To remove, repeat that process, the card
will pop out enough to remove. You can use any SD
card size up to 32GB. You must have the SD card in
the camera to be able to turn the camera on and
set it up.
NOTE: Every photo
taken with this
camera will be saved
to the SD card even if
it is sending the
photos wireless. You
will have access to
the high resolution
images on the SD
card.
Figure 6

Page11
Setting up the wireless network:
NET tab:
You will need to be patient as the camera does its
initial set-up and looks for cellular service. While
finding the network you will see the words
Searching Signal in red on the screen. The camera
will then say Connecting to Server as it is
connecting to the server. Once you see 1X RTT /
EVDO in the top right corner, you are ready to move
on. Under the NET tab, scroll down to Activation
and press OK.Your camera may take several
minutes to activate on the Verizon network.
Note: If your camera says Activation Failed, then
you are in a roaming area and will have to move to
a Verizon home network to activate your camera.
For a full list of zip codes in roaming areas, please
visit our website and search the coverage map.
Quick Tip: If your camera says Connection Failed,
turn the camera OFF then back ON. (Power Cycle.)

Page12
Figure 7
Definitions:
INSTANT: Turns wireless feature ON to send a
picture every time the camera is triggered.
Definitions:
REAL TIME: Offers real time, or immediate control
of your camera using the camera control function
of the app and web-portal
DELAY 0.5H: The camera will ping the server every
half an hour to transmit the commands.
DELAY 1.0H: The camera will ping the server every
hour to transmit the commands.
DELAY 2.0H: The camera will ping the server every
two hours to transmit the commands.

Page13
Figure 8
DELAY3. 0H: The camera will ping the server every
three hours to transmit the commands.
DELAY 4.0H: The camera will ping the server every
four hours to transmit the commands.
DELAY 6.0H: The camera will ping the server every
six hours to transmit the commands.
DELAY 12.0H: The camera will ping the server
every twelve hours to transmit the commands.
DELAY 24.0H: The camera will ping the server
every twenty-four hours to transmit the
commands.
Download Firmware:
Anytime your camera needs a firmware update, it

Page14
will be automatically pushed to your camera. When
you go check your camera, we encourage you to
scroll to the NET Tab and download the latest
firmware version in case there’s been an update.
Then take out your SD card, lock it and put it in your
camera. Turn your camera onto setup, scroll to the
SYS tab and scroll down to default set. Press OK.
Then turn your camera off, unlock your SD card and
put in back in your camera.
Important Note: Anytime you make changes
directly to the camera, press OK to save the
changes on your camera and the press the ◄to
sync the changes directly to the web portal.
Send a test photo:
Definition: This is a great way to make sure that
your camera is working properly before leaving your
camera set up remotely.
1) Press the button that has the CAMERA symbol
on it (1) time to manually take a photo with the

Page15
camera. You will know that a photo has been
taken because the photo counter on the screen
will say 001.
2) Press the PLAY button, located under MENU, to
enter the Play mode and then press the MENU
button. You will see the following screen.
3) Press the ▼to highlight the SEND option and
press OK. (Figure 9)
4) The LCD screen will start to count up from step
1 to 4 with brief pauses between numbers.
Once you see Send Successful, you have
successfully sent your first photo and your
camera is ready to take photos. Press PLAY to
return to the main menu.
Figure 9

Page16
Customizing the camera settings:
Setting the camera mode:
Press the ▼button to highlight the Camera Mode
option in yellow. Either Photo or Video will show
up in a white box to the right. Press the ►button
to toggle between Photo or Video until the option
you want shows in the white box. Press OK.
NOTE: If you do not press OK, your setting will
return back to the previous setting.
Camera mode settings:
PHOTO SIZE: Press the ▼or ▲button to highlight
Photo Size in yellow.
Figure 10

Page17
Press the ►arrow repeatedly to toggle between
3mp, 5mp, 8mp, or 12mp. Press OK once the
desired option shows in the white box. Keep in
mind the higher the MP, the larger the file and the
faster your SD card can fill up.
PHOTO BURST: Your camera can take a 1-10 shot
burst every time the PIR is triggered to take a
photo.
Press the ▲or ▼buttons to highlight the PHOTO
BURST option: To set this function, press the
►repeatedly to show the 1 Photo, 2 Photo, 3 Photo
(up to 10 Photo) option. Press OK to save the
desired setting.

Page18
Video mode settings: (Figure 11).
VIDEO SIZE: You can choose from VGA or QVGA
video options.
NOTE: The camera will NOT send videos to your
mobile app. It will only alert you that a video has
been taken. Recommend low flash when set to
video.
Press the ►button to toggle between the VGA and
QVGA options. Press OK to save the setting.
VIDEO LENGTH: You can adjust the length of time
the camera takes a video from 5-60 seconds. Press
Figure 11

Page19
the ▲or ▼button to highlight the VIDEO LENGTH
option. Press the ◄or ►buttons repeatedly to
change the number of seconds shown in the white
box. Long videos fill the SD card up quickly.
NOTE: You need to double the time interval from
what your video is set on. Example: 20 second
video length, your trigger interval needs to be at
LEAST 40 seconds.
PIR tab:
Press the ◄or ►buttons repeatedly until only the
PIR tab is highlighted in yellow in the menu. Screen
should appear like Figure 12.
Figure 12

Page20
SENSITIVITY: There may be situations where you
might feel the camera is not catching animals that
are nearby or maybe the camera is triggering too
easily. You can adjust the sensitivity of your camera
to help with this. Under most conditions, the N(10-
80℉)option will work the best. In high
temperatures, the H(>80℉)setting might help
differentiate between the outside temps and the
body temps of the animal. In cold conditions, you
may find that the L(<10℉)option is best as the
camera can easily differentiate the outside temps
from the body temps of the subject. If you want to
turn off the PIR you would choose OFF.
Press the ▼button to highlight the Sensitivity
option. Press the ►button repeatedly to toggle
between the options in the white box. Once the
desired option is chosen, press the OK button to
save the setting.
TRIGGER INTERVAL: Allows you to customize how
often the camera can be allowed to take a photo.
Press the ▲or ▼arrow to highlight the Trigger
Table of contents
Other Verizon Scouting Camera manuals