WingScapes WildlifeCam User manual

wingscapes.com |888.811.WING
© 2013 Ebsco Industries, Inc. All Rights Reserved. Made in China
This product is covered by one or more of the following US Patents: 6735387, 6768868, 6834162. Other patents pending.
WARNING! This product may contain lead, a chemical known to the state of California to cause cancer,
birth defects and other reproductive harm.
WildlifeCam®
User’s Guide
For Models:
WCW-00120 WildlifeCam
10/21/13

Page 15
WildlifeCam User Guide
Page 2
WildlifeCam User Guide
Tripods
For very precise placement and aiming,
no mounting method will beat a camera
tripod. A standard threaded tripod mount
(¼”-20) is
embedded into the bottom and
rear of the
WildlifeCam. This allows users
to attach the WildlifeCam
to any tripod
or any of thousands
of 3rd-party camera
mounting accessories – providing users
with a world of creative opportunities
through angle and height adjustment.
Mounting Strap
The WildlifeCam comes with a Mounting
Strap
to facilitate mounting. You will find
slots in the rear of the
WildlifeCam
through
which a strap can be threaded. Many users
will tighten the WildlifeCam to a tree,
then wedge a stick or piece of bark
between the WildlifeCam and the tree
to facilitate aiming.
Mounting Arm Accessories
Wingscapes an optional mounting
accessory for the WildlifeCam:
Camera Multi-Mount
(MCA-12669)
This accessory will allow you to easily
mount the WildlifeCam to a common bird
feeder pole, a post, a stake, a wall, or a
tree. Numerous angle settings and 360°
rotation make this mounting arm one of
the most versatile setup options.
Your Wingscapes WildlifeCam offers
nearly limitless mounting opportunities,
allowing you to capture images of wildlife
in practically any situation.
To read more about attracting wildlife to
your backyard and WildlifeCam, visit our
website at www.wingscapes.com.
IMPRINT INFO
SETUP MODE
< OPTIONS >
RESET TO
FACTORY DEFAULTS
ERASE ALL IMAGES
(FORMAT CARD)
AC CONNECTED?
DATE & TIME
WI-FI SD CARD?
DETECTION
DELAY
PHOTO OR
VIDEO
MULTI-SHOT
UPGRADE
FIRMWARE
PROGRAM
SECURITY CODE
IMPRINT INFO
PHOTO QUALITY
CAMERA NAME
MOTION FREEZE PHOTO QUALITY MANAGED
MEMORY
DATE/TIME: 11/11/11 11:11pm
PHOTO OR VIDEO: PHOTO
DETECTION DELAY: 10 SECONDS
MULTI-SHOT: 1 (OFF)
UPGRADE FIRMWARE: NO
PROGRAM SECURITY CODE: 00000
AC CONNECTED?: NO
Wingscapes WildlifeCam
DEFAULT SETTINGS

Page 14
WildlifeCam User Guide
Page 3
WildlifeCam User Guide
The key to taking great photos
and videos
is proper mounting and placement
of the
WildlifeCam. One reason the WildlifeCam
captures such unique images is that it can be
positioned very close to wild animals without
frightening them. Most WildlifeCam photos
are taken within three feet of their subjects.
We designed the WildlifeCam so that it can
be mounted many different ways.
Take a
moment to learn more about mounting
your
WildlifeCam properly, and you will quickly see
improvement in your images.
Basic Principles
1. Stability - Mount the WildlifeCam securely
so that it does not move. It should never be
hung from above or mounted to an object
that moves in the wind. If the WildlifeCam is
moving, it will cause the motion sensor to
trigger incorrectly.
2. Lighting - As with all cameras, it is best to
avoid aiming the WildlifeCam at the source of
light (for instance, the sun). Ideally during
daytime, position the WildlifeCam so it is
facing its target, e.g. a bird feeder, but facing
away from the sun.
On the Ground
Set up is simple, even on the ground. Just
position your WildlifeCam directly on the
ground. If you’re concerned about it falling
over, use the included Stretch Cords to secure
the WildlifeCam to the base of a tree, a post,
or other solid feature (a brick works great).
Mounting your WildlifeCam Menu Map
IMPRINT INFO
SETUP MODE
< OPTIONS >
RESET TO
FACTORY DEFAULTS
ERASE ALL IMAGES
(FORMAT CARD)
AC CONNECTED?
DATE & TIME
WI-FI SD CARD?
DETECTION
DELAY
PHOTO OR
VIDEO
MULTI-SHOT
UPGRADE
FIRMWARE
PROGRAM
SECURITY CODE
IMPRINT INFO
PHOTO QUALITY
CAMERA NAME
MOTION FREEZE PHOTO QUALITY MANAGED
MEMORY
WI-FI SD CARD?: NO
CAMERA NAME: WILDLIFECAM
IMPRINT INFO: YES
MOTION FREEZE: ON (FAST FLASH)
PHOTO QUALITY: HIGH (5 MP)
MANAGED MEMORY: DO NOT OVERWRITE
ERASE ALL IMAGES: NO
RESET TO FACTORY DEFAULTS: NO

Page 4
WildlifeCam User Guide
Page 13
WildlifeCam User Guide
Customer Support
Phone: 888.811.WING (9464)
Fax: 205.408.6157
Email: [email protected]
Web: www.wingscapes.com/support
Address: Wingscapes
150 Industrial Road
Alabaster, AL 35007
Photogallery: wingscapes.com/photogallery
YouTube: youtube.com/wingscapes
Blog: wingscapes.com/blog
Facebook: facebook.com/Wingscapes
Twitter: @wingscapes (or tweet with hashtags #birdcam
or #plantcam)
Find Us Online
Downloading & Viewing Images
There are a number of ways for you download and view
pictures and videos in the field or at another location.
Important
Make sure that the camera is in the OFF position
before removing SD card.
Removing the SD Card
To remove the SD Memory Card, open the camera cover
and push gently on the SD card and it will pop out slightly
allowing you to remove it. Load the SD card into the
player or card reader to view or move stored images to
another location.
ln the Field
You can download the pictures and videos with the aid
of external devices. To download, use an external player
or card reader that is supported by a Mini USB Jack.
At Home
Remove the entire camera and transport to another location to download images. To connect
the camera to a PC computer, turn the camera ON, press the OK button once to change to
SETUP Mode. Connect the USB cord (not included) between the USB out port and the PC
computer. The computer will recognize the camera as a removable drive. The unit works
with Windows XP/Vista/7. Copy the images and videos from the camera onto your PC for
further editing or printing. When the USB cable is disconnected, the camera will go back
to SETUP mode.
See the full line of Wingscapes camera accessories at www.wingscapes.com

Page 5
WildlifeCam User Guide
Page 12
WildlifeCam User Guide
Quick Start Guide
Use the steps below as a guide to quickly set up your camera so it will function using the
factory default settings.
STEP 1
Open camera cover. Press the Battery Chamber Release button. Install 6 C-cell alkaline
batteries. Recommended for use: Duracell®or Energizer®batteries. Reinsert the Battery
Chamber into the camera until you hear an audible click.
Rechargeable batteries are not recommended.
Do not use lithium batteries.
STEP 2
Insert SD Memory Card (label side up) until you hear an audible click. Camera will not
operate without SD Card. Slide the power switch to SETUP. Set the time and date by
pressing the RIGHT button until DATE & TIME appear on screen. Press OK to begin
entering the Time and Date, using +/- buttons to adjust the values and LEFT/RIGHT to
move between fields.
STEP 3
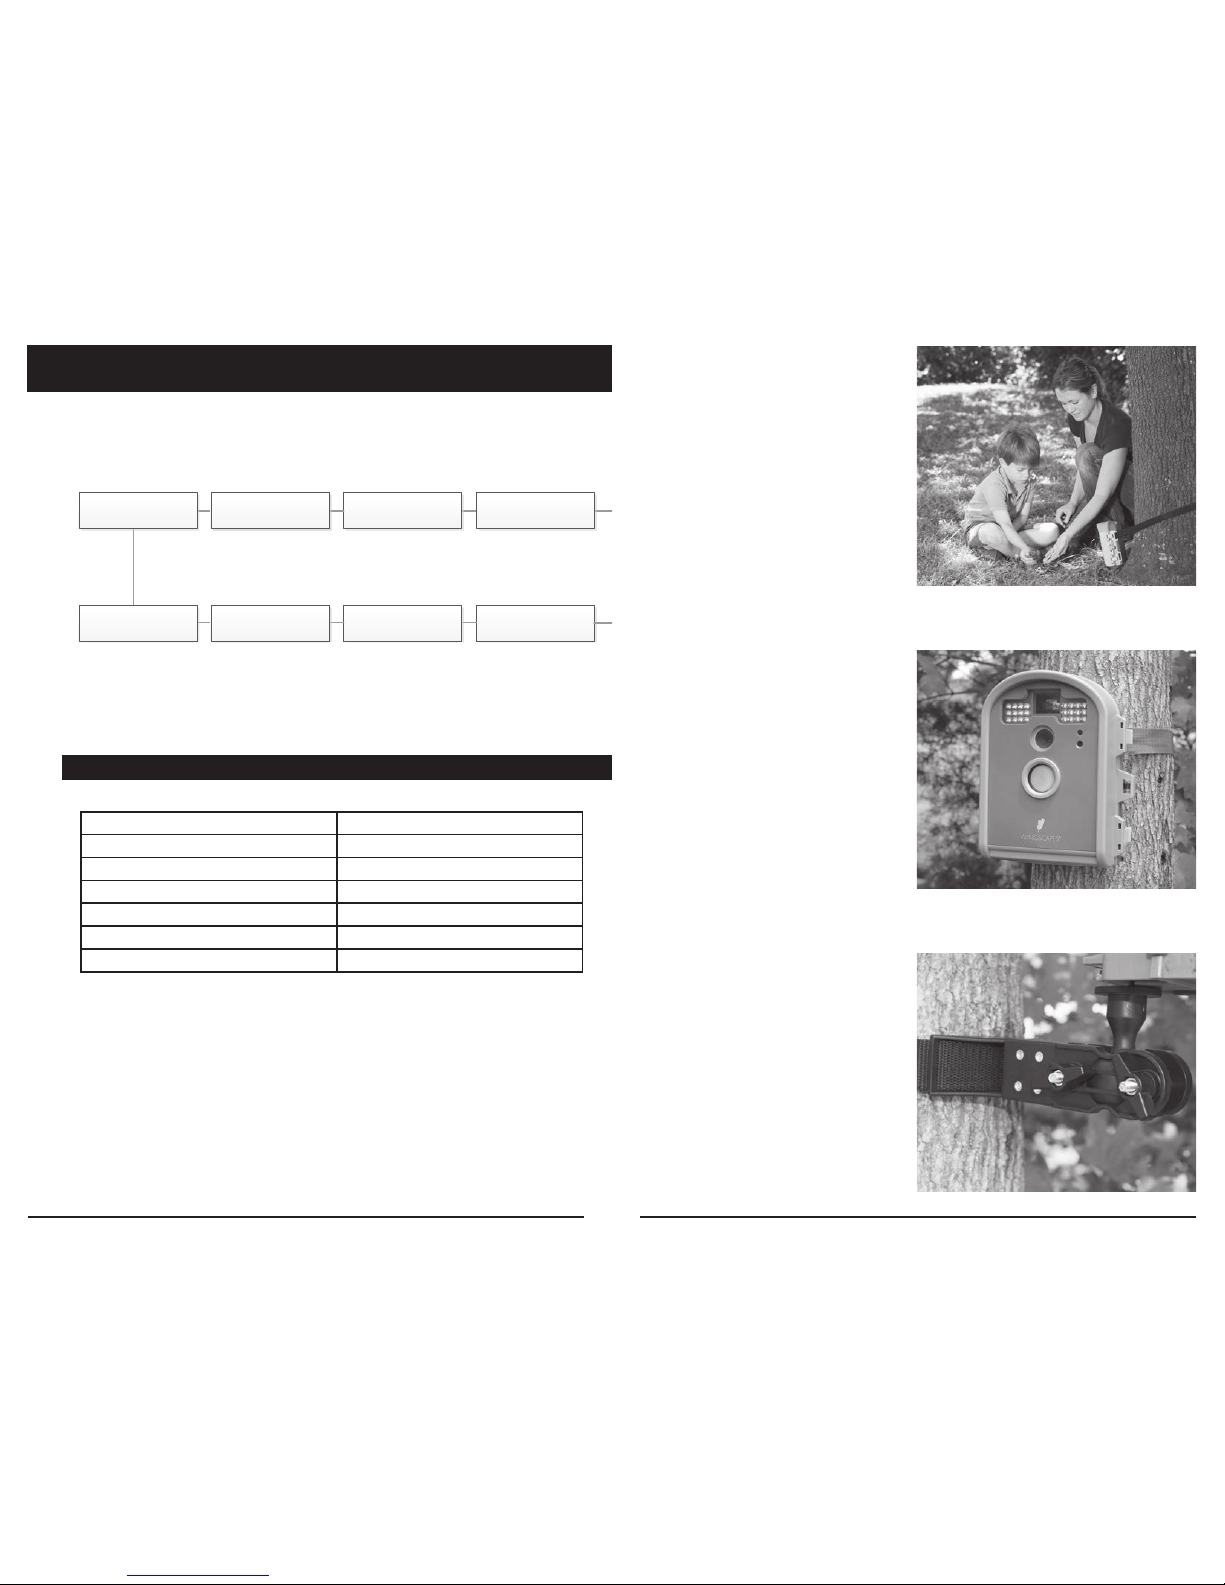
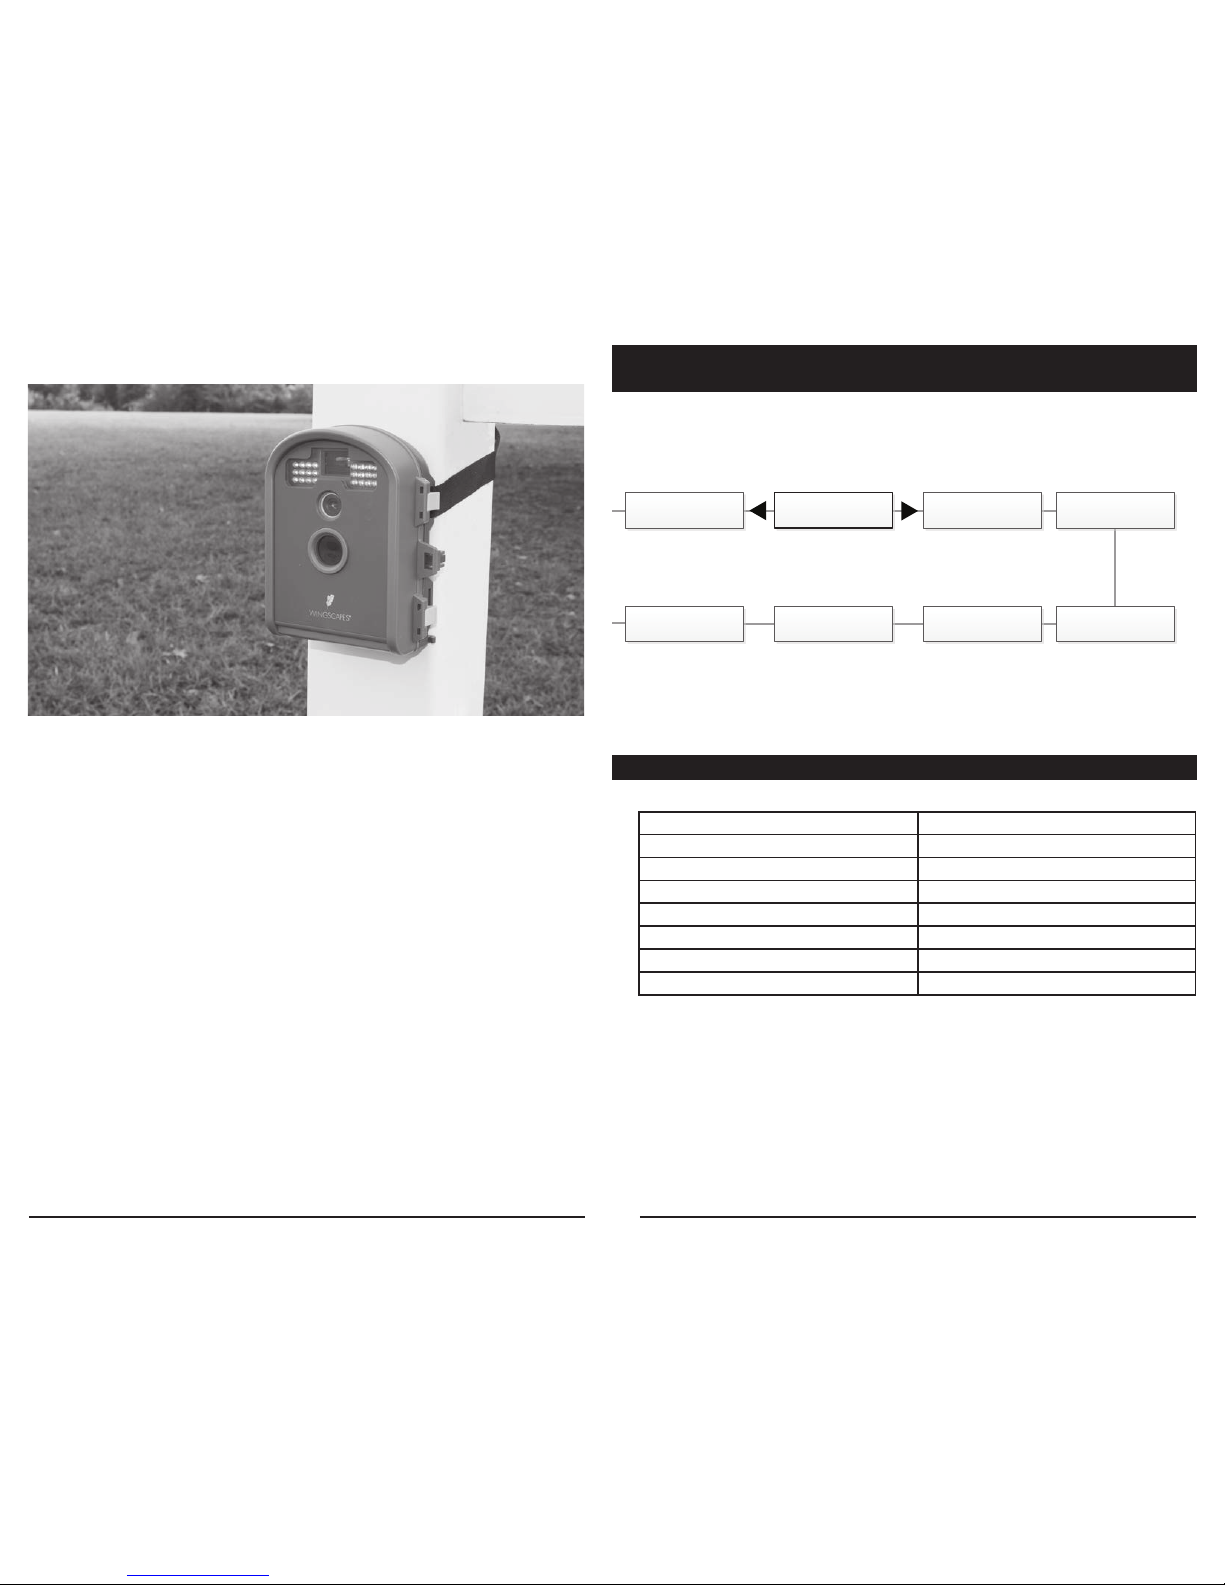
Mount Camera in desired location using a mounting strap or other accessories offered by
Wingscapes (visit www.wingscapes.com for more information on mounting accessories).
See page 14 for helpful mounting tips.
STEP 4
Slide the power switch to the ON position. The
camera will operate using default settings for the
respective mode selected. You may also customize the
settings if desired in SETUP. Press the Right (>) button
to begin taking photos or videos.
Memory & Storage
Your camera supports external SD memory card ONLY and will accept up to a 32GB card.
Using large memory cards can slow the camera response. The camera cannot capture any
photo or video without external memory. Please insert an SD memory card to operate camera.
Estimates are based on the most common types of memory cards that can be purchased at
electronic stores, office supply stores, or online. Estimates may vary based on camera settings
or environmental conditions.
Important
Always turn the unit off when inserting or removing an SD memory card to avoid damage and
ensure that the camera properly updates the memory information.
Auto Mode
SD Card Size: 2 GB 16 GB
ENHANCED 3264 x 2448 740 5920
HIGH 2592 x 1944 1100 8800
MED 1600 x 1200 3000 24000
LOW 640 x 480 17950 143600
Video Mode
SD Card Size: 2 GB 16 GB
VGA 640 x 480 (based on 10 sec video) 90 720
Actual capacity will vary based on image properties.
Warnings & Regulations
Wingscapes, a division of Plastic Research and Development Corporation
WildlifeCam
FCC Statements
Note: changes and modifications not expressly approved by the party responsible could void
the user’s authority to operate this device.
This device complies with Part 15 of the FCC Rules. Operation is subject to the following two conditions: (1) This device may
not cause harmful interference, and (2) this device must accept any interference received, including interference that may
cause undesired operation.
NOTE: THE MANUFACTURER IS NOT RESPONSIBLE FOR ANY RADIO OR TV INTERFERENCE CAUSED BY UNAUTHORIZED
MODIFICATIONS TO THIS EQUIPMENT. SUCH MODIFICATIONS COULD VOID THE USER’S AUTHORITY TO OPERATE THE
EQUIPMENT.
NOTE: This device complies with the limits for a Class B digital device, pursuant to Part 15 of the FCC Rules. These limits are
designed to provide reasonable protection against harmful interference in a residential installation. This device generates,
uses, and can radiate radio frequency energy and, if not installed and used in accordance with the instructions, may cause
harmful interference to radio communications. However, there is no guarantee that interference will not occur in a particular
installation. If this device does cause harmful interference to radio or television reception, which can be determined by turning
the equipment off and on, the user is encouraged to try to correct the interference by one or more of the following measures:
- Reorient or relocate the receiving antenna.
- lncrease the separation between the equipment and receiver.
- Connect the equipment into an outlet on a circuit different from that to which the receiver is connected.
- Consult the dealer or an experienced radio/TV technician for help.
This product may not comply with California Proposition 65 standards, known to the state of California to cause
birth defects or other reproductive harm.

Page 6
WildlifeCam User Guide
Page 11
WildlifeCam User Guide
System Requirements
OS:
Microsoft® Windows® XP with Service Pack 2 or Service Pack 3
(recommended); Windows Vista® Home Premium, Business,
Ultimate, or Enterprise with Service Pack 1; or Windows 7
Hard disk space: 100MB or above
CPU: Intel® Pentium® 4 or AMD Athlon® 64 processor or above
Memory: 1GB of RAM
Specifications
Operational Mode Motion Detect
Resolution 8.0 MP
Still Resolutions JPEG
Low 640 x 480, Medium 1600 x 1200, High 2592 x 1944,
Enhanced 3264 x 2448
Video Resolutions AVI - 640 x 480
Image Output USB OUT, SD Card
Housing Weather-resistant and lockable
Display LCD
SD Memory Card Up to 32 GB SD card (not included)
Format JPEG - Still pictures, AVI - Video clips
USB Output Requires PC / MS Windows XP / Vista / 7
Picture Delay Variable 10 sec, 30 sec; 1, 5, 10, 30 mins
Standby Time 300 Days
Run Time 180 days
Focus 5’ - Infinity
Infrared Sensor Passive
Flash Type 24 White LEDs
Flash Range 60’
Easy Read Bar Moon Phase / Camera Name / Date / Time
Power Supply 6 C-Cell Alkaline batteries (not included)
External Power port 12V
Size 6.9” x 5.4” x 2.8”
Erase Images
Press the OK button. Use the Up/Down buttons to choose between Yes - erase all images, or
No - does not change stored images. Press the OK button to select. When your selection has
been made, press the Right button to move to the next option.
NOTE: This will also format your SD card for use in your camera.
ERASE ALL IMAGES
NO
Reset to Default settings
You can reset your camera to the factory default settings. Press UP or DOWN to choose:
YES - all setups restored to factory default
NO - keep custom settings
Press the OK button again to make selection. Press the Right button to go to the Main Screen.
RESET TO FACTORY
DEFAULTS? NO

Page 7
WildlifeCam User Guide
SETUP AND PROGRAMMING (cont)
IV
Setting General Features
When you press the Right button from the General Settings screen, the LCD Display will
automatically display the different features within General Settings. Using the navigation
process, set the features you desire.
Setting Date and Time
Press the OK button. Use the Left/Right buttons to move from one value to the next and the
Up/Down buttons to adjust each value. Press the OK
button to lock in selections. When all your
selections
have been made, and the date and time has been set, press the Right button to
move to the next option.
DATE & TIME
11/11/11 11:11pm
SETUP MODE
< OPTIONS >
Page 10
WildlifeCam User Guide
PHOTO OR VIDEO?
PHOTO
Setting Photo or Video
Press the OK button. Use the Up/Down buttons to choose between Photo or Video. Press the
OK button. Press Left button to go to the Main Screen.
DETECTION DELAY
10 SECONDS
Event Delay Setting
Detection Delay determines the number of minutes between pictures when an animal is detected
and remains in range.
Press the OK button. Use the Up/Down buttons to choose between (5
sec, 10 sec, 30 sec, 1 min, 5 min, 10 min, or 30 min). Press OK to lock in your selection, then
press Left button to go to the next option.
MOTION FREEZE
ON (FAST FLASH)
Setting Motion Freeze
This feature maximizes the image clarity during night photos. When this feature is on, the
camera will adjust the exposure time to reduce blur associated with motion. Other adjustments
are made to increase the brightness and clarity of the photo. When this feature is turned off,
the camera will use a maximum exposure time that will not reduce blur, but will increase the
effective flash range and image brightness of night photos.
Press the OK button to confirm the
selection. Press the Right button to move to the next option.
Setting Photo Quality
Press the OK button. Use the Up/Down buttons to choose between 4 image resolution settings.
1. Enhanced: 3264 x 2448
2. High: 2592 x 1944
3. Medium: 1600 x 1200
4. Low: 640 x 480
Press the OK button to confirm the selection. Press the Right button to move to the next op
tion.
PHOTO QUALITY
HIGH (5MP)
MANAGED MEMORY
DO NOT OVERWRITE
Managed Memory
Selecting the OVERWRITE OLDEST option will cause the oldest files to be overwritten with
new captures when the SD card reaches its capacity. With the DO NOT OVERWRITE option
selected, the camera will cease image capture once the SD card reaches capacity.
Press the
OK
button to select. When your selection has been made, press
the Right
button to go to
the next option.

Page 8
WildlifeCam User Guide
Page 9
WildlifeCam User Guide
Setting Multi-Shot
Press the OK button. Use the Up/Down buttons to choose between settings. Choose how
many pictures you would like captured in a sequence when the camera is triggered (1 or 3).
Available options are:
1 (OFF) - Single photo taken per event.
3 BURST - Three rapidly captured photos taken per event. All 3 photos are captured within
one second.
NOTE: Burst mode is only capable of up to 4MP captures, regardless of your resolution
setting.
3 TRIGGERED - Up to three photos are captured per event with an approximate one second
delay between each capture. Each subsequent photo after the first requires an individual
trigger. This allows for multiple potential image captures of the same event while reducing the
chance of empty images if the subject moves out of the field of view after the first shot.
Press OK to lock in your selection, then press Right button to go to the next option.
MULTI-SHOT
1 (OFF)
UPGRADE FIRMWARE
WLIFE-131007 NO
Upgrade Firmware
The firmware version is displayed. Press Up/Down to choose setting.
YES - To upgrade firmware.
NO - Keep current firmware.
Make sure that an SD card with the new firmware is inserted into the camera. Press the
OK button to
make selection. Make sure the process is completed
before pressing other
buttons or powering the camera Off. Press the Right button to move to the next option.
PROGRAM SECURITY
CODE 00000
Security Code
Press the OK button. Use the Up/Down and Left/Right buttons to select a 5 digit security code
for your camera. Press the OK button to confirm the selection. Press the Right button to move
to the next option.
NOTE:
Please remember your security code. If the code is lost, you can contact
Wingscapes customer
support to reset the password (charges may apply). Also, use
caution when navigating through the Security Code option as not to set a code by
mistake. For no Security Code, the setting should remain as “00000”.
Imprint Info?
Use the Up/Down buttons to choose between:
YES - Camera Name, Time, etc, information will be imprinted at the bottom of the image/
video as an information bar
Note: Remember to input the camera name in the setup and set the clock accordingly.
NO - No information bar will be imprinted.
Press the OK button to confirm the selection. Press the Right button to move to the next op
tion.
IMPRINT INFO?
YES
CAMERA NAME
WILDLIFECAM
Setting Camera Name
Press the OK button. Use theUp/Down and Left/Right buttons to select an identity for your
camera. For example, you can use a name or a location; the identity you wish to use is up
to you. Press the OK button to confirm the selection. Press the Right button to move to the
next option.
WI-FI SD CARD?
NO
Wi-Fi SD Card
Select option when using a Wi-Fi enabled SD card. Turning this feature on will keep the SD
port powered for a set amount of time to allow the files to transfer off the card to the Wi-Fi
network set up.Press the OK button to confirm the selection. Press the Right button to move
to the next option.
NOTE: Wingscapes does not offer technical support for Wi-Fi SD cards. Please contact your
Wi-Fi card’s manufacturer for support. Before use, you must set up your Wi-Fi SD card on
your wireless network.
NOTE: Use of a Wi-Fi SD Card will decrease the battery life of the camera.
AC CONNECTED?
NO
AC Connected
Press the OK button. When the camera is connected to an AC power supply and this option is
selected, the camera will remain on instead of going to a sleep state between detection and
capture sequences. This will greatly improve camera speed and performance and can be used
in conjunction with most external supplies, but is only recommended when connected to an
AC power supply. In the event this option is selected but no external supply is detected, it will
default to the NO state. Press the OK button to confirm the selection. Press the Right button
to move to the next option.
Table of contents
Other WingScapes Scouting Camera manuals